Ever the Scientist

You would think having been out of the chemistry laboratory since 1978 (please don’t do the math) I would lose some of my scientific method mentality, but I haven’t.

I made rough puff pastry for the first time this week. Also for the first time, I bought an exorbitantly expensive commercial puff pastry (Dufour’s.) For price comparison, the Dufour was $11.99 for two sheets about 8”x9”. Trader Joe’s at $4.99 are only available in October and November. (Buy a bunch and stock up… I do!) Pepperidge Farms is $6.25 for 2 sheets, and my rough puff pastry is $1.65 for an equivalent size and number of sheets. Yes, not a typo, $1.65. It does take a little elbow grease to roll the cold dough out, but aside from the sore wrist, it is nearly free.

As for performance: Trader Joe’s puffs the least, which for a number of applications is an advantage. Dufour’s puffs more than Trader Joe’s but not as much as Dede’s Rough Puff, which in turn was less than Pepperidge Farms. All four tasted excellent, but as humble as I am capable of being, my rough puff was outstanding. It was as flavorful, puffed as much and was as easy to roll as any of the other three.

(I have made so many pastries with both Trader Joe’s and Pepperidge Farms I didn’t include them in today’s head to head analysis.)

Blackberry Hand Pies and Pain Au Chocolate.
(Dafour’s in the back, Dede’s in the front.)
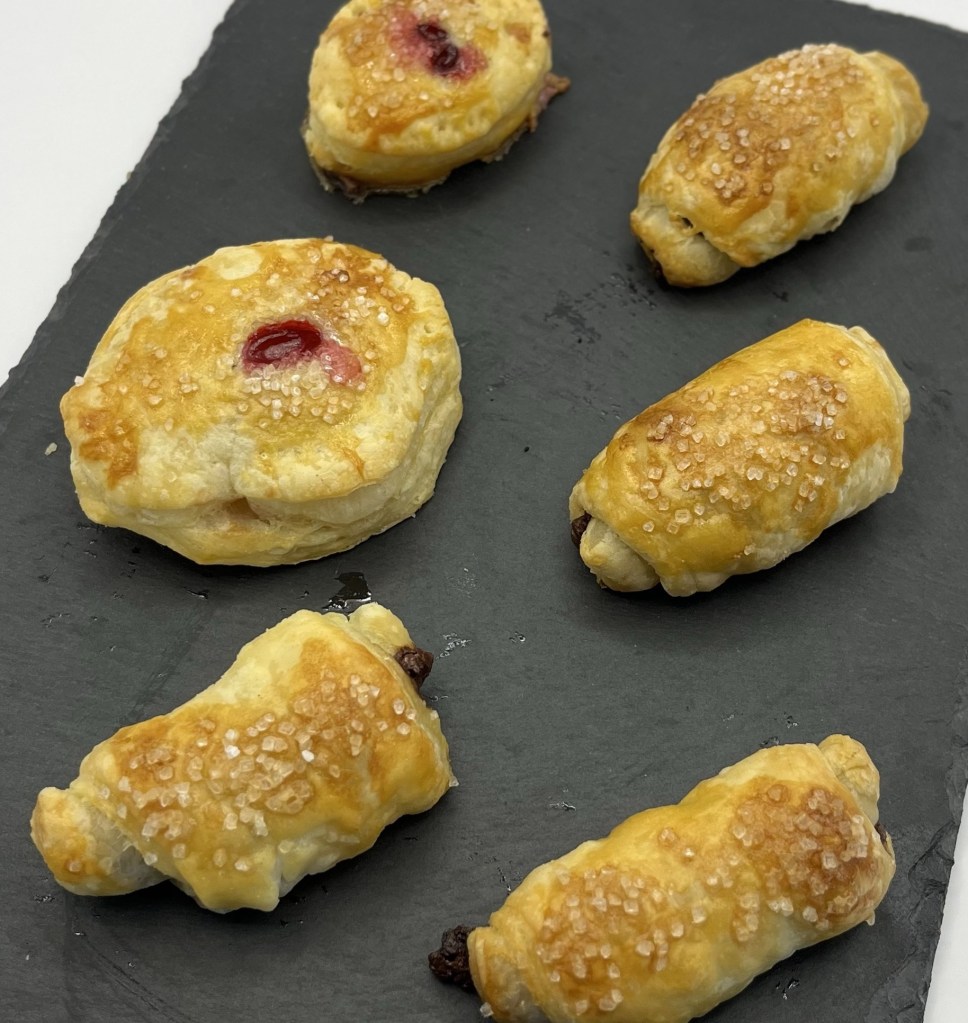
Pain au Chocolate

INGREDIENTS

  • Puff pastry
  • Chocolate
  • Confectioner’s sugar
  • 1 egg

METHOD

  1. Roll out puff pastry
  2. Dust with confectioner’s sugar
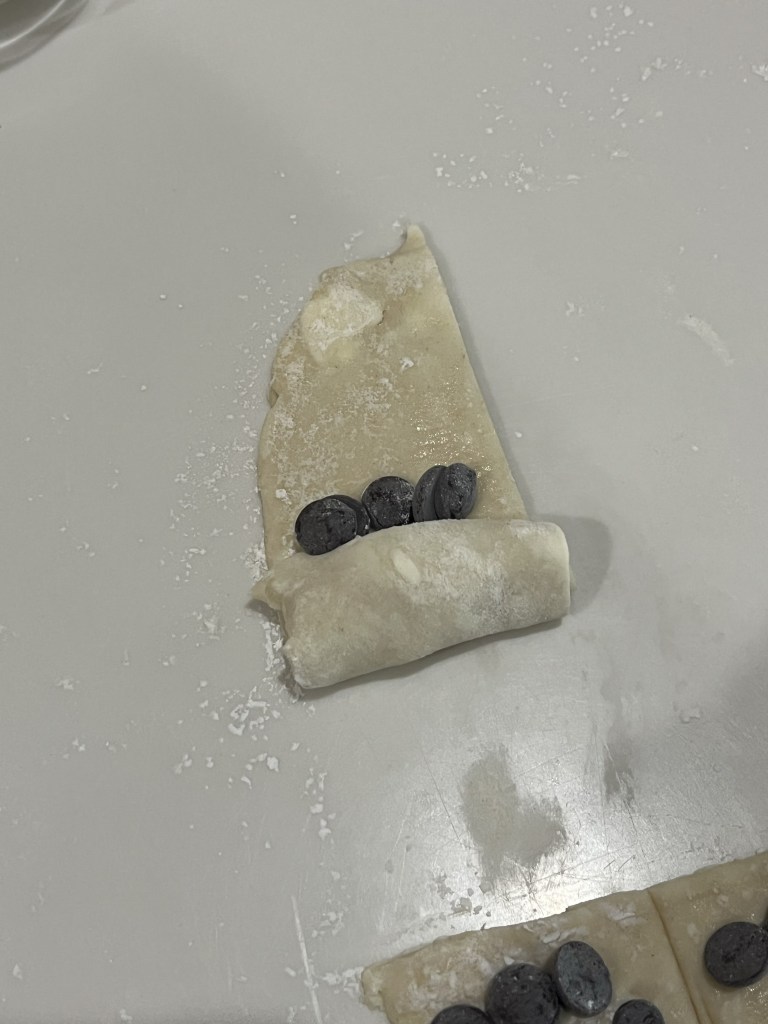
  3. Cut into 2” wide (cut 5 long strips, then cut each in half)
  4. Lay chocolate at one end, roll one time, press down gently and roll again, press gently again
  5. Add second row of chocolate and roll one last time, press gently
  6. Chill overnight or at least 2 hours.
  7. Make egg wash with 1 egg and 1 Tbl water. Beat well with a fork.
  8. Brush with egg wash
  9. Paint the inner end of the roll to seal the end. Press firmly.
  10. Bake 360 deg 20-25 min on parchment lined baking sheet

Berry Hand Pie

INGREDIENTS

  • 1 egg
  • 1 tablespoon water
  • 2 tablespoons all-purpose flour
  • 1 sheet puff pastry, thawed but cool.
  • 4 ounces cream cheese, softened
  • 2 tablespoons granulated sugar or decorating sugar
  • ½ cup white chocolate chips
  • 6 ounces berries
  • 3 tablespoons coarse white sugar or decorating sugar

METHOD

  1. Heat the oven to 400°F.  Beat the egg and water in a small bowl with a fork.
  2. Stir the cream cheese and granulated sugar in a medium bowl until the mixture is smooth.  Stir in the white chocolate chips.
  3. Cut large berries in half.
  4. Sprinkle the flour on the work surface.  Unfold the pastry sheet on the work surface.  Roll the pastry sheet into a 12-inch square. Using a round cutter, cut into 24 (2½ -inch) circles.
  5. Brush the edges of 12 pastry circles with the egg mixture.  Place about ½ tablespoon cream cheese mixture in the center of each.  Top each with about one small or two halves of a large berry.  Place the remaining pastry circles over the filling.  Press the edges firmly to seal.  Crimp the edges with a fork. If you don’t seal them adequately the filling will leak out of the sides of the finished pastry.
  6. Brush the pastries with the egg mixture and sprinkle with the coarse sugar.  Using a sharp knife cut small slits in the tops of the filled pastries.  Place the pastries onto a silicone or parchment paper lined baking sheet.
  7. Bake for 20 minutes or until the pastries are golden brown.  Remove the pastries from the baking sheets and let cool on wire racks for 10 minutes.
  8. Eat. They are small. Eat again.

Puff the Magic Rough Pastry

It’s really rough puff pastry and it’s magic that I made it! Usually, I buy either Pepperidge Farm, or Trader Joe’s puff pastry. Pepperidge Farm puffs up at least twice Trader Joe’s and I choose depending on what I am baking.

While significantly more work than driving the couple of miles to the supermarket, this is significantly less expensive and more self satisfying. I was pleasantly surprised with the resulting puff pastry and even more amazed at the resultant baked pastries.

Rough Puff Pastry has been in my “What’s Up in Dede’s Bakery” for months and to give you an idea how bored I was this morning, I decided today is the day!

I found an excellent blog (theflavorbender.com) with detailed, clear instructions. Her instructions, with minor edits, are below. The hardest part is grating the frozen butter (without skinning a knuckle) and the last few rolls of the laminated dough.

Rough Puff Pastry

INGREDIENTS
• 60 g unsalted frozen butter grated and kept in freezer while the flour chills
• 200 g unsalted frozen butter grated and kept in freezer while the flour chills (weigh the butter after grating it)
• 350 g AP flour that has been kept in the freezer for a couple of hours
• 1 tsp salt
• 120 – 150 g ice cold water I used about 9.5 tbsp (142ml)
• ½ tsp lemon / lime juice / white vinegar

Costs
• Butter ~ $1.50
• Flour ~ $0.15

METHOD

  1. In a bowl, sieve the flour, salt and freeze for about 2 hours
  2. Add the 60 g of frozen, grated butter. With your fingers quickly rub the butter into the flour.
  3. Add the lemon and water, a tablespoon at a time, while mixing with a wooden spoon or your fingertips to bring the dough together.
  4. Add enough water to form a firm dough (that is not tacky or too wet).
  5. Knead the dough on a floured surface for about a minute and leave it to rest for about 5 minutes (in the fridge).
  6. Roll the dough out into a long rectangle (about 6 – 7 inches wide, and 15 – 16 inches long).
  7. Sprinkle 100 g of frozen, grated butter on 2/3rds of the area of this rectangle.
  8. Fold over the portion without butter, towards the middle.
  9. Then fold the first fold over the still butter exposed end. You completed one-fold (while laminating butter).
  10. Turn the dough 90 degrees and roll it out to form another long rectangle (about 5 – 6 inches wide, and 15 – 16 inches long).
  11. Repeat with the rest of the butter and fold over, (completed 2nd fold with second lamination) and turn 90 degrees. Now you have incorporated all the butter in two folds.
  12. Complete 3 more folds so you have folded the dough about 5 times. You shouldn’t need to refrigerate between folds, if you work quickly, HOWEVER if it’s a hot day and the butter starts to seep through, keep the dough in the freezer for about 10 minutes to harden the butter and continue.
  13. After the fifth and final folding, wrap the dough in plastic wrap and store it in the fridge until needed.
  14. Let it rest for at least 2 hours before using. (I prefer to leave it longer, even overnight for best results.)
  15. If you’re not using it right away, cut the dough in half, wrap individual pieces in plastic wrap and store in the freezer.

Whipped Key Lime Pastries

I love key lime. I saw a recipe that inspired me to make two pastries featuring whipped key lime (like a chiboust with key lime curd mixed with stabilized whipped cream.)

My first attempt used Pepperidge Farm puff pastry to form the pastry cups. This puff pastry “puffed” up too much. My second try used Trader Joe’s puff pastry which only puffs about 25% of Pepperidge Farm’s. This pastry worked better.

Cut the puff pastry into circles (I use hexagons as they don’t waste as much pastry) about 2” larger than the diameter of the cupcake pan pocket. Fit the circles into each pocket. Try not to fold them over along the sides and more than necessary. Place a mini-cupcake paper in each and fill with baking beans (not baked beans,) then cover with an identical cupcake pan. This will retard the “puff” of the pastry.

Bake about 15 minutes at 400F. Remove the upper pan, the cupcake paper and beans, turn the oven off and return the baked shells to the over to dry the bottoms. This should take ~5 minutes.

I could have done a better job drizzling (should have!) When the first attempt failed I made profiteroles as well.

Key Lime Cream Puff Pastry

INGREDIENTS
• 1 sheet puff pastry (Trader Joe’s preferred)

Whipped Cream Key Lime Curd:
• ½ c white sugar
• 2 Tbl cornstarch
• ¼ tsp kosher salt
• 1 large egg, plus 2 large egg yolks
• 2 tsp lime zest
• ⅔ c key lime juice
• ⅔ c sweetened condensed milk
• 2 Tbl butter
• ¾ c heavy whipping cream

Key Lime Drizzle:
• 3 c confectioners’ sugar
• 2 tsp lime zest
• 4-6 Tbl key lime juice
• ¼ tsp Agar agar.

Alternative Raspberry Drizzle
• 12 oz raspberries – fresh or frozen; about 320g
• ~4 to 6 Tbl granulated sugar – to taste
• ~1 tsp lemon (or lime) juice
• ¼ tsp Agar agar.

METHOD

  1. Curd: In a medium saucepan, whisk together the sugar, cornstarch, and salt.
  2. Whisk in the egg yolks, lime zest, and juice. Bring to a boil, over medium-high heat. Whisk constantly and cook for about 1 minute.
  3. Remove from heat, whisk in sweetened condensed milk, and bring back to a boil.
  4. Remove from heat again and strain the mixture through a sieve. Add in butter and whisk until smooth.
  5. Cover with plastic wrap, and chill for at least 3 hours, or overnight.
  6. Puff Pastry Shell: Cut defrosted and pliable puff pastry into circles 2” larger than the cupcake pan pocket. I use hexagon cutters as they are more efficient and don’t waste as much pastry dough.
  7. Fill each cupcake pan pocket with pastry, put small cupcake paper in each pocket, fill with beans and cover with an identical cupcake pan.
  8. Bake at 400 F for 15 minutes, or until pastry is golden brown. Remove the upper pan, beans and cupcake papers and bake another 5 minutes to dry the bottoms of the shells.
  9. Cool pastry cups to room temperature.
  10. Drizzle: Whisk together confectioners’ sugar, key lime zest, and lime juice. Add more powdered sugar/lime juice if needed for the right dripping consistency.
  11. Assembly: Spread a thin layer pf curd in the bottom of each cup.
  12. Whip heavy cream to stiff peaks and fold into the the balance of the curd.
  13. Refrigerate the mixture until ready to use.
  14. Transfer the whipped cream key lime curd to a piping bag, with a large star tip.

Alternative raspberry drizzle:

  1. Add the raspberries, sugar, agar-agar and lemon juice to a saucepan and bring to a boil while mashing the raspberries to break them down. Once it boils, turn off the heat and adjust with more sugar or lemon juice as needed.
  2. Strain the raspberry sauce through a fine mesh sieve to remove the seeds. Press firmly to extract all of the pulp as that is what thickens the sauce.
  3. Thin with a teaspoon of water at a time, (if desired) keeping in mind the sauce thickens as it cools.
  4. Use in place of lime curd where desired.

Harry Potter: “I Love Magic”

This recipe for a chocolate magic custard cake flew by my Facebook stream and I knew I was going to make it.

Baked in one pan the resultant cake has three distinct layers, hence, the magic. The bottom is a typical, albeit dense, cake. The center is a delicious chocolate custard, much like a smooth, rich pudding. The top has the consistence of a very thin brownie.

The originators of this recipe have a number of “magic” cakes, Zerrin and Yusuf Gunaydin. Try them, they are worthy.

CHOCOLATE MAGIC CUSTARD CAKE

INGREDIENTS
• 4 eggs, room temperature, separated
• 1 teaspoon vanilla extract
• 1 ¼ cup sugar
• 110g butter (½ cup), melted and cooled
• ½ cup AP flour
• ⅓ cup and 2 tablespoons unsweetened cocoa powder
• 2 cups lukewarm milk
• 1 tablespoon powdered sugar for dusting

METHOD

  1. Preheat oven to 320F (160C).
  2. Grease an 8×8 inch square (or 9-inch round) baking pan line it with parchment paper.
  3. Beat egg whites in a bowl until stiff and put aside.
  4. Whisk egg yolks, vanilla extract and sugar until creamy.
  5. Add melted butter and mix for half a minute.
  6. Add the flour and unsweetened cocoa powder. Mix with a whisk (whisk attachment with hand mixer) until well incorporated.
  7. Pour the milk gradually and continue whisking.
  8. Add in the egg whites, one third at a time and gently stir with a whisk. (Full disclosure: I used a hand mixer with the whisk attachment at the slowest speed.) Stir until combined, do not over mix. There will be some small bits of egg white visible in the batter. Don’t worry about it.
  9. Pour this runny batter into the baking pan and bake for 60 minutes. I started checking doneness at 45 minutes, then every 5 minutes thereafter. (I stopped at 55 minutes.)
  10. The centre of the cake will still be jiggly when removed from oven.
  11. Let it cool for about half an hour and then remove from the pan. When it reaches room temperature, chill it at least for an hour. (I couldn’t wait and cut a QC piece in 30 minutes, cooling at room temperature. It was fine.)
  12. Slice it in the size you like and dust with powdered sugar right before serving and/or garnish it with fresh fruit
  13. Store in refrigerator

Apple/Pear Tarte Tartin

With perfect timing this recipe crossed my FaceBook feed a while ago when I needed a dessert like this for a reception coming up in a couple of weeks.

The first rendition of the original recipe was sampled by QC and me and was subsequently “binned.” There was too much caramel and it was too runny. As I was making in accordance with the recipe I felt, and even told QC that this was wrong, but I persevered and it failed.

Next, I researched several other recipes, combining the parts that I thought were sensible and voila!

I cut the pears in halves and cut out the cores. I cut the apples in eighths to position three thick slices between each pear half. I did siphon off a half cup of caramel as I felt it was too “soupy”and if I cooked it down too much more the apples would disintegrate.

Apple And Pear Tarte Tatin

INGREDIENTS
1/3 cup water
2/3 cup granulated sugar
100 g butter
2 large Granny Smith apples, peeled, cut in eighths
1 large Bosch pears, peeled, quartered
2 sheets frozen butter puff pastry, slightly thawed
1 egg-yolk, beaten
½ cup water
¼ cup caster sugar
thickened cream, to serve

METHOD

  1. Preheat oven to very hot, 425°F.
  2. Heat an 8-inch frying pan on medium. Add sugar and water and heat, stirring, until it starts to bubble.
  3. Then, simmer without stirring, for 4-5 minutes, until it begins to turn golden.
  4. Add butter and swirl to mix.
  5. Add apples, cut side up, firmly packed. Simmer, gently stirring and basting for 12-15 minutes, until beginning to caramelize.
  6. Add pears and simmer an additional 3-5 minutes. The pears will break down faster than the apples so should be caramelized for a shorter time. (I removed some caramel at this point to remove some liquid.)
  7. Brush one sheet of pastry with a little egg yolk. Place second sheet on top and press firmly to sandwich together. Roll out slightly. Place over fruit to cover, tucking excess overhang inside pan.
  8. Cover handle of pan with foil, if necessary, and bake for 15-20 minutes, until pastry is golden and crisp.
  9. Place a rimmed serving dish over pan. Invert pan and carefully lift pan off (remember to use an oven mitt).
  10. Add the water and extra sugar to same pan. Cook, stirring, until sugar and caramel residue dissolves.
  11. Bring to boil and cook, uncovered, for 3 minutes, until thickened and golden. Drizzle over tart. Serve warm with thickened cream.

Thickened Cream

  1. Mix cold water with equal parts cornstarch to form a paste-like substance
  2. Blend the mixture with a hand whisk to avoid clumping.
  3. Heat your cream to just below boiling
  4. Add the cornstarch mixture, constantly whisking.
  5. Let it simmer for a few minutes until the desired thickness of the cream.
  6. It will require about 2 tablespoons of the water and cornstarch mixture for about 1 cup of cream to be thickened.