
As Nearly Headless Nick cannot join the hunt because of a technicality, this dessert is only nearly a Neapolitan Mousse Cake due to a couple of technicalities. Picky, picky picky.

The chocolate ice cream base is actually almond chocolate cake. the vanilla ice cream is white chocolate mousse, much like a white chocolate ganache but lighter and airier as the cream is whipped, and the strawberry ice cream is raspberry mousse, because I like raspberries.
I have to be honest, this dessert takes some time and patience. Experimenting with the cake recipe (two tries), making the mice, mousses, err… white and pink fillings took 2 or three recipes each adjusting the amount of pectin, when to add it, the amount of whipped cream and how much to whip it. The whipped cream for the raspberry has to be whipped to firm peaks while the white chocolate should be soft peaks. I have removed gelatin from my pantry and replaced it with pectin. Gelatin is easier and fine if you like processed skin, bones, and connective tissues of animals such as domesticated cattle, chicken, pigs, and fish. I don’t. Pectin is sourced from fruit and vegetable peels. I am sure there are some nasty processing steps, but at least it didn’t start with Bessie or Babe or Miss Piggy.
The almond cake uses almond flour instead of food processor ground baked almonds. Its easier and I had some. The batter is pretty low viscosity but don’t worry, it about doubles in thickness in the oven. After cut, wrap the cake disks in plastic and they will stay fresh for 2 or 3 days so you can make them ahead.
-
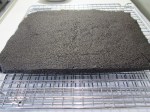
- Sheet Cake
-
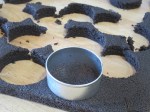
- Cutting Sheet Cake
-

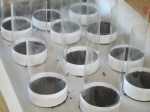
- Completed cake disks
I ordered some 3 mil acetate sheets online. I cut them to size (10 x 41/2″), cut 10 paper bands to hold the acetates in place around the cake. This obviated (not obliviate, we want to remember this recipe) the requirement to tape the acetate. I hope to use them again.
-
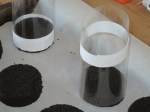
- Sliding on paper band
-
- Two bands on collars
-
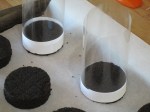
- Completed banded collars
The vanilla mousse sets quickly so work with some speed. Varying the whipping time – Tied to the Whipping Post – can create a thinner mousse, but too short a time can make the mousse dense. I like to pipe the mice, mousses, errr… fillings so I can control the thickness of each layer.
The raspberry fruit has the most powerful flavor, but is the trickiest to make just right. Pectin requires sugar and acid to cross link. Pectin’s structure binds with water in an acid environment and sugar increases pectin’s ability to gel. The lemon juice (I used key lime juice, it was in the fridge) provides the acid and the berries and sugar provide the sugar environment. Vary the amount of each and when to add them. The method below worked well for me.
Neapolitan Mousse Cake
CHOCOLATE ALMOND CAKE
INGREDIENTS
- 200 g (¾ cup + 2 tablespoons) unsalted butter
- 30 g (¼ cup) unsweetened cocoa
- 60 g (½ cup) plain (all-purpose) flour
- ½ teaspoon baking powder
- Pinch of salt
- 120 g (1 cup) almond flour
- 225 g (1 cup) caster (superfine) sugar
- 5 large egg whites, room temperature
- 1½ teaspoons pure vanilla extract
METHOD
- Preheat oven to 180° C (350° F). Line rimmed jelly roll pan with non-stick baking paper or silicone baking mat. Be sure to line the sides as well.
- In small saucepan, melt butter over medium-low heat, occasionally swirling pan, until it begins to brown and smells nutty, about 5 minutes. Remove from heat and set aside to cool.
- Meanwhile, using fine mesh sieve, sift cocoa two times. Then sift together cocoa (for a third time), flour, almond flour and sugar, baking powder and salt into mixing bowl.
- Add egg whites, one at-a-time, whisking until just combined after each addition (do not over mix).
- Stir the vanilla into the cooled butter.
- Gradually pour the vanilla-butter in a thin, steady stream into the batter, whisking to just combine. (Kitchenaid with beater on level 2)
- Pour the batter into the prepared jelly roll pan.
- Bake until a cake tester inserted in the center of the cakes comes out clean, about 22 minutes. Poke the cake gently, the depression of your finger should bounce back.
- Remove from oven and transfer to wire rack. Let stand 5 minutes, transfer cake to wire rack. Let stand until cooled completely.
- Using a 2½” ring cutter, cut 10 round mini cakes from the cooled sheet cake.
- Line rimmed baking sheet with non-stick baking paper or silicone baking mat. Arrange cakes on baking sheet, spacing 2½ cm (1-inch) apart.
VANILLA MOUSSE
INGREDIENTS
- 200 g white chocolate, cut fine
- 350 g heavy whipping cream
METHOD
- Melt the chocolate in a small bowl in the microwave. Heat 30 sec, then check the chocolate and stir. Heat another 30 seconds and stir again. Heat 15 seconds and stir. The chocolate should be liquid but not boiling. If more time in required keep reducing the time by 5 sec and check. Do not over cook.
- Whip the heavy cream until it forms soft peaks. If you overwhip the chocolate/cream mixture will set to quickly and will not form smooth even layers.
- Gently fold the liquid chocolate into the whipped cream using a figure 8 pattern. Be sure to scrape the bottom and sides of the bowl.
- Add to a piping bag and fill the acetate cylinder with about an inch of vanilla mousse.
RASPBERRY MOUSE
INGREDIENTS
- 2 tablespoons fresh lemon juice
- 1 teaspoon powdered pectin
- 175 g fresh raspberries (about 1 pint)
- 2½ tablespoons sugar
- ½ cup cold heavy cream
METHOD
- Place lemon juice in a small bowl and sprinkle with pectin. Let sit until pectin softens, 3 minutes.
- In a blender, puree raspberries until smooth, scraping down bowl as needed.
- Pour through a fine-mesh sieve into a measuring cup, pressing on solids (you should have about 1/3 cup of puree); discard solids.
- In a small saucepan, combine raspberry puree and 2½ Tbsp sugar over medium. Cook until bubbles form at edge. Add pectin mixture and cook, stirring constantly, just until gelatin dissolves, about 1 minute. Transfer mixture to a small bowl and let cool to room temperature, 20 minutes.
- In a large bowl, using an electric mixer, beat cream and 1 Tbsp sugar on medium-high until firm peaks form, about 4 minutes. Do not over mix.
- With a rubber spatula, gently fold in raspberry puree mixture in 3 parts until combined.
- Add raspberry mousse to a piping bag and fill the acetate cylinders with about an inch of mousse.
- Refrigerate until set, about 2 hours (or up to overnight).
DARK CHOCOLATE GANACHE
INGREDIENTS
- 120 ml (½ cup) heavy cream, 35%
- 113 g (4 ounces) dark chocolate, 70%
METHOD
- In a small saucepan, bring cream and corn syrup just to boil (small bubbles beginning to form around the sides of the pan) over medium heat, stirring until corn syrup is dissolved.
- Meanwhile, finely chop the chocolate and place in small bowl.
- Pour the cream mixture over the chocolate and let stand, 2 minutes. You may not need all the cream. I pour some to just wet the chocolate, wait a minute and stir. If it is too thick, I add more cream, too thin, more chocolate.
- Using a flexible spatula, gently stir together beginning in the center of the bowl gradually working toward the edges pulling in as much as chocolate as possible until the mixture is smooth, glossy and combined well.
Assembling Mousse Cakes
- To make acetate collars, cut ten 10 x 4 ½” strips of acetate paper or non-stick baking paper. Also cut 20 1” x 8½” pieces of paper for use as bands to secure the acetate. Wrap one collar around the base of each cake keeping the base flush with the baking sheet. Slide paper band down to base to secure the acetate collar. Return to baking sheet. Cover loosely with a sheet of plastic wrap.
- Prepare Vanilla Mousse.
- Evenly divide the vanilla mousse between each acetate collar. (The layers should be no more than 2½ cm or 1-inch high.) Cover the cakes with a couple of sheets of plastic wrap (don’t secure too tightly otherwise the collars will lose their shape).
- Transfer the cakes on the baking sheet to the refrigerator. Let chill until firm, about 2 hours.
- When vanilla mousse layer is firm, prepare Raspberry Mousse.
- Remove the cakes from the refrigerator.
- Evenly divide the strawberry mousse between each acetate collar. (Again, the layers should be no more than 2½ cm or 1-inch high.) Again, cover cakes with plastic wrap.
- Place the cakes in the freezer. Let chill until firm.
- Remove the cakes from the freezer and immediately remove collars. (I recommend
- Removing collars immediately after removing cakes from the freezer because removal is much easier when the cakes are firm. It makes for best presentation too.)
- Spoon a heaping tablespoon of chocolate ganache in the center (onto the surface) of each cake, gently coaxing the ganache to the edges, leaving a 6 mm (¼-inch) border. Chill, uncovered, in the refrigerator until thawed, about 15 minutes.
- To serve, transfer each cake to a dessert plate, and top each cake with raspberry.
 Independent Pizzeria
 sampled his pizza (and fresh bread, warm honey and chevre cheese appetizer) and met Joe. For the “right” way to make this pizza dough refer to the tutorial. This post documents what I did, and proves it is possible to make this dough by a home, amateur baker. It is undoubtedly the best pizza dough I ever made.


 l. Set aside until foamy, about 10 minutes.


 New Zealand and is a favorite around Christmas in the summer. Wait! Is it a Christmas treat, or a summer treat? Isn’t that a North American oxymoron? Ah, well, it is Christmas Eve, therefore, this time, it is a Christmas treat. (I just realized, I could have used the blueberries and made it a Chanukah treat in Israeli colors of white and blue.)
 Deceptively easy and insidiously versatile. You can top your pavlova with berries, nuts, chocolate, mocha, fruit, lemon curd or as King
 of butter, or butter and jam, or just jam, or with bacon and eggs, or… You get the idea.
 powder or baking soda as a chemical leavening agent rather than yeast. They are similar to British scones or the bannock from the Shetland Isles.”


 off the walls with a sugar high, let’s coat them with sugar icing! There is no thought of balancing flavors or textures here, just sweet and crunch. I saw a hint somewhere of using squeeze bottles with medium fine tips rather than traditional piping bags to decorate cookies. At about $1 each, what go wrong? As it turned out, they worked great and provided
  more fine motor control than piping.
 pipe thick icing. #1, it plugs the tip and “b” it takes a lot force (read: tired and cramping fingers and hands here). Once the damn dam is dried flood the inside with thinner frosting. Poke any holes with a toothpick. Let dry, probably overnight.
 sweet. Not that they don’t like sweet but somehow they escaped our kitchens of sweets iniquity to be more sensible and healthier eaters than their parents. Not that we don’t like savory, but c’mon, we are talking sweets here.


 larger 3″ diameter, wanting more surface area
 for the orange slices. Because the oranges are very sweet and the creme de Patisserie is likewise sweet, I wanted to add something to balance. I added the zest of three small mandarin oranges to the creme pat to add just a little bitter to the mix. (Hindsight – use 3 slices, not 5. Even small slices were too big/many.)
 correct it before the party.) Happily, I had some extra creme pat so I could substitute some
  blackberry tarts for the ganache/caramel/sea-salt ones originally planned. (Remember, disasters stay home.)

