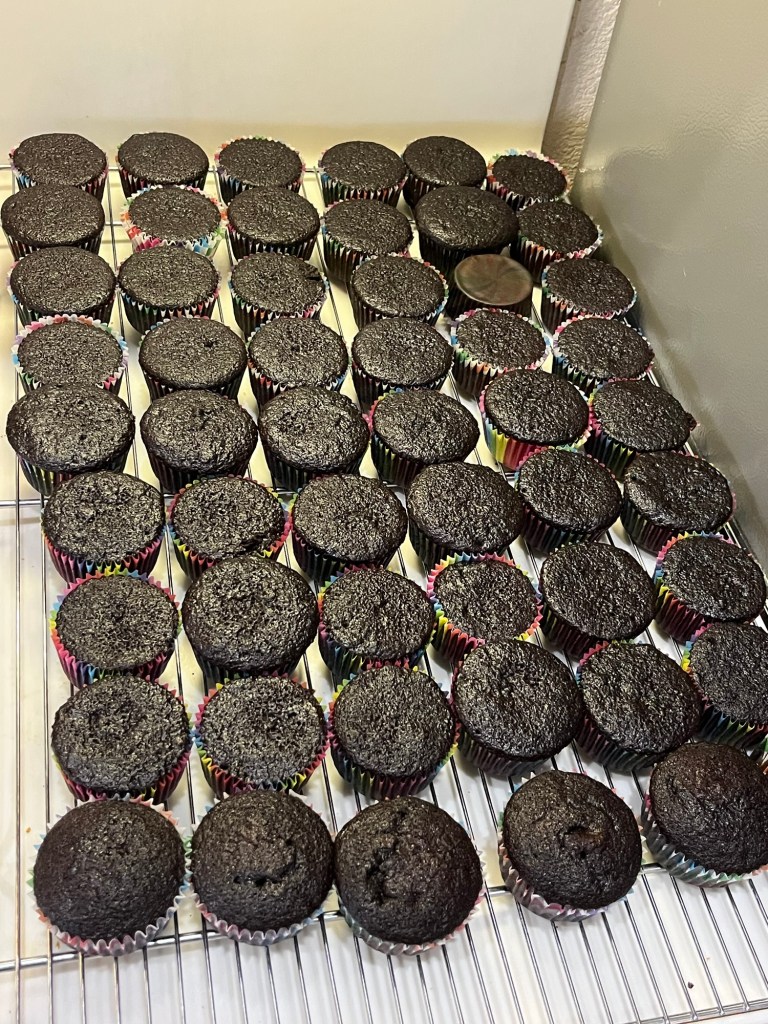
Today is the 80th birthday of one of our good friends, and golf buddy. She asked me to make cupcakes for the 15 guests coming to her bowling/birthday party. I decided to make cupcakes using my Extreme Chocolate Cake recipe with Italian Meringue frosting, because that combination is my fav. I did ask her what her favorite color is, and pink was among her answer, so I made a bi-color frosting.
My notes in my recipe said the recipe would make 36 cupcakes, but of the 3 different sizes of cakes in the recipe, it didn’t say which one made the 36. I decided to go with the medium size cake (10” round.) Well long story shorter, that made 54 cupcakes. I have since modified the recipe.
The cupcakes are soft and delicious and the meringue isn’t too sweet and pairs nicely.
This week was our son, Neil’s, birthday. He is a coffee Q Grader, cat owner and competitive pin ball player. This cake was in honor of one of his many accomplishments?
It’s based on my extreme chocolate cake, shortbread cookies and added a new meringue buttercream frosting. It was a relatively small cake so the decorations were somewhat oversized, but overall it was acceptable.
The red and white is royal icing. The black and yellow is fondant.
Swiss Meringue Buttercream – From Sally’s Baking Addiction
INGREDIENTS • 6 large egg whites (approximately 230g) • 2 cups (400g) granulated sugar • 1 and 1/2 cups (3 sticks; 350g) unsalted butter, softened but still cool (60°F and firm) and cut into Tbsp size pieces • 2 teaspoons pure vanilla extract • 1/8 teaspoon salt
METHOD
Make sure all the tools you are using are completely cleaned, dried, and grease-free. A quick wipe with a little lemon juice or white vinegar is very helpful.
Separate the eggs 1 at a time into a small bowl, then transfer to the metal stand mixer bowl. Repeat with the remaining egg whites. This way, if a yolk breaks in one of them, you don’t waste the whole batch.
Whisk sugar into the egg whites, then set the bowl over a saucepan filled with two inches of simmering water over medium heat assuring the bottom of the egg whites bowl don’t touch the water.
Whisk the whites and sugar constantly until sugar is dissolved and mixture has thinned out, about 4 minutes. The mixture will be thick and tacky at first, then thin out and be frothy white on top. To test that it’s ready, you can use your finger, or an instant read thermometer. Lightly and quickly dip your finger (it’s very hot, be careful) and rub the mixture between your thumb and finger. You shouldn’t feel any sugar granules. If using a thermometer, the temperature should read 160°F (71°C).
Don’t let it cool down to start this next step– it’s important to begin mixing while it is still warm. On medium-high speed, beat the mixture until stiff glossy peaks form and the meringue is no longer warm to the touch, at least 10-15 minutes. On particularly humid days, this has taken me up to 17-18 minutes. If it’s still not reaching stiff peaks, stop the mixer, place the bowl–uncovered–in the refrigerator for 10 minutes, then return to the mixer and continue beating until stiff peaks form.
If the bowl and meringue still feel warm, wait until both cool to room temperature (around 70°F (21°C)) before adding the butter in the next step. Feel free to place it in the refrigerator. A warm bowl and meringue will melt the butter.
Switch the stand mixer to the paddle attachment. On medium-high speed, add the butter 1 Tablespoon at a time. Wait for the butter to fully mix in before adding the next Tablespoon. After all the butter has been added, turn the mixer down to medium speed and fully beat in the vanilla and salt, about 30 seconds.
Add any color the beat until uniform. (Gel food coloring only.)
Your Swiss meringue buttercream should be thick, creamy, and silky smooth.
Notes Too Thick or Too Thin:
If your meringue has separated, curdled, or is too thick at any point after you mix in all of the butter, place the mixture in your heat-proof bowl back over a pot of 2 inches of simmering water.
Without stirring, let the edges of the meringue warm up and become liquid (the center of the meringue will still be solid), about 1-2 minutes.
Remove from heat and return to the mixer. Beat meringue on low speed for 30 seconds, then switch to medium-high speed and beat until smooth, about 2 minutes. Works every time.
If your mixture has become too thin and soupy after you add the butter, place the entire bowl in the refrigerator (covered or uncovered, doesn’t matter) for 20 minutes to cool down, then return it to the mixer and beat on medium-high speed until thickened. Any longer than this will solidify the butter, so only refrigerate in 20 minute spurts. If it’s still soupy, place back in the refrigerator for longer before re-whipping again.
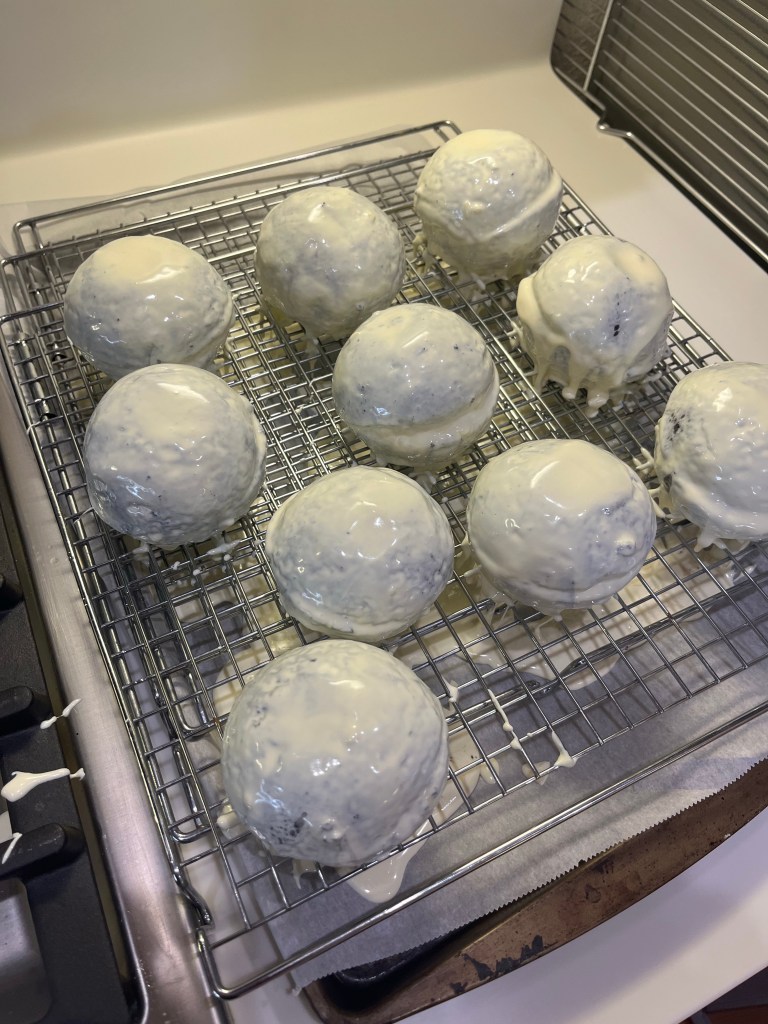
Yesterday was Fran’s (a.k.a. QC’s) birthday and for any who know her she feels Dani Rojas had it almost right: “Baseball is life” but Dani, American football is a close second.
To celebrate. I decided to make personalized, individual baseball birthday cakes. I had 2 1/2 inch silicone hemisphere molds but thought they would be too small a piece of cake so I bought two 3” ones. (In hindsight, the smaller ones were probably adequate, but would be more difficult to decorate.)
Due to the need to keep the cakes cold this is a pretty long procedure. It required about 6 hours total.
These photos were from a test batch before I decided to use pink raspberry buttercream for fill and bind the cakes.
Extreme Chocolate Cake Baseballs
Makes five 3” spherical cakes
INGREDIENTS • For Cake: 3 cups white sugar • 2⅔cups all-purpose flour • 1¼ cup unsweetened cocoa powder • 2¼ teaspoons baking soda • 2¼ teaspoons baking powder • 1½ teaspoon salt • 3 eggs • 1½ cup milk • ¾ cup vegetable oil • 3 teaspoons vanilla extract • 1½ cup boiling water • For Buttercream: 2 stick softened butter • 2cup icing sugar • 4-6 Tbl milk • For Raspberry Buttercream: 1 stick softened butter • 1 cup icing sugar • 2-3 Tbl milk • 6 oz fresh raspberries • For White Chocolate Ganache: 450g White Chocolate • 110g (½ cup) heavy cream • ~1 tsp white food coloring • For the Black Royal Icing: 1c (120g) confectioners’ sugar, sifted. • 1 Tbl meringue powder (not plain egg white powder) • 3 drops black food coloring • 1 Tbl Black Cocoa • 2-3+ Tbl room temperature water • For the Red Royal Icing: 1 c (120g) confectioners’ sugar, sifted. • 1 Tbl meringue powder (not plain egg white powder) • 3+ drops red food coloring • 2-3+ Tbl room temperature water
METHOD
Preheat oven to 350F (175C). Spray two 3” cell diameter silicone molds with Pam For Baking or equivalent. Line a 9×11” jelly roll pan with parchment paper.
Make the cake: In a stand mixer bowl, stir together the sugar, flour, cocoa, baking soda, baking powder and salt. Add the eggs, milk, oil and vanilla, mix for 3 minutes. Stir in the boiling water by hand.
Use a 1/3 measuring cup to fill each well two thirds full.
Pour remaining batter into jelly roll pan and spread to flatten.
Bake for ~25 minutes in the preheated oven, until a toothpick inserted comes out clean or 205 internal temp. Do NOT let the internal temp exceed 205 deg F or the cakes will be overdone.
Cool for 10 minutes before removing from silicon molds to cool completely.
Remove he cakes from the molds and refrigerate for 30 minutes to firm up the cakes.
Set small sheet cake aside to be used as a base for the baseballs when serving.
While the cakes are cooling make the raspberry buttercream: a. Make Raspberry Syrup: Heat 170g of raspberries in a small saucepan with two Tbl sugar and heat until boiling. b. When the raspberries are very tender mash them to break them into a sauce. c. Sieve the raspberries to remove the seeds and pulp and return to heat to reduce by half then cool. d. Make Raspberry Buttercream: Mix the butter and icing sugar and raspberry syrup. Add more milk as required to make the buttercream soft and easily spreadable. Beat at high speed until the buttercream is smooth and well mixed. (You may need to add the additional milk to achieve the desired viscosity as the cake will be very tender and fragile.)
Form and assemble the cake balls: With a sharp knife cut the top of each hemisphere to flatten and create a small hole in each cake (I used a melon scoop) a. Fill the hole in each hemisphere and cover half of the cakes with buttercream b. Mate each coated hemisphere with an uncoated one and return to fridge to set the buttercream.
Make vanilla and grass-green buttercream: Repeat making raspberry buttercream but substituting milk for raspberry syrup. Divide the buttercream 4::1. Color the larger amount with green food coloring to use to decorate the sheet cake later. a. Use the vanilla buttercream to fill any holes around the circumference of the cake ball and crumb coat each ball. (I dipped the ball in a thin buttercream and used gloved hands to smooth.) b. Return to the fridge to set the buttercream.
Make the white chocolate ganache: The ganache must be pourable but thick enough to cover each ball with a smooth coating. a. Fill a saucepan with water to about 2 inches deep. b. Place a metal or glass bowl over the warm water. Make sure the bowl does not touch the water. c. Place the chocolate and cream in the bowl and stir frequently. When the chocolate is almost completely melted, remove it from the heat and let the rest of the chocolate melt while it sits off the heat. Add white food coloring until the desired level of whiteness is achieved and mix well. If there is any un-melted chocolate let it rest until all the chocolate melts. As long as the mixture is warm, the chocolate will continue to melt.
To coat the balls: Place each cold ball on a stable surface that will keep them in place. a. Smooth the cold balls with gloved hands. b. Pour the white ganache over each ball, covering completely. Allow the chocolate to harden at room temperature, or in for fridge. c. If desired re-coat the balls by chilling them and repeat from step #12.
Make the Black Royal Icing: Combine confectioners’ sugar, meringue powder, black food coloring, black cocoa and 2 Tbl of water in a large bowl. a. Using a hand mixer or a stand mixer fitted with a whisk attachment, beat icing ingredients together on high speed for 1.5 – 2 minutes. b. When lifting the whisk up off the icing, the icing should drizzle down and smooth out within 5-10 seconds. If it’s too thick, beat in more water a few drops at a time. c. I usually need 3 Tbl but on particularly dry days, I use up to 4-5 Tbl. d. Keep in mind that the longer you beat the royal icing, the thicker it becomes. If your royal icing is too thin, just keep beating it to introduce more air OR you can add more confectioners’ sugar. e. Remember the icing has to flow through a very small piping tip so it cannot be to thick. If it’s too thin it will run (for reference, see my photos)
Make the Red Royal Icing: Sift confectioners’ sugar and meringue powder into a large bowl and add 2 Tablespoons of water. a. Add half the water after sifting the sugar. Add the remaining water or more, checking flow consistency of the icing is what you want for piping etc. b. Using a hand mixer or a stand mixer fitted with a whisk attachment, beat icing ingredients together on high speed for 1.5 – 2 minutes. c. When lifting the whisk up off the icing, the icing should drizzle down and smooth out within 5-10 seconds. If it’s too thick, beat in more water a few drops at a time. If your royal icing is too thin, just keep beating it to introduce more air OR you can add more confectioners’ sugar. d. When applied to cookies or confections in a thin layer, icing completely dries in about 2 hours at room temperature, quicker in the fridge.
Decorating the baseballs: Use black royal icing to draw the seams of the baseball. (I suggest doing one ball at a time, returning to the fridge between piping steps.) I wanted each person’s name written in script on each baseball using the black royal icing. a. After all the names and seams are piped and the black royal icing is setting in the fridge, clean the piping pen and fill with red royal icing. b. Remove the baseballs from the refrigerator, one at a time, and pipe the red stitches in the traditional baseball style. c. Return the baseballs to the fridge but bring them to room temperature an hour before serving.
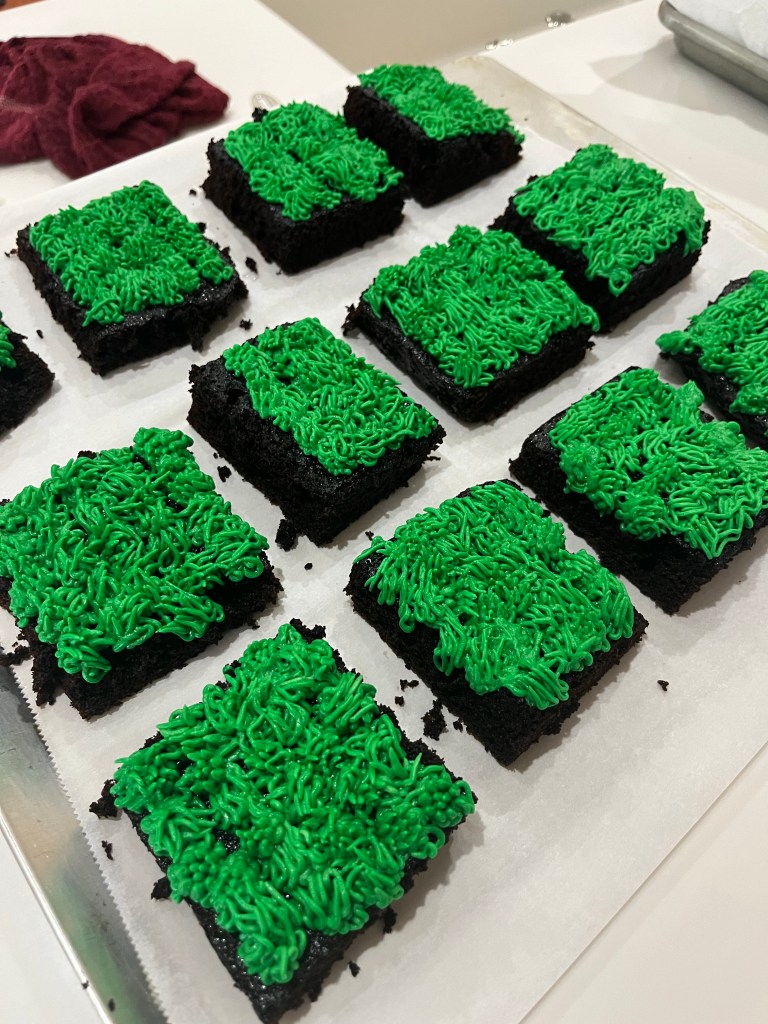
Make turf: Cut small sheet cakes into 3×3” squares and pipe green buttercream covering each square using a Wilton 233 piping tip or equivalent. Center each baseball cake on a piece of turf.
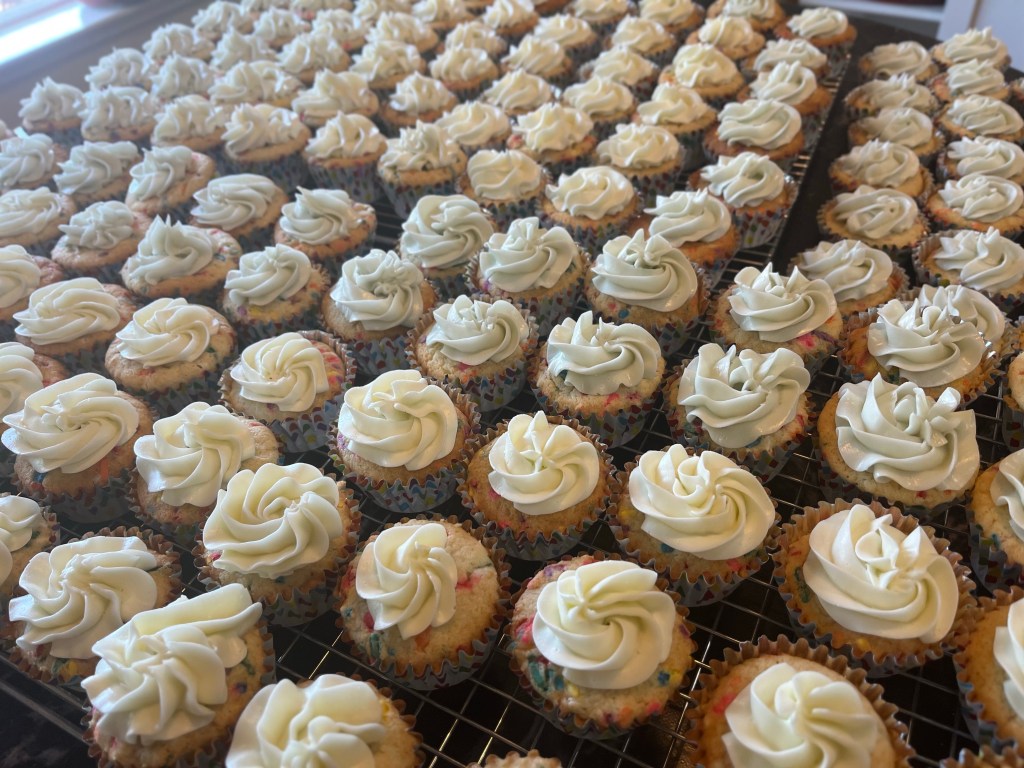
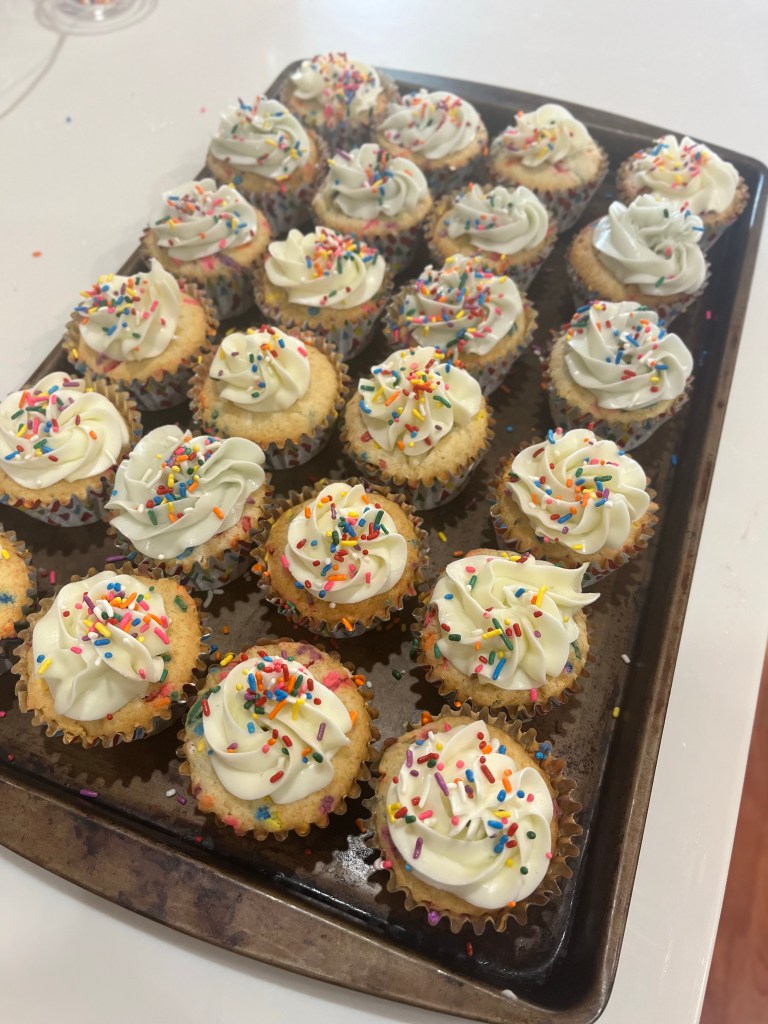
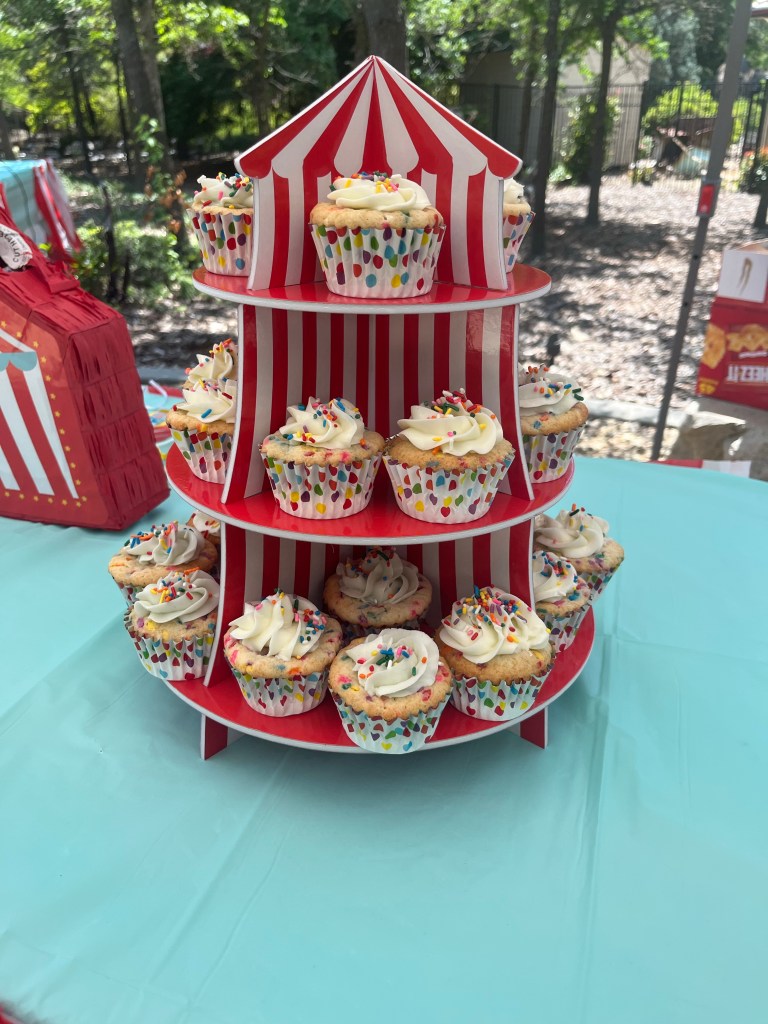
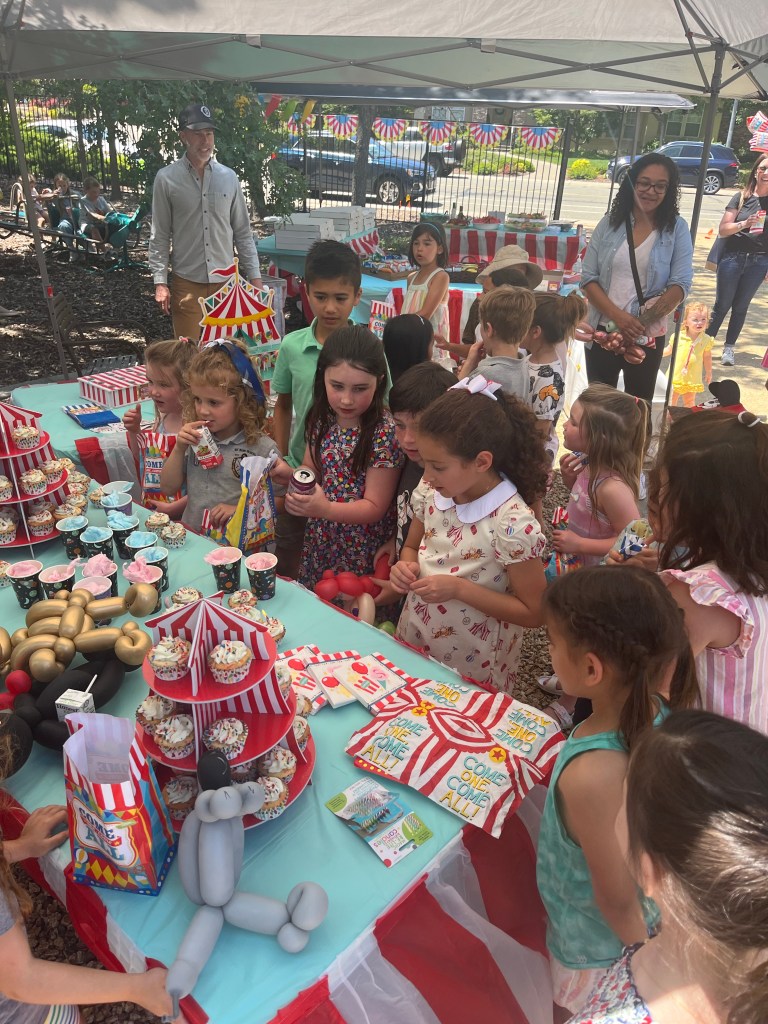
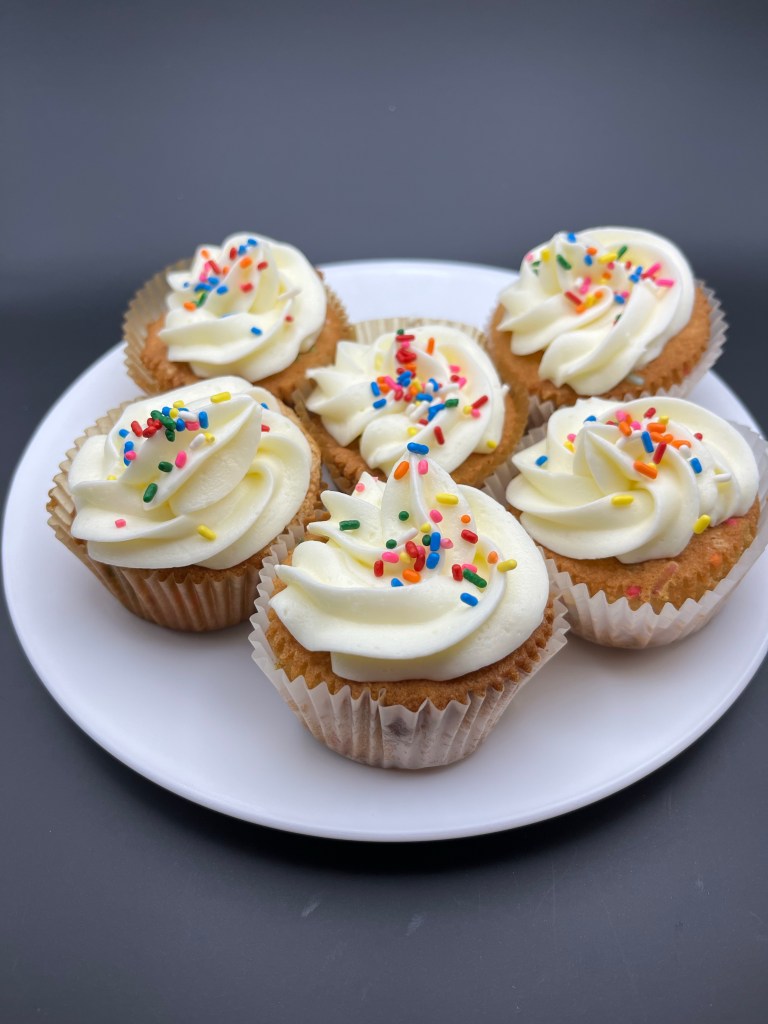
As they say, “Build it and they will come.” Dan and Frances built it and they came. It was our granddaughter Grace’s 7th birthday party and she requested FunFetti cupcakes as her party dessert. With an anticipated attendance of 100 kids and parents I figured 10 dozen cupcakes would be plenty. Well, I was wrong. They managed to eat only 40 cupcakes and we gave away an addition couple of dozen. Best laid plans of mice and men often go awry!
Kitchen at lift offField of dreamsFun!Ready for deliveryCupcake towerDessert tableReadySetGo!A little known fact. The candle was lit with a blowtorch!
FunFetti Cake
makes one 3-layer 8″ cake or 24 cupcakes
INGREDIENTS CAKE: • 2 ½ c AP flour • 1/4 c cornstarch • 1 tsp kosher salt • 2 tsp baking powder • 1 c unsalted butter, at room temperature • 1 ½ c sugar • 4 large egg whites • 1/4 c vegetable or canola oil • 1 Tbl clear imitation vanilla • 3/4 c whole milk (2% OK) • ½ c rainbow sprinkles (artificially colored cylinders)
Pairs nicely with Edna’s Crusting Buttercream or Italian Meringue Buttercream or Less Sweet Buttercream.
METHOD
Preheat the oven to 350ºf. Grease and line the bottoms of three 8-inch cake pans or line 24 cups of two muffin tins.
In a medium bowl, whisk together the flour, cornstarch, salt, and baking powder.
In a stand mixer fitted with the paddle attachment, cream together the butter and sugar until light and fluffy, 3 to 4 minutes. Add the egg whites, one at a time, mixing well after each addition. Add the oil and the extract.
By hand add the dry mixture and the milk in two or three alternating batches and mix until just barely combined, using a rubber spatula, gently fold in the sprinkles until they’re evenly distributed. Distribute the batter among the cake pans or muffin cups, spreading it out evenly if using cake pans.
Bake until a toothpick inserted into the center comes out clean. (~200 F. Do not overbake!) Begin checking for doneness at 20 minutes for cakes and 15 minutes for cupcakes.
Let cool in the pans for 10 minutes and then turn onto a wire rack to cool completely.
Buttercream Frosting – Less Sweet
For 3 cups of buttercream:
INGREDIENTS
• 1 1/2 cups (340g) unsalted butter, softened slightly • 2/3 cups (208g) light corn or glucose syrup • 1 1/4 cups (141g) powdered sugar (unsifted) • 1/8 teaspoon fine salt (to taste, start with a pinch) • 1 teaspoon vanilla extract • 3-6 tablespoons of heavy cream, room temperature • purple gel food coloring (optional)
METHOD
Add the softened butter to the bowl of your stand mixer. Using the whisk attachment, beat the butter on high speed until it’s paler in color and slightly more voluminous.
Add the corn syrup in 3 to 5 additions. Stop the mixer, add a little bit first, and mix it in at medium speed (still using the whisk attachment). Repeat until all the corn syrup has been added. Scrape down the bowl a couple of times to ensure everything is mixed well.
Once all the corn syrup has been added, mix at the highest speed for two minutes. This is an essential step, so make sure to time it. You need the butter to emulsify the sugar syrup, which won’t be visually apparent because the syrup is clear. If you under-whip at this step, your final frosting will have an overly buttery (fatty or greasy) feel. Proper emulsification will ensure that the syrup integrates evenly within the butter, giving it a much more pleasant texture.
Now give the frosting a taste. It should be smooth, creamy, and very buttery, with a slight sweetness. This is to gauge how much powdered sugar to add in this step. Notice how glucose (the sugar type in corn syrup) is not as sweet as the sucrose in powdered sugar.
Add the powdered sugar in a few additions, mixing on low speed to reduce the mess. Once all the sugar has been added, mix on high speed for 30 seconds. Give it another taste. Do you want it sweeter or need a firmer consistency of buttercream? Add more powdered sugar. You can add as much powdered sugar as you like. This buttercream can handle more, but remember that the more you add, the sandier the finished frosting will be.
Now let’s flavor and color the buttercream. Add the vanilla, a pinch of salt, and, optionally, a toothpick’s end of purple food coloring (to achieve a whiter shade). Mix on high speed for another minute.
Give it a taste. If it’s too buttery, add some heavy cream, one tablespoon at a time, until you like the consistency. Whip it in on high speed for at least one minute when you like the texture. (See my footnotes about this below.)
Switch over to a paddle attachment and run the frosting on low speed to get out any large air pockets. The finished buttercream will have minimal air bubbles and be ready to use.
Those of you who follow this blog know I almost always make a practice cake of any new bake. My almost 7 year old granddaughter wants a “FunFetti cake” for her birthday in a couple of weeks. I found this recipe and method and tried it this morning.
I think I over-baked the cake by about 3 or 4 minutes and know I over baked the cupcakes. I’ll try again making only cupcakes (as that is what we will serve at the party.) 80 cupcakes!
Funfetti Cake
INGREDIENTS CAKE: • 2 ½ c AP flour • 1/4 c cornstarch • 1 tsp kosher salt • 2 tsp baking powder • 1 c unsalted butter, at room temperature • 1 ½ c sugar • 4 large egg whites • 1/4 c vegetable or canola oil • 1 Tbl clear imitation vanilla • ½ tsp almond extract • 3/4 c whole milk (2% OK) • ½ c rainbow sprinkles (artificially colored cylinders) FROSTING: • 1 3/4 c unsalted butter, at room temperature • 3 ½ c powdered sugar • 1/8 tsp kosher salt • 1 ½ tsp clear imitation vanilla • 1/4 tsp almond extract (omit for nut free) • 2 Tbl whole milk
METHOD CAKE:
Preheat the oven to 350ºf. Grease and line the bottoms of three 8-inch cake pans or line 24 cups of two muffin tins.
In a medium bowl, whisk together the flour, cornstarch, salt, and baking powder.
In a stand mixer fitted with the paddle attachment, cream together the butter and sugar until light and fluffy, 3 to 4 minutes. Add the egg whites, one at a time, mixing well after each addition. Add the oil and the extracts.
With the mixer running on low speed, add the dry mixture and the milk in two or three alternating batches and mix until just barely combined. Do NOT over beat!.
Using a rubber spatula, gently fold in the sprinkles until they’re evenly distributed. Distribute the batter among the cake pans or muffin cups, spreading it out evenly if using cake pans.
Bake until a toothpick inserted into the center comes out clean. Begin checking for doneness at 20 minutes for cakes and 16 minutes for cupcakes. (Depends on your oven.)
Let cool in the pans for 10 minutes and then turn onto a wire rack to cool completely. FROSTING:
In a standing mixer fitted with a paddle attachment, beat the butter until smooth and gradually beat in the powdered sugar. Add the salt, extracts, and milk and beat to combine.
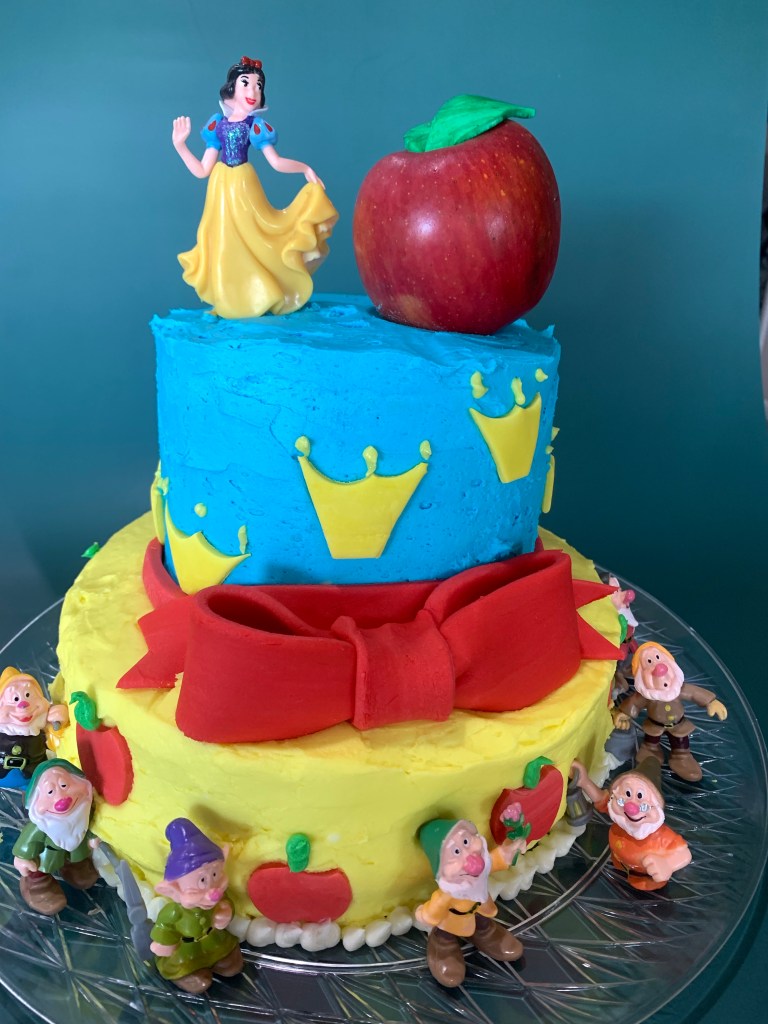
I realized I didn’t post at least a picture of my Snow White cake. I made this cake for my DIL Frances’ birthday last week. It’s an Extreme Chocolate Cake with buttercream frosting. (I am not the best at frosting smooth buttercream cakes.) The apple is real, but the leaves on the top are gum paste.
The ribbons, yellow crowns and red apples are also gum paste. The figurines are all purchased, but I thought my granddaughters would like to play with them.
Another week, another birthday cake, except this one wasn’t a themed cake, just a plain cake. Whew! Deep breath.
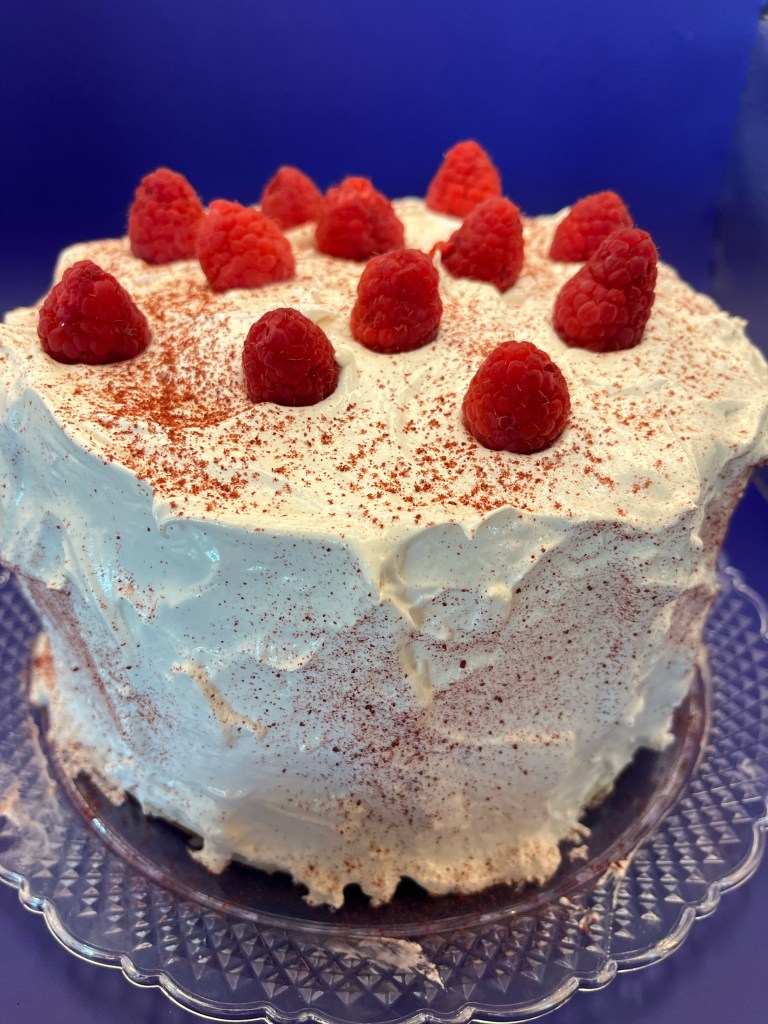
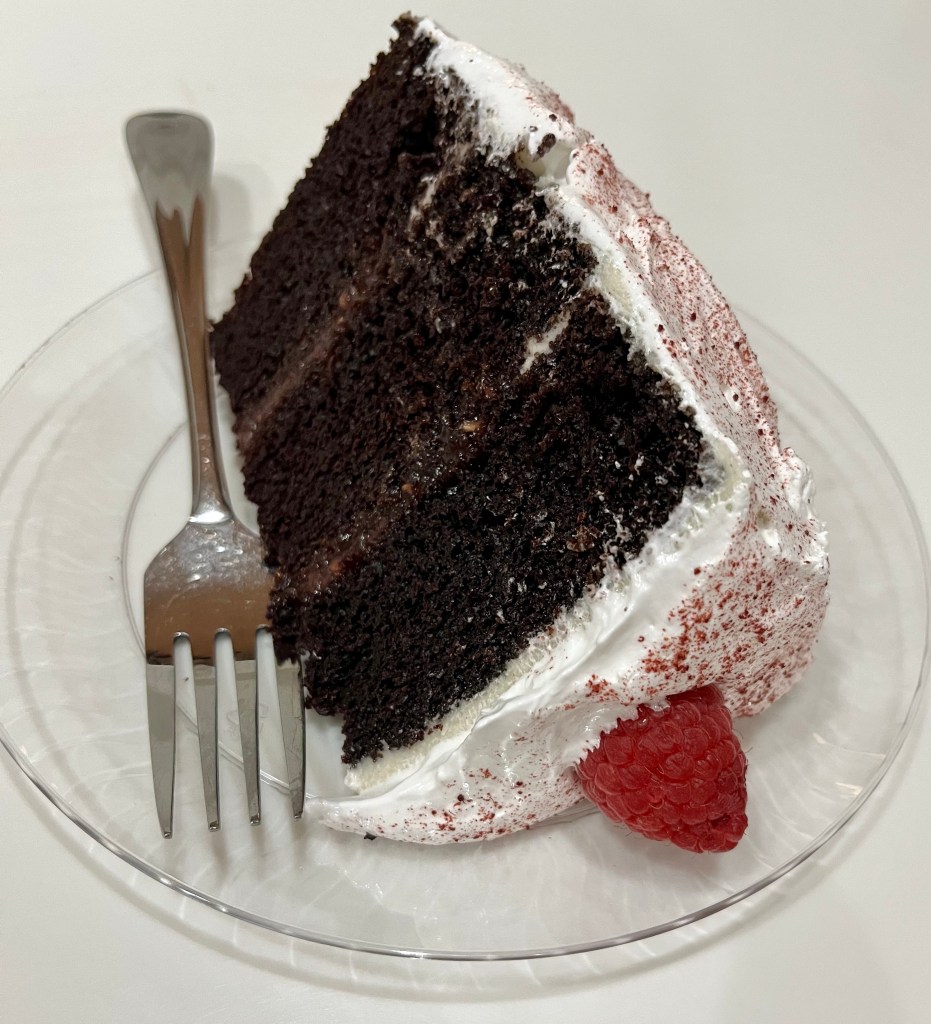
Today is my son Dan’s birthday. This summer I made Grace’s “Galaxy Cake” and Vivian’s “Princess Aurora “ and Mommy Frances’ “Snow White Cake.” Today was just plain Daddy Dan’s birthday cake. Let me say up front, there is and has never been anything “just plain” about Dan. I don’t have adequate adjectives to describe what a fantastic person, father, husband and son he is.
The cake is my Extreme Chocolate Cake, which is everyone’s favorite. This time I frosted it with marshmallow frosting (my favorite.) A light dusting of freeze dried raspberry powder added a nice tart contrast to the cake and frosting. I made the 10” Round Cake size which perfected filled three 8” cake pans. Wrapping them with wet cake pan strips kept the cakes from doming.
The filling between layers was home made raspberry jam. I piped a ring of buttercream to dam the raspberry filling in place. I used the rest of the buttercream to crumb coat the cake. (Not the smoothest crumb coating. It was fixed after setting in the fridge for a while.)
This is Version 1.1 because after I baked the cakes QC asked if I put jammy bits into the cake. What a great idea, a couple of hours too late, but never fear, there will be another chocolate cake and will certainly have jammy bits included in the batter!
Extreme Chocolate Cake
(Sorry, this blog software doesn’t let me create nice columns.)
INGREDIENTS
Cake 10” ROUND CAKE
9” ROUND CAKE Or 11”x15” or HALF Sheet Cake (18”X13”
Preheat oven to 350 degrees F (175 degrees C). Grease and flour two 9 inch cake pans. (SEE QTY FOR 10” CAKES, AND SHEET CAKES)
Use the first set of ingredients to make the cake. In a medium bowl, stir together the sugar, flour, cocoa, baking soda, baking powder and salt. Add the eggs, milk, oil and vanilla, mix for 3 minutes with an electric mixer. Stir in the boiling water by hand. Pour evenly (1000g in each 9” cake pan) into the two prepared pans. (For cupcakes, portion ¼ scant cups in each cupcake paper.
Bake for 30 to 35 minutes in the preheated oven, until a toothpick inserted comes out clean or 205 internal temp. Cool for 10 minutes before removing from pans to cool completely.
To make the frosting, use the second set of ingredients. Cream butter until light and fluffy. Stir in the cocoa and confectioners’ sugar alternately with the milk and vanilla. Beat to a spreading consistency. (This recipe will frost 36 cupcakes.)
Split the layers of cooled cake horizontally, cover the top of each layer with frosting, then stack them onto a serving plate. Frost the outside of the cake.
NOTES
Do NOT let the internal temp exceed 210 deg F or the cake will be overdone.
Fill cupcake papers 2/3rds full. This will allow space for the cupcakes to expand and create a nice domed shape.
Marshmallow Frosting
INGREDIENTS
2 egg whites
5 tablespoons cool water, plus more for the double boiler
1/4 teaspoon cream of tartar
1 1/3 cups granulated sugar
2 egg whites, room temperature
1 tablespoon light corn syrup
1 teaspoon vanilla extract
METHOD
Pour about 2 inches of water into a saucepan to create a double boiler. Bring the water to a gentle simmer.
In a clean, grease free large mixing bowl, combine 5 tablespoons of cool water, cream of tartar, sugar, egg whites and corn syrup. Place the bowl over the simmering water. Turn off the heat. Use an electric hand beater to whip the mixture. Do not leave mixture unattended and do not stop beating any time during this process.
After about 3 minutes, remove the bowl from the heat and quickly take the temperature of the egg whites. They need to reach 140 degrees F. If the mixture is less than 140 degrees F put the bowl back over the water and resume beating until they are finished, an additional 2 to 3 minutes.
Remove the bowl from the water and fold in the vanilla extract. It should look like marshmallow fluff. Allow the frosting to cool. Frost and serve immediately
Finally I made the Princess Aurora cake for my granddaughter Vivian’s birthday – 20 Covid days late. The extra days gave me extra time to obsess and agonize on the design and execution. The original design was to be 4 layers of 10” cake for the base and 3 of 8” for the top and serve 60 people. We are down to 9 people and a scaled down cake.
I made most of the decorations a few weeks ago and kept them safely tucked away until now. All the flowers and birds are gumpaste. The roses were made using the typical technique of adding several rows of die cut petals. The other flowers were also die cut and while still flexible placed on a slightly crumpled sheet of parchment paper to give them some contour.
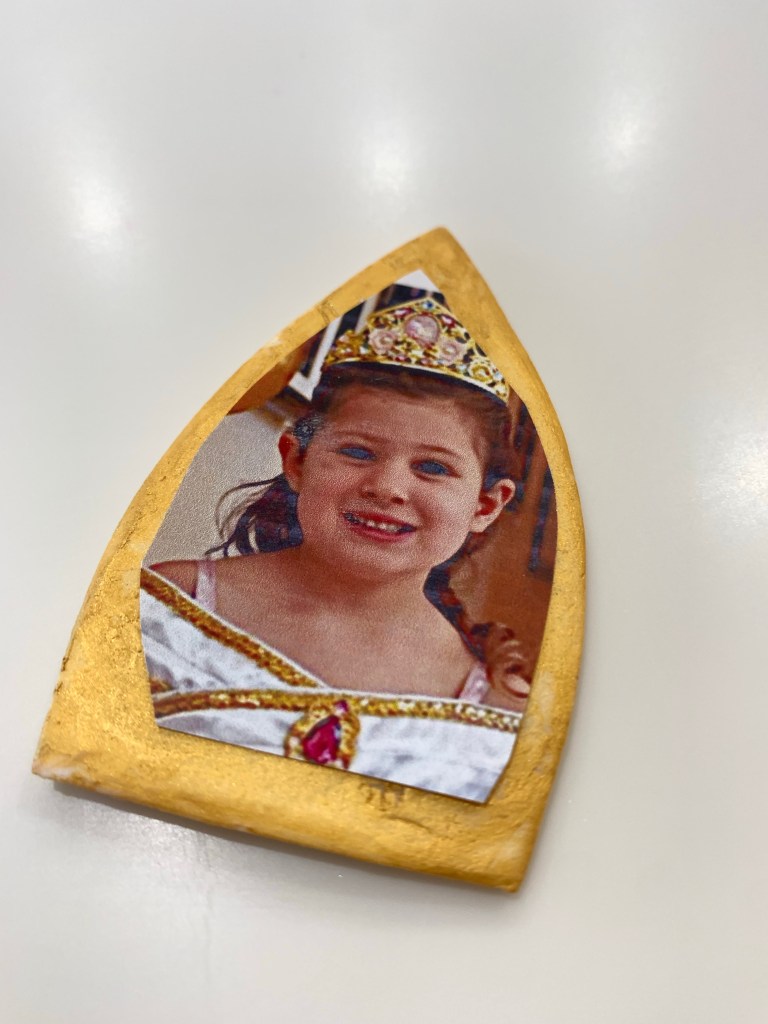
The letters fondant, rolled thick and cut with a die. A sharp knife cut the pattern into the letters which were airbrushed gold and dusted with glitter. The picture frame was cut from rolled gumpaste, allowed to dry and the edges were painted gold. Gumpaste glue stuck the picture to the frame.
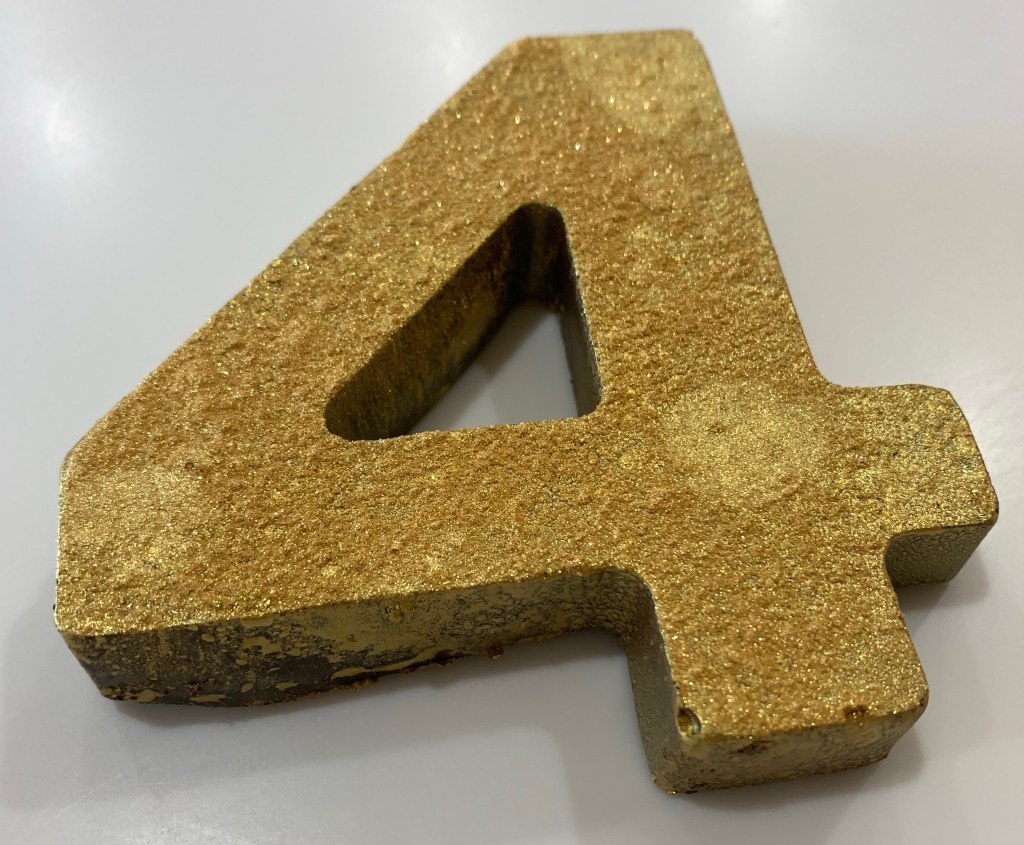
The drapes and dress are darker pink dyed, rolled fondant and dusted with silver petal dust. The crown is gold airbrushed gumpaste cut in the shape of Princess Aurora’s crown. Gold glitter was dusted on the still slightly wet crown. The “4” is tempered dark chocolate, airbrushed with gold and dusted (too heavily) with gold glitter. (The fingerprints are mine.)
The top two 6” layers are white cake and the bottom three 8” layers and my extreme chocolate cake (family favorite.) I am not a fan of this white cake. (I constantly and this far unsuccessfully search for a recipe that is light and moist.) The frosting is a simple buttercream with 3:1 butter to shortening ratio.
Many techniques, lots of time, tons of fun making this cake.
Tender White Cake
INGREDIENTS • 326g (2¾c) Unbleached Cake Flour Blend • 333g (1⅔c) sugar; superfine sugar is best • 1 Tablespoon baking powder • 3/4 teaspoon salt • 170g (12Tbl) unsalted butter, softened • 4 large eggs whites plus 1 whole large egg • 227g (1c) whole milk (2% plus 4Tbl Heavy Cream) • 2 teaspoons vanilla extract • 1 teaspoon almond extract
METHOD
Preheat the oven to 350°F. Prepare two 8″ x 2″ or 9″ x 2″ round pans; a 9″ x 13″ pan; or 2 standard cupcake pans (20 to 24 cupcakes) by greasing and flouring; or lining with parchment, then greasing the parchment. Note: Make sure your 8″ round pans are at least 2″ deep; if they’re not, use one of the other pan options.
Mix all of the dry ingredients on slow speed to blend. Add the soft butter and mix until evenly crumbly, like fine damp sand. It may form a paste, depending on the temperature of the butter, how much it’s mixed, and granulation of the sugar used.
Add the egg whites one at a time, then the whole egg, beating well after each addition to begin building the structure of the cake. Scrape down the sides and bottom of the bowl after each addition.
In a small bowl, whisk the yogurt (or milk) with the vanilla and almond extracts. Add this mixture, 1/3 at a time, to the batter. Beat 1 to 2 minutes after each addition, until fluffy. Be sure to scrape down the sides and bottom of the bowl.
Pour the batter into the prepared pans. Bake for 25 to 30 minutes for 8″ or 9″ rounds; 23 to 26 minutes for a 9″ x 13″ x 2″ sheet cake; or 20 minutes for cupcakes. A toothpick or cake tester inserted into the center will come out clean when done. Remove from the oven, remove from the pan, if desired (not advisable for a 9″ x 13″ sheet cake), cool on a rack, and frost.
Yield: Two 8″ or 9″ round layers; one 9″x 13″ x 2″ sheet cake, or 20 to 24 cupcakes.
Basic Crusting Buttercream
INGREDIENTS: • 1/2 cup solid high ratio shortening (1/4 cup Crisco, ¾ cup butter) • 1/2 cup butter softened (see above) • 1 tablespoon of merengue powder • 1 teaspoon Clear Vanilla Extract (or extract of choice) • 4 cups sifted confectioners’ sugar (approx. 1 lb.) • 2 tablespoons milk METHOD
In large bowl, cream shortening and butter with electric mixer.
Add vanilla and milk.
Gradually add sugar, one cup at a time, beating on a slow speed. Scrape sides and bottom of bowl often.
Keep bowl or covered with a damp cloth until ready to use. Refrigerated in an airtight container, this icing can be stored 2 weeks.
Don’t over whip or it will bring air to the icing and will be impossible to smooth. NOTE: If you have a kitchen Aid use white attachment, not whip attachment. YIELD: Makes about 3 cups.
Grace’s sixth birthday is a space themed extravaganza so I made a galaxy cake. It’s more of a solar system cake, but not our solar system.
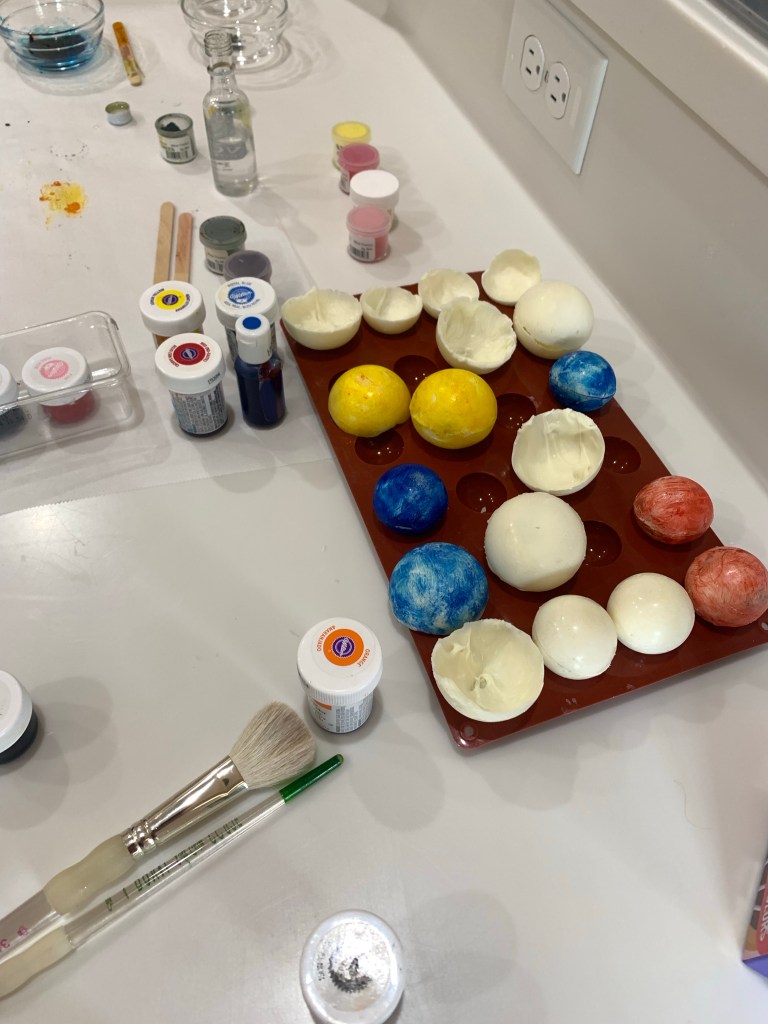
The cake is a six layer stacked extreme chocolate cake. A cardboard cake board separates each two layers to make cutting and serving easier. Each layer is a 9” round cake, and the “internal” cake board is 8” to allow a smooth buttercream transition between layers. The small white stars are tempered white chocolate made with a silicon mold. The larger stars, around the base, are various colors of white chocolate, again formed using a silicon mold.
The planets are white chocolate made with a variety of hemispherical silicon molds and painted with decorating colors mixed with vodka. Some of them were fused together to make spheres, the ones on the side of the cake were left as hemispheres. Slightly melting the edges of the hemisphere or the bottom of the spheres helped them adhere to the blue buttercream.
Before adding the planets I splattered the cake with white food coloring. The “space woman” was purchased and a printable decal image of Grace was pasted on the silver faceplate of the space suit.