
If Just For A While.
For the end of Mardi Gras I thought it appropriate to make a more or less “traditional King Cake.” I say more or less as I have never had a King Cake and am unsure of the “traditional” texture and flavor. When cut, this cake resembled a cinnamon roll, which is no surprise as it is a yeast dough, twice risen and rolled with cinnamon and sugar. It actually tasted more like a cinnamon roll than a “cake”. Next year, I may try a more cakey recipe.
I thought the glaze was a little too acidic. Maybe I should have used a cream cheese based glaze, or just cut the citrus juice in half. To help the colored sugar adhere I would also give a very light spray of water over the glazed cake prior to dusting. Too much water may melt the colored sugar.
-

- Kneaded Dough and Accessories
-

- Elastic Dough
-

- Read for First Proofing
INGREDIENTS
- 8 oz sour cream
- 2½ Tbsp sugar
- 2 Tbsp butter
- ½ tsp salt
- 2 tsp active dry yeast
- ¼ cup warm water (100 – 110 F)
- ½ Tbsp sugar
- 1 large egg, slightly beaten
- 3 to 3½ cups bread flour
- Purple, green and gold tinted sparkling sugar sprinkles
CINNAMON FILLING
- 2½ Tbsp butter, softened
- ¼ cup sugar
- 1 tsp ground cinnamon
-

- Rolled out Dough
-
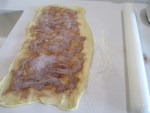
- Butter and Cinnamon Sugar Coated
-

- Rolled up Dough
CREAMY GLAZE
- 1 ½ Tbsp butter, melted
- 1 Tbsp fresh lemon juice
- ¼ tsp vanilla extract
- 1 to 2 Tbsp milk
- ¼ cup warm water (100 – 110 F)
- ½ Tbsp sugar
METHOD
- Cook first 4 ingredients in a medium saucepan over low heat, stirring often, until butter melts. Set aside and cool mixture to 100 to 110 F
- Stir together yeast, ¼ cup warm water, and ½ Tblsp sugar in a 1 cup glass measuring cup; let stand 5 minutes
- Beat sour cream mixture, yeast mixture, eggs and 1 cup flour at medium speed until smooth.
- Reduce speed to low, changed to dough hook and gradually add enough remaining flour 2 – 2 ½ cups until a smooth dough forms
- Knead with dough hook until smooth and elastic (about 12 min)
- Place in an oiled bowl and flip to grease top
- Cover and let rise in a warm place for 1 hour or until doubled
- Punch down dough, divide in half
- Roll into a 22”x12” rectangle
- Spread 2 Tbsp softened butter evenly on each rectangle, leaving a 1” border.
- Stir together ¼ cup sugar and cinnamon, and sprinkle evenly on each rectangle
- Roll up each rectangle, jelly roll style, starting with the long edge.
- Place seam side down on lightly greased baking sheet.
- Bring ends together to form an oval ring moistening and pinching edges together to seal
-
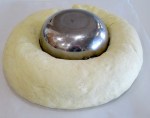
- Dough Proofed with bowl center spacer
-

- Cake Tented after 10 minutes
-
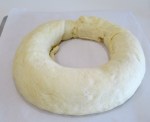
- Proofed Dough Ring
-
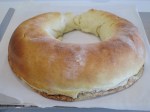
- Baked Cake
-
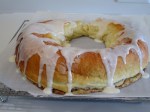
- Baked and Glazed Cake
METHOD – GLAZE
- Stir together first 4 ingredients
- Stir in 2 Tbsp milk, adding additional milk 1 tsp at a time until spreading consistency
PREPARATION AND ASSEMBLE
- Cover and let rise in a warm place 20 – 30 min until doubled
- Bake at 375 F for 14 – 16 min or until golden
- Slightly cool cake in pan on wire rack (about 10 min.)
- Drizzle creamy glaze evenly over warm cake, sprinkle with colored sugar, alternating colors

Finished King Cake
OPTION: Cream Cheese-filled King Cake
- Prepare 22×12” dough rectangle as directed
- Omit 2 Tblsp butter and cinnamon. Increase ¼ cup sugar to ⅓ cup
- Beat 1/3 cup sugar with 8 oz softened cream cheese, ½ large egg and 2 tsp vanilla extract at medium
- Spread mixture evenly on dough rectangle, leaving 1 inch border

 I also made 2 dozen chocolate dipped short bread cookies, but they were not part of this post. Just a picture for proof.
 conveniently planted near our fence such that some of it’s fruit hung over my side, helped me decide to try this new pastry. I hadn’t made a sweet tart where the filling, not just the pastry crust, was baked. This tart had a clean, fresh, sweet taste and excellent texture.
 and also increased the temperature of the caramel to slightly increase the hardness of the caramel.
 dipped, heart shaped, shortbread cookies.
 coupon) for a nice presentation.
