Often I bake for an event or occasion. Sometimes I see a recipe online and want to duplicate it. Sometimes I like to immerse myself in a bake to occupy my mind so I don’t think about anything else. Today was one of those days.
This recipe, upside down key lime pie, is from Sally of Sallys Baking Addiction.. It is delicious and my opinion is shared by the QC Cadre (i.e. neighbors.)
The graham cracker crumble is the perfect crunch for the pie filling just as the sweet meringue balances the tartness off the key lime.
I am sorry, but I cannot write my normal, snarky, quirky pander today. Perhaps I will return to it one day, but not today.
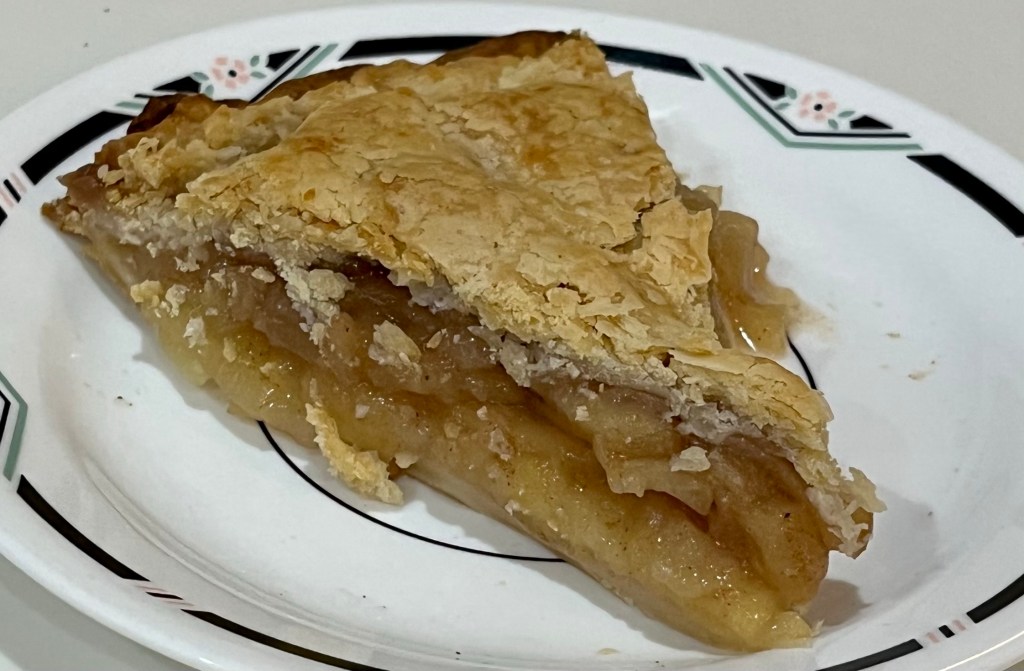
A month ago, QC and I went to Apple Hill to buy some, wait for it,… apples! This is our traditional trip up past Placerville. It’s a nice drive up and we take a backroad home through the Sierra Nevada foothills. It looks a lot like Vermont.
I made a couple of dozen pints of applesauce, (we like applesauce.) and had leftover apples, beyond those we ate. I found a recipe for an apple pie designed to be prepared and frozen (for up to 2 months.) I also have a nice pie crust recipe I never used so along with the apples, the time was ripe. If you do not over-mix the fats and dry ingredients and do not over-work the dough the crust will be very flaky and delicious like this one.
Unfortunately, I couldn’t wait the full two months to complete the test, and baked it today, almost exactly one month from freezing. (Next time I will make two pies.)
Two Slices, two plates.
Apple Pie Ready for Freezing
PIE CRUST • 2 ½ cups (315g) all-purpose flour plus more for shaping and rolling • 1 teaspoon salt • 6 Tablespoons (85g) unsalted butter, chilled and cubed • 2/3 cup (130g) vegetable shortening, chilled • ½ cup (120ml) ice cold water
INGREDIENTS – PIE FILLING • 6 c thinly sliced, peeled apples (6 medium) • ¾ c sugar • 3 Tbl all-purpose flour • ¾ tsp ground cinnamon • ¼ tsp salt • ⅛ tsp ground nutmeg • 1 tsp lemon juice
METHOD CRUST
Whisk the flour and salt together in a large bowl.
Add the butter and shortening. Use a pastry cutter, cut the butter and shortening until it looks like coarse gravel. (A few larger bits of fat are OK). In this step, you’re only breaking up the cold fat into tiny little flour-coated pieces; you’re not completely incorporating it. Do not overwork the ingredients.
Measure ½ cup (120ml) of water in a cup. Add ice. Stir it around. From that, measure ½ cup (120ml) of water, since the ice has melted a bit. Drizzle the cold water in, 1 Tablespoon (15ml) at a time, and stir with a silicone spoon after every tablespoon has been added. Stop adding water when the dough begins to form large clumps. Do not add any more water than you need.
Transfer the pie dough to a floured work surface. Using floured hands, fold the dough into itself until the flour is fully incorporated into the fats. The dough should come together easily and should not feel overly sticky. Avoid overworking the dough. If it feels a bit too dry or crumbly, dip your fingers in the ice water and then continue bringing dough together with your hands. If it feels too sticky, sprinkle on more flour and then continue bringing dough together with your hands. Form it into a ball. DO NOT OVERWORK THE DOUGH!
Use a sharp knife to cut it in half. If it’s helpful, you should have about 1 lb, 8 oz dough total (about 680g). Gently flatten each half into 1-inch-thick discs using your hands.
Wrap each tightly in plastic wrap. Refrigerate for at least 2 hours and up to 5 days.
After the dough has chilled for at least 2 hours roll it out, one crust at a time, keeping the other in the refrigerator until you’re ready to roll it out. Lightly flour the work surface, rolling pin, and your hands, and sprinkle a little flour on top of the dough. Use gentle-medium force with your rolling pin on the dough—don’t press down too hard on the dough. When rolling dough out, start from the center and work your way out in all directions, turning the dough with your hands as you go. Between passes of the rolling pin, rotate the pie crust and even flip it, to make sure it’s not sticking to your work surface. Sprinkle on a little more flour if it’s sticking; don’t be afraid to use a little more flour. Roll the dough into a very thin 12-inch circle. Your pie dough will be about 1/8 inch thick, which is quite thin. Visible specks of butter and fat in the dough are perfectly normal and expected.
Carefully roll one end of the circle of dough gently onto the rolling pin, rolling it back towards you, slowly peeling it off the work surface as you go. Pick it up, and carefully roll it back out over the top of the pie dish.
METHOD – PIE FILLING
Place 1 pie crust in 9-inch disposable foil or metal pie plate (do not use glass). Press crust firmly against side and bottom of pie plate.
In large bowl, gently mix filling ingredients; spoon into crust-lined pie plate.
Top with second crust. Wrap excess top crust under bottom crust edge, pressing edges together to flute and seal.
Tightly wrap unbaked pie in 3 layers of plastic wrap, making sure all sides of pie are completely sealed and unexposed.
When ready to bake pie, heat oven to 450°F. Remove frozen pie from freezer; cut a few slits in top crust and place in oven. Do not thaw pie.
Bake 25 minutes. Reduce oven temperature to 375°F; bake 40 to 50 minutes longer or until crust is golden brown and apples are hot and soft when pricked with a fork. If necessary, tent the edges of the pie to reduce darkening and bake in 10-minute periods until the internal temperature of the pie is 190 – 200°F.
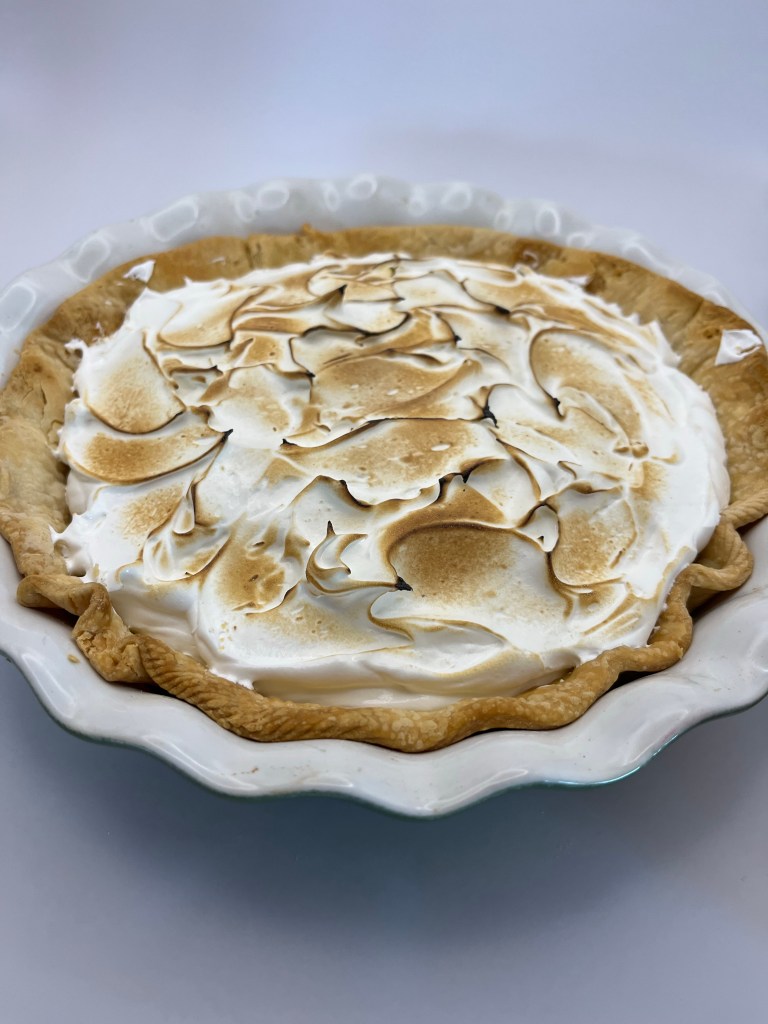
I needed a few cranberries for decoration on the Yule Cake, so with left over 11.75 oz of the 12 oz bag, I saw and made this recipe for a cranberry merengue pie. (You can take the boy out of Vermont…) Never having made one and needing a dessert to augment the smallish Yule Cake, I thought, Let’s give it a try, waste not, etc.
Macerating the cranberriesCooking berries, eggs and cornstarch until smoothPar-baked pie crustCranberry mixture poured into par-baked pie shellItalian Meringue, torch and cranberry pie.Meringue covered pie prior to torching.Torched Cranberry Meringue Pie
Cranberry Meringue Pie
INGREDIENTS For the filling: • 1 12-ounce bag whole cranberries, fresh or frozen • 3/4 cup water • 1 cup granulated sugar • 3 large egg yolks • 3 tablespoons cornstarch • 4 tablespoons cold salted butter, cubed • 1 8- or 9-inch pie crust, any kind, par-baked if necessary For the meringue: • 150g (or ¾ cup) granulated sugar • 60ml (or ¼ cup) water • 60g (or ¼ cup) egg whites (about 2 large egg whites)
METHOD To make the filling,
Combine the cranberries, water, and sugar in a medium saucepan with a lid. Cover the pot and bring to a boil over medium-high heat. Continue boiling for 3-5 minutes, or until the cranberries have totally disintegrated and the mixture is thick and gloopy. Use a potato masher to speed things up.
While the cranberries cook, whisk the egg yolks and cornstarch in a large mixing bowl.
When the cranberries are done, scrape the contents of the saucepan through a fine mesh sieve into the bowl with the eggs and cornstarch. Stir and press on the solids in the sieve until you’ve extracted all the liquid you possibly can, then scrape whatever’s on the bottom of the sieve into the bowl.
Whisk the cranberry-egg-cornstarch mixture together thoroughly, pour it back into the saucepan, and bring to a boil over medium heat, whisking constantly.
Cook at a full boil for 3 full minutes while whisking. Finally, whisk in the butter piece by piece until it’s completely incorporated and pour the filling into a prepared pie crust.
Cool on a rack at room temperature until there’s no heat coming off the bottom of the pan, then refrigerate overnight (or about three hours if you’re on deadline and like living dangerously).
ITALIAN MERINGUE
In a medium-sized saucepan, combine the sugar and water. Heat over low heat, stirring until the sugar has dissolved. Once the sugar has dissolved, turn the heat to medium-high and allow the syrup to come to a boil.
In the meantime, add the egg whites to a medium-sized, heatproof bowl and mix (with a mixer fitted with the whisk attachment) until foamy and the whites are almost able to hold soft peaks.
Once the syrup is boiling, clip on a candy (or sugar) thermometer.
Cook until the syrup reaches 116°C/240°F, then take the pan off the heat and slowly drizzle the hot syrup into the bowl with the foamy egg whites, mixing continuously to prevent the eggs from scrambling. Don’t pour the syrup onto the whisk, or the syrup may splatter against the sides of the bowl (or into your face!). Instead, aim for a spot close to the whisk.
Once all the syrup has been added, keep mixing until the bottom of the bowl feels cool to the touch and the meringue has cooled down to body temperature.
Use immediately or keep in the fridge (covered) until ready to use. It’s a very stable meringue, so it won’t start weeping, leaking or collapsing.
NOTES Italian meringue can be made two days in advance and stored in the fridge until needed (covered with plastic wrap,) or transferred to a piping bag, sealed, then placed in the fridge.
Wouldn’t it be wonderful if that were really true. Try to stay healthy. Take a walk, run or bike ride. Practice social separation and wash your hands frequently… You all know that. Do NOT socially isolate yourself from friends and family. Not all health is physical.
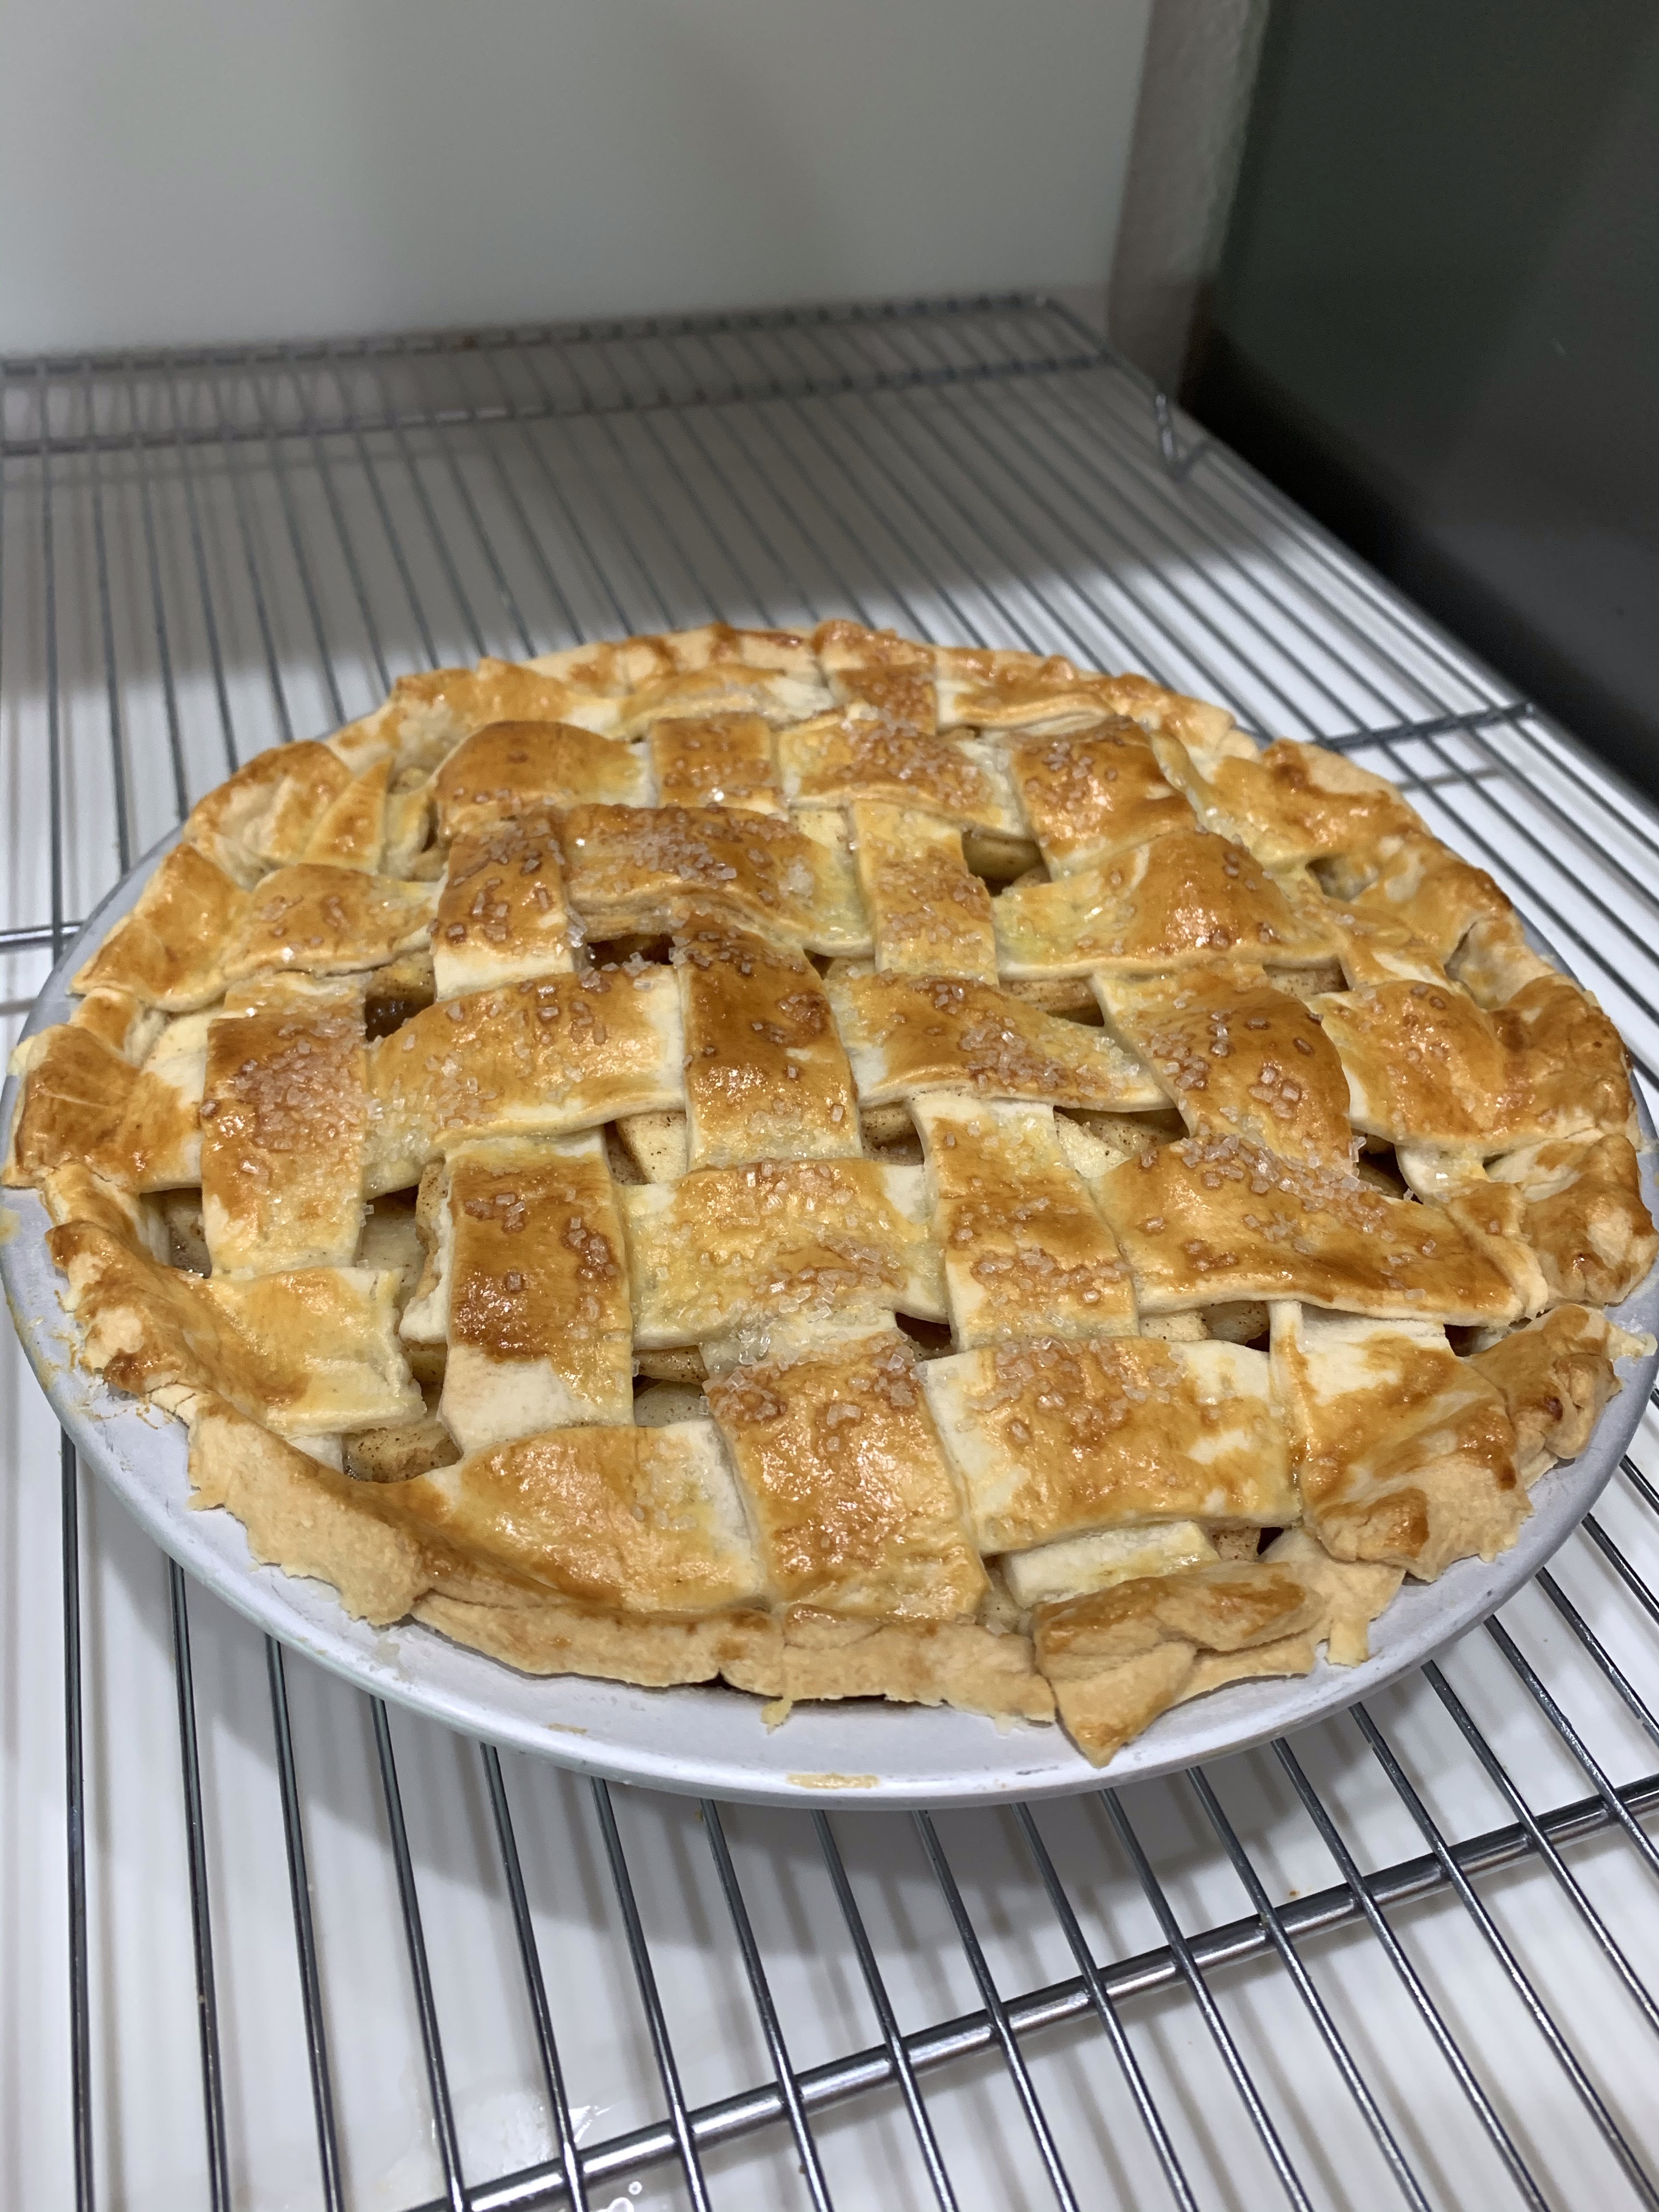
Now, here is a funny story. While at the market last week, Fran and I separated to expedite our essential expedition from sheltering-in-place. We wouldn’t want the Isolation Police to be upset. Somehow, when separated, one of us put our groceries into the wrong cart. One that was partly filled with someone else’s groceries. When I got to checkout I though we forgot our shopping bags in the car. Fran went out and they weren’t there. While she was gone I started to check out. I noticed we had a half dozen apples that I didn’t remember putting in the cart but “assumed” she did. When she returned to the market she found our original cart, with the grocery bags. I had already checked out so just kept the apples, which brings us to the reason for this post.
Last week we talked about making an apple pie and not, through a fortuitous mistake, now had the ingredients, and no thanks to an unfortunate circumstance had the time to make a pie. I had less than 2 lbs of apples so had to find a recipe that uses less than the 3 lbs we usually need. I found one this morning.
L to R: Top crust cut into strips, uncooked lattice, finished pie
Classic Apple Pie INGREDIENTS
• 7 cups (840 grams) sliced apples • 1 tablespoon (15 ml) fresh lemon juice • 1/2 cup (100 grams) granulated sugar • 1/4 cup (50 grams) brown sugar lightly packed • 1/4 cup (32 grams) all-purpose flour (spooned & leveled) • 1 teaspoon ground cinnamon • 1/4 teaspoon ground nutmeg • 2 pie crusts homemade or store-bought • 1 tablespoon (15 grams) butter cut into pieces • 1 large egg • 1 tablespoons milk • Coarse sugar for sprinkling on top optional
METHOD
Preheat oven to 400°F. Adjust oven rack to the lower third position.
Add the sliced apples and lemon juice to a large mixing bowl, toss until well combined. Set aside.
In a separate mixing bowl, whisk together the granulated sugar, brown sugar, flour, cinnamon, and nutmeg until well combined. Pour over the sliced apples and mix until the apples are fully coated with the dry ingredients. Set aside for 15-20 minutes while you prep the pie crusts.
Roll one of the pie crusts out to about 12 inches in diameter, transfer to a 9-inch pie plate, gently fit it in the dish, and trim any excess dough from the edges. Place in the refrigerator. Roll out the second pie crust dough and either cut lattice strips, decorations or leave whole to fully top the apple pie.
Remove the pie plate from the refrigerator. Using a slotted spoon, scoop the filling into the pie crust (making sure to leave as much juice as possible in the bowl) and spread around into one even layer. Dot with the pieces of butter. Top with the second pie crust and decorate the edges (if topping with a full piece of pie crust, make sure to cut some slits in the top).
Whisk together the egg and milk until well combined. Brush on top of the pie and around the edges. Sprinkle with coarse sugar if desired.
Bake in the lower third of the oven at 400°F for 20 minutes, then reduce oven temperature to 375°F and bake for an additional 35-40 minutes or until the top of the pie is golden brown and the filling is bubbly. Cover the edges of the pie with a pie crust shield as needed to prevent excess browning. You may also cover the top of the pie with aluminum foil to prevent it from browning too much before it’s finished baking.
Once the pie is finished baking, remove from the oven, and set on a wire rack to cool completely.
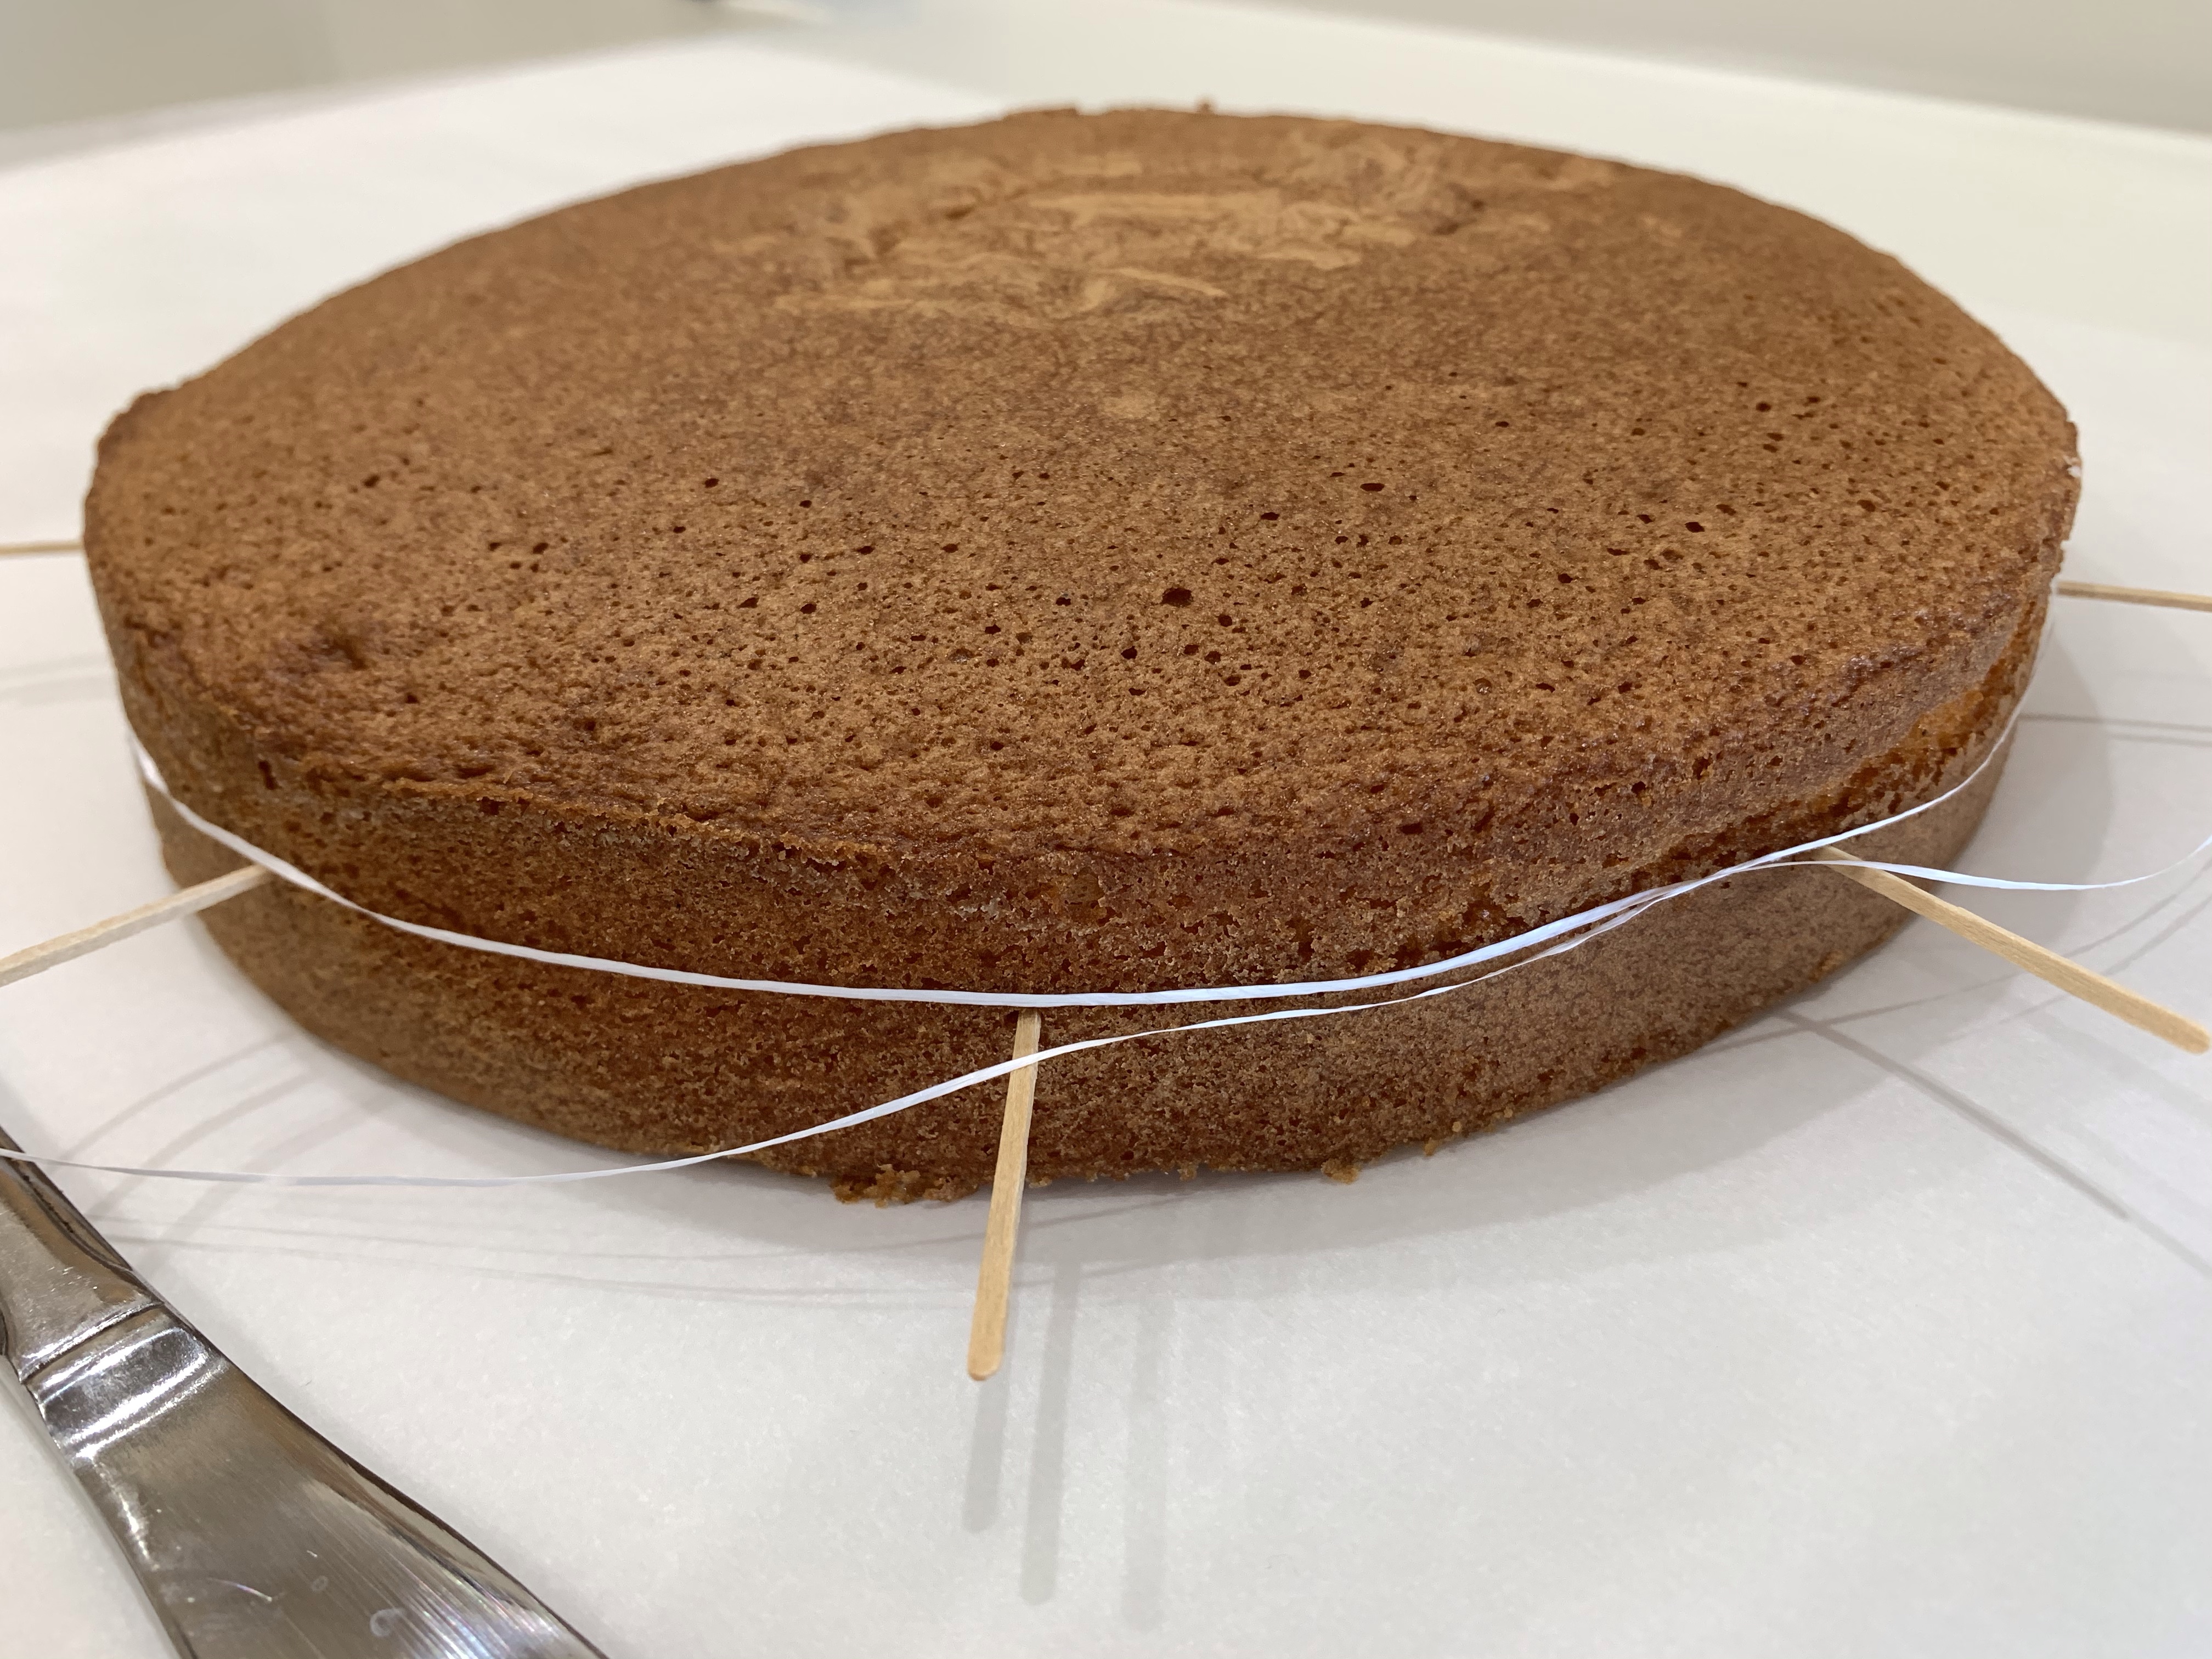
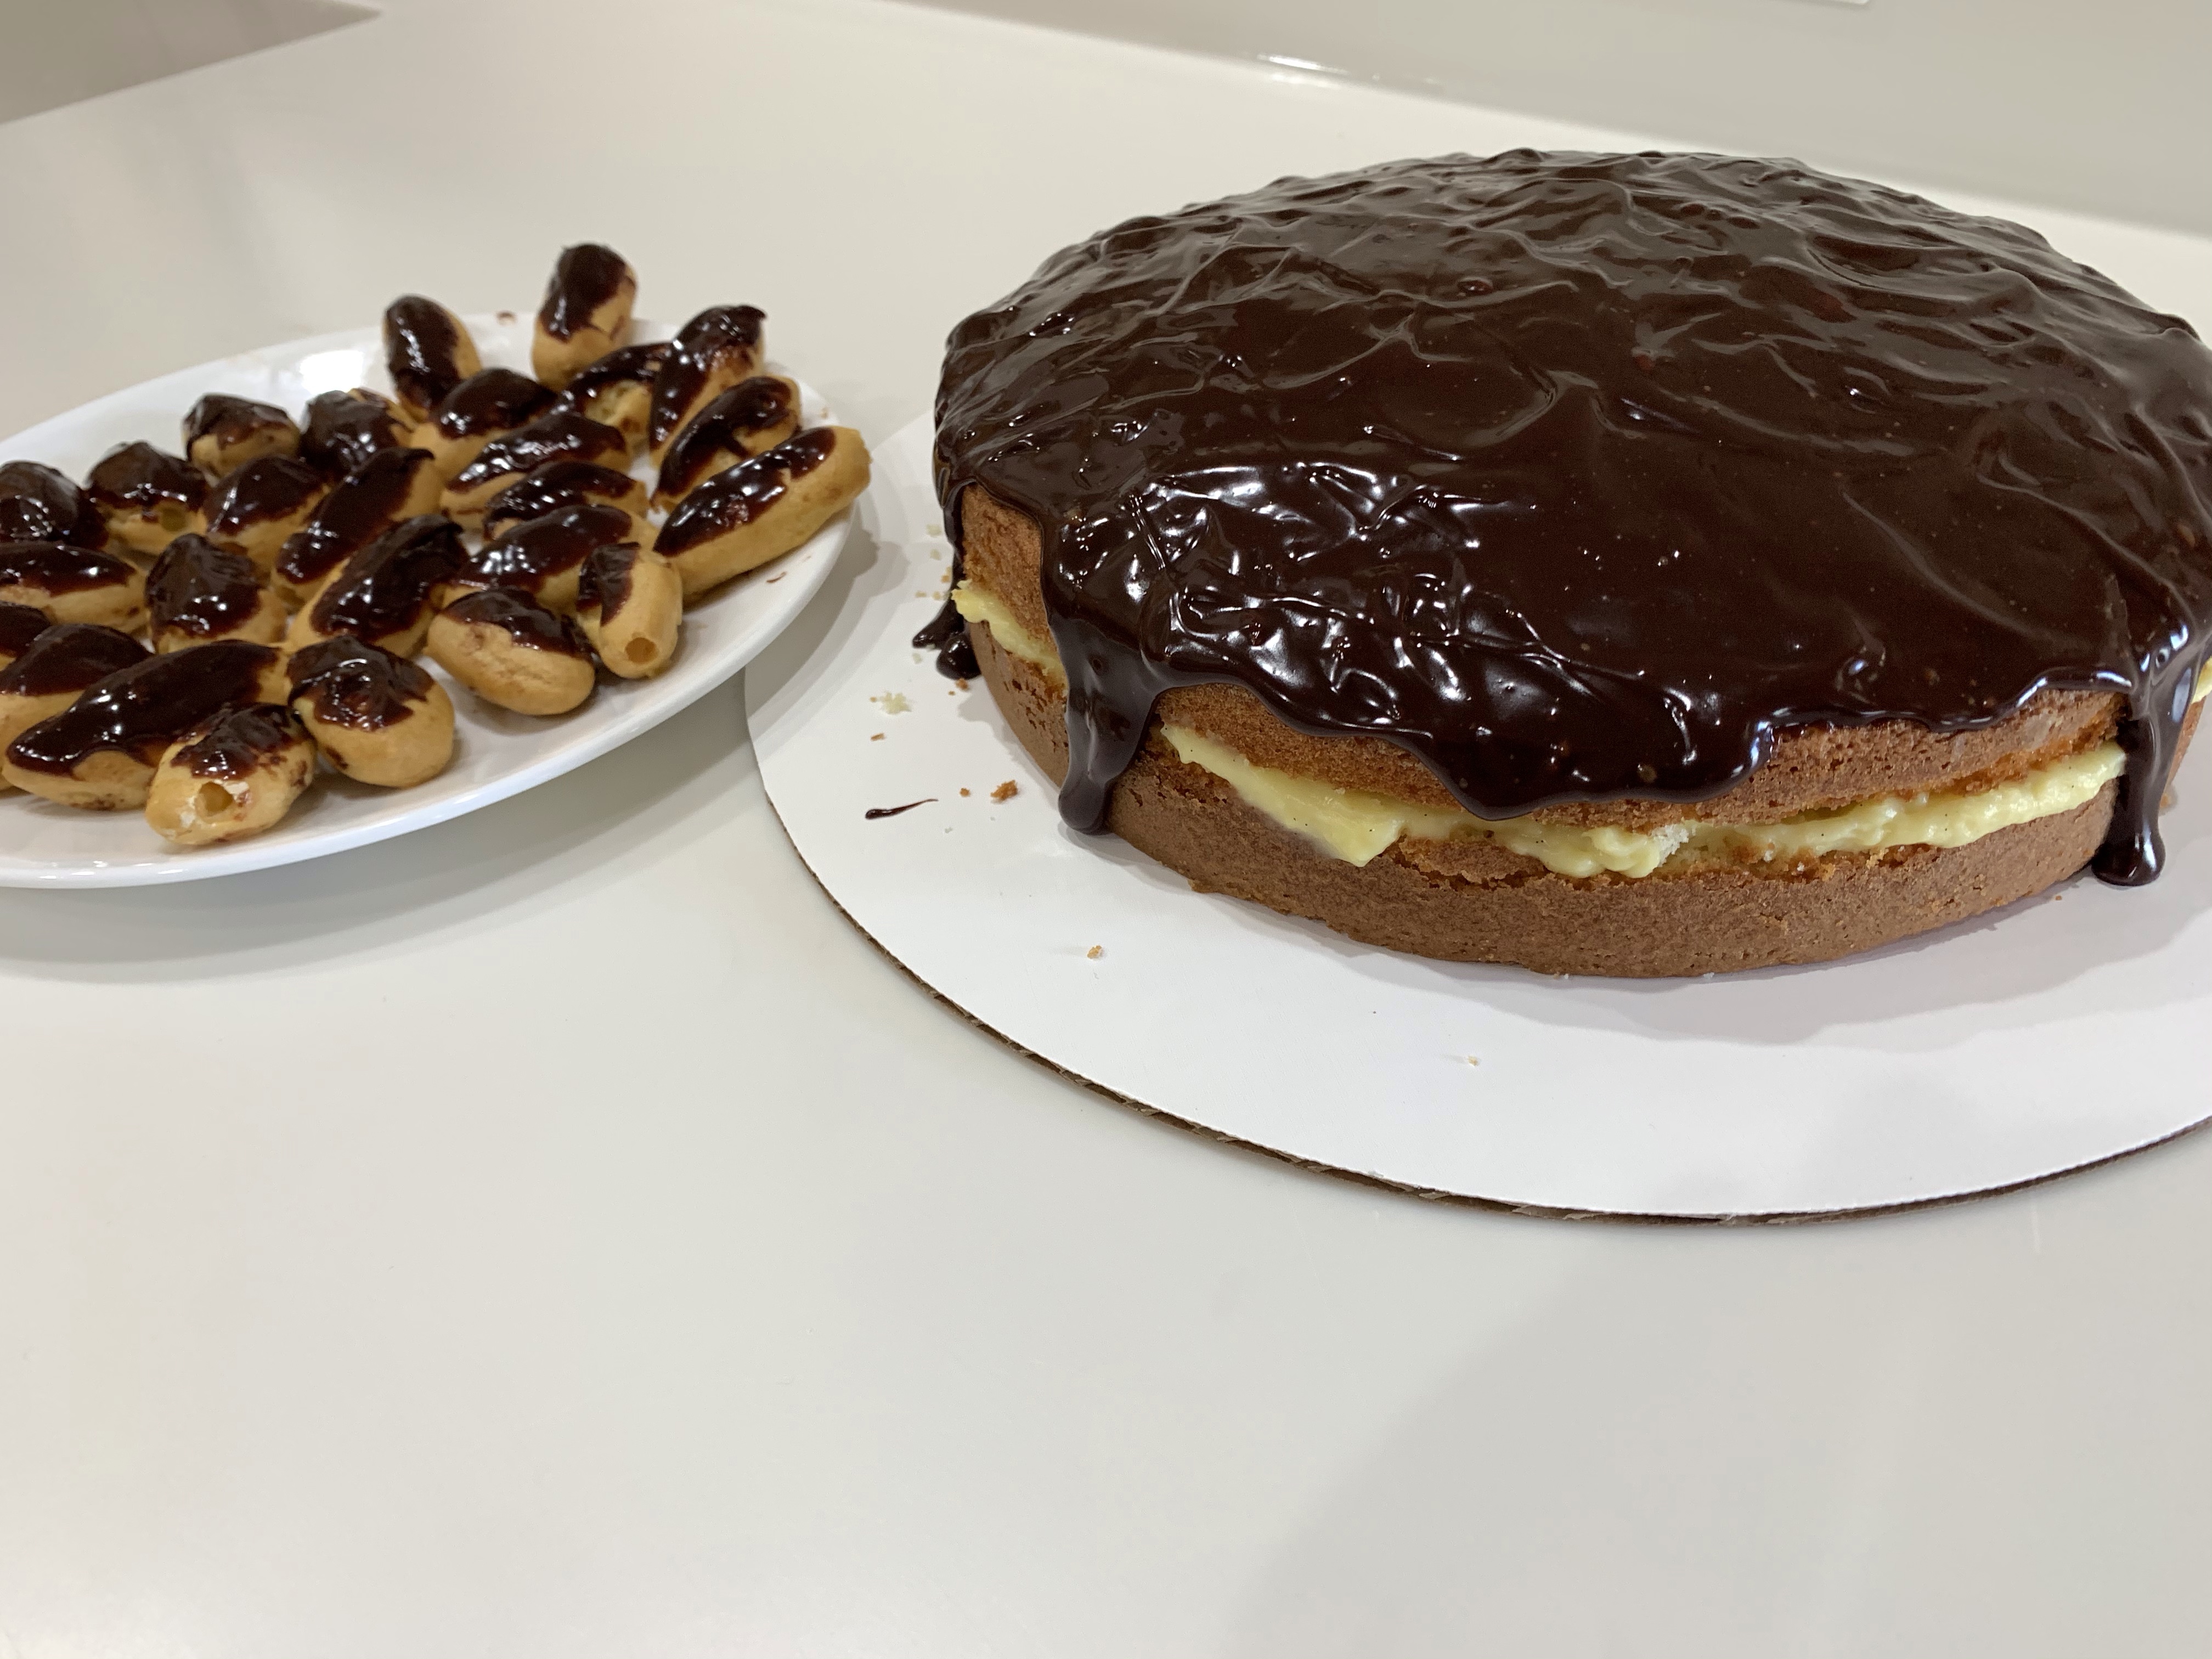
My friend Maggie asked if I would make a Boston Cream Pie using the same recipe she used. While her dessert was reportedly delicious, (I didn’t have any) the cake did not rise to her satisfaction. So, today I made the same cake (Betty Crocker’s recipe) with nearly identical results. The recipe called for a 9” pan sprayed on the bottom only, not the sides. Some cakes, like a angel food require dry sides for the cake to “grow” up the sides so I made sure the sides were dry. It didn’t help. The cake was just over an inch thick. Cutting it in half would result in two tortilla-thick disks rather than layers of cake.
I did a search for another recipe with significantly different ingredients and method. I chose one from Martha Stewarts Everyday Living. Following the recipe as written, Martha’s cake was nearly twice as high as Betty’s
Betty’s on the left – Martha’s on the right.
As I am inept at slicing a cake in half, this challenge provided the opportunity to use the “floss” technique. A butter knife was about half the height of the cake, so I used it to position tooth pics every few inches around the cake. I then laid the floss across the toothpicks and pulled it taut cutting cleanly through the cake, exactly where I wanted, resulting in two even, level layers of cake. THAT is a beautiful trick!
Left – Measure Height, Center – Wrap Floss, Right – Cut Cake
(Make a note for yourself – if you are making something that uses cream-pat and ganache be sure you have some frozen eclairs on hand. They are easy to thaw out, fill and dip in the extra ganache.)
Left Boston Cream Pie and Eclairs, Center BCP, Right Bonus Eclairs
The cake was moist, the cream-pat smooth and chocolate, well you know my opinion of chocolate. Incidentally, I used the cream-pat and ganache from my eclair post elsewhere in this blog.
Neapolitans, not Napoleons, one-bite Blueberry Pie and Caramel Sauce while sporting a new Ugandan Youth Center produced apron Neil picked up for me on his trip to Africa last month, made for a good week in the bakery (not to mention the sandwich and NY rye breads… which I did just mention, didn’t I? Sorry ’bout that.)
The Neapolitans are chocolate cookie based with a white cheesecake center and raspberry buttercream frosting, cut into 1” squares. Next time, I need to keep any skin from forming on the cheesecake. It kept the frosting from adhering properly.
The Blueberry Bites should be dusted with some coarse sugar after being egg washed to add some sweetness and shine. The caramelized sugar should add both. I may add a little lemon zest for a little tang.
The Caramel Sauce will be used later for a Peanut Butter/Caramel/Salted Chocolate petit four, but I had the time and it will keep in the fridge for a longtime so why not? The rest of the dessert will come later this week.
Preheat the oven to 450. Line a baking sheet with parchment paper. Use a pan with an edge so the pie bites don’t roll away when you place them in the oven.
Lightly flour a clean work surface and unroll the refrigerated pie crust.
Use a 1½” biscuit cutter to cut all your little pie bite circles out of the refrigerated pie crust.
Place 1 blueberry in the center of each circle. Sprinkle each one with a little sugar (you probably won’t use all the sugar).
Fold up two sides of one of the circles like a taco. The grab the adjacent sides and pinch the corners. This makes a little pocket for the blueberries. You can dip your fingers in egg wash to pinch the corners if you can’t get them to stick.
Brush each bite with the egg wash. Place each bite on the prepared baking sheet.
Sprinkle with a little more sugar and bake for about 10 minutes.
Bring the water, sugar, and butter to a simmer in a saucepan over medium heat. Do not stir the mixture until the sugar has completely dissolved in the water. Cook uncovered, stirring occasionally, until the caramel has turned golden brown, 5 to 10 minutes.
Carefully pour in a slow, steady stream of cream into the caramel while stirring constantly. The hot caramel will boil vigorously when the cream is added and solidify in areas. Add the vanilla extract and salt. Continue stirring over low heat until the caramel is smooth and creamy, 5 to 10 minutes more. Allow to cool for at least half an hour before using.
What do you do when left home alone for a week? It obvious isn’t it? You cook whatever you want! I decided this would be desert week (plus one “Dave’s Dinner” that I only make when Fran is not home.)
This week was pies. To not be gluttonous, I decided to make mini-pies in little 5″ pie plates. The recipes all come from Allrecipies.comand I did not change them at all. I made a raspberry, a blueberry, a raspberry/blueberry and
Granny Smith Apple
an apple pie. It was a good time to learn how to lattice the crust of a pie. (Alone time is good for experimentation and practice, practice practice.) Double wrapped in Darnel wrap, they froze perfectly. I defrosted at 350 until no longer frozen, then nuked the serving for that night separately.


 Neapolitans, not Napoleons, one-bite Blueberry Pie and Caramel Sauce while sporting a new Ugandan Youth Center produced apron Neil picked up for me on his trip to Africa last month, made for a good week in the bakery (not to mention the sandwich and NY rye breads… which I did just mention, didn’t I? Sorry ’bout that.)
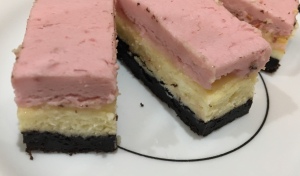 The Neapolitans are chocolate cookie based with a white cheesecake center and raspberry buttercream frosting, cut into 1” squares. Next time, I need to keep any skin from forming on the cheesecake. It kept the frosting from adhering properly.
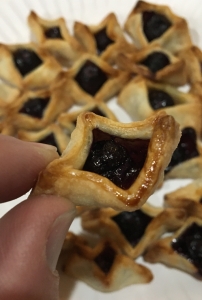 The Blueberry Bites should be dusted with some coarse sugar after being egg washed to add some sweetness and shine. The caramelized sugar should add both. I may add a little lemon zest for a little tang.
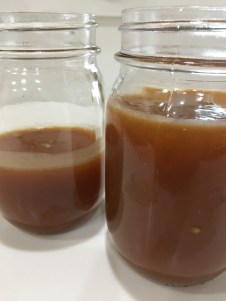 The Caramel Sauce will be used later for a Peanut Butter/Caramel/Salted Chocolate petit four, but I had the time and it will keep in the fridge for a longtime so why not? The rest of the dessert will come later this week.


