Savor the Moment

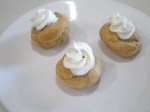
I like sweets and I love chocolate. I prefer foods where the ingredients list includes sugar, in large quantities. However, sometimes the moment requires other ingredients. Sometimes the bounty of the garden needs to be included in foods, savory foods and you know… they aren’t bad, not bad at all. I made a variety of test veggie savory pastries for our upcoming party. (Sadly, this time of year, very little came from my garden.)

I used, in various combinations, olives, roasted red peppers, asparagus, tomato, several herbs and gorgonzola,  cream, and parmesan cheeses. For these tart shells I used my standard tart recipe formed using small deep tart molds. Once the pastries were assembled I broiled them just long enough to melt, or at least soften the cheese. I apologize for not having a photo of the finished pastries. They… disappeared somehow after they were removed from the oven. Odd.

Asparagus and cream cheese pastry: Steamed asparagus was marinated in a mixture of balsamic vinegar, chives, parsley and tarragon then drained and patted dry.  Softened cream cheese coated the bottom of the shell, about 1/4″ thick, salt and pepper to taste and cut spears of asparagus laid across the top.

Olive and roasted red pepper pastry: A layer of crumbed gorgonzola cheese covered the bottom of the shell. A large olive was placed in the middle of the shell, on top of the cheese. A roasted red pepper was sliced lengthwise to about 1/2″ wide and wrapped around the olive.

Tomato and cheese pastry: Fill the bottom of the shell with a 1/4″ thick layer of shredded parmesan cheese. Place a thin slice of cherry tomato on top of the cheese, coat with a little more parmesan cheese and top with a piece of fresh basil. (From my garden 🙂 )

Party Tarty

In preparation of our family dinner in a week, and in celebration of receiving my new tart pan I made a “practice” berry tart. It consists of a tart shell, using the same recipe as used before, creme patisserie, as before and strawberries and blue berries. I did make the creme pat a bit firmer (doubled the corn starch) to assure it will cut properly (like a pumpkin pie) and support the weight of the berries.

To keep the bottom of the tart from becoming soggy (no one likes a soggy bottom), paint it with a thin coat of melted butter and refrigerate until it has set (about 15 min.)  I also brushed the entire tart with melted apple jelly to give it that extra shine. The finished tart can be kept in the refrigerator for up to 2 days. The baked, unfilled tart shell can be wrapped in plastic and frozen for 2-3 months.

completed-tart


Happy New Year!!

With Chinese New Year (year of the rooster) fast approaching, and as we are hosting a family dinner the same img_0003night I thought it appropriate to have some Chinese desserts. I saw both fortune cookies (ok not a dessert per se, but usually served after the meal) and black sesame macarons on the cooking shows we regularly watch.
I made “un-fortune” cookies the other day and the macarons today. For the uninformed, “un-fortune” cookies are fortune cookies without the little paper fortune tucked inside. I neglected to document the making of these cookies so will  omit them from img_0002this post, intending to document it the next time I make them. I found black sesame seeds at a specialty market near home and ground them to make a coarse powder. This gave the macaron a different texture than simply using fine almond powder.

The photos are bizarre. They are all color photos, but the gray coloring of the macarons and filling make everything monochrome.

Here is Stephanie Chen’s recipe with only three modifications. First, she didn’t indicate where to add the black sesame powder so I just mixed it in with the dry ingredients prior to img_0001adding the egg white. Second, she didn’t say when to add the black food coloring, so I added it after mixing the hot sugar mixture to the soft peak egg white and lastly I didn’t have any champagne so I just skipped it. The honey butter cream was awesome anyway.

INGREDIENTS

Macarons

  • 280 g ground almond meal, sifted at least twice
  • 240 g powdered sugar
  • 40g toasted ground black sesame powder
  • 100 g egg whites- for whipping, room temp
  • 100 g egg whites – for mixing into dry ingredients
  • Pinch of cream of tartar
  • 200 g granulated caster sugar
  • 80 g water
  • deep black americolor food coloring

Honey Champagne Buttercream

  • 56 g unsalted butter
  • 1 cup of powdered sugar
  • 2 tablespoons of clear clover honey
  • 2-3 tablespoons of good quality champagne (or more depending on consistency)

METHOD

Make the Black Sesame macarons:

  1. Prep 2 baking sheets with parchment paper with drawn circles. Separate your egg whites and clean all your appliances to ensure there are NO traces of yolk, oil, fat, etc.
  2. In separate bowls, sift the almond meal at least TWICE and sift the powdered sugar once. Whisk the two together and break up any lumps. Pour in half of the egg whites and fold them gently until the mixture is thick and paste like.
  3. In a stand mixer bowl fitted with a whisk attachment, add the other half of egg whites and leave it there.
  4. Start making the simple syrup. In a small saucepan, combine the granulated sugar and water together till they dissolve over a medium heat. Add candy thermometer.
  5. Start to mix the egg whites until they get to a soft peak. If they get there too soon before the sugar is ready then slow the mixer down. The egg whites will need some volume before adding the sugar.
  6. When the syrup hits 240 degrees F / 118 C, remove from heat and carefully pour into the side of the bowl while mixer is running. Make sure the mixture is being poured right where the egg and side of the bowl meet.
  7. Add food coloring to darken the mixture to a medium gray color.
  8. Whip on high until the bowl is cooled and glossy stiff peaks have formed.
  9. Add half of the meringue to the almond mixture and gently fold until combined and smooth. Then Add the rest of the meringue until batter is smooth and ribbons form. Do NOT over fold or mix.
  10. Preheat oven to 300 F / 148 C. Fill piping bag. Might want to secure the parchment paper down with a little of the macaron mixture.
  11. Pipe small rounds with the bag perpendicular to the baking sheet and make sure they’re the same size by counting how long you pipe them out. When you’re done, tap the trays on the table to get rid of the air bubbles.
  12. Add a few toasted black sesames to each of the cookies.
  13. Let the piped macs sit out until a shell is formed. Should be 20-30 minutes (maybe less).
  14. Bake one sheet at a time for 15-18 minutes. Rotate the tray after 7 minutes. Test the macs by wiggling the top of the shell back and forth. If the shell moves from the feet then they need another minute or two. Perfect macs should be a little wiggly but overall firm.
  15. When done, remove parchment paper from the sheet and let cool for 30 minutes on cooling rack. Gently peel the parchment paper off when they are cooled. (Be sure they are fully cooked. The cookie will pull apart when removing from the parchment paper if not.)

Honey Champagne Buttercream Filling

METHOD

  1. In a stand mixer bowl, beat the butter using a whisk attachment for 2 minutes until light and airy.
  2. Slowly add the powdered sugar and whisk until it’s all incorporated. Then add honey and champagne with the mixer on. Keep whisking for another minute until everything is incorporated.
  3. Add more champagne until the right consistency is met for a firm, pipeable filling.

Jocondularity, Jocondularity, Jocondularity. (M*A*S*H Father Mulcahey Omage)

The weather was, and still is, unusually cold the past few weeks here in the Sierra Nevada foothills. A cup of hot chocolate is a welcome, warming treat. A Hot Chocolate Joconde cake ain’t too shabby either.  I made a variation of Amanda Faber’s (The Great American Baking Show champion) Hot Chocolate Cake. First I reduced the recipe by 1/3rd to suit my family’s and tasters (who happen to be the same people) appetites and thinking marshmallow pairs properly with hot chocolate, I substituted mint marshmallow frosting for the mint vanilla butter cream. The first modification was a good choice, although it added a couple of challenges, the second did not work as well as I hoped. The marshmallow frosting did not set firm which resulted in smeared lines between the layers. It looked ok for a few jaconde-servings-close-up
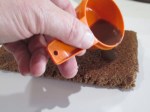
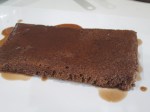
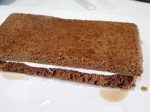
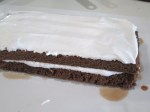
minutes, but the frosting started to flow a short time later. The other issue was tempering a small amount of chocolate. Because the cake was 1/3rd the original size I cut the
chocolate glaze to about 1/3rd as well. That mean starting with 40g of bittersweet chocolate and adding 20 g to temper. Accurately measuring and stabilizing the temperature of small amounts of chocolate and controlling the temperature is a challenge. I think I was lucky as the resultant glaze was well tempered and glossy.

Peppermint Hot Chocolate Cake Amanda Faber – The following is the full recipe as posted by the GABS with comments by me reflecting any modifications.

INGREDIENTS

Chocolate Joconde

  • 171g almond flour
  • 171g confectioners sugar
  • 171g all-purpose flour
  • 45g unsweetened cocoa powder
  • 9 large eggs
  • 3 large egg yolk
  • 6 large egg whites
  • 96g granulated sugar
  • 84g (2tbsp) unsalted butter, melted

Peppermint Buttercream

  • 1/2c water
  • 150g granulated sugar
  • 4 large egg yolks
  • 226g unsalted butter, room temperature
  • 1tsp pure peppermint extract

Chocolate Glaze

  • 80g unsalted butter, room temperature
  • 200g bittersweet chocolate chips, divided

Chocolate Milk Soak

  • 1tsp cocoa powder
  • 1/2c water
  • 115g granulated sugar
  • 1/2tsp pure vanilla extract
  • 1/2tsp pure chocolate extract
  • 1tbsp heavy whipping cream

METHOD

Chocolate Joconde – Remember I only made 1/3rd of this recipe, so only made one pan of sponge

  1. Pre-heat the oven to 400° F/205° C .
  2. In a stand mixer fitted with a paddle attachment, combine the almond flour, confectioners sugar, flour, and cocoa.
  3. Add eggs and egg yolk. Mix on high for 5 minutes. Set aside.
  4. Put a new bowl on the stand mixer and change to a whisk attachment. Whisk the egg whites with the granulated sugar until soft peaks.
  5. Fold half of the egg whites in to the other mixture. Then, stir in the melted butter.
  6. Fold in the rest of the egg whites.
  7. Using a scale with a bowl on top divided batter evenly among 3 sheet pans. Spread with off-set spatula to smooth.
  8. Bake one at a time for ~7 minutes.
  9. When the sponge is removed from the oven, slice around the edges to loosen.
  10. Invert the cake on to a large cutting board covered with a piece of parchment paper. Cool.

Peppermint Buttercream – I didn’t make this frosting. I used the marshmallow below

  1. In a heavy-bottomed sauce pan over high heat, boil the water and sugar until 238° F/114° C.
  2. In a stand mixer fitted with a whisk attachment, beat the egg yolks for one minute.
  3. Once the sugar has reached the proper temperature, stream it in to the stand mixer with eggs while it is running.
  4. Beat until completely cooled, 5-7 minutes.
  5. Beat in the butter little by little until thick and smooth.
  6. Add in the peppermint extract.

Chocolate Glaze – using 60 g of chocolate rather than 200 g was challenging

  1. Over a bain-marie, gently melt the butter and 170g of the chocolate. Stir constantly to keep an even temperature.
  2. Once melted and smooth, stir in the remaining 30g of chocolate.
  3. Cool until room temperature but still liquid. Reheat if necessary.

Chocolate Milk Soak

  1. In a heavy-bottomed saucepan over a medium-high heat, stir the cocoa powder, water, and sugar until the sugar is dissolved.
  2. Stir in the vanilla extract, chocolate extract, and heavy whipping cream.

ASSEMBLY

  1. Assembly the cake on a large cutting board.
  2. Soak the first cake with the chocolate milk soak. Cover with a thin layer of buttercream. Repeat with remain two layers. The top layer of buttercream should be very, very thin. You should see the cake through it in all places. It’s only there to make it smooth.
  3. Pour on the chocolate glaze. Spread it to be smooth. It’s okay if it runs off.
  4. Chill the cake for ~10-15 minutes.
  5. Cut in to 12 equal pieces, probably about 4×1.5 inches.
  6. Garnish each cake bar with a marshmallow and a mint leaf. (I had the mint leaf, but not marshmallows so I skipped this. It was for tasting anyway.)

SUBSTITUTED MINT MARSHMALLOW FROSTING

INGREDIENTS

  • 5 tablespoons cool water, plus more for the double boiler
  • 1/4 teaspoon cream of tartar
  • 1 1/3 cups granulated sugar
  • 2 egg whites, room temperature
  • 1 tablespoon light corn syrup
  • 1 teaspoon vanilla extract
  1. Pour some water, about 2 inches deep, into a saucepan to create a makeshift double boiler. Put the pan on the stove and bring the water to a gentle simmer. Dip the instant-read thermometer into the simmering water to clean any impurities off the end and to test that the thermometer works.
  2. In a clean, large mixing bowl, combine the 5 tablespoons of cool water, cream of tartar, sugar, egg whites and corn syrup. Gently lower the bowl over the simmering water. Turn off the heat under the pot. Use an electric hand beater to whip the whites over the water. Do not leave the egg white mixture unattended or stop beating any time during this process.
  3. After about 3 minutes, remove the bowl from the heat, set the beater down and quickly take the temperature of the egg whites. You want them to reach 140 degrees F. If you measure the temperature before they reach that point, immediately put the bowl of whites back over the water and resume beating until they are finished, an additional 2 to 3 minutes.
  4. Remove the bowl from the water and fold in the vanilla extract. It should look like marshmallow fluffiness. Set the frosting aside to allow the mixture to cool. Frost the cake by, as my father used to say, “glopping” the frosting all over the top and the sides. Serve immediately


Ahh… ahh… Choux

No, I don’t have a cold. It is cold here, below freezing at dawn, but it warming to the high 40’s to mid 50’s in the afternoon. When the sun is out it is beautiful. When its raining… well there is nothing like a 40 deg rain to keep one inside and baking.

Normally, I make my cream puffs with choux, creme pat and chocolate ganache. I thought this time I would make a lighter pastry with sweet chocolate and vanilla whipped cream filling, and with deference to the season, decided to stack them like a snowman. (Full disclosure: I saw them on the final of The Great American Baking Show and thought they looked amazing and I never have a problem with the baked choux sticking to the parchment paper like Amanda Faber did. Hmmm.)template

I drew a template of circles 1.75″ and 0.75″ diameter on one side of a piece of parchment
paper. The paper was then placed, pencil side down on a double thick cookie sheet and set aside.

Choux Pastry

INGREDIENTS:

  • ½ c (65 grams) AP flour
  • ½ tsp granulated white sugar
  • ¼ tsp salt
  • 4 tbsp (55 grams) unsalted butter, cut into pieces
  • ½ c (120 ml) water
  • 2 large eggs, lightly beaten
  • 1 large egg yolk beaten with 1 tbl water to glaze (optional

METHOD

  1. Preheat oven to 400o F (200o C) and place rack in center of oven.
  2. In a bowl whisk the flour with the sugar and salt.
  3. Place the butter and water in a saucepan over medium high heat and bring to a boil.cooling-choux
  4. Remove from heat and, with a wooden spoon, add the flour mixture, all at once, and stir until combined. It will look like mashed potatoes. Return saucepan to the heat and stir constantly until the dough comes away from the sides of the pan and forms a thick smooth ball (about 1-2 minutes). The dough will film the bottom and sides of the saucepan and make cleaning a pain.
  5. Transfer the dough to an electric mixer and beat on low speed to release the steam from the dough (about 1 minute). Once the dough is lukewarm start adding the lightly beaten eggs (dough will piped-chouxseparate and then come together) and continue to mix until you have a smooth thick paste (dough will fall from a spoon in a thick ribbon).
  6. Place the dough in a pastry bag fitted with a large plain tip and pipe disks, alternating sizes onto the parchment lined baking
    sheet. (Hold the bag at a 90-degree angle and pipe disks.) Alternate sizes so you don’t end up with all large or small disks. If baked-chouxdesired, with a pastry brush, gently brush the tops of the dough with the lightly beaten egg.
  7. Bake for 15 minutes and then reduce the oven temperature to 350o F (180o C).
  8. Remove from oven, pierce an end of each éclair with a small skewer to release the holes-in-chouxinterior steam.

Chocolate Whipped Cream

INGREDIENTS

  • 2 cups heavy cream
  • 1/4 cup cocoa powder
  • 1/2 cup powdered sugar

METHOD

  1. Place a metal mixing bowl and beaters in the freezer for 15 minutes.
  2. Remove the bowl from the freezer. Add the heavy cream, cocoa powder, and powdered sugar, and beat with an electric mixer for 4-5 minutes, or until stiff peaks form / it’s scoop-able with a spoon and holds its shape.
  3. Place leftovers in a container and store in the fridge for up to 3 days.

Sweet Vanilla Whipped Cream

INGREDIENTS

  • 1 cup heavy cream
  • 2 tablespoons confectioners’ sugar
  • 1/2 teaspoon vanilla extract

METHOD

  1. Pour the cream into a well-chilled bowl and add the sugar and vanilla.
  2. Using an electric hand mixer or balloon whisk, beat the cream to the desired consistency.
  3. For soft peaks, the cream will be just thick enough to hold its shape in soft billows.
  4. For stiffly beaten cream, the beaters or whisk wires will leave distinct traces on the cream and stand in firm peaks when the beaters are lifted.

ASSEMBLY

  1. Fill large puffs with chocolate whipped cream and small ones with vanilla.
  2. Pipe a swirl of vanilla whipped cream on top of the large puff
  3. Place small, filled puff on top of large one using the swirl of whipped cream as a binder.
  4. Drizzle with ganache
  5. Top with a berry, if you have any. A dab of whipped cream piped on top would be good also.completed-choux-dessertchoux-showing-filling


Sir Lawrence Olive Bread Sticks

I love olives. I love olives stuffed with pimentos, or not. I love green olives, I love black olives. I am the only one in our house who does love olives, so…. When the spouse is away, the baker can play. Several years ago when Fran was away I would treat myself to a dish of grilled turkey sausage over a bed of black beans and white rice and finished with a monolayer of sliced jalapenos.  Mmmmmm… But I digress, I was talking about olives.

Paul Hollywood made olive bread sticks on a GBBO Masterclass month. You may know, I love olives and you may also have caught the hint with Fran away I can make a variety of foods I prefer not to make. I made olive bread sticks today.

I used Paul’s recipe and technique, and it worked spot on, first time. I cut the recipe in half and ended up with about 18 bread sticks about an olive wide and 12” long. As an experiment, I added and egg wash to 4 and coated the tops of 4 with butter. It was not needed. It didn’t offer much. I wonder how they would be with turkey sausage and jalapenos?

INGREDIENTS

  • 1kg/2lb 2oz strong white bread flour, plus extra for dusting
  • 20g/¾oz salt
  • 20g/¾oz instant yeast
  • 800ml/1½ pints tepid water
  • 4 tbsp olive oil, plus extra for oiling
  • 1 x 1kg/2lb 2oz jar pitted green olives in brine, drained
  • fine semolina, for dusting (optional)

METHODmixing-dough-with-olives

  1. Oil two 2-3 liter/3½-5¼ pints square plastic container. (One for half recipe.)
  2. Put the flour into the bowl of a mixer fitted with a dough hook. Add the salt to one side of the bowl and the yeast to the other. Add three-quarters of the water and begin mixing on a slow speed. As the dough starts to come together, gradually add the remaining water.dough-with-olives-incorporated
  3. Mix for a further 5-8 minutes on a medium speed. The dough should now be wet and stretch easily when pulled. Add the olive oil and mix for a further two minutes. Add the olives and mix until well-distributed.
  4. Put the dough into the oiled containers and leave until they have at least tripled in size – for approximately an hour.mixed-dough-before-rise
  5. Line four baking trays with baking parchment or silicone paper and preheat the oven to 220C/425F/Gas
  6. Dust the work surface heavily with flour – add some semolina too, if you have some. Carefully tip the dough onto the surface. It will be very loose and flowing – but don’t worry. Rather than knocking it back, handle it gently so that you keep as much air in the dough as olive-loaf-risen-1possible.
  7. Dust the top of the dough with flour and then stretch it out gently to a rough rectangle. Starting at one long edge, cut the dough into approximately 36 strips. Stretch each piece out until 20-25cm/8-10in long. Place six strips onto each of the prepared baking trays, spacing them apart.dough-cut-straightened-and-baking
  8. Bake the dough sticks for 10-15 minutes. Cool on wire rack.olive-loaf-completed-1

In His Cap And Called it Macarons

I am sure I once posted making Macarons before, but if I did, I cannot find it. If anyone happens across it, please let me know. I hate to think of it wandering around the ethereal web, homeless, begging for a cup of sugar (confectioners of course.)

I am talking macarons, not macaroons. These are the almond flour confection with the “feet” not the shredded coconut cookie type. I made macarons-2
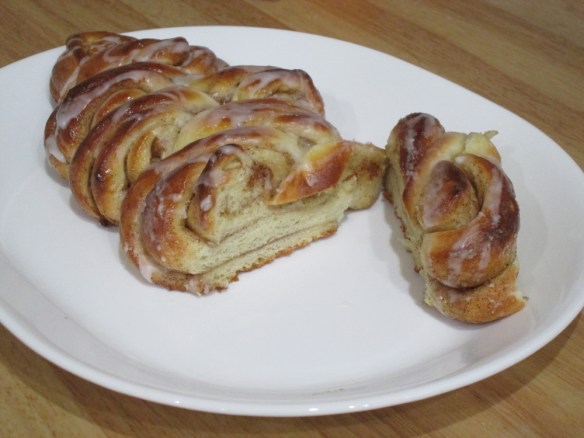
these with two different fillings, buttercream for Amy and blackberry jam because I had some extra blackberries in the fridge and I like blackberries. Plus, we thought they would travel better than other pastries.

I use a modified version of the Food Network’s macaron recipe and technique.

INGREDIENTS

  • 1¾ cups confectioners’ sugar
  • 1 cup almond flour
  • 3 large egg whites, at room temperature
  • ¼ teaspoon cream of tartar
  • Pinch of salt
  • ¼ cup caster sugar
  • 2 to 3 drops gel food coloring (see below)
  • ½ teaspoon vanilla, almond or mint extract

METHOD

Cookie

  1. Preheat the oven to 300 degrees F using the convection setting. Line a large double-thick baking sheet with parchment paper that you drew 1¾” circles about ¾” apart and flipped clean side up. Measure the confectioners’ sugar and almond flour by spooning them into measuring cups and leveling with a knife. Transfer to a bowl; whisk to combine.
  2. Sift the sugar-almond flour mixture, a little at a time, through a fine-mesh sieve into a large bowl, pressing with a rubber spatula to pass through as much as possible. It will take a while, and up to 2 tablespoons of coarse almond flour may be left; just toss it. Sift a second time.
  3. Beat the egg whites, cream of tartar and salt with a mixer on medium speed until frothy. Increase the speed to medium high; gradually add the superfine sugar and beat until stiff and shiny, about 5 more minutes.
  4. Transfer the beaten egg whites to the bowl with the almond flour mixture. Draw a rubber spatula halfway through the mixture and fold using a figure 8 pattern until incorporated, giving the bowl a quarter turn with each fold. Be sure the spatula goes all the way to the bottom in incorporate all the dry mixture.
  5. Add any food coloring and/or extract. Continue folding and turning, scraping down the bowl, until the batter is smooth and falls off the spatula in a thin flat ribbon, 2 to 3 minutes.
  6. Transfer the batter to a pastry bag fitted with a ¼ -inch round tip. Holding the bag vertically and close to the baking sheet, pipe 1¾ -inch circles (24 per sheet). Firmly tap the baking sheets twice against the counter to release any air bubbles.
  7. Let the cookies sit at room temperature until the tops are no longer sticky to the touch, 15 minutes to 1 hour, depending on the humidity. Slip another baking sheet under the first batch (a double baking sheet protects the cookies from the heat).
  8. Bake until the cookies are shiny and rise 1/8 inch to form a “foot,” about 20 minutes. Bake time is everything, too long and they will discolor, too short and they will be soft inside.
  9. Transfer to a rack to cool completely.
  10. Peel the cookies off the mats and sandwich with a thin layer of filling.

Berry Filling

  1. Puree berries in a food processor
  2. Sieve puree to remove seeds and solids
  3. Equal amounts (weight) of sieved berry puree and granulated sugar.
  4. Boil in a small saucepan until mixture reaches 225 F, stirring frequently to keep from burning.
  5. Cool jam until it is thick enough to pipe, or spread but not flow.

Won’t You Play with My… Kanellängd… a Ling

As you may know, had you read my previous blogs, I am a big fan of GBBO. A couple of weeks ago, Paul directed the contestants to make a Kanellängd as part of the Technical Challenge. It looked so good (when he demonstrated the technique) I had to try. The contestants did not have the advantage of seeing Paul make this which resulted in varying degrees of success, so I had a big step up. Theirs did not look all that appealing, mine was outstanding, in both looks and taste. (kanellangd-1Luckily, I have long arms and can pat myself on the back easily and often.) Sadly, I only made a half a Kanellängd, not sure of the final result. More sadly, a half loaf of Kanellängd is only enough for QC, snack and breakfast. Next time a full Kanellängd loaf, to have enough to share.

Kanellängd? Think cinnamon bun but not as sticky and made in a loaf. Kanellängd is akin to the Kanelbullen but is a plaited loaf and may be cut with a bread knife or simply torn at the thin spine of the plait, while  Kanelbullen is the individual cinnamon bun. The house smelled like cinnamon all afternoon, which isn’t a bad thing.  Try this, you won’t be sorry.img_0021

INGREDIENTS

  • For the dough
    • 38g/1½ oz unsalted butter, melted
    • 125ml/4½ fl oz full-fat milk, warmed
    • 225g/ ½ lb strong plain bread flour, plus extra for dusting
    • ½ tsp ground cardamom
    • 5g salt
    • 5g packet instant yeast
    • 20g/ ¾ oz caster sugar
    • 12g (¼) free-range egg, beaten (approximately ¾ tbsp)
  • For the filling
    • 5g/1½ oz unsalted butter, softened
    • ½ tsp vanilla paste
    • ½ tbsp ground cinnamon
    • 38g/1½ oz caster sugar
    • 12g (¼) free-range egg, beaten (approximately ¾ tbsp), for brushing
  • For the sugar syrup
    • 50g/1¾oz caster sugar
  • For the icing
    • 150g/5½ oz icing sugar
    • ½ satsuma, finely grated zest only

METHOD

  1. Melt the butter and gently warm the milk in a saucepan.
  2. Tip the flour and cardamom into a large mixing bowl and add the salt to one side of the bowl and the yeast to the other. Add the butter, milk, sugar and egg and turn the mixture round with your fingers. Continue to mix until you have picked up all the flour from the sides of the bowl. Use the mixture to clean the inside of the bowl and keep going until you have a soft dough.
  3. Tip the dough onto a lightly floured surface and begin to knead. Keep kneading for 10–12 minutes. Work through the initial wet stage until the dough starts to form a soft, smooth skin. When your dough feels smooth and silky, put it into a lightly oiled bowl. Cover and leave to rise for 30–40 minutes, until doubled in size.
  4. While the dough is rising, make the filling. Cream the butter and vanilla paste together in a bowl until soft and spreadable. In a separate bowl mix the cinnamon and sugar together.
  5. Line a baking sheet with baking paper. Turn the dough onto a lightly floured surface and knock it back. Roll out the dough into a rectangle, about 25x35cm/10x14in. Turn the dough 90 degrees if necessary, so you have a long edge facing you. Tack the back edge to the work surface, pushing down with your fingers, sticking the dough to the work surface.
  6. Spread the butter mixture evenly over the dough and sprinkle with the cinnamon sugar. Roll up the dough tightly like a Swiss roll, using the tacked edge to create tension. Place on the prepared tray.img_0011
  7. Using a clean pair of sharp scissors, cut the roll into 7 slices (approximately 2cm/¾in each) almost all the way through. (It’s important to cut almost all the way though, otherwise it is difficult to lay alternate slices opposite each other and on their sides.) Pull each slice out to alternate sides and press down gently with your hands. Put the tray inside a clean plastic bag and leave to prove for 20–25 minutes, or until the dough springs back if you prod it lightly with your finger. Do not over prove.kanellangd-10-min-bake
  8. Preheat the oven to 220C/425F. Brush the loaf with beaten egg and bake for 20–25 minutes until risen and golden-brown. Cover with aluminum foil after 10 minutes if it’s browning too quickly.
  9. For the sugar syrup, tip the sugar and 50ml/ 1¾ fl oz water into a small pan and bring to the boil stirring until the sugar has melted. Boil until reduced by kanellangd-10-min-bake-tentedhalf.
  10. For the icing, mix the icing sugar with enough water to make a thin icing, then stir in the satsuma zest. (I forgot the zest. No problem, it didn’t need it.)
  11. Place the loaf on a wire rack to cool. Brush with the sugar syrup then drizzle over the icing. Leave to cool completely.kanellangd-with-syrup-coat

kanellangd-cut-dough


Do You Know the Way to Canelé?

do-you-know-the-way-to-san-jose-sheet-musicA canelé is a small French pastry flavored with rum and vanilla with a soft and tender custard center and a dark, thick caramelized crust. It takes the shape of small, striated cylinder up to five centimeters in height with a depression at the top. Originally a specialty of the Bordeaux region of France, today it is widely available in pâtisseries in France and abroad.

I had my first canelé in Seattle while visiting Neil and Maureen this past December. It was delicious and I knew I would make them soon. I started researching recipes and equipment when I returned home. Traditional canelé molds are copper to facilitate heat transfer and provide an even caramelized crust. At about $24 each, I decided to opt for the modern silicone mold version ($15 for a sheet of 8 molds.) Supposedly, the crust is more difficult to caramelize and more likely to be uneven.

Adapted from ChezPim, basically her recipe and technique with some of my words and comments.

Ingredients

  • 500g (2c) whole milk
  • 50g (3½ tblsp) butter
  • 1 vanilla bean or 3-4 tsp. vanilla extract
  • 100g (¾c +1 tblsp) AP flour
  • 250g (2c) un-sifted powdered sugar
  • 1 tsp sea salt
  • 2 large fresh eggs
  • 2 large egg yolks
  • ¼c rum (optional)
  • 20g (¾oz) beeswax cut into small chunks (using a hot knife will make your life easier)
  • 20g (¾oz or 1½ tablespoons) butter, cut into small chunks

Method

  1. Make the batter – 2 days before you plan to bake the canelés.
    1. Place the milk, butter, and vanilla bean (cut in half and scrape the seeds into the
      canale-liquid-ingredients

      Liquid Ingredients

      pot) over medium heat and bring to a boil. If you want to be precise it should be 183F. Remove from heat and let cool down while you get to the other ingredients. Measure and then sift together the flour, powder sugar and salt.

    2. Use your fingers, or a spatula and press the eggs and yolks through a strainer into the dry ingredients to mix them without incorporating air.
    3. When the milk/butter/vanilla mixture is just a bit warm but not so hot ~120F or so, remove the vanilla bean halves. Don’t throw them away
      Dry Ingredients

      Dry Ingredients

      though, instead put them in another bowl of about the same size. Pour the warm milk mixture into the bowl containing the dry ingredients, and gently stir together until well-blended. You’ll see plenty of lumps in the batter, but that’s fine for now. I use a wooden spoon to mash the large lumps against the side of the bowl to break them up.

    4. Strain the lumpy batter (through a fine-mesh strainer) into the bowl you put the vanilla bean in earlier, pressing the lumps through until you get a
      Batter

      Final Batter

      totally lump-free batter. Add the rum and stir until combined. Cover the bowl with plastic wrap (no need to press the plastic right over the surface of the batter) and place in the fridge to rest for 48 hours. Stir once after 24 hours and put it back in the fridge to continue to rest the second 24 hours.

  2. Coat the silicone molds:
    1. Place the molds in the hot oven for a few minutes to warm.
    2. Melt equal amounts of beeswax + butter in a small pan set in nearly boiling water.

      melted-wax-and-butter

      Melted Wax and Butter Mixture

    3. Stir occasionally until melted. Keep mixture warm as it will set up quickly,
  3. With a pastry brush, (don’t use a good one, it will be ruined. I bought a silicone bristle brush from which the wax can be cleaned,) paint the hot beeswax + butter mixture on the warm mold. Brush mostly on the side of the molds, the wax will drip a little down to the bottom on its own. If you brush all the way to the bottom you’ll end up with a thick pool of wax on the bottom of the mold. Brush a thin coating such that you can see the mold through it.
  4. After coated, freeze the molds for ~10 minutes, you want
    Coated Silicone Mold

    Coated Silicone Mold

    them to be very cold when they go into the oven. Keep the batter cold too, this will keep the moist, custardy interior.

  5. When you’re ready to bake, fill each cavity almost to the top. Place the mold on the middle rack of your preheated oven.
  6. Bake them for 15 minutes at 450F (preheated at 475F) then lower the temperature after you put the molds in the oven) then an additional 40 minutes at 375F, turning the molds every 15 minutes to ensure even baking.
  7. The canelé batter will expand over the molds, but only
    Baking Caneles

    Baking Caneles

    slightly. If you see the massive poufs (Pim’s word, but a good one), especially around the first 10-20 minutes take the whole baking sheet out of the oven and put it outside for a few minutes, the poufs should calm down and settle back into the molds. When the batter settles back into the molds, put them back in the oven to continue baking. (Make sure you pause the timer when the molds are outside the oven and restart it when you put it back so you could keep track of the actual baking time.)

    caneles

    Baked Caneles