Yodel Lay Hee Hoo

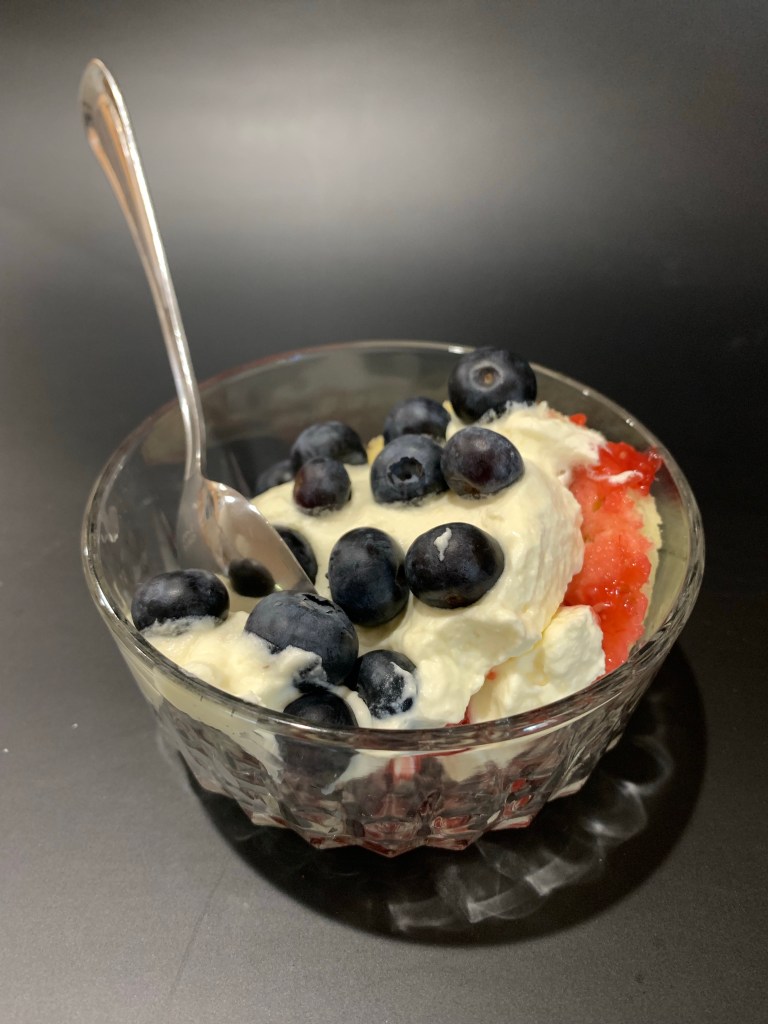
Have you ever see contestants on GBBO struggle making a Swiss roll? For those unfortunate few readers unfamiliar with this cake, it is a thin sheet cake rolled tight, usually with some filling inside.

Follow this method and you too could be a contender!.

Swiss Roll

INGREDIENTS
• 4 large eggs, separated and at room temperature
• ¼ (32g) cup confectioners sugar, sifted, plus extra for dusting
• 1 tsp vanilla extract
• Dash of salt
• 2 (25g) Tbl granulated sugar
• ¾ (96g) cup cake flour
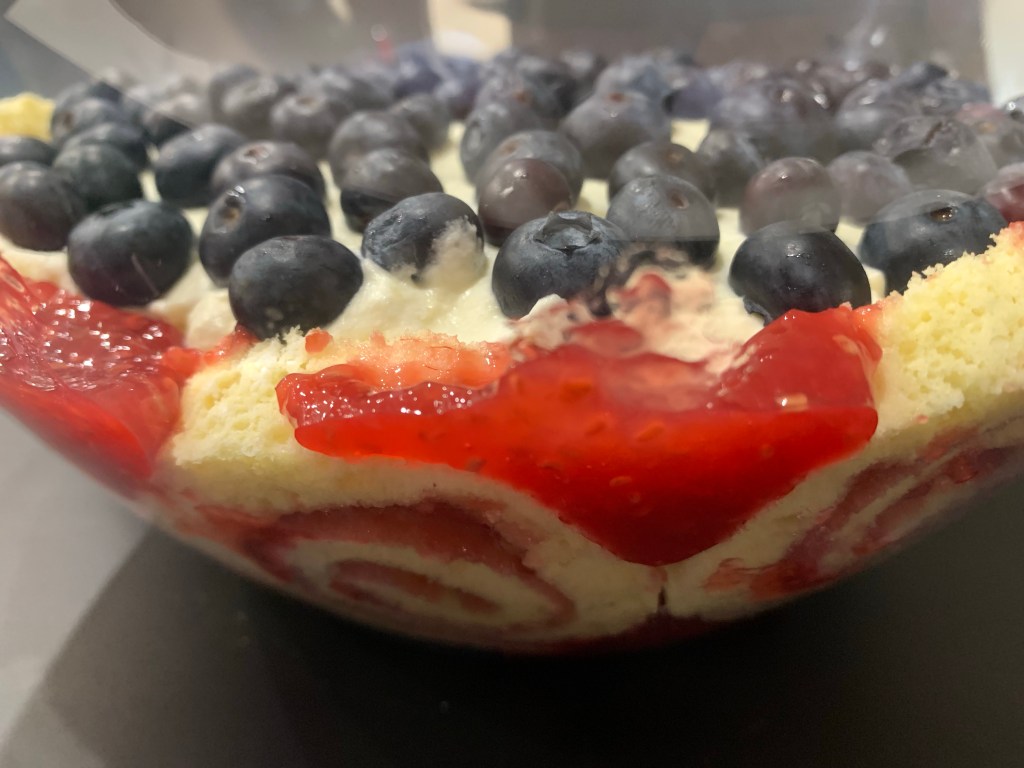
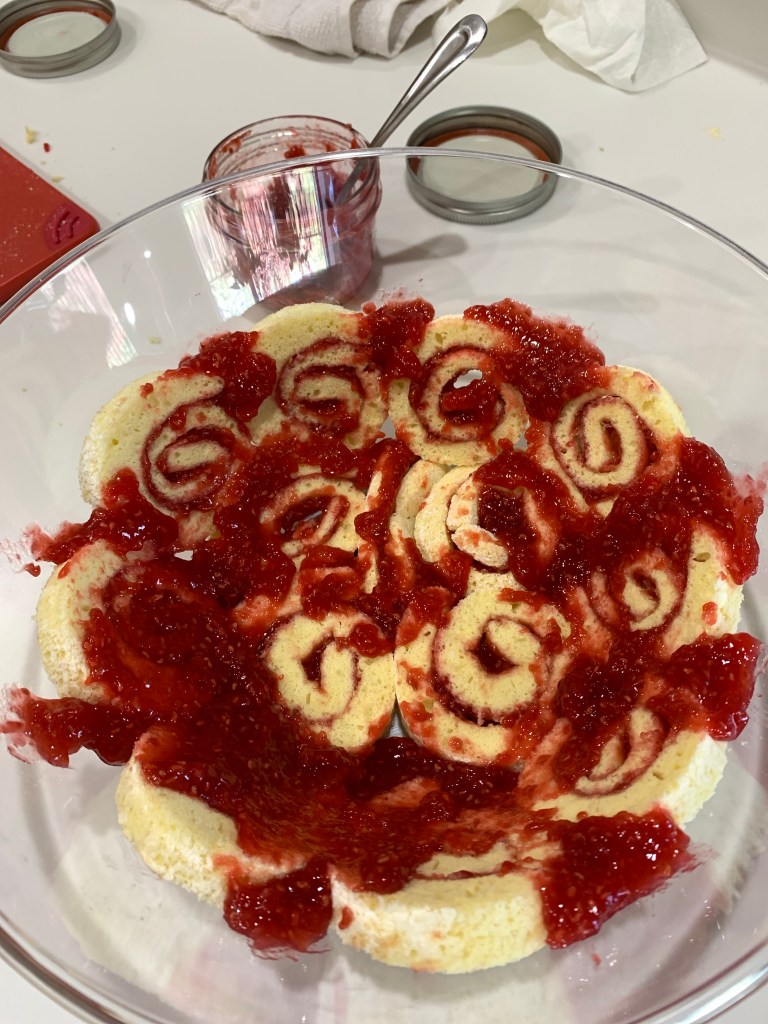
• ½ c raspberry jam

METHOD

  1. Preheat the oven to 350 F. Line the bottom of a 15-x-10-inch jelly roll pan with parchment paper. Leave the sides unlined and undressed.
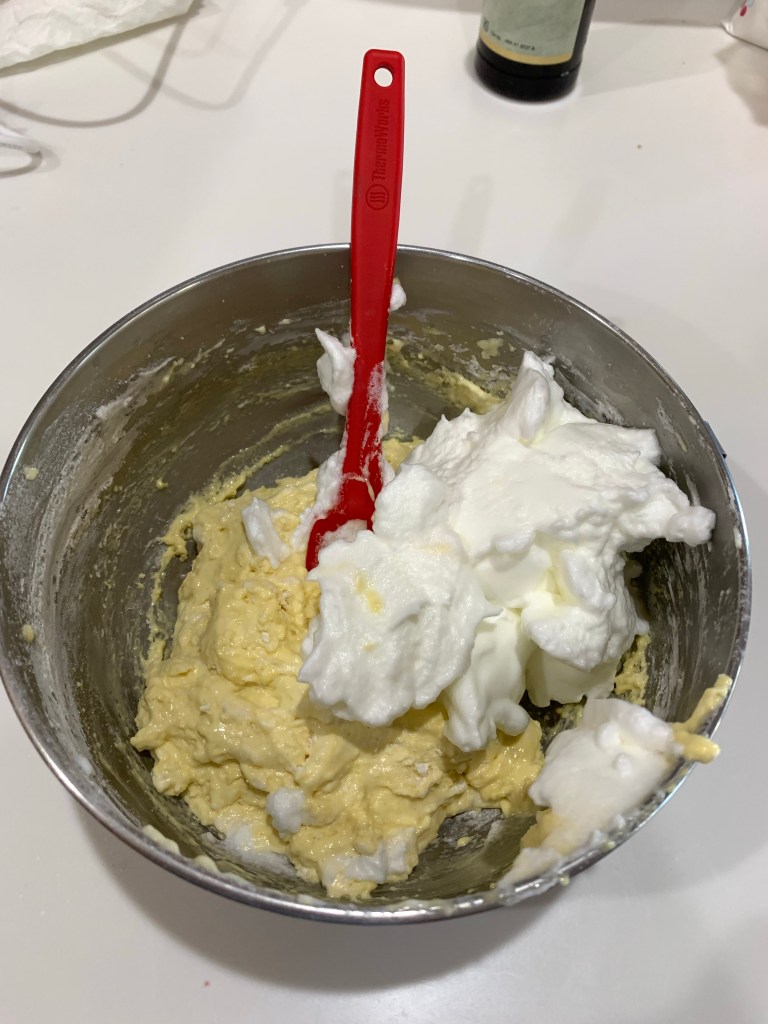
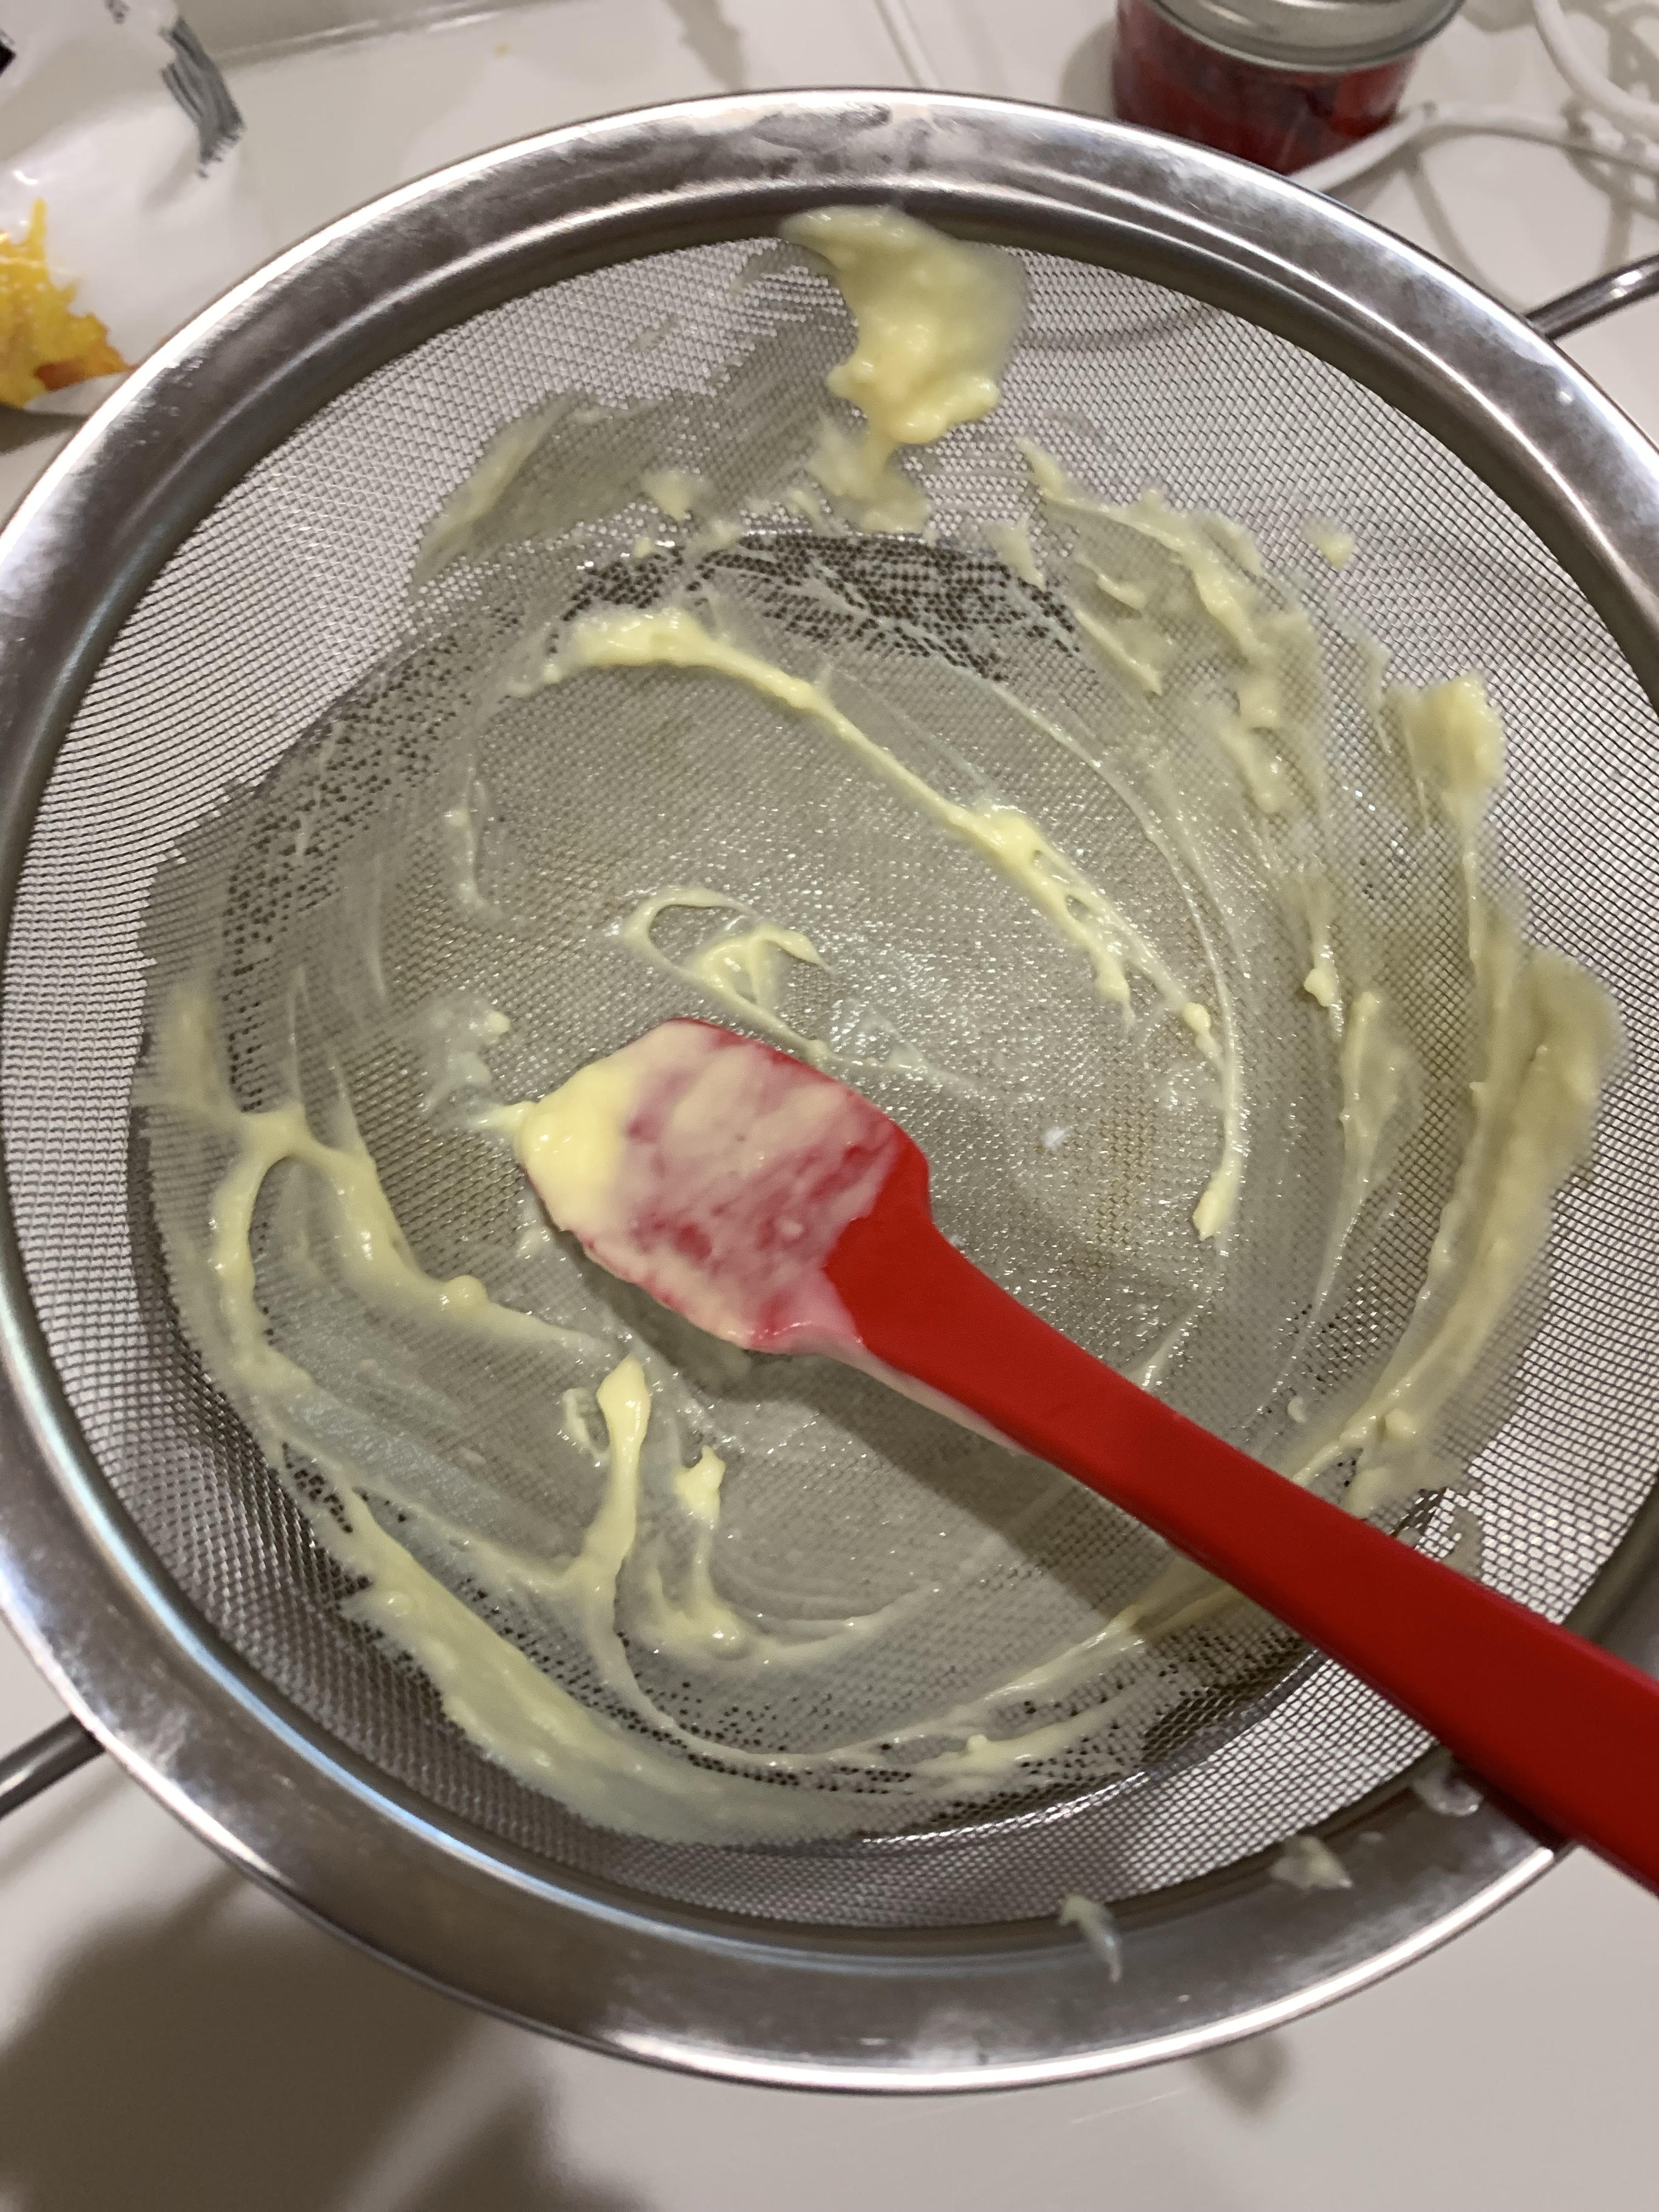
  2. Place the egg yolks and confectioners sugar in a large bowl and whip until the yolks have doubled in volume and hold a ribbon. This takes about 4 minutes. Whip in the vanilla.
  3. In the bowl of a stand mixer, whip the egg whites with the salt first on low speed until foamy, then increase the speed to high and pour in the granulated sugar, whipping until the whites hold a medium peak.
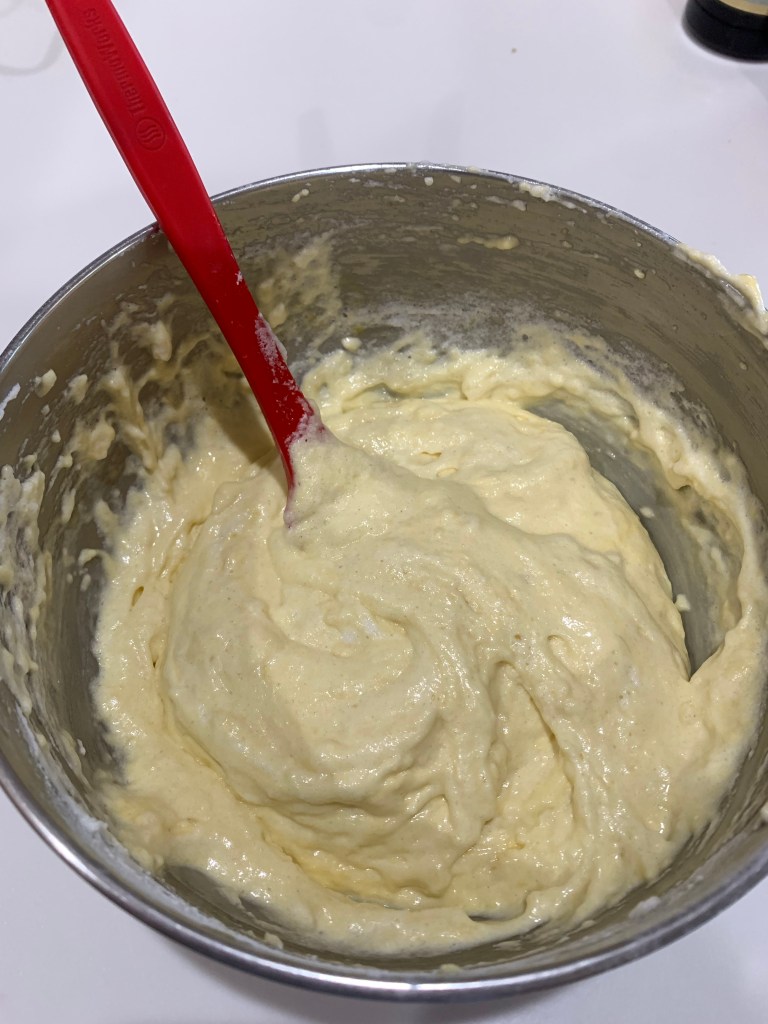
  4. Sift half of the flour into the yolk mixture and fold in without deflating the eggs, then fold in half of the whipped egg whites. Repeat with the remaining flour, and fold in the balance of the whites until evenly incorporated. Spread the batter into the prepared pan, taking the time to ensure the batter is level.
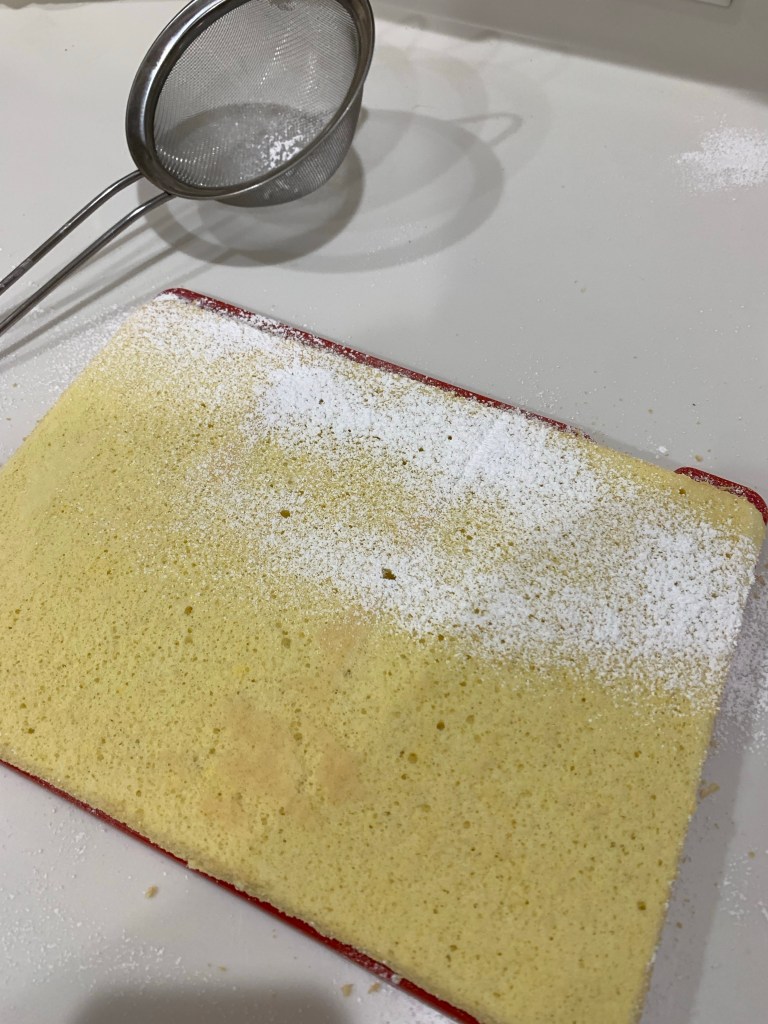
  5. Bake the cake for about 12 minutes, until the cake springs back when gently pressed in the center. It will only lightly brown. Do NOT over-bake. Cool the cake for about 2 minutes on a cooling rack, then loosen the sides with a spatula. I found using the spatula and pushing straight down on the edges worked very well.
  6. Sift a layer of confectioners sugar over the surface of the cake and cover with a clean towel. Place a second pan of about the same size as the jelly roll pan over the towel and flip the cake, removing the pan it was baked in. Peel off the parchment paper and dust this surface with icing sugar. Roll the cake up from the 10-inch side with the towel and let it cool completely (cooling it rolled sets its “memory” so the cake won’t crack once filled and re-rolled.)
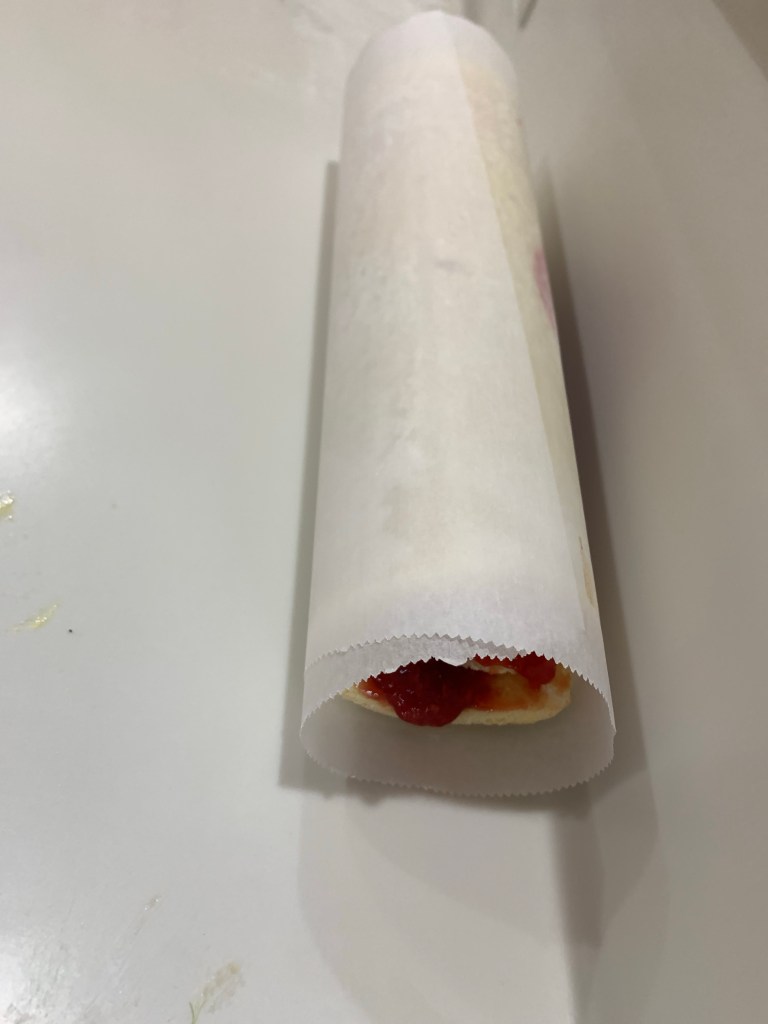
  7. Stir the raspberry jam to soften. Unroll the cake and spread an even layer of jam over the cake. Don’t use too much jam. The ½ cup should be plenty. Leave and inch on the last part of the cake uncoated with jam. The jam will squeeze along as you roll and will eventually coat the last edge. Roll the cake back up again, if desired, dust the top with confectioners sugar. Cover and store at room temperature until ready to serve.
  8. The cake can be prepared up to a day in advance and stored, wrapped and unrefrigerated.

It’s Independence Day This Time

I need an Independence Day themed dessert for a party this weekend. I started out with a red, white and blue mousse cake. The blue was to be blueberry mousse. As you may know, blueberries are not chucked full of flavor, so having made the blueberry mousse, (it tasted mostly like whipped cream) I looked elsewhere for inspiration.

I don’t know how it came to mind, but a berry trifle with red berries, whipped cream and blueberries sounded perfect for a cool, light summer dessert. As one of the kids at the party is allergic to strawberries I used raspberries as the red. (The fact raspberries are my fav, didn’t enter into the decision.) I wanted something more substantial than simple whipped cream so I decided on Creme Diplomat. This creme is basically cream patisserie and whipped cream. I fortified each with cornstarch to help it retain is structure longer.

Rather than lady fingers or simple cubes of white or vanilla cake I settled on a sliced Swiss roll with raspberry filling. (Prettier). I never made a Swiss roll before, but had lots of advice and examples from watching years of GBBO.

By coincidence, I made raspberry jam last week and had plenty to use for this project. I sliced the cool, filled Swiss roll into 14 pieces. (Note the nice tight swirl pattern. GBBO contestants always struggle with this.) The bottom and sides of the bowl were lined with the slices, then extra jam was forced into any openings between, or on top of the slices.

Creme Diplomat is essentially 1:1 cream patisserie and whipped cream. It resulted in a light, cool and perfect for a summer dessert. QC loved it, said it wasn’t overly sweet but delicious. 😄

I am experimenting with a new backdrop for many of my pictures. I am using the dark background in this post. Let me know what you think.

Crème Diplomat

INGREDIENTS

• ½ c sugar
• ¼ c corn starch
• Pinch salt
• 2 c whole milk
• 4 egg yolks
• 2 Tbl butter
• 2 cups heavy cream, cold
• 2 Tbl granulated sugar

METHOD

  1. Whisk eggs and milk together and add to all other ingredients (except vanilla) to a medium saucepan.
  2. Bring to boil whisking constantly
  3. Cook until thickened (it’s ok if it looks lumpy)
  4. Sieve lumpy mixture into a bowl and add 1 tsp vanilla, mix thoroughly
  5. When incorporated, cover with plastic directly on the cream and cool about an hour.
  6. Whip the cold heavy cream and granulated sugar to medium peaks.
  7. Fold a few spoonfuls of the custard into the cream. Gradually fold the rest of the custard in 2 or 3 additions, being careful to not knock the air out.

Mousse, No Squirrel

Don’t ask me why I was obsessed with making a Neapolitan Mousse Cake, but I was, and it’s now complete. Today was the third and fourth (and final) adjustments to the recipe(s).

To make the three layers approximately the same thickness I increased the amount of white and strawberry mousse. I also adjusted the amount of agar agar to create the consistency I wanted.

Neapolitan Mousse

INGREDIENTS

WHIPPED CREAM (for Chocolate Mousse)– YIELDS 1 ½ CUPS OF WHIPPED CREAM
• 1 cup Heavy whipping cream
• 4 tablespoons Powdered Sugar or Confectioners sugar
• 1 ½ teaspoons Cream of tartar
• 1 tsp vanilla bean paste
WHIPPED CREAM (for Vanilla and Strawberry Mousse)– YIELDS 2 CUPS OF WHIPPED CREAM
• 1 ½ cup Heavy whipping cream
• 6 tablespoons Powdered Sugar
• 2 teaspoons Cream of tartar
• 1 ½ tsp vanilla bean paste
WHITE CHOCOLATE
• 2 cup White chocolate chips
• ½ cup heavy whipping cream
DARK CHOCOLATE
• 1 cup dark chocolate chips
• ½ cup Heavy whipping cream
STRAWBERRY PURÉE
• 1 ½ cup fresh strawberries
• 1/3 + 2 Tbl cup granulated sugar
• 1 ½ tsp strawberry extract
• Red food coloring to suit (1-2 drops)
AGAR AGAR
• 2 Tsp Agar Agar
• 2 Tbl warm water
CHOCOLATE GANACHE
• 1 cup chocolate
• ¾ cup heavy cream
GRAHAM CRAKER CRUST
• 2 cups finely crushed regular graham crackers
• 1/3 cup butter, melted
• ½ beaten egg white
• 3 tablespoons sugar

METHOD

GRAHAM CRACKER CRUST

  1. Heat oven to 350°F. In a food processor pulse the crushed graham crackers several times, then add the rest of the ingredients until well mixed. Press remaining mixture firmly and evenly against bottom of an 8” removable bottom cake pan.
  2. Bake at 350 F for 10 min. Set aside to cool.
  3. When cool, line the inside edges of the cake pan with acetate

WHIPPED CREAM – (3 batches required)

  1. Before beginning with the recipe, place the mixing bowl and whisk in the freezer for at least 10 minutes to chill.
  2. Once the bowl has chilled, add heavy cream and vanilla and beat on low speed until the cream starts to thicken slightly. There will be fewer and larger bubbles.
  3. Add the cream of tartar and powdered sugar and beat with increasingly higher speed until stiff peaks form. Once done, set it in the fridge to chill.

PREPARING THE CHOCOLATE MOUSSE

  1. Heat heavy cream to steam, not boil. I use the microwave in 30 second bursts
  2. Place 1 cup chopped chocolate in a heat proof bowl.
  3. Pour heated cream over chocolate, cover and let sit 30 seconds
  4. Beat until the cream is completely incorporated and the chocolate is smooth and creamy
  5. Let come to room temperature
  6. Gently fold the room temperature chocolate into the cold whipped cream
  7. Spread the chocolate mousse evenly on top of the graham cracker crust
  8. Refrigerate

PREPARING THE STRAWBERRY PURÉE

  1. Combine strawberries and sugar in a saucepan and bring to a boil. Lower the heat and simmer for 10 minutes until the syrup thickens.
  2. Keep stirring occasionally. When the strawberries are soft and the syrup has thickened, remove from heat and allow to cool.
  3. When completely cooled, coarsely puree it with an immersion blender. Add strawberry extract and set it aside. Measure the syrup – you will require ½ cup of thick syrup

AGAR AGAR MIX

  1. Mix 3 teaspoons Agar agar powder with 4 Tbl lukewarm water
  2. Whisk to combine
  3. Let rest 4 – 5 minutes for the agar agar to bloom

PREPARING STRAWBERRY AND VANILLA MOUSSE

  1. Heat a pan 1/2 filled with water over low heat and place the white chocolate bowl over the water when it simmers. Keep stirring the chocolate as it softens and melts.
  2. Add agar agar mix and stir constantly for 5 minutes
  3. Add ½ cup warm milk and mix until the chocolate is thick but runny.

FOR VANILLA MOUSSE

  1. If desired add a few drops of white food coloring to lighten the yellowish mixture and mix well
  2. Gently fold the cool to touch white chocolate [and agar] mixture into the cool whipped cream until combined. Do not beat and deflate the mousse.

FOR STRAWBERRY MOUSSE

  1. Add half the cooled whipped cream to the cool white chocolate mixture
  2. Add the strawberry syrup that was prepared earlier to the whipped cream/white chocolate mixture
  3. Mix gently to not deflate.
  4. Add the rest of the whipped cream to the strawberry-white chocolate.
  5. [OPTIONAL – add two drops of red food coloring. Without the coloring the strawberry mousse is not strongly differentiated from the vanilla mousse.]

TO MAKE CHOCOLATE GANACHE

  1. Warm cream in the microwave just until a simmer and not boiling hot.
  2. Pour it over the chocolate and let it rest, undisturbed, for 30 seconds.
  3. Now start stirring gently until it forms a smooth chocolate ganache.
  4. Let the ganache cool slightly, but it should still be pourable.

DECORATING THE MOUSSE CAKE WITH GANACHE

  1. Pour the chocolate around the edge of the mousse cake letting some run down the side, but not so much as to drip all the way to the bottom.
  2. Cover the rest of the cake with chocolate and top with sliced strawberries.

DECORATING THE MOUSSE CAKE WITH A CHOCOLATE COLLAR

  1. Cut a piece of parchment paper the circumference and height (or a little more) of the mousse cake.
  2. Place it on a larger piece of parchment paper to help later clean-up.
  3. Temper a cup of chocolate, fill a piping bag and let cool slightly. This was an experiment for me. It needs to be cool enough to not run when piped, but warm enough to pipe easily
  4. Cut a small hole in the end of the piping bag and with an erratic swirling pattern make a lace pattern over the smaller piece of parchment paper, being sure to cover all the way to the edges.
  5. Let the chocolate collar dry such that it won’t drip when picked up.
  6. Carefully wrap the mousse cake with the still slightly soft collar and press gently.
  7. Let the collar cool for a few minutes then carefully peal the parchment paper base from the collar, leaving the chocolate collar adhered to the mousse cake.

In a Galaxy Far Far Away…

Grace’s sixth birthday is a space themed extravaganza so I made a galaxy cake. It’s more of a solar system cake, but not our solar system.

The cake is a six layer stacked extreme chocolate cake. A cardboard cake board separates each two layers to make cutting and serving easier. Each layer is a 9” round cake, and the “internal” cake board is 8” to allow a smooth buttercream transition between layers. The small white stars are tempered white chocolate made with a silicon mold. The larger stars, around the base, are various colors of white chocolate, again formed using a silicon mold.

The planets are white chocolate made with a variety of hemispherical silicon molds and painted with decorating colors mixed with vodka. Some of them were fused together to make spheres, the ones on the side of the cake were left as hemispheres. Slightly melting the edges of the hemisphere or the bottom of the spheres helped them adhere to the blue buttercream.

Before adding the planets I splattered the cake with white food coloring. The “space woman” was purchased and a printable decal image of Grace was pasted on the silver faceplate of the space suit.

Graduation 2022

My younger granddaughter graduated pre-school today and I made a cake for her celebration party. The cake was relatively simple, extreme chocolate cake for the cap and marble cake for the base. The mortarboard was a 1/4” thick piece of tempered dark chocolate.

The time consuming part of this cake was making all the little decorations. The tassels were made by cutting a 1/8” rectangle of fondant 2.5” wide and slicing it into 1 1/2” x 1/4” strips, leaving the top 1” intact. Cut each three strip piece apart leaving the 1” header. Paint one side of the header with water and roll up. Twist each of the strips to form the tassel. Let dry. Paint the gold tassels and leave some white. Make another set using the black fondant.

Roll another sheet (or a portion of the above) and cut with a circulate cutter. (I used a large piping tip,) Again, paint the gold ones, leave some white ones and cut out the black.

The mortarboard was made by pouring tempered dark chocolate onto a parchment lined cutting board. Before it was completely set and hard use a straight edge to cut it into a 8”x8” square.

Extreme Chocolate Cake

Makes two 9” round cakes
INGREDIENTS

(Makes one 10’ ROUND CAKE [and two 5”] – quantities are in parenthesis. Or one 11”x15”x2” sheet cake.)
• 2 cups white sugar (3)
• 1 3/4 cups all-purpose flour (2 2/3)
• 3/4 cup unsweetened cocoa powder (1 ¼)
• 1 1/2 teaspoons baking soda (2 ¼)
• 1 1/2 teaspoons baking powder (2 ¼)
• 1 teaspoon salt (1 ½)
• 2 eggs (3)
• 1 cup milk (1 ½)
• 1/2 cup vegetable oil (¾)
• 2 teaspoons vanilla extract (3)
• 1 cup boiling water (1 ½)

METHOD

  1. Preheat oven to 350 degrees F (175 degrees C). Grease and flour two 9 inch cake pans. (SEE QTY FOR 10” CAKES)
  2. Use the first set of ingredients to make the cake. In a medium bowl, stir together the sugar, flour, cocoa,baking soda, baking powder and salt. Add the eggs, milk, oil and vanilla, mix for 3 minutes with an electric mixer. Stir in the boiling water by hand. Pour evenly into the two prepared pans. (For cupcakes,portion ¼ scant cups in each cupcake paper.
  3. Bake for 30 to 35 minutes in the preheated oven, until a toothpick inserted comes out clean or 205F internal temp. Cool for 10 minutes before removing from pans to cool completely.

Marble Cake

INGREDIENTS
• 454 g cake flour
• 454 g granulated sugar
• 1 tsp salt
• 1 Tablespoon baking powder
• 1 teaspoon baking soda
• 4 large eggs room temperature
• 142 g vegetable oil
• 397 g buttermilk room temperature or slightly warm
• 227 g butter unsalted and softened
• 2 teaspoon vanilla
• 1/2 teaspoon almond extract
• 29 g cocoa powder dutch or natural
• 85 g hot water
• 1 Tablespoon cocoa powder for dusting

METHOD
Cake Batter

  1. Prepare three 8″x2″ cake pans with cake goop or another preferred pan spray. Preheat your oven to 335ºF
  2. Bring your butter, milk, and eggs to room temperature. It’s really important when making a cake for the ingredients to all be slightly warm so they create an emulsion.
  3. Heat the water until it’s simmering and then combine it with your cocoa powder.
  4. Stir it until the cocoa powder is moistened. It will look lumpy, but that is normal.
  5. Set it aside and let it cool while you prepare the cake batter.
  6. In a separate container, combine 3/4 cup of the milk and the oil together and set it aside.
  7. In a separate container, combine the remaining milk, eggs, vanilla, and almond extract together. Whisk it to break up the eggs, and then set it aside.
  8. In the bowl of your stand mixer, combine the flour, sugar, baking powder, baking soda, and salt with the paddle attachment. Mix for 10 seconds to combine everything.
  9. Add your softened butter to the flour mixture and mix on low until the mixture resembles coarse sand (this takes about 30 seconds). This style of mixing is called the reverse creaming method, and it will result in a very velvety, moist cake. A lot of my other cake recipes like brown butter cake and white velvet buttermilk cake use this method.
  10. Add in your milk/oil mixture and mix it on low until the dry ingredients are moistened.
  11. Increase the speed to medium (setting 2 on my Bosch Mixer, setting 4 on a KitchenAid) and let it mix for 2 minutes to develop the cake’s structure. If you don’t let your cake mix on this step, your cake could collapse.
  12. Scrape your bowl and then reduce the speed to low.
  13. Add in your egg mixture in three batches, letting the batter mix for 15 seconds between additions.
  14. Scrape down the sides again to make sure everything has incorporated.
  15. Marbling the Cake Batter
  16. Take out 1/3 of your batter and combine it with the cooled chocolate mixture and fold it gently until it’s combined.
  17. Layer your batter into your pans, starting with vanilla, then chocolate, and ending with vanilla.
  18. Use a butter knife to swirl them together gently. Do not over-mix or your cake will not have a marbled interior.
  19. Bake the cakes for 35-40 minutes at 335ºF (168ºC) or until a toothpick inserted into the center comes out cleanly (but the cake has not begun to shrink yet from the sides of the pan). IMMEDIATELY TAP THE PAN FIRMLY on the countertop once to release the steam from the cake. This stops the cake from shrinking.
  20. Let the cakes cool for 10 minutes inside of the pan before flipping them out. The cake will shrink a bit and that is normal.
  21. Flip the cake onto a cooling rack and let it cool completely. I chill my cakes before handling them, or you can wrap them in plastic wrap and freeze them to trap moisture in the cake.
  22. Thaw the cake on the countertop while it’s still wrapped before frosting.

Marshmallow Fondant

INGREDIENTS
• 1 package (16 ounces) white mini marshmallows
• 2-5 tablespoons water
• 2 pounds sifted confectioners’ sugar
• 1/4 cup solid vegetable shortening
METHOD

  1. Grease your mixing bowl and a glass bowl that can be used to melt marshmallows in the microwave.
  2. Place the marshmallows, water and flavoring of your choice in greased glass bowl and microwave on high at 30 second intervals.
  3. Stir every 30 seconds until marshmallows are completely melted, about 2 minutes.
  4. Sift one half of the 2 pound bag of confectioner’s sugar in a greased mixing bowl. Make a well in the center of the confectioner’s sugar and pour in the melted marshmallows.
  5. I use the paddle attachment for my KitchenAid mixer for this first part of the mixture.
  6. Mix until all the melted marshmallows are incorporated in the confectioner’s sugar.
  7. Add any food coloring at this point.
  8. Mixture will be thick but still runny.
  9. Sift the remaining half bag of confectioner’s sugar into the melted marshmallows.
  10. Mix on low until it comes together.
  11. Change to your dough hook attachment as this will get extremely thick.
  12. Fondant will be very thick and have a dough like consistency
  13. Wrap fondant in saran and make sure no air gets to it.
  14. Rest fondant for at least an hour before use.