In a Galaxy Far Far Away…

Grace’s sixth birthday is a space themed extravaganza so I made a galaxy cake. It’s more of a solar system cake, but not our solar system.

The cake is a six layer stacked extreme chocolate cake. A cardboard cake board separates each two layers to make cutting and serving easier. Each layer is a 9” round cake, and the “internal” cake board is 8” to allow a smooth buttercream transition between layers. The small white stars are tempered white chocolate made with a silicon mold. The larger stars, around the base, are various colors of white chocolate, again formed using a silicon mold.

The planets are white chocolate made with a variety of hemispherical silicon molds and painted with decorating colors mixed with vodka. Some of them were fused together to make spheres, the ones on the side of the cake were left as hemispheres. Slightly melting the edges of the hemisphere or the bottom of the spheres helped them adhere to the blue buttercream.

Before adding the planets I splattered the cake with white food coloring. The “space woman” was purchased and a printable decal image of Grace was pasted on the silver faceplate of the space suit.

I Ain’t Afraid Of No Ghosts

I was shown a picture of a Jack ‘O Lantern cake, found the tutorial and more of less followed it. It is supposed to be one of those plastic buckets used to collect your spoils during Trick or Treat. I am satisfied with my first attempt. The recipe called for chocolate cake, so I used my Extreme Chocolate Cake. I also used my recipe for buttercream frosting and marshmallow fondant.

While a little time consuming, most of the individual elements can be prepared well in advance. I made the cakes almost a week early and frozen them. When thawed they are every bit as good as fresh. Fondant needs to rest overnight and buttercream will stay in the fridge for several days before use.

Mark a 4” circle on the top and the mid-point down the cake. Try your best to carve a half a sphere, evenly around the center of the cake. I put a 4” flat plastic disk to serve as a base. The QC department suggested the top of a round plastic storage container that worked perfectly. Take a deep breath, hold the cake tight and flip it end for end. Repeat the same carving on what will now be the top of the cake, making a perfect sphere, or in my case a slightly distorted, but acceptable, ovoid.

  1. Make the cakes and cool, or if frozen, let warm to room temp.
  2. Mix the buttercream.
  3. Before coloring I set a piping bag full aside to frost some birthday party cupcakes I made.
  4. Frost between the layers, smooth any seepage and refrigerate overnight.
  5. Carve the cool cake and crumb coat, back to the fridge.
  6. Frost the cake and yup, refrigerate again.
  7. Make the marshmallow fondant, break off some of the un-colored fondant and set aside.
  8. Knead in the orange food coloring. Protect your work surface to avoid stains. I like to wear gloves for this.
  9. Knead black food coloring for the face into the white piece set aside.
  10. Find a face you like, or draw your own.
  11. Cut it out, pin it to the cake and cut out holes for the black fondant.
  12. Cut the black fondant to fit the template and fit into the holes on the cake.
  13. Cut a 4” circle on the top about 1/2” deep and line with fondant. (Which ever color you have left over.)
  14. Roll a piece of black fondant out into a long trip. Lay a piece of wire on it and wrap with the fondant, leaving a couple off inches of wire uncoated. Push the clean ends into each side of the top opening.
  15. Place a few pieces of wrapped candy in the shallow hole on the top.
Halloween/Birthday Cupcakes

Straight Down the Middle

As we near the end (of some peoples playing season,) one of my golf buddies invited our foursome and families over for a patio dinner before the weather starts turning cold(er). I offered to bring a cake along to the dinner. This is what I made this morning

It’s my extreme chocolate cake with buttercream frosting.

The trees are gum-paste cones made by wrapping thin gum-paste around a form, then set to dry overnight.

Of course, I rarely hit it straight down the middle!!

Summertime, And The Livin’ is Easy

It’s summertime again. Actually, it is the end of May and summer is still 3 weeks away but if you live in South Florida summer began months ago. I needed a cake for a dinner party this weekend and said to myself, “Self, what springs to mind when you think about summer?” After a moment, I replied, “Well, after a long hot winter I want to fall into a cool, refreshing cake that shrieks summer.” I decided on a Watermelon Cake. It doesn’t taste like watermelon (it is actually a white cake dyed reddy/pink) but sure looks like one. IMG_1421[1]

Bake the cake in a greased and flowered Wilton Egg Pan (because I own one.) Fill the pan to within an inch of the top and be sure to put a cookie sheet under it while baking as it will overflow the pan. My oven is slow so I baked it for an hour at 350 F. Remove from the oven and let cool completely. Trying to remove the cake while warm will destroy it.

After the cake is completely cool, (I know, the cake is very cool, but in this case I mean the temperature) cut the excess cake along the edge of the Egg Pan to make a perfectly flat side then turn it out onto a wire rack. If necessary loosen the edges of the cake from the pan with a flexible spatula.

Frost the cake with a heavy IMG_1422[1]layer of white crusting butter cream frosting (I made a double recipe of the below) and place in the freezer. When the frosting is set, about an hour, coat with another layer of white frosting making it as smooth as possible, returning to the freezer. This makes the thicker white watermelon rind. While the twice white frosted cake is again setting add some green food coloring to the remaining frosting. This green should be the background green of the watermelon, not the dark green lines. Add a little additional milk to reduce the viscosity, or to the non-scientists among us, reduce the “thickness.” After the frosting on the cake is set, smooth a layer of the light, thinner green frosting over the entire cake and return to the freezer. After the now light green cake is set, remove from the freezer and smooth the surface. I like to use a latex gloved hand wetted by holding it under the faucet. A bowl of water would also work but then you have to clean another bowl. You will have to clean and re-wet your hand a few times to smooth the entire cake. Once the light green frosted cake is smooth, guess what? Return it to the freezer to set.
IMG_1427[1]Remove the smooth light green frosted cake from the freezer and paint the dark green stripes. I used Duff green airbrush dye and a 3/8″ brush (because I own them.) If you are the artistic type with a good eye and imagination this is no biggie. If you are the more analytical, fallen chemist type, set your iPad with a picture of a watermelon next to your cake and copy to the best of your limited artistic ability.

BTW, here is a tip I found online: to disperse the chocolate chips and not have them settle to the bottom of the cake batter mix them into the flour mixture being sure the are well coated with flour. This seems to help them “float” in the cake batter as it bakes.

Here is another tip: don’t let the cake with the thick frosting warm up in the car ride to your party. Soften or melted rind signficantly affects the overall impression of the cake.

Recipe: Heavenly White (Watermelon Colored) Cake

Ingredients

  • 2 3/4 cups sifted cake flour
  • 4 teaspoons baking powder
  • 3/4 teaspoon salt
  • 4 egg whites ( or substitute)
  • 1 1/2 cups white sugar
  • 3/4 cup butter
  • 1 cup milk
  • 1 teaspoon vanilla extract
  • 1/2 cup of chocolate chips
  • Red dye

Directions

  1. Measure sifted flour, baking powder, and salt; sift together three times.
  2. Add chocolate chips and mix being sure the chips are well coated with the flour mixture
  3. In a mixing bowl, beat egg whites until foamy. Add 1/2 cup sugar gradually, and continue beating only until meringue will hold up in soft peaks. Add red dye to approximate a watermelon color.
  4. Cream butter or margarine. Gradually add remaining 1 cup sugar, and cream together until light and fluffy. Add sifted ingredients alternately with milk a small amount at a time, beating after each addition until smooth. Add red food dye until the same watermelon pinky/red is achieved. Mix in flavorings. Add colored meringue, and beat thoroughly into batter.  Pour into well greased and floured Egg Pan.
  5. Bake at 350 degrees F (175 degrees C) for about 60 minutes. Check the springiness of the cake after about 45 min. Guess when it is done (when the depression caused by your finger is anti-depressed, or springs back up.) Leave the cake in pans until completely cool, then trim the bumpy puffed up cake above the rim of the Egg Pan and remove and transfer to a wire rack.

Basic Crusting Butter Cream

Ingredients:

  • 1/2 cup solid high ratio shortening
  • 1/2 cup butter softened
  • 1 tablespoon of meringue powder
  • 1 teaspoon Clear Vanilla Extract (or extract of choice)
  • 4 cups sifted confectioners’ sugar (approx. 1 lb.)
  • 2 tablespoons milk
  • Green food color (add after cake is frosted with the white frosting)

In large bowl, cream shortening and butter with electric mixer. Add vanilla and milk. Gradually add sugar, one cup at a time, beating on a slow speed. Scrape sides and bottom of bowl often. Keep bowl or covered with a damp cloth until ready to use. Refrigerated in an airtight container, this icing can be stored 2 weeks. Don’t overwhip or it will bring air to the icing and is impossible to smooth. If you have a kitchen Aid use white attachment, not whip attachment.


Take Me Out to the Ball… Park

For her birthday all Fran wanted was one of my cakes. For the woman who starts counting the days until pitchers and catchers report from the last out of the World Series (114 days) I thought a baseball themed cake would be perfect. I mulled it over for a while, discarding baseballs, gloves and bats before deciding on a baseball park.BB Stadium 3

As I often do, I searched Google images for ideas of a design for a baseball park cake. Not finding any that caught my eye or attention, I designed my own. The first thing I discovered is it is very difficult to make a small cake with any detail. I compromised and used M&M’s for fans and Peanut M&M’s for players. The scoreboard is a Hershey bar (one of Fran’s favs) with a Happy Birthday message piped with royal icing. You can tell I did that, the piping is mediocre and the penmanship is atrocious. The BB Stadium 4
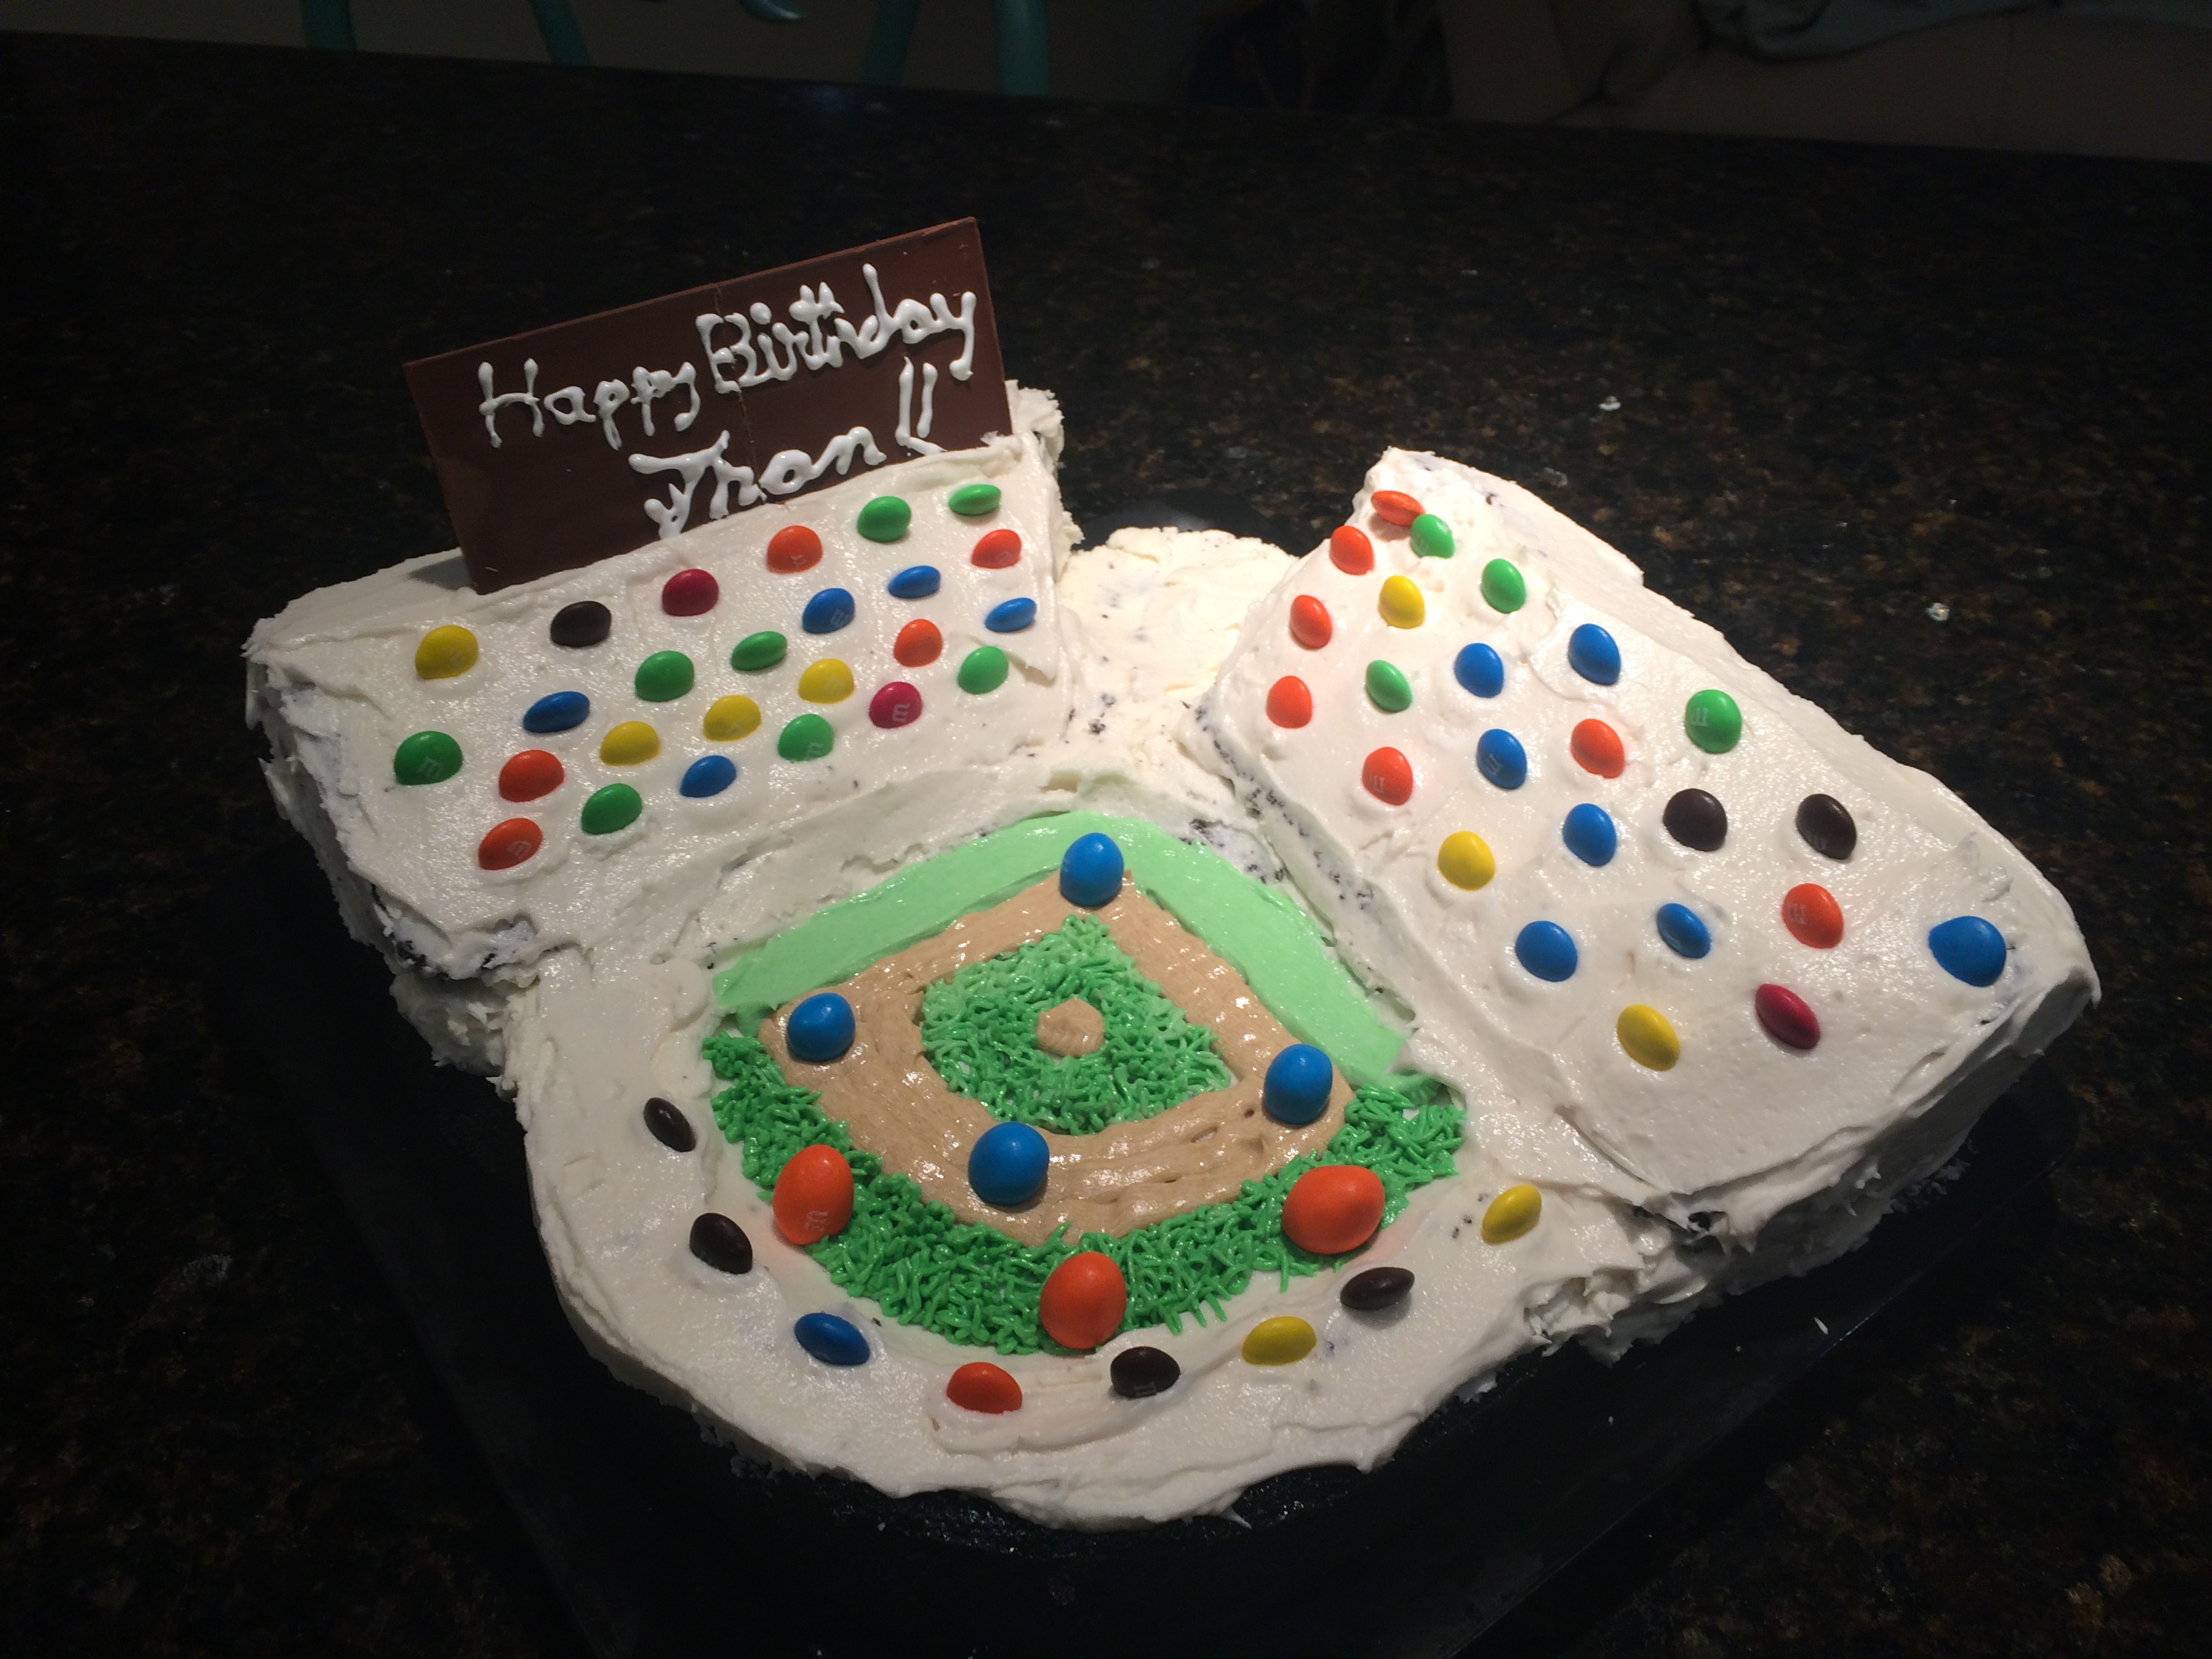
playing field is chocolate cake with the outfield carved into a curved radius and grand stands are white velvet cake baked in a bread loaf pan then cut at an angle to make parallel triangular wedges for the grand stands. Everything was crumb coated with white butter cream frosting, chilled overnight and a finish frosting coat added the next day.

The infield was made from green dyed butter cream and piped onto the cake with a grass tip (Wilton #233.) M&M’s were placed strategically around the ball park and the scoreboard on top of the right field grand stand.

Recipes for all cakes, frostings and icings can be found in other posts in my blog.

Thanksgiving 2013 or Another Step on the Road to Gluttony

OK, Turkey Day 4 is over and I am officially done. Turkey, sides and desserts 4 days in a row beat me. Of course, it is also Chanukah! I could tell because the one bottle of London Pub Ale miraculously transformed into eight bottles to last all eight days. (Claiming literary license here as I am only drinking one bottle per week these days.) Pumpkin Pie Chocolate Cake 
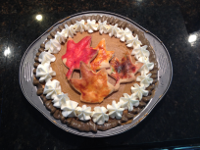
The pumpkin pie is actually a chocolate cake in disguise. Use about 1/3 of the batter and spread it out in a pie plate that was baked along with the rest of the batter which was put into two 6″ cake pans with their bottoms covered with quick release silicone sheets, greased and floured. (Only fill the pie platter a little less than half full or the cake will rise over the top.) Make a double batch of butter cream frosting. One cup was diluted slightly to make it easily spreadable and dyed with a mixture of orange and brown food coloring to match the color of the traditional pumpkin pie Fran made. This was spread over the top of the cake. Another cup was dyed to match the crust (more brown, less orange.) Use a #125 petal, or similar,  tip to pipe the darker brown frosting around the edge to form the crust and an open star tip to form the whipped cream from the balance of the white butter cream. (Save a little white buttber cream for later.) Dreidle Cake While the small chocolate cakes are baking, make a batch of chocolate frosting. You will need lots of chocolate frosting. Don’t be afraid to make a double batch here. It will not go to waste. Any left-over makes an excellent side for lunch or even a wonderful breakfast dessert. The two 6″ round chocolate cakes were cooled and one of the layers was cut into two thinner disks. One of the thinner disks was stacked on top of the full layer which was topped with a chocolate frosting cover, then the entire small cake was frosted. The remaining thin disk of cake was crumbled, mixed with a little chocolate frosting, shaped to resemble a turkey body, neck and head and then frozen. Don’t use all the chocolate frosting as you will need more than a cup for the turkey cake. While the oven is still hot make the Heavenly White cake in two 9″ parchment paper bottom lined round cake pans. While it is baking, make another (double) recipe of butter cream frosting. Dye 1/4 cup green, 1/4 cup blue, about 3/4 cup yellow and the rest dark orange. When cool, crumb coat the double layer Heavenly White cake and refrigerate. Use multiple piping bags as some colors will need to be used more than once. Use the blue frosting to pipe the outline and fill the dreidel. Smooth it with a spatula and use a petal tip or other ribbon making tip to pipe one of the Hebrew letters on the blue dreidel. (I made a Hei, it seemed the easiest.) This cake is complete. TurkeyCake1 Add about a tablespoon of milk to a cup of white butter cream and mix well to thin it. Use the thin frosting to coat the white cake with a smooth outer shell. I used a star tip to pipe the outer dark chocolate turkey feathers. Start about 2″ from the edge of the cake. As you squeeze the piping bag move slowly toward the edge then back towards the beginning point, releasing pressure as you go. Repeat as necessary to cover about 200 degrees of the perimeter of the cake. (I am basically a scientist. Deal with it.) Next use the dark orange butter cream and same tip form the next layer of feathers using the same technique. While you have the orange in the bag pipe the perimeter around the bottom of the cake. Pipe some of the yellow frosting inside the orange feathers and save the rest in the bag. Use the green frosting with a #233 grass tip to make the grass. Coat the frozen chocolate turkey-looking-thing with chocolate frosting, shaping it to be a little more turkey-ish. Lay it inside the semi-circle of yellow feathers and across the grass. Use the remaining yellow frosting to pipe the turkey feet. Use some remaining chocolate frosting to make the wings and dye a little left over white butter cream red to make the beak and comb. Taa-daa!

Chocolate Cake

Ingredients

  • 2 cups white sugar
  • 1 3/4 cups all-purpose flour
  • 3/4 cup dark unsweetened cocoa powder
  • 1 1/2 teaspoons baking soda
  • 1 1/2 teaspoons baking powder
  • 1 teaspoon salt
  • 2 eggs
  • 1 cup milk
  • 1/2 cup vegetable oil
  • 2 teaspoons vanilla extract
  • 1 cup boiling water

Preheat oven to 350 degrees F (175 degrees C). Grease and flour two 9 inch cake pans. Use the first set of ingredients to make the cake. In a medium bowl, stir together the sugar, flour, cocoa, baking soda, baking powder and salt. Add the eggs, milk, oil and vanilla, mix for 3 minutes with an electric mixer. Stir in the boiling water by hand. Pour evenly into the two prepared pans. Bake for 30 to 35 minutes in the preheated oven, until a toothpick inserted comes out clean. Cool for 10 minutes before removing from pans to cool completely.

Chocolate Fudge Frosting

Ingredients

  • 3/4 cup butter
  • 1 1/2 cups unsweetened cocoa powder
  • 5 1/3 cups confectioners’ sugar
  • 2/3 cup milk
  • 1 teaspoon vanilla extract

To make the frosting, use the second set of ingredients. Cream butter until light and fluffy. Stir in the cocoa and confectioners’ sugar alternately with the milk and vanilla. Beat to a spreading consistency.

Recipe: Heavenly White Cake

Ingredients

  • 2 3/4 cups sifted cake flour
  • 4 teaspoons baking powder
  • 3/4 teaspoon salt
  • 4 egg whites ( or substitute)
  • 1 1/2 cups white sugar
  • 3/4 cup butter
  • 1 cup milk
  • 1 teaspoon vanilla extract

Directions

  1. Measure sifted flour, baking powder, and salt; sift together three times.
  2. In a mixing bowl, beat egg whites until foamy. Add 1/2 cup sugar gradually, and continue beating only until meringue will hold up in soft peaks.
  3. Cream butter or margarine. Gradually add remaining 1 cup sugar, and cream together until light and fluffy. Add sifted ingredients alternately with milk a small amount at a time, beating after each addition until smooth. Mix in flavorings. Add meringue, and beat thoroughly into batter. Spread into cake pans with parchment paper lining the bottom.
  4. Bake at 350 degrees F (175 degrees C) for 30 to 35 minutes. Cool cake in pans for 10 minutes, then remove and transfer to a wire rack to finish cooling.

Basic Crusting Butter Cream

Ingredients:

  • 1/2 cup solid high ratio shortening
  • 1/2 cup butter softened
  • 1 tablespoon of meringue powder
  • 1 teaspoon Clear Vanilla Extract (or extract of choice)
  • 4 cups sifted confectioners’ sugar (approx. 1 lb.)
  • 2 tablespoons milk

In large bowl, cream shortening and butter with electric mixer. Add vanilla and milk. Gradually add sugar, one cup at a time, beating on a slow speed. Scrape sides and bottom of bowl often. Keep bowl or covered with a damp cloth until ready to use. Refrigerated in an airtight container, this icing can be stored 2 weeks. Don’t overwhip or it will bring air to the icing and is impossible to smooth. If you have a kitchen Aid use white attachment, not whip attachment.