Have you ever see contestants on GBBO struggle making a Swiss roll? For those unfortunate few readers unfamiliar with this cake, it is a thin sheet cake rolled tight, usually with some filling inside.
Follow this method and you too could be a contender!.
Swiss Roll
INGREDIENTS • 4 large eggs, separated and at room temperature • ¼ (32g) cup confectioners sugar, sifted, plus extra for dusting • 1 tsp vanilla extract • Dash of salt • 2 (25g) Tbl granulated sugar • ¾ (96g) cup cake flour • ½ c raspberry jam
METHOD
Preheat the oven to 350 F. Line the bottom of a 15-x-10-inch jelly roll pan with parchment paper. Leave the sides unlined and undressed.
Place the egg yolks and confectioners sugar in a large bowl and whip until the yolks have doubled in volume and hold a ribbon. This takes about 4 minutes. Whip in the vanilla.
In the bowl of a stand mixer, whip the egg whites with the salt first on low speed until foamy, then increase the speed to high and pour in the granulated sugar, whipping until the whites hold a medium peak.
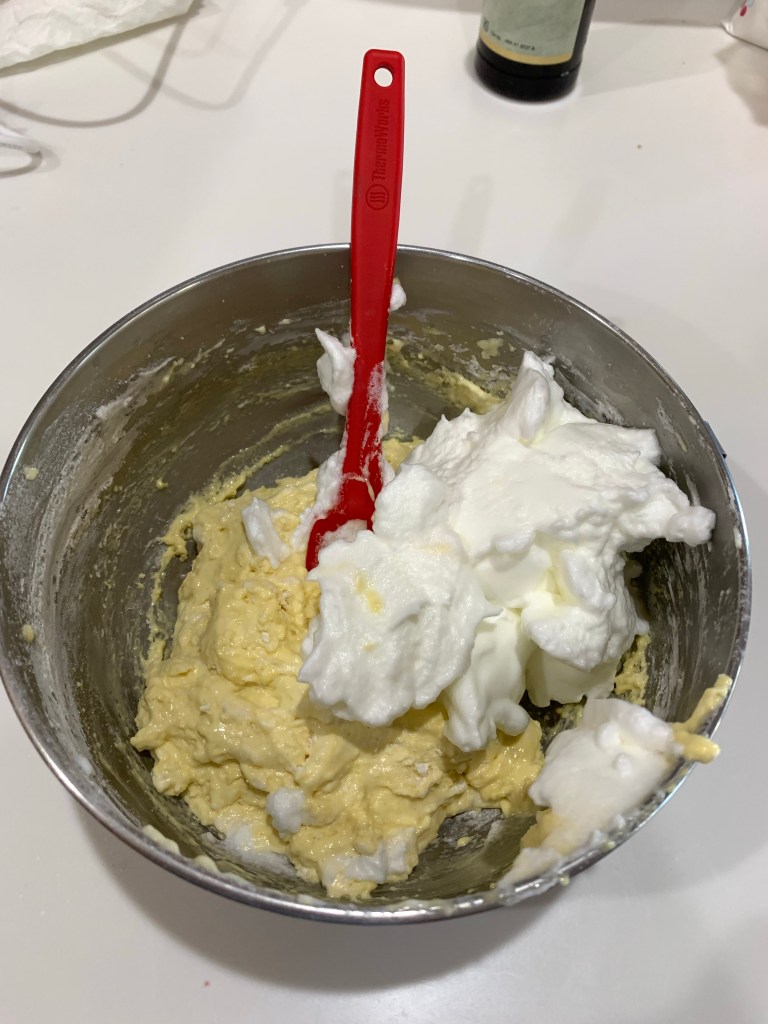
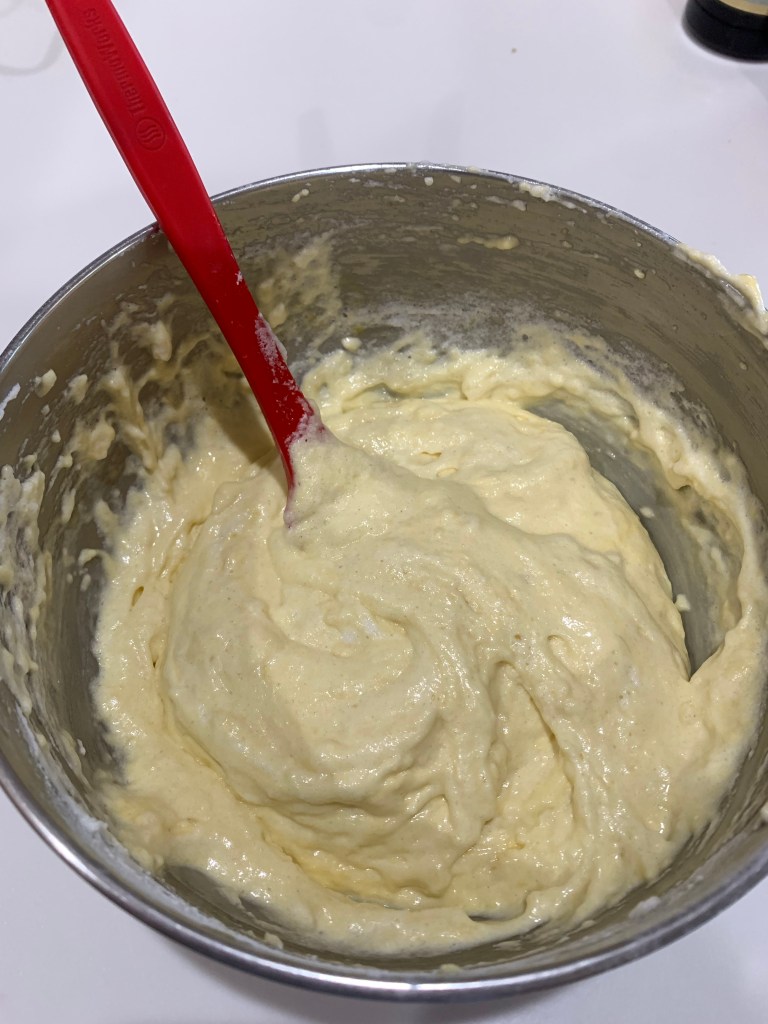
Sift half of the flour into the yolk mixture and fold in without deflating the eggs, then fold in half of the whipped egg whites. Repeat with the remaining flour, and fold in the balance of the whites until evenly incorporated. Spread the batter into the prepared pan, taking the time to ensure the batter is level.
Bake the cake for about 12 minutes, until the cake springs back when gently pressed in the center. It will only lightly brown. Do NOT over-bake. Cool the cake for about 2 minutes on a cooling rack, then loosen the sides with a spatula. I found using the spatula and pushing straight down on the edges worked very well.
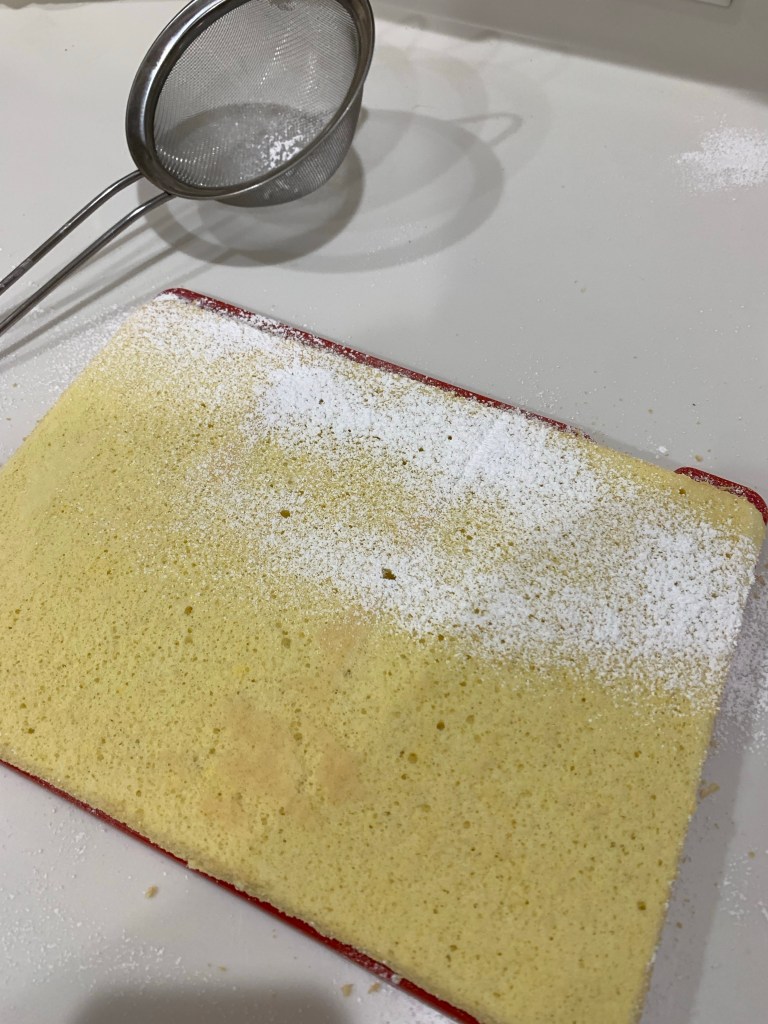
Sift a layer of confectioners sugar over the surface of the cake and cover with a clean towel. Place a second pan of about the same size as the jelly roll pan over the towel and flip the cake, removing the pan it was baked in. Peel off the parchment paper and dust this surface with icing sugar. Roll the cake up from the 10-inch side with the towel and let it cool completely (cooling it rolled sets its “memory” so the cake won’t crack once filled and re-rolled.)
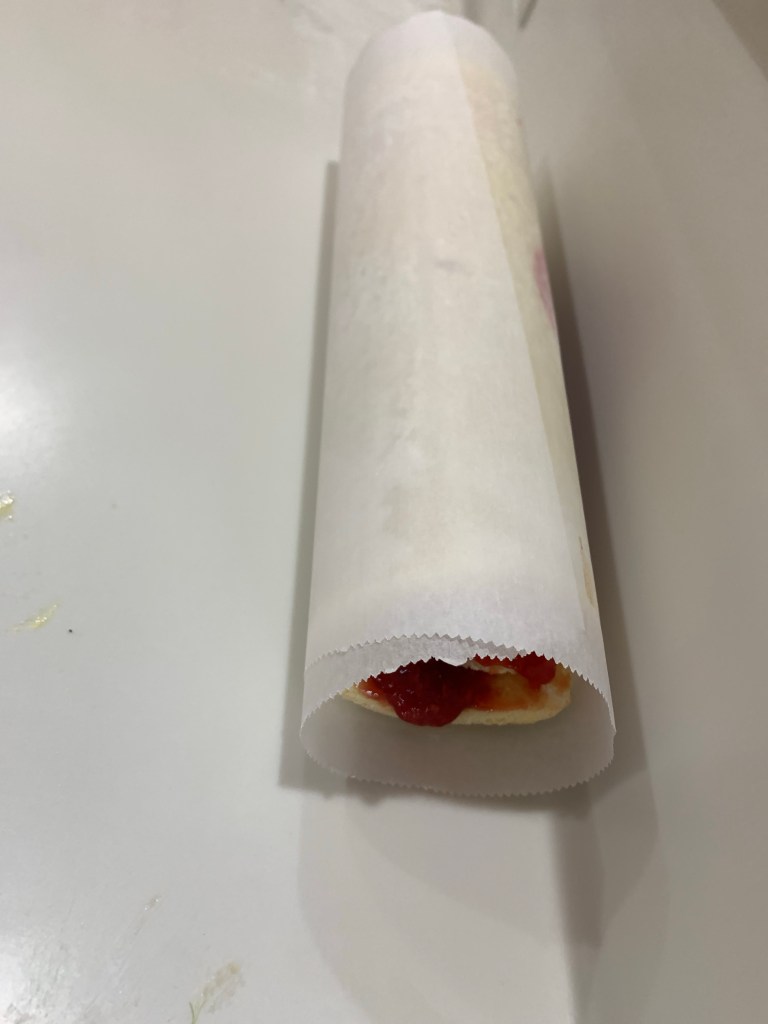
Stir the raspberry jam to soften. Unroll the cake and spread an even layer of jam over the cake. Don’t use too much jam. The ½ cup should be plenty. Leave and inch on the last part of the cake uncoated with jam. The jam will squeeze along as you roll and will eventually coat the last edge. Roll the cake back up again, if desired, dust the top with confectioners sugar. Cover and store at room temperature until ready to serve.
The cake can be prepared up to a day in advance and stored, wrapped and unrefrigerated.
Mix by hand to incorporate confectioners sugarSwitch to hand mixer with whisk attachmentAdd whipped cream in several additionsFold everything together without deflating the mixture.Cooled cakeDusting cake with confectioners sugarCooled cake, unrolled to spread jamCake with jam being rolled back upFinished Swiss Roll, wrapped for room temperature storage
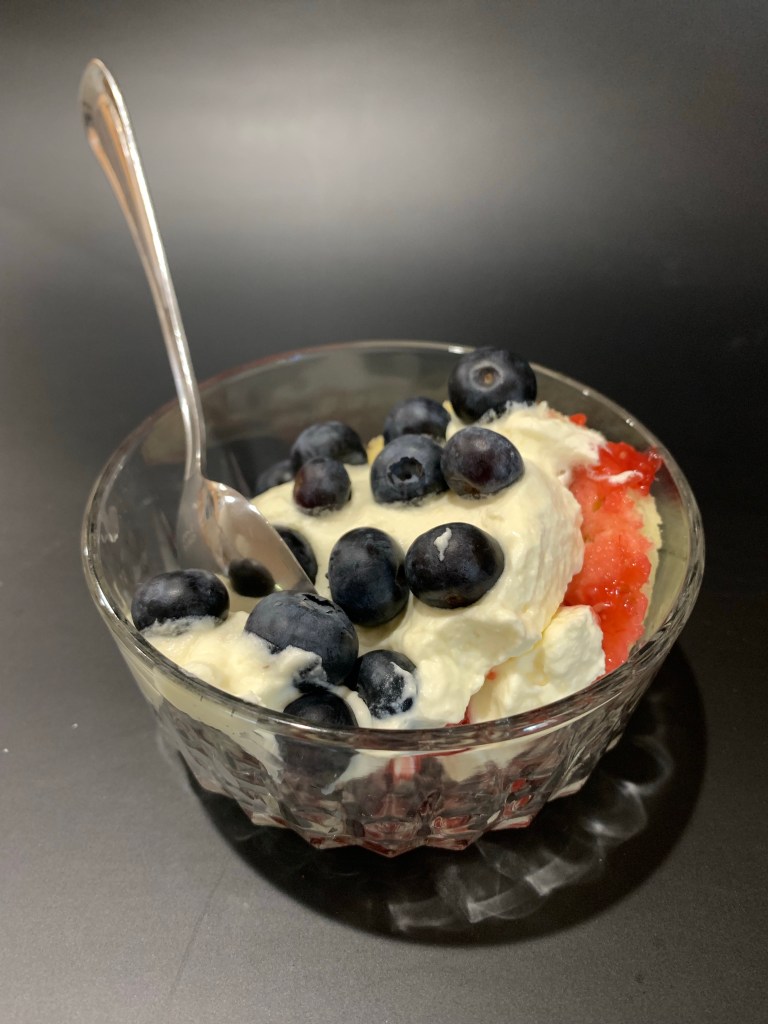
I need an Independence Day themed dessert for a party this weekend. I started out with a red, white and blue mousse cake. The blue was to be blueberry mousse. As you may know, blueberries are not chucked full of flavor, so having made the blueberry mousse, (it tasted mostly like whipped cream) I looked elsewhere for inspiration.
I don’t know how it came to mind, but a berry trifle with red berries, whipped cream and blueberries sounded perfect for a cool, light summer dessert. As one of the kids at the party is allergic to strawberries I used raspberries as the red. (The fact raspberries are my fav, didn’t enter into the decision.) I wanted something more substantial than simple whipped cream so I decided on Creme Diplomat. This creme is basically cream patisserie and whipped cream. I fortified each with cornstarch to help it retain is structure longer.
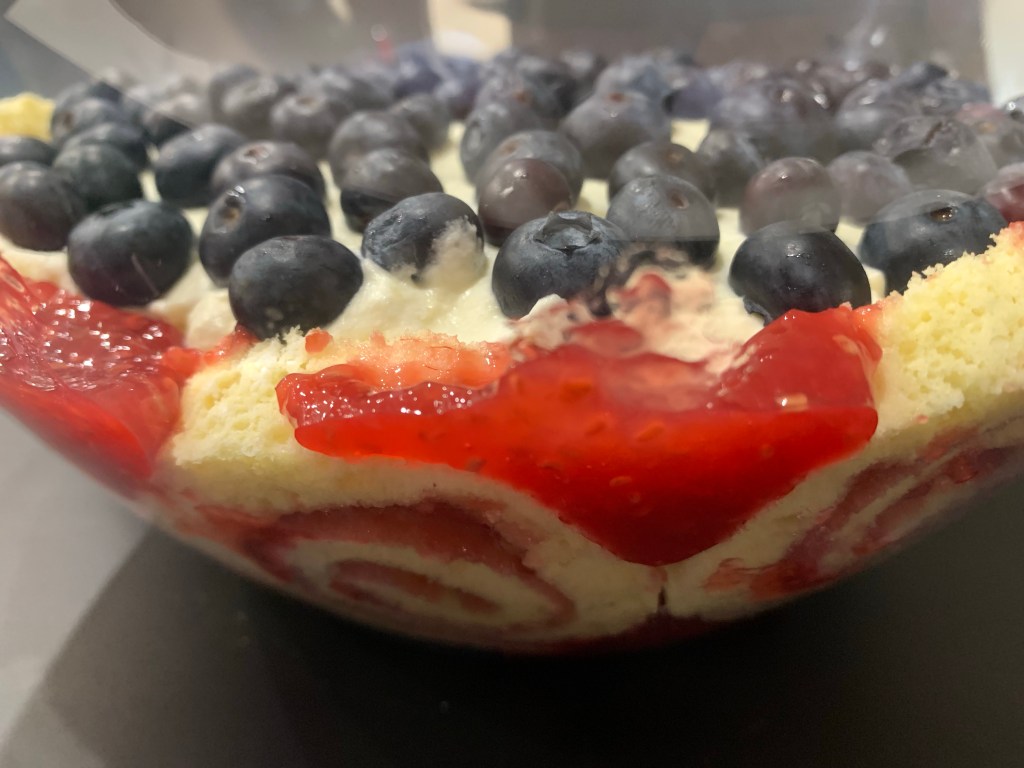
Rather than lady fingers or simple cubes of white or vanilla cake I settled on a sliced Swiss roll with raspberry filling. (Prettier). I never made a Swiss roll before, but had lots of advice and examples from watching years of GBBO.
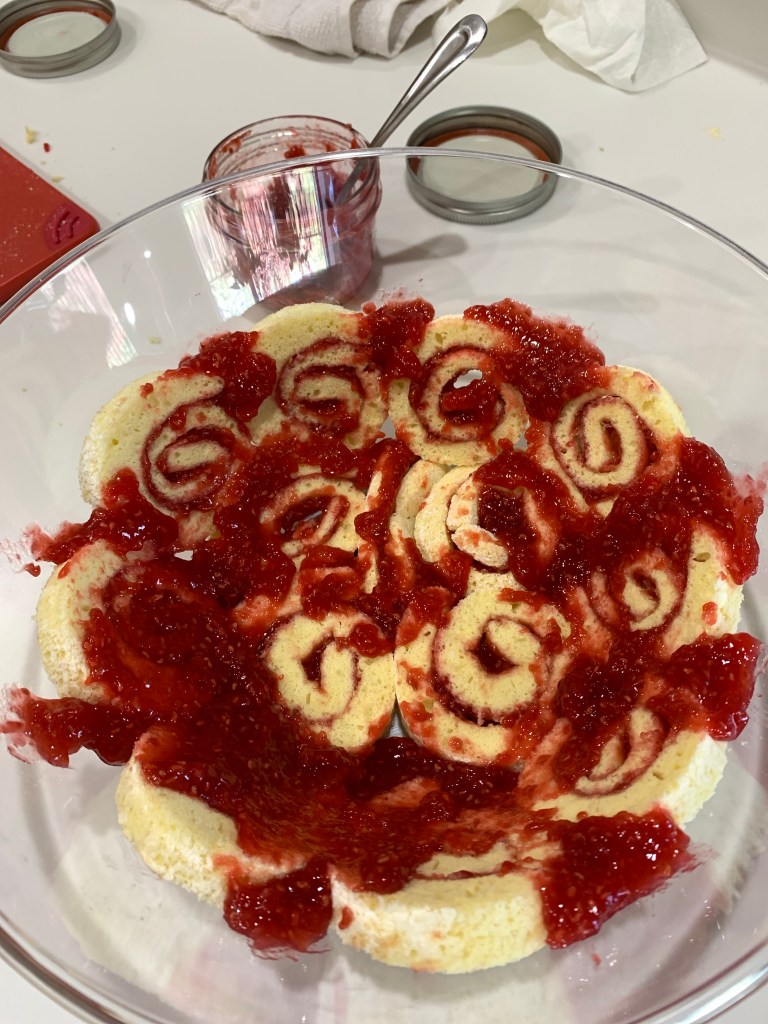
By coincidence, I made raspberry jam last week and had plenty to use for this project. I sliced the cool, filled Swiss roll into 14 pieces. (Note the nice tight swirl pattern. GBBO contestants always struggle with this.) The bottom and sides of the bowl were lined with the slices, then extra jam was forced into any openings between, or on top of the slices.
Creme Diplomat is essentially 1:1 cream patisserie and whipped cream. It resulted in a light, cool and perfect for a summer dessert. QC loved it, said it wasn’t overly sweet but delicious. 😄
I am experimenting with a new backdrop for many of my pictures. I am using the dark background in this post. Let me know what you think.
Crème Diplomat
INGREDIENTS
• ½ c sugar • ¼ c corn starch • Pinch salt • 2 c whole milk • 4 egg yolks • 2 Tbl butter • 2 cups heavy cream, cold • 2 Tbl granulated sugar
METHOD
Whisk eggs and milk together and add to all other ingredients (except vanilla) to a medium saucepan.
Bring to boil whisking constantly
Cook until thickened (it’s ok if it looks lumpy)
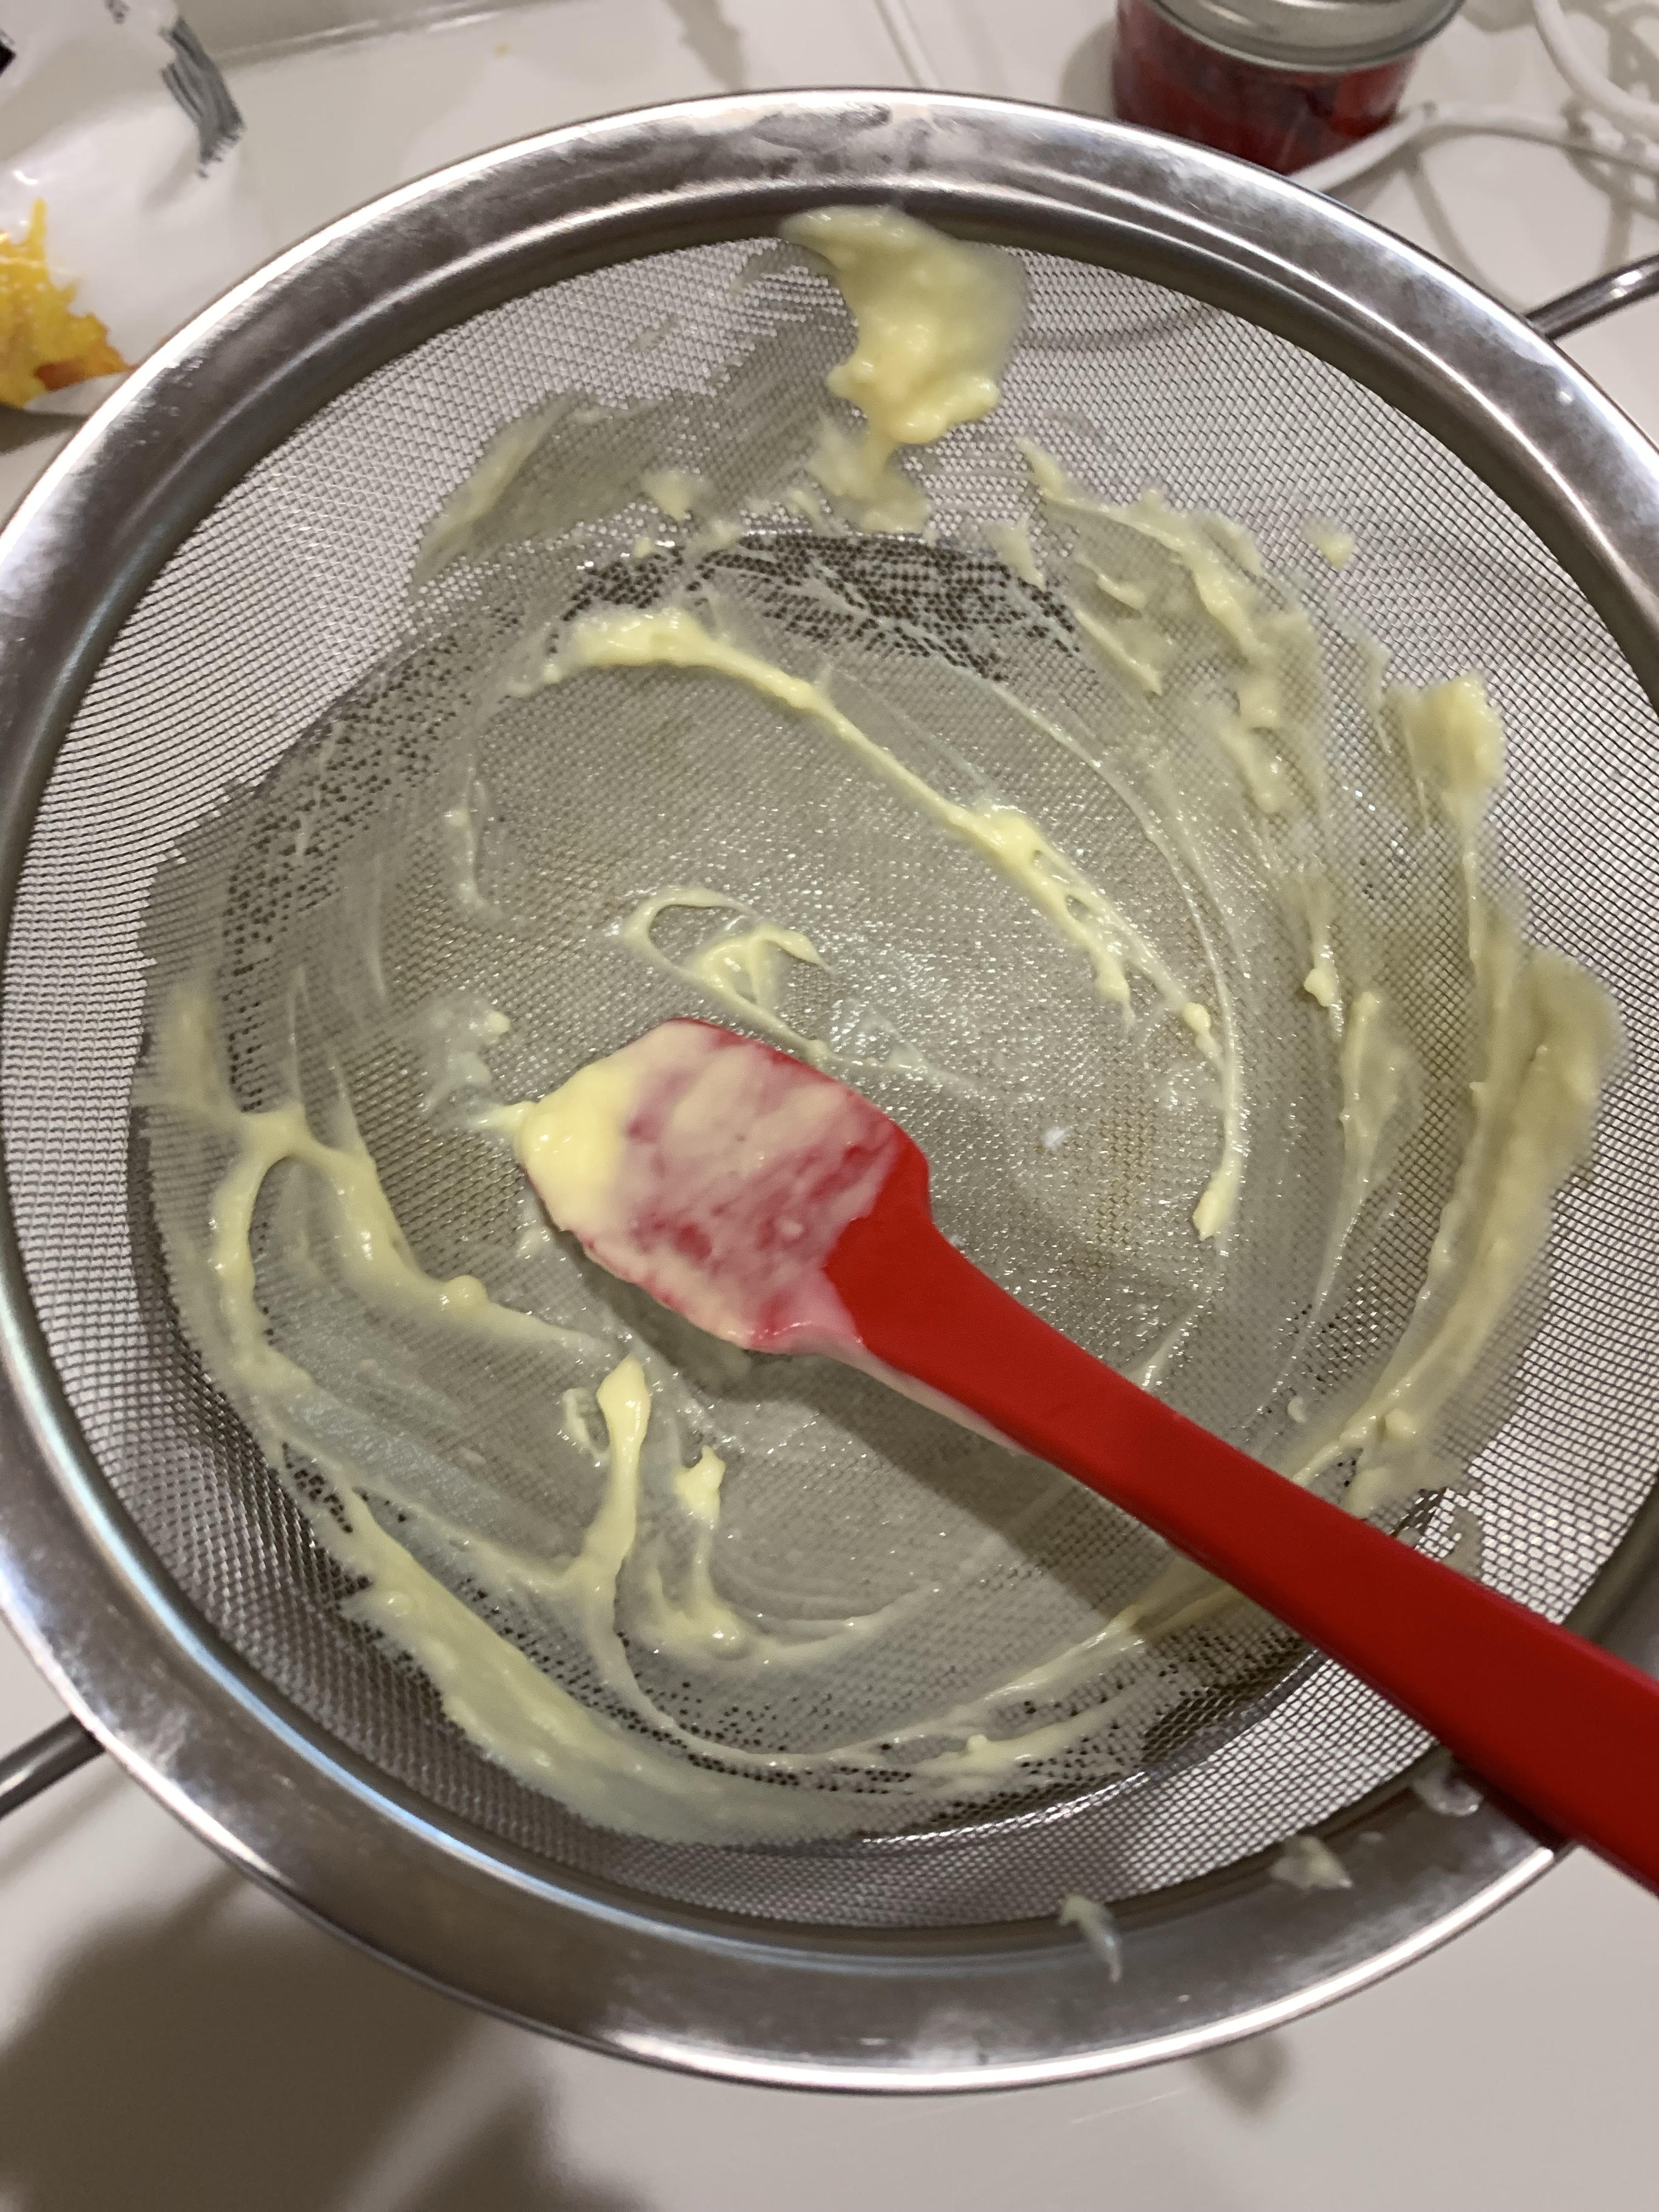
Sieve lumpy mixture into a bowl and add 1 tsp vanilla, mix thoroughly
When incorporated, cover with plastic directly on the cream and cool about an hour.
Whip the cold heavy cream and granulated sugar to medium peaks.
Fold a few spoonfuls of the custard into the cream. Gradually fold the rest of the custard in 2 or 3 additions, being careful to not knock the air out.
Whisk ConstantlyNote Temperature. It will boil lower than expectedSieve mixtureDon’t be afraid to force every bit through the strainer.Cover with plastic wrap directly on the cream.
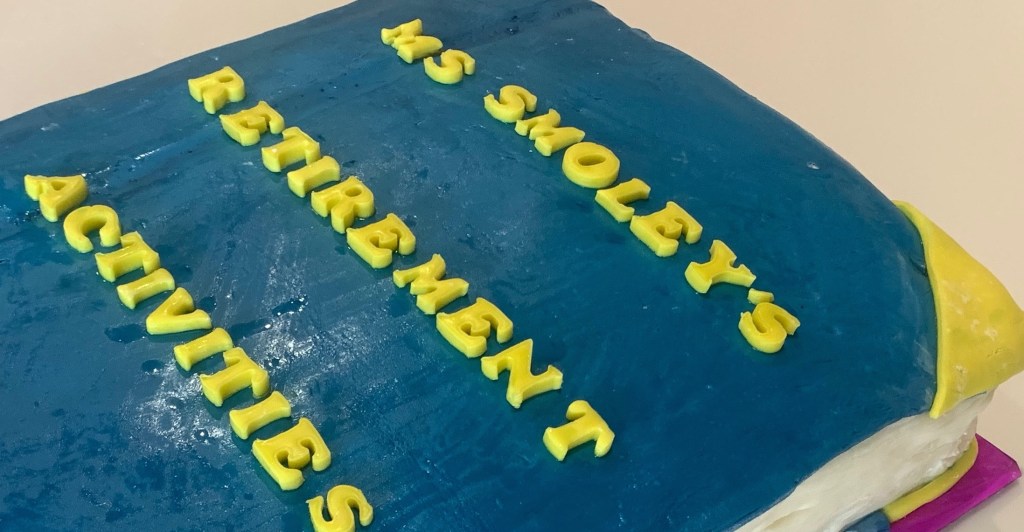
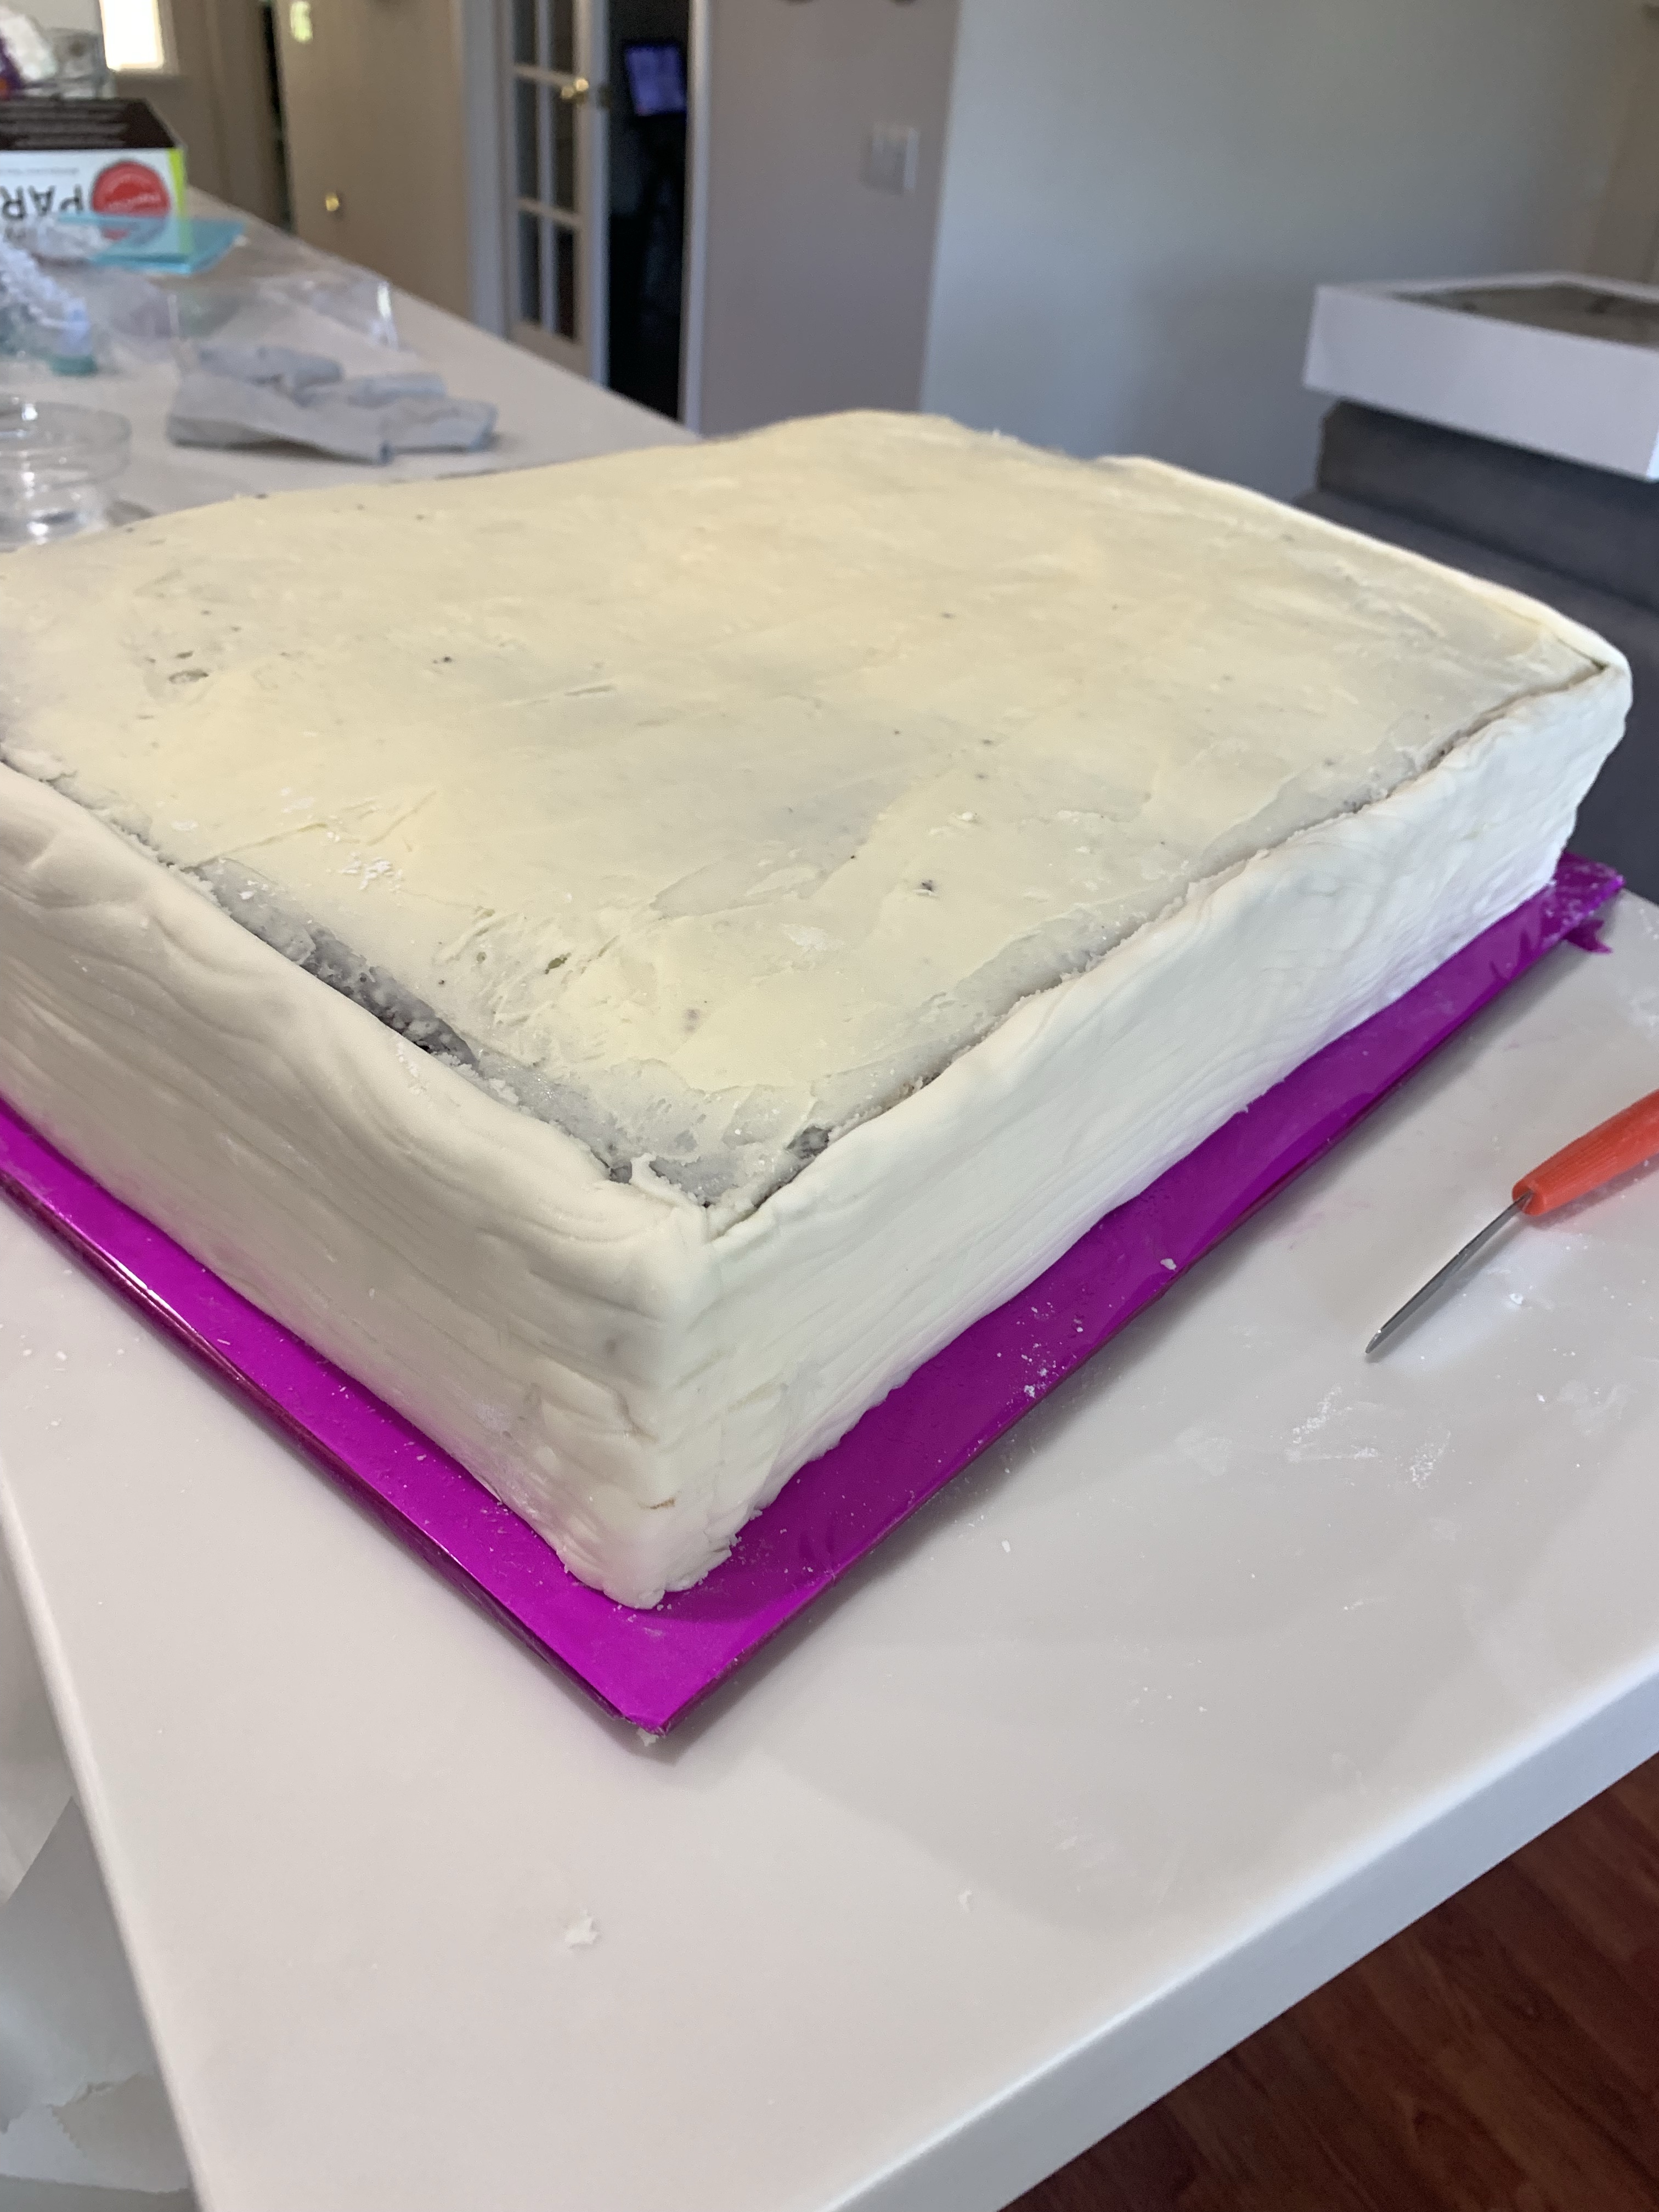
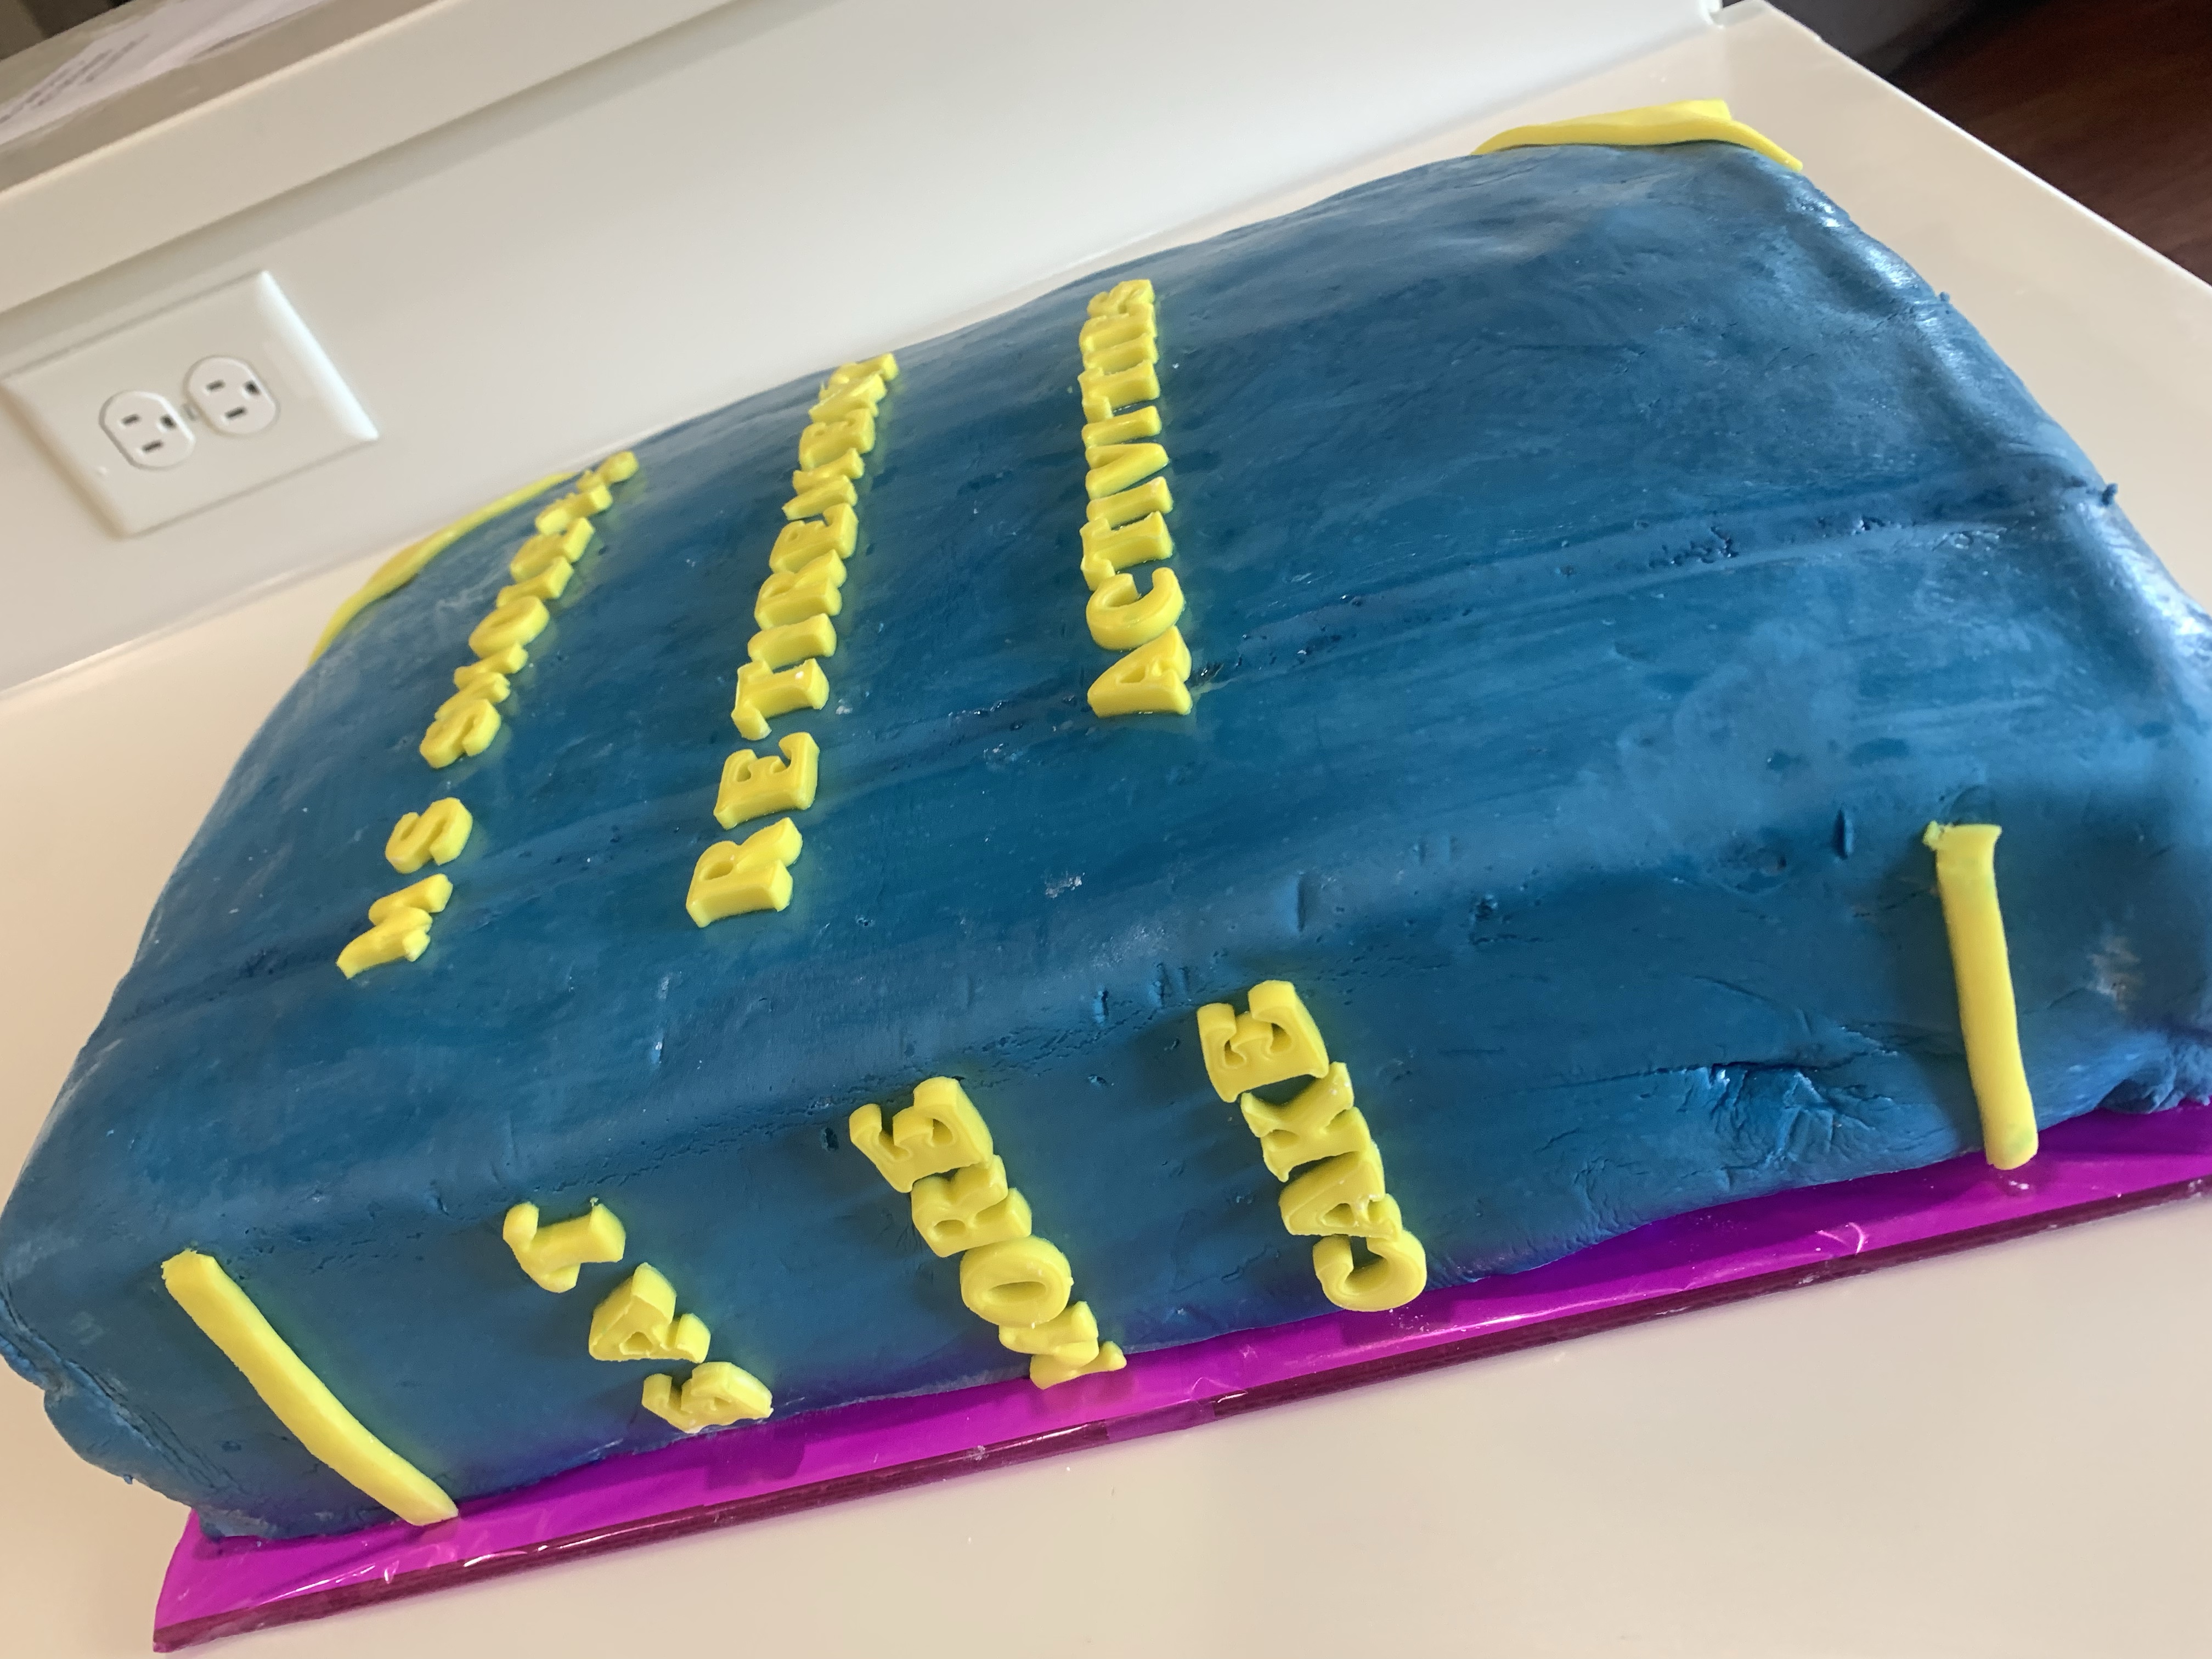
I thought a “Book Cake” would be an appropriate choice for a school principal’s retirement party. I was told she likes to read and likes chocolate cake, so….
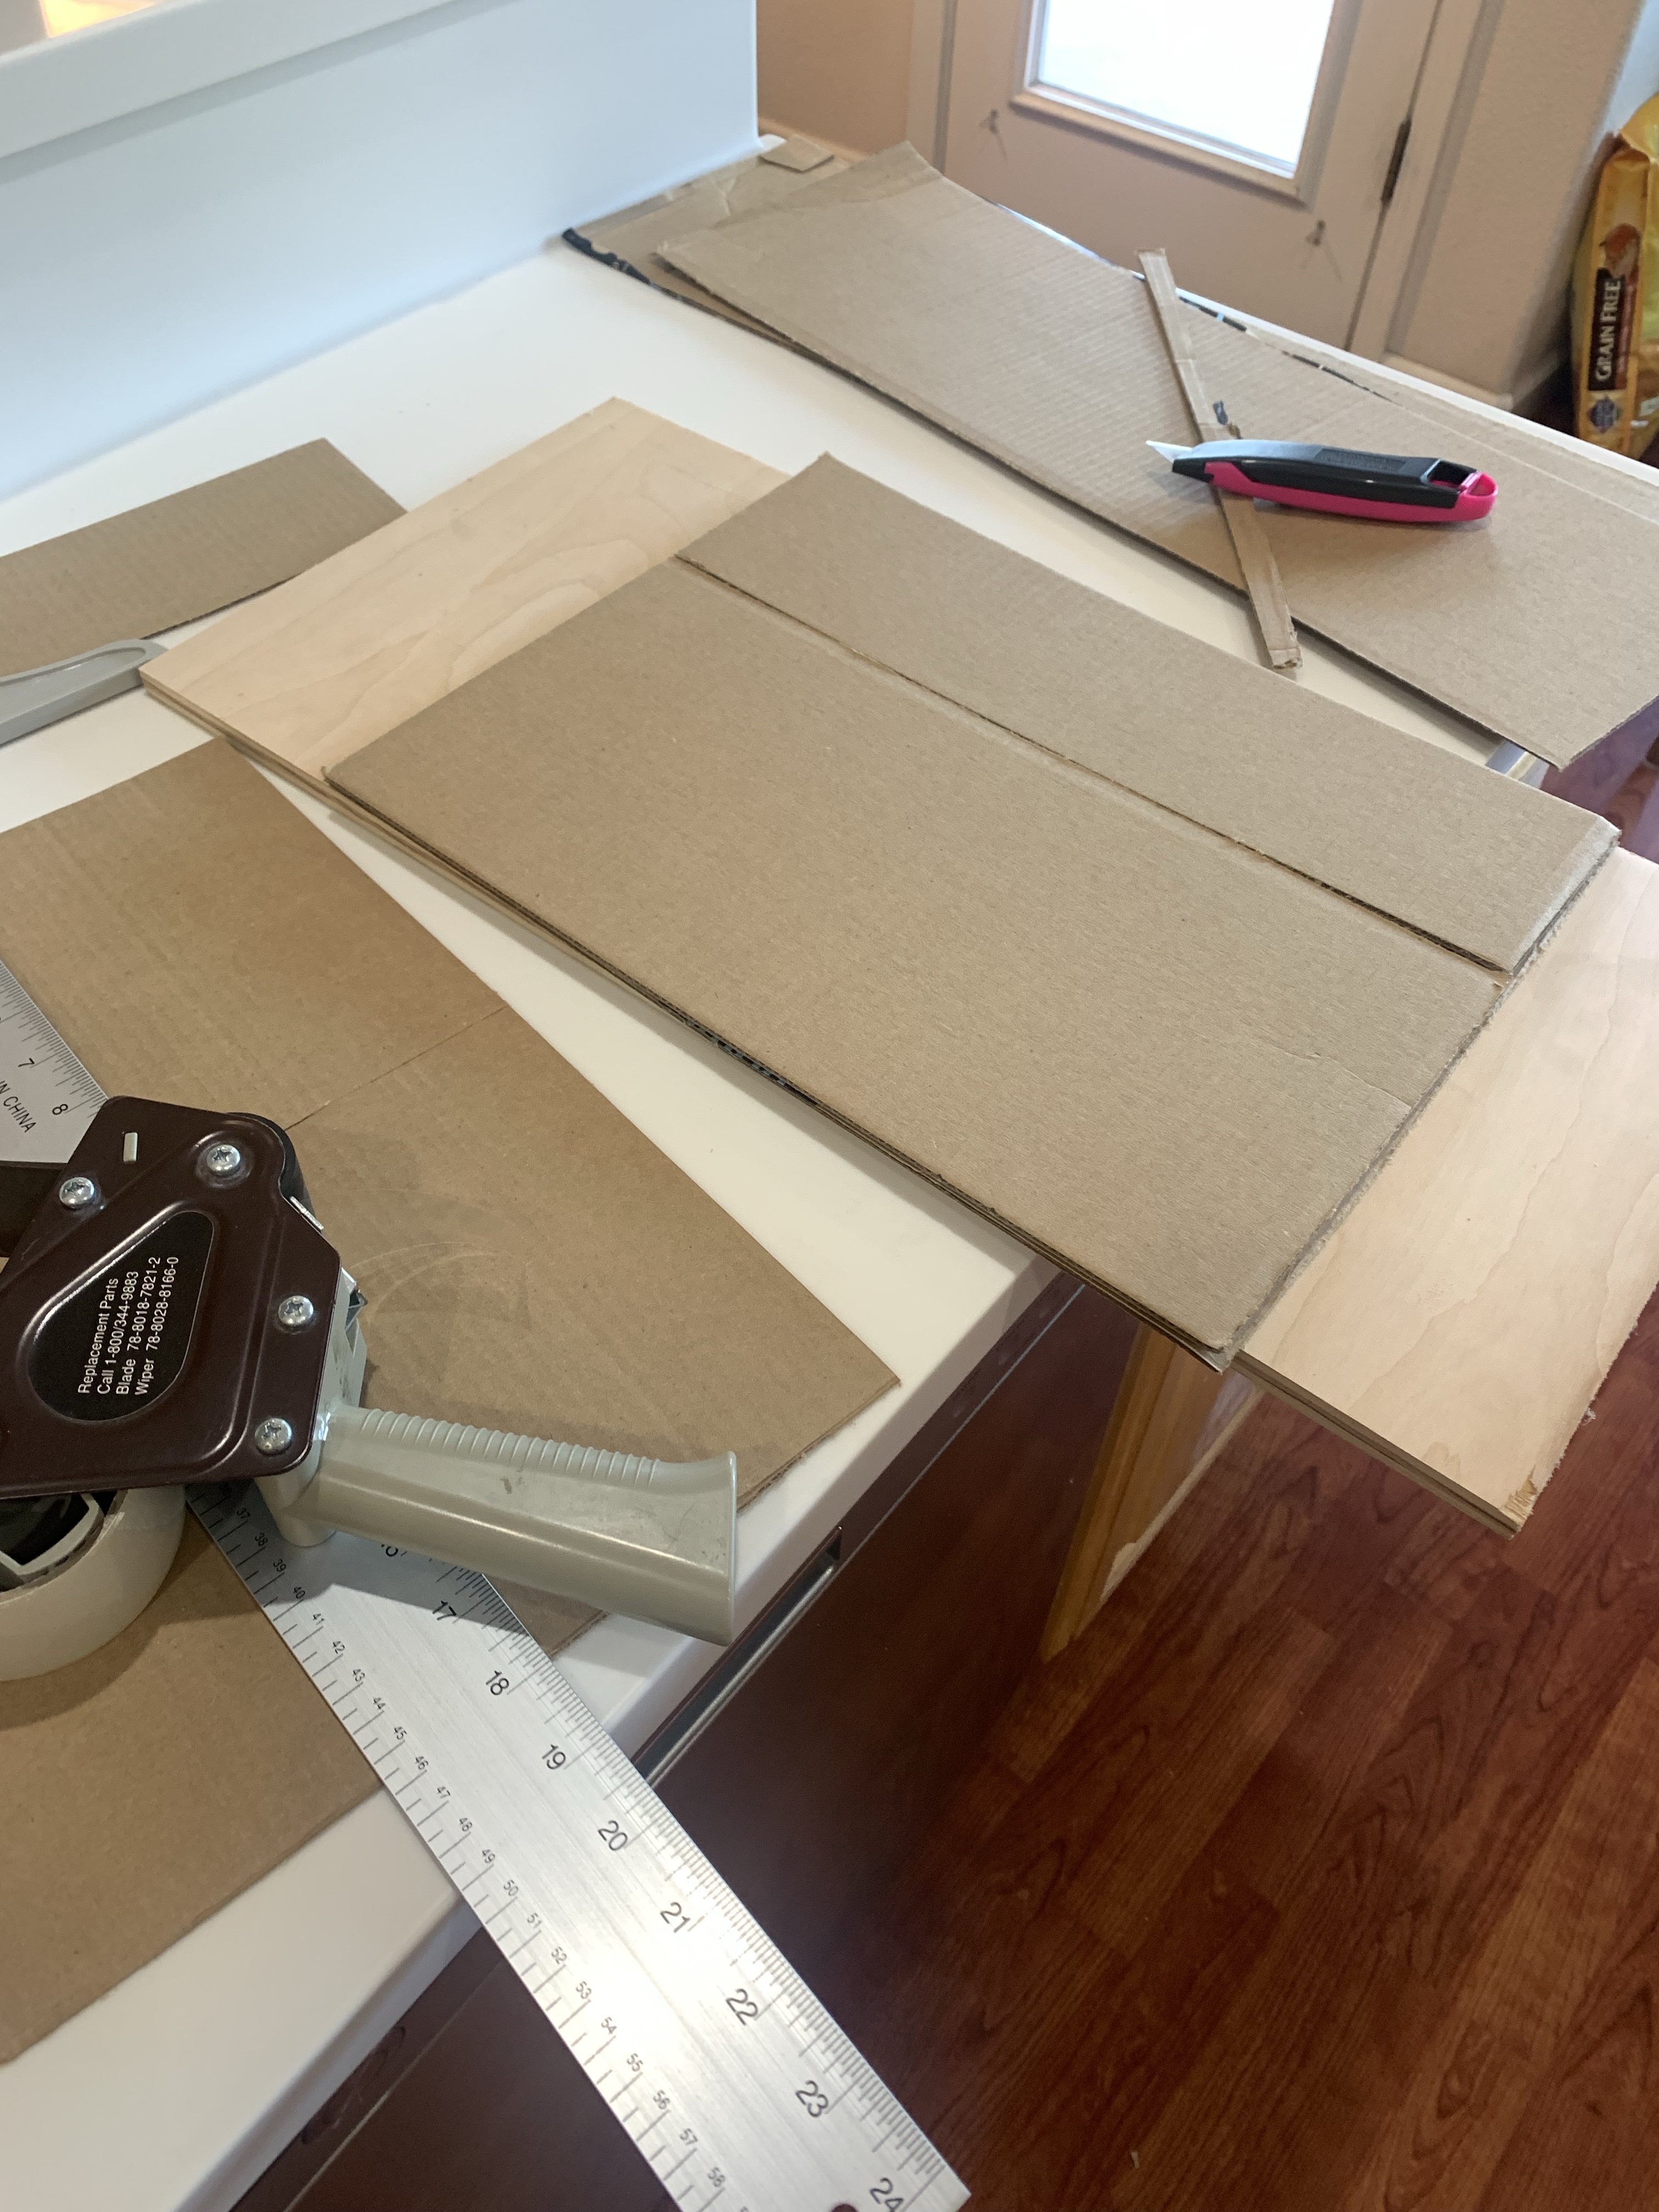
I didn’t have a rectangular cake board of the appropriate size (13”x17”,) nor did the local stores, so I made one from cardboard and food quality cellophane.
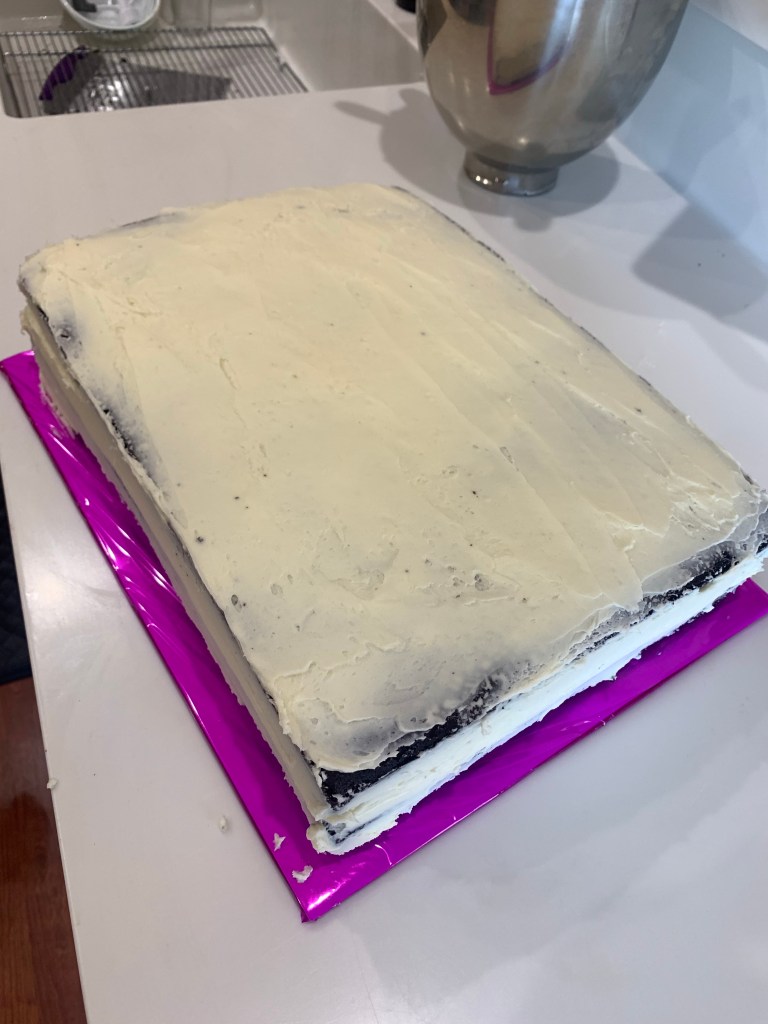
I made two 11×15” Extreme Chocolate Cakes and refrigerated them for a couple of days. When crumb coating, I like to cool (and firm) the cakes. Also, I make my buttercream frosting a little thinner when using it for crumb coating..
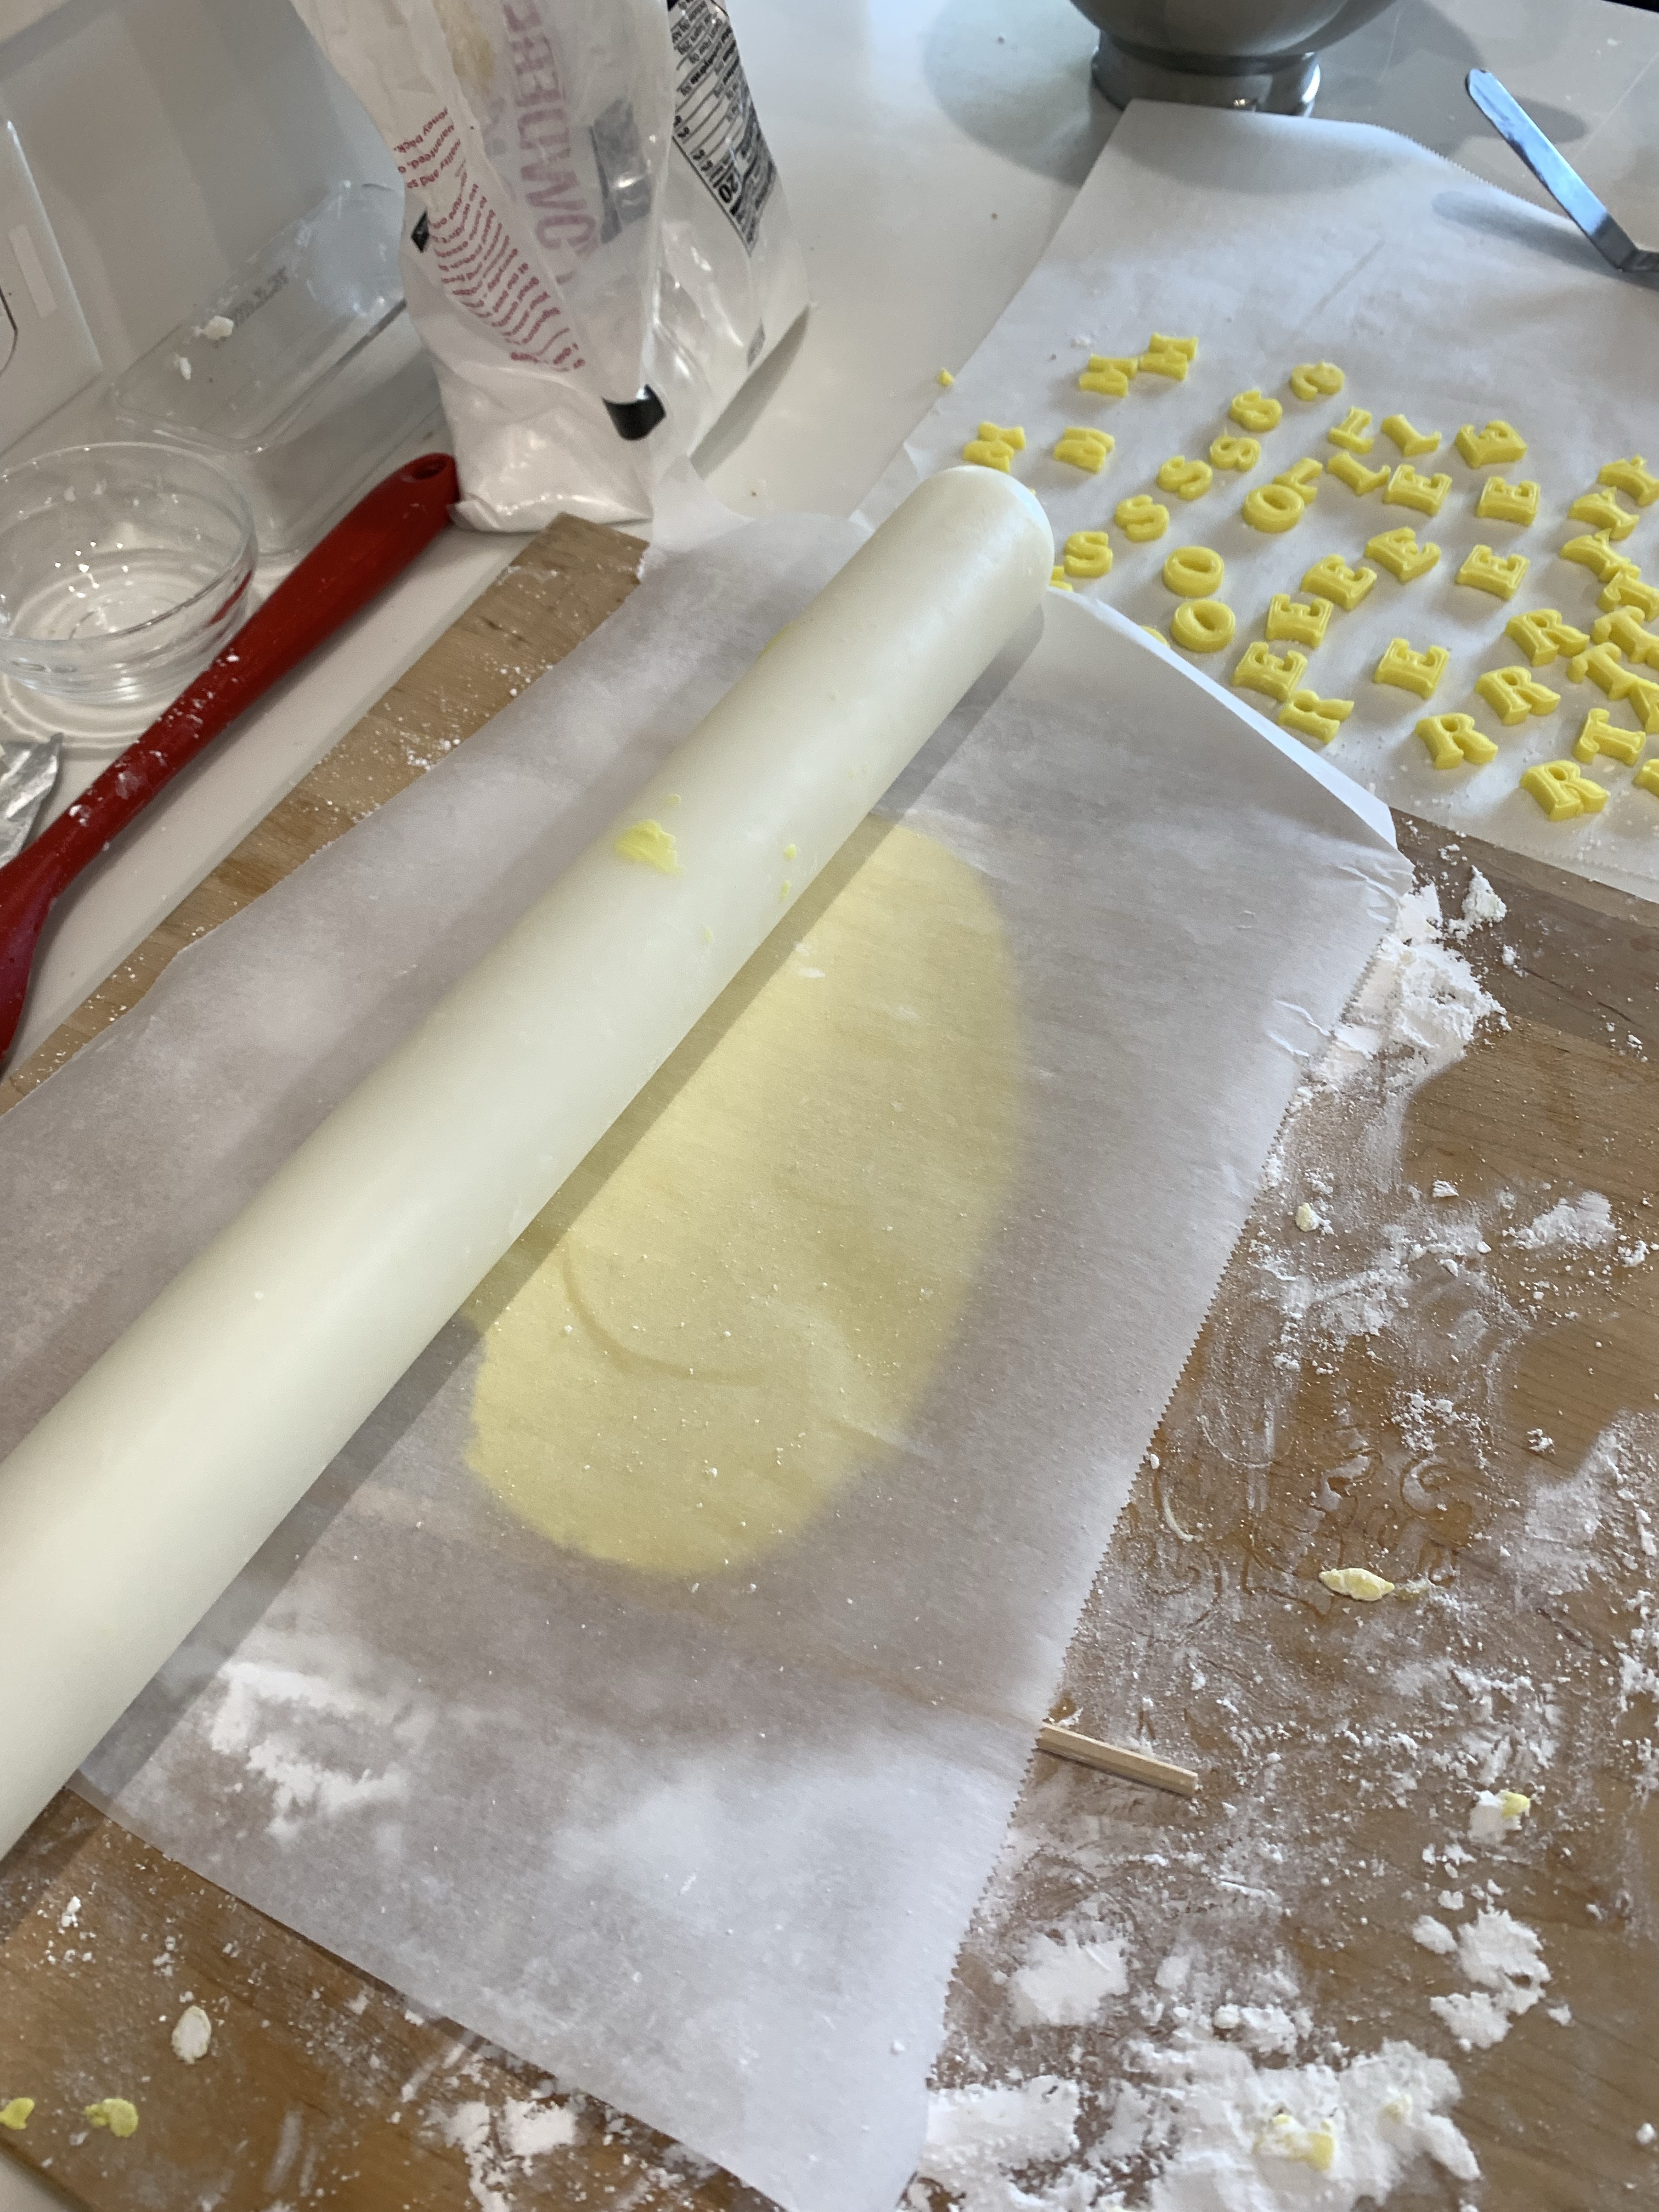
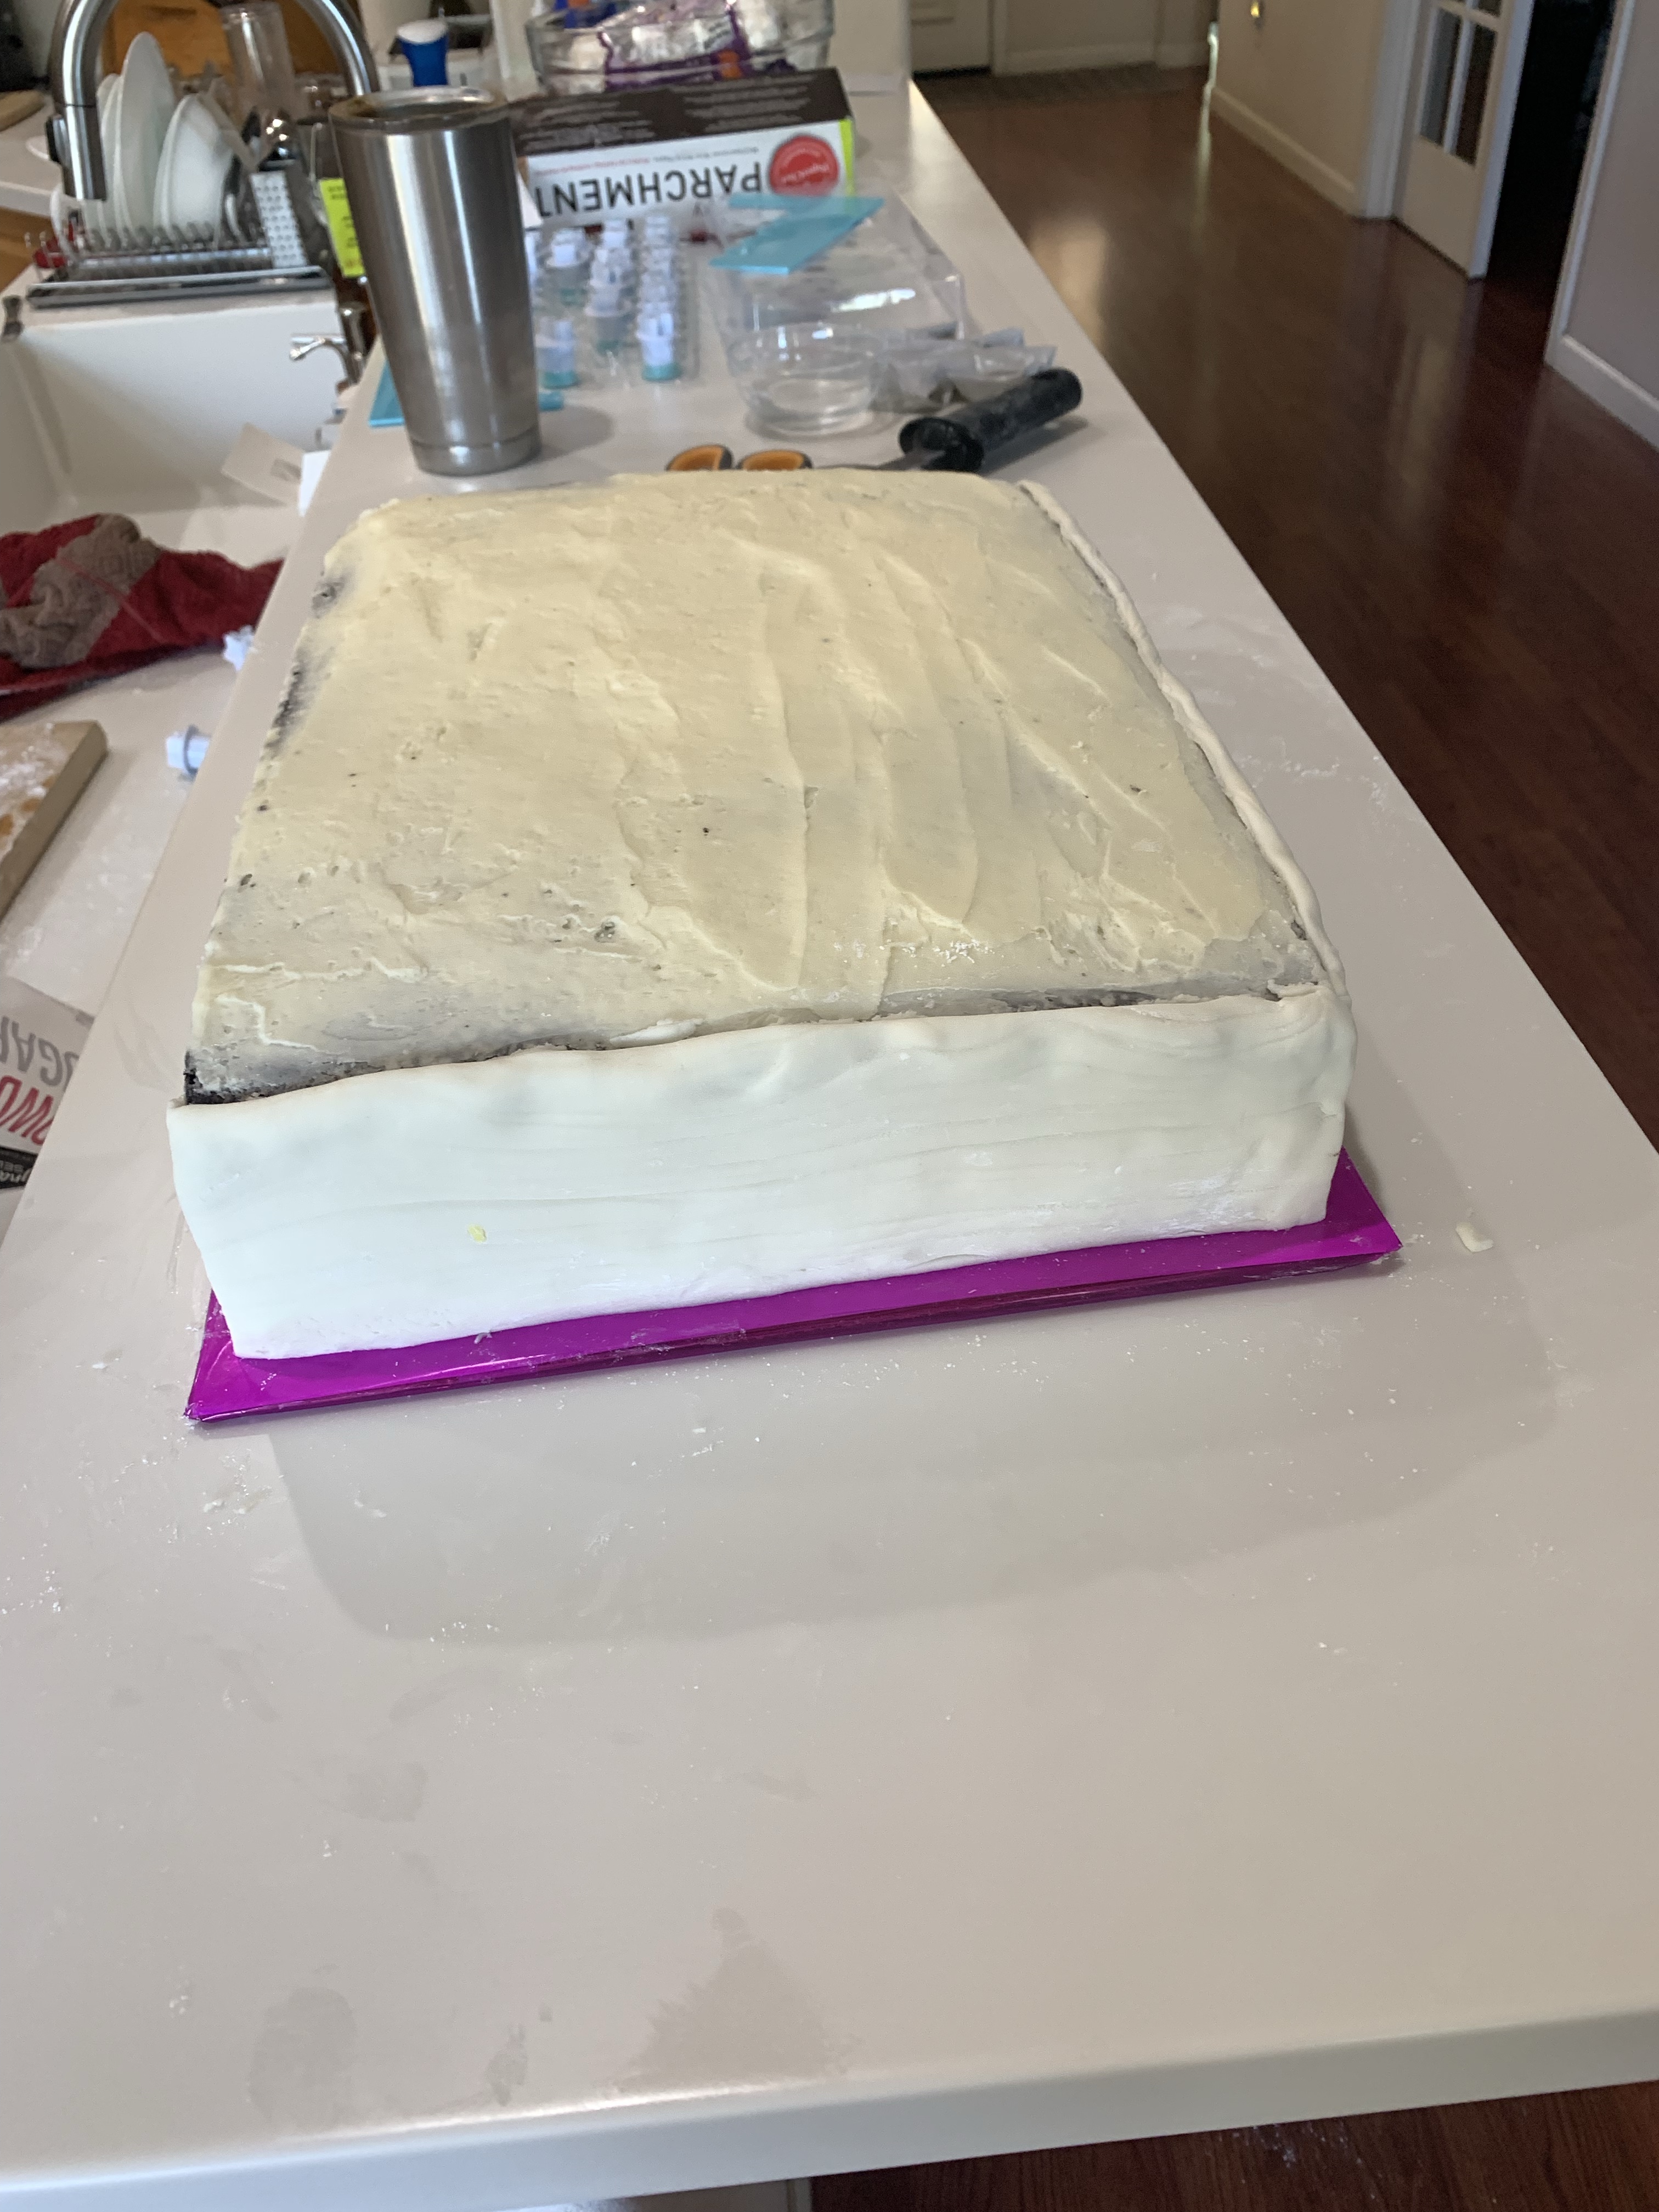
One batch of marshmallow fondant was divided 4:1. The large portion formed the edges and were striated to resemble pages of a book. The small portion was colored with the school color “yellow.” The white fondant was wrapped in plastic and left to rest for a couple of hours. The yellow portion was rolled out between parchment paper sheets. I use chopsticks of various sizes to roll the fondant into the desired thickness. The yellow fondant sheet was left to dry slightly, uncovered on a thin bed of powered sugar. After an hour or so, brush some additional sugar on the top of the sheet and flip it over, letting it rest until dry to the touch. I used the yellow to make the letters for the title and spline. (See the top of the pictures below. If they are dry, they are easier to punch out.
When the white fondant is firmer, roll three pieces long and wide enough to cover the edges of the cake. Use a sharp tool to score the fondant lengthwise to represent the pages of the book.
Before covering the cake with fondant smooth the surface of the crumb coat by wetting gloved hands and rubbing them over the surface. This also helps wet the crumb coat so the fondant will stick.
Cut the sheets of white fondant to be an inch longer and wider than the sides of the cake. Press them on, smoothing the joins on the corners and trim the top to be just wider than the book. Cut the bottom off even with the bottom of the book.
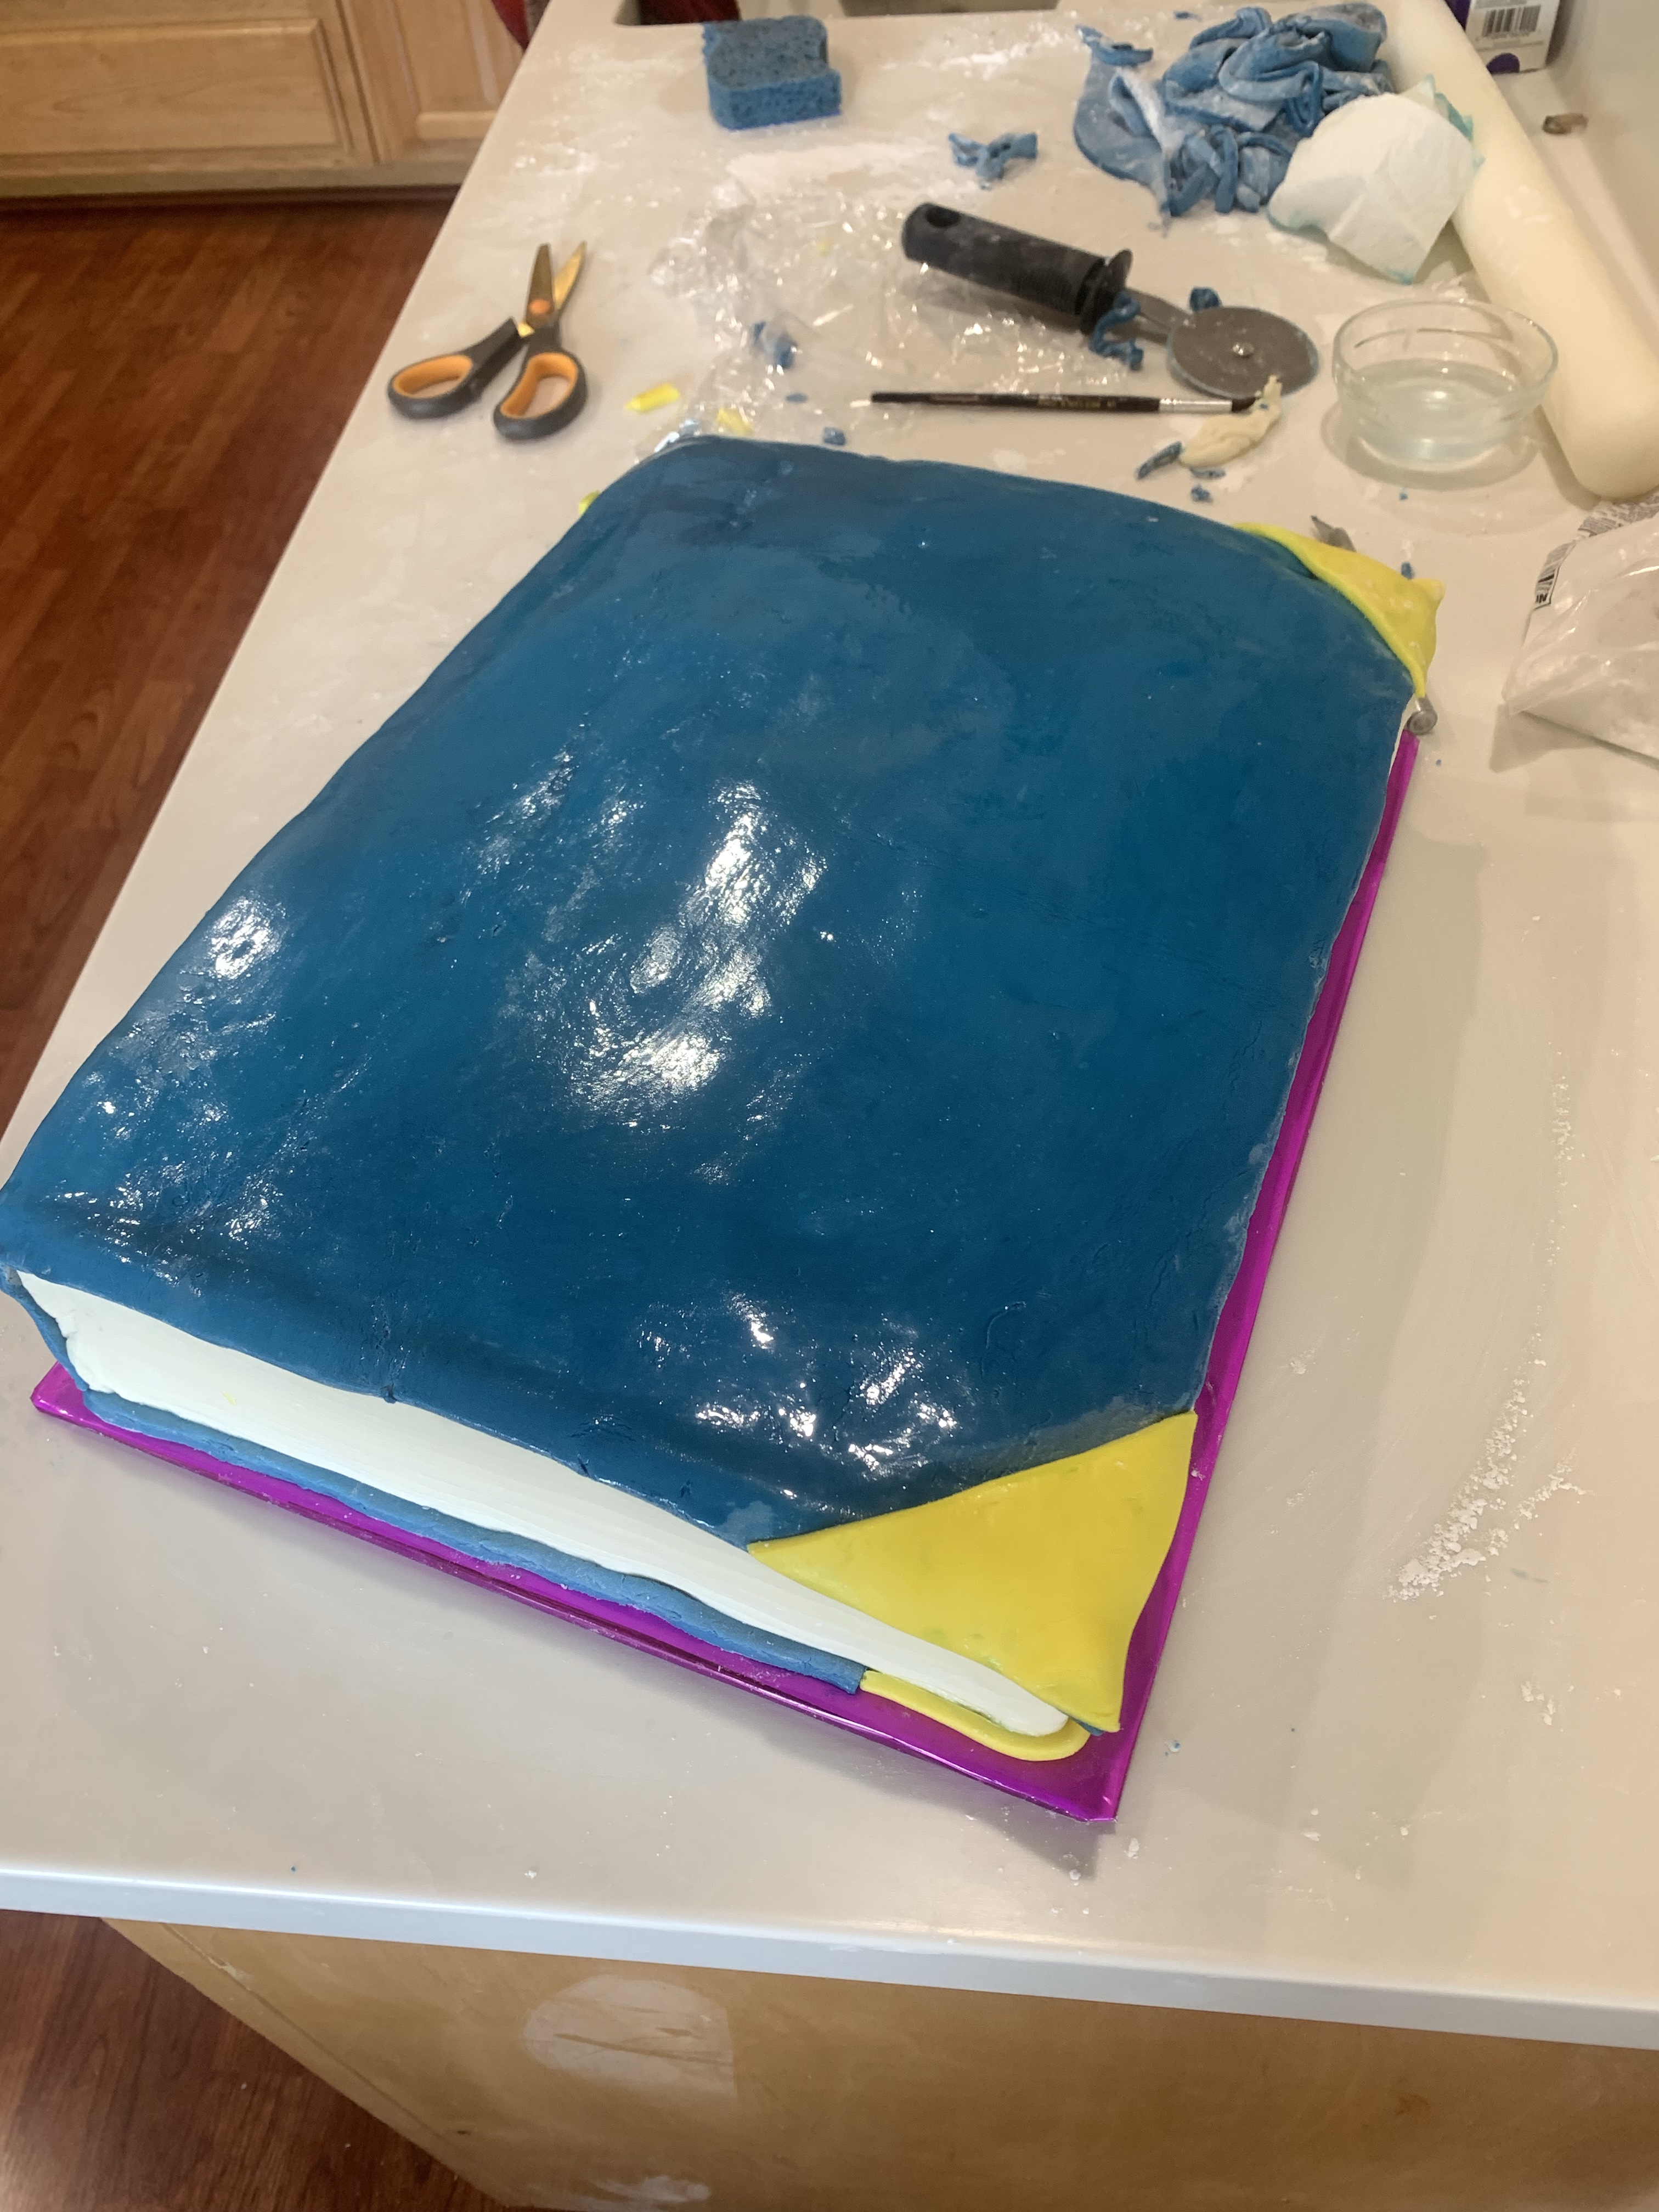
Make another batch of fondant. (Note to self: be sure to use fresh, mini-marshmallows. Life will be much easier.) This batch will be the book cover and can be colored “school blue” in the mixer. Once the consistency and color is correct, transfer the fondant to a vegetable-shortening-coated-surface and knead the fondant with gloved and grease covered hands to be sure the fondant is a uniform consistency and color. Let it set for an an hour, wrapped in plastic.
Roll the fondant out on a well sugar dusted table to be two inches wider and longer than the book. In my case it was 16”x16” and I used a 1/4” chopstick to roll it an even thickness. Fold it in half and carefully transfer to the cake. Trim to size and cut thin long pieces to be the bottom cover of the book. Paint water along the bottom edge and apply the thin pieces.
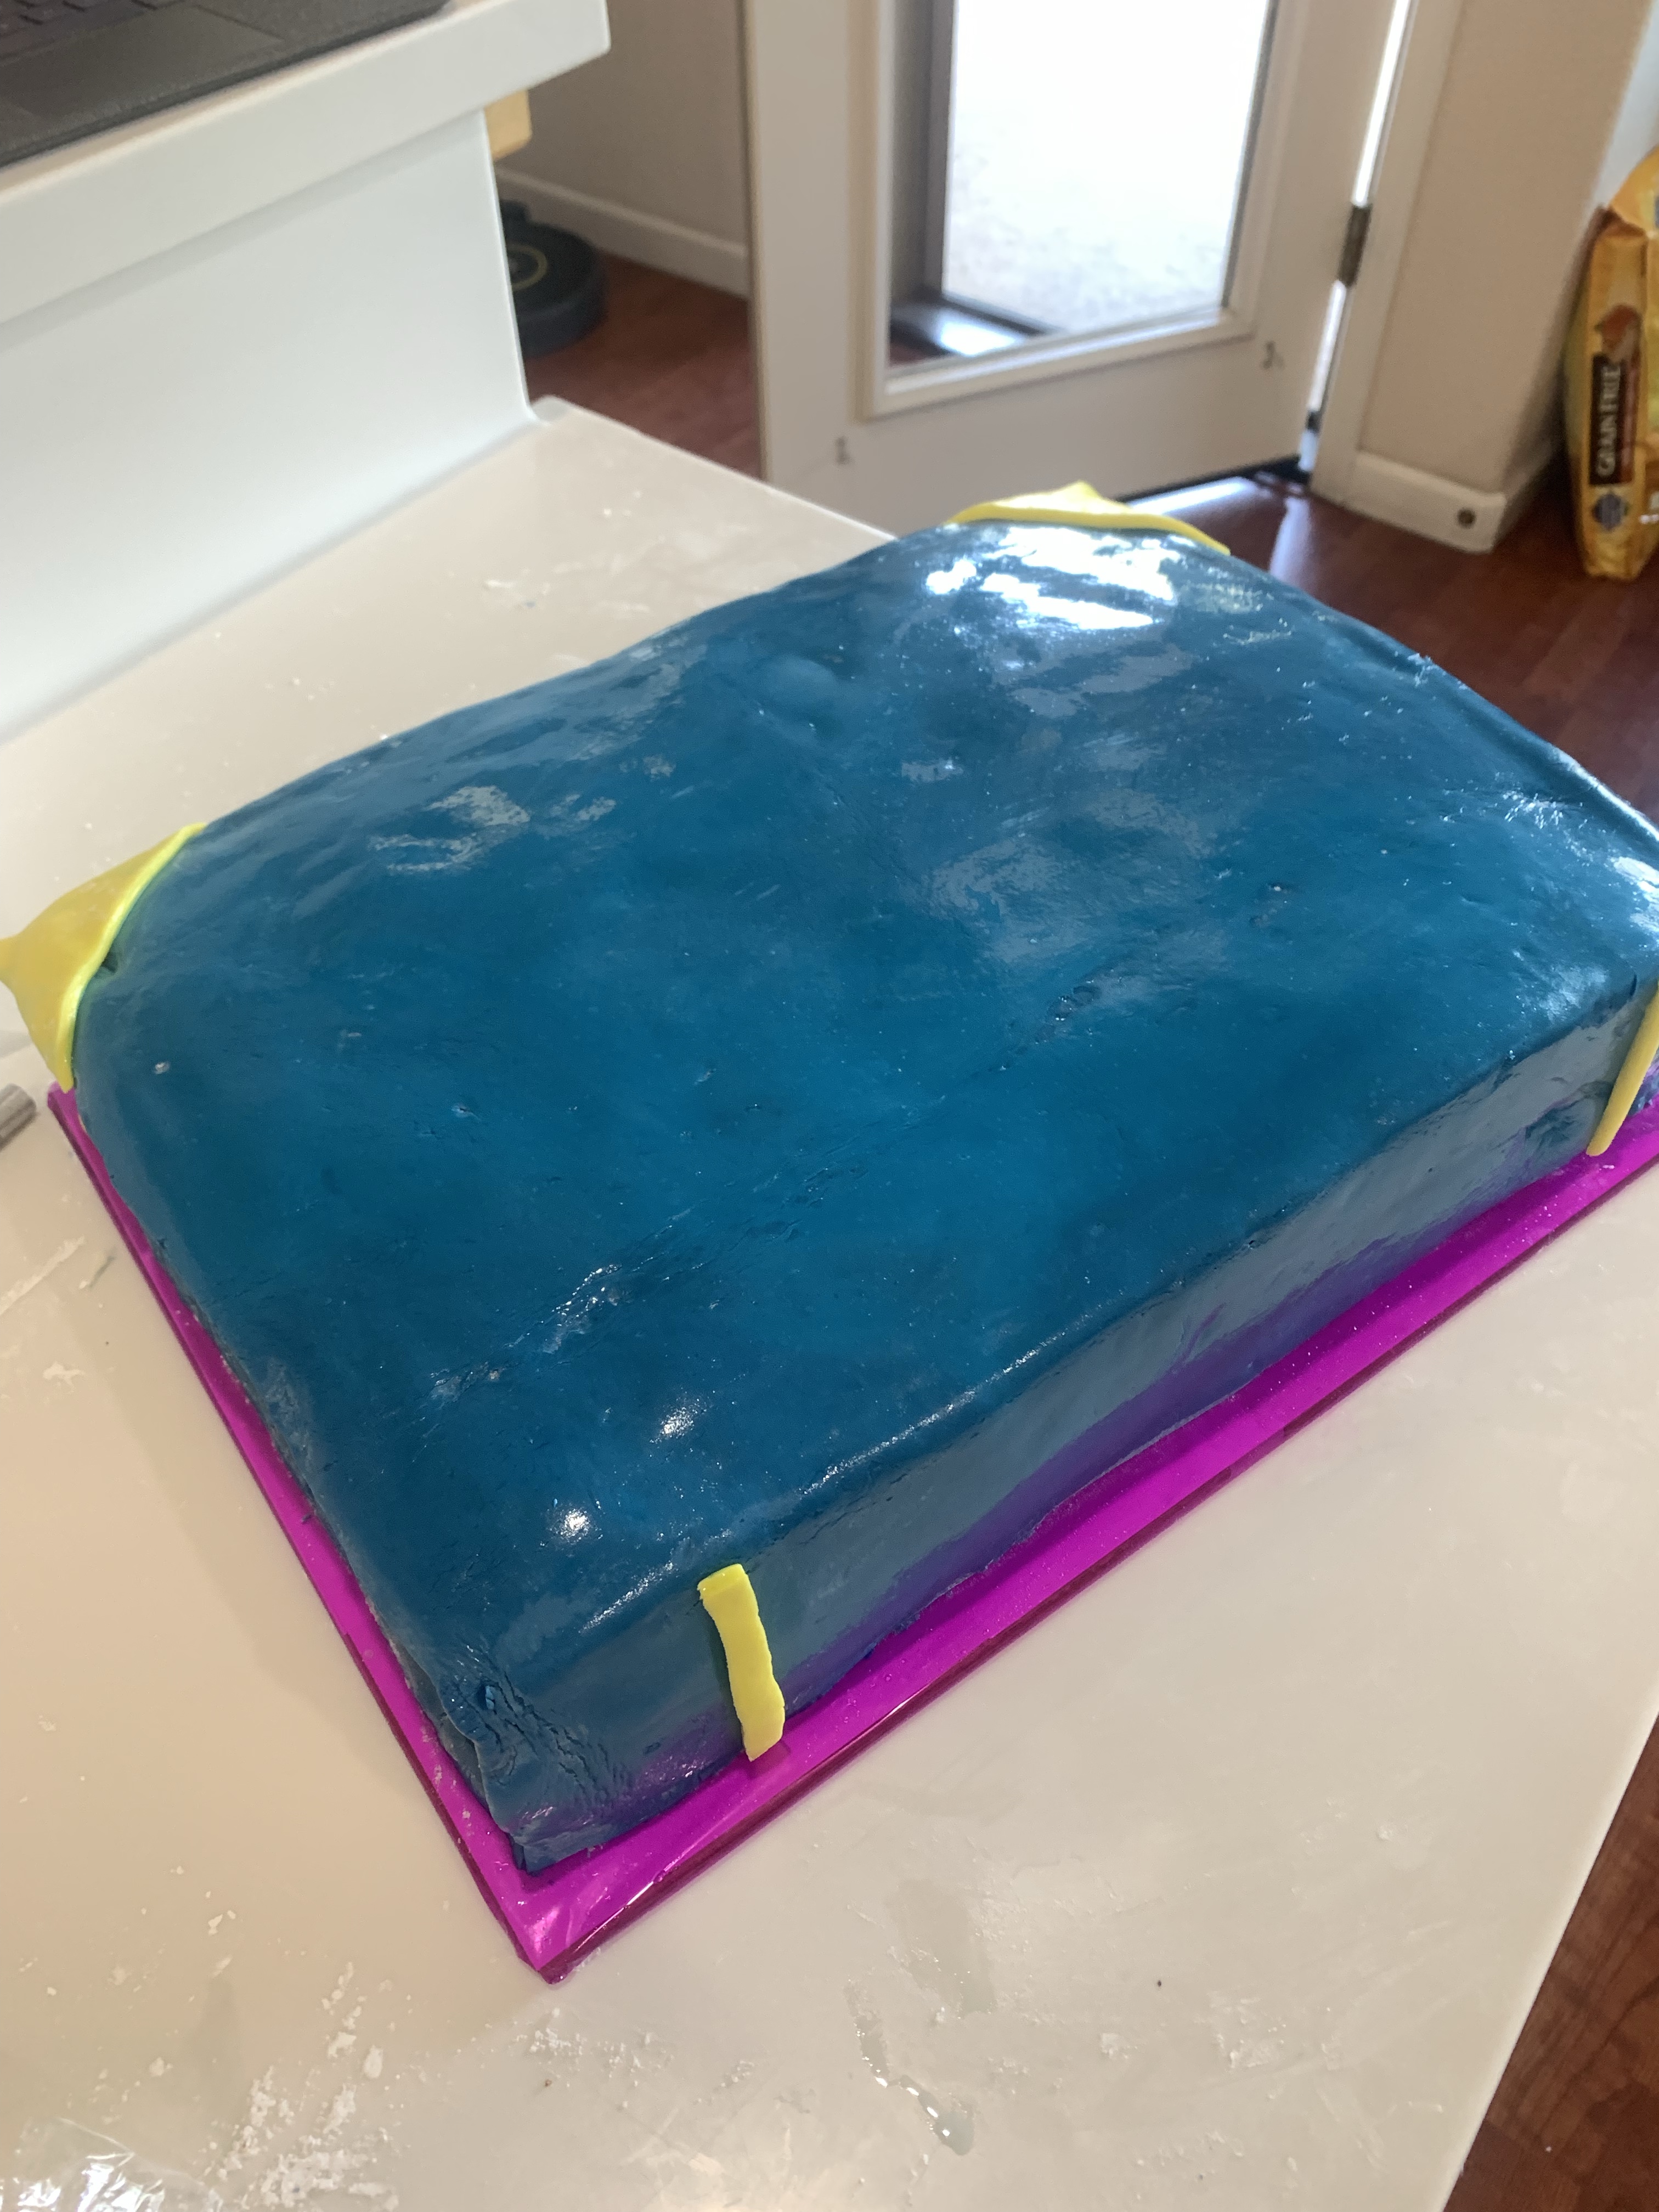
Use the yellow fondant and apply as reinforcements to the corners of the top of the book and thin pieces on the bottom corners. Two more short thin pieces were added to the spline. Wipe the book cover with a damp paper towel. This removes any residual sugar and makes the fondant sticky so the letters will adhere. If the fondant is still too soft, push a toothpick into the top corners to hold it in place. Just remember to remove the toothpick before delivering the cake.
If you have the talent you can brush or pipe the lettering on after the fondant dries. My handwriting is all but illegible so I opt to punch them out and place by hand.
Extreme Chocolate Cake
Makes two 9” round cakes INGREDIENTS (Makes one 10’ ROUND CAKE [and two 5”] – quantities are in parenthesis. Or one 11”x15”x2” sheet cake.) • 2 cups white sugar (3) • 1 3/4 cups all-purpose flour (2 2/3) • 3/4 cup unsweetened cocoa powder (1 ¼) • 1 1/2 teaspoons baking soda (2 ¼) • 1 1/2 teaspoons baking powder (2 ¼) • 1 teaspoon salt (1 ½) • 2 eggs (3) • 1 cup milk (1 ½) • 1/2 cup vegetable oil (¾) • 2 teaspoons vanilla extract (3) • 1 cup boiling water (1 ½)
METHOD
Preheat oven to 350 degrees F (175 degrees C). Grease and flour two 9 inch cake pans. (SEE QTY FOR 10” CAKES)
Use the first set of ingredients to make the cake. In a medium bowl, stir together the sugar, flour, cocoa, baking soda, baking powder and salt. Add the eggs, milk, oil and vanilla, mix for 3 minutes with an electric mixer. Stir in the boiling water by hand. Pour evenly into the two prepared pans. (For cupcakes, portion ¼ scant cups in each cupcake paper.
Bake for 30 to 35 minutes in the preheated oven, until a toothpick inserted comes out clean or 205F internal temp. Cool for 10 minutes before removing from pans to cool completely.
Marshmallow Fondant
INGREDIENTS • 1 package (16 ounces) white mini marshmallows • 2-5 tablespoons water • 2 pounds (about 8 cups) sifted confectioners’ sugar • 1/4 cup solid vegetable shortening METHOD
Grease your mixing bowl and a glass bowl that can be used to melt marshmallows in the microwave.
Place the marshmallows, water and flavoring of your choice in greased glass bowl and microwave on high at 30 second intervals.
Stir every 30 seconds until marshmallows are completely melted, about 2 minutes.
Sift one half of the 2 pound bag of confectioner’s sugar in a greased mixing bowl. Make a well in the center of the confectioner’s sugar and pour in the melted marshmallows.
I use the paddle attachment for my KitchenAid mixer for this first part of the mixture.
Mix until all the melted marshmallows are incorporated in the confectioner’s sugar.
Mixture will be thick but still runny.
Sift the remaining half bag of confectioner’s sugar into the melted marshmallows.
Mix on low until it comes together.
Change to your dough hook attachment as this will get extremely thick.
Fondant will be very thick and have a dough like consistency
Wrap fondant in saran and make sure no air gets to it.
Sometime around my birthday our Florida BFF send me a packet of recipes she culled from a selection of magazines. This Raspberry Swirl Pound Cake caught my eye, however, the first attempt hit the bin after QC rated it thumbs down. (Mfg agreed.)
I modified the original recipe from FoodNetwork by swapping out the AP flour for cake flour. This reduced the gluten to make a softer, lighter cake. Pound cake is not expected to be light and airy, but let’s be honest, dense, wet, stodgy cake is not terribly pleasant. I also substituted caster sugar for the cane sugar, reduced the oven temperature from 350F to 325F, increased the number of egg yolks by 2 and eliminated the almond extract. (QC and I do not like almond extract.) The final result was deemed presentable!
Raspberry-Swirl Pound Cake
INGREDIENTS Cake • 226g (2 sticks) salted butter, at room temperature, plus more for the pan • 198 (1 ¾ cups) cake flour, plus more for the pan • 6-oz fresh raspberries • 2 tablespoons seedless raspberry jam • 248g (1 cup plus 2 tablespoons) caster sugar, divided • 3 large eggs, plus 3 egg yolk, at room temperature • ¼ cup heavy cream • 1 1/8 teaspoons pure vanilla extract • 4 drops red gel food coloring (or enough to make an intense pink color) Glaze • ½ cup confectioners’ sugar • 2 tablespoons heavy cream for topping (more to thin if necessary) • 1/8 teaspoon vanilla • Crushed freeze-dried raspberries, for topping
METHOD
Make the pound cake:
Preheat the oven to 325˚. Spray the bottom and sides of a 9-by-5-inch loaf pan with Baker’s Joy, then line with parchment paper in two overlapping strips, leaving an overhang. Butter the parchment and lightly dust with flour, tapping out the excess.
Combine the fresh raspberries, jam, 2 tablespoons cane sugar and 1/4 cup water in a medium saucepan over medium heat. Cook, stirring and smashing the berries with a wooden spoon, until thickened, 10 to 15 minutes. Remove from the heat and strain through a fine-mesh sieve into a medium bowl, pressing with a rubber spatula. Let cool.
Whisk the eggs, egg yolks, 1/4 cup heavy cream and 1 teaspoon vanilla extract in a medium bowl until slightly foamy; set aside.
Beat the butter and remaining 1 cup caster sugar in a large bowl with a mixer on medium speed until well combined, 1 to 2 minutes. Scrape down the bowl and increase the mixer speed to medium high. Beat until pale and fluffy, 6 to 7 more minutes.
Reduce the mixer speed to low and beat in the flour until just combined.
Gradually add the egg mixture and beat until combined. Scrape down the bowl, increase the speed to medium and beat until smooth and fluffy, 15 to 30 seconds.
Scoop 3/4 cup batter into the bowl with the raspberry sauce and stir in the red food coloring. Transfer half of the remaining plain batter to the prepared pan and top with half of the raspberry batter; swirl together with a knife. Repeat and swirl the batters together again.
Bake until the top springs back when gently pressed and a toothpick inserted into the center comes out clean, 1 hour 10 minutes to 1 hour 20 minutes. (205 F internal temperature)
Transfer to a rack and let cool 15 minutes in the pan. Lift the cake from the pan and remove the parchment; return to the rack to cool completely.
Make the Glaze
Combine the confectioners’ sugar, 2 tablespoons heavy cream and the remaining 1/8 teaspoon each vanilla and almond extracts in a medium bowl and whisk until smooth; thin with the remaining 1 tablespoon heavy cream, if needed.
Spoon the glaze over the cooled cake and sprinkle with freeze-dried raspberries. Let set at least 20 minutes.
I am making my granddaughters birthday cake. Like so many girls she is really into unicorns, hence a Unicorn Cake. This will be a three tier cake, 10”, 8” and 6”. The 6” layer will have a unicorn cake topper and a multicolored flowing mane down the back. Check out that post in a few days.
The base will be my Extreme Chocolate Cake (my favorite) and the center will be a Heavenly White Cake, which is a blend between white and angel food cake. Again, stop back next week for details
Right now I am describing the strawberry cake recipe that I adapted from my Heavenly White Cake. The trick to this cake lies in the strawberry puree reduction. Placed sliced strawberries in a food processor and pulse until it is a puree. Place the puree in a small saucepan and with occasional stirring, reduce to about half the volume. This will take 30 – 40 minutes. Cover and place in the fridge until cool, (Overnight would be fine.)
I also added 1/4th tsp of strawberry extract to enhance the flavor. Any more would make it taste artificial. The Heavenly White Cake uses a cup of plain milk (I use 2% low calcium as that is what we stock in the home.) For the strawberry version I added 1 Tbl of vinegar to 1/2 cup of milk. This makes a pseudo buttermilk. I also added 1/4 cup of heavy cream hoping the final cake would be moist. The 1/2 cup strawberry reduction added the balance of the liquid.
For my test cake this recipe made two 6” and one 5” round cakes, 2” high. They required about 30 minutes to bake. I checked it using the spring back test, clean tooth pick check and measuring the center of the cake to be 210 deg F.
Overall, I was pleased with the moisture, flavor and texture of the cake. Combined with the Heavenly White and Extreme Chocolate cakes, marshmallow fondant and buttercream frosting, it should be a Unicorn Spectacular!
Heavenly Strawberry Cake
INGREDIENTS • 2¾ cups sifted cake flour • 4 teaspoons baking powder • ¾ teaspoon salt • 4 egg whites • 1½ cups white sugar • ¾ cup butter • ½ cup milk (add 1 Tbl vinegar to make “Buttermilk” equivalent milk) • ¼ cup heavy whipping cream • 1 teaspoon vanilla extract • ¼ tsp strawberry extract • ¼ tsp red food coloring • ~250 g diced strawberries
METHOD
The day before baking: Puree strawberries and reduce to ½. This will take 20-30 minutes. Place in the refrigerator, covered, overnight.
Measure sifted flour, baking powder, and salt; sift together three times.
In a mixing bowl, beat egg whites until foamy. Add 1/2 cup sugar gradually, and continue beating only until meringue will hold up in soft peaks.
Cream butter or margarine. Gradually add remaining 1 cup sugar, and cream together until light and fluffy. Add sifted ingredients alternately with milk a small amount at a time, beating after each addition until smooth. Mix in flavorings. Add meringue, and beat thoroughly into batter.
Whisk in ½ cup of puréed strawberries.
Add ¼ tsp red food coloring, mixing well. (Optional)
Spread batter in a 15 x 10 x 1 inch pan which has been lined on the bottom with parchment paper.
Bake at 350 degrees F (175 degrees C) for 30 to 35 minutes. Cool cake in pan 10 minutes, then remove from pan and transfer to a wire rack to finish cooling. This cake may also be baked in two 9 inch round pans for 30 to 35 minutes, or in three 8 inch round pans for 25 to 30 minutes.
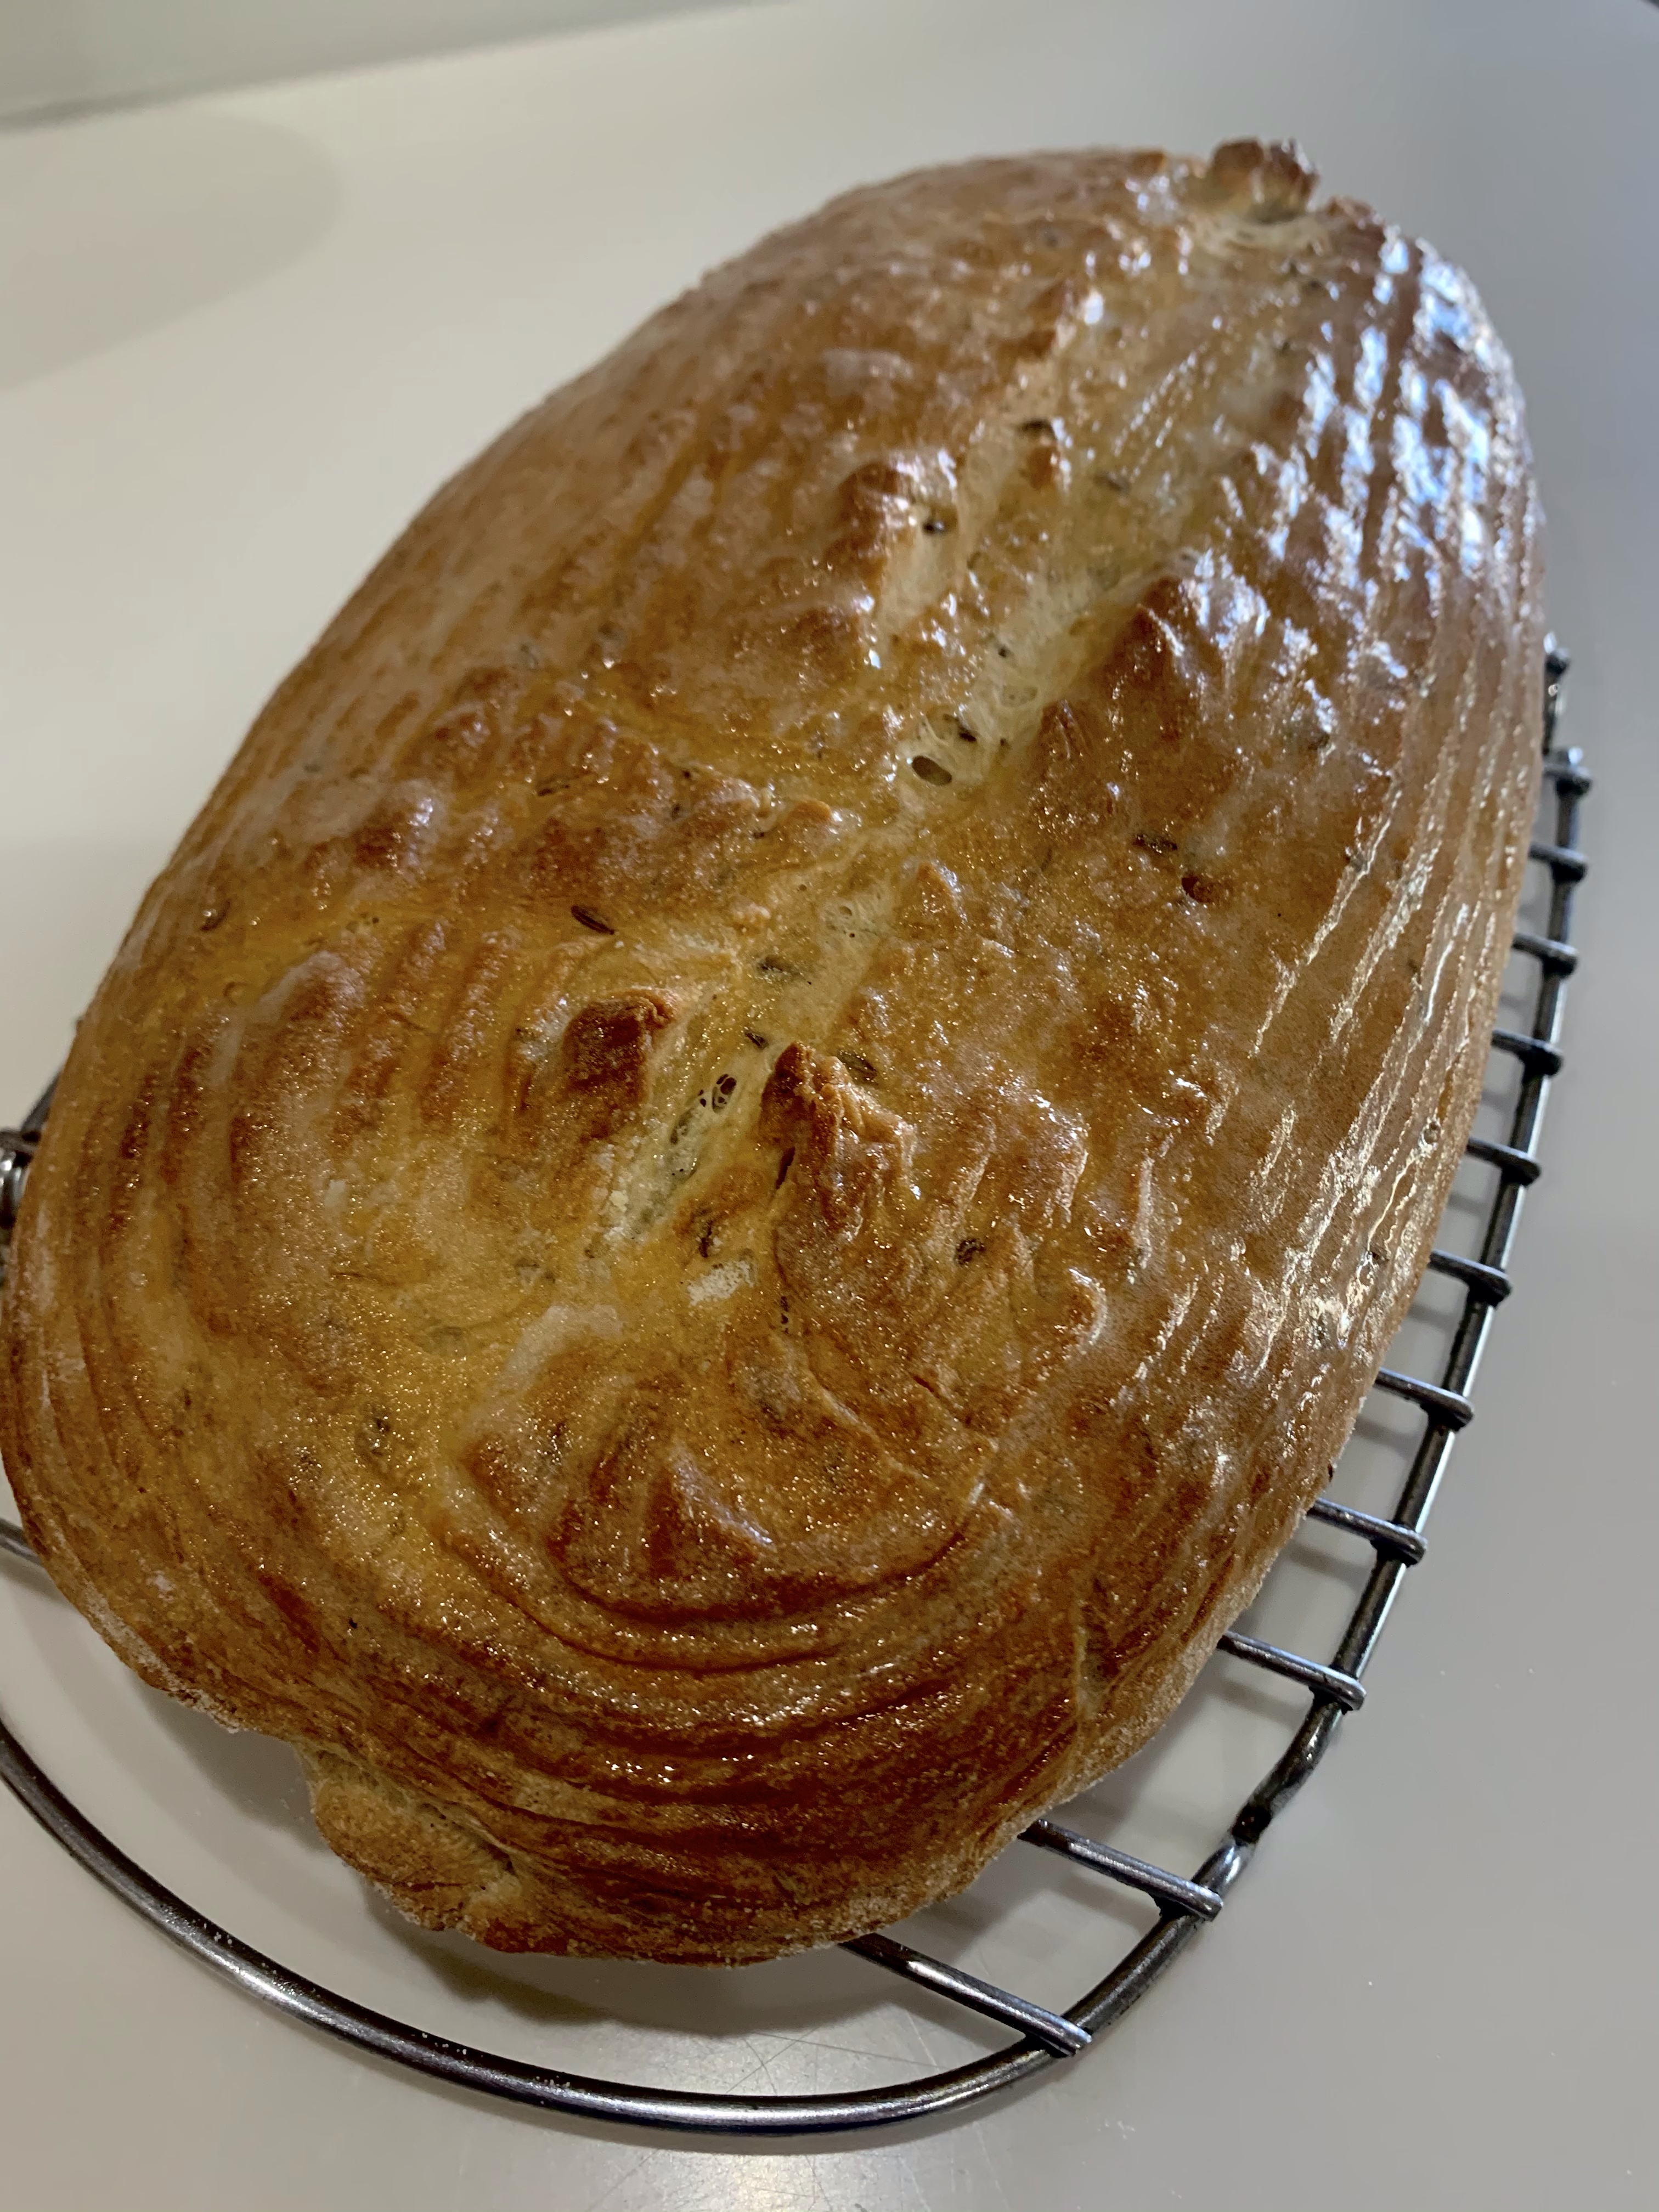
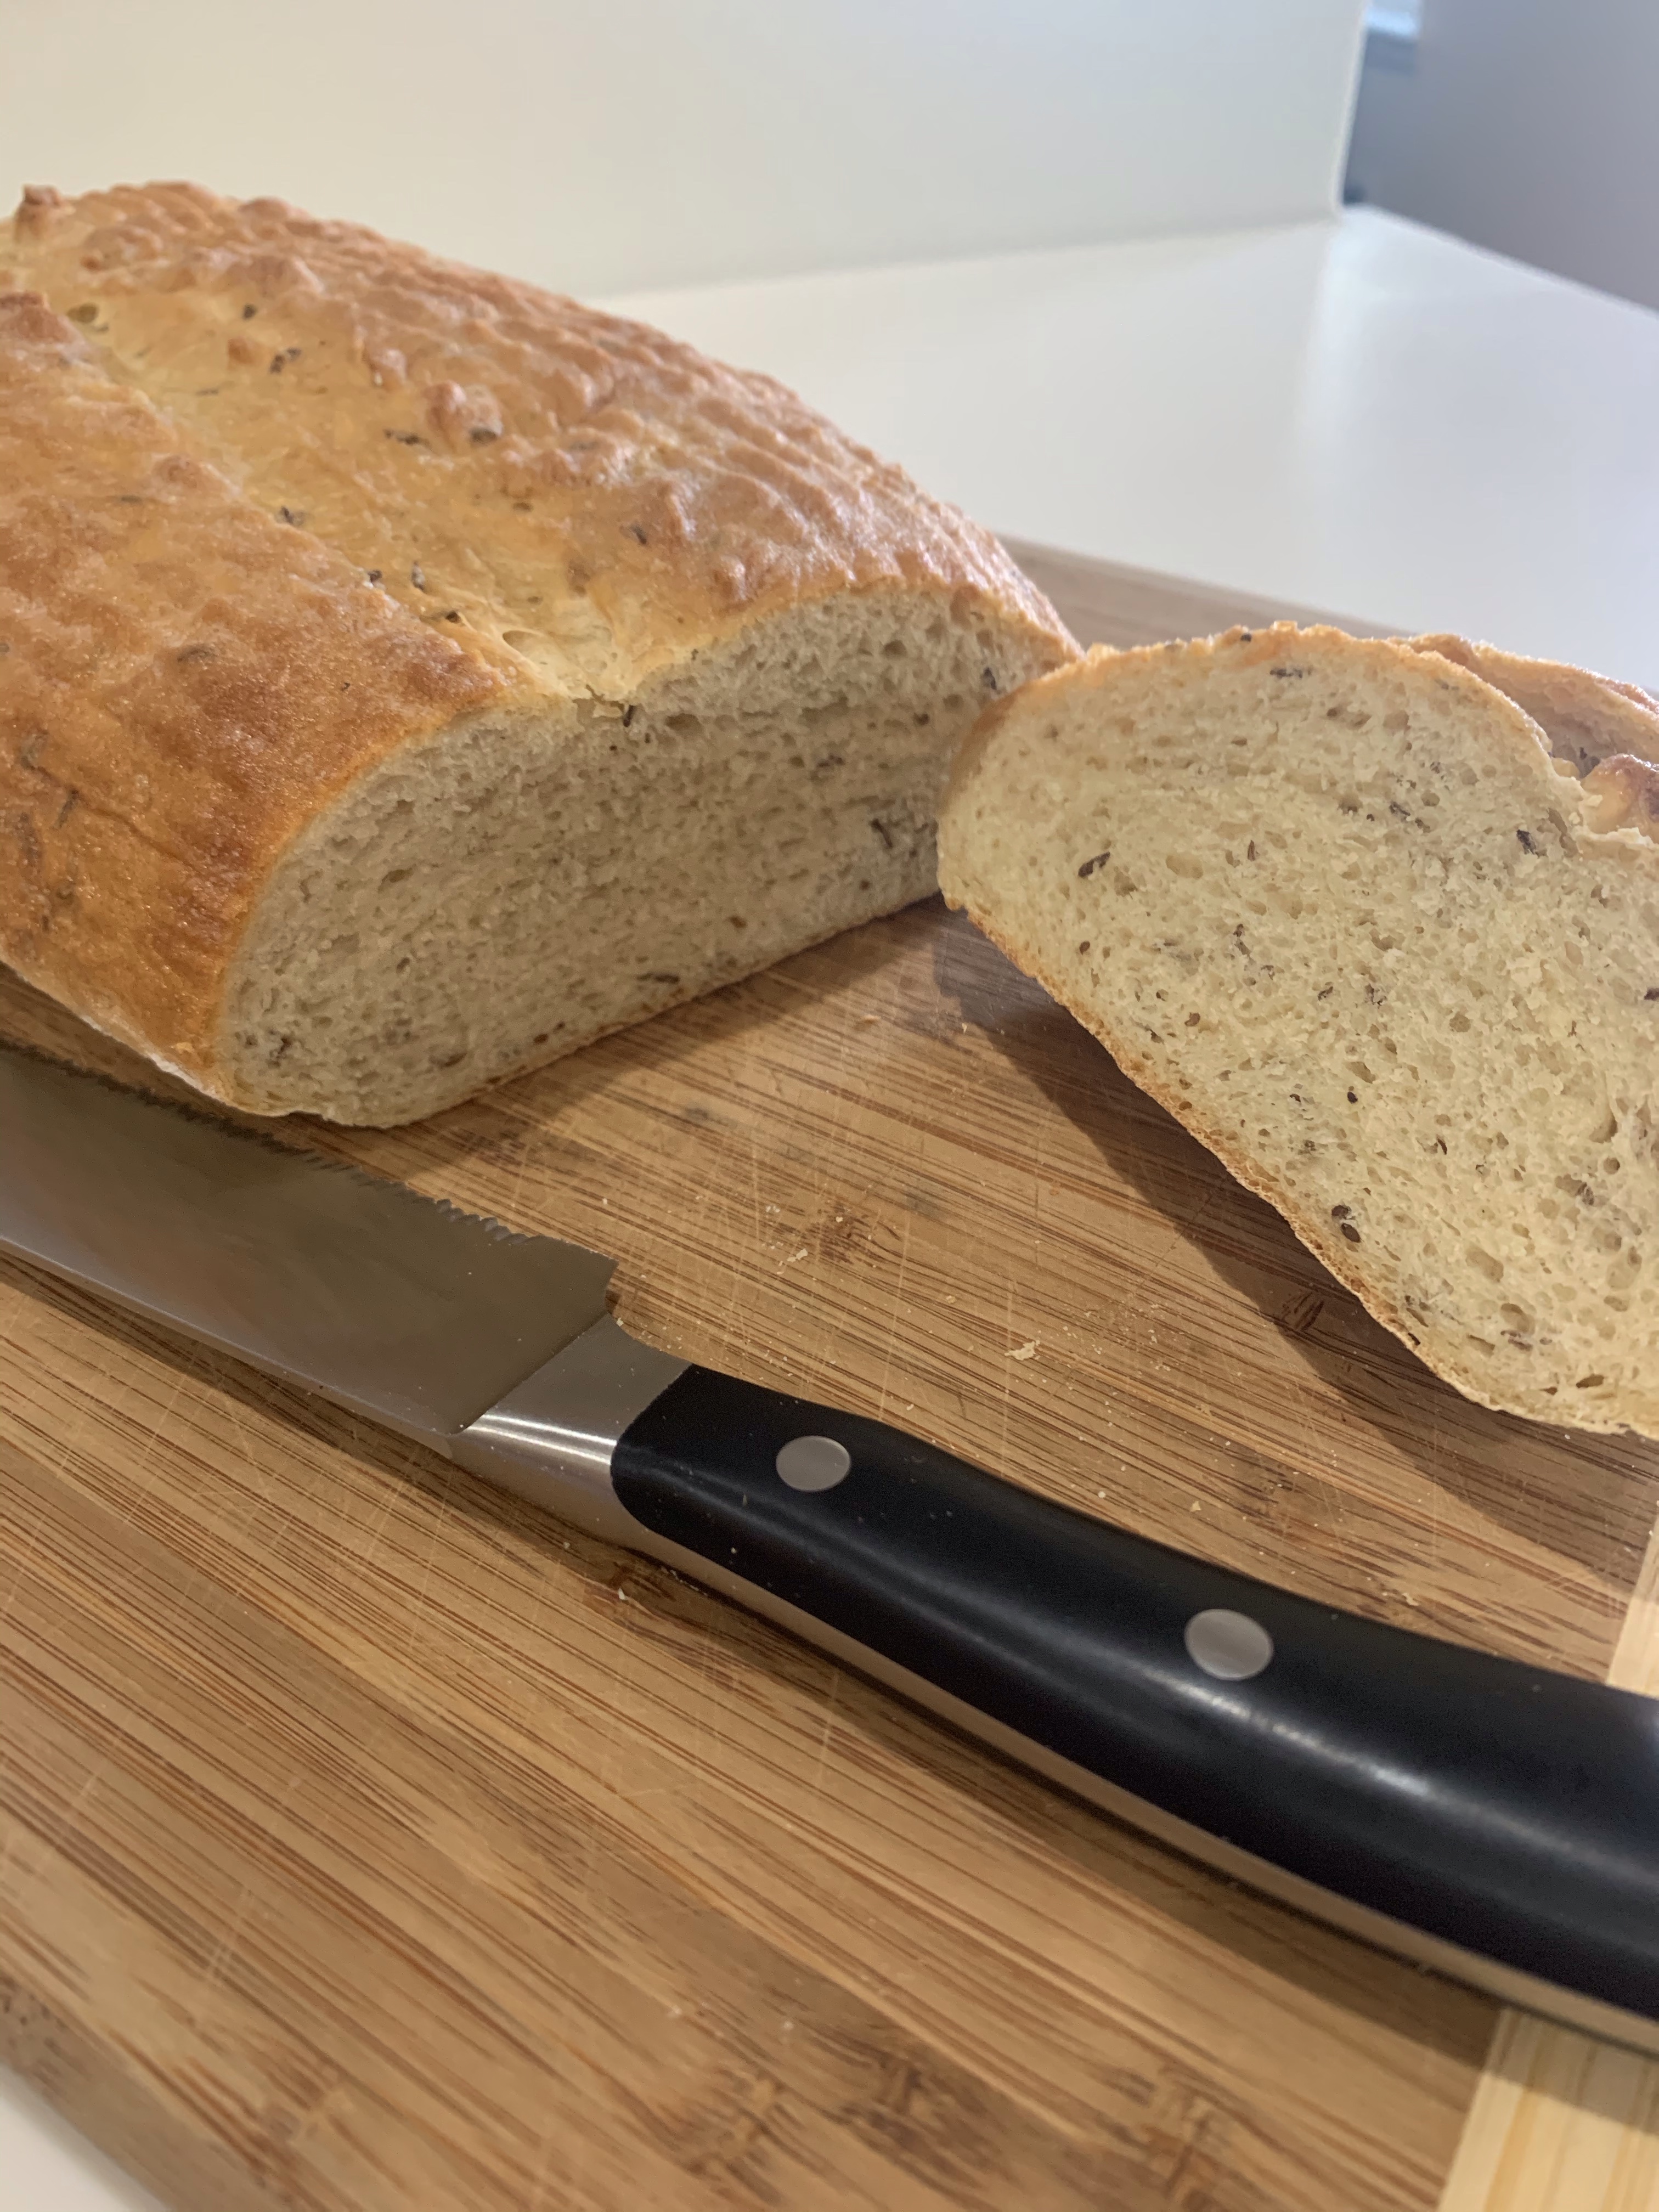
As I said in Part 1, this variation will simply substitute First Clear Flour for the White Rye in Part 1. I added an egg/water wash to this loaf to increase the color of the bread. I did not coat the finished warm bread with butter, which darkened the Part 1 loaf. I also baked it in the bottom of a Dutch Oven to help keep its shape. (No real difference.) I won’t publish the recipe again, just go to Part 1 and make the change noted above.
Part 2 Rye Bread
Manufacturing reports the crumb may be a little better. The holes are slightly larger and more evenly distributed. The crust is a little chewier and darkened just about right. The rise was higher. QC has yet to report.
Part 3 will substitute Rye Bread Improver for the Vital Wheat Gluten. I am thinking Part 4 will be the winner of Parts 1-3 and substituting pumpernickel flour for the other rye flour. Stay tuned.
I have a recipe for fig cake, but currently have an over abundance of sliced plums in the freezer and this year’s crop is on the tree. Substituting the plums for figs was a good choice. The tartness of the plums paired nicely with the sweetness of the cake. Now, what to do with the bags of frozen figs?
L – Unsugared Cake, C – Unsugared Mini-Bundt, R – Sugared Cake Using other cake mold
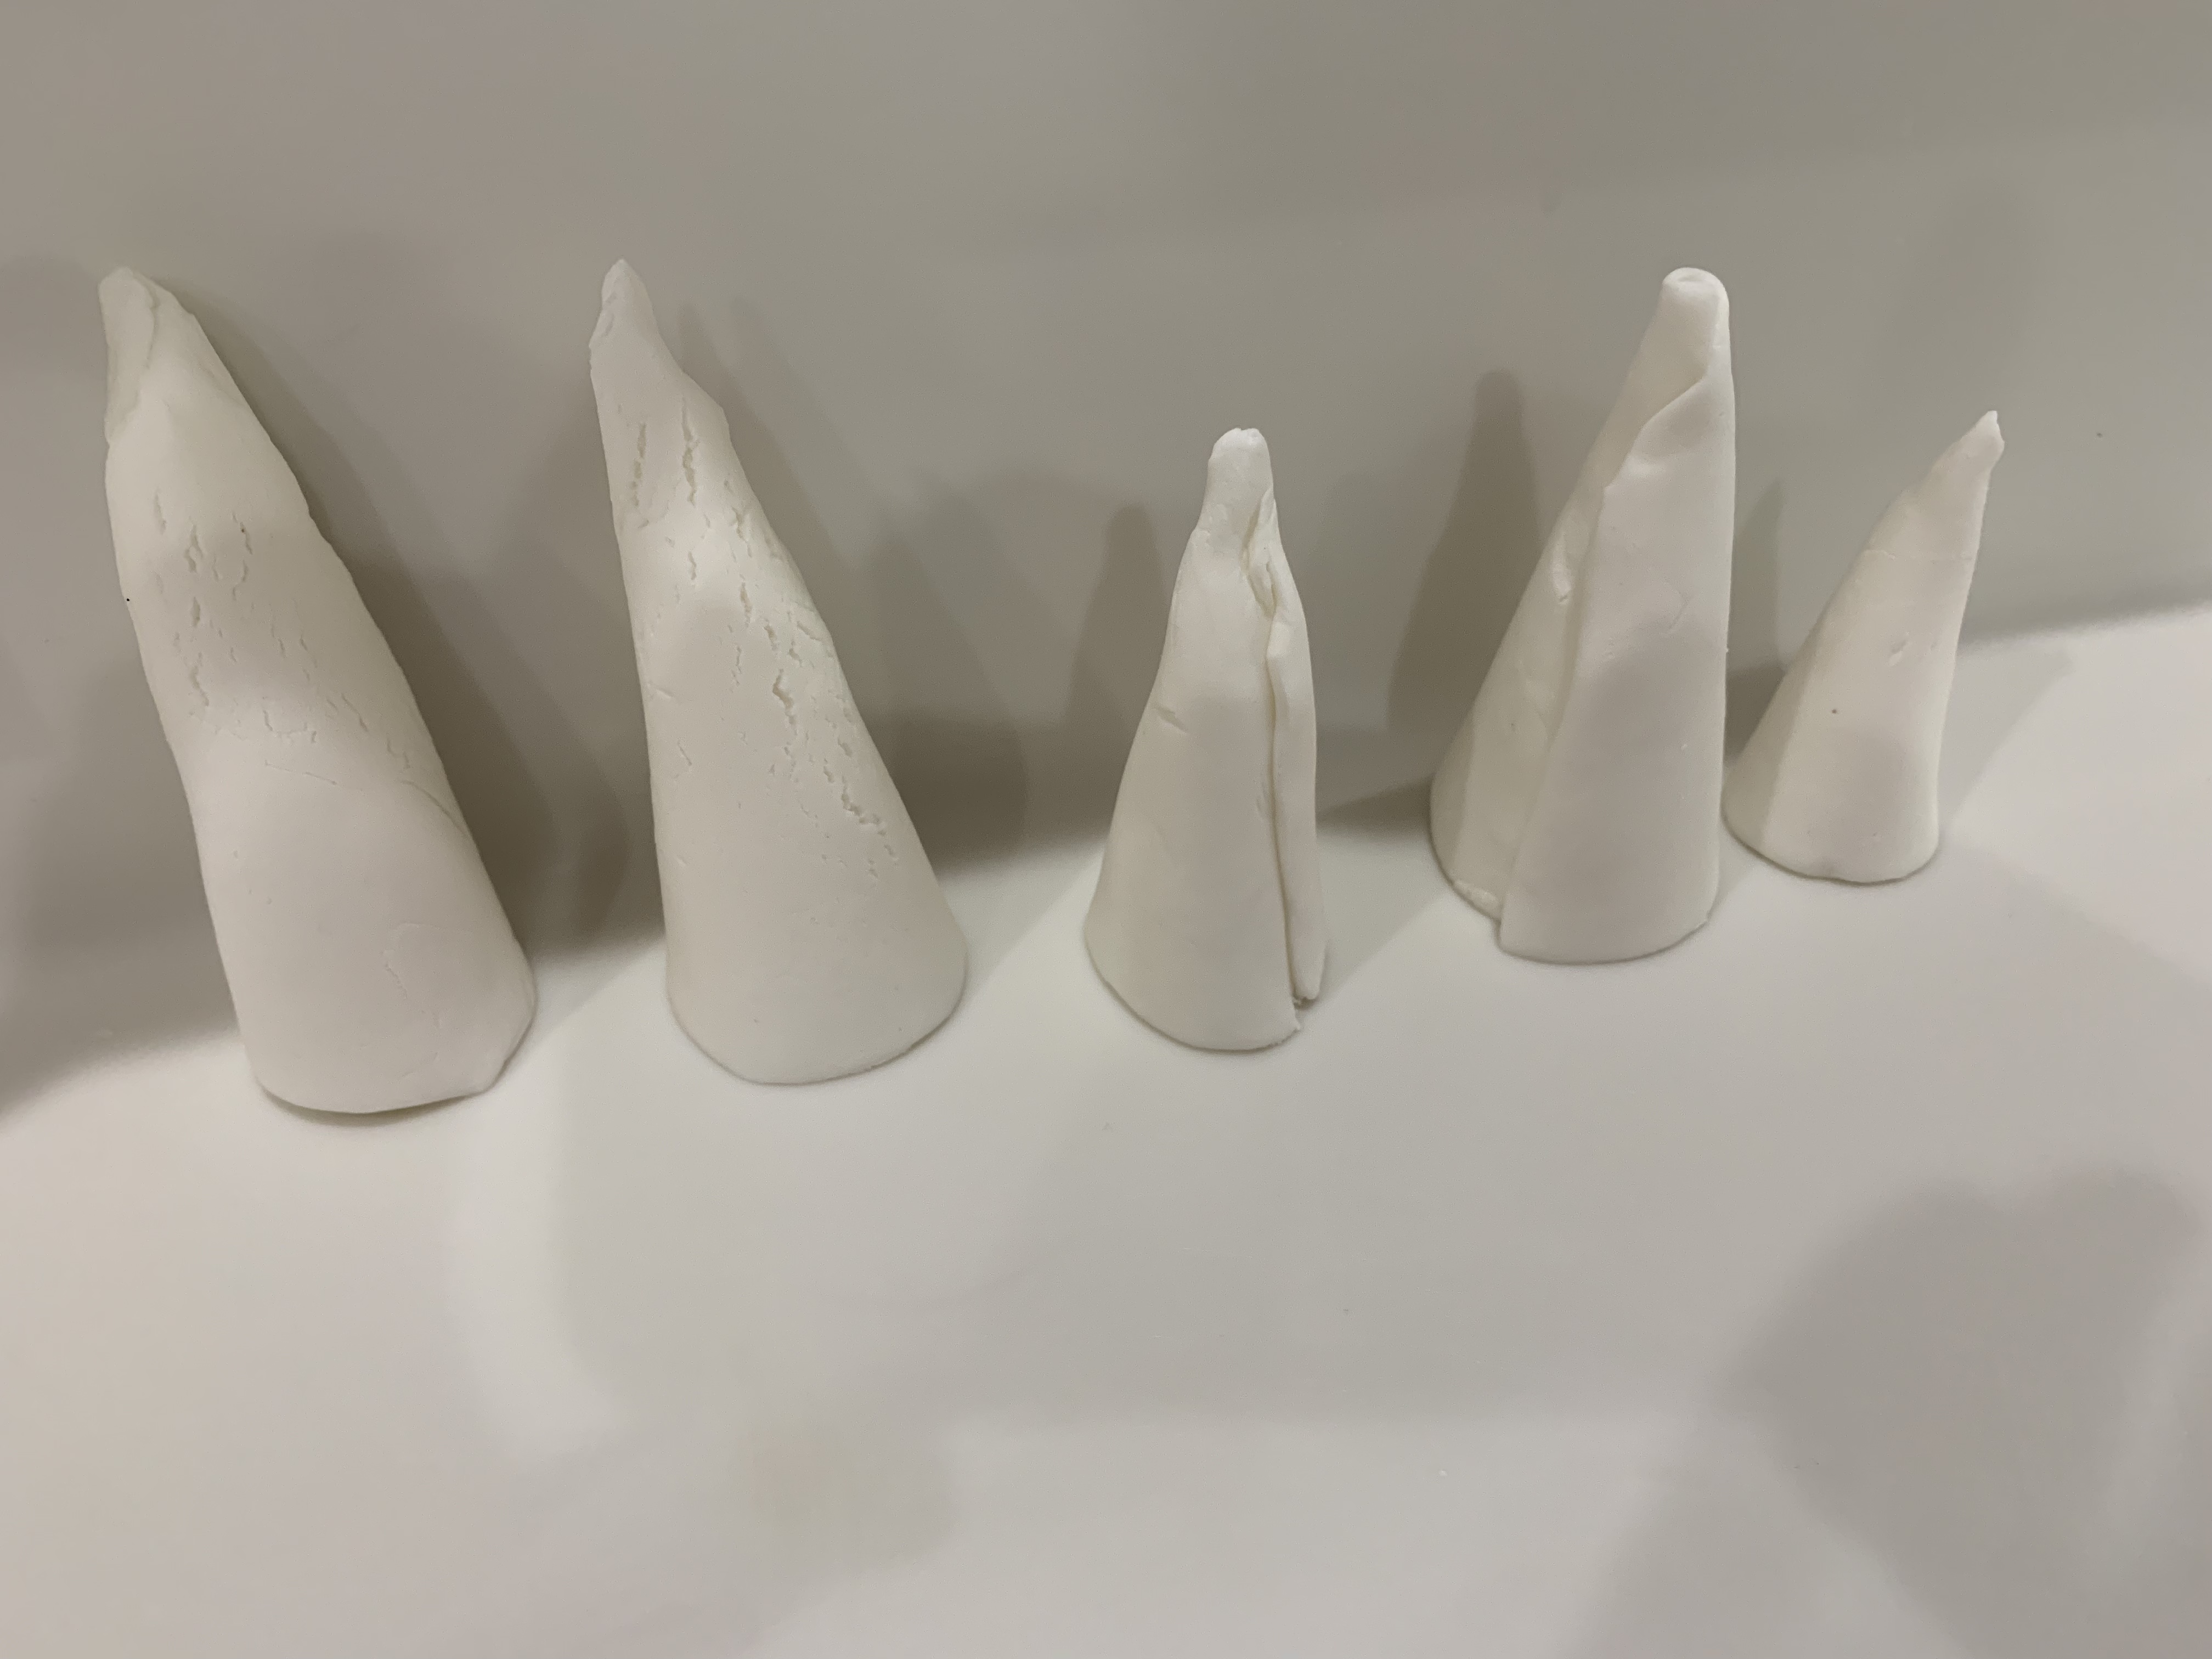
As we near the end (of some peoples playing season,) one of my golf buddies invited our foursome and families over for a patio dinner before the weather starts turning cold(er). I offered to bring a cake along to the dinner. This is what I made this morning
It’s my extreme chocolate cake with buttercream frosting.
The trees are gum-paste cones made by wrapping thin gum-paste around a form, then set to dry overnight.
Of course, I rarely hit it straight down the middle!!
It’s summertime again. Actually, it is the end of May and summer is still 3 weeks away but if you live in South Florida summer began months ago. I needed a cake for a dinner party this weekend and said to myself, “Self, what springs to mind when you think about summer?” After a moment, I replied, “Well, after a long hot winter I want to fall into a cool, refreshing cake that shrieks summer.” I decided on a Watermelon Cake. It doesn’t taste like watermelon (it is actually a white cake dyed reddy/pink) but sure looks like one.
Bake the cake in a greased and flowered Wilton Egg Pan (because I own one.) Fill the pan to within an inch of the top and be sure to put a cookie sheet under it while baking as it will overflow the pan. My oven is slow so I baked it for an hour at 350 F. Remove from the oven and let cool completely. Trying to remove the cake while warm will destroy it.
After the cake is completely cool, (I know, the cake is very cool, but in this case I mean the temperature) cut the excess cake along the edge of the Egg Pan to make a perfectly flat side then turn it out onto a wire rack. If necessary loosen the edges of the cake from the pan with a flexible spatula.
Frost the cake with a heavy layer of white crusting butter cream frosting (I made a double recipe of the below) and place in the freezer. When the frosting is set, about an hour, coat with another layer of white frosting making it as smooth as possible, returning to the freezer. This makes the thicker white watermelon rind. While the twice white frosted cake is again setting add some green food coloring to the remaining frosting. This green should be the background green of the watermelon, not the dark green lines. Add a little additional milk to reduce the viscosity, or to the non-scientists among us, reduce the “thickness.” After the frosting on the cake is set, smooth a layer of the light, thinner green frosting over the entire cake and return to the freezer. After the now light green cake is set, remove from the freezer and smooth the surface. I like to use a latex gloved hand wetted by holding it under the faucet. A bowl of water would also work but then you have to clean another bowl. You will have to clean and re-wet your hand a few times to smooth the entire cake. Once the light green frosted cake is smooth, guess what? Return it to the freezer to set. Remove the smooth light green frosted cake from the freezer and paint the dark green stripes. I used Duff green airbrush dye and a 3/8″ brush (because I own them.) If you are the artistic type with a good eye and imagination this is no biggie. If you are the more analytical, fallen chemist type, set your iPad with a picture of a watermelon next to your cake and copy to the best of your limited artistic ability.
BTW, here is a tip I found online: to disperse the chocolate chips and not have them settle to the bottom of the cake batter mix them into the flour mixture being sure the are well coated with flour. This seems to help them “float” in the cake batter as it bakes.
Here is another tip: don’t let the cake with the thick frosting warm up in the car ride to your party. Soften or melted rind signficantly affects the overall impression of the cake.
Recipe: Heavenly White (Watermelon Colored) Cake
Ingredients
2 3/4 cups sifted cake flour
4 teaspoons baking powder
3/4 teaspoon salt
4 egg whites ( or substitute)
1 1/2 cups white sugar
3/4 cup butter
1 cup milk
1 teaspoon vanilla extract
1/2 cup of chocolate chips
Red dye
Directions
Measure sifted flour, baking powder, and salt; sift together three times.
Add chocolate chips and mix being sure the chips are well coated with the flour mixture
In a mixing bowl, beat egg whites until foamy. Add 1/2 cup sugar gradually, and continue beating only until meringue will hold up in soft peaks. Add red dye to approximate a watermelon color.
Cream butter or margarine. Gradually add remaining 1 cup sugar, and cream together until light and fluffy. Add sifted ingredients alternately with milk a small amount at a time, beating after each addition until smooth. Add red food dye until the same watermelon pinky/red is achieved. Mix in flavorings. Add colored meringue, and beat thoroughly into batter. Pour into well greased and floured Egg Pan.
Bake at 350 degrees F (175 degrees C) for about 60 minutes. Check the springiness of the cake after about 45 min. Guess when it is done (when the depression caused by your finger is anti-depressed, or springs back up.) Leave the cake in pans until completely cool, then trim the bumpy puffed up cake above the rim of the Egg Pan and remove and transfer to a wire rack.
Basic Crusting Butter Cream
Ingredients:
1/2 cup solid high ratio shortening
1/2 cup butter softened
1 tablespoon of meringue powder
1 teaspoon Clear Vanilla Extract (or extract of choice)
Green food color (add after cake is frosted with the white frosting)
In large bowl, cream shortening and butter with electric mixer. Add vanilla and milk. Gradually add sugar, one cup at a time, beating on a slow speed. Scrape sides and bottom of bowl often. Keep bowl or covered with a damp cloth until ready to use. Refrigerated in an airtight container, this icing can be stored 2 weeks. Don’t overwhip or it will bring air to the icing and is impossible to smooth. If you have a kitchen Aid use white attachment, not whip attachment.
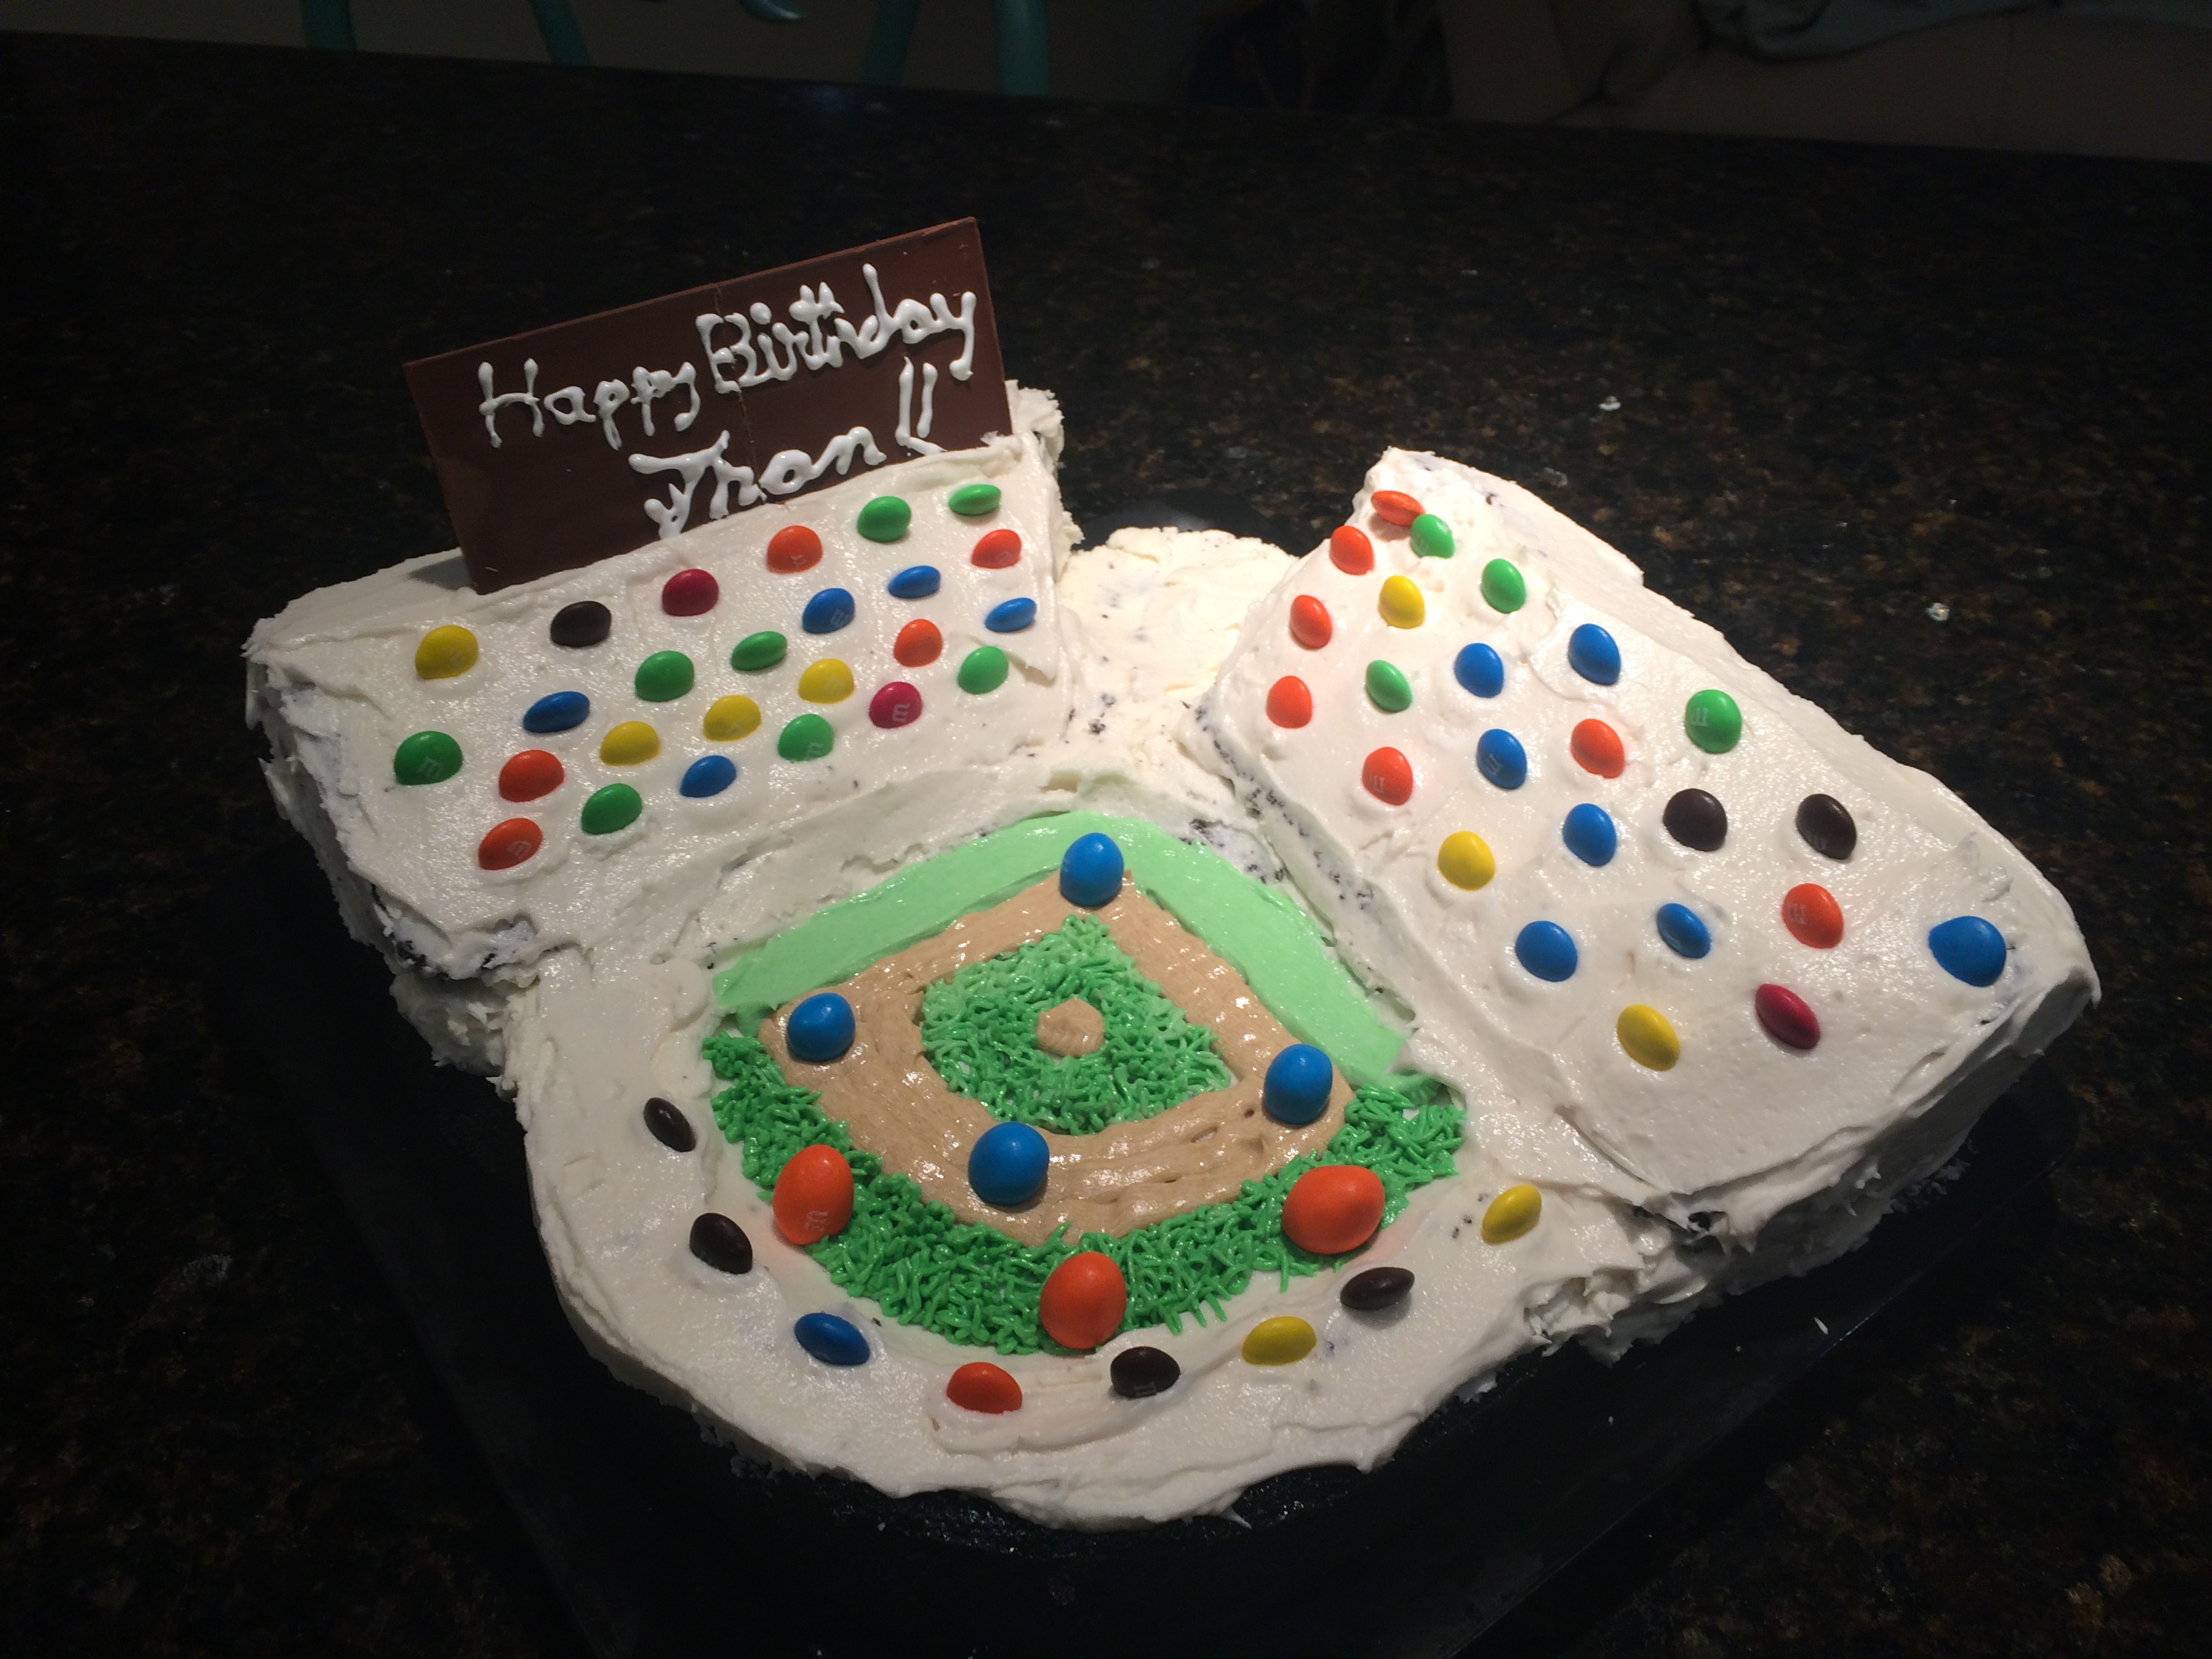
For her birthday all Fran wanted was one of my cakes. For the woman who starts counting the days until pitchers and catchers report from the last out of the World Series (114 days) I thought a baseball themed cake would be perfect. I mulled it over for a while, discarding baseballs, gloves and bats before deciding on a baseball park.
As I often do, I searched Google images for ideas of a design for a baseball park cake. Not finding any that caught my eye or attention, I designed my own. The first thing I discovered is it is very difficult to make a small cake with any detail. I compromised and used M&M’s for fans and Peanut M&M’s for players. The scoreboard is a Hershey bar (one of Fran’s favs) with a Happy Birthday message piped with royal icing. You can tell I did that, the piping is mediocre and the penmanship is atrocious. The playing field is chocolate cake with the outfield carved into a curved radius and grand stands are white velvet cake baked in a bread loaf pan then cut at an angle to make parallel triangular wedges for the grand stands. Everything was crumb coated with white butter cream frosting, chilled overnight and a finish frosting coat added the next day.
The infield was made from green dyed butter cream and piped onto the cake with a grass tip (Wilton #233.) M&M’s were placed strategically around the ball park and the scoreboard on top of the right field grand stand.
Recipes for all cakes, frostings and icings can be found in other posts in my blog.


![IMG_1421[1]](https://abatteredoldsuitcase.com/wp-content/uploads/2015/05/img_14211.jpg?w=300)
![IMG_1422[1]](https://abatteredoldsuitcase.com/wp-content/uploads/2015/05/img_14221.jpg)
![IMG_1427[1]](https://abatteredoldsuitcase.com/wp-content/uploads/2015/05/img_14271.jpg)
 playing field is chocolate cake with the outfield carved into a curved radius and grand stands are white velvet cake baked in a bread loaf pan then cut at an angle to make parallel triangular wedges for the grand stands. Everything was crumb coated with white butter cream frosting, chilled overnight and a finish frosting coat added the next day.