There’s Chocolate, Then There’s Chocolate

Sigh, there are many, many varieties of chocolate, and so little time.

I am a fan of dark chocolate, (not intense 85%+ cacoa but a nice 52-70%.) I find the flavor more intense than milk chocolate (34%) and of course there are the currently purported health benefits of dark chocolate. Not only do I have to contend with percent cacao but also many different manufacturers. I should probably create a spreadsheet for them all.

I am also experimenting with fillings for chocolate candies, a tough job, but someone really should do it. Last month I made two new fillings, buttercream and fresh raspberry/chocolate ganache. Both were excellent, but I wanted some candies with a soft gooey filling.

This morning I made a batch with some Guittard 46% semi-sweet baking chips I picked up at the grocery story a couple of weeks ago. I thought these might be a good compromise between the dark that I like and the milk chocolate that Fran prefers.

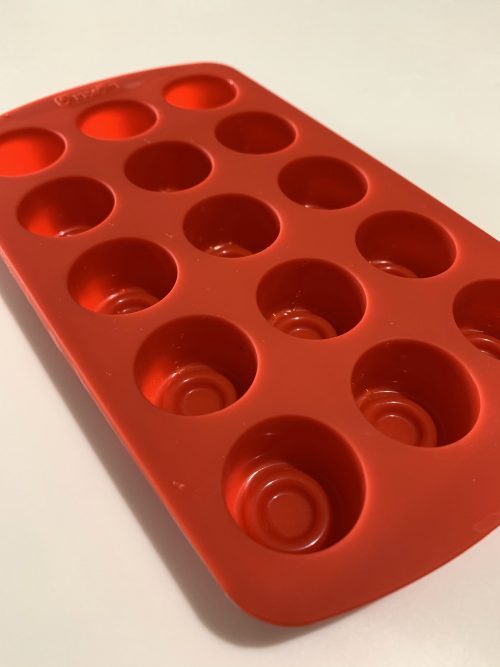
I tempered the chocolate, coated the inside of a heart shaped silicone mold and let it cure. This morning I made a batch of cream filling and divided it into two. One was flavored with peppermint to make some gooey peppermint patties, the other with vanilla for plain vanilla chocolates.

I want to make this same recipe but flavor with fresh strawberry or raspberry or orange ganache. I am experimenting with fillings as much as I am with different chocolates.

Homemade Peppermint or Vanilla Patties

INGREDIENTS

• ½ – ¾ cup sweetened condensed milk (amount depends on desired consistency)

• 1 ½ teaspoons peppermint extract (optional)

• 339g (3 cups) powdered sugar

Optional Dipping Chocolate or use tempered chocolate in mold

• 8 ounces dark chocolate chopped

• 2 teaspoons oil

METHOD

1. In a medium size bowl mix the sweetened condensed milk, peppermint extract, and powdered sugar together. Add more sweetened condensed milk until mixed to viscosity desired.

2. Divide dough into number of flavors desired and place each portion in a small bowl

3. Add flavorings and mix well.

4. Pipe filling to fill each chocolate well to within 1/8” of the top of the well

5. Let set for 10 minutes

6. Add enough tempered chocolate to each well to seal the filling inside.

7. Scape bottom of mold to remove excess chocolate

8. Store the peppermint patties in the fridge until ready to be served! Enjoy!

Yes, Need Bread

While traveling last week I saw a recipe for no-knead bread and today was my first chance to try it. Actually, I started it last night and finished it in time for a sandwich for lunch today. That seemed appropriate as the recipe described it as sandwich bread.

Rather than kneading the dough, once mixed into a wet sticky mess, it is rested, covered, in the refrigerator overnight. In the morning shape it into an 8” long log and place into a lightly greased bread pan. Allow the dough to warm to room temperature and rise under a clean, flour dusted kitchen towel for two hours.

This recipe makes an enriched Pullman loaf, although I don’t actually have a Pullman Loaf Pan (a square bread pan with lid.) While the shape was off, the buttery flavor was excellent and it had the fine crumb a Pullman Loaf should exhibit. It made a wonderful turkey, tomato and home grown lettuce sandwich.

Bake at 375 deg F for about 40 minutes, or until the internal temperature is 200 deg F. Place on a cooling rack and coat the top with butter. Make your sandwich and sit back to watch the Tennessee vs Kansas City playoff game.

No Knead Sandwich Bread

INGREDIENTS
• 31⁄3 cups bread flour, plus more for work surface
• 11⁄2 cups whole milk, at room temperature
• 21⁄2 tablespoons granulated sugar
• 11⁄2 teaspoons active dry yeast (from 1 1⁄4-oz. envelope)
• 6 tablespoons unsalted butter, melted, divided
• 13⁄4 teaspoon kosher salt
• Cooking spray

METHOD
Stir together flour, milk, sugar, yeast, and 5 tablespoons of the melted butter in a large bowl. Stir with a wooden spoon until no dry spots remain. Cover the bowl with a clean dish towel and let stand 20 minutes. Add salt and stir until dough is sticky and elastic, about 2 minutes. Cover the bowl tightly with plastic wrap and transfer to the refrigerator; chill for 8 hours or overnight.

Lightly coat an 81⁄2-by-41⁄2-inch loaf pan with cooking spray. Turn chilled dough out onto a lightly floured surface. Using lightly floured hands, shape dough into a rough oval. (Dough may be difficult to shape.) Fold short ends of oval in toward the center, pressing gently to seal. Working in the same direction as the previous fold, fold dough in half over itself, pressing gently to seal and form an 8-inch-long log.

Transfer dough, seam side down, to prepared loaf pan, gently encouraging it into the pan. Cover loosely with plastic wrap that has been lightly coated with cooking spray. Let rest in a warm place (like the top of the refrigerator) until dough has risen just over the lip of the pan, about 2 hours. During the final 30 minutes of resting, preheat oven to 375°F with oven rack in lower third.

Bake until bread is golden brown and a thermometer inserted in center of loaf registers 200°F, 40 to 45 minutes, tenting with aluminum foil after 30 minutes if bread is browning too quickly. Invert loaf onto a wire rack; turn right-side up and brush top with remaining 1 tablespoon melted butter. Let cool completely before slicing.

A Truffle Trifle

After I finished the caramels and before the chocolate lost its temper (and had a hissy fit) I coated the inside of a silicone candy mold with the leftover chocolate. I left it in the fridge until today. (I should have taken a picture before filling. Dang!)

Beyond what I used to coat the mold I had some chocolate left over from making the chocolate coated caramels and thought, “Hmmm… I also have some raspberries in the fridge that I need to use soon.” Well, one thing led to another so I made some chocolate covered raspberry/chocolate truffles.

I made the raspberry ganache using the recipe below, filled each well of the mold leaving some room at the top to cover with more chocolate. I didn’t bother re-tempering the tops of the chocolates and they seem fine. Actually, the tops become the bottoms of the chocolates once they are removed from the mold.

The ganache stays nice and soft and the raspberry/chocolate flavor was excellent. I may try less chocolate in the ganache next time to make the flavor a bit more raspberry forward.

I also want a nice chocolate covered vanilla cream center, and maybe a nice peppermint filling too.

Chocolate Raspberry Truffles Recipe
INGREDIENTS
• 1 package (10 oz.) fresh raspberries
• 1/4 cup powdered sugar
• 1 lb. semisweet chocolate chips – try with 1⁄2 lb. chocolate chips
• 3/4 cup cream
• 2 tbsp. light corn syrup
• One candy mold coated with tempered chocolate
OR Alternatively
• 1 lb. chocolate candy coating (for dipping)


METHOD

  1. Blend or food process the raspberries until they are liquid. Sieve the raspberry puree into a small saucepan.
  2. Add the powdered sugar to the raspberry puree and heat it over medium heat, stirring frequently, until it is thick and syrupy and reduced by about half. Remove the puree from heat and set aside.
  3. Place the chocolate chips in a large bowl and heat the cream (I microwave in 30 sec intervals) until bubbles start to form around the edges, but do not allow it to come to a full boil. Once simmering, pour the hot cream over the chopped chocolate and allow it to sit for a minute or two to soften and melt the chocolate before whisking the chocolate and cream together gently, until the chocolate is melted and the mixture is smooth and homogenous.
  4. Add the corn syrup and raspberry puree to the chocolate mixture, and whisk it all together. Cover the surface of the raspberry ganache with cling wrap, and refrigerate until it is thickened.
  5. Add enough raspberry ganache to each tempered chocolate coated mold to within 1/8” of the top. Cover the top of each mold well with melted chocolate. It doesn’t appear to need to be tempered at this point. Chill and when nearly softened scape the bottom of the mold to remove excess chocolate.
    If you are going to dip the raspberry ganache in chocolate chill until it can be formed in small balls (1” or less diameter) and placed on a lined cookie sheet
  6. Alternative coating method:
  7. Using dipping tools or a fork, dip a truffle into the chocolate. Bring it out of the chocolate and allow the excess to drip back into the bowl. Place the coated truffle back onto the baking sheet and repeat with remaining truffles and chocolate.
  8. Place the truffles in the refrigerator to set the candy coating for about 30 minutes. If desired, you can melt red candy coating (or tint white coating with red candy coloring) and drizzle a small amount over the truffles decoratively.
  9. Place the candy coating in a large microwave-safe bowl. Microwave in one-minute increments until melted, stirring after every minute to prevent overheating. Stir until the coating is completely smooth. Allow the coating to cool until it is barely warm. Do not let it start setting up, but let it cool down so that it does not melt the truffle fillings.
  10. Chocolate raspberry truffles can be stored in an airtight container in the refrigerator for up to two weeks.