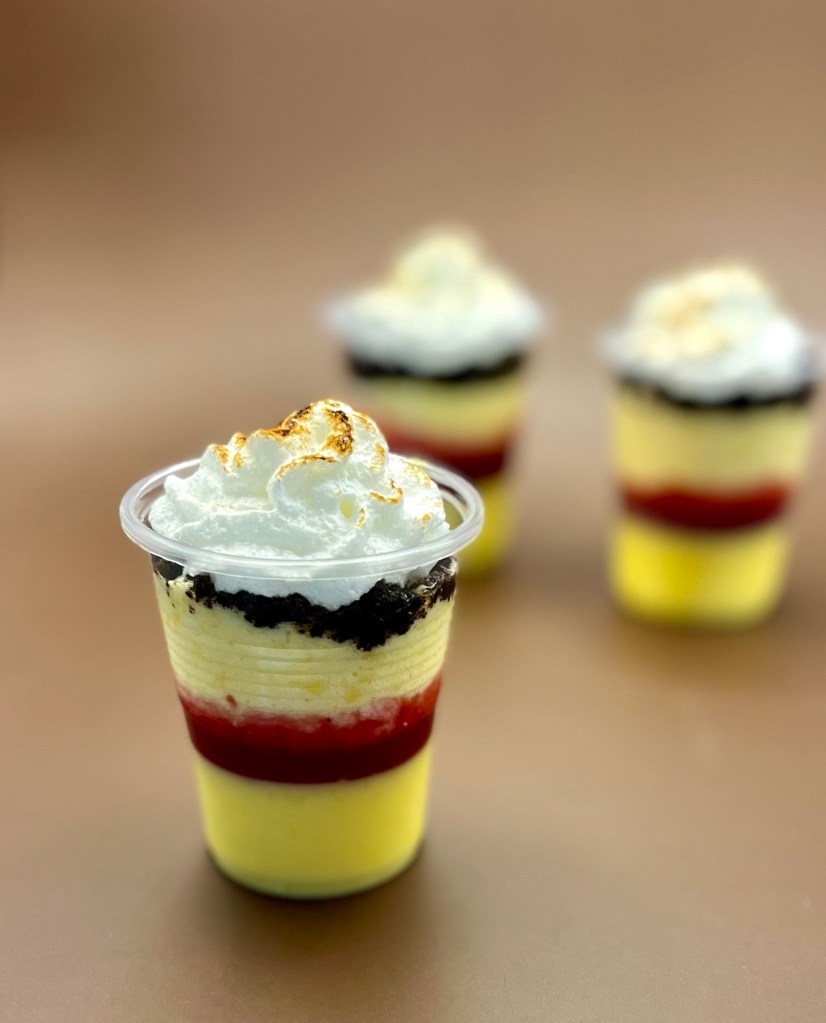
The idea for this parfait jumped into my head a couple of weeks ago. I knew I wanted the bottom to be creme patisserie, topped with fresh raspberry sauce. I was unsure of the upper layer until last week. It is creme chiboust, to add a lighter component. I considered adding a chocolate component and QC suggested crumbled graham crackers, which I did but made chocolate graham crackers to add a crunch. It is topped off with brûléed Italian meringue.
Make the chocolate graham crackers early to they have time to cool and crisp up, Make the creme patisserie early also so it has time to cool to room temperature. (To make 10 five ounce cups, as pictured, requires two recipes of creme patisserie.)
Chill the cup between adding each layer.
The raspberry sauce can be made a week in advance. Make sure it is thick enough not to run up the sides of the container when the creme chiboust is added. The viscosity of a thin jam is perfect.
Raspberry Parfait with Crème Chiboust
INGREDIENTS:
Raspberry Dessert Sauce (Can make 1 week in advance)
• 1 Tbl water
• 2 tsp cornstarch
• 375g (¾ c) fresh or frozen raspberries
• 50g ( ¼ c) granulated sugar
• 1 tsp fresh lemon juice (do not leave out)
• optional: ½ tsp vanilla extract
Chocolate Graham Crackers – KAB (Can make 1 week in advance)
• 60g ( ½ c) All-Purpose Flour
• 85g ((¾ ca) Whole Wheat Flour
• ½ tsp table salt
• ½ cup (42g) Dutch-process cocoa
• 1 ¼ cups (142g) confectioners’ sugar
• 1 tsp baking powder
• 113g (8 Tbl ) unsalted butter, cold, cut into pats
• 43g (2 Tbl) honey
• 28g (2 Tbl) milk, cold
Creme Patisserie:
• 240 mL full-fat milk 1 c
• 4 egg yolks from large eggs (save the egg whites from these eggs for the meringue)
• 30 g butter 2 Tbl
• ¼ tsp sea salt
• 25 g sugar ~ 2 generous Tbl
• 30 g cornstarch – 4 Tbl
• 1.5 tsp vanilla extract
Italian meringue:
• 4 egg whites at room temperature
• 150 g white sugar – ¾ cup
• 80 g water – ⅓ cup
METHOD
Chocolate Graham Crackers
- Preheat your oven to 325°F with racks in the upper and lower thirds. Have two baking sheets and parchment paper to line them at the ready.
- In a medium-sized bowl, whisk together the flours, salt, cocoa, sugar, and baking powder. With a pastry blender, two knives, or your fingertips, cut the butter into the flour mixture until evenly crumbly.
- In a separate bowl, whisk the honey and milk, stirring until the honey dissolves. Add the liquid to the dry ingredients and toss lightly with a fork until the dough comes together. Add additional milk, if necessary.
- Turn the dough out onto a well-floured surface and fold it over gently 10 to 12 times, until smooth.
- Divide the dough in half, about 250 grams each. Work with half the dough at a time, keeping the remaining dough covered.
- Working with one piece at a time, transfer the dough to a sheet of parchment and shape into a flattened square. Place another piece of parchment over top and roll the dough to about 1/16″ thick; aim to roll it into a rectangle a bit larger than 10″ x 14″. Prick the dough evenly with a dough docker or fork.
- Use the parchment to transfer the sheet of dough to a baking sheet, then gently peel off the top sheet. Repeat with the remaining piece of dough.
- Bake the crackers for 15 to 20 minutes, rotating the baking sheets top to bottom and front to back halfway through, or until you begin to smell chocolate. Remove them from the oven, and immediately cut them into rectangles with a pizza wheel or knife. Transfer them to a rack to cool.
- Store the cooled crackers tightly wrapped for up to a week, or freeze for up to one month.
Raspberry Dessert Sauce
- Whisk the cornstarch and water together until all the cornstarch has dissolved. Combine cornstarch mixture, raspberries, granulated sugar, and lemon juice in a small saucepan over medium heat. Using a silicone spatula, stir the mixture while lightly mashing the raspberries as they begin to heat.
- Bring to a boil and let it boil for 3 full minutes, stirring occasionally. Remove the pan from heat and—if desired for a richer flavor—stir in vanilla extract, and if desired, a few fresh raspberries.
- OPTIONAL (SKIP for a thicker sauce) Press the warm sauce through a fine mesh strainer to remove the seeds, if desired. I use the back of a spoon to press the liquid through the strainer, held over a bowl. It takes a couple minutes to really squeeze it all out.
- Feel free to serve warm over warm desserts, but it should be cooled to really thicken up. Cool the sauce completely at room temperature or in the refrigerator. The sauce will thicken slightly as it cools, but the strained version is still liquid and perfect for drizzling.
Creme Patisserie
- Whisk eggs and milk together and add to all other ingredients (except vanilla) to a medium saucepan.
- Bring to boil whisking constantly
- Cook until thickened (it will look lumpy, its ok)
- Sieve lumpy mixture into a bowl and add vanilla, mix thoroughly
- When incorporated, cover with plastic directly on the crème patisserie and cool about an hour.
Alternatively, slide the piping tip you would use to fill the pâte à choux into the piping bag but don’t cut off the tip. Spoon the hot batter directly into the piping bag and seal the end. When the crème patisserie is cool, cut the tip off, force the bag around the piping tip and squeeze the crème pat to fill the end.
Italian meringue
- In a medium-sized saucepan, combine the sugar and water. Heat over low heat, stirring until the sugar has dissolved. Once the sugar has dissolved, turn the heat to medium-high and allow the syrup to come to a boil without stirring.
- In the meantime, add the egg whites to a medium-sized, heatproof bowl and mix (with a mixer fitted with the whisk attachment) until foamy and the whites are almost able to hold soft peaks.
- Once the syrup is boiling, clip on a candy (or sugar) thermometer.
- Cook until the syrup reaches 116°C/240°F, then take the pan off the heat and slowly drizzle the hot syrup into the bowl with the foamy egg whites, mixing continuously to prevent the eggs from scrambling. Don’t pour the syrup onto the whisk, or the syrup may splatter against the sides of the bowl (or into your face!). Instead, aim for a spot close to the whisk.
- Once all the syrup has been added, keep mixing until the bottom of the bowl feels cool to the touch and the meringue has cooled down to body temperature.
- Use immediately or keep in the fridge (covered) until ready to use. It’s a very stable meringue, so it won’t start weeping, leaking or collapsing.
Creme Chiboust
- Add about ⅓ of the meringue mix into the room temperature custard, and mix to loosen up the custard base.
- Add the rest of the meringue and fold it in until there are no more white streaks in the custard. Be gentle when you fold in the meringue because if you mix it too vigorously, you will lose the air and it may deflate too much.
- It’s very important to use the creme chiboust while it’s at room temperature, since it will set in the fridge. If you do want to keep the creme chiboust in the fridge, you will need to whisk it again before using. However, keep in mind that this will deflate the mixture AND not set as well again.