Honey Chamomile Cakelets

While on vacation last month, and at King Arthurs Bake shop, I learned a new word—Cakelets! I had absolutely no reason for buying a Nordicware Cakelet pan and, back home, tried it this morning for the first time. I used the Noricware recipe for Honey Chamomile Cakelets as a control for future bakes.

The recipe was simple and easy to follow, although I made a couple of changes and converted the volume measurements to weight. (I moved making the simple syrup to the beginning as reducing the liquid to a syrup takes a while and the cakelets should be coated while warm.) I find it’s convenient to measure most ingredients (such as honey) by weight. A cup of honey weighs 340g and a tablespoon weight 21g. Put your bowl directly on the scale and weight the required amount. Less mess and more accurate!

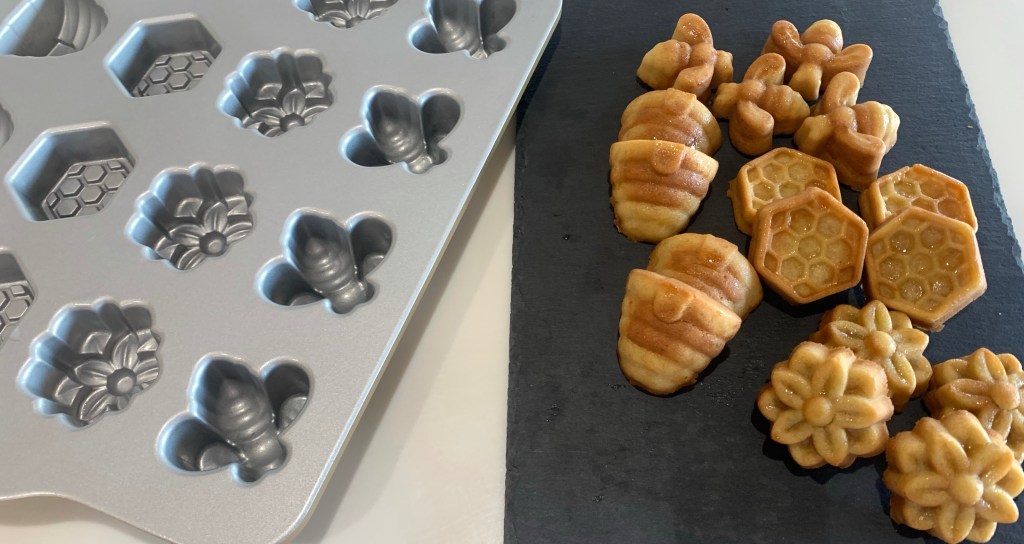
There was about twice as much honey syrup than required, so it’s quantity could be reduced by half. The cakelets released from the pan perfectly and maintained all the detail. I was very pleased with the result. The cakelets were strong honey which overpowered the chamomile but that is easily adjusted. I wonder how these would be with either a mirror glaze, or perhaps dipped in tempered chocolate. Hmmmm.

HONEY CHAMOMILE BEE CAKELETS

Recipe from Nordicware

INGREDIENTS
• 177ml (¾ cup) water
• 3 chamomile or jasmine tea bags
• 115g ( ½ cup) butter, softened (best to let come to room temp)
• 150g (¾ cup) granulated sugar
• 126g (6 tbsp) honey
• ¼ tsp vanilla extract
• 1 large egg + 1 large egg yolk
• 218g (1 ¾ cups) all-purpose flour
• ¼ tsp salt

TEA-INFUSED SIMPLE HONEY SYRUP:
• 237g (1 cup) water
• 2 chamomile or jasmine tea bags
• 170g (½ cup) honey
• 100g (½ cup) sugar

METHOD

  1. Preheat oven to 350°F.
  2. Prepare Busy Bee Bitelet Pan with baking spray containing flour and use a pastry brush to evenly coat the details of the pan.

    HONEY SYRUP
  3. In a small saucepan, heat water to boiling. Steep 2 tea bags for 3-5 minutes.
  4. Reduce heat, remove bags and add honey and sugar. Cook until reduced and syrupy.
  5. Keep warm but not boiling until the cakelets are ready.

    BATTER
  6. Heat water in a saucepan until it just starts to boil. Remove from heat and steep 3 tea bags for 3-5 minutes. Cool to lukewarm and set aside.
  7. Using a mixer with a paddle attachment, cream butter and sugar. (Do not over beat)
  8. Blend in honey and vanilla. In a small bowl, whisk eggs and tea.
  9. In a second small bowl, whisk together flour and salt.
  10. On low speed, add egg mixture alternately with flour into butter mixture until incorporated. Don’t over-mix to avoid air bubbles.
  11. Fill each design with batter, filling only 3/4 full. Gently tap pan on towel-covered countertop to remove any air bubbles.
  12. Bake for 15-16 minutes or until edges are lightly browned and center of cakes firm to touch.
  13. Cool cakelets in pan for 5 minutes, then invert onto a cooling rack.
  14. While cakes are still warm, brush with honey syrup and serve.
  15. Clean pan and repeat with remaining batter. Makes 32 cakelets.

Mini Loaf Pan – Pumpernickel

After my success with the whole wheat bread yesterday I bit the bullet and created my own pumpernickel bread recipe based on what I learned yesterday and two other recipes. The results were excellent. (Whew!)

PUMPERNICKEL MINI LOAF BREAD

INGREDIENTS
• 2 ½ cups warm water (100°-110°F)
• ¼ cup vegetable oil
• 2 Tbl molasses
• ¼ cup honey
• 3 ½ cups (400g) pumpernickel flour
• 2 Tbl unsweetened cocoa powder
• ¼ cup Vital Wheat Gluten
• 1 Tbl lemon juice
• 1 ½ tbl (13.5g) instant yeast
• 1 tsp (6g) salt
• 2-3 cups (240-360g) bread flour
• rolled oats (for dusting loaves)

METHOD

  1. In the bowl of a stand mixer fitted with a dough hook, stir together water, oil, molasses, and honey until mixed well.
  2. Add pumpernickel flour to water mixture.
  3. Add cocoa, yeast, and salt, Vital Wheat Gluten, lemon juice and stir until blended.
  4. Let mixture sit for 10 minutes.
  5. Stir in bread flour, one cup at a time, until dough clings to hook and almost clears the sides of mixer, about 3-4 minutes.
  6. Continue to knead with the dough hook for 6-8 minutes
  7. Turn dough out on a lightly greased counter and knead by hand for 5-8 minutes until the dough is smooth and supple.
  8. Divide dough by weight into 8 equal portions. Mine were 192 g each.
  9. Place each portion into a mini loaf pan and dust with rolled oats.
  10. Allow dough to rise in until it is about 1 inch above the the edge of the pan, about 30-60 minutes. Take note of how high the bread is before starting proof. Mine was almost an inch to begin and I let it rise to 1 1/2 to 2”. There was a lot of oven spring also.
  11. Toward the end of the rising time, preheat oven to 350 F.
  12. Bake at for 18-25 minutes. (Internal temp should be 190-200 deg. F)

New KAF Mini-Loaf Pan and RASPBERRY/PLUM Preserves

While on vacation I stopped by King Arthurs store in Norwich, Vermont. They had lots of real cool stuff that I didn’t need, so only bought a shopping cart full. One pan that I didn’t need and bought was their mini-loaf pan. There will be more cool stuff to come.

I have a new recipe for soft, light, fluffy whole wheat bread. I rarely have any luck in making whole wheat bread light and fluffy, but keep trying.

This pan was excellent and the recipe even better. I believe one ingredient and two method instructions make the difference. The ingredient is Vital Wheat Gluten. I use this with any flour that doesn’t have high gluten content such as wheat, pumpernickel, etc. I needed to replenish my supply and luckily the KAF store had it in stock. (OK, this was one thing I needed.) The two method steps that helped were to let the dough rest for 15 minutes before adding the balance of the flour and second, after the mixer finishes kneading the dough, give it a 5-10 minute hand kneading.

Whatever was responsible for making this the best whole wheat bread I ever made, I am glad I tried this new recipe

MINI WHOLE WHEAT BREAD

https://www.melskitchencafe.com/small-batch-whole-wheat-bread/

INGREDIENTS
• 5-6 cups whole wheat flour
• 1 1/2 tablespoons instant yeast
• 1/4 cup vital wheat gluten (see note)
• 2 3/4 cups warm water
• 1 tablespoon lemon juice (bottled or fresh)
• 1/3 cup oil
• 1/3 cup honey
• 1 tablespoon salt


METHOD

  1. In the bowl of a stand mixer fitted with the dough hook, mix together 3 cups of the whole wheat flour, yeast, and gluten. Add the warm water and mix well. Cover the bowl and let the mixture rest for 10-12 minutes.
  2. Add the lemon juice, oil, honey, and salt. Mix on low speed.
  3. With the mixer running on low speed, continue adding flour 1/2 cup at a time until the dough pulls away from the sides of the bowl (don’t over-flour! A little stickiness is ok as long as the dough forms a ball and doesn’t leave a lot of residue on your fingers).
  4. Let the mixer knead the dough for 5-6 minutes until the dough is soft and smooth.
  5. Turn the dough onto a lightly greased counter and divide in eights. (I found each loaf to be 159 g.) Shape each half into a taut loaf and place in a lightly greased mini-loaf pan (8 loaves per pan.)
  6. Cover the loaf pan and let the loaves rise until they are 1-2 inches above the edge of the loaf pan.
  7. Preheat the oven to 350 degrees F. Make sure an oven rack is in the middle/center position. Bake the loaves for 28-32 minutes until golden and baked through (an instant-read thermometer should register 180-190 degrees in the center of the loaf).
  8. Turn the bread onto a wire rack. Brush the tops with butter, if desired. Let cool completely.

NOTES
Letting the Dough Rise: this bread recipe does not require the dough to rise before being shaped into loaves and letting the loaves rise in the bread pans. However, if you find your bread is a little dense after baking and cooling, letting the dough rise after kneading may help with that, as well as making sure the dough isn’t over floured.

Vital Wheat Gluten: is often found in the baking aisle at the grocery store (near the flour). Many brands of vital wheat gluten have Vitamin C added; those are ok to use in this recipe. I buy mine at KAF.

RASPBERRY/PLUM JAM

INGREDIENTS
• 1 lb raspberries (454 grams)
• 3 lbs plums , sliced and pits removed (leave skins on) (1360 grams) (picked from our tree)
• 5 cups granulated sugar (1000 grams)
• ½ cup bottled lemon juice (120 ml)
• Zest of 1 orange (picked from neighbors tree)

METHOD

  1. Combine the raspberries, sliced plums, sugar, lemon juice, and orange zest in a large heavy-bottomed pot. Place over medium high heat and stir frequently as the sugar dissolves and the fruit begins to release its juices.
  2. Continue to cook, stirring frequently as the jam simmers and thickens. Skim any foam off of the surface with a spoon.
  3. While the jam is simmering, remove plum skins with a spider strainer. Clean the strainer often to reduce the amount of jam removed.
  4. Place a plate in the freezer and when the jam thickens wipe a little on the plate and return to the freezer for 2 minutes. Repeat until the jam stops running and has the consistency you want. Mine heated to 220 deg F.
  5. Once the jam is reduced and thickened, remove from heat and ladle jam into sterilized jars. Top with a lid and screw on with a ring. This recipe made 7 half pints.
  6. Process jars in a water bath for 10 minutes (15 minutes for 5,000+ ft elevation). Remove from water bath and let cool. Check that lids have sealed by pressing down into the center of each one. It should not move.
  7. Store jam in a cool dry place like a pantry and consume within 1 year.