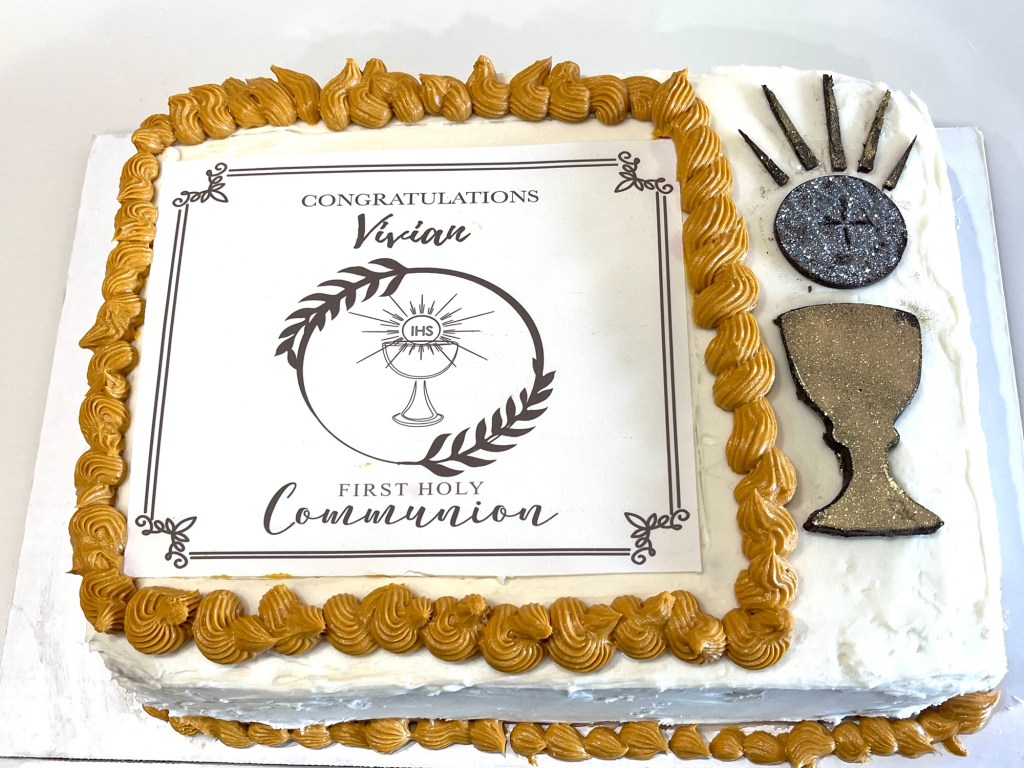
Our granddaughter Vivian’s First Holy Communion was this morning with a celebratory meal after. I finished her choice of a confetti cake two hours before services. Its design is much like her sister Graces except I made the chalice by cutting tempered chocolate and dusting with gold and/or silver sparkling dust.
I see all the imperfections, but will keep quiet.
Crusting gold buttercream was a bit of a challenge but mixing the appropriate quantities of yellow, brown and red food colorings yielded an acceptable shade. I wanted crusting so the sugar decoration would not melt (it did slightly) and I wanted the boarder piping to keep its form
Transform regular butter cream by substituting half the butter for and equal volume of vegetable shortening.
Note: volume, not weight. By weight half the butter weighs 113g and the vegetable shortening is 93g.
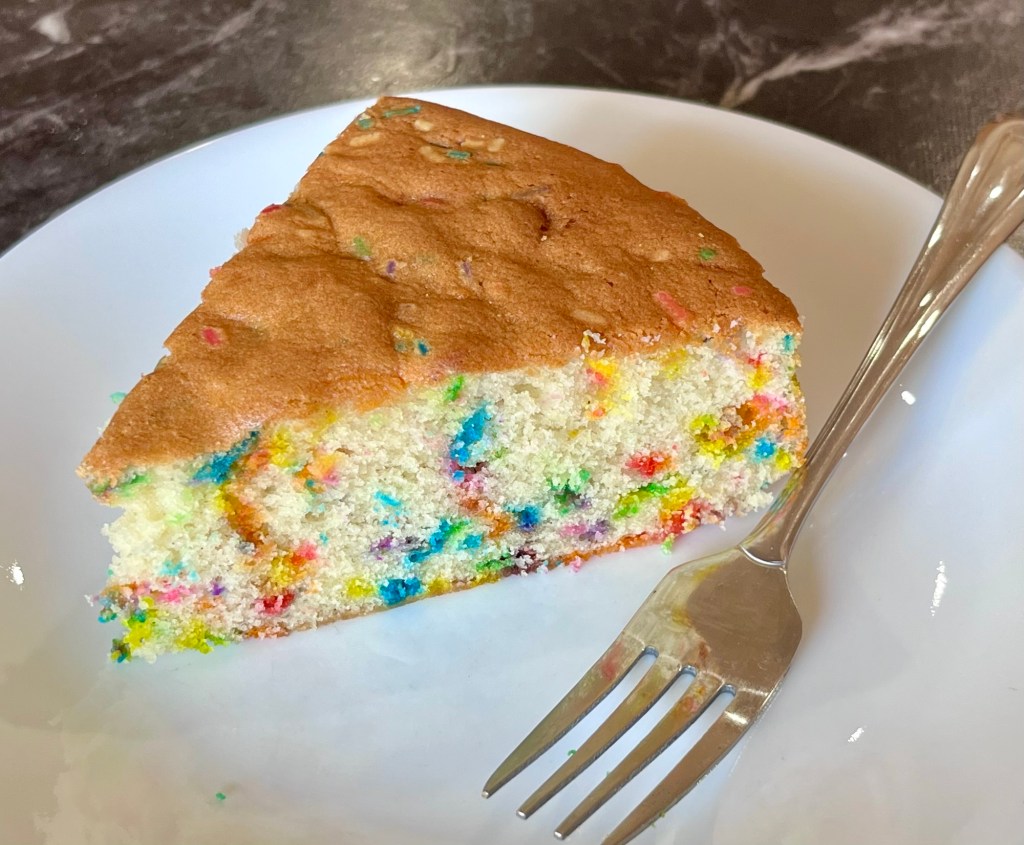
I have been looking for a new, soft and moist white cake. Thankfully, our younger granddaughter asked for a confetti cake for her First Holy Communion cake on Saturday. I made Sally’s Confetti Cake for practice this morning. The final cake will be crumb coated and frosted with a standard buttercream or perhaps a marshmallow fondant.
The final cake will need to feed about 70 people so I will make a double layer 11”x15” sheet cake. Layering the cake could be tricky as the cake is very fragile. The bake time will be adjusted, but as I bake by internal temperature that shouldn’t be an issue.
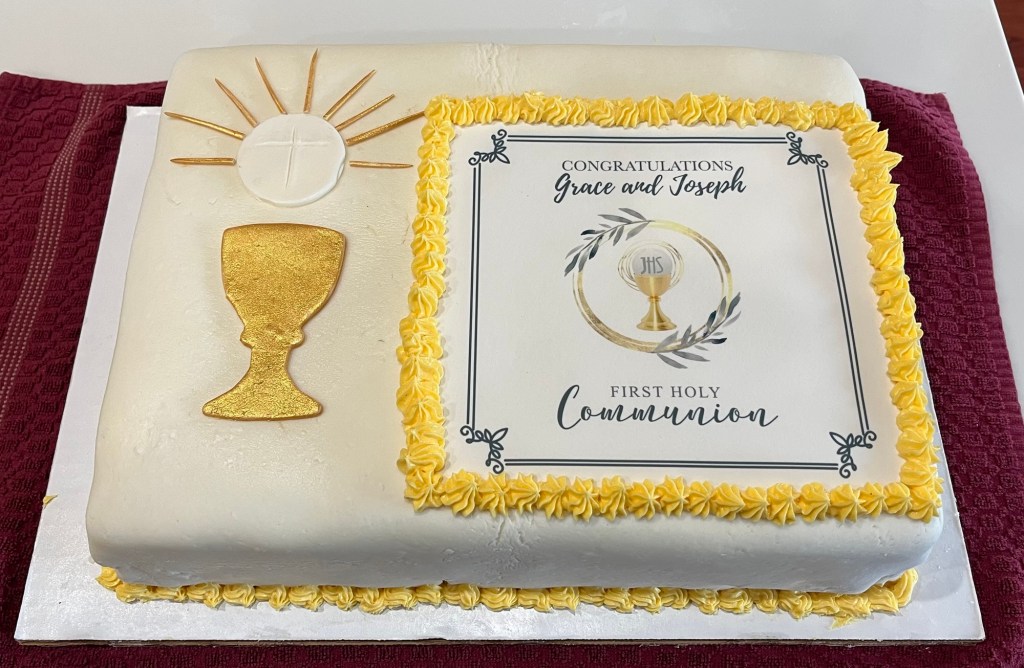
(I added a picture of her sister’s Communion cake from 2 years ago so you can see the final result.)
OK, I realize you can’t hit ‘em all out of da park, and I realize that accidents do happen when baking, but sometimes there is simply a “perfect storm” that is unavoidable.
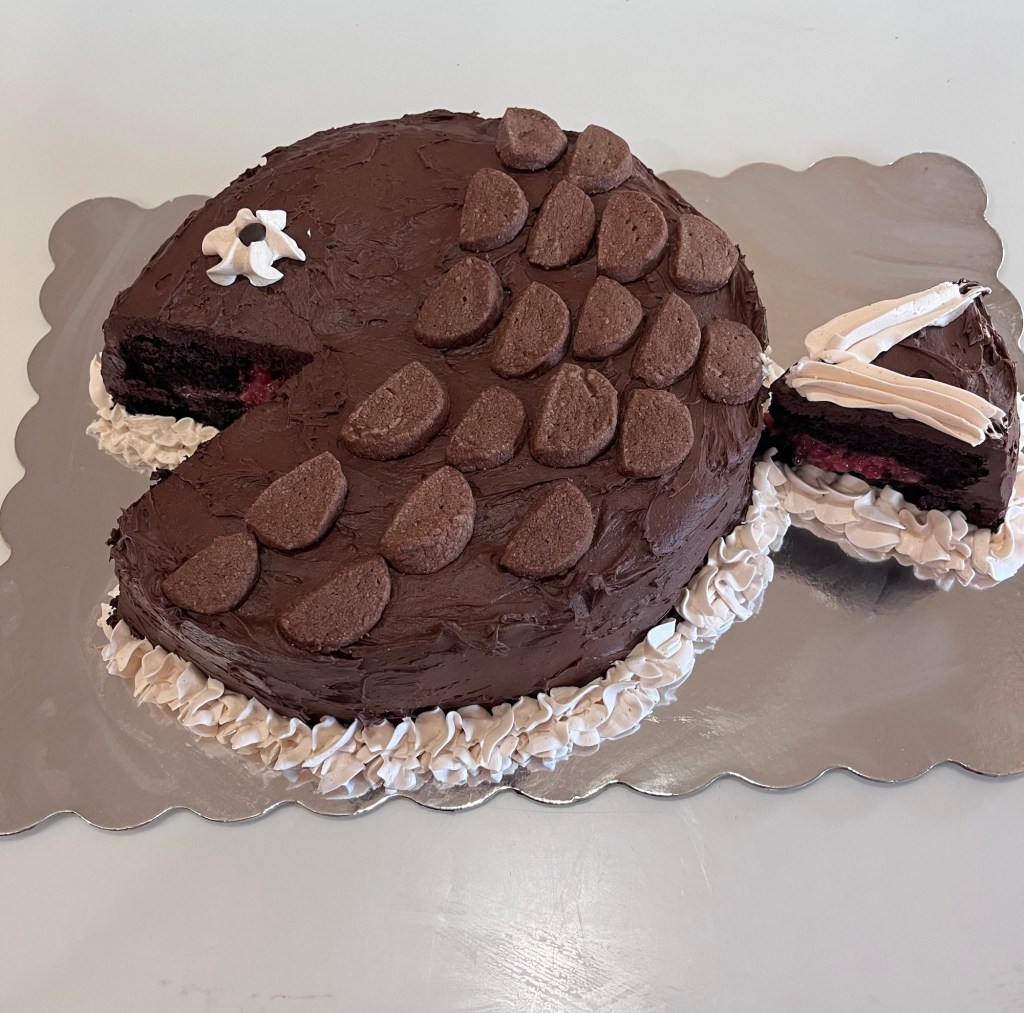
I saw a picture of a cake shaped like a fish which was perfect for the Fish Fry fundraiser dinner last night.
In no particular order here are the mistakes I made with my “Fish Cake”
I chose the wrong cake recipe for my cake. It was too fragile for the required shaping. I needed a denser cake to hold everything together. I considered starting over with a firmer cake, but it was like I was in a baking contest and had a time limit. As it turned out I baked most of the day and finished with 15 minutes left. Whew!
The visual appeal was uninspiring for high value bids. While it may be a delicious cake, it must appeal to people to bid.
I didn’t check my supplies and ran out of cocoa powder before finishing. (However, the QC Cadre came through in many ways to help out!)
The chocolate shortbread cookie scales were almost perfect, but should have been lighter shade of brown than the frosting.
The cake ended up selling, but for much less than previous years entries. Note to self: Remember lessons learned this past week.
I used my standard Extreme Chocolate Cake and frosting. The flavor is outstanding. I used a new recipe for the chocolate shortbread cookies and they are delicious.
I filled the cake with a raspberry curd mixed with mashed fresh raspberries for the fresh berry tartness. ( It was so good I almost bought the cake so the QC Cadre and I could share it.)
Chocolate Shortbread Cookies
INGREDIENTS
226g (1 c) butter (use salted butter, see note)
113g (1 c) powdered sugar
20g (¼ c) unsweetened cocoa powder
1 teaspoon vanilla extract
217g (1 ¾ c) all-purpose flour
½ tsp salt
METHOD
Cream butter and sugar in the bowl of a stand mixer (or in a very large bowl using a hand mixer), until fluffy and creamy, about 1 minute. Scrape the sides and bottom of the bowl.
Mix in cocoa powder and vanilla, then again scrape the sides and bottom of the bowl.
Add flour and mix until smooth, scraping the sides and bottom of the bowl (especially down in the bottom of the stand mixer bowl where things get caught) once during mixing.
Lay out a piece of plastic wrap on a clean work surface. Scoop the dough onto the plastic and use your hands to form it into a log. Wrap up the log and roll to make into a uniform size. How long your roll is determines how many cookies you’ll get (or if you want small bite size cookies, make two rolls).
Chill the rolls at least 1 hour, or until firm, before slicing and baking (or as long as overnight). To help the roll stay round, place it standing up in a tall drinking glass to chill in (this way it won’t flatten on one side).
Preheat oven to 350°F. Line 2 cookie sheets with parchment paper or silicone baking mats.
Slice log into ¼-inch thick slices and place 2-inches apart on cookie sheets. Bake for 14-17 minutes or until they just loose their glossy sheen. Cool completely before removing from cookie sheets.
Extreme Chocolate Frosting
Ingredients • 168g ( ¾ c butter ½ c • 125g (1 ½ c) unsweetened cocoa powder 1 c • 624g (5 2/3 confectioners’ sugar 624g 3 ½ c • 162g (⅔ c) milk .45 c • 1 tsp vanilla extract
Directions
Cream butter until light and fluffy.
Stir in the cocoa and confectioners’ sugar alternately with the milk and vanilla.
The only date that is also a command sentence (guesses anyone?) observed two birthdays of QC members AND the addition of two new members (we are up to 13 now!)
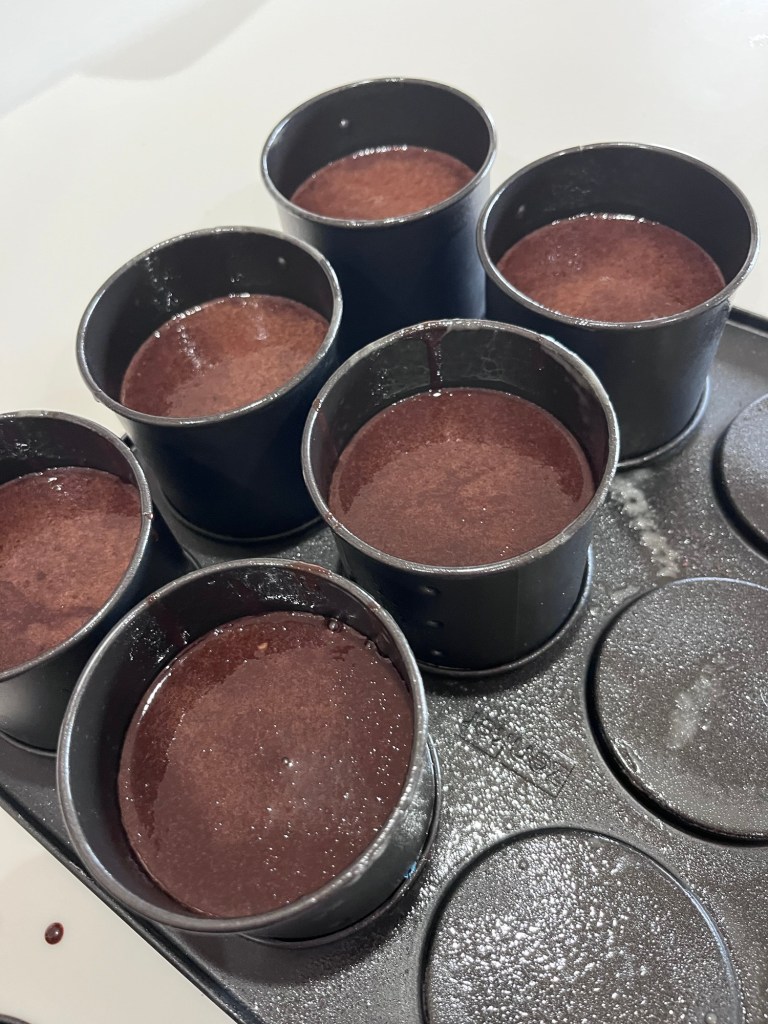
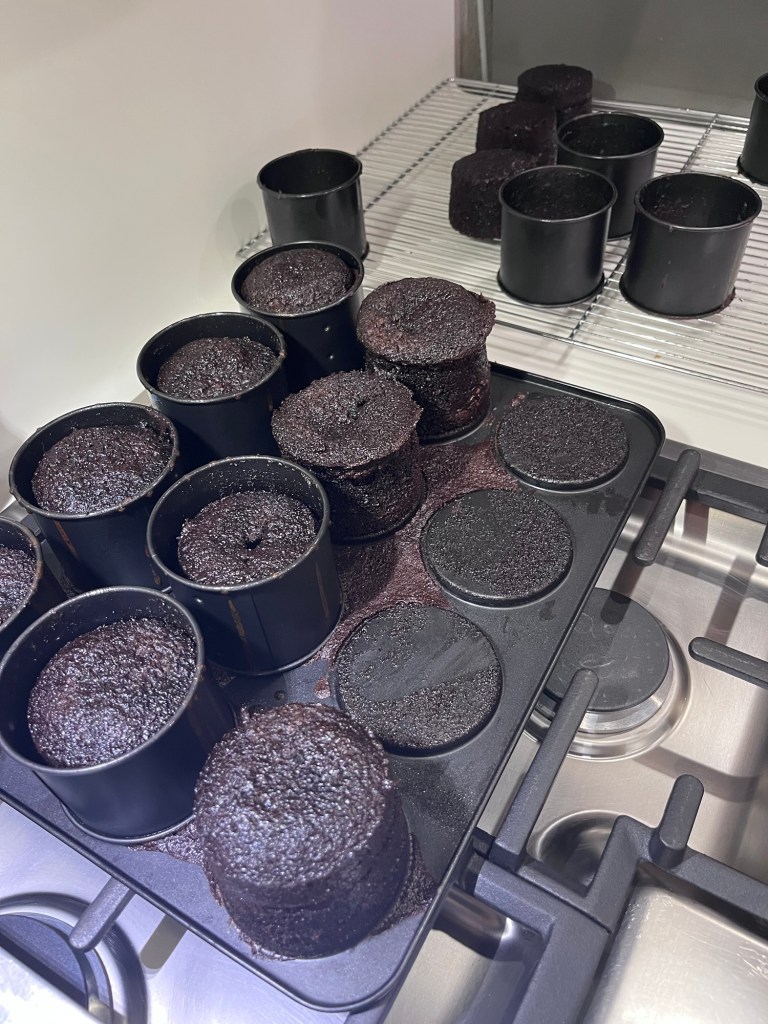
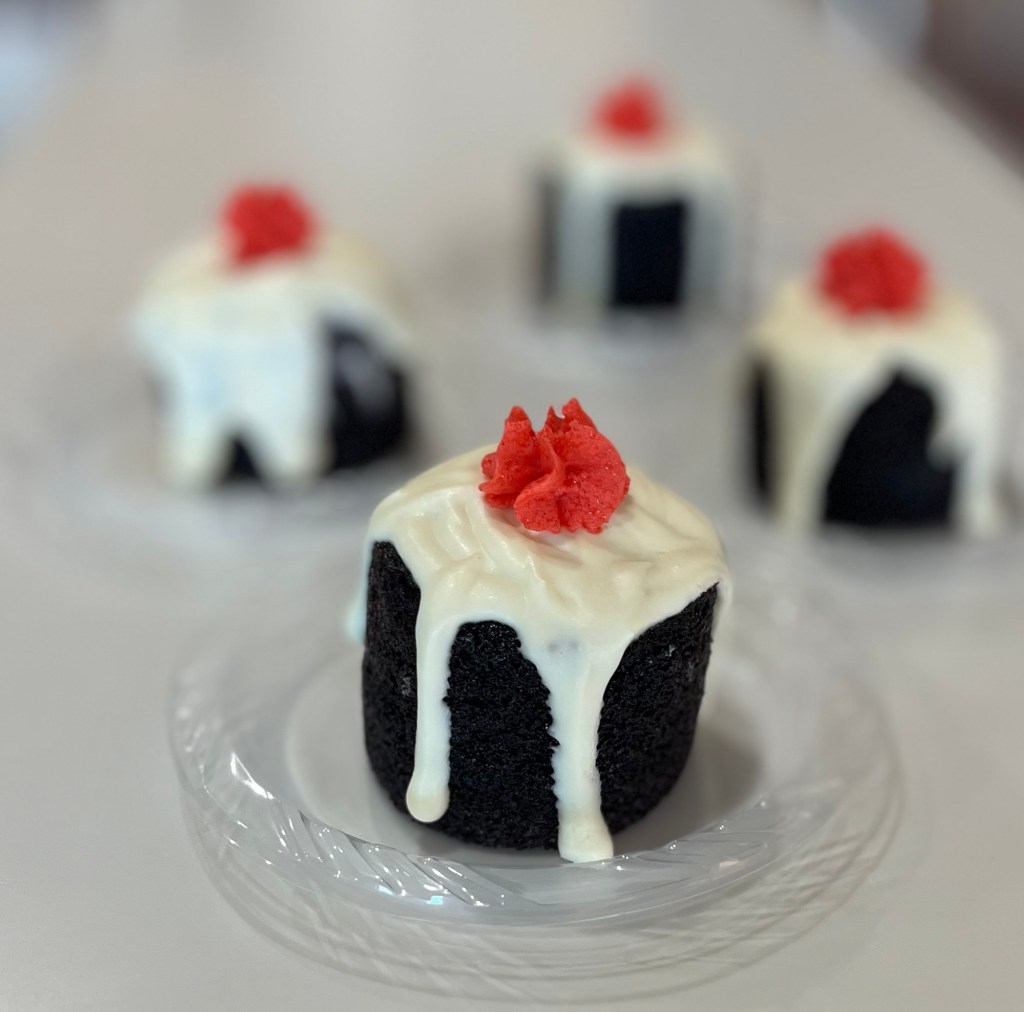
To celebrate, I made individual extreme chocolate cakes both dripped and filled with cream cheese/white chocolate ganache. To fill the cakes I used an apple corer to hollow out the cake, piped about a tablespoon of ganache into each cake and “plugged” the bottom with a piece of the removed cake-core. (Tip: don’t cut the cake all the way through.)
Fill pans half full and…they won’t overflow…And they will look like this.
White Chocolate Cream Cheese Ganache
Makes 3 cups
INGREDIENTS • 200 g white chocolate • 200 g heavy cream • 300 g cream cheese full fat, not skim or low fat
METHOD
Finely chop the white chocolate and place it in a heatproof bowl.
Heat the cream on the stovetop until just below boiling point, or heat in microwave (stirring between bursts) in 30 second then 15 second then 5 second bursts until the cream is scalding (not boiling) 170-180 deg
Pour the hot cream over the chocolate.
Use a hand whisk to mix until the chocolate has fully melted and the mixture is smooth.
Cover the surface with cling wrap, ensuring it touches the surface, and refrigerate overnight or until completely chilled.
In a new bowl, use a hand mixer to beat the cream cheese until smooth, light, and fluffy. Scrape the bowl occasionally to ensure even mixing.
Add the whipped cream cheese to the chilled chocolate mixture. Mix until well combined, stiff, and thick. The ganache should have a smooth, silky texture.
I needed a treat for QC’s Mah Jongg group today, luckily I saw contestants on GBBO make a chocolate babka and remembered I made one once or twice before.
The question is, what is a babka, a cake or a bread? The internet says it is a cake-bread hybrid, spanning the gap between breakfast bread and dessert. Call it what you like, just call me when it’s ready!
After this bake I modified the recipe to include tenting the babka about half way through the bake to protect the exposed chocolate on the top from over baking. Next time for sure.
Chocolate Babka
INGREDIENTS For the dough: • 3¾ cups (530 g) all-purpose flour , plus extra for dusting • ½ cup (100 g) granulated sugar • 1 tablespoon (10g) instant yeast • 3 large eggs • ½ cup (120 ml) water • ¾ teaspoon fine sea salt • ⅔ cup (150 g) unsalted butter , at room temperature, cut into small cubes • Neutral oil (sunflower, canola) for dressing For the chocolate filling: • ½ cup (50 g) powdered sugar • ⅓ cup (30 g) unsweetened cocoa powder • 130 g dark chocolate , melted* • ½ cup (120 g) unsalted butter , melted • ⅔ cup (120 g) chocolate chips or chunks OR 1 cup (100g/3.5oz) pecans, coarsely chopped (optional) For the sugar syrup: • ½ cup (120ml) water • ½ cup (100g) granulated sugar
METHOD Making the dough:
Place flour, sugar, and yeast in a standing mixer fitted with the dough hook and mix on low speed until combined. Add eggs and water, and mix on medium speed until dough comes together, 2-3 minutes. Add salt, then butter, adding a few cubes at a time, mixing until incorporated. Continue mixing for about 10 minutes on medium speed, until dough is completely smooth, elastic, shiny, and pulls away from the sides of the bowl. During mixing, you will need to scrape down the sides of the bowl.
Place dough in a large bowl brushed with oil, cover with plastic wrap, and leave in the fridge for at least half a day or overnight.
Grease two loaf pans (9×4 inch) with oil and line the bottom of each pan with parchment paper. Divide dough in half and keep one half covered in the fridge. Making the filling:
Whisk together powdered sugar, cocoa powder, chocolate, and butter until you have a spreadable paste.
Roll out dough on a lightly floured surface and shape into a rectangle measuring 15×11 inches. Position dough so that a long side is closest to you. Using an offset spatula, spread half of the chocolate mixture over the rectangle, leaving a ¾ inch border all around. Sprinkle half of the pecans or chocolate chips on top of the chocolate. Shaping the dough:
Use both hands to roll up the rectangle like a roulade, starting from the long side closest to ]’’]you and ending at the other long end. Press to seal the dampened end onto the roulade, then use both hands to even out the roll into a perfect thick cigar. Rest the cigar on its seam.
Trim about ¾ inch off both ends of the roulade with a serrated knife. Then use the knife to gently cut the roll in half lengthwise, starting at the top and finishing at the seam, essentially dividing the log into two long even halves, with the layers of dough and filling visible along the length of both halves. With the cut sides facing up, gently press together one end of each half, then lift the right half over the left half. Repeat this process, but this time lifting the left half over the right, to create a simple two-pronged plait. Gently squeeze together the other ends so that you are left with the two halves, intertwined, showing the filling on top. Carefully lift the cake into a loaf pan. Don’t worry if there are gaps in the pan since the cake will rise and will eventually look fine, even if you feel like it’s messy at this point. Cover the pan loosely with plastic wrap or a wet tea towel and leave to rise in a warm place for 1 to 1½ hours. Repeat to make the second cake.
Preheat oven to 375°F/190°C, making sure to allow plenty of time for it to heat fully before the cakes have finished rising. Remove plastic wrap or tea towels, place cakes on middle rack of oven, and bake for about 25-30 minutes, (tent the cakes about half way through to protect the chocolate from burning) until a skewer inserted into the center comes out clean with no dough attached. (190°F)
While the cakes are in the oven, make the syrup. In a small saucepan over medium heat, bring water and sugar to a boil. As soon as the sugar dissolves, remove from heat and set aside to cool. As soon as the cakes come out of the oven, brush the syrup over them. Use all of the syrup, even if it looks a lot. Let cakes cool until they are warm, then remove from pans and let cool completely before serving. Serve warm or at room temperature.
Babka will stay fresh for 24 hours in an airtight container at room temperature. Don’t place in the fridge.
Babka freezes well for up to 2 months. To thaw, leave on counter or overnight in the fridge.
Recipe Notes
To melt butter and chocolate, place them in a heat-proof bowl, and heat in the microwave in 20 second-intervals, stirring in between each interval, until melted and smooth (or alternatively, set it over a saucepan of simmering water, stirring occasionally).
I had some over ripe bananas and not being one to thrown them out (or eat them) I looked for a use for over ripe bananas. Sally once again to the rescue!
Everything she said about them is true. Very nice banana flavor and delicious cream cheese frosting. As it contains bananas, which is a traditional breakfast food, and cream cheese, which is a natural on breakfast bagels, I advertised this cake as a breakfast dessert with a clear conscience.
QC Cadre comments were: “Cake is to die for” (hope not!); “Very Delicious”; “The cake is so moist and good and that frosting is fabulous. Very breakfasty.”
Banana Cake – Sally
INGREDIENTS Banana Cake • 345g (1 ½c) mashed bananas (about 4 medium or 3 large bananas) • 375g (3 c) all-purpose flour (spooned & leveled) • 1 tsp baking powder • 1 tsp baking soda • ½ tsp ground cinnamon • ½ tsp salt • 170g (¾ c;12 Tbl) unsalted butter, softened to room temperature • 200g (1 c) granulated sugar • 100g ( ½ c) packed light or dark brown sugar • 3 large eggs, at room temperature • 2 tsp pure vanilla extract • 360 g (1 ½ c) buttermilk, at room temperature* Cream Cheese Frosting • 226 (8 oz) full-fat brick cream cheese, softened to room temperature • 113g ( ½ c; 8 Tbl) unsalted butter, softened to room temperature • 360g (3 c) confectioners’ sugar, plus an extra 1/4 cup if needed • 1 tsp pure vanilla extract • ⅛ tsp salt
METHOD
Preheat the oven to 350°F (177°C) and spray a 9×13-inch pan. Make the cake:
Mash the bananas using stand mixer with paddle on high speed for 1 minutes. Set mashed bananas aside.
Whisk the flour, baking powder, baking soda, cinnamon, and salt together. Set aside.
Using a handheld or stand mixer fitted with a paddle attachment, beat the butter on high speed until smooth and creamy—about 1 minute.
Add both sugars and beat on high speed for 2 minutes until creamed together. Scrape down the sides and up the bottom of the bowl with a rubber spatula as needed.
Add the eggs and the vanilla. Beat on medium-high speed until combined, then beat in the mashed bananas. Scrape down the sides and up the bottom of the bowl as needed. With the mixer on low speed, add the dry ingredients in three additions alternating with the buttermilk and mixing each addition just until incorporated. Do not over-mix. The batter will be slightly thick and a few lumps is OK.
Spread batter into the prepared pan. Bake for 45–50 minutes. Baking times vary, so keep an eye on yours. The cake is done when a toothpick inserted in the center comes out clean. If you find the top of the cake is browning too quickly in the oven, loosely cover it with aluminum foil.
Remove the cake from the oven and set on a wire rack. Allow to cool completely. After about 45 minutes, I usually place it in the refrigerator to speed things up. Make the frosting:
In a large bowl using a handheld or stand mixer fitted with a paddle or whisk attachment, beat the cream cheese and butter together on high speed until smooth and creamy. Add 3 cups confectioners’ sugar, vanilla, and salt. Beat on low speed for 30 seconds, then switch to high speed and beat for 2 minutes. If you want the frosting a little thicker, add the extra 1/4 cup of confectioners sugar (I add it). Spread the frosting on the cooled cake. Refrigerate for 30 minutes before serving. This helps sets the frosting and makes cutting easier.
Cover leftover cake tightly and store in the refrigerator for 5 days.
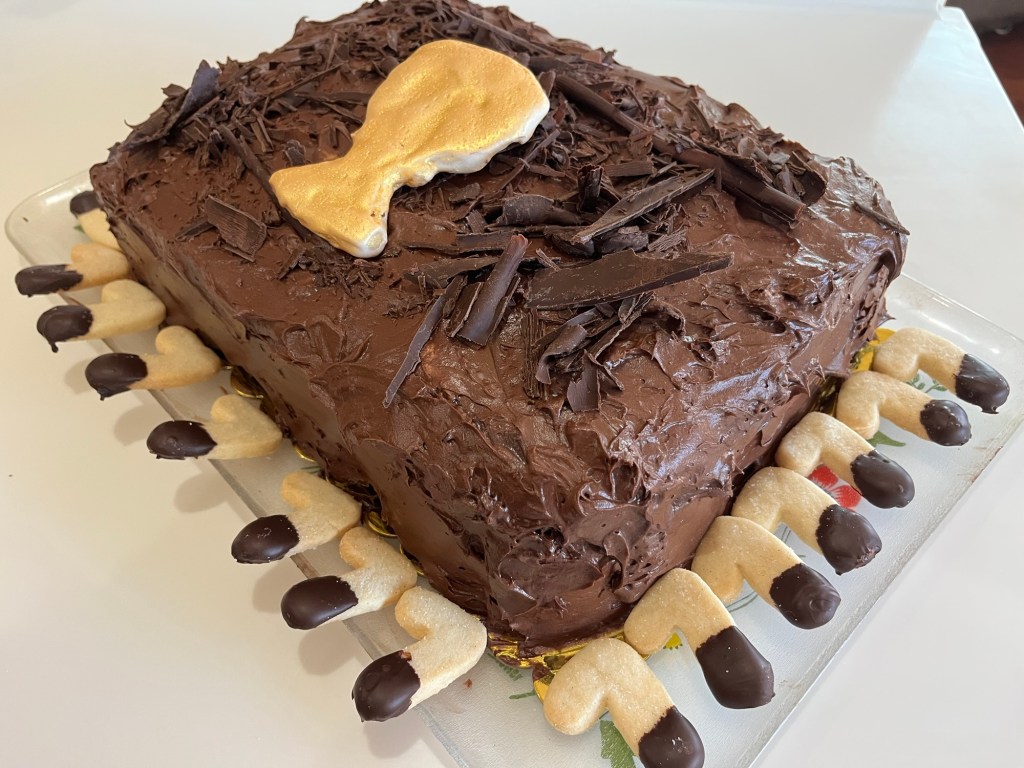
My instructions for Vivian’s birthday cake were that it was to be a “Chocolate, chocolate, chocolate cake.” This is neither the prettiest or most imaginative cake I have made but it’s the most chocolate.
The cake (#1 chocolate) is my Extreme Chocolate Cake, which is universally loved and complimented, (by me also.) The frosting is new to me, a cream cheese chocolate frosting (#2 chocolate.) It is whipped up into a lighter, less sweet frosting when compared to my usual buttercream frosting. (My fav, however, is Italian Meringue.) The top of the cake is covered with chocolate shards (#3 chocolate) created during my failed attempt to make chocolate tubes. To be continued.
Around the bottom of the cake are shortbread cookies, shaped like 7’s with a chocolate foot (#4 chocolate.) Mission accomplished and she was very happy. (Me too.) There is also a golden shortbread trophy on the top as a result of her fabulous year swimming.
Extreme Chocolate Cake
Makes two 9” round cakes and can be scaled up, as this cake was INGREDIENTS • 2 cups white sugar • 1 3/4 cups all-purpose flour • 3/4 cup unsweetened cocoa powder • 1 1/2 teaspoons baking soda • 1 1/2 teaspoons baking powder • 1 teaspoon salt • 2 eggs • 1 cup milk • 1/2 cup vegetable oil • 2 teaspoons vanilla extract • 1 cup boiling water
METHOD
Preheat oven to 350⁰F (175 degrees C). Grease and flour two 9 inch cake pans.
Use the first set of ingredients to make the cake. In a medium bowl, stir together the sugar, flour, cocoa, baking soda, baking powder and salt. Add the eggs, milk, oil and vanilla, mix for 3 minutes with an electric mixer. Stir in the boiling water by hand. Pour evenly into the two prepared pans.
Bake for 30 to 35 minutes in the preheated oven, until a toothpick inserted comes out clean or 205⁰F internal temp. Cool for 10 minutes before removing from pans to cool completely.
Chocolate Cream Cheese Frosting – Sally
INGREDIENTS • 339g (12 oz) full-fat brick cream cheese, softened to room temperature* • 170g (¾ c; 12 Tbl) unsalted butter, softened to room temperature • 420g (3½ c) confectioners’ sugar • 55g (⅔ c) unsweetened natural or dutch-process cocoa powder • 1 tsp pure vanilla extract • 1–2 tbl heavy cream • pinch salt
METHOD
In a large bowl using a stand mixer fitted with a paddle or whisk attachment, beat the cream cheese for 1 minute on high speed until completely smooth and creamy.
Beat in the butter until combined. Add the confectioners’ sugar, cocoa powder, vanilla extract, 1 Tablespoon milk, and salt and beat on medium-high speed until combined and creamy.
Add 1 more Tablespoon of milk to slightly thin out, if desired. Taste, then add another pinch of salt if desired.
Cover and store leftover frosting for up to 5 days in the refrigerator or up to 3 months in the freezer. After freezing, thaw in the refrigerator then beat the frosting for a few seconds so it’s creamy again.
Notes
Make Ahead Instructions: Cover and store leftover frosting for up to 5 days in the refrigerator or up to 3 months in the freezer. After freezing, thaw in the refrigerator then beat the frosting for a few seconds so it’s creamy again.
Tip for Piping Cream Cheese Frosting: Refrigerate the frosting inside the piping bag for at least 30 minutes prior to piping. Cream cheese frosting holds its shape much better when it’s piped cold.
This recipe is enough to frost 18-24 cupcakes, one 9×13-inch sheet cake, or one 3 layer cake.
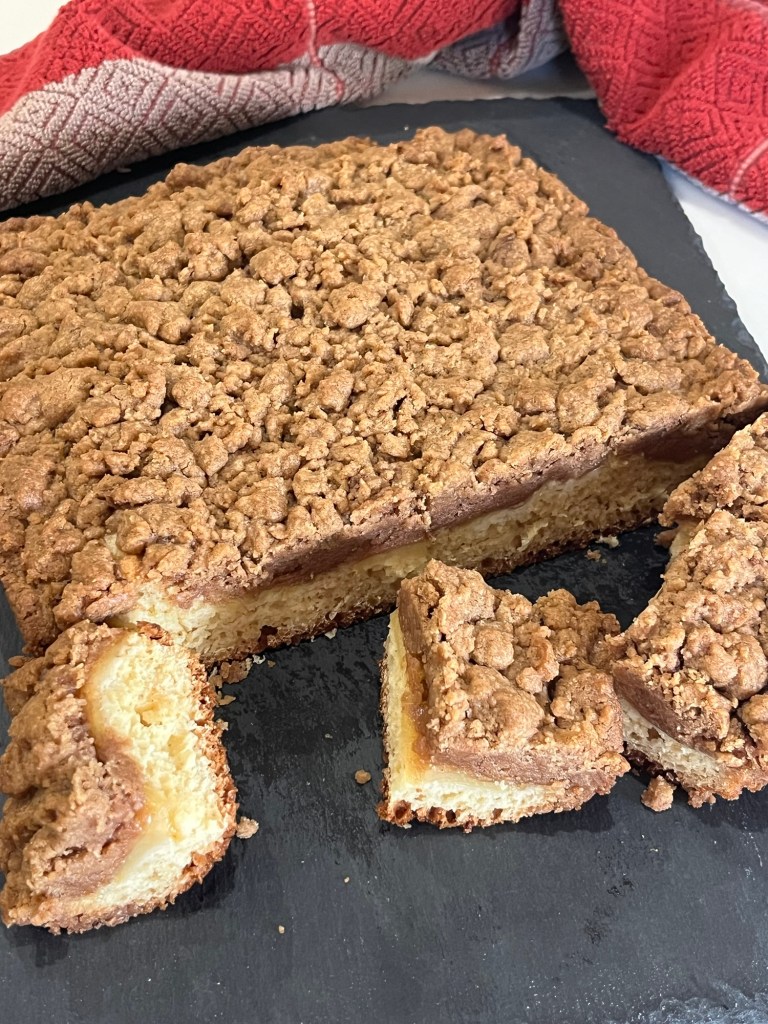
QC wanted a New Jersey Crumb Cake and who am I to object? She asked for a layer of apples sandwiched between the cake and crumble topping. It was suggested, next time, to make the layer of apples thicker, so I adjusted the recipe accordingly.
The finished cake was quite sweet, due to the very thick layer of crumble topping, (no complaint, just fact.)
The overall cake was very good and well worth making again.
New Jersey Crumb Cake
INGREDIENTS Topping • 1 ½ c brown sugar • 1 ½ Tbl ground cinnamon • ¾ tsp kosher salt • 2 ¼ c cake flour • ¾ c RT butter melted (1 ½ sticks) • 2 sweet apples, sliced ¼” thick Cake • 1 ½ cups all-purpose flour • ½ c sugar • 2 tsp baking powder • ¼ tsp baking soda • ½ tsp kosher salt • 1 RT large egg • ½ c RT buttermilk • Spray canola oil • 2 tsp vanilla • Confectioners sugar
METHOD Preheat oven to 325°
Cut 16-inch length parchment paper or aluminum foil and fold lengthwise to 8-inch width. Cut excess. Spray 9-inch square baking pan with nonstick cooking spray and fit parchment into pan, pushing it into corners and up sides.
Let excess paper hang over the sides of the pan. Affix to the sides of the pan with metal binder clips. Spray the piece of parchment paper and repeat with a piece of parchment laying in the opposite direction. Crumb topping
Whisk sugar, cinnamon, salt, and all purpose flour in medium bowl to combine. Add melted butter and mix with sturdy rice paddle or wooden spoon until mixture resembles thick, crumbly dough. Refrigerate while you make the cake batter. Cake batter
Sauté apples to at denté in a frying pan with 1 tablespoon butter
Whisk flour, sugar, baking powder, baking soda, and kosher salt together in a medium bowl. Set aside.
Mix buttermilk, vanilla and egg until combined.
Pour the wet ingredients into the dry ingredients and fold until just combined. Assemble and bake
Transfer the batter to the prepared pan. Spread evenly.
Add sautéed apples evenly in two layers across the batter.
Break crumb topping apart, with your fingers, into pea-sized and slightly larger pieces and spread in even layer over batter, beginning with edges and then working toward center. It will seem like a lot of topping, but it’s worth it!
Bake for 40 to 45 minutes, or until a toothpick comes out clean, rotating the pan after 20 minutes then continue baking.
Let cool at least 15 minutes. Remove cake from pan by lifting parchment overhang. Dust powdered sugar over the top of the cake.
St. Honoré cake is a pastry dessert named for the French patron saint of bakers and pastry chefs and when created correctly is amazing.
The various components of my cake were delicious. The size of the patisserie cream filled profiteroles were slightly large. I will know better next time. Bake and learn,
The cake is basically a circular (7” diameter) base of puff pastry with a ring of choux pastry about 1/2” thick piped around the perimeter. With the excess choux pastry a dozen or so profiteroles (about 1” to 1.5” diameter. are piped on the same baking sheet. This is baked, then cooled.
While the base is cooling make the cream patisserie and chantilly cream. Fill the profiteroles with cream patisserie and set aside. Using a St Honoré piping tip fill the base with a nice pattern of the traditional piping style.
Make the caramel and use it to stick the profiteroles to the edges of the round base. Add another filled profiterole to the center then drizzle caramel over all the profiteroles.
INGREDIENTS Puff Pastry • 1 sheet of puff pastry • Or home made rough puff pastry Pate a Choux • 1/4 cup unsalted butter • 1/2 cup water • 1/2 tsp granulated sugar • 1/4 tsp salt • 1/2 cup all-purpose flour • 2 eggs Creme patisserie • 1 cup milk • 1/4 tsp vanilla bean paste, or 1/2 tsp vanilla extract • 1/3 cup granulated sugar • 2 tbsp cornstarch • 2 tbsp all-purpose flour • 1 egg • 1 egg yolk Chantilly cream • 1/2 cup heavy whipping cream • 2 tbsp powdered sugar • 1/4 tsp vanilla extract Salted Caramel • 2/3 cup granulated sugar • ¼ c water • 1/3 cup heavy cream • 1/2 tsp salt, or more to taste
METHOD Pate a Choux
Preheat the oven to 425°F. In a medium saucepan over medium heat, warm the water, unsalted butter, sugar and salt together. Once the butter has melted, remove the saucepan from the heat.
Pour in the all-purpose flour and stir together to combine. Move the saucepan over to low heat, and stir the now-formed dough/paste until it no longer sticks to the bottom of the pan (about 30 seconds to 1 minute).
Remove the saucepan from the heat and stir in the eggs, one at a time. It will be slightly difficult to mix the egg into the dough, but just keep vigorously stirring and eventually they’ll become incorporated. Temporarily set this aside. Puff Pastry Base and Pastry Puffs
Cut out a 7″ round from the puff pastry. You can use a bowl, pan, pot lid – whatever you have that will help you cut out a nice 7″ circle (or simply trace it after measuring with a ruler – perfection isn’t necessary!). Place this puff pastry circle on one side of a baking sheet fitted with parchment paper or a silicone mat.
Fill a pastry bag (with no tip) with the pate a choux dough that you created in your saucepan. In one continuous motion, pipe the dough out along the edge of the puff pastry circle (creating a sort of wall for the puff pastry). Now, pipe out approximately 16 small mounds on the open side of the baking sheet, spacing the mounds slightly apart. Smooth out any ridges or pointed tips using your fingers.
Bake the pastry for 10 minutes at 425°F, then WITHOUT opening the oven door, bake the pastry for another 12-16 minutes at 375°F, until they’re a deep golden color. Place the pastry ring and pastry puffs on a wire cooling rack to cool completely.
Creme Patisserie
Meanwhile, heat the milk in a medium saucepan over medium-low heat. In a medium bowl, whisk the sugar, cornstarch, flour, egg, and egg yolk together.
Once the milk is hot and steam is beginning to rise from it, stir in the vanilla bean paste (if using extract, hold off for now). Then, pour half of the milk into the egg mixture, whisking the egg mixture vigorously as you do. Pour the rest of the milk in, and continue to whisk vigorously.
Transfer the entire batter back into the saucepan and whisk over medium heat. It will take about 5 minutes for the cream to thicken up into a pudding-like consistency. Just keep whisking the whole time.
Once the cream is starting to look like pudding, quickly remove the cream from the heat. If you’re using vanilla extract, stir the extract in now. If there are any lumps in your cream, just whisk the cream really vigorously to smooth them out.
Transfer the cream to a clean bowl and cover the cream with a sheet of plastic wrap placed directly onto the cream (this will prevent a filmy layer from forming). Chill the pastry cream in the refrigerator.
Chantilly Creme
In the bowl of a stand mixer, whisk the heavy cream on high speed until indentations begin to appear. Pour in the vanilla extract and powdered sugar, then whisk on high speed until a frosting-like consistency is formed.
Caramel
In a medium saucepan, add the sugar and 1/4 cup of water. Do NOT stir the two together. Simply place the saucepan over medium-high heat, and allow the mixture to come to a simmer. Watch the sugar-water bubble for approximately 7 to 8 minutes, watching it go from white-ish/clear to a medium amber color. Do NOT step away from the caramel as it can burn in a matter of seconds.
Once the caramel has reached a medium amber color and is JUST beginning to smoke, quickly remove the caramel from the heat. Carefully pour the heavy cream into the caramel (it will bubble), then stir to combine. Add the salt, and again stir to combine. Assembly
Fit a pastry bag with a long, narrow filling tip. Fill the pastry bag with the creme patisserie and then pipe this into the pastry puffs. Flip the pastry puff upside down so that the flat side is facing you, then dip the top in the salted caramel. Gently give it a shake to pour off excess caramel, then carefully dip the bottom of the pastry puff in caramel too.
Place the pastry puff onto the pate a choux wall that you created on top of the puff pastry circle. The caramel will act like a glue. Continue until you’ve got a ring of pastry puffs.
Scoop the remaining creme patisserie onto the center of the puff pastry. Fill a new pastry bag fitted with whatever tip you like (plain, star, st. honore) with the creme Chantilly, and pipe the creme on top of the pastry cream.
Stick one final pastry puff in the center of the dessert, then drizzle caramel all over. Refrigerate until ready to serve.
Two more days before I can return to golfing! This forced time off is not helping my health.
I wanted to improve the cake in the Lady Baltimore cupcakes I am making for a friends birthday tbis weekend, but was not a fan of the traditional filling and frosting. Today I re-made the cake (3rd time is a charm) but filled the cupcake with creme patisserie and frosted them with my favorite chocolate frosting, topped with a white chocolate curl.
This modification of the cake recipe was excellent and what could be wrong with the rest?
Boston Cream-ish Cupcakes
INGREDIENTS Cupcakes: • 171 g (1½ c) cake flour • 150 g (¾ c) sugar • 2 tsp baking powder • ¼ tsp of salt • 84 g ( 6 Tbl) unsalted RT butter, cut into small pieces • 90 g (3) egg whites • 113 g (½ c) whole milk • 2 Tbl KAB Bread and Cake Enhancer • 1 Tbl sour cream • ¾ teaspoon vanilla • Optional: 1 Tbl vanilla pudding mix OR • Optional: 1 Tbl vegetable oil Frosting • 62 g (3 Tbl) butter • 63 g (¾ c) unsweetened cocoa powder • 312 g (2⅔ c) confectioners’ sugar • ⅓ c milk • ½ teaspoon vanilla extract Crème Patisserie • ¾ c 2% milk + 2 Tbl heavy cream • 2 (40g) egg yolks • ¼ cup sugar • 2 Tbl corn starch • Pinch salt • 1 Tbl butter • ½ tsp vanilla
METHOD
Heat an oven to 350⁰ F. Line 12 wells of a muffin pan with paper liners and set the pan aside.
Add the flour, sugar, baking powder, and salt to a large bowl and whisk to combine.
Add the butter and mix by hand with a Danish whisk until the mixture resembles coarse crumbs, about 5 minutes.If necessary use you hands to break up butter balls as if you were making pastry.
Mix the egg whites, milk, and vanilla in a small bowl, then pour it into the mixer bowl.
Beat vigorously with a Danish whisk for 5 minutes until the batter is creamy and homogeneous. (Makes 2 c batter)
Evenly distribute the batter among the lined muffin tins (50g/tin) and bake until the edge of the cupcakes are light golden brown and a toothpick comes out clean, 14-16 minutes.
Set the pan on a wire rack and let the cupcakes cool in the pan for 15 minutes, then remove them from the pan and let them completely cool on the rack.
Use an apple corer to to cut a cylinder out of the top of the cupcake. Slice the removed cylinder so that you have a ¼” thick disk of cake. Reserve the disk and discard (or eat) the rest of the cylinder.
Frosting
Cream butter until light and fluffy.
Stir in the cocoa and confectioners’ sugar alternately with the milk and vanilla.
Beat and add additional milk to achieve a spreading or piping consistency
Crème Patisserie
Whisk eggs and milk together and add to all other ingredients (except vanilla) to a medium saucepan.
Bring to boil whisking constantly
Cook until thickened (it will look lumpy, its ok)
Vigorously whisk mixture, add vanilla, and vigorously whisk thoroughly
When incorporated, cover with plastic directly on the crème patisserie and cool about an hour.
Alternatively, slide the piping tip you would use to fill the pâte à choux into the piping bag but don’t cut off the tip. Spoon the hot batter directly into the piping bag with sealed end.
When the crème patisserie is cool, cut the tip off, force the bag around the piping tip and squeeze the crème pat to fill the end.
Pipe crème patisserie into each cylinder. Place a reserved cake disk on top of the filling and press down on it to seal the cupcake.
Frost the cupcakes with the chocolate frosting.
For Flavored Cream Patisserie with Liqueur Replace vanilla with 3 Tbl banana liqueur or an other flavored liqueu