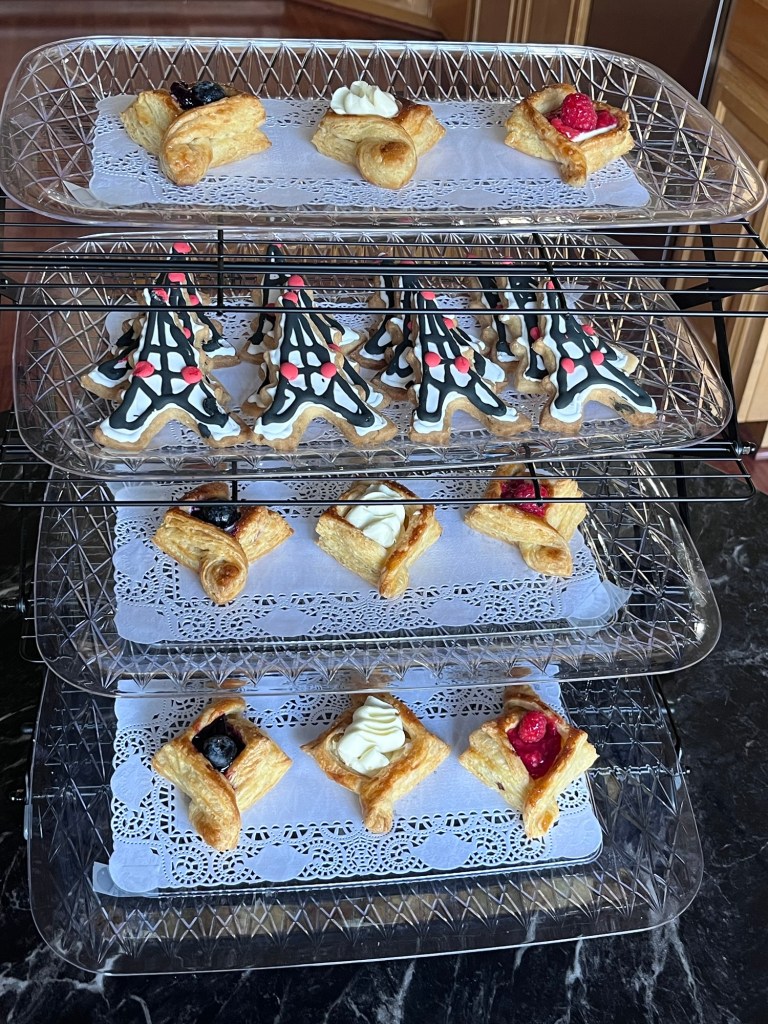
We are participating in a Trivia Night at our clubhouse tonight and I volunteered to make desserts. Our tables theme is “France” and our team name is Les Quizerables, (a take on Les Miserables.)
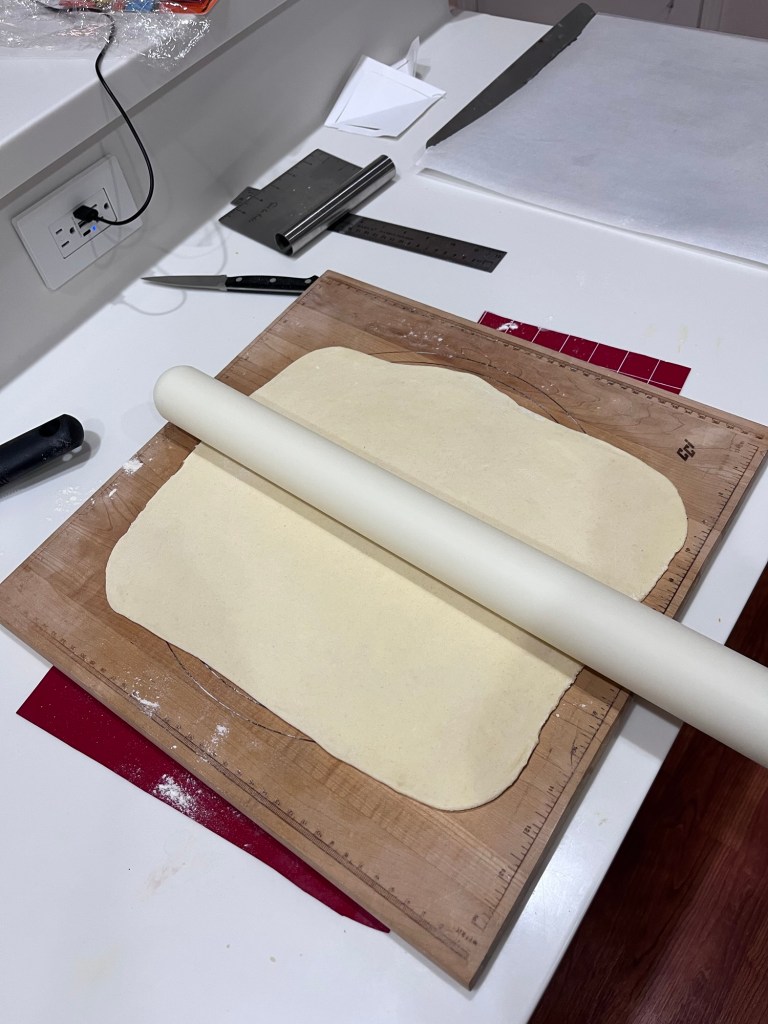
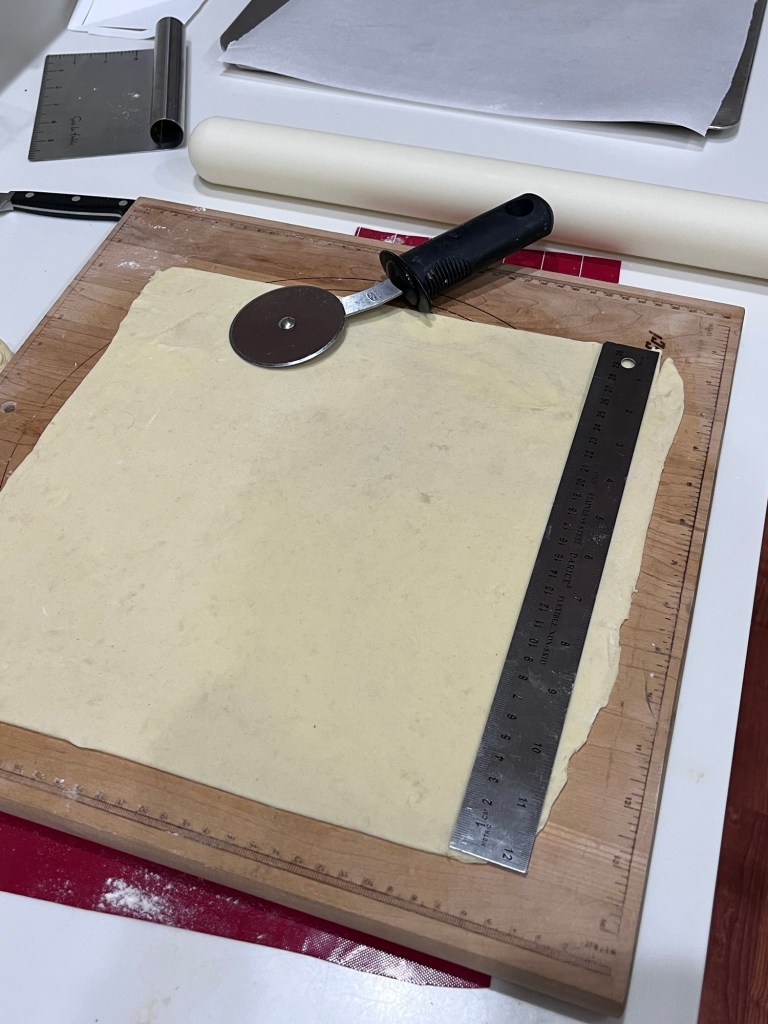
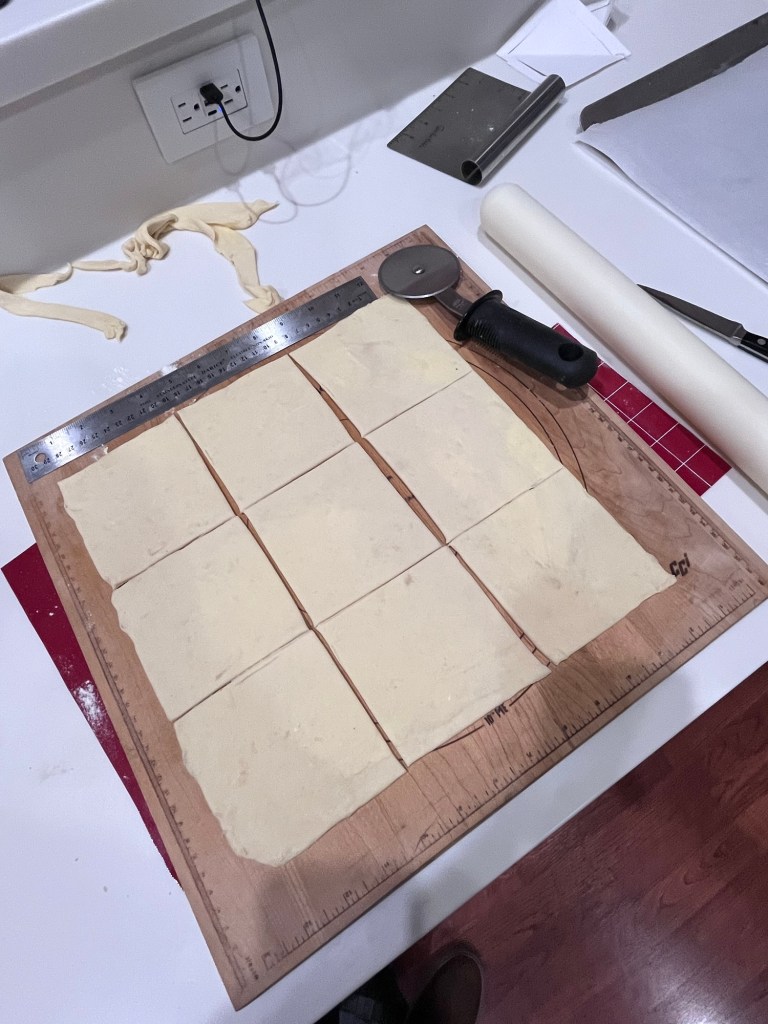
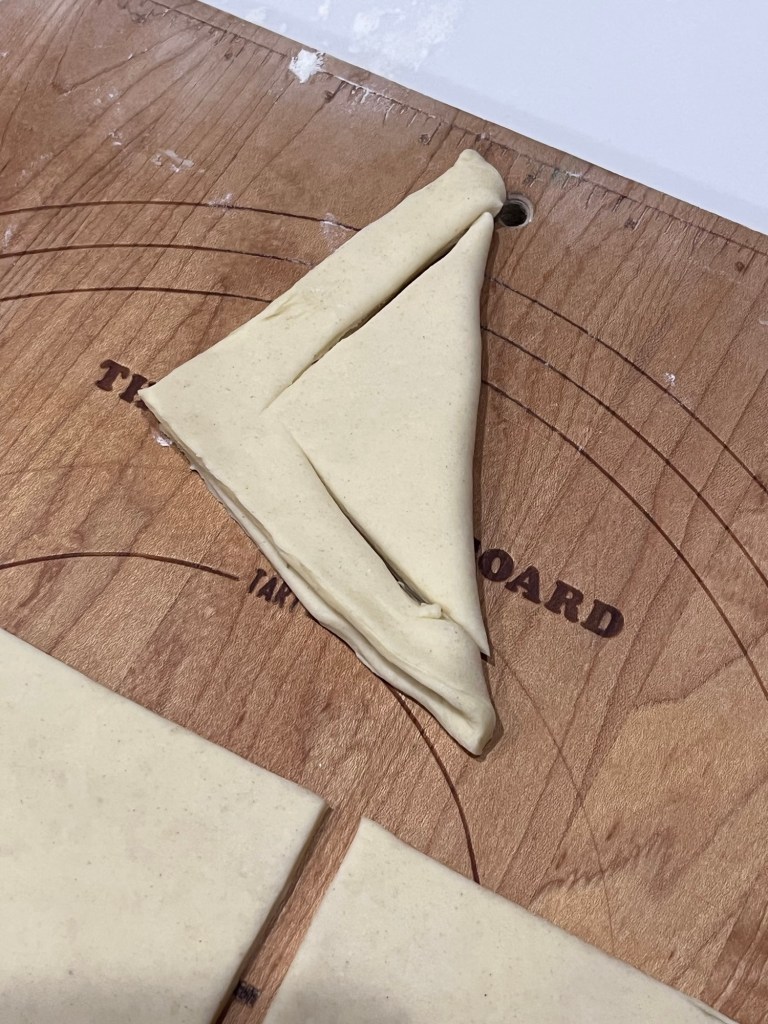
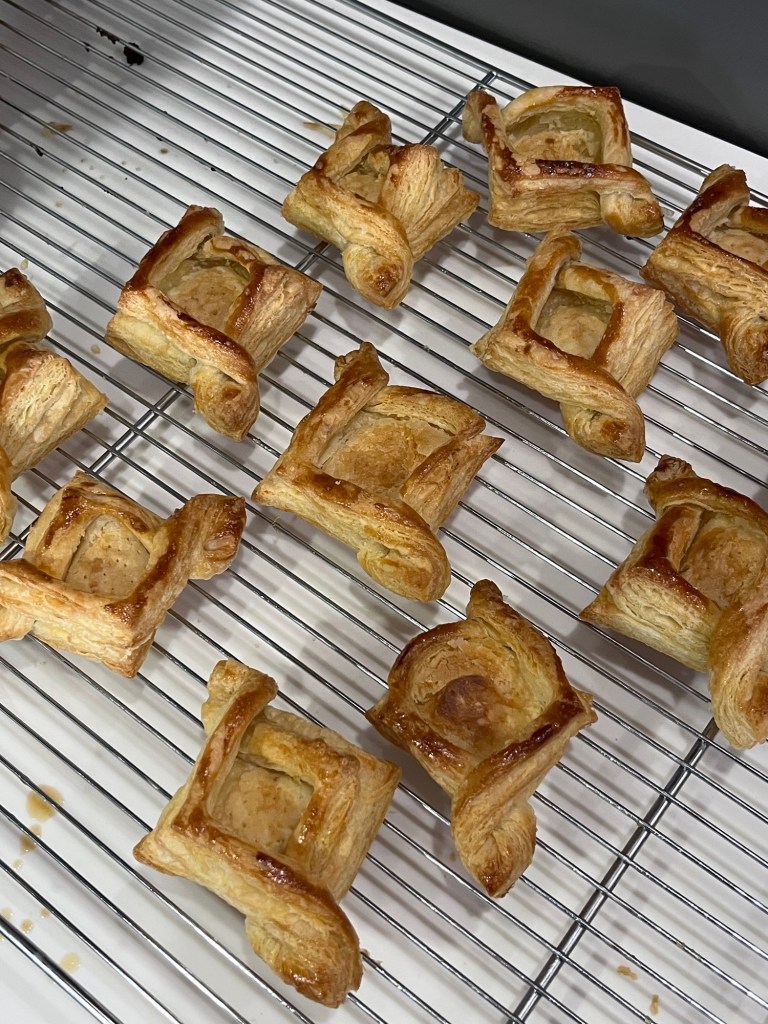
I made filled puff pastries in the color of the French flag (blue, white and red.) I made blueberry, white chocolate/cream cheese ganache, and raspberry pastries.
I combined and re-rolled the scraps from cutting the 12” square to make a few pain de chocolat, just because, why not?
The puff pastry is Sally’s recipe and method and it is fantastic. I made three batches of Sally’s raspberry sauce before I found the right formula for my use, but hit the blueberry on the first try.
Roll the doughTrim into a 12” squareCut into 4”x4” squaresFold and cut, unfold and wrapDock the centers and bakeFill with sauces and ganach
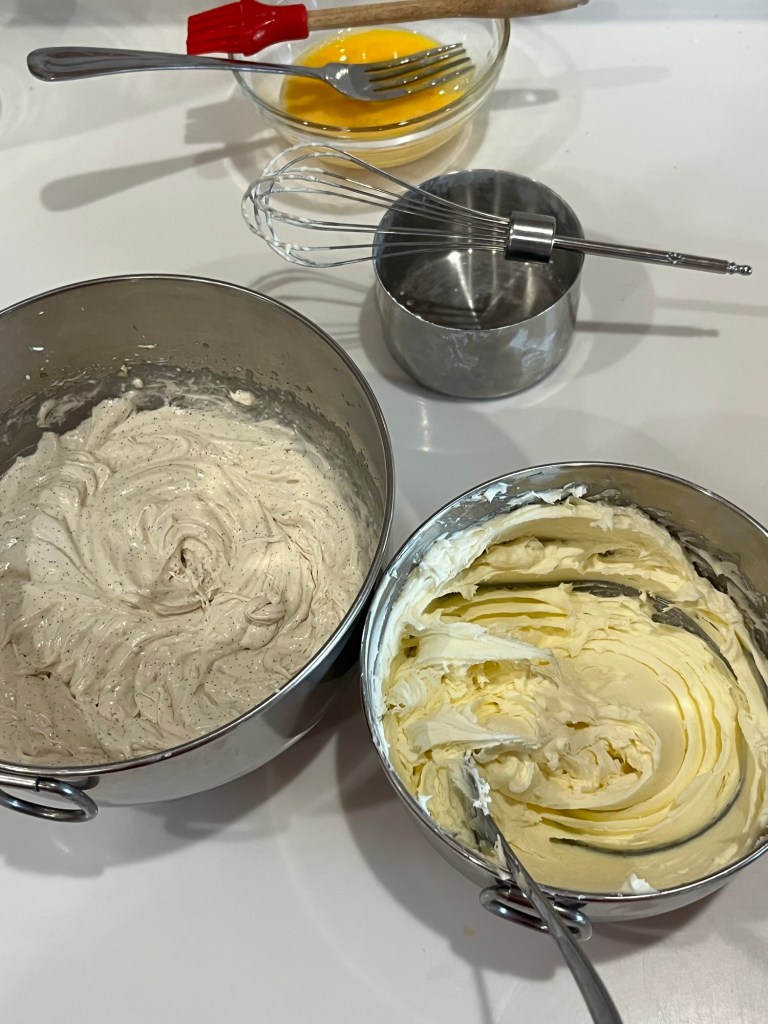
White Chocolate Cream Cheese Ganache
Makes 3 cups
INGREDIENTS • 200 g white chocolate • 200 g heavy cream • 300 g cream cheese full fat, not skim or low fat
METHOD
Finely chop the white chocolate and place it in a heatproof bowl.
Heat the cream on the stovetop until just below boiling point, or heat in microwave (stirring between bursts) in 30 second then 15 second then 5 second bursts until the cream is scalding (not boiling) 170-180 deg
Pour the hot cream over the chocolate.
Use a hand whisk to mix until the chocolate has fully melted and the mixture is smooth.
Cover the surface with cling wrap, ensuring it touches the surface, and refrigerate overnight or until completely chilled.
In a new bowl, use a hand mixer to beat the cream cheese until smooth, light, and fluffy. Scrape the bowl occasionally to ensure even mixing.
Add the whipped cream cheese to the chilled chocolate mixture. Mix until well combined, stiff, and thick. The ganache should have a smooth, silky texture.
Raspberry Dessert Sauce
Makes ~1 cup
INGREDIENTS • 1 Tbl water • 2 tsp cornstarch • 375g (3 c) fresh or frozen raspberries • 50g ( ¼ c) granulated sugar • 1 tsp fresh lemon juice (do not leave out) • optional: ½ tsp vanilla extract
METHOD
Whisk the cornstarch and water together until all the cornstarch has dissolved. Combine cornstarch mixture, raspberries, granulated sugar, and lemon juice in a small saucepan over medium heat. Using a silicone spatula, stir the mixture while lightly mashing the raspberries as they begin to heat.
Bring to a boil and let it boil for 3 full minutes, stirring occasionally. Remove the pan from heat and—if desired for a richer flavor—stir in vanilla extract, and if desired, a few fresh raspberries.
OPTIONAL (SKIP for a thicker sauce) Press the warm sauce through a fine mesh strainer to remove the seeds, if desired. I use the back of a spoon to press the liquid through the strainer, held over a bowl. It takes a couple minutes to really squeeze it all out.
Feel free to serve warm over warm desserts, but it should be cooled to really thicken up. Cool the sauce completely at room temperature or in the refrigerator. The sauce will thicken slightly as it cools, but the strained version is still liquid and perfect for drizzling.
Cover and store for up to 1 week in the refrigerator.
Notes
Freezing Instructions: After the raspberry sauce cools completely, freeze in a freezer-friendly container for up to 3–6 months. Thaw on the counter or in the refrigerator. Warm up in the microwave or on the stove, if desired.
Other Berries: You can substitute blackberries with no changes to the recipe.
Chunky Blueberry Sauce – Sally
INGREDIENTS • 80g (1/3 c) warm water • 15g (1 Tbl) fresh lemon juice • 1 ½ tsp cornstarch • 280g (2 c) fresh or frozen blueberries (if using frozen, do not thaw) • 25g (2 Tbl) granulated sugar • ½ teaspoon pure vanilla extract
METHOD
Whisk the cornstarch, water, and lemon juice together until all the cornstarch has dissolved. (I just use a fork to mix—very easy.) Set aside.
Warm the blueberries and sugar together in a small saucepan over medium heat. With a wooden spoon or sturdy silicone spatula, stir continuously for 3 minutes, gently smashing the berries against the sides of the pan to help them release some juices. For chunkier sauce leave some berries whole. (If you used frozen blueberries, you won’t need to smash them as much because they will naturally break down as they thaw over heat.)
After 3 minutes, add the cornstarch mixture and continue to stir for another 2–3 minutes, smashing more berries if needed. The mixture will start to thicken.
Remove from heat and stir in the vanilla. Allow to cool. The mixture is liquid and drippy, but thickens considerably as it cools.
You can serve the sauce warm before it cools completely if desired, or store in the refrigerator for up to 1 week. Blueberry topping will be thick after refrigeration, so microwave for 15 seconds or warm on the stove to thin out, if desired.
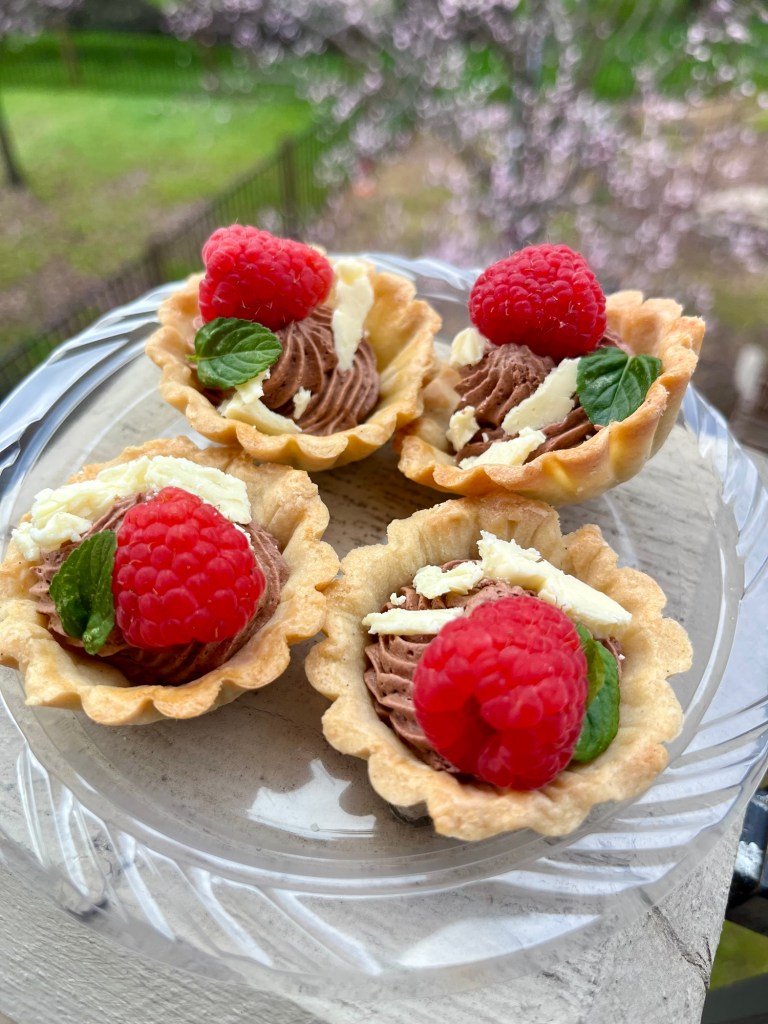
This month’s challenge from Sally’s Baking Addiction was to make chocolate mousse using her recipe. First of all, it was delicious. Thick and silky smooth. Definitely a keeper and sure to be a repeat offender.
Because I only needed to fill 20 tartlets I made a half recipe, but it made no difference, still a perfect mousse. It perfectly filled 20 mini tartlets.
Chocolate Mousse Half Recipe- Sally
INGREDIENTS
113g semi-sweet chocolate, finely chopped
80g (⅓ c) heavy cream
60g 2 large egg whites
50g (¼ c) granulated sugar
⅛ tsp cream of tartar
pinch of salt
METHOD
Place chopped chocolate in a medium heatproof bowl. Heat the cream in a small saucepan over medium heat until it begins to gently simmer. Pour over chocolate, then let it sit for 2–3 minutes to gently soften the chocolate.
With a metal spoon or small silicone spatula, slowly stir until completely combined and chocolate has melted. Set aside to slightly cool.
Place egg whites, sugar, cream of tartar, and salt in a heatproof bowl. Set bowl over a saucepan filled with 2 inches of simmering water. Do not let the bowl touch the water. Whisk constantly until sugar is dissolved and mixture has thinned out, about 4 minutes. The mixture will be thick and tacky at first, then thin out and appear frothy on top. Heat to 160°F (71°C).
Pour hot mixture into the bowl of a stand mixer. Whip on high speed until stiff glossy peaks form, about 7 minutes.
Remove the bowl from the mixer and pour the chocolate ganache into the meringue and gently fold together with a silicone spatula until completely combined.
Spoon or pipe the mousse into dessert dishes, ramekins, or jars. Refrigerate for at least 4 hours or up to 48 hours. After about an hour in the fridge, cover the mousse.
Top with whipped cream, chocolate curls, raspberries, and/or fresh mint to serve
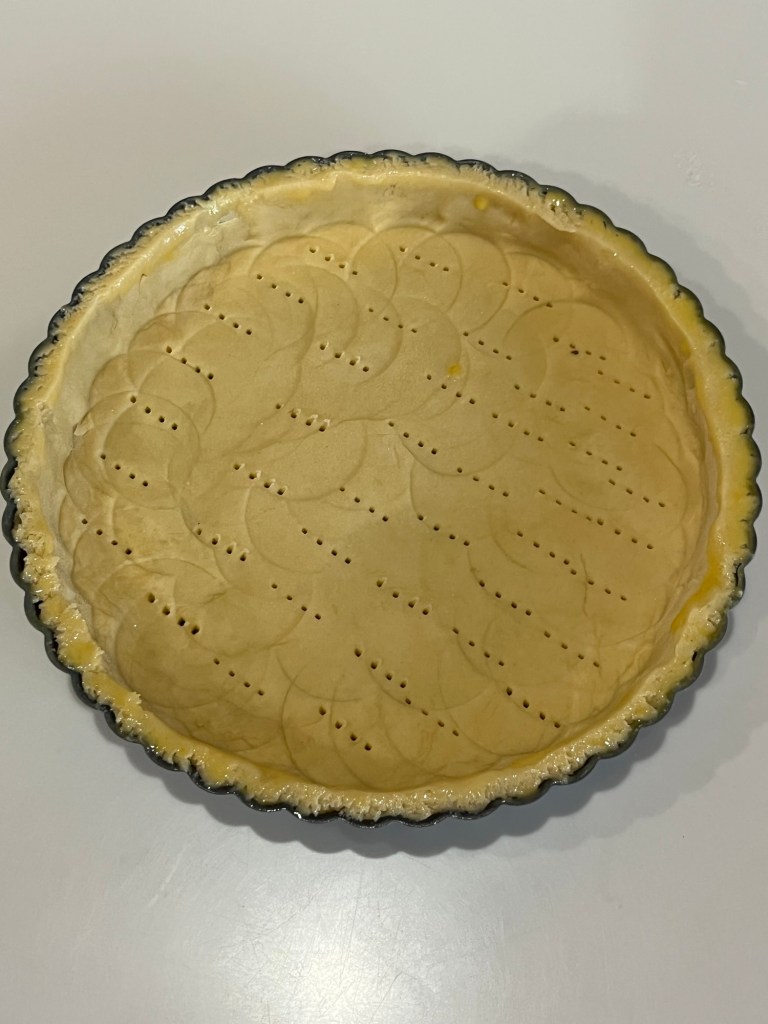
Tart Shell
Makes 20 mini tartlets (2” diameter)
INGREDIENTS • 100 g cold butter cut into small cubes • 60 g icing sugar • ½ tsp vanilla • ¼ tsp salt • 2 egg – 1 for the dough and the other 1 reserved for an egg wash • 200 g all-purpose flour
METHOD
In a stand mixer mix butter with sugar
Add salt then vanilla
Add egg and mix until incorporated
Add flour and mix by hand like you are kneading bread until incorporated
Cover with plastic and refrigerate for 30 min
Pre-heat oven to 350⁰F
Butter tartlet pans, or use non-stick pans
Roll dough to about 1/8” thick
Cut dough into circles large enough to cover the sides and bottom of the rather pans
Lay over tart mold and press into all crevices
Roll top to cut off excess
Prick holes in bottom and sides of formed dough
Fill tarts with pastry weights. For mini tartlet pans I put beans in a cupcake paper. For large pans use crumpled parchment paper filled with beans. Remove 5 minutes before the end of the bake.
Paint edges of the tartlet with the egg wash.
Bake in preheated oven 350⁰ F (175⁰ C) for 15 min
Immediately remove from pans and cool on a wire rack
The June 2025 Sally’s Baking Challenge was the above mentioned tart and it was fantastic. The look and taste were perfect. I am harvesting the blackberries in my garden so added a few, because I could.
Removing the pith from the mandarin oranges was challenging. I ended up dipping them for a few seconds in near boiling water then gently rubbing with a soft brush. Not perfect, but not bad either.
Frozen tart shellFilling ingredients Folded filling ingredients Baked tart shellFilled tart shell with toppings in the backgroundFinished Fresh Fruit Tart
INGREDIENTS Crust • 188g (1 ½ c) all-purpose flour, plus more as needed • 45g (6 Tbl) confectioners’ sugar • ⅛ teaspoon salt • 113g ( ½ c (8 Tbl) unsalted butter, at room temperature and cut into 8 pieces • 1 large egg, cold Vanilla Mascarpone Cream • 120g ( ½ c) heavy cream, cold • 60g ( ½ c) confectioners’ sugar, divided, 45g:15g • ½ tsp fresh lemon zest • 1½ tsp vanilla bean paste • 8 ounces (226g) mascarpone, cold Fruit Topping • assorted fresh sliced fruit • 2 Tablespoons orange, peach, or apricot preserves • 1 Tablespoon water
METHOD
Lightly grease a 9-inch tart pan with a removable base with nonstick spray.
Make the crust: In a food processor, combine the flour, confectioners’ sugar, and salt and pulse or process on low speed to combine. Add the butter, 1 Tablespoon at a time, pulsing a few times after each addition. Add the egg and pulse only until the dough comes together in a clump. The dough should be soft. Transfer it to a lightly floured surface and press it into a 1-inch-thick disc.
Place the soft dough in the prepared pan and use your hands to press it evenly into the pan and up the sides. It may seem like you don’t have enough dough at first, but keep pressing. Use the bottom of a metal measuring cup to press the edges firmly against the rim of the pan. (Refrigerate for 10 minutes to make the dough firmer and easier to press into the sides of the pan.) Flatten the top edge so it’s even with the rim of the pan, or use a paring knife to trim. Save the scraps to patch up any thin-looking areas. Prick the bottom of the crust all over with a fork. Cover and freeze for at least 30 minutes or up to 1 day.
Preheat the oven to 350°F (177°C). Remove the crust from the freezer and place the tart pan on a large baking sheet for easy handling.
Bake for 25 minutes (rotation half way through) or until the crust appears set. Place on a cooling rack to cool completely.
Make the cream filling: Using a handheld or stand mixer fitted with a whisk attachment, beat the heavy cream, 6 Tbsp (45g) confectioners’ sugar, the lemon zest, vanilla extract, and vanilla bean seeds until stiff peaks form, about 3–4 minutes. In a small bowl using a fork, gently mix the mascarpone with the remaining confectioners’ sugar. Don’t over-mix; you only want to smooth out the mascarpone here. Over-mixing will result in a separated mixture.
Transfer the mascarpone mixture to the whipped cream mixture. Fold together with a silicone spatula or beat on low speed until combined. Use right away (next step), or cover and refrigerate the filling for up to 3 days before using.
Spread the filling into the cooled crust. I usually use a small offset spatula for this. Refrigerate until ready to garnish with fruit, or garnish right away.
Top the tart: Garnish the tart with fresh fruit. Use a fork to whisk together the jam and water in a small microwave-safe bowl. Warm for about 15 seconds in the microwave, then brush the glaze on top of the fruit.
Slice and enjoy! Store leftover fruit tart, covered, in the refrigerator for up to 3 days.
Somewhere I came across Pastéis de Natas, so I researched online for a suitable recipe. I had 6 left-over egg yolks and an extra sheet of puff pastry. Doing the maths I calculated if I used two more sheets of puff pastry and made 18 tarts I should about run out of left overs.
Well, I was once semester short of graduating with a math minor, but somehow I ended up with two small bowls of custard. This isn’t a problem as it is smooth and delicious. (I have some raspberries that need to be used soon so a nice raspberry coulis could be used here.)
Pastéis de Nata
INGREDIENTS
• 296 g (1⅓ c) granulated sugar • 115 g (½ c) water • ½ tsp cinnamon • 225 g (1 c) whole milk • ½ cup (115ml) double cream • 5 large egg yolks • 1 large egg • 1 tablespoon vanilla extract • 28 g (¼ c) cornstarch/cornflour • 1 pack frozen puff pastry
METHOD
Preheat oven to 500°F. Making the Custard:
In a small pan, add the sugar, water, and cinnamon stick. Bring to a simmer and allow to simmer for 3 minutes. Turn off the heat and set it aside to infuse.
In a separate saucepan, combine milk and cream and place over medium heat. Allow the mixture to come to a simmer, then remove from the heat and set aside to cool down.
To a large bowl, add the egg yolks, whole egg, vanilla extract, and cornflour. Whisk until fully combined and no lumps remain.
Temper the egg mixture by slowly pouring the hot milk to it briskly whisking as you go.
Return this egg mixture to the saucepan and place over low-medium heat. Whisk continually until mixture thickens, around 3-4 minutes. Remove from the heat.
Whisk in the cooled cinnamon sugar syrup. Set the custard aside. Assembling the Tarts:
Lightly flour a work surface and cut puff pastry into roughly 14 equal rounds using a 3 ½ inch cookie cutter.
To a lightly greased muffin tin, push each piece of puff pastry down and up into the sides of the muffin holes until evenly distributed.
Pour custard into each muffin tin so each one is three-quarters full. Bake for roughly 15 minutes or until golden brown on top.
Serve warm as is or with a dollop of cream on top, or dusted with confectioners sugar.
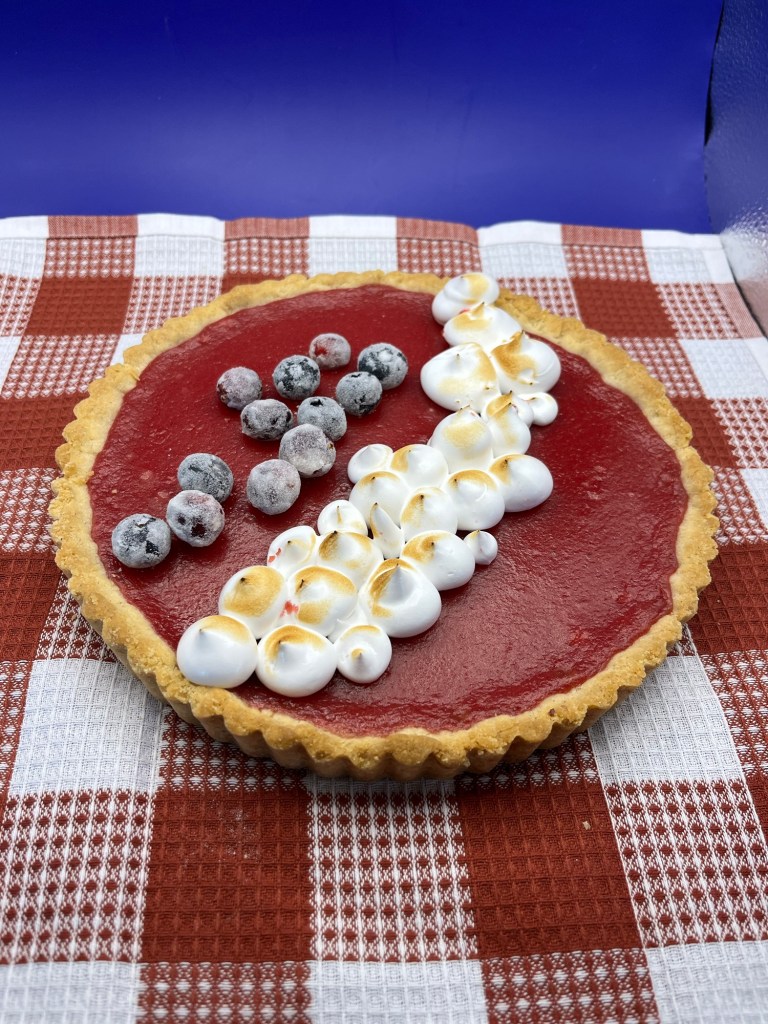
By special invitation is my almond-crust-cranberry-curd tart.
Today is Thanksgiving in the USA . Thanksgiving is a national holiday celebrating the harvest and other blessings of the past year. It is believed to be modeled on a 1621 harvest feast shared by the English colonists (Pilgrims) of Plymouth and the Wampanoag people.
For my whole life Thanksgiving centered around family and friends, old and new, sharing both a meal and each other. As a child Thanksgiving was held at our house and all our aunts, uncles and cousins would come for a huge mid-day meal. We had to finish early as our uncles had to go back to the farm to milk the cows. I had a lot of aunts and uncles and LOTS of cousins. Mostly I remember the pies, so many pies.
Since moving to California our son and daughter in law have hosted Thanksgiving and this year was no exception. There were over 20 people and enough food for 50.
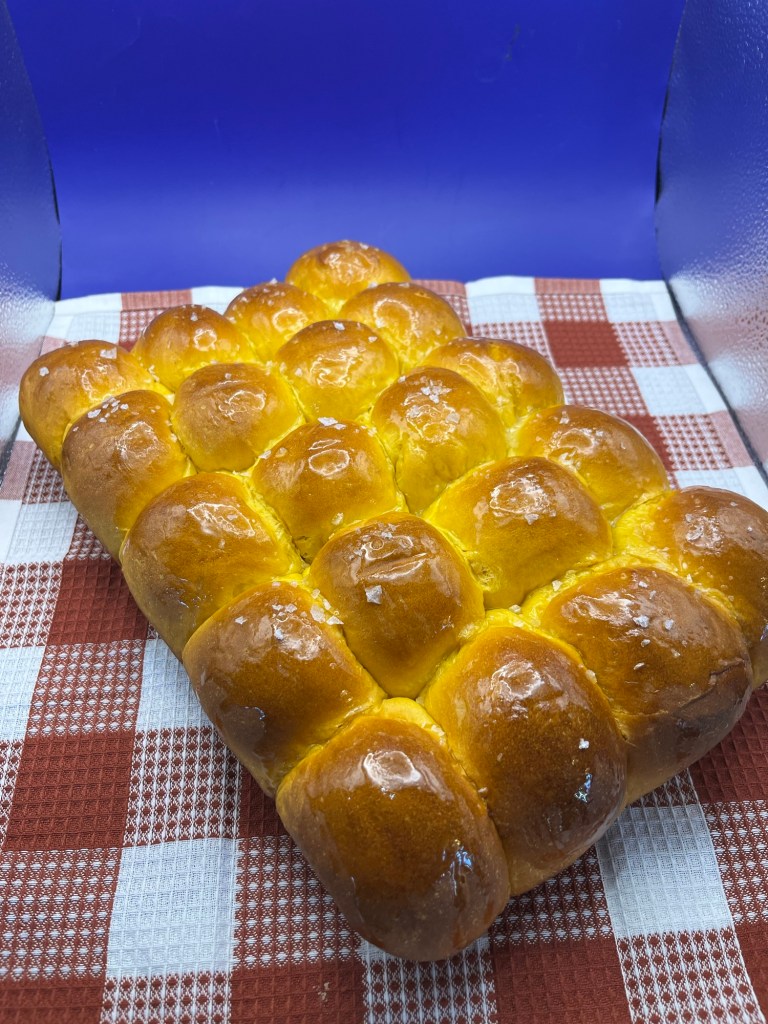
I made an apple pie, an almond-crust-cranberry-curd tart (see below) and sweet potato dinner rolls. There were also two pumpkin pies and very little left when we were done.
Cranberry Curd Tart Almond Crust
INGREDIENTS For the crust • 99g (½ c) granulated sugar • 113g (8 Tbl) unsalted butter, softened • ¼ tsp table salt • 1 tsp King Arthur Pure Vanilla Extract • ½ tsp almond extract • 180g (1½ c) King Arthur Unbleached All-Purpose Flour • 72g (¾ c) almond flour or finely ground sliced or slivered almonds
For the cranberry curd • 12 ounces cranberries (fresh or frozen) • juice of one orange (~ ¼ c) • 250g (1 ¼ c) sugar • 2 whole eggs • 2 egg yolks • 113g (½ c, 1 stick) unsalted butter • 1 teaspoon vanilla extract • 1 tablespoon orange liqueur, such as TripleSec or Grand Marnier (optional)
For the Italian meringue • 2 egg whites • 1/8 teaspoon cream of tartar • 1/2 cup sugar • 1/4 cup water
METHOD Crust
Mix butter with sugar then add salt then vanilla.
Add egg and mix until incorporated. Stir in flour. Mix by hand like you are kneading bread until incorporated
Cover with plastic and refrigerate for 30 min
Pre-heat oven to 350⁰F
Butter tartl pans, or use non-stick pans
Dock (prick holes in) bottom and sides of formed dough then refrigerate for 20 minutes
Line tart pan with crumpled then smoothed parchment paper and fill with pastry weights.
Paint edges of the tartlet with the egg wash.
Bake in preheated oven 350⁰ F (175⁰ C) for 15 min. Remove pastry weights 5 minutes before the end of the bake.
Immediately remove from pans and cool on a wire rack
Cranberry Curd
Heat the cranberries and orange juice in a medium saucepan over medium-high heat until the cranberries split. Mix with an immersion blender then strain through a food mill or fine mesh sieve and discard the skins.
Return the strained cranberry mixture to the saucepan and add the sugar, eggs, egg yolks, butter, vanilla, and orange liqueur (if using) to the pan and give everything a good stir. Heat gently over medium-low heat, stirring constantly, until the mixture thickens and registers 170°F on an instant read thermometer (this usually takes about 8-9 minutes). Immediately strain (again) through a fine mesh sieve into a large measuring bowl and then pour into the prepared crust. (The curd can be stored in an airtight container in the fridge for up to a week. You may need to bake it a few more minutes for the tart to set when baking from chilled)
Bake (still at 350°F) until the curd is set (it should jiggle but not slosh), about 10 minutes. (Curd was jiggly after 20 more minutes baking.)
Let cool at room temperature for about 1 hour, then transfer to the refrigerator to chill. You can serve this chilled or at room temperature.
Italian meringue
Add egg whites and cream of tartar to the bowl of a stand mixer fitted with a whisk attachment. Heat sugar and water in a small saucepan over medium high heat.
When the sugar mixture registers about 220°F turn on the mixer and begin beating the egg whites on medium speed.
When the sugar mixture registers 240°F remove from heat and carefully pour into the mixer over the egg whites. Increase the mixer speed to high and beat until the egg whites form stiff peaks.
Transfer to a piping bag (or zip top bag) and pipe onto cooled tart as desired. If you want, torch the meringue with a kitchen torch. (But since it is cooked, this is totally optional).
As long as the oven was on and I had time to wait for doughs to chill etc, I also made a loaf of artisan bread.
When I cannot golf, I bake. On one hand, that is a good thing. My skills and knowledge are growing. On another hand the QC Cadre isn’t tired of my supplying them with baked goods. On someone else’s hand my muscles for playing golf are atrophying.
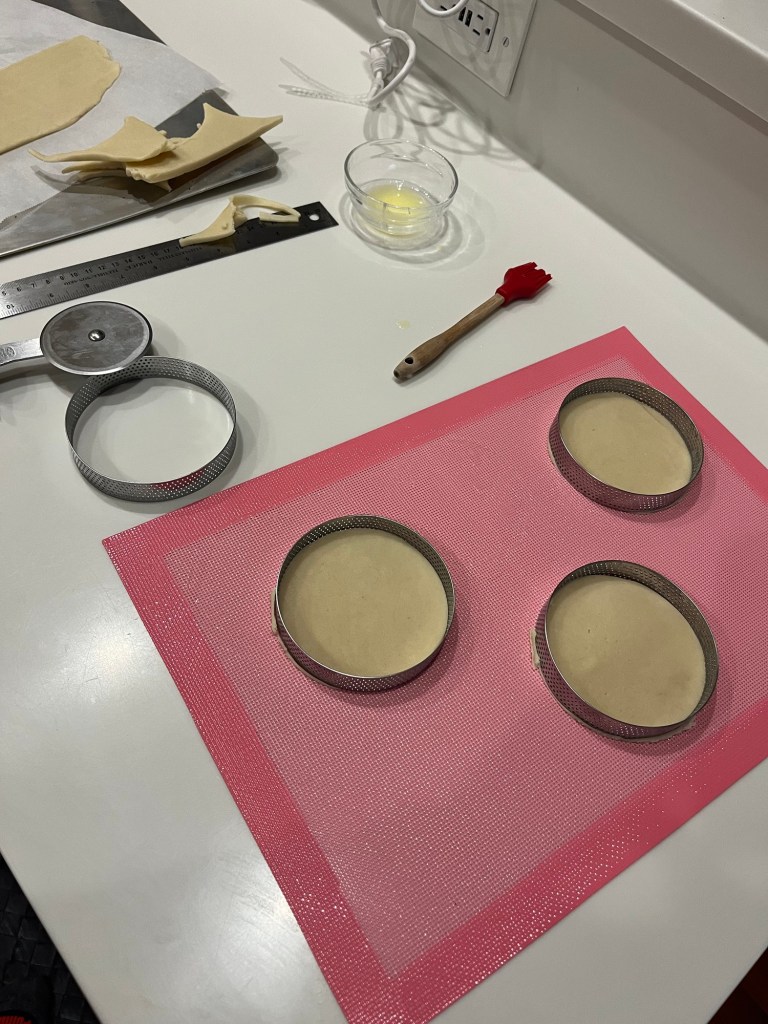
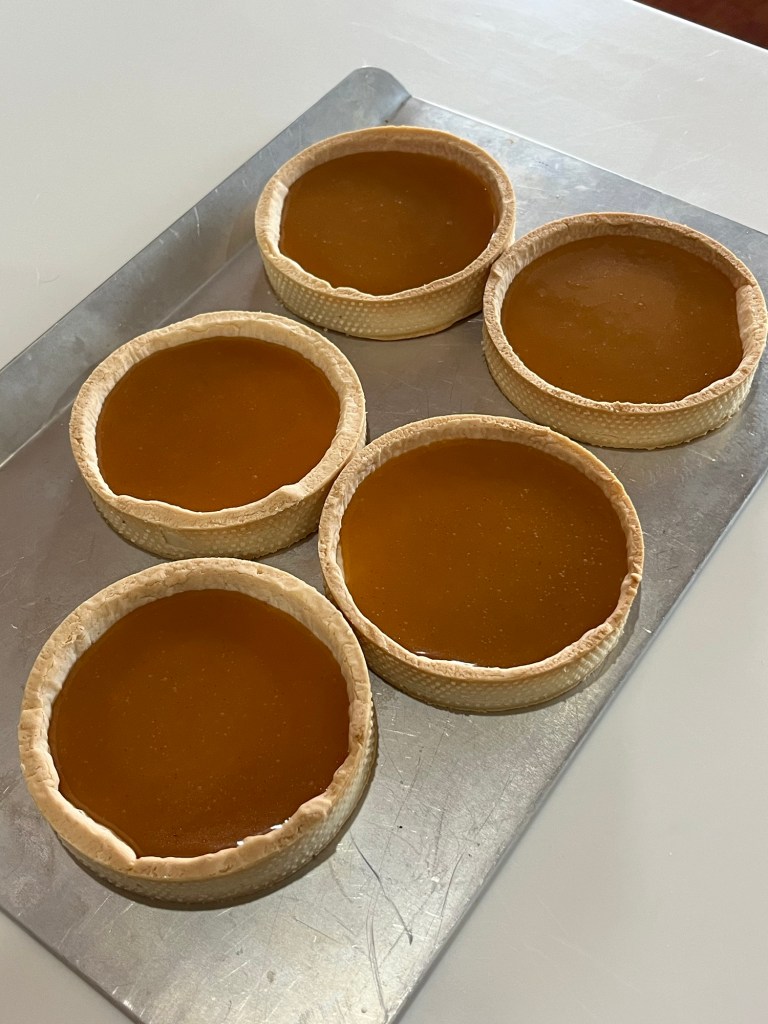
I recently received a set of perforated tart rings and a perforated silicon mat to bake the rings on. They all worked perfectly. Once baked, the tarts almost fell out of the rings.
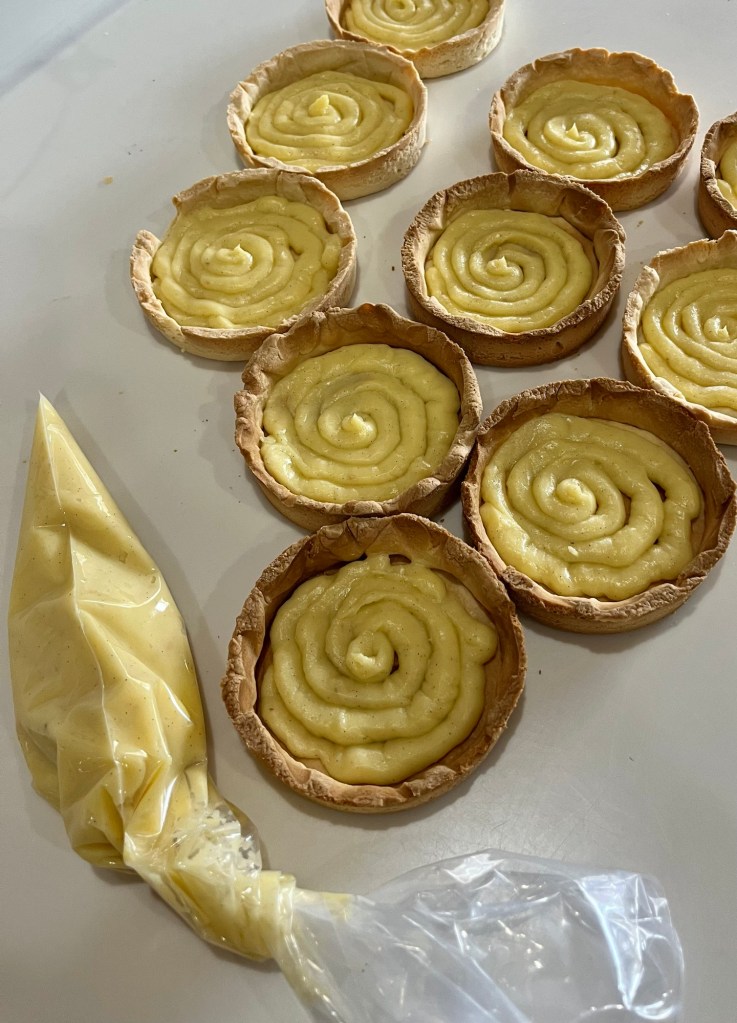
QC asked for a chocolate covered caramel tart for her birthday. We spent her birthday day at the grands school talent show, then at a car dealership, during a severe rainstorm, and finally out with the family to a pizza birthday dinner. There was no time to fill the tarts, so I did them this morning.
Ingredients measured and weighedDry ingredients siftedTart disk bottoms cut and placed in ringsCaramel filled baked rings filledChocolate glazed tarts with edible gold foil garnish
CHOCOLATE CARAMEL TART
INGREDIENTS Crust • Unsalted Butter (room temp) 100g • Salt a pinch • Powdered Sugar 72g • Almond Powder 20g • Corn Starch 30g • Eggs (room temp)36g • Cake Flour 170g Caramel • 2 cups (424 g) granulated sugar • ½ cup water • ¼ cup corn syrup • ½ cup (113 g) salted butter, cut into 4-5 pieces • ½ cup heavy cream • 1 teaspoon vanilla extract Glaze • 2 Tbl water • 60g sugar • 46g corn syrup (60ml) • 52g condensed Milk (40ml) • ¼ tsp agar agar • 60g dark chocolate
METHOD
Beat the room temp. butter lightly (add in salt).
Sift in powdered sugar, almond powder and corn starch. Beat lightly. Add the room temp. eggs gradually and mix. Finally, add in the cake flour and mix well.
Using a bench knife, “fraiser” the dough by repeated smearing portions of it on the table.
Roll it out to 2mm/3mm thickness between parchment papers. (2mm thickness for 6~8cm diameter, 3mm thickness for 14~18cm thickness.
Rest in the fridge for 1~2hrs
For perforated tart ring:
Cut it out into strips/discs. Disks equal to tart ring diameter, strips ~ ¾” wide and 2” longer than tart ring circumference, ~14.5” for a 4” tart ring. (4” x π + 2”)
Coat the inside of the ring with butter. Position tart ring over a disk and place on a perforated mat.
If the strips are too stiff to bend, warm slightly with your hands. Line the side of the tart ring with the disk. Glue any seams by warming with your finger.
Trim top of strip with a knife
Refrigerate for 20 minutes.
Bake 3mm thick crust at 340⁰F for 15mins. (320⁰F for 2mm)
If you are to bake the tart crust again after adding the almond cream, then bake 2-3mins less. (~12-13mins.)
For regular tart pan:
Cut it out into one big disc ~2” larger than tart pan
Line the tart pan.
Prick the bottom.
Place a sheet of parchment paper and then pie weights.
Bake 3mm crust at 340⁰F for 10mins, take the pie weights out, then bake for another 5 mins. (320⁰F for 2mm)
If you want to apply egg wash the recipe is as follows: 10g Heavy Cream, 40g Egg yolk. Mix them well and strain it before use. Once the tart shell has cooled down completely, then brush them evenly and bake for ~10-12mins at 160℃.
For the caramel:
In a heavy bottomed saucepan (important so that the heat conducts evenly!), combine the sugar, water and corn syrup (try not to splash the mixture up on the sides of the pan). Bring the mixture to a simmer over medium heat. Cook for 10-12 minutes, until the mixture is a medium-dark amber color, tilting the pan just slightly every couple of minutes to swirl the mixture.
Immediately remove the pan from the heat and carefully add the butter, cream and vanilla. The hot mixture will bubble vigorously. Stir to combine (don’t go too crazy scraping down the sides of the pan).
Pour the caramel over the baked crust. Refrigerate until the caramel is set and no longer warm, 1-2 hours (make sure you set the tart on a really flat surface in the fridge or else it will set up tilted or uneven).
For the glaze:
Heat water, sugar, agar, corn syrup to boil to 220⁰F
Add condensed milk and dark chocolate and blend with an immersion blender.
Leave it overnight and use it the next day.
Heat in the microwave to make it pourable
Divide evenly among the tarts, rolling around to smooth out and cover each tart
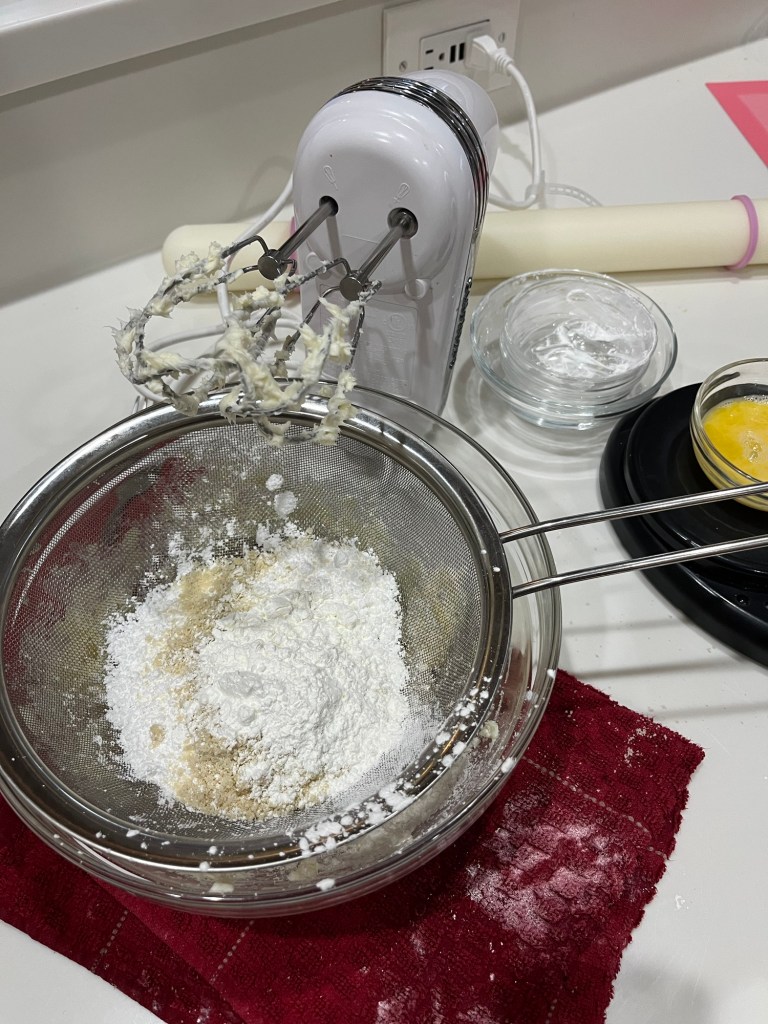
One of my neighbors gave me some of their mandarin oranges and to thank them I “processed” the fruit and re-gifted it to them. I love the orange/chocolate tarts I made a few times, but have yet to perfect them. I changed the recipe and method this time, remembering Einstein’s quote: (reported and most likely never said,) “The definition of insanity is doing the same thing over and over again and expecting different results“
I used a recipe and method (by Philippine pastry chef, Hanbit Cho. My first attempt used standard tart rings resulted in useable but not “excellent” tart shells. The edges are ragged and some of them broke.
(I ordered and received some perforated tart rings and am waiting for the accompanying perforated baking mat to arrive, then will try again. If at first…)
I also changed my previous recipe to use creme patisserie and chocolate ganache which don’t require baking. I used my standard creampat recipe (ala Martha Stewart) and a chocolate ganache and orange glaze from Preppy Kitchen.
Baked Tart ShellsCandied Orange SlicesCreamPat Filled ShellsChocolate Ganache with Orange Creme spiralFinished TartsFinished Tart
Chocolate Orange Tart with Crème Patisserie – REVISED
Yield: Five 4” tarts. INGREDIENTS Tart Shell • 100g unsalted room temperature butter • Salt a pinch • 72g powdered sugar • 20g almond flour • 30g corn starch • 36g (~1) room temperature egg • 170g cake flour Chocolate Ganache • ½ cup heavy cream (120ml) • 180g (1 c) semi-sweet chocolate chopped Orange Glaze • 1 cup powdered sugar • 3 Tbl orange juice • 1 tsp orange zest Crème Patisserie • 1¾ cups 2% milk + ¼ cup heavy cream • 80g (~4) egg yolks • ½ cup sugar • ¼ c corn starch • Pinch salt • 2 Tbl butter • 1 tsp vanilla ½ tsp vanilla
METHOD Tart Shell
Beat the butter lightly (add in salt).
Sift in powdered sugar, almond flour and corn starch. Beat lightly.
Add the eggs gradually and mix.
Finally, add in the cake flour and mix well.
Roll it out to 2mm/3mm thickness between parchment papers. (2mm thickness for 3-4” diameter, 3mm thickness for 7-9” diameter.
Rest in the fridge for 1~2hrs.
For regular tart pan: Cut chilled dough into disc ~2” larger diameter than tart ring
For perforated tart ring: Cut discs the size of the tart ring
For regular tart pan: Butter inside of ring and gently fit the dough inside the ring, leaving enough to line the edges. Be gentle to not tear the dough. Prick the bottom. Place a sheet of parchment paper on the dough and and fill with pie weights.
For perforated tart ring: Butter inside of ring and set over one of the cut-to-size discs. Cut strips of dough 1” wide and cut ~15” long. Line the ring with the long strips cementing and connections by warming gently with a finger. Place it on a perforated mat.
For either type of tart ring chill the formed rings in the fridge for an hour before baking, then put them directly in the pre-heated oven.
For regular tart pan: Bake at 350F for 10mins, take the pie weights out, then bake for another 5 mins. (325Ffor 2mm thick)
For perforated tart ring: Bake at 350 F for 15mins. (325 Ffor 2mm thick)
Chocolate Ganache
Heat the cream in a small saucepan over medium heat until very steamy and just about to boil. (You can also heat it in the microwave for 1 to 2 minutes until very hot but not boiling.)
Meanwhile, place the chocolate in a large measuring cup.
Pour the hot cream over the chocolate and set aside for 5 minutes, allowing the chocolate to melt from the heat of the cream.
Stir the chocolate and cream together until fully combined, smooth, and glossy. If there are a few pieces of chocolate left unmelted, you can microwave the ganache at 50% power for about 10 seconds and mix again.
Orange Glaze
Place confectioners’ sugar into a bowl. Add 2 tablespoon orange juice and 1 teaspoon orange zest.
Whisk or beat until smooth, adding more juice as necessary. Reserve remaining zest and juice for another use. The glaze should be pipeable but should not flow from the piping tip. Crème Patisserie
Whisk eggs and milk together and add to all other ingredients (except vanilla) to a medium saucepan. Bring to boil whisking constantly. Cook until thickened (it will look lumpy, its ok)
Sieve lumpy mixture into a bowl and add vanilla, mix thoroughly
When incorporated, cover with plastic directly on the crème patisserie and cool about an hour. (Alternatively, slide the piping tip you would use to fill the pâte à choux into the piping bag but don’t cut off the tip. Spoon the hot batter directly into the piping bag with sealed end. When the crème patisserie is cool, cut the tip off, force the bag around the piping tip and squeeze the crème pat to fill the end )
ASSEMBLY
Pipe a ¼” layer of crème patisserie layer into each tart shell and smooth while the crème patisserie is still warm. Let set before proceeding.
Pipe a ¼” layer of warm chocolate ganache on the crème patisserie layer
Pipe a spiral ⅛” wide circles of orange cream and feather the orange cream with a toothpick
Chill to set
Candied Orange Slices
Add the sugar and water to a 12-inch skillet or a large saucepan and set it over medium-high heat. Bring the water to a boil, stirring from time to time. As the water heats, the sugar will melt into the water. It’s important that the sugar be completely melted before adding the orange slices.
After boiling the water, reduce the heat to medium and add the orange slices. Don’t overcrowd the pan; the orange slices should fit in the pan with little overlap.
Let the orange slices cook at a gentle simmer for about ~60 minutes, until the white part of the peel (the pith) is nearly translucent. Use tongs to turn them over in the syrup every now and then.
Use tongs to remove the slices from the sugar syrup, laying them out in one layer on a wire rack.
Spread the slices on a parchment paper lined baking pan and bake for 1-2 hours at 170F
When “dry” they will be tacky but also feel set – kind of like gummy candy. Coat with caster sugar if desired.
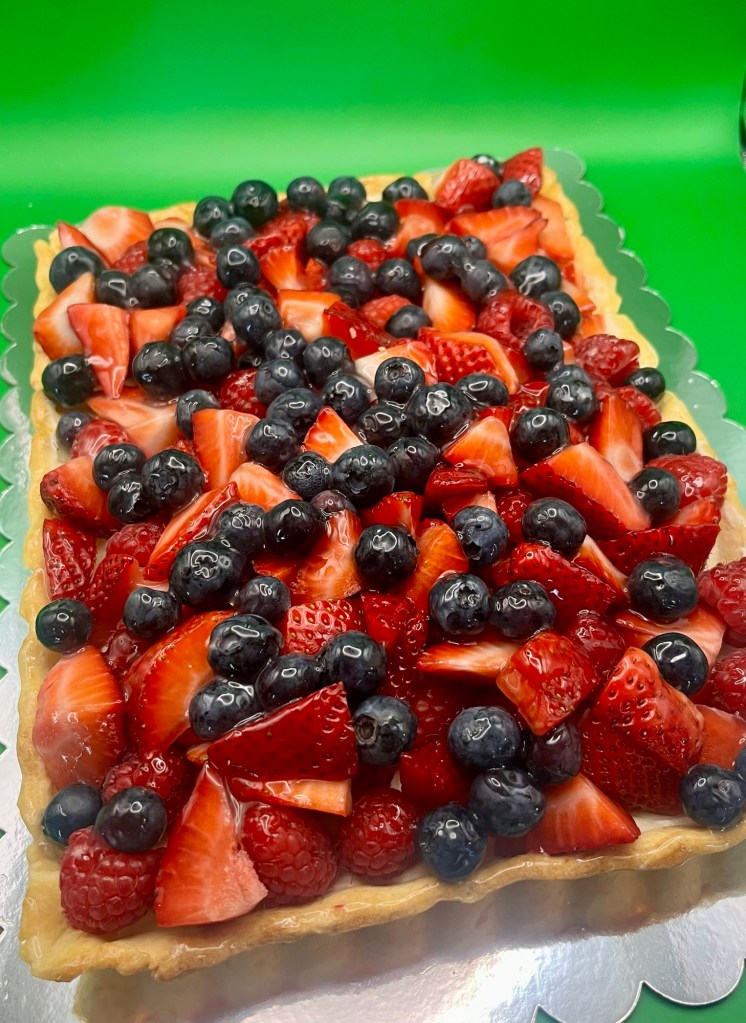
We are going to a friends birthday luncheon today and QC and I thought a nice summery berry tart would be a nice dessert on a warm sunny day.
There were choices and challenges to this bake. The choice was, should I make a Berry Chantilly Cake or this tart. The tart won, but don’t feel bad, summer is a long time.
The challenge is our refrigerator died yesterday so we spent the afternoon buying and installing and transferring out food to a small refrigerator. While it is a bit inconvenient it’s only for a couple of weeks, and I only have one more required bake. (Note: required.)
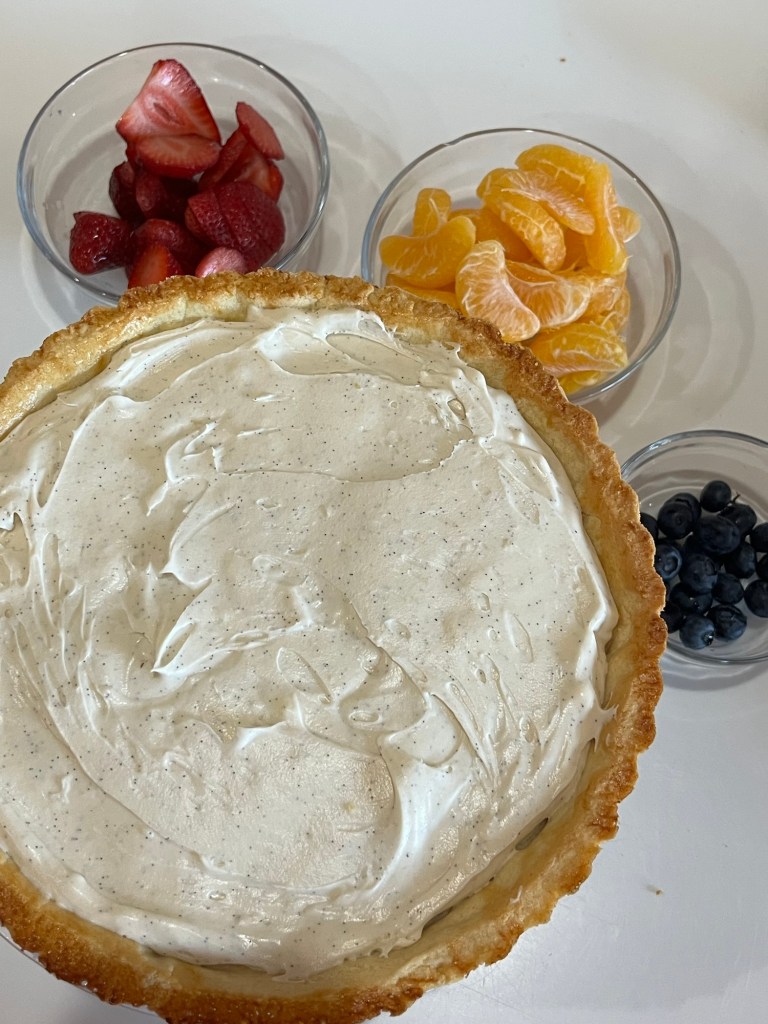
I had some left over strawberries so dipped some in chocolate to add around the tart.
INGREDIENTS Shell • 100 g cold butter cut into small cubes • 60 g icing sugar • 200 g Kim’s Bread flour • ½ tsp vanilla • ¼ tsp salt • 2 eggs – 1 for the dough and the other 1 reserved for an egg wash Filling: • 1 (12 ounce) package white chocolate chips, melted and cooled • ¼ c heavy cream • 8 ounces cream cheese, softened Topping: • 2 c fresh strawberries, sliced • 1 c fresh blueberries • 1 c fresh raspberries Glaze: • 1 c water • ½ c white sugar • 2 Tbl cornstarch • 2 Tbl corn syrup
METHOD Shell
Preheat the oven to 300 degrees F (150 degrees C). Grease a 12-inch tart pan.
Pulse flour, sugar and salt a few times to combing
Add cubed butter and pulse until the mixture resembles coarse sand
Add egg and pulse until the dough just comes together but does not clump into a ball.
Chill in fridge for an hour.
Roll dough between sheets of wax paper until ~2 inches wider and longer than the tart pan (It needs to cover the bottom and all sides of the pan,) then refrigerate for 15-30 minutes
Spray tart pan and flip chilled sheet of dough onto the pan and press into all corners. Dock the dough on the bottom of the pan.
Fill with baking beads and bake 15-20 minutes, until the dough is dry and the edges begin to brown.
Take from oven and remove parchment paper.
Egg wash the edges of the tart.
Return to oven and bake crust until lightly browned, 10 to 15 minutes. Let cool completely. Filling
Beat melted and cooled white chocolate and heavy cream in a bowl until smooth. Mix in cream cheese until thoroughly combined. Spread over cooled crust. Chill in the refrigerator for 30 minutes. Glaze
Combine 1/2 cup water and white sugar in a saucepan and bring to a boil. Mix remaining 1/2 cup water and cornstarch together in a bowl until cornstarch dissolves; add to sugar mixture. Cook and stir until mixture thickens and clears, about 5 minutes. Stir in corn syrup and return to a boil. Remove glaze from heat and let cool for 10 minutes. Topping
Arrange strawberries, blueberries, and raspberries over cream cheese layer and brush with glaze. Chill for at least 1 hour; store in refrigerator until ready to serve.
I am always pleased when asked to prepare some items for a party, large or small. Tonight is our annual temple baseball themed gala with an expected attendance of 100 people. I started this tradition in 2018, but missed a couple of years due to Covid etc.
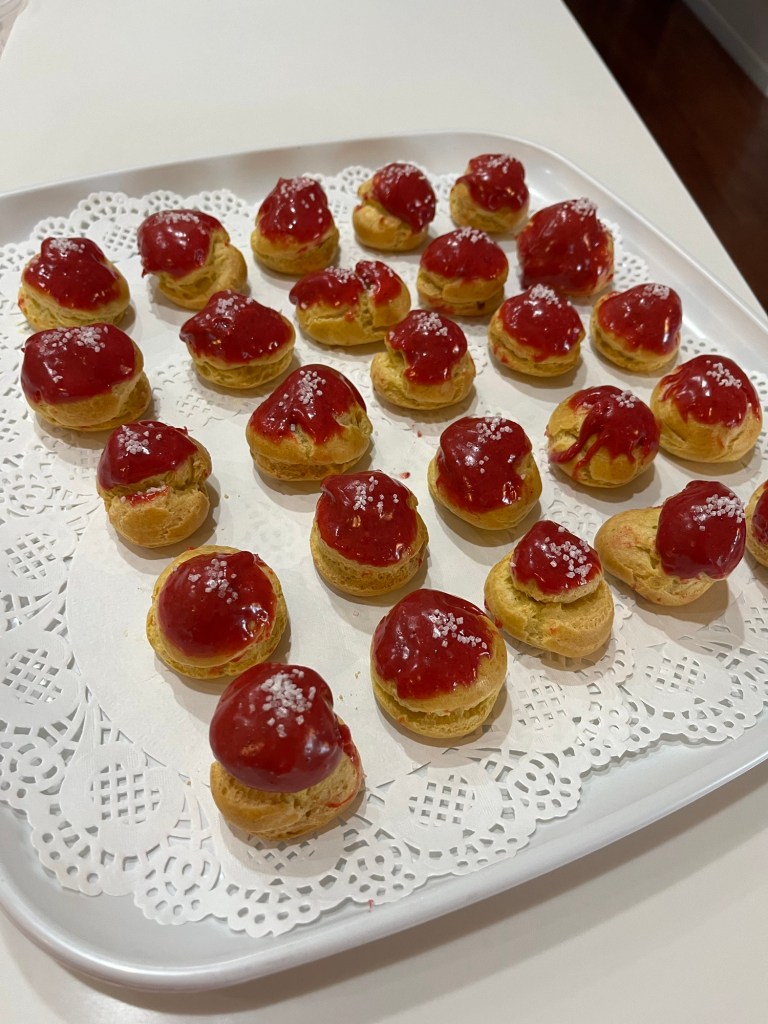
Tonight Dede’ Bakery and Confectionary is serving chocolate/raspberry baseball field brownies, gluten free raspberry mousse tarts with baseball decorated cookies and key lime profiteroles with no baseball association whatsoever. (I just like them.)
GLUTEN FREE TARTS INGREDIENTS • 100 g cold butter cut into small cubes • 60 g icing sugar • 200 g Kim’s Bread flour blend • ½ tsp vanilla • ¼ tsp salt • 2 eggs – 1 for the dough and the other 1 reserved for an egg wash
METHOD
Mix dry Ingredients.
Lightly beat egg then add the melted butter.
Add wet to dry ingredients. Form into a dough ball.
Wrap the dough ball in plastic and refrigerate for 30 minutes.
Roll to a 1/8” thick sheet between two pieces of parchment paper or plastic.
Cut rounds of the dough about an inch larger than the tart pans
Gently press the dough circles into the tart pans pressing into any flutes
Patch any breaks with extra dough
Dock the bottom of the crust. Wrap and keep in freezer at least 30 minutes.
Pre-bake the tart crust 8 to 10 minutes in preheated oven at 350 deg.
Depending on recipe, you may want to protect the crust of the tart with foil
Cool to room temperature
Fill with raspberry mousse.
Top with a raspberry and white sugar cookies with red baseball seams.
Combine raspberries and 2 Tbl confectioners’ sugar in a small bowl and add to a food processor and pulse until berries are reduced
Sieve the mixture allowing enough time for most of the raspberry juice to drip into a bowl, (enough to make 200ml (2/3 c) puree)
Add 1 Tbl vanilla pudding, softened cream cheese and 1/4 cup sweetener, raspberry powder and ouzo and beat until well combined (3-4 minutes on high.) Mix in red food coloring in 2 or 3 aliquots until desired color is attained.
In a large bowl, whip the heavy cream, vanilla pudding mix and confectioners sugar.
Add red food coloring (in several small amounts until desired color is attained) and whip to firm peaks.
Fold the raspberry mixture into the whipped cream until combined. Divide the mousse among 6 dessert cups, cover, or fill a piping bag and chill until set, about 1 hour.
KIM’S GLUTEN FREE BREAD FLOUR BLEND Yield: 700g (5 c) INGREDIENTS • 285g Bob’s Red Mill potato starch • 250g superfine white rice flour (DON’T use regular rice flour, ie Bob’s Red Mill) • 75g Tapioca flour • 75g Whey protein isolate or egg white protein. • 15g Xanthan gum METHOD
Weigh all ingredients and add to a stand mixer bowl
Mix on low, with bowl covered for 30 seconds
CHOCOLATE AND RASPBERRY BROWNIE BARS I made a 1 ½ recipe and used an 11×15 pan.
INGREDIENTS Brownies • 4 large eggs • 1 ¼ c dark cocoa • 1 tsp salt • 1 tsp baking powder • 2 tsp vanilla extract • 2 ¼ c sugar • 1 c unsalted butter, melted • 1 ½ c All-Purpose Flour • 1 c chocolate chips • 1 c Raspberry Jammy Bits • 3 Tbl seedless raspberry jam • 1 Tbl water Chocolate Ganache Glaze • 1 Tbl cup heavy cream • 1 Tbl light corn syrup (20g) • 2 ⅔ c (400g) semisweet or bittersweet chocolate, chopped • 1 Tbl vanilla extract
METHOD
Preheat the oven to 350°F. Lightly grease a 9″ x 13″ pan. To make very even bars, line the pan with aluminum foil before baking, leaving foil sticking up above the edges of the pan.
Crack the 4 eggs into a bowl, and beat them with the cocoa, salt, baking powder, and vanilla until smooth.
Add the sugar and melted butter, stirring until smooth.
Add the flour, chips, and Jammy Bits, again stirring well. The batter will be very thick.
Spoon the batter into the prepared pan and smooth.
Bake the brownies for about 30 minutes, until a cake tester inserted into the center comes out clean (205 degrees,) or with just a few moist crumbs clinging to it. The brownies should feel set on the edges, and the center should look moist, but not uncooked. Do not over bake! Remove them from the oven.
Heat the seedless raspberry jam with the water and stir until smooth. (I use 2 tsp of apple jelly, mixed with 1 tsp water and heated to melt the jelly.) Brush over the warm brownies. Set aside to cool for an hour or longer before topping with the ganache.
To make the ganache, heat the cream and corn syrup until they begin to steam. Pour over the chopped chocolate in a bowl. Let sit for 5 minutes, add any flavorings, and whisk until smooth. Let cool for 15 minutes or so.
Pour ganache over the brownies while it’s still warm but has begun to thicken — reheat if it thickens too much as you work. Allow several hours for the ganache to set up fully. You may refrigerate the brownies to hasten the setting of the ganache.
Remove the brownies from the pan using the aluminum foil sling. Heat a knife in hot water, wipe dry and use to cut the brownies. Repeat with each cut.
KEY LIME PROFITEROLES INGREDIENTS Whipped Cream Key Lime Curd: • ½ c white sugar • 2 Tbl cornstarch • ¼ tsp kosher salt • 1 large egg, plus 2 large egg yolks • 2 tsp lime zest • ⅔ c key lime juice • ⅔ c sweetened condensed milk • 2 Tbl butter • ¾ c heavy whipping
Choux Pastry: • ½ c (65 grams) AP flour • ½ tsp granulated white sugar • ¼ tsp salt • 4 tbsp (55 grams) unsalted butter, cut into pieces • ½ c (120 ml) water • 2 large eggs, lightly beaten White Chocolate Raspberry Ganache • 150 g confectioner’s sugar • 50 g heavy cream • 1 Tbl freeze-dried raspberry powder • Red food coloring • Coarse decorating sugar
METHOD
Preheat oven to 400° F (200° C) and place rack in center of oven.
In a bowl whisk the flour with the sugar and salt.
Place the butter and water in a saucepan over medium high heat and bring to a boil.
Remove from heat and, with a wooden spoon, add the flour mixture, all at once, and stir until combined. It will look like mashed potatoes. Return saucepan to the heat and stir constantly until the dough comes away from the sides of the pan and forms a thick smooth ball (about 1-2 minutes). The dough will film the bottom and sides of the saucepan and make cleaning a pain.
Transfer the dough to an electric mixer and beat on low speed to release the steam from the dough (about 1 minute).
Once the dough is lukewarm start adding the lightly beaten eggs (dough will separate and then come together) and continue to mix until you have a smooth thick paste (dough will fall from a spoon in a thick ribbon).
Place the dough in a pastry bag fitted with a large plain tip and pipe oblongs of dough (about 3/4 inch (2 cm) wide) onto the parchment lined baking sheet. (When piping hold the bag at a 45-degree angle.) If desired, with a pastry brush, gently brush the tops of the dough with the lightly beaten egg.
Bake for 15 minutes and then reduce the oven temperature to 350o F (180o C).
Remove from oven, pierce an end of each éclair with a small skewer to release the interior steam.
Continue to bake for a further 25 minutes or until the shells are a nice amber color and when split, are almost dry inside. Remove from oven and place on a wire rack to cool.
Warm white chocolate to soften (30 seconds in a 1000W microwave)
Heat whipping cream to steam, but not boil and pour over the softened white chocolate
Let sit 3-4 minutes then add freeze dried raspberry, red food coloring and beat with a spoon until the mixture is smooth
After filling the profiteroles with the key lime curd dip the top into the warm ganache and sprinkle with decoration sugar. ROYAL ICING Makes ~3 cups of royal icing, (¼ recipe decorated 48 1” diameter cookies) INGREDIENTS • 4 cups (480g) confectioners’ sugar, sifted • 3 Tablespoons meringue powder (not plain egg white powder) • 9–10 Tablespoons room temperature water METHOD
Sift confectioners’ sugar and meringue powder, into a large bowl and add 9 Tablespoons of water. Add half the water after sifting 2 cups of sugar. Add the remaining water or more, checking flow consistency of the icing is what you want for piping etc.
Using a hand mixer or a stand mixer fitted with a whisk attachment, beat icing ingredients together on high speed for 1.5 – 2 minutes.
When lifting the whisk up off the icing, the icing should drizzle down and smooth out within 5-10 seconds. If it’s too thick, beat in more water 1 Tablespoon at a time. I usually need 10 Tablespoons but on particularly dry days, I use up to 12-14 Tablespoons. Keep in mind that the longer you beat the royal icing, the thicker it becomes. If your royal icing is too thin, just keep beating it to introduce more air OR you can add more confectioners’ sugar.
When applied to cookies or confections in a thin layer, icing completely dries in about 2 hours at room temperature. If icing consistency is too thin and runny, it will take longer to dry. If the icing is applied very thick on cookies, it will also take longer to dry. If you’re layering royal icing onto cookies for specific designs and need it to set quickly, place cookies in the refrigerator to help speed it up.
I made some chocolate-orange-custard tarts last week. Honestly, they tasted pretty good, but if I saw them in a patisserie I would give them a pass.
I remade them today but without the baked custard, chocolate and orange bases. (Truthfully, maybe a little over baked in my case.) Version 2.0 used a new method to make the tart case, and creme patisserie, chocolate ganache and a new orange drizzle.
The tart base was made using a food processor to mix the butter, sugar, salt and 1/4th of the flour. It’s basically the same method I use to make berry drop scones. Using the food processor is easier and quicker than cutting the butter into the sugar with your hands.
I use the “Martha Stewart” creme patisserie method and a standard eclair ganache recipe and method. The orange drizzle is simple the zest of one orange, 70 grams of confectioners sugar and enough fresh orange juice to make a pipeable paste.
There are a lot of steps in this recipe (none of them very difficult,) but believe me, it is well worth the effort.
CremePat – Chocolate – Orange Tart
Yield: Five 4” tarts.
INGREDIENTS Tart Shell • 100 g cold butter cut into small cubes • 60 g icing sugar • ½ tsp vanilla • ¼ tsp salt • 2 egg – 1 for the dough and the other 1 reserved for an egg wash • 200 g all-purpose flour Chocolate Ganache • 150 g dark chocolate finely chopped • 150 g heavy cream • 2 Tbl corn syrup • 1 tsp vanilla Orange Crème • 1 orange, juiced and zested • 35g confectioners sugar Crème Patisserie • 1 c (175 ml) whole/full fat milk (¾ c 2% plus ¼ c heavy cream) • 2 (40g) large egg yolks • ¼ c (13 grams) granulated/caster sugar • ⅛ c corn starch • 1 Tbl butter • ½ tsp vanilla extract
METHOD Tart Shell
In a food processor pulse sugar, salt and 50g AP flour
Pulse in cubed butter and vanilla
Transfer to a mixing bowl and add egg and mix until incorporated
Stir in flour. Mix by hand like you are kneading bread until incorporated
Cover with plastic and refrigerate for 30 min
Pre-heat oven to 350 degrees
Butter or spray tartlet pans, or use non-stick pans
Roll dough to about ⅛” thick
Lay over tart mold and press into all crevices
Prick holes in bottom and sides of formed dough
Fill tarts with pastry weights. (For mini tartlet pans I put beans in a cupcake paper. For large pans use crumpled parchment paper filled with pie weights.)
Paint edges of the tartlet with the egg wash.
Bake in preheated oven 350° F (175 C) for 12 min
Remove from oven, remove weights, then roll top to cut off excess
Return to oven and bake 8 more minutes to dry the bottoms
Immediately remove from pans and cool on a wire
Chocolate Ganache
Heat the cream to just below boiling.
Place the chopped chocolate in a heat proof bowl
Pour the hot cream over the chocolate and let it sit for a couple of minutes
Add the corn syrup and vanilla and mix until smooth
Pour the chocolate into a sealed piping bag. (No piping tip required.)
Let the mixture cool to the desired viscosity.
Orange Crème
Place the confectioners’ sugar and zest in a small bowl. Add the orange juice one drop at a time while stirring, until the desired viscosity is attained.
Pour into a piping bag with a small circular piping tip inserted. (Do not cut the end off yet.)
Crème Patisserie
Whisk eggs and milk together then add to all other ingredients (except vanilla) to a medium saucepan.
Bring to boil, whisking constantly
Cook until it begins to thicken (it will look lumpy, its ok)
Sieve lumpy mixture into a bowl and add vanilla, mix thoroughly
Transfer to a sealed piping bag to cool. (No piping tip required.)
ASSEMBLY
Pipe a ¼” layer of CremePat into each tart shell and smooth
Pipe a ⅛” layer of chocolate crème on the CremePat layer and smooth
Pipe concentric ⅛“wide circles of orange cream and feather the orange cream with a toothpick