My Grammie Wasn’t French

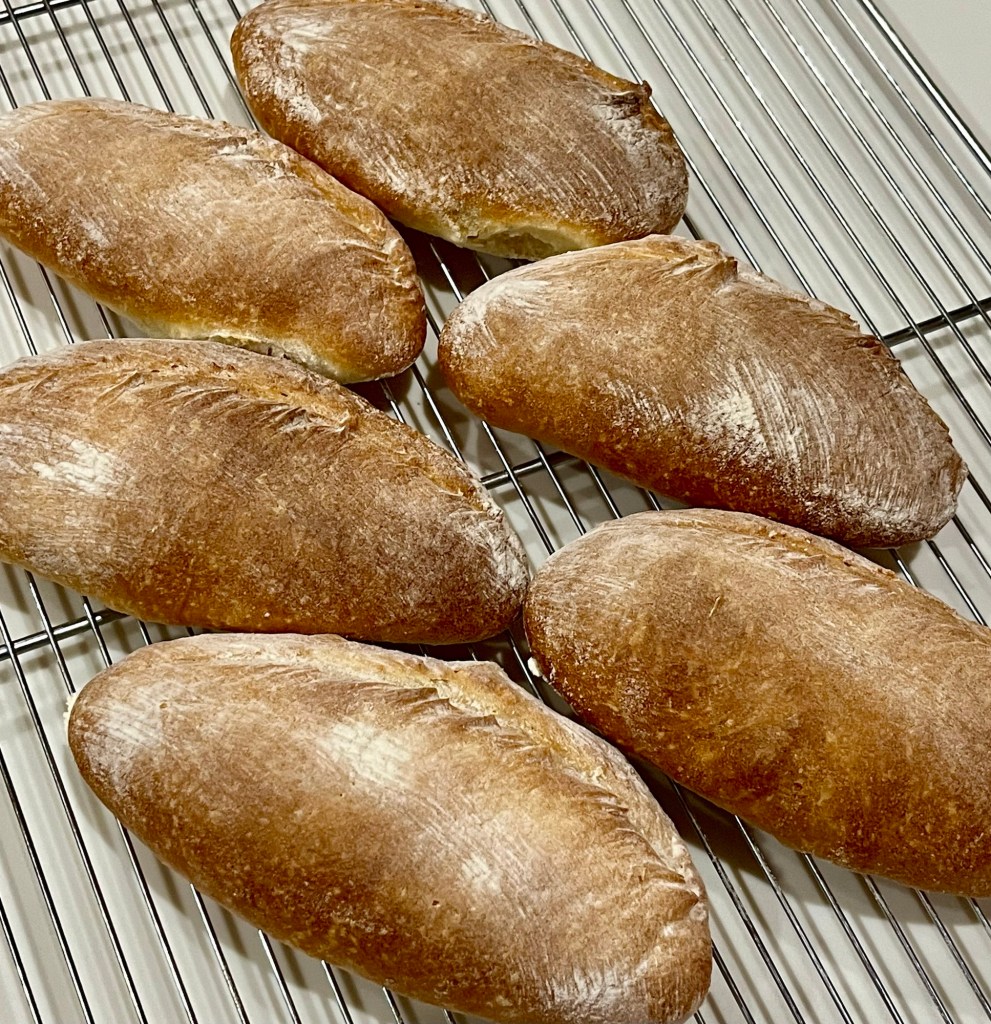
YouTube posted a video demonstrating how someone’s Grandmother made an easy french bread. Well, apparently my Grammie wasn’t French.

My bread tasted fine and was fairly fast and easy to make. My problem was with fermenting and proofing the dough. Although I followed the directions and used the standard “poke test,” my loaves were under-proofed.

When I mixed the water, milk, sugar and yeast I didn’t see the usual activation of the yeast. To test it I mixed a tablespoon of water with teaspoons of sugar and yeast. Within 5 minutes the yeast was bubbly so, it tested good.

I continued on with the instructions, while in retrospect, should have extended the proofing time.

The final baked bread resulted in a good color, a minimal rise, nice crust and flavor. It needed a better, more open structure to be a good loaf.

French Bread from a French Grandmother

INGREDIENTS
• 200 ml of warm water.
• 200 ml of warm milk.
• 1 Tbl of sugar.
• 8g (2½ tsp) dry yeast.
• 1 egg, separated
• 90 ml of vegetable oil.
• 700 g of bread flour, divided (600g & 100g)
• 1 tsp of salt.

METHOD

  1. Whisk water, milk, sugar and yeast, cover, and leave for 5 minutes until the yeast dissolves.
  2. Separate the egg, cover the yolk with cling film for later use.
  3. Add egg white and vegetable oil to bowl and mix well with a spoon.
  4. Sift in 600 g of bread flour and 1 teaspoon of salt mix well with a spoon
  5. Sift in the remaining 100 g of flour and mix by hand.
  6. Sprinkle the table with flour.
  7. The dough should be medium soft and formed into a large ball.
  8. Coat the bowl with vegetable oil, place ball, smooth side, up in the oiled bowl, cover and set aside in a warm place for 40 minutes.
  9. Place on lightly floured table, de-gas, roll into a ball and divide into 3 parts and roll each part into a ball, cover, and leave to rise for 20 minutes.
  10. Roll out the dough into a ~12 x 16” rectangle on the lightly floured table.
  11. Roll from the smaller side into a batard, pinch the edges and ends together, place on parchment paper, cover and leave for 15 minutes.
  12. Coat the surface with milk. (Or egg wash?)
  13. Make 6 diagonal cuts on each batard, dust top with flour.
  14. Bake in a preheated oven at 180°C/360°F for 35-40 minutes.

Toffee/Chocolate Chip Cookies

I saw an article rating (in the author’s opinion) the best chocolate chip cookie recipes and this was #1. It’s actually a toffee/chocolate chip cookie, but with the seriously heavy density of chocolate I felt it really deserved to be in this category.

These cookies require significantly more work and time than a “standard” cookie, but if you are looking for something outside the norm give these a try.

I followed the directions on the first browned butter try. After they went up in a cloud of not very pleasant burnt sugar, I “binned” them. (Binned is a GBBO term.) In the second attempt, I lowered the heat from medium high to low. I realize these terms are relative and individual results may vary.

The resultant cookies were about 3” diameter and a good thickness. The texture was excellent and the predominant flavor was chocolate with overtones of brown sugar and toffee. Were they the “best ever”? I guess I will have to keep trying.

Below is the modified recipe.

Browned Butter Toffee Chocolate Chip Cookies

INGREDIENTS
• 2 sticks (227 g) unsalted butter
• ½ (100 g) cup granulated sugar
• 1 cup (200 g) lightly packed dark brown sugar
• 1 ½ cups (190 g) all-purpose flour
• 1 cup (127 g) bread flour
• 1 tsp baking soda
• 1 tsp fine sea salt
• 1 tsp instant espresso powder, optional
• ½ tsp baking powder
• 2 large eggs plus 1 egg yolk, at room temperature
• 2 tsp vanilla
• 10 ounces (283 grams) semisweet chocolate, chopped
• 1 cup toffee bits, homemade or Heath
• Flaky sea salt, for finishing

METHOD

  1. In a medium stainless pan set over low heat, melt the butter. Swirling the pan occasionally, it should become foamy as the water boils off. Once the mixture quiets, stir until the butter develops a nutty aroma and brown bits start to form at the bottom. When the bits turn amber, immediately remove from heat and pour into the bowl of a stand mixer or it will burn. Be sure to include the brown bits at the bottom of the pan.
  2. Add the granulated sugar and brown sugar to the hot butter, stirring to combine. Set aside to cool to room temperature.
  3. In a medium bowl, combine the flours, baking soda, salt, espresso powder, and baking powder.
  4. Whisk in the eggs, yolk, and vanilla into the cooled butter mixture until combined. Gradually stir in the flour mixture with a rubber spatula. Stir in the chocolate chunks and toffee bits. Wrap dough in plastic wrap and refrigerate for at least 24 hours but no more than 72 hours.
  5. Let dough sit at room temperature just until it is soft enough to scoop, about 1 hour. (In my kitchen the block of dough was still too hard to scoop so I used a knife to cut the dough into 50g portions, rolled them into balls with my hands and placed on a parchment lined baking sheet.)
  6. Preheat the oven to 350ºF. Line baking sheets with parchment paper.
  7. At this point, you can portion the dough, place it on a baking sheet, and freeze just until solid. Remove frozen balls of dough to an airtight container and store for up to 6 weeks.
  8. Bake for 10 – 12 minutes, or until golden brown. Remove from oven and sprinkle flaky sea salt on top of the cookies, if desired. Let cookies cool for 2 minutes before removing to wire racks to cool completely.
  9. Store in an airtight container at room temperature for up to 3 days.

Homemade Toffee Bits

INGREDIENTS
• 1 stick (113 grams) unsalted American butter
• 1 cup (200 grams) light brown sugar
• 1 teaspoon fine salt

METHOD

  1. Line a small rimmed baking sheet with parchment paper or a silicone baking mat.
  2. In a heavy-bottomed small saucepan, melt the butter over medium heat. Add the sugar and salt and whisk vigorously for one minute until combined. Cook, stirring constantly, until the mixture looks like melted peanut butter and a candy thermometer reaches 295 to 305°F, about 10 minutes.
  3. If the mixture separates at all, remove from heat and whisk vigorously until recombined. Return to heat and continue cooking.
  4. Immediately and carefully pour the hot toffee onto the prepared baking pan, allowing it to spread into an even layer. Let cool and harden for about 20 minutes.
  5. Place the sheet of toffee on a cutting board or in a zip top bag. Use a mallet, rolling pin, or heavy object to crack it into small pieces. You can also cut into bits with a sharp serrated knife. Store in an airtight container for up to 1 week.

The Life of Pie

You can take the boy out of science, but you can’t take science out of the boy.

Blackberries were on sale this week and, of course, I couldn’t resist. I had no idea how to use them, but knew something would come to me.

I also had some plain yogurt left over from a Blueberry Cake I made recently and wanted to use it up. I also had a pie crust frozen in the freezer left over from a Banana Cream Pie and a piece of puff pastry that was ending its useful life.

I decided to make Berry Hand Pies – half with pie crust (for the first time) and half with puff pastry. I also made half of each with fillings made with yogurt or cream cheese.

I preferred the puff pastry version while QC liked the pie crust variety. Both the yogurt based and cream cheese based filled were equally delicious.

Berry Hand Pie

INGREDIENTS
• 1 egg
• 1 tablespoon water
• 2 tablespoons all-purpose flour
• 1 sheet Trader Joe’s puff pastry, thawed but cool.
• 2 ounces cream cheese, softened
• 1 tablespoons granulated sugar or decorating sugar
• ¼ cup white chocolate chips
• 3 ounces berries
• 2 tablespoons coarse white sugar or decorating sugar

METHOD

  1. Stir the cream cheese and granulated sugar in a medium bowl until the mixture is smooth. Stir in the white chocolate chips.
  2. Cut large berries in half.
  3. Sprinkle the flour on the work surface. Unfold the pastry sheet on the work surface. Roll the pastry sheet into a 12-inch square. Using a round cutter, cut into as many 4 -inch circles as you can.
  4. Brush the edges of the pastry circles with the egg mixture. Place about ½ tablespoon cream cheese mixture in the center of each. (Don’t overfill.) Top each with about one small or two halves of a large berry. Fold the circles in half, pinching the edges together. Crimp both edges with a fork. If you don’t seal them adequately or have to much filling it will leak out of the sides of the finished pastry.
  5. Brush the pastries with the egg mixture and sprinkle with the coarse sugar. Using a sharp knife cut small slits in the tops of the filled pastries. Place the pastries onto a silicone or parchment paper lined baking sheet.
  6. Bake for 20 minutes or until the pastries are golden brown. Remove the pastries from the baking sheets and let cool on wire racks for 10 minutes.

Turkish Bread – Francala

I saw a video on YouTube on how to make Turkish Bread. It caught my attention because of the “sauce” baked inside each loaf. The sauce is a mixture of water, flour and oil painted on the flattened circle of dough before it is rolled up.

The bread is soft, flavorful with a crisp crackling crust.

The published recipe instructed me to make 12 loaves, but after forming the first two I combined them to make six larger loaves (as pictured.) These are about 6” long .

Turkish Bread – Francala – Somum Ekmek

INGREDIENTS
For the dough:
• 10 g (1 Tbl) dry yeast
• 20 g (1 Tbl) sugar
• 100 ml milk
• 200 ml water
• 420 g (3.5c) bread flour
• 8 g (1 tsp) salt
• 20 ml (2 Tbl) oil
For the sauce:
• 20 g (1 Tbl) flour
• 10 ml (1 Tbl) oil
• 30 ml (3 Tbl) water

METHOD

  1. Add all ingredients to a medium sized bowl and mix into a shaggy mass
  2. Knead in the bowl to a smooth sticky dough then cover and let ferment until it doubles in size
  3. Add the flour, oil and water in a small bowl and mix until it is a smooth consistency
  4. Deflate the dough on a lightly floured surface then form into a ball and divide it into 6 pieces
  5. Shape each piece into a ball then use your fingers to pat the dough into a flat bumpy circle about 5” diameter turn over and repeat
  6. Coat the dough with the sauce and fold it over pressing the seam as you go. Pinch the ends and seam together and roll out slightly to taper the ends
  7. Place on a baking sheet, cover and let sit for an hour
  8. After 30 minutes preheat the oven to 450ᵒF
  9. Sprinkle flour on top then cut with a curve, lengthwise score with a lame
  10. Add a cup of hot water to a container in the oven
  11. Drop the temperature to 375ᵒF and bake for ~20-30 min? Check internal temperature after 20 min.
  12. Should be finished baking when ~ 210-220ᵒF

Key Lemon Tarts

You may remember from a previous post that a friend gave me a dozen small lemons from her tree and I made Lemon-Honey Madeleine cookies for her in return. That prompted her to give me two dozen more lemons. I made some gluten free tartlet shells for QC’s mahjong group (one of whom is gluten intolerant) and 5” tart shells for the neighbor QC Corps.

I did a search for different meringue/tart piping ideas and liked this one. After torching, I sprinkled some lemon zest on the top and will ultimately add a blueberry to each small tartlet and two or three to each large one.

Key Lemon Pie and Tarts

INGREDIENTS
Filling
• 14 ounces sweetened condensed milk 1 can
• 4 large egg yolks
• 1/2 cup fresh lemon juice (about 3-4 lemons)
• 2 teaspoons fine lemon zest no white
• 1 graham cracker crust gluten-free if desired
• optional whipped cream lemon zest and lemon slice(s) for garnish
Graham Cracker Crust
• 1 ½ cups finely crushed regular or cinnamon graham crackers (24 squares)
• 1/3 cup butter, melted
• 1 beaten egg white
• 3 tablespoons sugar

METHOD
Filling

  1. Zest, then juice lemons, to get 2 teaspoons of zest and 1/2 cup of juice.
  2. Whisk together sweetened condensed milk, egg yolks, zest and lemon juice (add half at a time) until well combined.
  3. Pour filling into prepared crust and bake for 15 minutes at 350 F. Cool pie completely on rack, then chill for a minimum of 1-2 hours (filling will continue to set as it cools). Store covered.
  4. Optionally, before serving, top with whipped cream rosettes, lemon zest and lemon slice(s)

Graham Cracker Crust

  1. Heat oven to 350°F.
  2. In a food processor pulse the crushed graham crackers several times, then add the rest of the ingredients until well mixed.
  3. Reserve 3 tablespoons crumb mixture for garnishing top of pie before serving, if desired. Press remaining mixture firmly and evenly against bottom and side of pie plate.
  4. Bake at 350 F for 10 min. Set aside to cool

OPTIONAL Tartlet Shell
INGREDIENTS

• 50 g cold butter cut into small cubes
• 100 g all-purpose flour
• 30 g icing sugar
• ¼ tsp vanilla
• ⅛ tsp salt
• 1 egg – ½ for the dough and the other ½ reserved for an egg wash

METHOD

  1. Mix butter with sugar
  2. Add salt then vanilla
  3. Add egg and beat until incorporated. It may not be smooth.
  4. Stir in flour. Mix by hand until incorporated
  5. Cover with plastic and refrigerate for 30 min
  6. Butter or spray tartlet pans, or use non-stick pans
  7. Roll dough to ~ ⅛” thick, then lay over tart mold and press into all crevices and roll top to cut off excess. Cover and refrigerate 30 minutes
  8. Prick holes in bottom and sides of formed dough
  9. Fill tarts with pastry weights (I put weights in a cupcake paper for small tartlets and crumpled and form fitted to the larger tart molds.)
  10. Paint edges of the tartlet with the egg wash.
  11. Bake in preheated oven 350 deg F (175 C) for 15 min (Remove wights and papers 5 minutes before the end of the bake.)
  12. Immediately remove from pans and cool on a wire rack

ITALIAN MERINGUE

INGREDIENTS

  • 150g (or ¾ cup) granulated sugar
  • 60ml (or ¼ cup) water
  • 60g (or ¼ cup) egg whites (about 2 large egg whites)

METHOD

  1. In a medium-sized saucepan, combine the sugar and water. Heat over low heat, stirring until the sugar has dissolved. Once the sugar has dissolved, turn the heat to medium-high and allow the syrup to come to a boil.
  2. In the meantime, add the egg whites to a medium-sized, heatproof bowl and mix (with a mixer fitted with the whisk attachment) until foamy and the whites are almost able to hold soft peaks.
  3. Once the syrup is boiling, clip on a candy (or sugar) thermometer.
  4. Cook until the syrup reaches 116°C/240°F, then take the pan off the heat and slowly drizzle the hot syrup into the bowl with the foamy egg whites, mixing continuously to prevent the eggs from scrambling. Don’t pour the syrup onto the whisk, or the syrup may splatter against the sides of the bowl (or into your face!). Instead, aim for a spot close to the whisk.
  5. Once all the syrup has been added, keep mixing until the bottom of the bowl feels cool to the touch and the meringue has cooled down to body temperature.
  6. Use immediately or keep in the fridge (covered) until ready to use. It’s a very stable meringue, so it won’t start weeping, leaking or collapsing.

NOTES

Italian meringue can be made two days in advance and stored in the fridge until needed (covered with plastic wrap).

Lucy Van Pelt Was Crabby Too

To make a cake for a “Crab Fest” charity auction, I searched the internet for some crab themed cakes. I designed mine based on several ideas I found..

It’s a three layer Extreme Chocolate Cake and a two layer Vanilla Cake. The decorations are Marshmallow Fondant and the sand is blitzed vanilla cake scraps.

The crumb coat is American Buttercream and the finish frosting is Italian Meringue Buttercream.

Vanilla Layer Cake


INGREDIENTS
VANILLA CAKE

  • 1¼ cups (162g) all-purpose flour
  • 1¼ tsp baking powder
  • ¼ tsp salt
  • 6 Tbl (84g) unsalted butter, room temperature
  • ¾ c (155g) sugar
  • 1 ½ Tbl vegetable oil
  • ½ Tbl vanilla extract
  • 2 large eggs
  • ½ c + 4 Tbl (150ml) milk

    METHOD
    For the Cake:
  1. Prepare two 5-inch cake pans with parchment paper circles in the bottom and baking spray or grease the sides. Preheat oven to 350°F (176°C).
  2. Combine the flour, baking powder and salt in a medium sized bowl and set aside.
  3. Add the butter, sugar, oil and vanilla extract to a large mixer bowl and beat together until light in color and fluffy, about 2-3 minutes. Do not skimp on the creaming time.
  4. Add the eggs one at a time, mixing until mostly combined after each. Scrape down the sides of the bowl as needed to be sure all ingredients are well incorporated.
  5. Add half of the dry ingredients to the batter and mix until mostly combined.
  6. Slowly add the milk and mix until well combined. The batter will look curdled, but that’s ok.
  7. Add the remaining dry ingredients and mix until well combined and smooth. Scrape down the sides of the bowl as needed to be sure all ingredients are well incorporated. Do not over mix the
    batter.
  8. Wrap each pan with wet cake pan strips then divide the batter evenly between the cakes pans (~320g per cake pan.) and bake for ~28 minutes, or until a toothpick comes out with a few
    crumbs. (205°F) If the tops of the cakes brown too much, cover with foil after ~20 minutes.
  9. Remove the cakes from the oven and allow to cool for about 2-3 minutes, then remove to cooling racks to cool completely.