Baseball Themed Gala Practice #1

We are going to a gala at our temple next month and our administrator asked if I would make some desserts for the baseball themed event. At this point my providing pastries and other baked goods is more or less a tradition.

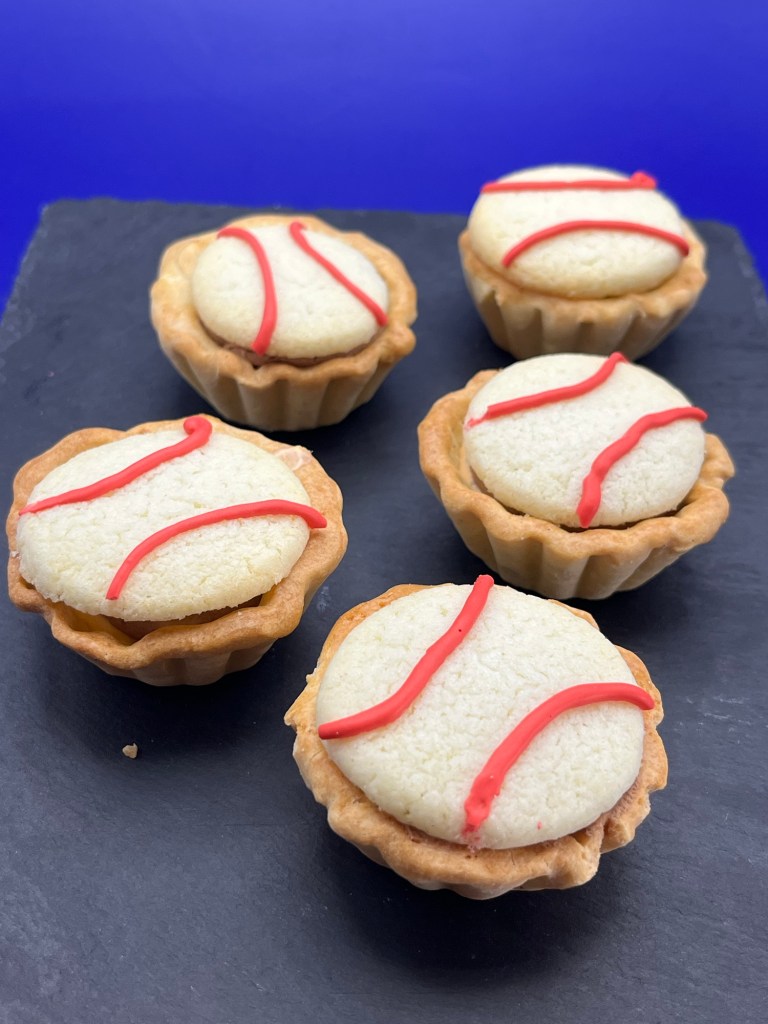
These tartlets are the first of three types of pastries I am making. In deference to a gluten intolerant friend these tartlets are gluten free, but you could not tell from the taste and texture. They are wonderful. (No brag, just fact, for anyone old enough to remember that TV line.)

For gluten free pastries I mix a specialty flour from an online baker named Kim. (Search Kim’s Artisan Bread Flour for more info.) It is an exceptional gluten free flour.

New design after QC’s brilliant suggestion!

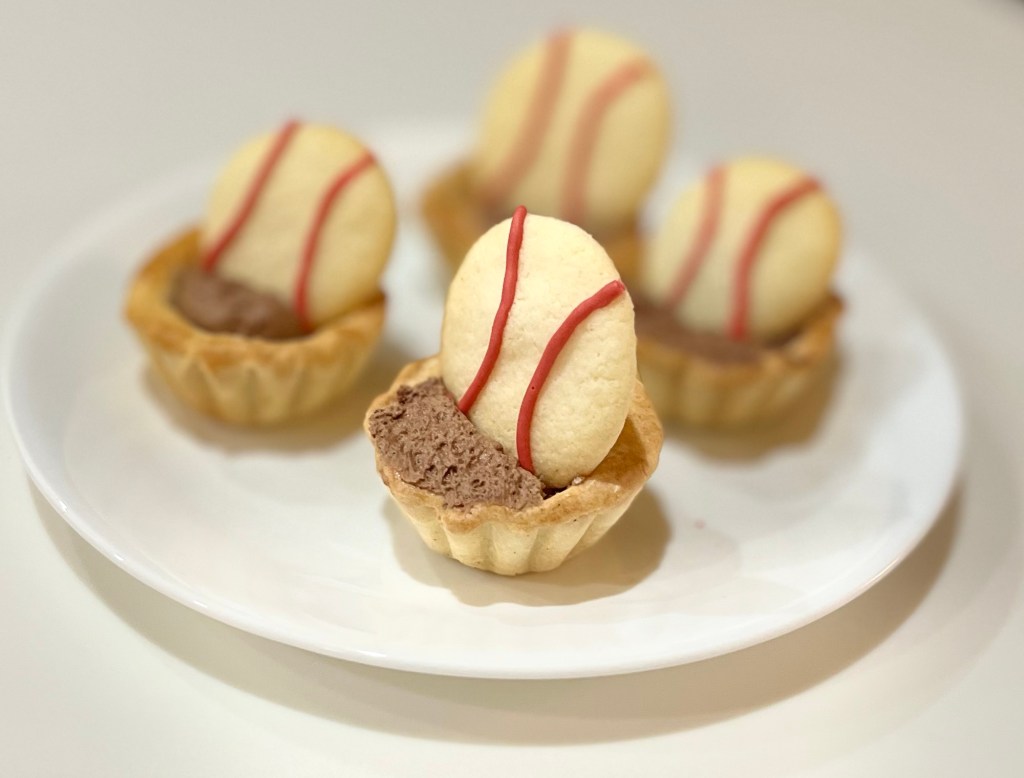
A couple of weeks ago my uphill neighbors gave me a bag of oranges and I have been concocting ways of processing and returning them. These tartlets have a layer of fresh orange mousse, covered with a layer of dark chocolate mousse. The entire tartlet is topped with a gluten free sugar cookie striped with royal icing to give the impression of a baseball. Whew!

Key Lime Tartlets Using Kim’s Bread Flour

INGREDIENTS
• 100 g cold butter cut into small cubes
• 60 g icing sugar
• 200 g Kim’s Bread flour
• ½ tsp vanilla
• ¼ tsp salt
• 2 eggs – 1 for the dough and the other 1 reserved for an egg wash

METHOD

  1. Mix butter with sugar until well incorporated 3-5 min
  2. Add salt then vanilla.
  3. Add egg and mix 3-5 min
  4. Stir in flour. Mix by hand until incorporated and forms a thick smooth(ish) sticky dough
  5. Cover with plastic and refrigerate for 30 min.
  6. Butter or lightly spray tartlet pans or use non-stick pans.
  7. Roll dough between parchment paper to about ⅛” thick
  8. Refrigerate rolled dough still between parchment paper until firm: 20 – 30 minutes
  9. Remove from fridge and while still firm, cut dough to rounds about 1” larger diameter than the mold. Cut all the rounds at once while still firm. If necessary, return to the fridge to firm up. Again, if necessary, use an offset spatula to remove the circles from the parchment paper. Keep the spatula clean.
  10. Lay tart dough circles over molds. This allows the dough to thaw slightly, then gently press into the molds and fill all crevices.
  11. Pre-heat oven to 350 degrees
  12. Return to fridge for 15 – 20 min to firm up the shell
  13. Prick holes in bottom of formed dough
  14. Place a mini cupcake paper in each tart and fill with with pastry weights (or beans)
  15. Paint edges of the tartlet with an egg-white wash. (Whisk one egg white with 1 Tbl water)
  16. Bake in preheated oven 350 deg F (175 C) for 8 min until edges are dry
  17. Remove pastry weights and bake an additional 4-6 minutes to dry the bottoms. Bake until the edges begin to turn light brown and the bottom is nearly dry. (I find it easier to dump the weights into a bowl then remove the cupcake papers.)
  18. Immediately remove from pans and cool on a wire rack

Dark Chocolate Mousse

INGREDIENTS
• ½ c chopped chocolate (72 percent)
• 1 c heavy cream
• 4 large egg yolks
• ⅓ c sugar
• Whipped cream, for serving
• Chocolate shavings, for garnish

METHOD

  1. Melt the chocolate in a bowl over a water bath, making sure the water is not boiling. Set aside.
  2. In a separate bowl, whip the heavy cream to soft peaks.
  3. Place the egg yolks in a small bowl and set over the same water bath to slightly heat while beating them with a whisk.
  4. Add the sugar to the yolks and then transfer the mixture to a stand mixer set up with the whisk attachment. Beat until the sugar is completely dissolved and the yolks double in size, about 5 minutes.
  5. Carefully fold the chocolate into the yolks.
  6. Lastly, fold in the whipped cream.
  7. Store the mousse in an unopened piping bag until ready to fill the tartlets.
  8. When ready to assemble the tartlets pipe about ¼” of chocolate mousse on top of the orange mousse. Store in a refrigerator to keep cold.

Orange Mousse

INGREDIENTS
• ½ c orange juice
• ¼ c plus 1 tablespoons sugar
• 1/8 tsp salt
• 2 egg yolks
• 2 tbl unsalted butter, at room temperature
• ¼ tsp orange zest (from ¼ orange)
• ½ c heavy cream
• ¼ tsp vanilla extract
• Orange gel food coloring (optional)

METHOD

  1. In a small saucepan set over medium heat, bring the orange juice to a boil and cook until reduced by half, about 4 minutes.
  2. Meanwhile in a small bowl, whisk together 1/4 cup of the sugar, the salt and yolks until smooth. Whisking constantly, add half of the reduced orange juice to the yolk mixture to temper.
  3. When it is all incorporated, return the tempered yolk mixture to the pan. Cook over low heat, stirring constantly with a rubber spatula to prevent the eggs from scrambling, until thick enough to coat the back of a spoon, about 7 minutes.
  4. Strain the mixture into a clean bowl and whisk in the butter, 1 tablespoon at a time, and the zest. Place a piece of plastic wrap directly on the surface of the mixture and refrigerate until chilled through, at least 5 hours.
  5. Pour the heavy cream into a medium bowl and add the vanilla and the remaining tablespoon sugar. Using an electric mixer, beat the cream on medium speed just until stiff peaks form, 2 to 3 minutes, being careful avoid over-beating.
  6. Using a rubber spatula, gently fold half of the whipped cream into the chilled orange mixture. Pour that mixture into the remaining whipped cream and continue to fold until completely incorporated.
  7. Transfer the mixture to an unopened piping bag, close the end and refrigerate until ready to use.
  8. When ready to assemble the tartlets pipe about ¼” of orange mousse into the bottom of refrigerated tartlet shells. Store in a refrigerator to keep cold.

Kim’s Gluten Free Bread Flour Blend

Yield: 700g (5 c)
INGREDIENTS

  • 285g Bob’s Red Mill potato starch
  • 250g superfine white rice flour (DON’T use regular rice flour, ie Bob’s Red Mill)
  • 75g Tapioca flour
  • 75g Whey protein isolate or egg white protein.
  • 15g Xanthan gum

METHOD

Mix all ingredients, place in an air tight container and shake well to mix everything together.

Happy Everyone’s Irish Day

QC and I are going to a St. Patrick’s Day dinner and I was asked if I ever made Irish Soda Bread. I replied that I had not.

The next morning, before an 8:30am golf tee time, I made a loaf as a test. It was delicious so I texted back saying after further thought I had made Irish Soda Bread before.

I made two loaves for dinner tonight, one with raisins and one without. Equally delicious.

Irish Soda Bread


INGREDIENTS
• 1 and 3/4 cups (420ml) buttermilk*
• 1 large egg (optional, see note)
• 4 and 1/4 cups (531g) all-purpose flour (spooned & leveled),
• 3 Tablespoons (38g) granulated sugar
• 1 teaspoon baking soda
• 1 teaspoon salt
• 5 Tablespoons (71g) unsalted butter, cold and cubed*
• optional: 1 cup (150g) raisins

METHOD

  1. Preheat oven & pan options: Preheat oven to 400°F (204°C). Bake in a seasoned 10–12-inch cast iron skillet (no need to preheat the cast iron unless you want to).
  2. Whisk the buttermilk and egg together. Set aside.
  3. Whisk the flour, granulated sugar, baking soda, and salt together in a large bowl. Cut in the butter using a pastry cutter, a fork, or your fingers. Mixture is very heavy on the flour but do your best to cut in the butter until the butter is pea-sized crumbs.
  4. Stir in the raisins. Pour in the buttermilk/egg mixture. (*Adding all of the mixture yielded an overly wet dough. Try reserving ½ cup, adding more as necessary.) Gently fold the dough together until dough it is too stiff to stir.
  5. Pour crumbly dough onto a lightly floured work surface. With floured hands, work the dough into a ball as best you can, then knead for about 30 seconds or until all the flour is moistened. If the dough is too sticky, add a little more flour.
  6. Transfer the dough to the prepared skillet. Using a very sharp knife or bread lame, score the dough with a slash or X about 1/2 inch deep. (“Score” = shallow cut.)
  7. Bake until the bread is golden brown, and center appears cooked through, about 45-55 minutes. Loosely tent the bread with aluminum foil if you notice heavy browning on top. The bread is done when an instant read thermometer reads the center of the loaf as 195°F.
  8. Remove from the oven and allow bread to cool for 10 minutes, and then transfer to a wire rack. Serve warm, at room temperature, or toasted with desired toppings/spreads.
  9. Cover and store leftover bread at room temperature for up to 2 days or in the refrigerator for up to 1 week. We usually wrap it tightly in aluminum foil for storing.

NOTES

  1. Freezing Instructions: Baked and cooled bread freezes well up to 3 months. Freeze the whole loaf or individual slices. Thaw in the refrigerator or at room temperature, then reheat as desired.
  2. Buttermilk: Using cold buttermilk is best. Buttermilk is key to the bread’s flavor, texture, and rise. The bread will not rise without it. If you don’t have any buttermilk on hand, you can make a homemade “DIY” version. Whole milk or 2% milk is best, though lower fat or nondairy milks work in a pinch. Add 1 Tablespoon of lemon juice or white vinegar to a liquid measuring cup. Add enough cold milk to make 1 and 3/4 cups. Whisk together, then let sit for 5 minutes before using in the recipe.
  3. Egg: 1 egg adds richness and density. Feel free to skip it to make a slightly lighter loaf. No other changes necessary, simply leave out the egg.
  4. Cold Butter: The colder the butter, the less sticky the dough will be. Make sure it’s very cold, even frozen cubed butter is great.
  5. Smaller Loaves: You can divide this dough up to make smaller loaves. The bake time will be shorter, depending how large the loaves are. An instant read thermometer will be especially helpful. Bake the loaves until an instant read thermometer reads the center of the loaf as 195°F (90°C).

Chocolate – Orange – Vanilla Tarts Revisited

I made some chocolate-orange-custard tarts last week. Honestly, they tasted pretty good, but if I saw them in a patisserie I would give them a pass.

I remade them today but without the baked custard, chocolate and orange bases. (Truthfully, maybe a little over baked in my case.) Version 2.0 used a new method to make the tart case, and creme patisserie, chocolate ganache and a new orange drizzle.

The tart base was made using a food processor to mix the butter, sugar, salt and 1/4th of the flour. It’s basically the same method I use to make berry drop scones. Using the food processor is easier and quicker than cutting the butter into the sugar with your hands.

I use the “Martha Stewart” creme patisserie method and a standard eclair ganache recipe and method. The orange drizzle is simple the zest of one orange, 70 grams of confectioners sugar and enough fresh orange juice to make a pipeable paste.

There are a lot of steps in this recipe (none of them very difficult,) but believe me, it is well worth the effort.

CremePat – Chocolate – Orange Tart


Yield: Five 4” tarts.

INGREDIENTS
Tart Shell
• 100 g cold butter cut into small cubes
• 60 g icing sugar
• ½ tsp vanilla
• ¼ tsp salt
• 2 egg – 1 for the dough and the other 1 reserved for an egg wash
• 200 g all-purpose flour
Chocolate Ganache
• 150 g dark chocolate finely chopped
• 150 g heavy cream
• 2 Tbl corn syrup
• 1 tsp vanilla
Orange Crème
• 1 orange, juiced and zested
• 35g confectioners sugar
Crème Patisserie
• 1 c (175 ml) whole/full fat milk (¾ c 2% plus ¼ c heavy cream)
• 2 (40g) large egg yolks
• ¼ c (13 grams) granulated/caster sugar
• ⅛ c corn starch
• 1 Tbl butter
• ½ tsp vanilla extract

METHOD
Tart Shell

  1. In a food processor pulse sugar, salt and 50g AP flour
  2. Pulse in cubed butter and vanilla
  3. Transfer to a mixing bowl and add egg and mix until incorporated
  4. Stir in flour. Mix by hand like you are kneading bread until incorporated
  5. Cover with plastic and refrigerate for 30 min
  6. Pre-heat oven to 350 degrees
  7. Butter or spray tartlet pans, or use non-stick pans
  8. Roll dough to about ⅛” thick
  9. Lay over tart mold and press into all crevices
  10. Prick holes in bottom and sides of formed dough
  11. Fill tarts with pastry weights. (For mini tartlet pans I put beans in a cupcake paper. For large pans use crumpled parchment paper filled with pie weights.)
  12. Paint edges of the tartlet with the egg wash.
  13. Bake in preheated oven 350° F (175 C) for 12 min
  14. Remove from oven, remove weights, then roll top to cut off excess
  15. Return to oven and bake 8 more minutes to dry the bottoms
  16. Immediately remove from pans and cool on a wire

    Chocolate Ganache
  17. Heat the cream to just below boiling.
  18. Place the chopped chocolate in a heat proof bowl
  19. Pour the hot cream over the chocolate and let it sit for a couple of minutes
  20. Add the corn syrup and vanilla and mix until smooth
  21. Pour the chocolate into a sealed piping bag. (No piping tip required.)
  22. Let the mixture cool to the desired viscosity.

    Orange Crème
  23. Place the confectioners’ sugar and zest in a small bowl. Add the orange juice one drop at a time while stirring, until the desired viscosity is attained.
  24. Pour into a piping bag with a small circular piping tip inserted. (Do not cut the end off yet.)

    Crème Patisserie
  25. Whisk eggs and milk together then add to all other ingredients (except vanilla) to a medium saucepan.
  26. Bring to boil, whisking constantly
  27. Cook until it begins to thicken (it will look lumpy, its ok)
  28. Sieve lumpy mixture into a bowl and add vanilla, mix thoroughly
  29. Transfer to a sealed piping bag to cool. (No piping tip required.)

    ASSEMBLY
  30. Pipe a ¼” layer of CremePat into each tart shell and smooth
  31. Pipe a ⅛” layer of chocolate crème on the CremePat layer and smooth
  32. Pipe concentric ⅛“wide circles of orange cream and feather the orange cream with a toothpick
  33. Add a sprig of candied orange peel for garnish.

How Many Ways to Shape Puff Pastry

I was watching YouTube for ideas on how to shape pastries and boy! there are a lot of them. These three are pretty popular and I thought they would be a good place to start.

I bought some berries that were on sale from a local supermarket. (Truthfully, they should have paid me to take them away.) Out of a 6 oz container I was fortunate enough to find a half dozen berries to use as garnish. The rest were made into jam.

Flower and Pin-Wheel Designs

While I now make my own puff pastry I had a box of Pepperidge Farm puff pastry in the freezer and I wanted to use it up.

I don’t actually have a recipe for this so here it is in a nutshell: Cut the puff pastry in 4 squares. Fold a square in have to form a triangle and cut as necessary to make the desired design. Fold and pinch any overlaps to reduce the chance of separation.

The jam is made with equal parts berry and sugar, cooked until the temperature reaches 220° F. When cooled and gelled, add a rough teaspoon to each pastry. Coat the pastry with an egg wash. (I used an egg-white wash as I had some left over in the fridge.)

Bake 12-16 minutes until the pastry is a nice brown. Let them cool then dust with some confectioners sugar.

Don’t Look a Gift Horse…

My neighbors gave me a BIG bag of oranges from their trees. The navel oranges in the markets have been very disappointing this year, but these are wonderful.

Usually I give them something made with their oranges in appreciation of their generosity. This time I made chocolate/orange tarts with a vanilla custard base. They tasted good, but looked poor to fair. They baked well with all the components done perfectly. The problem is the top, and therefore the appearance has no “snap.” They would not catch your eye in a patisserie (I will re-make them on the next rained out golf day.)

A 1/8” layer of vanilla custard was poured into the bottom of each tart shell. The tart was baked for 10 minutes at 450° F to set the custard. A layer of chocolate filling was piped over the custard followed by a spiral of the orange crème. A toothpick was used to feather the orange crème.

Chocolate Orange Tart with Vanilla Custard


Yield: Five 4” tarts.
INGREDIENTS
Tart Shell
• 100 g cold butter cut into small cubes
• 60 g icing sugar
• ½ tsp vanilla
• ¼ tsp salt
• 2 egg – 1 for the dough and the other 1 egg white reserved for an egg wash
• 200 g all-purpose flour
Chocolate Filling
• 75g butter
• 115g dark chocolate (no more than 60% cocoa solids), finely chopped
• 115g caster sugar
• 55g AP flour
• 4 medium eggs
Orange Crème
• 25g butter
• 50g white chocolate
• 1 orange, finely grated zest only
• 35g caster sugar
• 25g AP flour
• 2 medium egg yolks
Cream Custard
• 1 ½ cups (350 ml) whole/full fat milk (1 ¼ c 2% plus ¼ c heavy cream)
• 6 large egg yolks
• ¼ cup (45 grams) granulated/caster sugar
• 1 teaspoon grated nutmeg
• ¼ teaspoon pure vanilla extract

METHOD

Tart Shell

  1. Mix butter with sugar
  2. Add salt then vanilla
  3. Add egg and mix until incorporated
  4. Stir in flour. Mix by hand like you are kneading bread until incorporated
  5. Pre-heat oven to 350° F
  6. Cover with plastic and refrigerate for 30 min
  7. Butter tartlet pans, or use non-stick pans
  8. Roll dough to about ⅛” thick
  9. Lay over tart mold and press into all crevices
  10. Roll top to cut off excess
  11. Prick holes in bottom and sides of formed dough
  12. Fill tarts with pastry weights. For mini tartlet pans I put beans in a cupcake paper. For large pans use crumpled parchment paper filled with beans. Remove 5 minutes before the end of the bake.
  13. Paint edges of the tartlet with the egg wash.
  14. Bake in preheated oven 350° F (175 C) for 15 min
  15. Immediately remove from pans and cool on a wire

    Chocolate Filling
  16. Melt the butter and chocolate in a heatproof bowl set over a pan of gently simmering water until melted and smooth. Remove from the heat and stir in the sugar and flour. Beat in the eggs, one at a time, and leave to stand.

    Orange Crème
  17. Melt the butter and white chocolate in a heatproof bowl set over a pan of gently simmering water until melted and smooth. Remove from the heat and stir in the orange zest, sugar and flour. Beat in the egg yolks, one at a time and pour the mixture into a jug.

    Cream Custard
  18. Add the milk to a saucepan over medium heat. Just heat until it starts to lightly simmer, do not boil. Turn off the heat.
  19. Add egg yolks and sugar to a separate mixing bowl, vigorously whisk (or use a hand blender) until pale and bubbly. Remove the milk from the heat and very slowly drizzle into the egg yolks while whisking. Whisk in the vanilla if using. Transfer the mix to a container with a spout.

    ASSEMBLY
  20. Pipe a ¼” layer of custard into each tar shell and smooth
  21. Pipe a ½“ layer of chocolate crème on the mousseline layer and smooth
  22. Pipe concentric ⅛“ wide circles of orange cream and feather the orange cream with a toothpick
  23. Bake tarts 14-16 minutes at 350°F. (Start checking at 10 minutes.)