NY Rye Bread

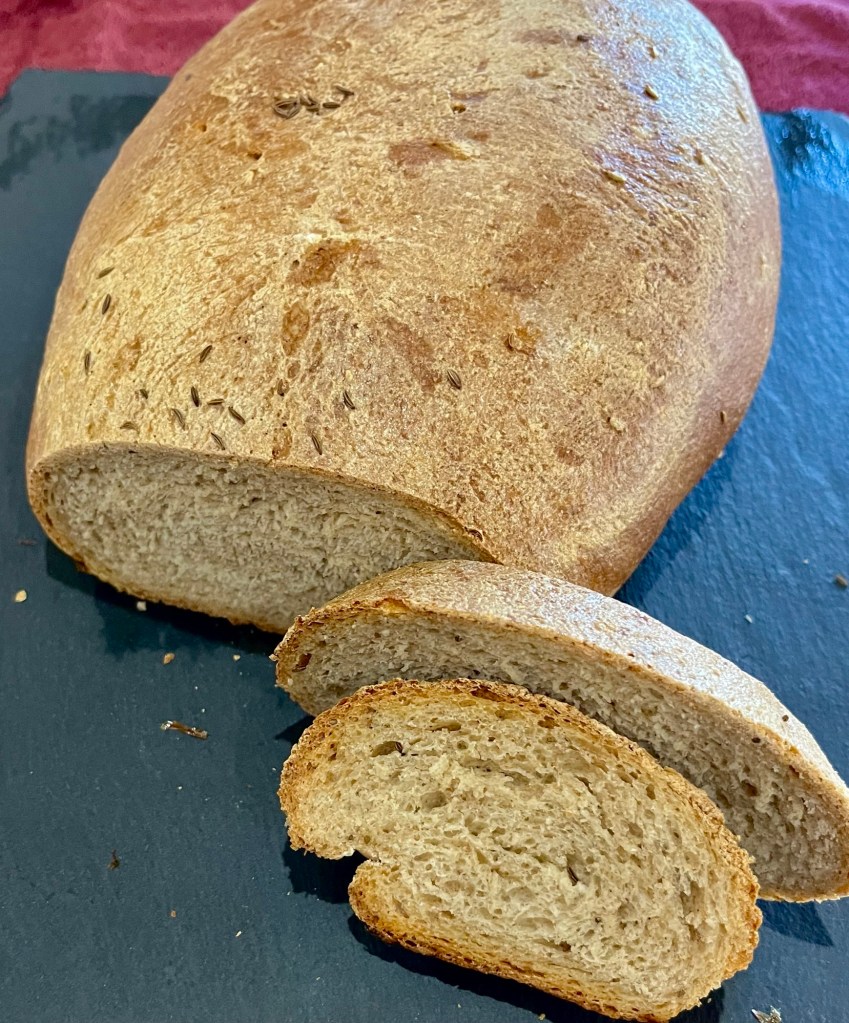
Surprise! I didn’t see this recipe first this time. I decided to make a rye bread and since we went to New York this spring for both baseball and friends, I said to myself, “Self, why not make a NY rye bread, even though we didn’t go to Rye, New York?” Ta da!

I made good rye breads before but this time I search for alternative recipes. (As my golf friends know, I am one of those who is never satisfied. My baking QC squad would agree, but since they receive bakes from me, they don’t bring it up.)

The PreppyKitchen is one of my go to baking recipe sites. John Kanell explains his techniques beautifully and they are great to watch.

However, my first change was to add the rye bread improver from King Arthur. This add a boost of great rye flavor, stronger rise and improved texture, and it works!

I also formed the loaf as a boule. I would never make a rye bread in a standard bread pan and would only reluctantly use my unglazed stoneware baking pan. By tensioning the boule before the second rise it allows the loaf to rise up instead of flatten out. Again, it works.

This may be my best rye bread ever.

Yup, that’s what I am talking about!

Rye Bread (Modified) PreppyKitchen Recipe

Author John Kanell
My modifications in italics

INGREDIENTS
• 1½ c warm water 105 to 110°F (360mL)
• 2 Tbl honey (or molasses for a deeper color)
• 2 tsp active dry yeast
• 2¾ c bread flour 330g
• 1½ c rye flour 160g
4 Tbl Rye Bread Improver
• 1 tablespoon vegetable oil
• 1 tablespoon caraway seeds
• 1¾ teaspoons salt

METHOD

  1. In the bowl of a stand mixer fitted with the dough hook attachment, whisk together the warm water, honey and yeast until combined. Let it stand for 5 minutes, until very foamy.
  2. To the bowl with the yeast mixture, add both flours, rye bread improver, oil, caraway seeds and salt. Using a wooden spoon or rubber spatula, mix the ingredients together until no dry flour from the bottom and sides of the bowl remains and a shaggy dough forms.
  3. With the stand mixer, mix on medium-low speed for 6 to 8 minutes until most of the dough balls up around the dough hook and it is smooth and slightly sticky.
  4. Transfer the dough to a lightly floured surface and gently shape into a ball.
  5. Place the ball of dough in a clean, lightly oiled bowl. Flip the dough over once so that the top also has a coating of oil. Scrape down the sides of the bowl to shape the dough into a ball. Cover the bowl with plastic wrap and let it rise in a warm, draft-free spot (75°F) for 30 to 45 min, until doubled in size.
  6. Turn the dough out onto a very lightly floured surface. With moist hands, stretch and shape it into a 9-inch square. Fold the dough using an envelope fold, sealing each fold with the side of your hand. Pinch the seams on the sides and ends together tightly to seal.
  7. With a gentle motion and an open hand, roll the log to tension the surface.
  8. Place the dough on a lightly sprayed piece of parchment paper seam side down. Spray a piece of plastic wrap with nonstick spray, cover the loaf and let it rise in a warm, draft-free spot (75°F) for 35 to 45 minutes. Use the finger poke test to check the rise is complete.
  9. After 15 minutes of the second rise, preheat the oven and baking stone to 350°F.
  10. Bake the bread for 35 to 40 minutes, until the top of the loaf is golden brown, and it sounds hollow when tapped. The internal temperature should be 195°F to 200°F.
  11. Let it cool in the pan for a couple of minutes, then turn it onto a wire rack to cool completely before slicing.
  12. Allow the no-knead rye bread to cool completely before slicing. Waiting to slice freshly baked bread is really difficult, but the cooling time is important for the crumb to set.

New Recipes!

I had no reason whatsoever to make a cake, then fortuitously I ran across two new recipes, one for a supposedly moist, tender sponge cake, and the other for a less (than buttercream) sweet white chocolate ganache frosting.

I made the cakes yesterday and wrapped them in heavy plastic wrap then this morning made the frosting. I was amazed both the cakes and frosting were as light and tasty as promised.

I was surprised beating the egg yolks into the initial meringue would result in the promised light fluffy batter, but it did. I was equally surprised after chilling the diluted white chocolate ganache it whisked into a light, spreadable frosting, but it did.

Sponge Cake

INGREDIENTS
• 6 large eggs, separated and at room temperature
• ½ teaspoon white vinegar
• 175 g (¾ c plus 2 tbsp) granulated sugar
• ¼ teaspoon salt
• 142 g (1 c) all-purpose flour
• 30 g (¼ c) tapioca starch
• 80 ml (⅓ c) 35% heavy cream, heated to just below simmering
• 1 tsp (5ml) pure vanilla extract

METHOD

  1. Preheat the oven to 350°F. Lightly grease and flour two 8-inch round cake pans and line them with rounds of parchment paper.
  2. First separate the eggs: Place the yolks in a small bowl and place the egg whites in the bowl you intend to whip them in – in a large mixing bowl if using an electric hand mixer or the bowl of a stand mixer.
  3. Sift the dry ingredients: Sift flour and tapioca starch into a medium bowl and whisk to blend evenly.
  4. Heat the cream: Place the cream in a small saucepan and heat it until it almost simmers. It should be hot but not boiling. Set it aside, but keep warm.
  5. Whip egg whites: Place the room temperature egg whites in the bowl of a stand mixer fitted with the whisk attachment (or in a large bowl if using a hand mixer), add the vinegar and beat on high speed for 1-2 minutes until very frothy and doubled in volume.
  6. Add sugar gradually in about 3 or 4 stages while beating for 1-2 minutes after each addition. After the last addition, beat until the meringue is thick and glossy and holds firm peaks, a total of 7 minutes at least. Yhe meringue is whipped sufficiently when you lift up the beaters and the meringue holds a peak that just curls over slightly. If it is still very soft and curls down immediately, then whip it longer.
  7. Whip in salt and egg yolks 2 at a time until evenly combined and the mixture is pale yellow and fluffy.
  8. Add dry ingredients. Place a fine mesh sieve over the bowl and sift half of the flour and tapioca starch again over the egg mixture. Whisk to gently fold it in until just until combined. Sift the remaining dry ingredients on top and fold it in.
  9. Add the hot cream. Pour the hot cream around the sides of the bowl, add the vanilla extract and gently fold it in with a wide spatula. The batter should weigh ~728 g.
  10. Divide the batter evenly between the prepared pans and then run a knife around in the batter to pop any very large air bubbles. Bake for 20 minutes until evenly golden and it springs back when pressed gently. It should feel slightly firm when you press the surface. Transfer pan to a wire rack to cool for a few minutes, then while the cake is still hot, gently run a knife or offset spatula gently around the sides in an up and down motion and invert the cakes on a wire rack while warm.

Vanilla Whipped White Chocolate Ganache Frosting

INGREDIENTS

  • 200 g (7 oz) pure white chocolate
  • 355 ml (1 ½ c) 35% heavy whipping cream
  • 2 tsp vanilla bean paste
  • ½ tsp pure vanilla extract
    METHOD
  1. Chop the chocolate: Finely chop the white chocolate and place it into a large bowl. Or, use
    couverture white chocolate chips.
  2. Heat the cream: Pour ½ cup of cream into a 1-quart stainless steel saucepan with the
    vanilla bean paste and place over medium heat. Watch it as it comes to a simmer.
  3. Make the ganache: Once simmering, immediately pour the hot cream over the chopped
    chocolate, cover the bowl and let stand for 2 minutes. Uncover the bowl and whisk until the
    chocolate is completely melted and the mixture is smooth and silky. Let it cool for 5
    minutes so it is no longer hot.
  4. Add cold cream: Pour in the remaining cold cream while whisking until combined.
  5. Chill the ganache: Place the bowl in the fridge and chill for at least 2 hours or overnight until
    completely cold. If you choose to chill overnight, then cover the bowl after 20 minutes.
  6. Whip it until thick and fluffy: Once thoroughly chilled, add the vanilla extract and beat with
    an electric hand mixer or stand mixer fitted with the whisk attachment on medium speed
    until thick, airy and fluffy. This will take about 2 minutes, depending on your mixer.

He Said With a “Rye” Smile

I made this dark rye loaf 4 years ago. A lot of water and experience passed under the bridge since 2020. I decided to make this bread after lunch, when we finished the oat bread I made a few days ago. In 4 hours, most of which was proofing and baking, this was the result.

I made two loaves from the recipe below. The longer one was in a covered, unglazed, stoneware baking pan, the other was a free standing boule baked on a baking stone.

The crumb was perfect, the crust wonderful and the flavor exceptional. Although that is only my opinion, however, QC totally agrees with me. It was impossible to resist slicing and sampling the bread before it cooled adequately.

DON’T OVER MIX, OVER-KNEAD, OVER PROOF DON’T OVER BAKE.

Homemade Rye Bread


Makes 2 loaves

INGREDIENTS
16 g (4½ tsp) packages active dry yeast
592 g (2 ½ c) warm water (just barely warm to the touch)
2/3 (225 g) cup molasses
2 Tbl caraway seeds (optional)
1 Tbl salt
50 g (¼ c) vegetable oil
20 g (¼ c) cocoa powder
1 Tbl Rye Bread Improver
3 Tbl Bread and Cake Enhancer
240 g (2 c) rye flour
700 g (5 c) bread flour
Egg wash (optional)

METHOD

  1. Dissolve the yeast in the warm water with the molasses. Put yeast mixture into a stand mixer bowl.
  2. Add the caraway seeds, salt, vegetable oil, cocoa powder, 2 cups of rye flour and then 2 cups of bread flour, mixing into the yeast mixture after each addition with a silicone spoon.
  3. Add Rye Bread Improver and Bread and Cake Enhancer
  4. Add more bread flour, a cup at a time, until the dough is not so sticky and is too hard to mix it with the silicone spoon.
  5. Knead the dough with a Kitchen-aide bench mixer using the dough hook. Add more bread flour in small amounts until the dough begins to pull away from the sides of the bowl. Once the sides of the bowl are mostly clean then knead 8 minutes.
  6. Transfer dough to a lightly floured surface and knead by hand until the dough is soft and springs back when poked.
  7. Let the dough rise: Spread some vegetable oil around a large bowl and place the dough in it, turning it to coat it with oil.
  8. Cover the bowl with plastic wrap or a damp cloth. Let rise at room temperature until it has doubled in size, 1 to 1 ½ hours.
  9. Gently press down on the risen dough to release some of its air. Turn the dough out onto a lightly floured piece of parchment paper, knead the dough a few turns and then divide it in half with a sharp knife. The full loaf should weigh ~1910 g.
  10. Shape each half into loaf. Place dough loafs into either oiled 8×4-inch bread loaf pans, or onto a flat baking sheet or peel that was sprinkled with corn meal, depending if you want to cook the loaves in pans or directly on a baking stone. Cover with plastic or a damp cloth.
  11. Let the loaves rise: Let the bread rise again, this time not doubling in volume, but rising by about half of its volume, about 30 to 45 minutes, half as long as the first rising. The dough should be peeking over the top of the loaf pan if using a loaf pan. (Over-proofing the bread may cause it to collapse as the yeast will be exhausted and not have any more energy when placed in the oven.)
  12. If you are using a Dutch Oven or baking stone, place it in the oven and preheat oven to 350°F for at least half an hour before baking.
  13. If baking in a Dutch Oven lift the dough by the corners of the parchment paper and place the dough and parchment paper into the Dutch Oven or directly on the baking stone. (Brush with optional egg wash. Whole eggs and water for a crisp shiny crust, egg whites and water for a crisp crust only.) Score the loaves a few times on the top of the dough right before putting it in the oven. Be careful, the Dutch Oven or baking stone will be hot!
  14. Put loaves in the oven. If you have a mister, mist the dough with a little water the first 10 minutes of baking. Bake for 40-50 minutes, or until done. The internal temperature should be ~200F. The bread should sound hollow when tapped.

Summertime Peach Frosty

There is nothing like a fresh peach frosty. Early in the season peel and cut fresh peaches into wedges, spread them on a cookie sheet, or two and freeze overnight. After they are frozen solid bag them into freezer bags.

When I want s refreshing dessert I allow some (~200g) of the peaches thaw slightly. If you don’t soften them the blender has trouble blending the peaches and vanilla ice cream (~100g.) Add 4-6 Tbl of milk (to desired viscosity) and enjoy. This makes about 12 oz of refreshing, delicious peach frosty.

The 2:1 ratio of peach to ice cream is about right for me.

INGREDIENTS

  • 200 g fresh frozen peach wedges
  • 100 g vanilla ice cream
  • 4-6 Tbl milk

METHOD

  • Partially thaw the frozen peach wedges,either on the counter or with a microwave,
  • Add ice cream and milk and blend, adding milk until the desired viscosity is attained.