Happy Thanksgiving to all who celebrate!

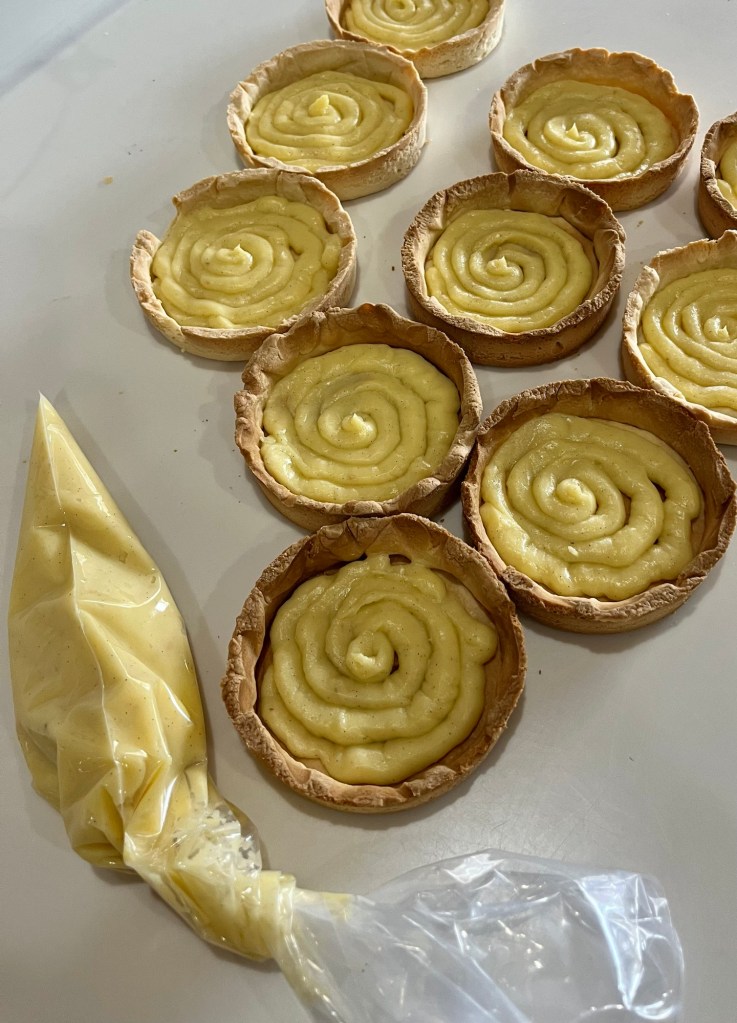
By special invitation is my almond-crust-cranberry-curd tart.

Today is Thanksgiving in the USA . Thanksgiving is a national holiday celebrating the harvest and other blessings of the past year. It is believed to be modeled on a 1621 harvest feast shared by the English colonists (Pilgrims) of Plymouth and the Wampanoag people.

For my whole life Thanksgiving centered around family and friends, old and new, sharing both a meal and each other. As a child Thanksgiving was held at our house and all our aunts, uncles and cousins would come for a huge mid-day meal. We had to finish early as our uncles had to go back to the farm to milk the cows. I had a lot of aunts and uncles and LOTS of cousins. Mostly I remember the pies, so many pies.

Since moving to California our son and daughter in law have hosted Thanksgiving and this year was no exception. There were over 20 people and enough food for 50.

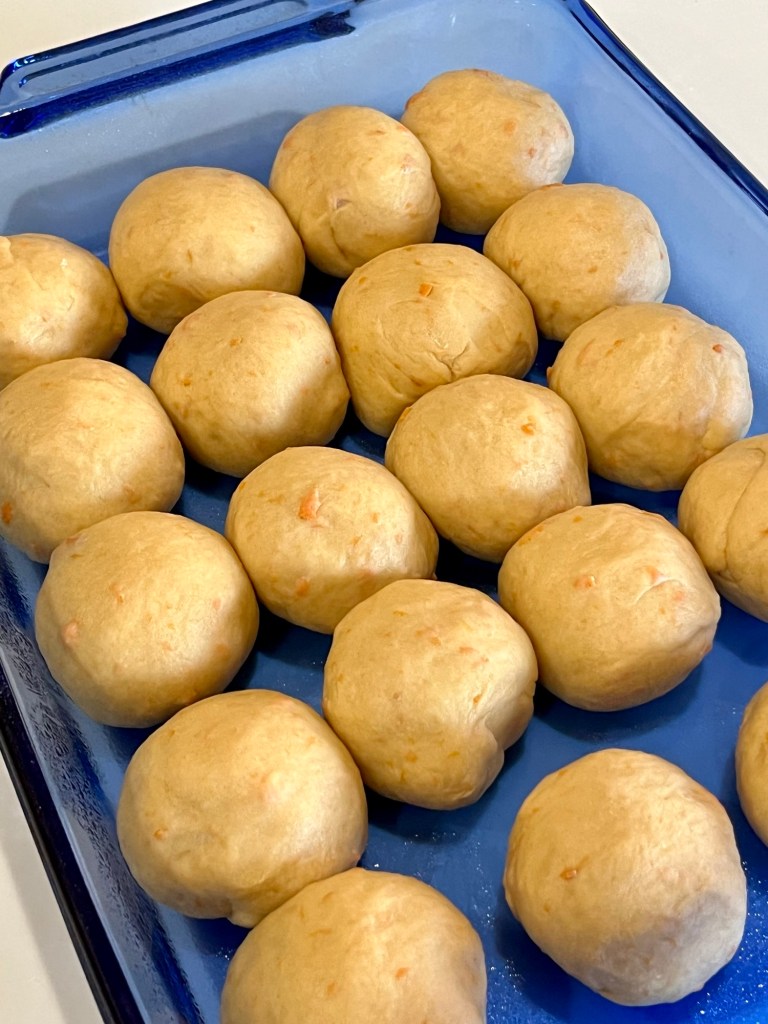
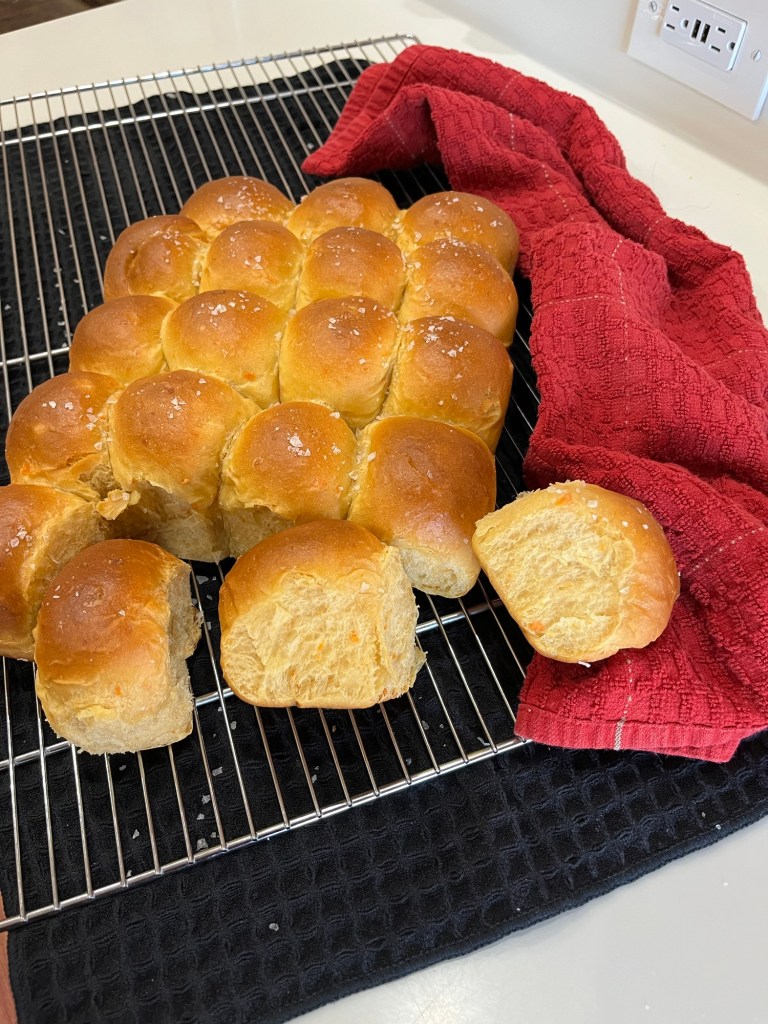
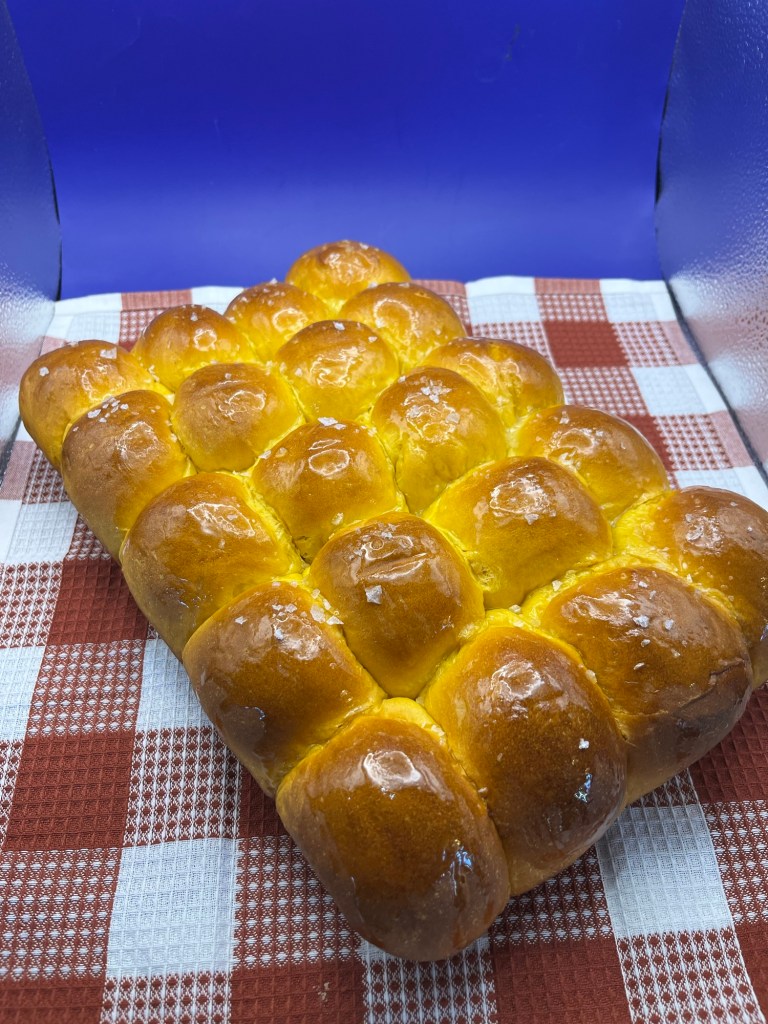
I made an apple pie, an almond-crust-cranberry-curd tart (see below) and sweet potato dinner rolls. There were also two pumpkin pies and very little left when we were done.

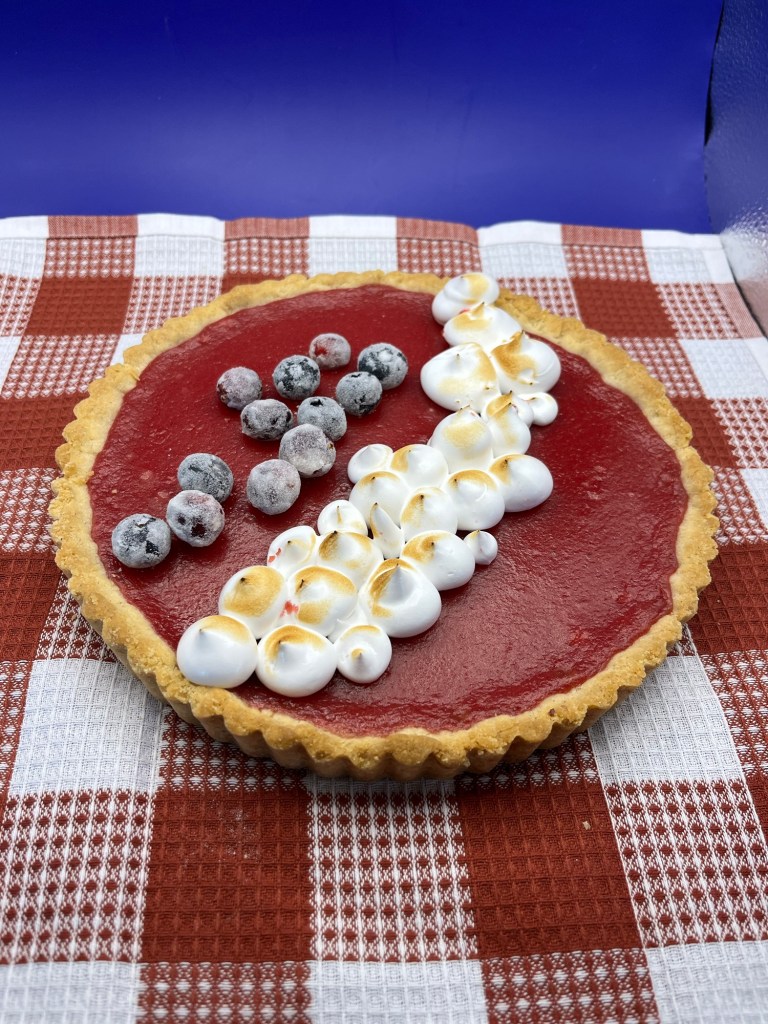
Cranberry Curd Tart Almond Crust

INGREDIENTS
For the crust
• 99g (½ c) granulated sugar
• 113g (8 Tbl) unsalted butter, softened
• ¼ tsp table salt
• 1 tsp King Arthur Pure Vanilla Extract
• ½ tsp almond extract
• 180g (1½ c) King Arthur Unbleached All-Purpose Flour
• 72g (¾ c) almond flour or finely ground sliced or slivered almonds

For the cranberry curd
• 12 ounces cranberries (fresh or frozen)
• juice of one orange (~ ¼ c)
• 250g (1 ¼ c) sugar
• 2 whole eggs
• 2 egg yolks
• 113g (½ c, 1 stick) unsalted butter
• 1 teaspoon vanilla extract
• 1 tablespoon orange liqueur, such as TripleSec or Grand Marnier (optional)

For the Italian meringue
• 2 egg whites
• 1/8 teaspoon cream of tartar
• 1/2 cup sugar
• 1/4 cup water

METHOD
Crust

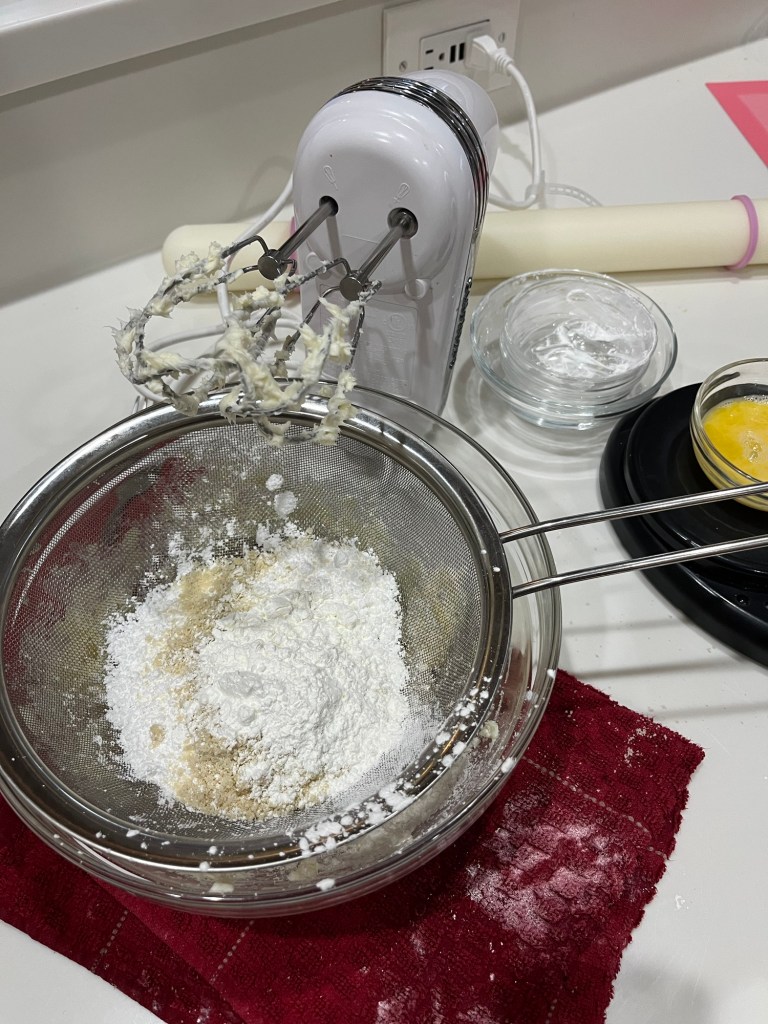
  1. Mix butter with sugar then add salt then vanilla.
  2. Add egg and mix until incorporated. Stir in flour. Mix by hand like you are kneading bread until incorporated
  3. Cover with plastic and refrigerate for 30 min
  4. Pre-heat oven to 350⁰F
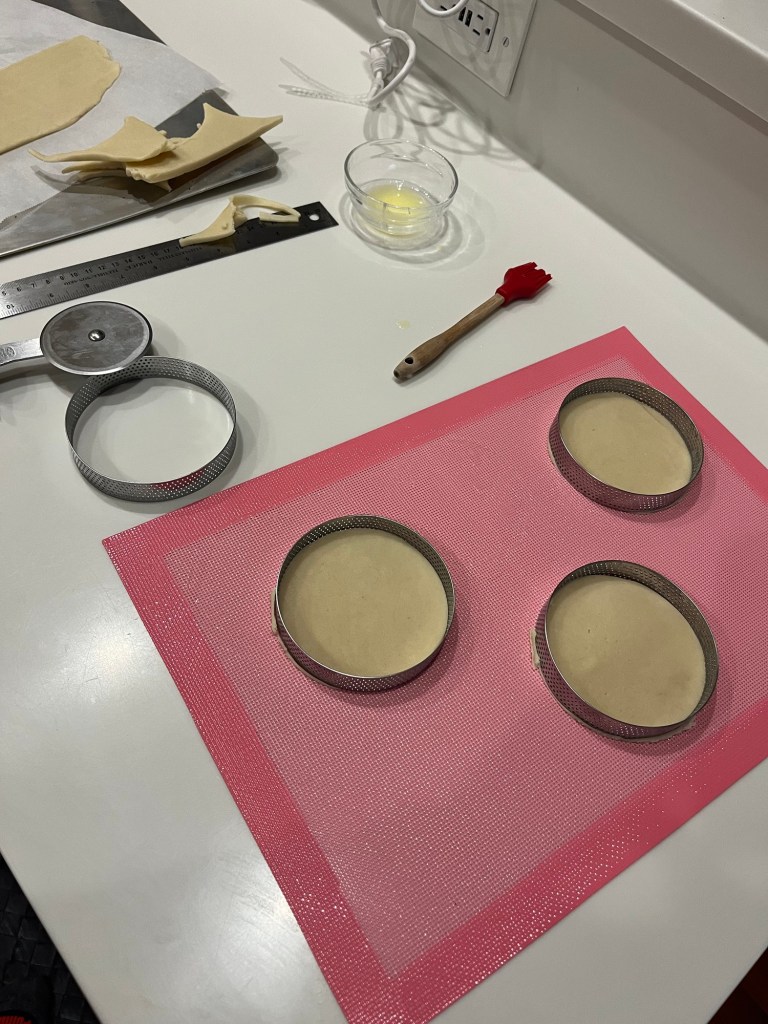
  5. Butter tartl pans, or use non-stick pans
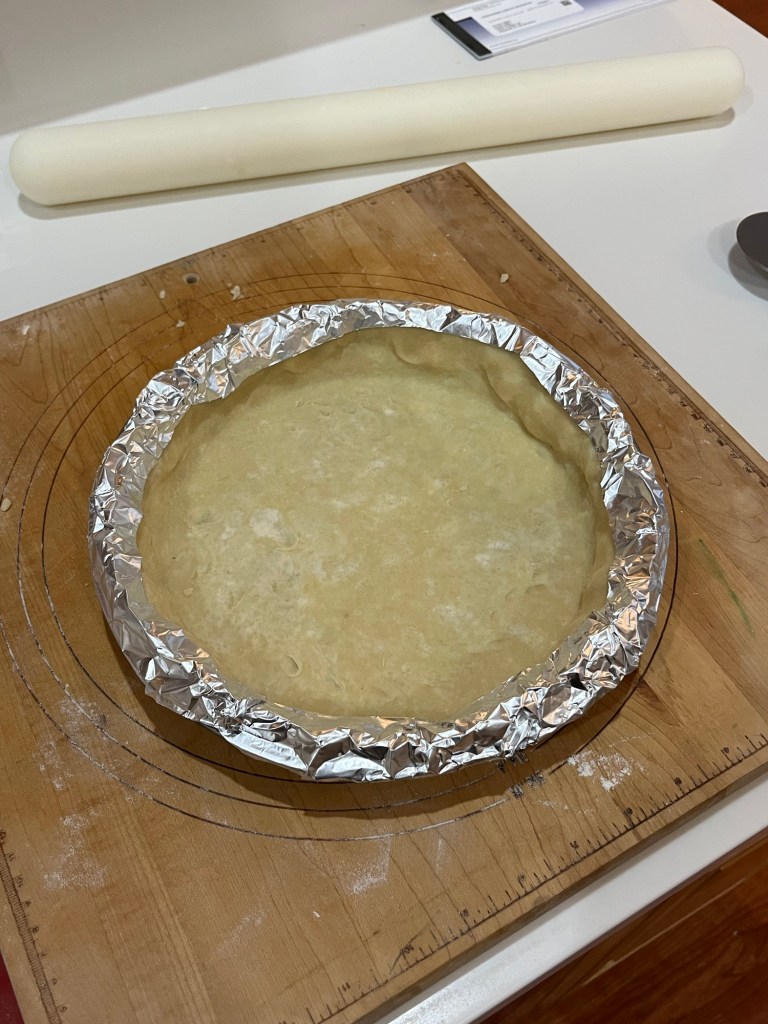
  6. Dock (prick holes in) bottom and sides of formed dough then refrigerate for 20 minutes
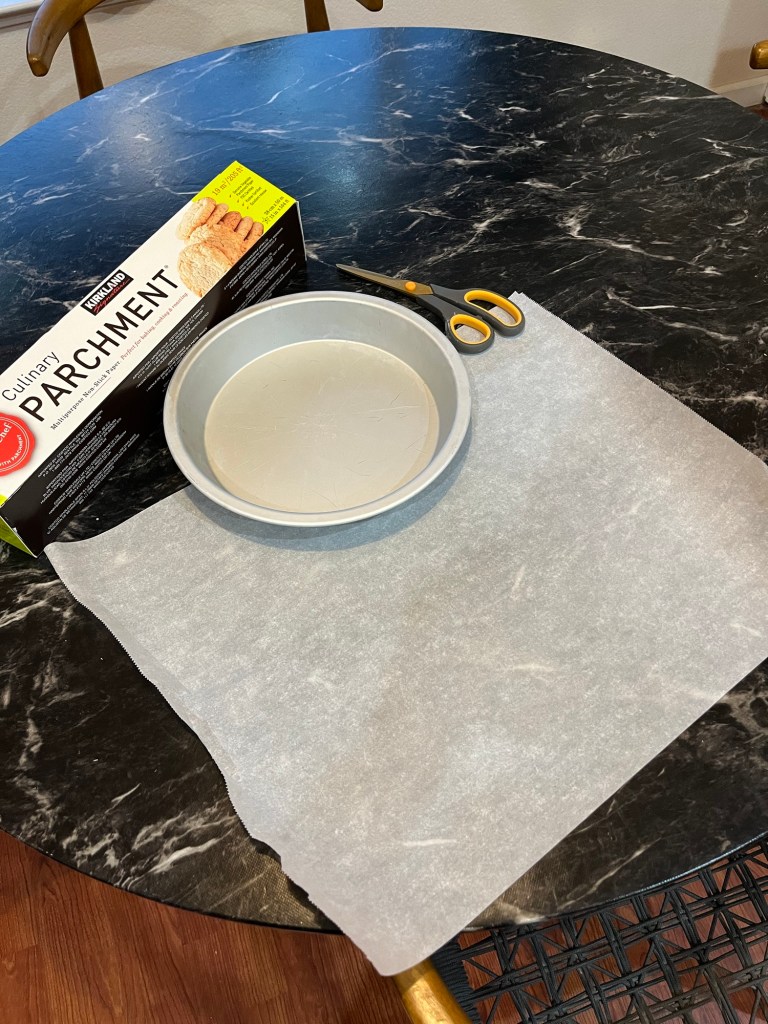
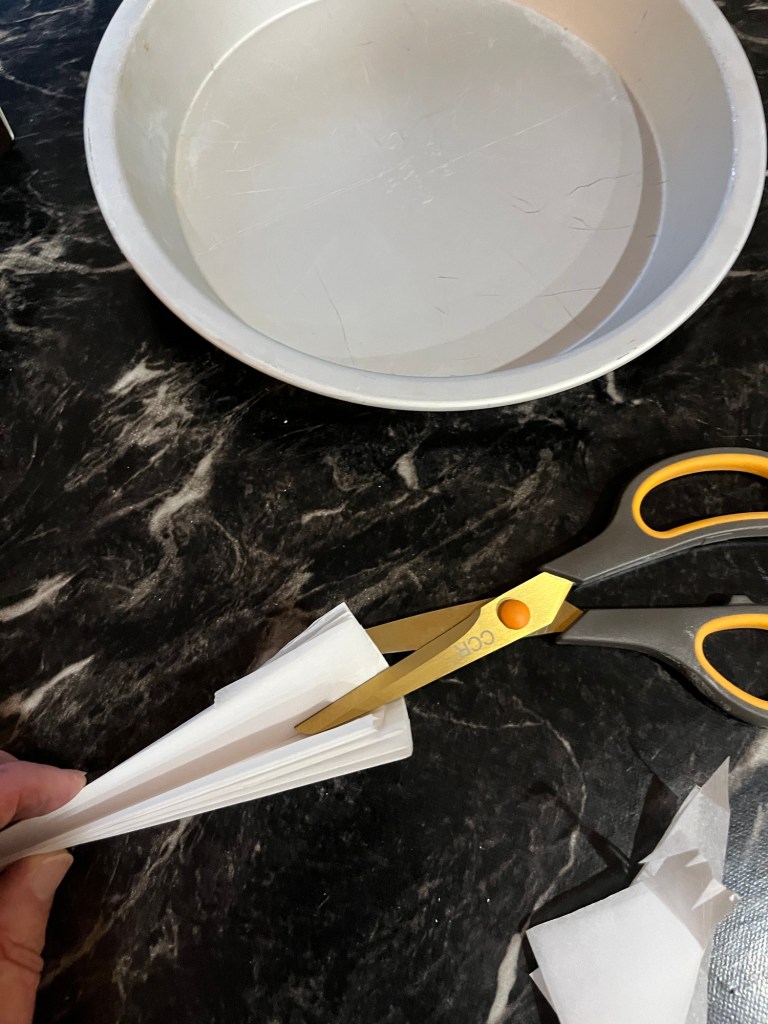
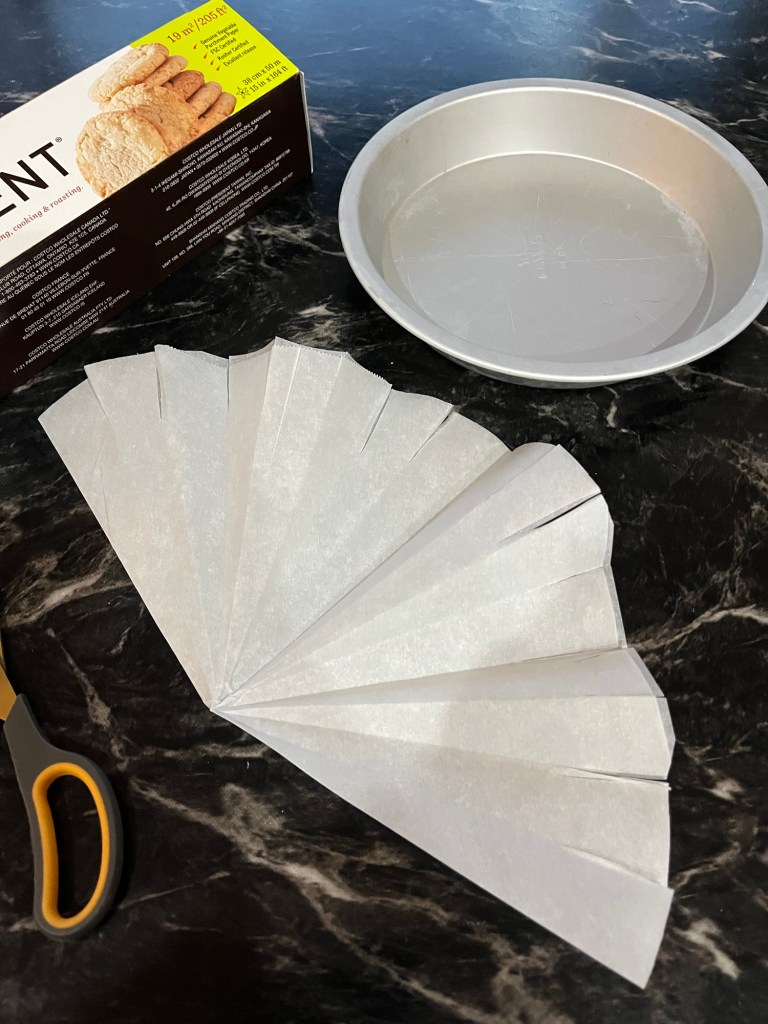
  7. Line tart pan with crumpled then smoothed parchment paper and fill with pastry weights.
  8. Paint edges of the tartlet with the egg wash.
  9. Bake in preheated oven 350⁰ F (175⁰ C) for 15 min. Remove pastry weights 5 minutes before the end of the bake.
  10. Immediately remove from pans and cool on a wire rack
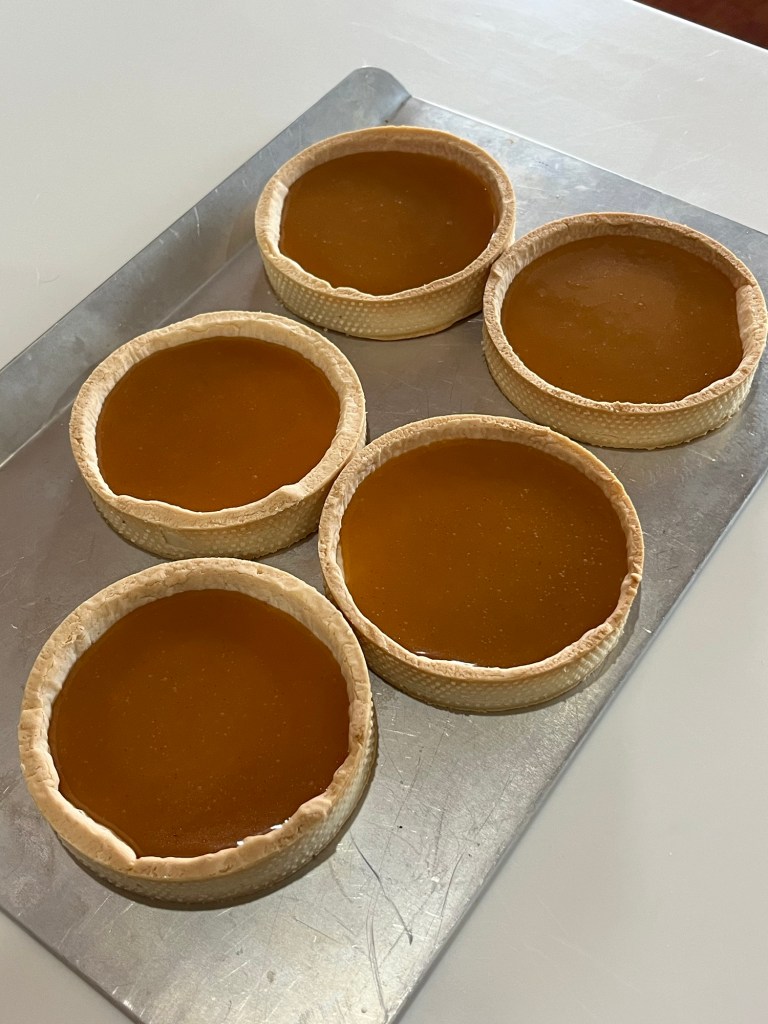
    Cranberry Curd
  11. Heat the cranberries and orange juice in a medium saucepan over medium-high heat until the cranberries split. Mix with an immersion blender then strain through a food mill or fine mesh sieve and discard the skins.
  12. Return the strained cranberry mixture to the saucepan and add the sugar, eggs, egg yolks, butter, vanilla, and orange liqueur (if using) to the pan and give everything a good stir. Heat gently over medium-low heat, stirring constantly, until the mixture thickens and registers 170°F on an instant read thermometer (this usually takes about 8-9 minutes). Immediately strain (again) through a fine mesh sieve into a large measuring bowl and then pour into the prepared crust. (The curd can be stored in an airtight container in the fridge for up to a week. You may need to bake it a few more minutes for the tart to set when baking from chilled)
  13. Bake (still at 350°F) until the curd is set (it should jiggle but not slosh), about 10 minutes. (Curd was jiggly after 20 more minutes baking.)
  14. Let cool at room temperature for about 1 hour, then transfer to the refrigerator to chill. You can serve this chilled or at room temperature.

    Italian meringue
  15. Add egg whites and cream of tartar to the bowl of a stand mixer fitted with a whisk attachment. Heat sugar and water in a small saucepan over medium high heat.
  16. When the sugar mixture registers about 220°F turn on the mixer and begin beating the egg whites on medium speed.
  17. When the sugar mixture registers 240°F remove from heat and carefully pour into the mixer over the egg whites. Increase the mixer speed to high and beat until the egg whites form stiff peaks.
  18. Transfer to a piping bag (or zip top bag) and pipe onto cooled tart as desired. If you want, torch the meringue with a kitchen torch. (But since it is cooked, this is totally optional).

As long as the oven was on and I had time to wait for doughs to chill etc, I also made a loaf of artisan bread.

Please Let The Rain Stop Soon!

When I cannot golf, I bake. On one hand, that is a good thing. My skills and knowledge are growing. On another hand the QC Cadre isn’t tired of my supplying them with baked goods. On someone else’s hand my muscles for playing golf are atrophying.

I recently received a set of perforated tart rings and a perforated silicon mat to bake the rings on. They all worked perfectly. Once baked, the tarts almost fell out of the rings.

QC asked for a chocolate covered caramel tart for her birthday. We spent her birthday day at the grands school talent show, then at a car dealership, during a severe rainstorm, and finally out with the family to a pizza birthday dinner. There was no time to fill the tarts, so I did them this morning.

CHOCOLATE CARAMEL TART

INGREDIENTS
Crust
• Unsalted Butter (room temp) 100g
• Salt a pinch
• Powdered Sugar 72g
• Almond Powder 20g
• Corn Starch 30g
• Eggs (room temp)36g
• Cake Flour 170g
Caramel
• 2 cups (424 g) granulated sugar
• ½ cup water
• ¼ cup corn syrup
• ½ cup (113 g) salted butter, cut into 4-5 pieces
• ½ cup heavy cream
• 1 teaspoon vanilla extract
Glaze
• 2 Tbl water
• 60g sugar
• 46g corn syrup (60ml)
• 52g condensed Milk (40ml)
• ¼ tsp agar agar
• 60g dark chocolate

METHOD

  1. Beat the room temp. butter lightly (add in salt).
  2. Sift in powdered sugar, almond powder and corn starch. Beat lightly. Add the room temp. eggs gradually and mix. Finally, add in the cake flour and mix well.
  3. Using a bench knife, “fraiser” the dough by repeated smearing portions of it on the table.
  4. Roll it out to 2mm/3mm thickness between parchment papers. (2mm thickness for 6~8cm diameter, 3mm thickness for 14~18cm thickness.
  5. Rest in the fridge for 1~2hrs

    For perforated tart ring:
  6. Cut it out into strips/discs. Disks equal to tart ring diameter, strips ~ ¾” wide and 2” longer than tart ring circumference, ~14.5” for a 4” tart ring. (4” x π + 2”)
  7. Coat the inside of the ring with butter. Position tart ring over a disk and place on a perforated mat.
  8. If the strips are too stiff to bend, warm slightly with your hands. Line the side of the tart ring with the disk. Glue any seams by warming with your finger.
  9. Trim top of strip with a knife
  10. Refrigerate for 20 minutes.
  11. Bake 3mm thick crust at 340⁰F for 15mins. (320⁰F for 2mm)
  12. If you are to bake the tart crust again after adding the almond cream, then bake 2-3mins less. (~12-13mins.)

    For regular tart pan:
  13. Cut it out into one big disc ~2” larger than tart pan
  14. Line the tart pan.
  15. Prick the bottom.
  16. Place a sheet of parchment paper and then pie weights.
  17. Bake 3mm crust at 340⁰F for 10mins, take the pie weights out, then bake for another 5 mins. (320⁰F for 2mm)
  18. If you want to apply egg wash the recipe is as follows: 10g Heavy Cream, 40g Egg yolk. Mix them well and strain it before use. Once the tart shell has cooled down completely, then brush them evenly and bake for ~10-12mins at 160℃.

    For the caramel:
  19. In a heavy bottomed saucepan (important so that the heat conducts evenly!), combine the sugar, water and corn syrup (try not to splash the mixture up on the sides of the pan). Bring the mixture to a simmer over medium heat. Cook for 10-12 minutes, until the mixture is a medium-dark amber color, tilting the pan just slightly every couple of minutes to swirl the mixture.
  20. Immediately remove the pan from the heat and carefully add the butter, cream and vanilla. The hot mixture will bubble vigorously. Stir to combine (don’t go too crazy scraping down the sides of the pan).
  21. Pour the caramel over the baked crust. Refrigerate until the caramel is set and no longer warm, 1-2 hours (make sure you set the tart on a really flat surface in the fridge or else it will set up tilted or uneven).

    For the glaze:
  22. Heat water, sugar, agar, corn syrup to boil to 220⁰F
  23. Add condensed milk and dark chocolate and blend with an immersion blender.
  24. Leave it overnight and use it the next day.
  25. Heat in the microwave to make it pourable
  26. Divide evenly among the tarts, rolling around to smooth out and cover each tart

Apple Pie, Again

Sorry to be redundant, but I made PreppyKitchen’s amazing pie crust again. I filled the crust with some apple pie filling that I made a couple of weeks ago.

I did make PreppyKitchen’s pie crust last week and while delicious, it was tough. Hence, another try. I think I over worked the dough the last time as today the recipe resulted in a marvelous flaky, tender, delicious crust. I am now confident to bring an apple pie for Thanksgiving dinner.

Here are some of the comments from my QC Cadre:

  • Crust is excellent , very buttery !!
    Best crust we ever had !!
    Apple filling is to die for , perfect amount of cinnamon , apples —just right
    Thank you
  • Well, I don’t know anything about pie crust and I’m not sure what you’re looking for, but all I can say is to me that pie crust was just about perfect. The whole apple pie just delicious.
  • Absolute perfection! It was the perfect flakiness 😊
  • Some of the best pie crust I have ever tasted. Very flaky and light.
    Excellent
    👍❤️🥧

Oh! What I Have Learned!

There are volumes documenting all that I don’t know, and a postcard describing what I do know. I discover, or am taught, new ideas daily.

Here are two things I didn’t know, but probably everyone else did.

  • A pie shield that doesn’t fall off during baking
  • A parchment paper liner for par baking that fits the pastry

Pie Shield to Protect the Edges of the Pie

I reviewed all the pie shields on Amazon and reviews of all of them complained about them falling off. This one creates a shield from a single sheet of aluminum foil that does not come off while baking.

Contour forming parchment paper liner

Ever try to fit a piece of parchment paper to a pastry shell without deforming the pastry? The simple solution is to crumple the parchment paper then smooth out (at least two times.) For smaller pastries cut slits into the edges of the paper to allow it to fit into the smaller shells.

Fold the parchment paper diagonally in half. Place a finger in the middle of the long side of the triangle and fold across your finger. Keep your finger in the same place and fold diagonally again. Fold one short side down the the long side and repeat. Cut the large end to make a triangle ~2 inches longer than the radius of your pie plate.

Baked Jelly Donut Holes

A day off from golf usually means a day on in Dede’s bakery.

I found this recipe from Natashas Kitchen on YouTube. Considering they are not fried (a good thing) they are light, airy and delicious. (An even better thing.) I did cheat and bought some seedless raspberry jam to fill the donuts rather than making my own. (Raspberries are very expensive this time of year.)

I followed the method as written below but was slightly disappointed with re-rolling the scraps to make the additional 4 donuts. The dough didn’t come together all that well. Any suggestions would be appreciated.

Baked Jelly Donut Holes

INGREDIENTS
• 2 ½ cups all-purpose flour, divided, plus more for dusting
• ¼ cup granulated sugar
• ¼ tsp salt
• 2 ¼ tsp instant yeast, quick acting, (1 packet = 7 grams)
• ⅔ cup warm milk, 110˚F – microwave 35 sec.
• 4 Tbsp unsalted butter, melted, divided 3::1
• 2 egg yolks
• ½ tsp vanilla extract
• ⅓ cup jelly or jam, (no large fruit pieces)
• ⅓ cup granulated sugar to roll donuts

METHOD

  1. In a large mixing bowl, whisk together 1 cup flour, ¼ cup sugar, 2 ¼ tsp instant yeast and ¼ tsp salt.
  2. Add warm milk, 3 Tbsp melted butter, 2 egg yolks and ½ tsp vanilla extract, and whisk vigorously to combine well.
  3. Cover with plastic wrap and rest at room temperature 10 minutes, until some bubbles form on the surface.
  4. Add remaining 1 ½ cups flour, adding just enough until dough holds together and no longer sticks to the sides of the bowl (Add the last 2 Tbsp of flour only if needed) and knead in the bowl 5 minutes. If dough is really sticking to your hands, dust lightly with flour then continue kneading with clean dry hands. Cover the bowl with plastic wrap and let rise in a 100˚F oven for 45 min or at room temperature for 1 ½ hours, or until doubled in size.
  5. Line a baking sheet with parchment paper.
  6. Turn dough out onto a floured surface and roll the dough out to just under ½” thick. Cut circles using a 2 ½ inch round cookie cutter. Re-roll scraps if needed to make 12 donuts total. Place donuts on prepared baking sheet, cover with a tea towel and let rise in a 100˚F oven for 20 min or at room temperature 45 min, or until puffed.
  7. While the donuts are rising, preheat oven to 375˚F with rack in the center of the oven.
  8. Bake uncovered in the center of a preheated oven at 375˚F for 10-12 minutes or until lightly golden on top.
  9. Right out of the oven, brush each hot bun, one at a time, all over with remaining 1 Tbsp melted butter and roll in a bowl of granulated sugar to coat all over.
  10. After all the donuts are sugar coated, cut a deep slit in the side of each donut and pipe jam with a pastry bag into each one.

Orange Chocolate CreamPat Tarts

One of my neighbors gave me some of their mandarin oranges and to thank them I “processed” the fruit and re-gifted it to them. I love the orange/chocolate tarts I made a few times, but have yet to perfect them. I changed the recipe and method this time, remembering Einstein’s quote: (reported and most likely never said,) “The definition of insanity is doing the same thing over and over again and expecting different results 

I used a recipe and method (by Philippine pastry chef, Hanbit Cho. My first attempt used standard tart rings resulted in useable but not “excellent” tart shells. The edges are ragged and some of them broke.

(I ordered and received some perforated tart rings and am waiting for the accompanying perforated baking mat to arrive, then will try again. If at first…)

I also changed my previous recipe to use creme patisserie and chocolate ganache which don’t require baking. I used my standard creampat recipe (ala Martha Stewart) and a chocolate ganache and orange glaze from Preppy Kitchen.

Chocolate Orange Tart with Crème Patisserie – REVISED

Yield: Five 4” tarts.
INGREDIENTS
Tart Shell
• 100g unsalted room temperature butter
• Salt a pinch
• 72g powdered sugar
• 20g almond flour
• 30g corn starch
• 36g (~1) room temperature egg
• 170g cake flour
Chocolate Ganache
• ½ cup heavy cream (120ml)
• 180g (1 c) semi-sweet chocolate chopped
Orange Glaze
• 1 cup powdered sugar
• 3 Tbl orange juice
• 1 tsp orange zest
Crème Patisserie
• 1¾ cups 2% milk + ¼ cup heavy cream
• 80g (~4) egg yolks
• ½ cup sugar
• ¼ c corn starch
• Pinch salt
• 2 Tbl butter
• 1 tsp vanilla ½ tsp vanilla

METHOD
Tart Shell

  1. Beat the butter lightly (add in salt).
  2. Sift in powdered sugar, almond flour and corn starch. Beat lightly.
  3. Add the eggs gradually and mix.
  4. Finally, add in the cake flour and mix well.
  5. Roll it out to 2mm/3mm thickness between parchment papers. (2mm thickness for 3-4” diameter, 3mm thickness for 7-9” diameter.
  6. Rest in the fridge for 1~2hrs.
  7. For regular tart pan: Cut chilled dough into disc ~2” larger diameter than tart ring
  8. For perforated tart ring: Cut discs the size of the tart ring
  9. For regular tart pan: Butter inside of ring and gently fit the dough inside the ring, leaving enough to line the edges. Be gentle to not tear the dough. Prick the bottom. Place a sheet of parchment paper on the dough and and fill with pie weights.
  10. For perforated tart ring: Butter inside of ring and set over one of the cut-to-size discs. Cut strips of dough 1” wide and cut ~15” long. Line the ring with the long strips cementing and connections by warming gently with a finger. Place it on a perforated mat.
  11. For either type of tart ring chill the formed rings in the fridge for an hour before baking, then put them directly in the pre-heated oven.
  12. For regular tart pan: Bake at 350F for 10mins, take the pie weights out, then bake for another 5 mins. (325Ffor 2mm thick)
  13. For perforated tart ring: Bake at 350 F for 15mins. (325 Ffor 2mm thick)

Chocolate Ganache

  1. Heat the cream in a small saucepan over medium heat until very steamy and just
    about to boil. (You can also heat it in the microwave for 1 to 2 minutes until very hot but not boiling.)
  2. Meanwhile, place the chocolate in a large measuring cup.
  3. Pour the hot cream over the chocolate and set aside for 5 minutes, allowing the
    chocolate to melt from the heat of the cream.
  4. Stir the chocolate and cream together until fully combined, smooth, and glossy. If
    there are a few pieces of chocolate left unmelted, you can microwave the ganache
    at 50% power for about 10 seconds and mix again.

Orange Glaze

  1. Place confectioners’ sugar into a bowl. Add 2 tablespoon orange juice and 1 teaspoon orange zest.
  2. Whisk or beat until smooth, adding more juice as necessary. Reserve remaining zest and juice for another use. The glaze should be pipeable but should not flow from the piping tip.
    Crème Patisserie
  3. Whisk eggs and milk together and add to all other ingredients (except vanilla) to a medium saucepan. Bring to boil whisking constantly. Cook until thickened (it will look lumpy, its ok)
  4. Sieve lumpy mixture into a bowl and add vanilla, mix thoroughly
  5. When incorporated, cover with plastic directly on the crème patisserie and cool about an hour. (Alternatively, slide the piping tip you would use to fill the pâte à choux into the piping bag but don’t cut off the tip. Spoon the hot batter directly into the piping bag with sealed end. When the crème patisserie is cool, cut the tip off, force the bag around the piping tip and squeeze the crème pat to fill the end )

ASSEMBLY

  1. Pipe a ¼” layer of crème patisserie layer into each tart shell and smooth while the crème patisserie is still warm. Let set before proceeding.
  2. Pipe a ¼” layer of warm chocolate ganache on the crème patisserie layer
  3. Pipe a spiral ⅛” wide circles of orange cream and feather the orange cream with a toothpick
  4. Chill to set

Candied Orange Slices

  1. Add the sugar and water to a 12-inch skillet or a large saucepan and set it over medium-high heat. Bring the water to a boil, stirring from time to time. As the water heats, the sugar will melt into the water. It’s important that the sugar be completely melted before adding the orange slices.
  2. After boiling the water, reduce the heat to medium and add the orange slices. Don’t overcrowd the pan; the orange slices should fit in the pan with little overlap.
  3. Let the orange slices cook at a gentle simmer for about ~60 minutes, until the white part of the peel (the pith) is nearly translucent. Use tongs to turn them over in the syrup every now and then.
  4. Use tongs to remove the slices from the sugar syrup, laying them out in one layer on a wire rack.
  5. Spread the slices on a parchment paper lined baking pan and bake for 1-2 hours at 170F
  6. When “dry” they will be tacky but also feel set – kind of like gummy candy. Coat with caster sugar if desired.

Preppy Kitchen Blueberry Pie

I subscribed to Preppy Kitchen’s website and he posted his blueberry pie. He had me at blueberry.

I also used his flakey pie recipe and was once again very impressed. Although this pie is not par-baked it remained flakey and delicious with no soggy bottom!

I made a lattice top using a (new) fluted pastry wheel cutter.

Blueberry Pie – PreppyKitchen

INGREDIENTS
• 1 recipe homemade pie crust (or 2 store-bought)
• 900g (6 c) fresh blueberries
• 1 tablespoon lemon zest
• 2 tablespoons fresh lemon juice
• 133g (⅔ c) granulated sugar
• 31g (¼ c) AP flour
• 14g (2 Tbl) cornstarch
• ½ teaspoon ground cinnamon (optional)
• Pinch of salt
• 2 tablespoons butter diced
• 1 large egg beaten with 2 teaspoons water for egg wash

METHOD

  1. Preheat the oven to 425°F.
  2. On a lightly floured surface, roll one disk of pie dough into a 13-inch circle. Place in a 9-inch pie pan and let the excess pie dough hang over the edge.
  3. In a large mixing bowl, combine the blueberries, lemon zest, and lemon juice, tossing to combine. Add the sugar, flour, cornstarch, cinnamon, and salt and stir until the berries are well coated in sugar. Pour the filling into the pie crust and pat it out into an even layer. Dot the butter all over the top of the filling.
  4. Roll the remaining pie crust into a 12-inch circle. Cut the dough into 10 to 12 strips, about 1-inch wide, using a pastry wheel or knife. Arrange the strips on top of the pie in a lattice pattern by weaving the strips over and under each other. Trim the excess dough (top and bottom crust), so there is about 1-inch of overhang from the edge of the pie dish. Tuck all of the excess under and crimp the edge.
  5. Lightly brush the pie crust with egg wash, and if desired, sprinkle with more sugar. Place the pie on a rimmed baking sheet.
  6. Bake for 20 minutes. Reduce the oven temperature to 350°F and continue baking for 35 to 45 minutes, or until the crust is a deep golden brown and filling is bubbling around the edges. Tent the pie with foil or the edges with a pie shield if the crust starts to brown too quickly. Let the pie cool completely before slicing, about 4 hours.

Soft Sweet Potato Rolls

Sweet Potato Dinner Rolls

Sally’s Baking Addiction contest this week is the above mentioned Soft Sweet Potato Rolls. My usual dinner rolls are a tremendous hit, but I am willing to chance one for the contest.

I followed the instructions exactly as shown below.

After QC and I sampled a roll each we agreed these are as exceptional and my standard rolls and they have the advantage of being sweet potato based and Thanksgiving is in a couple of week. LiG.

Soft Sweet Potato Rolls


https://sallysbakingaddiction.com/sweet-potato-dinner-rolls/

INGREDIENTS
• 1 medium sweet potato, about 250–290g, peeled and chopped (to yield 1 cup mashed)
• ¾ cup (180ml) whole milk, warmed to about 110°F (43°C)
• 2 ¼ tsp instant dry yeast
• 1/3 cup (113g) honey, divided
• 2 large eggs, at room temperature
• 5 Tbl (71g) unsalted butter, softened
• 1 ¾ tsp salt
• 5 ½ c (715g) bread flour* (spooned & leveled), plus more as needed
• optional: 2 Tbl (28g) melted butter and flaky sea salt, for finishing

METHOD

  1. Prepare the sweet potato: Place the chopped sweet potato in a medium saucepan and add enough water to cover. Bring to a boil over high heat, then reduce the heat to medium-high and boil until the sweet potato is very soft and tender, about 10–12 minutes. Drain off the water, then mash the sweet potato as well as you can—a few small lumps are okay. Measure 1 cup (230g) of mashed sweet potato to use in the dough, and set aside to slightly cool. (Do not use more than 1 cup in your dough. Discard or eat any leftover.)
  2. Proof the yeast: Whisk the warm milk, yeast, and 2 Tablespoons of honey together in the bowl of your stand mixer. Cover and allow to sit for 5 minutes.
  3. Make the dough: Add the remaining honey, eggs, butter, mashed sweet potato, salt, and 1 cup (125g) flour. With a dough hook or paddle attachment, mix/beat on low speed for 1 minute. Stop and scrape down the sides of the bowl with a silicone spatula, then add the remaining flour. Beat on medium speed until the dough comes together and pulls away from the sides of the bowl, about 3 minutes. If the dough seems too wet to a point where kneading (next step) would be impossible, beat in more flour 1 Tablespoon at a time until you have a workable dough. Don’t be nervous if you’re adding a lot more flour; there are a lot of variables such as moisture in the sweet potato, humidity, weather, etc. Dough should be soft and a little sticky, but still manageable to knead with lightly floured hands.
  4. Knead the dough: Keep the dough in the mixer fitted with a dough hook and beat on low speed for an additional 5 full minutes, or knead by hand on a lightly floured surface for 5 full minutes. If the dough becomes too sticky during the kneading process, sprinkle 1 teaspoon of flour at a time on the dough or on the work surface/in the bowl to make a soft, slightly tacky dough. After kneading, the dough should feel soft and smooth. Poke it with your finger—if it slowly bounces back, your dough is ready to rise.
  5. 1st Rise: Lightly grease a large bowl with oil or nonstick spray. Place the dough in the bowl, turning it to coat all sides in the oil. Cover the bowl and allow the dough to rise in a relatively warm environment for 1–2 hours or until double in size. (I always let it rise on the counter. Takes about 1 and 1/2 hours.
  6. Grease a 9×13-inch baking pan.
  7. Shape the rolls: When the dough is ready, punch it down to release the air. Weigh the dough (~1370g) then divide the dough into 20 equal pieces (about ~68g each.) Shape each piece into a smooth ball. Arrange in prepared baking pan.
  8. 2nd Rise: Cover shaped rolls and allow to rise until puffy, about 30 to 45 minutes.
  9. Adjust oven rack to a lower position and preheat oven to 350°F (177°C). (It’s best to bake the rolls towards the bottom of the oven so the tops don’t burn.)
  10. Bake the rolls: Bake for 25 minutes or until golden brown on top (internal temperature if taken with an instant-read thermometer should be 190°F), rotating the pan halfway through. If you notice the tops browning too quickly, loosely tent the pan with aluminum foil (I usually add it after 20 minutes).
  11. Remove from the oven, brush with melted butter and sprinkle with flaky sea salt. Allow rolls to cool for 15 minutes before serving. We’ve learned that the longer they cool, the better their flavor.
  12. Cover leftover rolls tightly and store at room temperature for up to 3 days, or in the refrigerator for up to 1 week.
    Notes
  13. Freezing Instructions: You can freeze the baked dinner rolls. Allow them to cool completely, then place them in a freezer-safe container or bag and freeze for up to 3 months. Thaw in the refrigerator or at room temperature, then reheat as desired. If reheating the whole pan, lightly cover and reheat in a 300°F (150°C) oven for about 10 minutes or until warm. If you are planning to freeze the baked rolls, omit the melted butter and flaky sea salt finishing step after baking, and instead do that after thawing and reheating.
  14. Overnight Instructions: Prepare the recipe through step 7. Cover the shaped rolls tightly and refrigerate for up to about 15 hours. At least 3 hours before you need them the next day, remove the rolls from the refrigerator, keep covered, and allow to rise on the counter for about 1-2 hours before baking. Alternatively, you can let the dough have its 1st rise in the refrigerator overnight. Cover the dough tightly and place in the refrigerator for up to about 15 hours. Remove from the refrigerator and allow the dough to fully rise for 2 more hours. Continue with step 6.
  15. Baking Pan: I prefer baking the rolls in a glass 9×13-inch baking pan because I find they brown a little too quickly in a metal pan. But as long as you bake the rolls on a lower oven rack and keep your eye on them, any pan is great. You can also bake these rolls in a large cast iron skillet, in two 9-inch round or square baking pans, or on a lined baking sheet. Bake time remains the same.
  16. Can I Use Regular Potato? Yes. No other changes necessary.
  17. Milk: Whole milk is ideal for the best, richest flavor and texture. Keeping that in mind, feel free to substitute with a lower-fat or nondairy milk.
  18. Yeast: I always use instant yeast, but if you use active dry yeast, there are no changes to the recipe. Rise times will be slightly longer using active dry yeast. Reference my Baking with Yeast Guide for answers to common yeast FAQs.
  19. Flour: If you don’t have bread flour, you can use all-purpose flour. All-purpose flour is convenient for most, but bread flour produces chewier dinner rolls. The rolls are still soft and fluffy no matter which you use. Either flour is fine and there are no other changes to the recipe if you use one or the other.

You Are The Apple Of My Eye

Last month I made an amazing, flaky, delicious pie crust with PreppyKitchen’s recipe. QC and I then made the best chicken pot pie ever!

We are making an apple pie for Thanksgiving and wanted to try the crust again. Not everything went as smoothly as the first try. (I believe when mixing the dough in the food processor I did not add enough water.) The dough held together when testing it, but just barely. When I tried to form a cohesive ball on the counter it wouldn’t come together, I should have popped it back into the food processor and added another tablespoon or two, but like a golf shot where I notice the club face isn’t aligned correctly, I assume I can fix it on the downswing.

I also had issues making an aluminum foil pie ring. I cut three pieces of foil 3” wide and folded them around the edge of the pie crust. They wouldn’t stay on and I had to adjust them several times. Since then I saw how to cut a single large hole one piece of foil, to cover the edge and leave the center open.Next time.

After freezing the dough I wet my hands and gently kneaded the dough as little as possible to have it come together so I could roll it out. It worked, but I probably lost some of the flakiness.

(This pie is for internal consumption and review by the QC Cadre, not for Thanksgiving dinner. I can take the well deserved criticism.)

I used apple pie filling that I made and froze after visiting Apple Hill in September. I froze it in a plastic film lined pie plate so it would perfectly fit into the par-baked pie shell. Apparently, I used a different pie-plate today. The resultant pie looked good. I guess I fixed in on my downswing.

The pie was baked at 425F for 30 minutes. The edges were covered and the pie was baked an additional 20 minutes, until the internal temperature reached 195F.

Pie Crust – PreppyKitchen

INGREDIENTS
• 360g (3 c) all-purpose flour
• 1 Tbl sugar
• 1 tsp salt
• 227g (1 c) cold unsalted butter cut into cubes
• 4 to 6 Tbl ice water

METHOD

  1. In the work bowl of a food processor, combine 1½ cups of flour, sugar, and salt. Pulse a few times to combine.
  2. Add half of the butter. Process until very crumbly and starting to ball up, about 30 seconds. Scatter in the remaining butter and the remaining 1½ cups of flour. Pulse 2 times just to distribute.
  3. Drizzle 4 tablespoons of ice water over the mixture. Pulse a few times. Add more water, a tablespoon at a time, as needed, and pulse once or twice after each addition. The mixture should easily stick together when squeezed, but not feel wet or dry.
  4. Transfer the dough onto the counter and form it into a ball. Cut the ball in half and press each half into a disc. Wrap tightly in plastic wrap and refrigerate for at least 1 hour or up to 2 days. (Don’t worry if the dough seems `dry. The flour will hydrate as it rests in the fridge.) The disks can also be frozen for a few months and thawed in the fridge overnight before using.

    To Blind or Par-Bake:
  5. If required, prepare the crust as directed in the recipe until it’s ready to use.
  6. Roll the pie crust into a 14-inch circle and line a pie-pan with the dough. Fold the ends under and crimp the edges as desired. Poke the bottom all over with the tines of a fork. Freeze for 30 minutes.
  7. Meanwhile, position an oven rack in the bottom third and preheat the oven to 425⁰F.
  8. Once the oven is hot, remove the pie from the freezer and place on a rimmed baking sheet. Line with a square of parchment paper. (I find it useful to crumple the parchment paper then smooth out. Repeating the crumple/smooth helps make the parchment paper more pliable.) Add enough dried beans or pie weights to fill the center.
  9. Bake for 20 minutes. Peek under the parchment by carefully lifting an edge. If the bottom of the crust is pooled with melted butter, cook for another 5 minutes. (It should still appear wet and underbaked.)
  10. Remove the pie crust from the oven. Carefully lift out the parchment paper and weights and set them aside to cool. At this point, your pie crust is par-baked and could be used in recipes that call for partially baking the crust before filling. (If a shiny crust is desired, you can brush the crust all over with egg wash.)

    To Blind Bake:
  11. Return the crust to the oven and continue baking until the bottom appears dry and begins to brown, about 10 more minutes.
  12. Let the pie crust cool completely before filling.

Freezing Apples for Apple Pie

INGREDIENTS

• 5 cups Apples peeled & sliced apples (amount may vary)
• 1 quart Water to prevent browning apples
• 2 teaspoon salt to prevent browning apples
• ½ cup Sugar for pie filling
• ½ teaspoon Cinnamon for pie filling
• 3 Tablespoons flour for pie filling
• 1 pinch salt for pie filling

METHOD

  1. Freezing Apples for Pie Filling
  2. Peel, core and slice apples into a salt water soak. About 2 teaspoon salt dissolved in 1 quart water. This will prevent browning apples.
  3. When all apples are sliced let them soak about 5 minutes and drain well.
  4. Place apples in your pie plate to be sure you have the right amount. Pack them in and mound them up. I like lots of apples in my apple pie!
  5. Remove these apples to a bowl, add sugar cinnamon mixture and mix to coat. ½ cup sugar, ½ tsp. cinnamon, 3 Tbsp flour, Dash of salt
  6. Lay an oversized piece of foil or plastic wrap in your pie plate. You want enough to wrap around all of the apple filling.
  7. Put the apples back into your lined pie plate. Include all the sugar mixture. Wrap the foil sides up and around the pie filling. If needed add another layer of foil or plastic wrap to be sure it is all covered.
  8. Place the pie plate and contents in the freezer and allow to freeze.
  9. When it is frozen take the wrapped pie filling out of the pie plate and place in freezer bag or wrap in freezer paper.
  10. Remove air, seal, and label. Put back in the freezer for later baking.

Yippee Ki-Yay!

I made a western themed cake for this year’s annual auction-fundraiser for the girls school. My extreme chocolate cake (six full layers, not torted) is 12 inches high and weighs 18 lbs. Whew!

Fresh raspberry mousse filled the layers. I developed the mousse last year and found using fresh raspberries resulted in a much better mousse than using frozen berries.

I made and froze all the cakes two weeks in advance and made all the fondant decorations a week later. The bandana was the most difficult decoration as the fondant needs to be exactly the right texture and strength to fold and arrange without stretching or tearing.

Extreme Chocolate Cake Single Recipe

Makes two 9” round cakes
INGREDIENTS
• 2 cups white sugar
• 1 3/4 cups all-purpose flour
• 3/4 cup unsweetened cocoa powder
• 1 1/2 teaspoons baking soda
• 1 1/2 teaspoons baking powder
• 1 teaspoon salt
• 2 eggs
• 1 cup milk
• 1/2 cup vegetable oil
• 2 teaspoons vanilla extract
• 1 cup boiling water

METHOD

  1. Preheat oven to 350 degrees F (175 degrees C). Grease and flour two 9 inch cake pans.
  2. Use the first set of ingredients to make the cake. In a medium bowl, stir together the sugar, flour, cocoa, baking soda, baking powder and salt. Add the eggs, milk, oil and vanilla, mix for 3 minutes with an electric mixer. Stir in the boiling water by hand. Pour evenly into the two prepared pans.
  3. Bake for 30 to 35 minutes in the preheated oven, until a toothpick inserted comes out clean or 205F internal temp. Cool for 10 minutes before removing from pans to cool completely.

Raspberry – Cream Cheese Mousse


INGREDIENTS
Raspberry Puree
• 340 g (~2 ½ c, 12 oz) fresh raspberries
• 2 Tbl confectioner’s sugar
• 1 Tbl instant vanilla pudding mix (substitute corn starch if desired.)
• 112 g (4 oz) cream cheese softened
• ¼ c powdered sugar
• 1 Tbl freeze-dried raspberry powder
• Optional: ¼ tsp red food coloring
• Optional: 1 tsp ouzo (for tartness)
Whipped Cream – Stabilized
• 1 cup heavy whipping cream, chilled
• 2 Tbl instant vanilla pudding powder (substitute corn starch if desired.)
• 2-3 Tbl powdered sugar

METHOD

  1. Combine raspberries and 2 Tbl confectioners’ sugar in a small bowl and add to a food processor and pulse until berries are reduced
  2. Sieve the mixture allowing enough time for most of the raspberry juice to drip into a bowl, (enough to make 200ml (2/3 c) puree)
  3. In a large bowl, add raspberry juice, 1 Tbl vanilla pudding, softened cream cheese and 1/4 cup powdered sugar, raspberry powder and ouzo and beat until well combined (3-4 minutes on high.) Mix in red food coloring in 2 or 3 aliquots until desired color is attained.
  4. In the bowl of a stand mixer whip the heavy cream, vanilla pudding mix and confectioners’ sugar.
  5. Add red food coloring (in several small amounts until desired color is attained) and whip to firm peaks.
  6. Fold the raspberry mixture into the whipped cream until combined.

Marshmallow Fondant

INGREDIENTS
• 1 package (10 ounces) white mini marshmallows
• 2-5 tablespoons water
• 851 g (1 ¼ lbs or 20 oz) sifted confectioners’ sugar, divided in half
• 1/4 cup solid vegetable shortening

METHOD

  1. Grease your mixing bowl and a glass bowl that can be used to melt marshmallows in the microwave.
  2. Place the marshmallows, water and flavoring of your choice in greased glass bowl and microwave on high at 30 second intervals.
  3. Stir every 30 seconds until marshmallows are completely melted, about 2 minutes.
  4. Sift half of the confectioner’s sugar in a greased mixing bowl. Make a well in the center of the confectioner’s sugar and pour in the melted marshmallows.
  5. I use the paddle attachment for my KitchenAid mixer for this first part of the mixture.
  6. Mix until all the melted marshmallows are incorporated in the confectioner’s sugar.
  7. Add any food coloring at this point.
  8. Mixture will be thick but still runny.
  9. Sift the remaining half of confectioner’s sugar into the melted marshmallows.
  10. Mix on low until it comes together.
  11. Change to your dough hook attachment as this will get extremely thick.
  12. Fondant will be very thick and have a dough like consistency
  13. Wrap fondant in saran and make sure no air gets to it.
  14. Rest fondant for at least an hour before use.