Scottish Oatcakes and Tangzong Artisan Bread

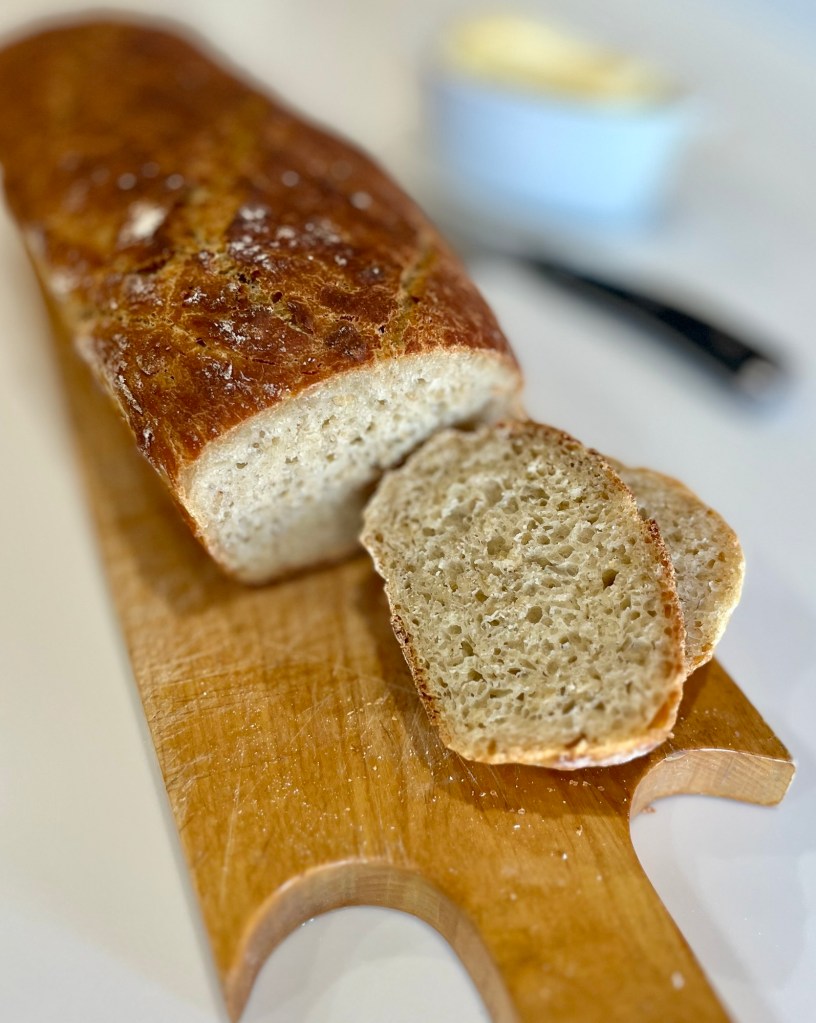
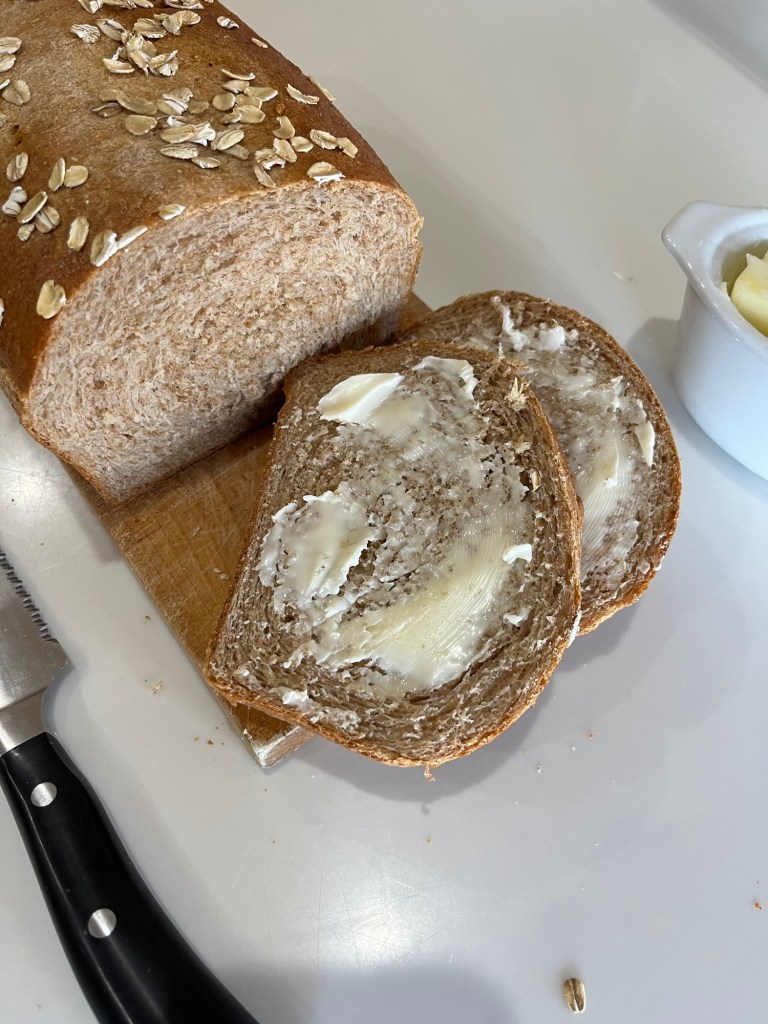
I wasn’t going to mention the artisan bread (as seen in the background) I made this morning, but I added a twist to the recipe. I use the Tangzong technique fairly often, but hadn’t used it on artisan bread. The standard method yields a bread that is 9.5 out of 10, so what is the point?

Tangzong pre-gelatinizes the starch in the flour, allowing it to absorb twice as much water than with cool water. Since there’s less free (unabsorbed) water in the dough, it’s less sticky and easier to knead plus it stays fresh longer, not that that is an issue here, over the past 2 weeks I made the artisan loaf every 2 or 3 days. For variety I did occasionally change from boule to batard.

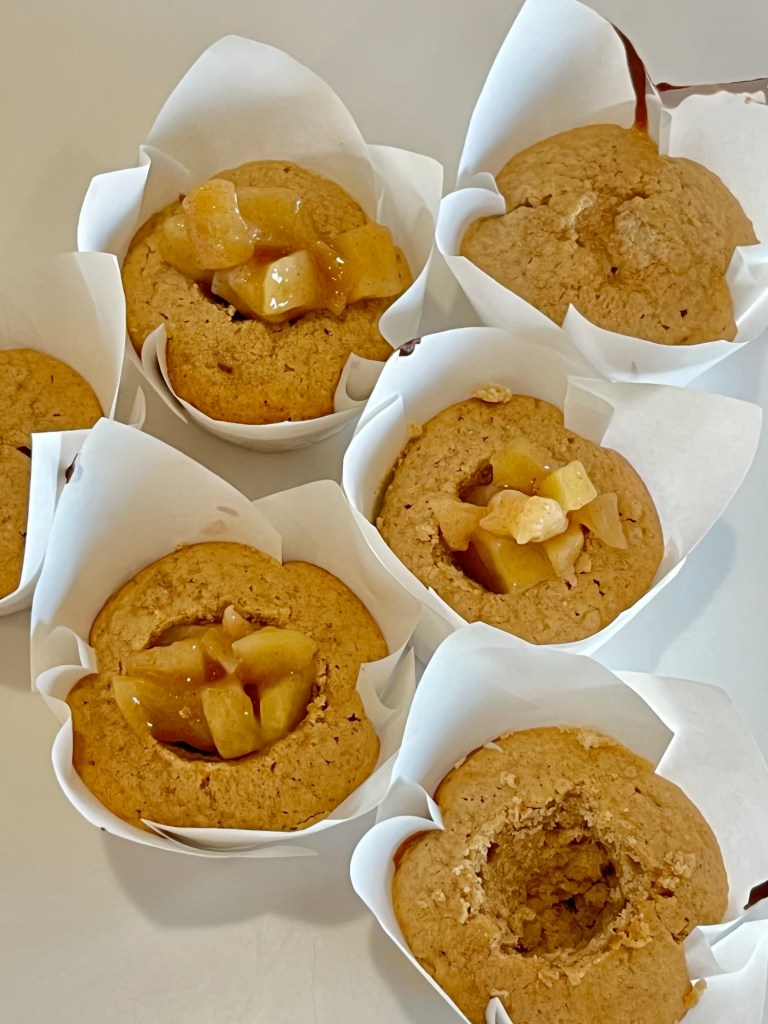
I also made Scottish Oatcakes this morning. I read an article about them, which is all it ever takes for me. The bake resulted in 16 crisp “biscuits” (as cookies are called in the UK.) They be a nice change from all the cookies (but don’t worry, plenty of cookies coming up. I am doing another fund raiser in March and need to practice, practice, practice.)

Artisan Bread with Tangzong

INGREDIENTS

  • 450g (3 ¾ c) bread flour divided (For Italian Bread use AP flour))
  • 2 ¼ teaspoons instant yeast
  • 10g (1 ¾ tsp) kosher salt 
  • 360g (1 ½ c) warm water between 120°F and 130°F (360 grams)

METHOD

  1. In a large mixing bowl, whisk flour, yeast, and salt to combine.  Measure water into a small bowl
  2. Tangzong: Transfer 3 tablespoons of the measured flour and ½ cup of the measured milk or water into a saucepan and set over medium-high heat.
  3. Cook the mixture, whisking constantly until it thickens into a thick slurry (~1 minute.)
  4. Transfer the cooked mixture to a bowl until cool to lukewarm, then add remaining flour, milk (or water), and other dough ingredients combine with a dutch dough which until the mixture is very sticky, and no lumps of flour remain.
    1. Cover and place in a proofing oven until doubled in size, about 1 to 1 ½ hours.
  5. Preheat the oven to 450°F. Place a large dutch oven with a lid in the oven for at least 30 minutes.
  6. Using lightly floured hands, reach down one side of the dough to the bottom of the bowl, pull up, and stretch the edge of the dough over the center toward the opposite side. Turn the bowl 90 degrees and repeat the folding and turning, working in a circle around the dough until the dough starts to hold its shape, about 8 to 10 rotations. Pinch any seams together at the center of the dough ball.
  7. Turn out the dough onto a lightly floured surface, placing it seam side down. Shape into a boule or batard, depending on the intended use. Transfer the dough onto parchment paper lined banneton and sprinkle with flour. Loosely cover with plastic wrap or a tea towel for 10 minutes while the oven heats to 450°F. Place a large dutch oven with a lid in the oven while it preheats.
  8. Using a sharp knife or bread lame, cut a slit about ¼-inch deep across the top of the dough. Very carefully place the dough with the parchment paper directly into the preheated Dutch oven. Cover with the lid.
  9. Bake for 20 minutes. Remove the lid and bake until deeply golden brown and the internal temperature is about 195°F (~15 to 17 minutes more.) Carefully remove the bread from the Dutch oven using the parchment paper to help, and place on a wire rack to cool for at least 20 minutes before slicing


Tangzong

Tangzong pre-gelatinizes the starch in the flour, allowing it to absorb twice as much water than with cool water. Since there’s less free (unabsorbed) water in the dough, it’s less sticky and easier to knead

METHOD

  1. Measure out the total amount of flour and milk specified in the recipe.
  2. Transfer 3 tablespoons of the measured flour and ½ cup of the measured milk or water into a saucepan and set over medium-high heat.
  3. Cook the mixture, whisking constantly until it thickens into a thick slurry (~1 minute.)
  4. Transfer the cooked mixture to a bowl until cool to lukewarm, then add remaining flour, milk (or water), and other dough ingredients and proceed with the original recipe method.

Scottish Oatcakes

INGREDIENTS
• 226g quick-cooking oats (2 ½ c)
• 1 tsp kosher salt
• ¼ tsp baking soda
• 66g (6 Tbl) melted clarified butter
• ¾ c hot water, around 200ºF (93ºC)

METHOD

  1. In a medium bowl, stir oats, salt, and baking soda to combine. Add melted clarified butter or ghee to oat mixture and, using a flexible spatula, toss to evenly coat oats with fat. Add hot water and stir until mixture begins to thicken, 30 – 60 seconds. Let sit until oat mixture has hydrated and is slightly sticky, about 5 minutes.
  2. Using a flexible spatula, scrape oat mixture onto a 18×13” piece of parchment. Top with another 18×13” piece of parchment so oat mixture is sandwiched between and, using a rolling pin, roll oat mixture to ¼ “thick. Grab both ends of the parchment, set onto a 18×13” rimmed baking sheet, and freeze until mixture is firm but pliable, about 30 minutes. Line two 18×13” rimmed baking sheet with parchment; set aside.
  3. While the mixture is chilling adjust oven racks to second-from-top and second-from bottom positions and preheat to 350ºF (175ºC). 350ºF or 325ºF convection
  4. Set a clean piece of parchment on your kitchen counter. Remove oatcake mixture from freezer. Peel off top layer of parchment, then invert oatcake mixture onto prepared sheet of parchment. Using a 3-inch round cookie cutter, cut out 16 oatcakes. (Scraps can be rerolled, frozen, and punched out into additional oatcakes.) Transfer oatcakes to prepared baking sheets, spacing them about 1 inch apart, and bake until crispy and lightly browned, 30 to 35 minutes. Remove from oven and let cool completely before serving or storing.

Clarified Butter

INGREDIENTS
• 230g (2 sticks) unsalted butter, cubed

METHOD

  1. In a small saucepan, melt butter over medium-high heat.
  2. Continue to cook over medium-high heat; an even layer of white milk proteins will float to the surface.
  3. Bring to a boil; the milk proteins will become foamy.
  4. Lower heat to medium and continue to gently boil; the milk proteins will break apart.
  5. As butter gently boils, milk proteins will eventually sink to the bottom of the pot, and the boiling will begin to calm and then cease. Adjust heat as needed to continue boiling off water without scorching milk solids.
  6. Once boiling has stopped, pour butter through a cheesecloth-lined strainer or through a coffee filter into a heatproof container to remove browned milk solids.
  7. Let cool, then transfer to a sealed container and refrigerate until ready to use. Clarified butter should keep at least 6 months in the refrigerator.


Artisan Bread and Shortbread Cookie Bake

On Wednesday this week I spent the morning replenishing our artisan bread supply and making some nibbling cookies. This bread may be the best I make, and QC said the pistachio/cranberry shortbread cookies may be the best of anything I bake.

To mix things up a little this time I shaped the bread as a boule while the previous bread was a batard. The shortbread cookies were the same as the past bake.

Apple Pie Cupcakes with Maple Cream-cheese Buttercream

First of all, thank you to all my friends and family for your suggestions on what substrate to use as a carrier for the maple cream-cheese buttercream I could not resist. (There is a nerdish play on words in that sentence. In semiconductor fabrication, a resist is a thin layer used to transfer a circuit pattern to the semiconductor substrate which it is deposited upon. Sorry. Plus that explanation ends with a preposition, which is acceptable in modern English although it still annoys me.)

Most of the QC Cadre cast their votes within minutes of delivery of their sample and universally they loved them, (I did too!)

I hollowed out a cone from the center of each cupcake so I could fit extra apple pie filling. I piped the buttercream frosting to cover any exposed cupcake and all the filling. I then sprinkled a little allspice to add some color and counter the sweetness of the maple syrup.

Apple Pie Cupcakes with Maple Cream-cheese Buttercream

INGREDIENTS
For the Apple Pie Filling
• 2 apples (prefer granny smith), peeled, cored, and chopped
• 3 Tbsp granulated sugar
• 2 Tbsp water, divided
• 1 Tbsp unsalted butter
• ½ tsp ground cinnamon
• ½ Tbsp cornstarch
For the Cupcakes – makes twelve 78g cupcakes
• 1 ⅔ cups (220g) cake flour
• ½ c (124g) granulated sugar
• ½ c (127g) light brown sugar
• 1 ½ tsp baking powder
• ½ tsp kosher salt
• 1 ½ tsp ground cinnamon
• ½ tsp ground allspice
• ¼ tsp ground nutmeg
• ½ c (1 stick) unsalted butter, melted
• 2 large eggs at room temperature
• 1 tsp pure vanilla extract
• ½ c (114g) whole milk at room temperature
• ½ c (112g) sour cream at room temperature
For the Buttercream
• 250 g (2 ¼ c) butter unsalted
• 62 g (½ c) cream cheese
• 198 g (7oz) sweetened condensed milk
• 107 g (5 ½ Tbl) pure maple syrup

METHOD
For the Apple Pie Filling

  1. Melt butter in a saucepan over medium heat. Stir in apples, sugar, 1 Tbsp water, and cinnamon.
  2. Cover and cook, stirring occasionally, for 4 to 6 minutes or until very slightly softened.
  3. In a small dish combine cornstarch and 1 Tbsp water. Add the mixture to the pan while stirring and continue to cook over medium heat until apples are tender, and mixture has thickened.
  4. Remove from heat, pour into an airtight container, and chill in the refrigerator at least 1 hour before adding to cupcakes.
    For the Cupcakes
  5. Preheat the oven to 350°F. Line a muffin tin with cupcake liners.
  6. Mix together cake flour, sugars, baking powder, salt, cinnamon, allspice, and nutmeg in the bowl of a stand mixer fitted with the paddle attachment.
  7. Beat in butter, whisking until combined. Add eggs, one at a time, beating well after each addition. Beat in vanilla.
  8. Beat in the milk and sour cream, mixing just until the batter is smooth. Scrape down the sides of the bowl and mix for 10 seconds more on medium speed. Divide the batter among muffin cups, filling each 2/3-full (you should get 14 to 15 cupcakes out of this batter).
  9. Bake 15 to 18 minutes or until a toothpick inserted into the center of a cupcake comes out clean.
  10. Cool cupcakes in pans 10 minutes before moving to a cooling rack.
    For the Cream Cheese Buttercream
  11. Start with the butter in a mixing bowl. It should be soft enough to mix but still cool to the touch.
  12. Using a hand or stand mixer, beat the butter for 2-3 minutes until it becomes light and fluffy.
  13. Add the cream cheese to the bowl and continue mixing for another minute until it’s thoroughly combined with the butter.
  14. Add the chilled sweetened condensed milk and mixing for about a minute, ensuring it blends smoothly into the mixture.
  15. Should the mixture start to curdle, simply keep mixing. It will eventually blend into a smooth texture.
  16. Finally, pour in the maple syrup and mix for one more minute to fully incorporate.
  17. Store the buttercream in the refrigerator for up to one week or in the freezer for up to two months. When ready to use, allow it to reach room temperature and mix well to regain smoothness.
    Assembly
  18. Cool cupcakes completely before filling with apple pie filling, then frosting with maple cream-cheese buttercream frosting. Dust with nutmeg or cinnamon or …

Lemonade Scones

Here is another on-line recipe I couldn’t resist. I made several changes and additions to the original, but only to suit my tastes.

Everything in this recipe is fairly simple and straight forward. They are definitely worth making.

Lemonade Scones

https://www.recipetineats.com/lemonade-scones/
(Modified for my preferences)

INGREDIENTS
Scone
• 3 ½ c AP flour, plus extra for dusting
• 2 ½ Tbl baking powder
• 1 tsp salt
• 1 cup heavy cream
• 1 cup lemonade
• zest of 1 lemon
Chantilly Cream
• 1 c cold or whipping cream
• ½ c powdered sugar
• 1 tsp vanilla bean paste
• (Option #1 for stabilized chantilly cream – 1/3 cup mascarpone, fridge cold (40%+fat)
• (Option #2 for stabilized chantilly cream – 1 Tbl per cup of cream)
Raspberry Jam
• Equal weights raspberries and sugar
• Juice and zest of 1 lemon (2 Tbl)

METHOD
Chantilly Cream

  1. At medium high beat the cream, icing sugar, vanilla (plus mascarpone if making stabilized cream). Move the beater around the bowl until the required stiffness is achieved.
  2. Stiffness options – Beat for around 1 ½ minutes if you want soft peaks (kind of dollops) or 2 minutes for stiff peaks (for piping).
  3. Set aside in a piping bag
    Raspberry Jam
  4. Mix berries, lemon and sugar in a suitable sized pan and heat on medium-low until berries start to release their juice.
  5. Strain the mixture to remove the seeds, return to heat.
  6. Heat to 220°F
  7. Set aside to cool. (Better to make the day prior to using)
    Scones
  8. Preheat oven to 390°F. Line tray with baking/parchment paper.
  9. Combine the flour, cream and lemonade in a bowl and mix until flour is mostly combined. Do not over mix, it will make the scones dense! The dough should be soft and sticky.
  10. Turn out onto a floured surface and knead gently just 3 – 5 times to bring dough together, then gently pat into a disc shape 1″ thick.
  11. Use a 2.5″ round cutter to cut rounds – press straight up and down (don’t twist), flour cutter in between.
  12. Use a knife or spatula lift (avoid touching sides) and place on tray, slightly touching each other (they help each other rise).
  13. Brush the tops lightly with milk.
  14. Bake for 15 minutes until golden on top. Place on rack to cool. Place tea towel over them to stop the tops from getting crusty.
  15. Serve with copious amounts of Chantilly cream and jam

Notes

  1. Lemonade – Any brand lemonade works fine, or even 7Up. Just needs to be lemony, fizzy and sweet!
  2. “Thickened cream” is a term typically used in Australia and New Zealand that generally refers to a cream that is simply thicker than regular milk or light cream, but not whipped, often used in sauces or as a pouring cream, while “whipped cream” is when the cream has been beaten to incorporate air bubbles, resulting in a light and fluffy texture; essentially, thickened cream is just a thicker liquid cream, not aerated like whipped cream.
  3. Storage – keeps for 3 days in an airtight container but needs to be reheated to serve. Also freezes well, for up to 3 months.

No-Knead Honey Oat Bread

Well, Sally did it again. I subscribe to the sallysbakingaddiction.com mailing list. Along with its featured content it contains links to other enticing bakes and I found one yesterday. First of all “no-knead” always catches my attention. It requires much less hands on action. “Oat” is a second tick in the box as I bought oats at Costco a couple of weeks ago and have lots and lots and lots to use. And finally, “honey” is my go-to sweetener. Plus, the smallest amount Costco sells is three jars!

This is a 92% hydration bread (360g water::390g flour) so do not expect it to behave like the way a 65% hydration bread will. The dough is so soft the lame (or knife) tears it, rather than cuts. You cannot tension the surface as you can with lower hydration bread, but I found freezing it for 30 minutes before baking then slashing helped.

All that being said, this is a delicious honey oat bread. (I am eating a QC test slice right now.) The hint-o-cinnamon sets it off perfectly. (To confirm the evaluation, I had to have a second slice.)

No-Knead Honey Oat Bread

https://sallysbakingaddiction.com/no-knead-homemade-honey-oat-bread/print/76423/
(Modified for my use.)

INGREDIENTS
• 390g (3 c) bread flour
• 85g (1 c) old-fashioned whole oats
• 1½ tsp Platinum Yeast from Red Star or any instant or active dry yeast
• 1½ tsp salt
• ½ tsp ground cinnamon
• 360g (1 ½ c water, close to room temperature at about 70°F (21°C)
• 128g (6 Tbl) honey
• 25g (30ml or 2 Tbl) vegetable oil (or other neutral tasting oil)

METHOD

  1. The evening before baking: In a large ungreased bowl, whisk 3 cups (390g) bread flour, the oats, yeast, salt, and cinnamon together. Set aside. In a medium bowl or large liquid measuring cup, whisk the water, honey, and oil together. Pour water mixture into flour mixture and gently stir together with a dutch dough whisk, silicone spatula or wooden spoon to combine. Dough will be heavy and very wet/sticky. Do not overwork dough.
  2. 1st rise: Cover the dough tightly with plastic wrap or aluminum foil and set on the counter at room temperature for 12-18 hours. (See note if you need to extend this time.) You want it to almost double in size during this time.
  3. Gently shape: Turn the dough out onto a lightly floured work surface and, using lightly floured hands, shape into a ball as best you can. Transfer dough to a large piece of parchment paper. Lift the parchment paper and dough up and place it all into a banneton (oval or round depending on the shape of your dutch oven.) Using a very sharp knife or bread lame, gently score an X into the top. Cover dough lightly with plastic wrap and leave alone for 30 minutes. (The dough is very slack, typical of a 90+% hydration bread. To firm the surface of the dough I put it, still in the banneton, into the freezer for 30 minutes, then slashed it.
  4. Bake: Heat the oven, with dutch oven and lid inside, to 425°F (218°C) for 30 minutes. After 30 minutes place the dough inside the dutch oven by lifting it up with the parchment paper and sticking it all–the parchment paper included–inside the pot.
  5. Cover with the lid. Bake for 30 minutes with the lid on. Carefully remove the lid and continue baking for 10-12 more minutes or until the bread is golden brown. The bread is done when an instant read thermometer reads the center of the loaf as 195°F (90°C).
  6. Remove dutch oven from the oven, carefully remove the bread, and allow to cool on the counter for 30 minutes before breaking/slicing/serving.
  7. Cover leftover bread and store at room temperature for up to 3 days or in the refrigerator for up to 10 days.

NOTES

  1. Make Ahead Instructions: This recipe is wonderful for making ahead because the 1st rise time (step 2) is so long. If needed, you can extend the 1st rise time by letting the dough rest in the refrigerator instead of at room temperature for up to 18 hours. Then, after refrigerating, let the dough sit at room temperature to warm and rise, about 4-6 hours. You want it to mostly double in size during this time. Do not extend these times further because the dough may begin to deflate.
  2. Freezing Instructions: Prepare recipe through step 4 and feel free to use a disposable loaf pan since it will be going into the freezer. Cover loaf tightly and freeze for up to 3 months. On the day you serve it, let the loaf thaw and rise for about 5 hours at room temperature. Bake as directed. You can also freeze the baked bread loaf. Allow the bread to cool completely and then freeze for up to 3 months. Thaw in the refrigerator or at room temperature and reheat if/as desired.
  3. If You Want to Top with Oats or Cinnamon-Sugar: If you want to top the dough with oats prior to baking, carefully brush the dough after the 2nd rise (step 5) with 1 egg white beaten with 1 Tbsp water, and then sprinkle 2 Tbsp of oats on top. (The oats do not stick without the egg white and the bread will no longer be egg-free by doing this.) You can skip the egg white/oats and sprinkle cinnamon-sugar on top instead. Combine 1 Tablespoon granulated sugar and 1/8 teaspoon cinnamon. Sprinkle on top of the loaf right before baking.

Whole Wheat Bread – Sally

Sally, owner and author of Sallysbakingaddiction.com, writes her blog to teach newbies and help oldies with their baking. I usually modify her recipes for my own personal, selfish use. For more details and tips and tricks refer to Sally and not me.

This is a beautiful bread with chewy crust and soft tender interior. I did use 50:50 whole wheat and bread flours in the sponge.

Whole Wheat Bread – Sally

INGREDIENTS
Sponge
• 1 cup (240ml) water, warmed to about 110°F (43°C)
• ⅓ cup (80ml) whole milk, warmed to about 110°F (43°C)
• 2 ¼ teaspoons (7g) active dry or instant yeast
• 2 cups (260g) whole wheat flour
• Optional: 130g (1 c) whole wheat flour and 130g (1 c) bread flour
Dough
• 3 Tablespoons (63g) honey
• 3 Tablespoons (43g) RT unsalted butter,
• 1 teaspoon fresh lemon juice (or apple cider vinegar)
• 1 ⅓ cups (173g) whole wheat flour (plus more as needed
• 1 and 1/4 teaspoons salt
• optional oat topping: 1 beaten egg white + 1 Tablespoon whole oats

METHOD

  1. Prepare the sponge: In a large bowl or the bowl of your stand mixer, whisk the water, whole milk, and yeast together. Add the 2 cups (260g) flour and stir with a spatula or wooden spoon until a thick batter forms. Cover lightly and allow to double in size at room temperature, about 60–90 minutes. Sometimes this can take up to 2 hours.
  2. Add the remaining dough ingredients including the honey, butter, lemon juice, remaining flour, and the salt. With a dough hook attachment or using a spatula or wooden spoon (and some arm muscle!), beat on medium speed/mix until the dough comes together and pulls away from the sides of the bowl, about 3 minutes. If the dough seems too wet to a point where kneading (next step) would be impossible, beat in more flour 1 Tablespoon at a time until you have a workable dough. Dough should be soft and a little sticky, but still manageable to knead with lightly floured hands. It took 4 Tbl added a minute or so apart for the dough to clear the sides of the mixer bowl and knead properly.
  3. Knead the dough: Keep the dough in the mixer and beat for an additional 8–10 full minutes or knead by hand on a lightly floured surface for 8–10 full minutes. If the dough becomes too sticky during the kneading process, add 1 more Tablespoon of flour at a time to make a soft, slightly tacky dough. Do not add more flour than you need; you do not want a dry dough. After kneading, the dough should still feel a little soft. Poke it with your finger—if it slowly bounces back, your dough is ready to rise and/or do a “windowpane test” to see if your dough was adequately kneaded.
  4. 1st rise: Lightly grease a large bowl with oil or nonstick spray. Place the dough in the bowl, turning it to coat all sides in the oil. Cover the bowl and allow the dough to rise in a proofing oven or other warm environment for 1.5–2 hours or until about double in size.
  5. Grease a 9×5-inch loaf pan.
  6. Shape the dough: When the dough is ready, punch it down to release the air. Lightly flour a work surface, your hands, and a rolling pin. Roll the dough out into a large rectangle, about 8×15 inches. It does not have to be perfect—in fact, it will probably be rounded on the edges. That’s ok! Roll it into an 8-inch log and place in the prepared loaf pan, seam side down.
  7. 2nd rise: Cover shaped loaf. Allow to rise until it’s about 1 inch above the top of the loaf pan, about 45–60 minutes.
  8. Adjust oven rack to a lower position and preheat oven to 350°F (177°C). It’s best to bake the bread towards the bottom of the oven so the top doesn’t burn.
  9. Optional oat topping: If you want to add the optional oat topping, add it right before baking the bread. With a pastry brush, brush the risen loaf with egg white, then sprinkle the oats on top.
  10. Bake the bread: Bake for 36–40 minutes, or until golden brown on top. If you notice the top browning too quickly, loosely tent the pan with aluminum foil. (I usually add it around the 20-minute mark.) To test for doneness, if you gently tap on the loaf, it should sound hollow and the center of the loaf is 195–200°F (90–93°C). Remove from the oven and allow bread to cool for a few minutes in the pan on a cooling rack before removing the bread from the pan and slicing. Feel free to let it cool completely before slicing, too.
  11. Cover leftover bread tightly and store at room temperature for up to 1 week.

Notes

  1. Freezing Instructions: Prepare recipe through step 6. Place shaped loaf in a greased 9×5-inch loaf pan or disposable loaf pan, cover tightly, and freeze for up to 3 months. On the day you serve it, let the loaf thaw and rise for about 4–5 hours at room temperature. Bake as directed. You can also freeze the baked bread loaf. Allow the bread to cool completely, then freeze for up to 3 months. Thaw in the refrigerator or at room temperature, then reheat as desired.
  2. Overnight Instructions: Prepare the recipe through step 6. Cover the shaped loaf tightly and refrigerate for up to about 15 hours. At least 3 hours before you need the bread the next day, remove from the refrigerator, keep covered, and allow to rise on the counter for about 1–2 hours before baking. Alternatively, you can let the dough have its 1st rise in the refrigerator overnight. Prepare the dough through step 3, then cover the dough tightly and place in the refrigerator for up to 12 hours. Remove from the refrigerator and allow the dough to fully rise for 2 more hours. Continue with step

    Sally’s Baking Addiction – Ciabatta – Jan 2025

    I just typed the year for the first time and got it right!

    Sally set this month’s challenge as ciabatta bread. Her recipe is based on KAB’s, but with a few minor changes that makes the method easier but remains fantastic. In the past I used KAB’s recipe and method but I am now a Sally convert. (As I am with so many other fantastic bakes.)

    There are a lot of steps in this bake, making it intermediate level difficulty . Follow Sally’s directions (which I modified very, very slightly) and you too can enjoy this amazing bread.

    Good with or without butter, with or without oil and vinegar. I know, I tried it both ways.

    Homemade Ciabatta Bread -Sally


    INGREDIENTS
    Biga/Preferment
    • 130g (1 c) bread flour
    • 1/8 tsp active-dry or instant yeast
    • 120g/ml (½ c) room-temperature water (about 70°F)
    Ciabatta Rolls
    • 3g (1 tsp) active-dry or instant yeast
    • 240g (1 c) warm water (about 100–110°F)
    • 325 (2 ½ c) bread flour, plus more as needed
    • 8g (1 ½ tsp) table salt
    • olive oil, as needed for coating hands and spatula

    METHOD
    Day 1: Make the biga/preferment:

    1. In a large mixing bowl, whisk together the bread flour and yeast.
    2. Add the water and mix with a silicone spatula until combined.
    3. Cover the bowl tightly with plastic wrap and let rest at room temperature for 8–24 hours.
      Day 2: Make the dough:
    4. Uncover the bowl with the biga. In a separate large mixing bowl whisk together the yeast and warm water.
    5. Cover and let sit for 5 to 10 minutes until the yeast has dissolved.
    6. Add the biga, flour, and salt. Gently mix together with a silicone spatula or Dutch bread whisk. The dough will seem dry and shaggy at first but keep working it until all the flour is moistened and the dough is uniform in texture (no dry pockets). If needed, lightly grease your hands with olive oil and gently knead the ingredients together in the bowl. The dough will be wet and sticky; that’s normal, expected, and encouraged.
    7. 1st rest: Cover the bowl and let the dough rest for 30 minutes at room temperature.
    8. 1st stretch-and-fold: Visualize a clock on top of your dough. You’ll be folding it at the 12 o’clock mark. With an olive oil-greased spatula or lightly oiled hands, lift up the dough at 12 o’clock and gently stretch it up and pull it toward the opposite side of the bowl (6 o’clock), folding it down over the dough. Turn the bowl 90 degrees and repeat. Do this until you’ve gone around the bowl twice, for a total of 8 folds. Cover the bowl and let rest for 30 minutes at room temperature.
    9. Remaining stretch-and-folds: Repeat step 8 three more times, allowing the dough to rest for 30 minutes between each. Use a coil fold for the 4th stretch-and-fold then cover the bowl and place it in the refrigerator for at least 1 hour and up to 24 hours.
    10. Shape the rolls/bread: Very generously flour your counter or work surface. Using lightly oiled hands or a lightly oiled spatula, gently scrape the dough out of the bowl and onto the floured surface. Generously sprinkle flour on top of the dough. Using floured hands, gently stretch and shape the dough into a rough rectangle shape, about 10×7 inches in size.
      a. For 8 rolls: With a floured bench scraper, cut the dough into 8 pieces each around 2.5×3.5 inches.
      b. For 2 loaves: With a floured bench scraper, cut the dough in half to make two 5×7-inch (or 10×3.5-inch) rectangles.
    11. Lightly flour a piece of parchment paper. With floured hands, and using the floured bench scraper to help, lift the sticky dough pieces up and transfer them to the floured parchment, arranging them at least 2 inches apart to make room for expanding. Take care to be extra gentle because you don’t want to deflate the dough. If the pieces of dough lost shape during the transfer, gently reshape into rectangles.
    12. Proof Before Baking: Lightly sprinkle flour over the rolls, and then gently cover them with a clean kitchen towel or piece of parchment paper. Let rest at room temperature for 1 hour.
    13. Meanwhile, position one oven rack in the very bottom position and another rack in the center/middle position. Place a flat cookie sheet or a rimmed baking sheet on the center rack. Preheat the oven to 450°F (232°C). You want your oven and baking surface to be heating for about an hour before the bread goes in.
    14. When ready to bake, scatter several cups of ice cubes in a large shallow metal roasting pan, cast-iron skillet, or rimmed baking sheet (do not use glass). Uncover the rolls and lightly spray or flick them with a little water. (This is optional, but it helps create even more steam, which promises a crispier crust.) Working quickly, carefully remove the preheated baking sheet from the oven and slide the parchment paper and proofed bread onto it. Place back in the oven. Slide the pan with the ice cubes onto the bottom oven rack and quickly close the oven door, trapping the steam from the melting ice inside.
    15. Bake for 20–22 minutes, or until the bread/rolls are golden brown. I usually extend this time to 25 minutes, for a deeper golden color. Gently tap the bread—if they sound hollow, they’re done. For a more accurate test of doneness, the bread is done when an instant-read thermometer inserted in the bread reads 205°F (96°C) to 210°F (99°C).
    16. Remove the rolls from the oven and allow to cool for at least 45 minutes before slicing and serving. If you cut into the bread too early, it will likely have a gummy texture.
    17. Store leftovers loosely covered at room temperature for up to 5 days or in the refrigerator for up to 1 week.

      Notes
    18. Make Ahead & Freezing Instructions: There are many ways to make this dough ahead of time. First, in step 1, the biga can sit for up to 24 hours. Second, in step 5, after you have completed all of the stretch-and-folds, the dough can sit in the refrigerator for up to 24 hours. You can also bake the bread, allow it to cool, and freeze for up to 3 months. Thaw at room temperature before serving.
    19. Flour: For absolute best flavor and chewy texture, I strongly recommend using bread flour. You can use a 1:1 substitution of all-purpose flour in a pinch with no other changes to the recipe, however the dough may not be as strong, and may not hold shape very well. Do not use whole-wheat flour in this dough.
    20. Yeast: You can use instant or active dry yeast, but I highly recommend an instant (aka “rapid rise” or “quick rise” yeast). If using active dry yeast, there are no changes needed to the recipe.
    21. Adding Herbs/Flavors: Fresh or dried herbs are best for flavoring this dough. My favorite is fresh or dried rosemary with a little garlic. When adding the salt in step 2, add 2 and 1/2 teaspoons fresh chopped rosemary or 1 teaspoon dried, plus 2 minced garlic cloves. Feel free to replace the rosemary with another herb, and/or leave out the garlic.
    22. Can I Bake on a Pizza Stone? Yes. If you want to bake your bread/rolls on a pizza stone, place the pizza stone in the preheating oven for 1 hour. In step 10, place the shaped and scored dough on your preheated pizza stone. Bake as directed.
    23. Can I Use This Dough for Focaccia? Yes. Generously grease a 9×13-inch baking pan with olive oil. After completing step 5, pour the dough into the greased pan. Flip to coat all sides in the oil. Stretch and flatten the dough to fit the pan, being careful to avoid tearing the dough. If it’s shrinking back as you try to stretch it out, cover with a clean towel and let it rest for 5–10 minutes before continuing. This lets the gluten settle and it’s much easier to shape after that. Continue with step 7 in my focaccia recipe.