Artisan Italian Bread

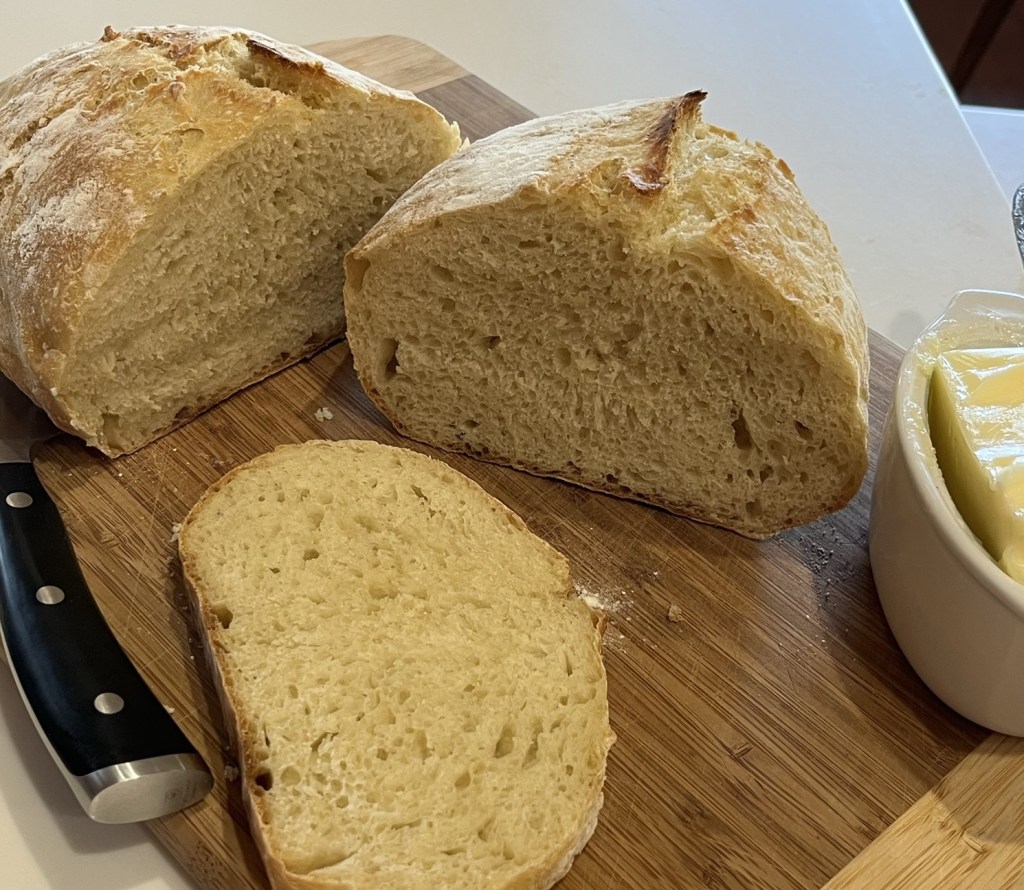
This is my basic Artisan Bread recipe from PreppyKitchen with modifications to make it Italian Bread. This bread substitutes AP flour for the bread flour, reducing the protein and gluten resulting in a softer, finer, more delicate crumb. Rather than using a dutch oven, it is baked on a stone with boiling water added to a pan in the oven to provide steam.

The final product is a soft, flavorful crumb with a nice crackling crust.

Artisan Bread

INGREDIENTS
• 450g (3¾ c) bread flour divided (For Italian Bread use AP flour))
• 2 ¼ teaspoons instant yeast
• 10g (1¾ tsp) kosher salt
• 360g (1½ c) warm water between 120°F and 130°F (360 grams)

As an alternate add 2 tsp sugar, mix the water, yeast and sugar in a bowl and let set 10 minutes. Thoroughly mix in the flour and salt, cover with a towel and let sit for ~1 hour until doubled in size. Bowl fold as in step #4 below. Shape the dough, place into a greased loaf pan, slash the top, and let rise an additional 30 min. Bake 30-35 minutes at 375°F until the top is a golden brown or internal temperature is 190°F.
METHOD

  1. In a large mixing bowl, add flour, yeast, and salt, stirring with a dutch dough whisk to combine. Stir in water until the mixture is very sticky, and no lumps of flour remain.
    a. Cover and place in a warm, draft-free area until doubled in size, about 1½ to 2 hours.
    b. Alternatively, for an overnight rise: After mixing the dough, cover and refrigerate until doubled in size. This will take about 8 hours but will keep in the fridge up to 24 hours total.
  2. Preheat the oven to 450°F. Place a large dutch oven with a lid in the oven for at least 30 minutes.
  3. If refrigerated, remove the dough from the refrigerator and let rest at room temperature for 30 minutes.
  4. Using wet hands, reach down one side of the dough to the bottom of the bowl, pull up, and stretch the edge of the dough over the center toward the opposite side. Turn the bowl 90 degrees and repeat the folding and turning, working in a circle around the dough until the dough starts to hold its shape, about 8 to 10 rotations. Pinch any seams together at the center of the dough ball.
  5. Turn out the dough onto a lightly floured surface, placing it seam side down. Shape into a boule or batard, depending on the intended use. Transfer the dough onto parchment paper lined banneton and sprinkle it with flour. (Alternatively, divide dough in half and form each into a small batard, place in a parchment paper line French bread form) Loosely cover with plastic wrap or a tea towel for 10 minutes while the oven heats to 450°F. Place a large dutch oven with a lid in the oven while it preheats.
  6. Using a sharp knife or bread lame, cut a slit about ¼-inch deep across the top of the dough. Very carefully place the dough with the parchment paper directly into the preheated Dutch oven. Cover with the lid.
  7. Bake for 15 minutes. (If making 2 smaller loaves shaped in french bread forms, slide the loaves from the bread form directly only the baking stone and bake for ~20-25 minutes, on an oven rack positioned in the upper third of the oven then check internal temperature.) Remove the lid and bake until deeply golden brown and the internal temperature is about 195°F (~11 to 12 minutes more.) Carefully remove the bread from the Dutch oven using the parchment paper to help, and place on a wire rack to cool for at least 20 minutes before slicing

Quick Artisan Rolls

I saw this recipe on YouTube while listening to my favorite podcaster Sean Carroll, Homewood Professor of Natural Philosophy at Johns Hopkins, and theoretical physicist and cosmologist, which has nothing to do with this post!

This bread is lower hydration than I usually bake, but the video looked so good I couldn’t resist. The percent bread hydration determines the gluten development, higher hydration equals more gluten development which yields more open and airy crumb structure in the final product. My pain de cristal is 100% hydration (equal parts water and flour,) while my standard artisan bread is 80% (360g water divided by 450g flour) and this bread is 69%.

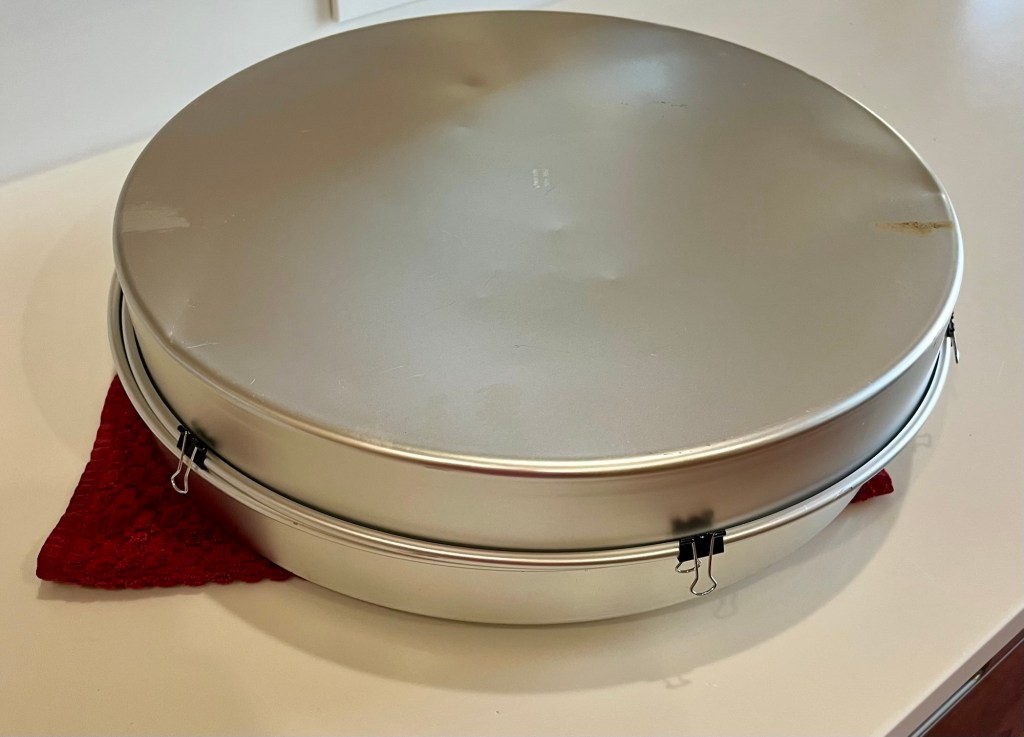
This recipe called for a large, lidded baking pan, which I don’t own. (I know thats hard to believe there is some baking equipment I don’t have.) I do have two 16” round cake pans and used one for the bottom and one for the top. I attached binder clips around the perimeter of the upper pan and used the clips to center and hold it in place on the lower. (I am quite proud of my Yankee ingenuity.)

These rolls, while delicious with a wonderful crunchy crust were a bit small for a hearty sandwich. I will probably scale the recipe up by 50% rather than only make 3 per bake. They are too good to only have 6 small rolls.

Quick Artisan Rolls

INGREDIENTS
• 220g (1c) water
• 2g (½ tsp) instant dry yeast
• 320g (2 ½ c) bread flour
• 6g ( 1 tsp) salt

METHOD

  1. Mix water and yeast, let rest 5 min.
  2. Add flour and salt and mix until there’s no more dry flour
  3. Cover and let rest for 30 minutes
  4. With a wet hand do 4 bowl folds then lift and slap the dough back into the bowl 6 times
  5. Cover and let rest for 30 minutes
  6. Repeat the bowl folds and lift and slaps
  7. Repeat the bowl folds but perform a gentler lift and slap. The dough is now much more elastic and smooth.
  8. Let the dough rise about 2 hours until it has doubled in size.
  9. Dust work surface and surface of the dough, (especially the perimeter) with flour
  10. Gently transfer the dough onto the floured work surface and fold it into a log then divide in 6 equal parts
  11. Brush off any excess flour, gently flatten and fold it tightly into a ball
  12. Pinch to seal then roll against work surface with cupped fingers to tighten the surface of the dough
  13. Let the balls rest for 10 minutes uncovered
  14. Roll the dough into a longer shape with your palm
  15. Place it on the baking pan
  16. Lightly sprinkle flour over the bread
  17. Smooth the flour with your hand
  18. Score the bread with a sharp blade or knife
  19. Sprinkle a little water around the bread to make steam
  20. Cover with another tray of the same size
  21. Bake at 430°F (220°C) for 20 minutes
  22. Remove the top tray
  23. Bake for 10 more minutes until the tops are a nice light brown and the internal temp is 195 F.

Lemon Blueberry Babka

Well, it’s the first of the month and Sally, of Sally’s Baking Addiction, posted her challenge for June. Below is her recipe slightly modified to suit my recipe format (i.e. weights are first and volume second and abbreviations as I like. I figure the recipe is for me to use, so why not?)

Sally’s pictures were much better than mine, but then, I bet she has made this before. Nice separate lemon and blueberry flavors.

Lemon Blueberry Babka


https://sallysbakingaddiction.com/lemon-blueberry-babka/

INGREDIENTS

Dough
• 160g ( 2/3 c) whole milk, warmed to about 110°F (43°C)
• 7g (2 ¼ tsp) yeast
• 75g (6 Tbl) granulated sugar, divided
• 71g (5 Tbl) RT unsalted butter, sliced into 1 Tbsp-size
• 1 tsp lemon zest
• 1 large RT egg
• 1 tsp pure vanilla extract
• 1/2 teaspoon salt
• 358g (2 ¾ c) bread flour or AP flour, plus more as needed
Blueberry Filling
• 170-180g ( ¼ c) fresh blueberries (do NOT use frozen)
• 75g 6 Tbl) granulated sugar
• 1 tsp lemon juice
• Crumble Topping
• 24g (3 Tbl) bread flour or all-purpose flour
• 38g (3 Tbl) packed light or dark brown sugar
• 28g (2 Tbl) unsalted butter, cold and cubed
Brush on Assembled Loaf
• 1 egg white, beaten
Lemon Icing (Optional)
• 120g (1 c) confectioners’ sugar
• 1 ½ Tbl fresh lemon juice
• 1 Tbl whole milk, heavy cream, or half-and-half

METHOD

  1. Whisk the warm milk, yeast, and 1 Tablespoon of sugar together in the bowl of your stand mixer fitted with a dough hook or paddle attachment. Cover and allow to sit for 5 minutes, until foamy and frothy on top. If you don’t have a stand mixer, mix the dough by hand using a silicone spatula or wooden spoon.
  2. Add the remaining sugar, butter, lemon zest, egg, vanilla, salt, and 1 cup (130g) of bread flour. Beat on low speed for 30 seconds, scrape down the sides of the bowl with a silicone spatula, then add another 1 cup of flour. Beat on medium speed until relatively incorporated (there may still be chunks of butter). Scrape down the sides of the bowl with a silicone spatula. Add 1/2 cup of flour and beat on medium speed until the dough begins to come together. As the mixer runs, add another 2–4 Tablespoons of flour (up to 2 and 3/4 cups total) depending on how wet the dough looks. This should be a very soft and almost creamy-feeling dough. Do not add more flour than you need.
  3. Keep the dough in the mixer (and switch to the dough hook if using the paddle) and beat for an additional 6–8 full minutes. If the dough becomes too sticky during the kneading process, sprinkle 1 teaspoon of flour at a time on the dough or on the work surface/in the bowl to make a soft, slightly tacky dough. Do not add more flour than you need because you do not want a dry dough. After kneading, the dough should still feel a little soft. Poke it with your finger—if it slowly bounces back, your dough is ready to rise.
  4. 1st rise: Lightly grease a large bowl with nonstick spray or butter. Place the dough in the bowl, turning it to coat all sides. Cover the bowl tightly and allow the dough to rise in a relatively warm environment until nearly double in size, about 3–4 hours.
  5. While the dough is rising, make the blueberry filling: Combine blueberries, sugar, and lemon juice together in a small saucepan with tall sides over medium heat. Stir constantly with a wooden spoon or silicone spatula, pressing the blueberries against the sides of the pan (stand back in case they splatter!). Once the blueberries are mostly smashed and the sugar has dissolved, stop stirring and allow to come to a boil. Boil, stirring occasionally, until the mixture is slightly reduced, about 10 minutes. (If you have a candy or instant-read thermometer, the mixture should reach about 215–220°F.) You should have about 1/2 cup (around 160g). Remove from heat and allow to cool completely. The filling will thicken as it cools. You can transfer it to a shallow heat-safe dish and place it in the refrigerator to cool down quicker. Set aside.
  6. Grease a 9×5-inch loaf pan with nonstick spray or butter.
  7. When the dough is ready, punch it down to release the air. Flour a work surface, your hands, and a rolling pin. Roll the dough out to a 9×15-inch rectangle. Note: Should it run over the sides of the dough, the blueberry filling can stain a work surface. If needed, transfer the rolled-out dough to a piece of parchment paper or silicone baking mat. Gently spread the blueberry filling mixture on top, leaving a 1/2-inch border uncovered. Using floured hands, tightly roll up the dough to form a 15-inch-long log. Place the log on its seam. Fold in half, then twist it to form a figure 8. Pinch the ends together. Place in the prepared loaf pan.
  8. Loosely cover shaped babka. Allow to rise until it’s puffy and nearly reaches the top of the loaf pan, at least 1–1.5 hours.
  9. Make the crumble topping: Mix the brown sugar and flour together in a small bowl. Add the cold butter and, using a pastry cutter, fork, or your fingers, cut the butter into the brown sugar mixture until pea-size crumbles form. Refrigerate or freeze until ready to use. (Cold crumbles are best!)
  10. Preheat oven to 350°F (177°C).
  11. Brush the surface of the babka with egg white. Using a toothpick, poke 10–12 holes all over the top of the loaf; this helps prevent an air bubble gap in the interior layers. Sprinkle with crumble topping.
  12. Bake: Bake for 50 minutes or until golden brown on top. The surface of the bread browns quickly, so I recommend loosely tenting the pan with aluminum foil around the 30-minute mark. To ensure the bread is done at 50 minutes, give the warm bread a light tap. If it sounds hollow, it’s done. For a more accurate test, the bread is done when an instant-read thermometer reads the center of the loaf as 195°F (90°C).
  13. Remove from the oven and allow bread to cool in the pan for at least 30 minutes before icing, or slicing and serving. A serrated knife is best for slicing.
  14. In a medium bowl or liquid measuring cup, whisk together confectioners’ sugar, lemon juice, and milk. Drizzle over the babka.
  15. Cover leftover babka tightly and store at room temperature for 2 days or in the refrigerator for up to 1 week.
    Notes
  16. Freezing Instructions: Baked babka (without icing) freezes wonderfully. Wrap the cooled loaf in plastic wrap, then a layer of aluminum foil. Freeze for up to 3 months. Thaw wrapped loaf overnight in the refrigerator or at room temperature, then unwrap and warm to your liking. You can also freeze the dough. After punching down the dough in step 7, wrap the dough tightly in plastic wrap, then a layer of aluminum foil. Freeze for up to 3 months. Thaw overnight in the refrigerator, then punch the dough down again to release any air bubbles. Continue with the rest of step 7.
  17. Make-Ahead Instructions: Prepare the dough through step 3. Place into a greased bowl (use nonstick spray to grease). Cover tightly and place in the refrigerator for up to 24 hours. Remove from the refrigerator and allow the dough to come to room temperature, then let it rise until doubled in size, about 3 hours. Continue with step 6. You can prepare the blueberry filling and crumble topping ahead of time as well. Let the filling cool completely, then store in an airtight container in the refrigerator for up to 1 week. Refrigerate or freeze the topping for up to 1 week.
  18. Special Tools (affiliate links): Stand Mixer or Large Glass Mixing Bowl | Citrus Zester | Citrus Juicer | Silicone Spatula or Wooden Spoon | 9×5-inch Loaf Pan | Rolling Pin | Pastry Cutter | Pastry Brush
  19. Yeast: Platinum Yeast from Red Star is an instant yeast. Any instant yeast works. You can use a 1:1 substitution of active dry yeast instead with no changes to the recipe. Rise times will be slightly longer if using active dry yeast. Reference my Baking with Yeast Guide for answers to common yeast FAQs.
    Find it online:

Dutch Crunch Bread

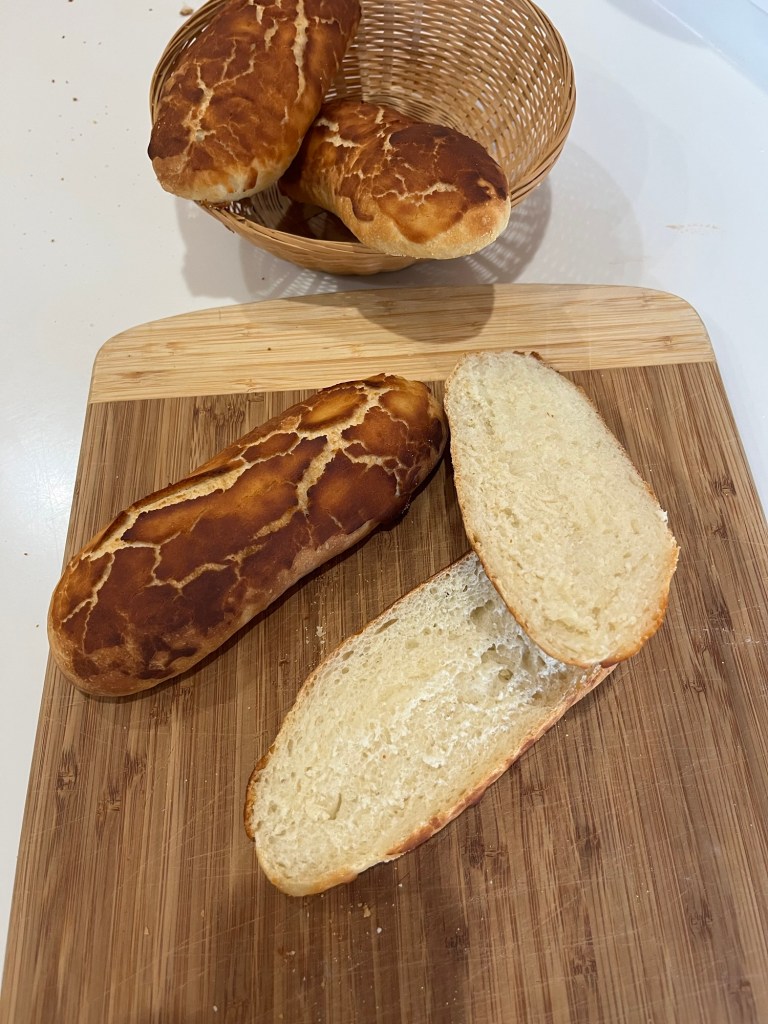
I never heard of Dutch Crunch Bread before our son, Dan asked me about it. Frances, our D.I.L., brought him a sandwich from San Francisco, made with this bread, one of his favorites.

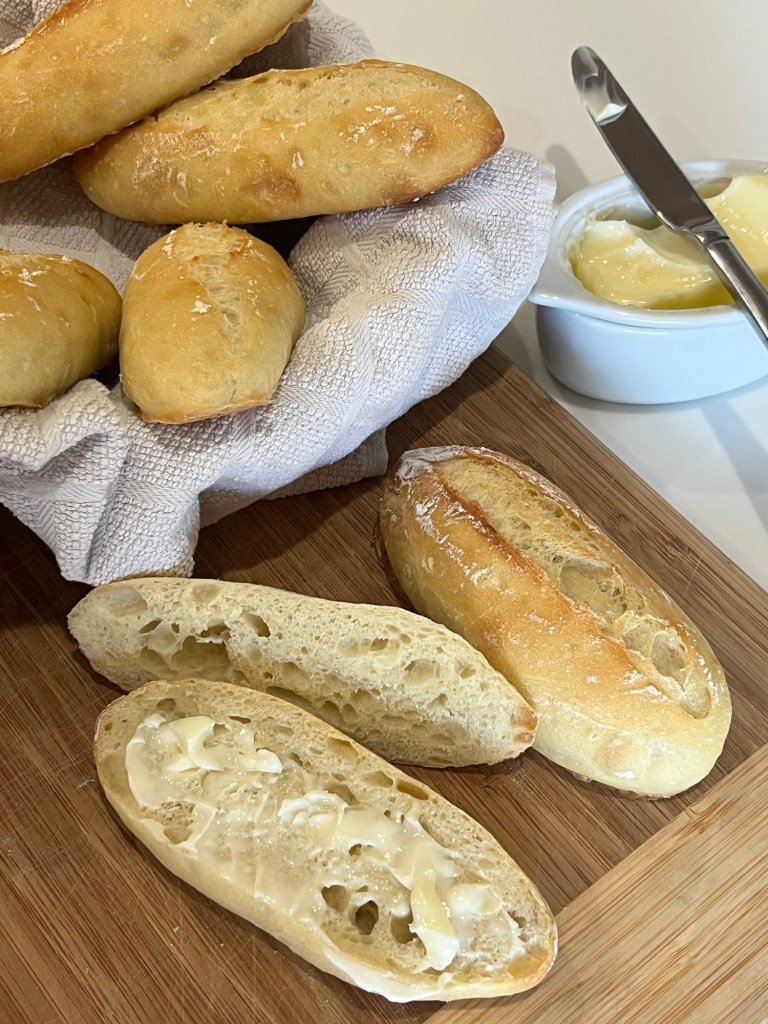
I checked the internet (of course) and was pleased to see King Arthur Baking had both a recipe and video. I made it the same morning and was overjoyed at the result. A great crunch from the topping and a soft chewy crumb from the basic dough.

I made a nice roast beef sandwich for that day’s lunch and froze 3 rolls to make toast a couple or days later. Let the rolls warm to room temperature, then slice lengthwise I toasted it for breakfast.

Definitely a keeper!

Dutch Crunch Bread

INGREDIENTS
Dough
• 503g (4 c plus 3 Tbl) King Arthur Unbleached Bread Flour
• 331g (1 1/3 c plus 2 Tbl ) water*
• 15g(1 Tbl plus ½ tsp) granulated sugar
• 2 Tbl (28g) butter or 2 Tbl (25g) vegetable oil
• 9g (1 Tbl) instant yeast
• 12g (2 tsp) table salt
*For cooler months (air and flour temperature around 65°F), use 85°F to 95°F water. In warmer months (air and flour temperature around 75°F), use 65°F to 75°F water.

Baking
• yellow cornmeal or King Arthur Semolina Flour, for dusting

Topping
• 113g (1/2 c) water, lukewarm
• 9g (1 Tbl) instant yeast
• 12g (1 Tbl) granulated sugar
• 1 Tbl (12g) vegetable oil
• 6g (1 tsp) table salt
• 107g (3/4 c) white rice flour

METHOD

  1. To make the dough: Weigh your flour; or measure it by gently spooning it into a cup, then sweeping off any excess. In a large bowl, mix all the dough ingredients together until thoroughly combined and homogeneous. Knead briefly with a wet hand in the bowl, 1 minute or so. 

  2. Scrape down the sides of the bowl, then perform a bowl fold: Use a wet hand to grab a section of dough from one side, lift it up, then press it down into the middle. Give the bowl a quarter-turn (90°) and repeat 3 to 6 times, until you’ve circled the dough and it’s become resistant to stretching. (The dough will be rough at this stage.) Turn the dough seam-side down in the bowl. The dough temperature should be between 74°F and 78°F. Cover the bowl and let it rest at room temperature for 15 minutes. 

  3. Knead the dough in the container or on a work surface to form a cohesive, smooth mass, 2 to 3 minutes. Turn the dough seam-side down in the bowl and allow it to rise at room temperature until it feels marshmallow-y and light, 45 to 90 minutes.
  4. While the dough is still in the bowl, lightly sprinkle it with flour. Use a bowl scraper to release the sides of the dough so that it can come out of the bowl without pulling or tearing. Invert the dough onto a lightly floured work surface. Lightly flour the top, then divide it into 8 pieces (about 113g each). For larger hoagies, divide the dough into 4 pieces (about 226g each). 

  5. To preshape the dough: Use lightly floured hands to pat each piece of dough into a rough square. Fold the left and right sides in to meet in the middle, then press to gently seal. Starting at the top, fold the rectangle towards yourself in 3 motions, pressing gently after each fold, to create a 5″ cylinder with the seam-side down. The entire time you work, apply flour as needed to make sure the dough is moving easily on the work surface. Cover and repeat with the remaining pieces of dough. Let the preshaped dough rest for 5 to 10 minutes.
  6. Line 2 baking sheets with parchment and sprinkle lightly with cornmeal or semolina.
  7. To shape the rolls: Starting with the first piece of dough you preshaped, flip it over so the seam is up. Pat it into a rectangle with the long side facing you. Fold the top long edge into the middle, then fold the bottom edge into the center to meet it. Fold the top of the dough down to the bottom edge and press to seal with the heel of your hand. Roll the log against the surface to make an even tube about 7 1/2″ to 8″ long. Repeat with the remaining dough, placing the shaped rolls on the prepared baking sheets, spacing them evenly.
  8. Loosely cover the baking sheets and set aside to rise for 30 minutes. While the rolls rise, make the crunch topping.
  9. To prepare the crunch topping: In a small bowl, stir together the topping ingredients until homogenous. Set aside until the dough completes the 30-minute rise; no need to cover it. Before use, stir to deflate and check the consistency: It should be thick but not tight, somewhere between pudding and ketchup. Adjust with additional water or rice flour as necessary. 

  10. To apply the crunch topping: Portion 1 tablespoon of the crunch topping onto the center of the rolls. (If making the large hoagie-sized rolls, use 2 tablespoons of crunch topping per roll.) Use a small offset spatula or the back of a spoon to gently distribute the crunch topping evenly over the surface and down the sides, stopping just shy of where the roll meets the pan.
  11. After applying the topping, allow the rolls to rise for an additional 45 to 75 minutes, until jiggly and wobbly. (No need to cover.)
  12. Towards the end of the rise, preheat the oven to 450°F with racks in the upper and lower thirds.
  13. Put the rolls in the oven and immediately drop the temperature to 425°F.
  14. Bake the rolls for 18 to 24 minutes, rotating the baking sheets halfway through, or until the tops are deeply colored and mottled in appearance and the sides are golden. Cool briefly and enjoy.

Storage information: Dutch crunch rolls are best eaten fresh. Store any leftovers in an airtight container at room temperature for 2 days and reheat or toast before using; freeze for longer storage