Dave Oney was born mid last century in Middlebury, Vermont. He received his BS in Chemistry and worked as a polymer chemist in Massachusetts and New Jersey. He became a microscopist (someone who studies little bitty things using a microscope) and photomicrographer (someone who photographs little bitty things) before settling into a 35-year career in technical sales of scientific imaging equipment (the science of digitally recording itty bitty things, sending the image to a computer for analysis.) He designed and created a number of products contributing to this field. He is (was) proficient in several computer languages and is currently working on mastering English.
After making a few more paradigm shift career changes Dave and his wife, Fran, retired and moved closer to their children and granddaughters and now live in the foothills of the Sierra Nevadas.
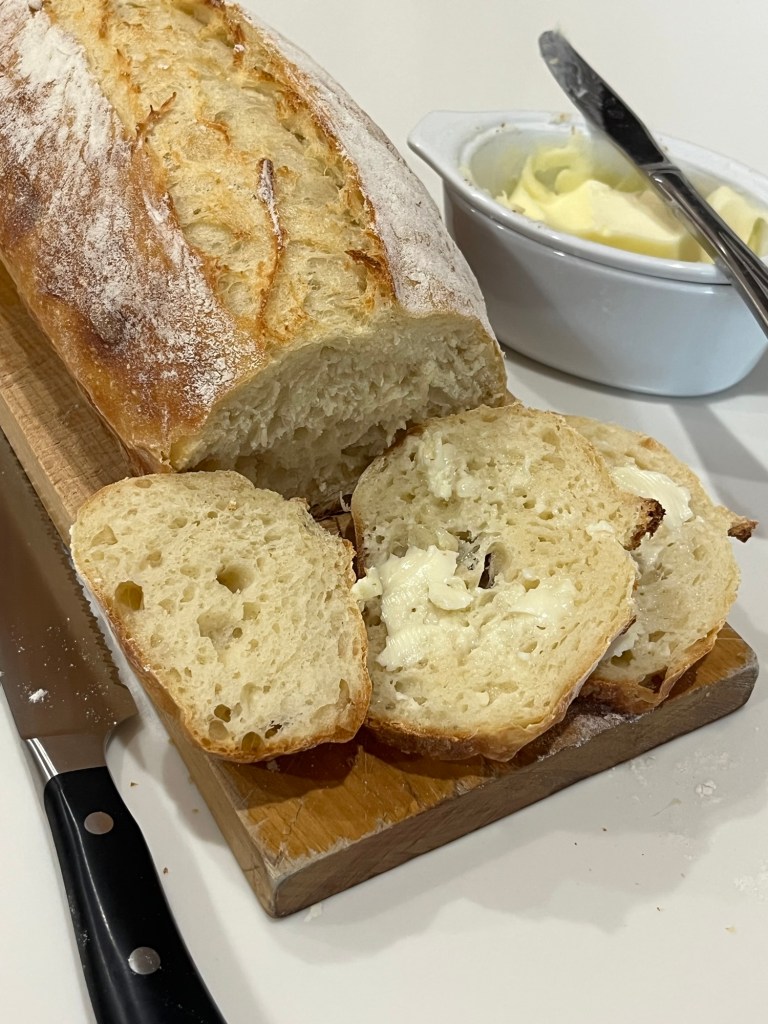
Every time I make this no-knead artisan bread I confirm it is the best loaf I ever made, and this mornings bake is no exception. There are only 4 ingredients and they come together, including weighing, in 10 minutes, then an hour ferment, followed by a stretch and fold and shape for 10 minutes and baked for 20 minutes. (10 minutes with Dutch Oven cover on and ~10 more minutes uncovered to brown and create a great crust) until internal temperature is 190-200F.
There is nothing exciting about a simple chicken salad sandwich, unless the bread was fresh from the oven and the lettuce was picked in the backyard minutes before eating, then it is exciting and special.
The bread is my standard artisan boule. I planted the lettuce in early September and it’s ready for harvest. Gotta love it.
It’s been a while. I was on whatever retired people call an extended trip, when “vacation” seems wrong somehow. To me, vacation is an excused absence from work, even if you are self employed.
Anyway, it’s a new month and Sally has a new challenge. This month it is the above mentioned bread with savory fillings. This is my first attempt at a savory bread, but am a huge pizza fan.
I will admit I was skeptical about this bake. I thought “PIzza Bread” was a bit of a stretch, but, WOW, was I wrong. It is delicious and the texture is perfect AND it tastes like pizza. This is both and winner and keeper.
Vacation Photo (not part or the contest)Pizza BreadSliced Pizza Bread
Crusty No-Knead Pizza Bread with Hot Honey Butter – Sally
INGREDIENTS • 40g (3⅓ c) bread flour, plus more as needed for shaping and pan • 2 tsp instant or active dry yeast • 2 tsp Kosher salt • 1 tsp granulated sugar • 2 tsp dried oregano • 1 tsp dried basil • 1 ½ tsp garlic powder • ¼ tsp crushed red pepper flakes, optional • 135g (~1 heaping c) 43g chopped pepperoni+ 34g sun-dried tomatoes, and 52g + 52g olives + 2 Tbl grated jalapeños • 113 (1 c) shredded mozzarella cheese • 360g (1 ½ ) water, close to room temperature at about 70°F (21°C) Optional Hot Honey Butter • 113G ( ½ c; 8 Tbl) unsalted RT butter • 63g (3 Tbl) honey • 1 Tbl confectioners’ sugar • ⅛–¼ tsp flaky sea salt or coarse salt • pinch of crushed red pepper flakes, to taste
METHOD
In a large mixing bowl, whisk together the flour, yeast, salt, sugar, oregano, basil, garlic powder, and crushed red pepper (if using). Using a silicone spatula, mix in the chopped add-ins (pepperoni, sun-dried tomatoes, olives) and mozzarella cheese. Pour in the water and gently mix together using a Dutch whisk. Shape into a ball.
Cover the bowl tightly with plastic wrap or aluminum foil and set on the counter at room temperature. Allow to rise for 3 hours. The dough will just about double in size, stick to the sides of the bowl, and have a lot of air bubbles. Place the risen dough, still covered, in the refrigerator for at least 12 hours and up to 3 days. The dough will puff up during this time, but may begin to deflate after 2 days. That’s normal.
Turn the dough out onto a lightly floured work surface and, using generously floured hands, shape into a ball as best you can. It doesn’t have to be perfect. Transfer the dough to a large piece of parchment paper. (Large enough to fit inside your pot and one that is safe for high heat. Place the ball of dough with parchment paper, seam side down, inside a medium-size banneton so the dough doesn’t spread out as it rests. Cover and let it rest for 30 minutes.
During this rest, preheat the oven to 450°F (232°C). Place a 6-quart or larger Dutch oven (with the lid) or heavy-duty pot in the oven for 30 minutes so that it’s extremely hot before the dough is placed inside.
After 30 minutes, using a very sharp knife or bread lame (some even use kitchen shears), score the dough with an X, about 1/2 inch deep. Remove the Dutch oven from the oven and carefully place the scored dough inside by lifting it up with the parchment paper and placing it all—the parchment paper included—inside the pot. Cover with the lid.
Bake for 25 minutes with the lid on. Carefully remove the lid and continue baking for around 10–15 minutes more until the bread is golden brown. The bread is done when an instant-read thermometer reads the center of the loaf as 195°F (90°C).
Remove pot from the oven, carefully remove the bread from the pot, and allow to cool on a cooling rack for at least 20 minutes before slicing. Because of the heavy add-ins and cheese, this bread is flatter than most boules. But this just means a higher crust to interior ratio! Slice and serve with homemade hot honey butter, if desired.
Make the hot honey butter: In a large bowl using a handheld mixer or stand mixer fitted with a paddle attachment, beat the butter on medium speed until completely smooth and creamy, about 1 minute. Add the remaining ingredients, starting with only 1/8 teaspoon of salt and a small pinch of red pepper flakes. Beat on medium-high speed until completely smooth, about 1 minute. Scrape down the sides of the bowl with a silicone spatula and beat again as needed to combine. Taste. Add more salt and/or crushed red pepper flakes if desired.
Store leftovers loosely covered at room temperature for up to 3 days or in the refrigerator for up to 1 week. Tightly cover leftover hot honey butter and store at room temperature for up to 2 days or in the refrigerator for up to 2–3 months.
It’s a challenge to find a granola bar that doesn’t melt when golfing in the summer where the temperature can be over 100 degrees
I made these peanut butter granola bars with rolled oats, honey, peanut butter and eggs. While it hasn’t been over 98 this month these bars held up.
Predominantly peanut butter flavor I added raisins and the bars held up to the heat.
Peanut Butter Granola Bars
INGREDIENTS • 3 cups old-fashioned rolled oats • 3/4 cup peanut butter • 1/3 cup honey or maple syrup • 1/2 cup mini chocolate chips (optional) • 2 whole eggs • Optional add-ins: pinch of salt (omit if peanut butter is salted), walnuts, pecans, almonds, chia, sunflower, or pumpkin seeds, or dried fruit
METHOD
Preheat oven to 350℉.
In a large bowl, combine all ingredients and mix well. *If your peanut butter is solid at room temperature, heat it for 10-15 seconds to make it a more drizzly consistency before adding to the mix.
Line a 9×9 inch baking dish or pan with parchment paper. This makes it much easier to remove the bars from your dish once baked.
Transfer the mixture to the prepared dish or pan. Very firmly press the mixture into the pan in an even layer — the firmer you press, the better the bars will stick together. If you’re using chocolate chips, sprinkle them on top, then press them down into the bars.
Bake for 15-17 minutes or until the center is baked through and the edges are just starting to brown. Start checking at 14 minutes, as all ovens are different.
Remove from the oven and place pan on a cooling rack.
Let the bars cool completely (this is important) before cutting into 16 squares with a sharp knife
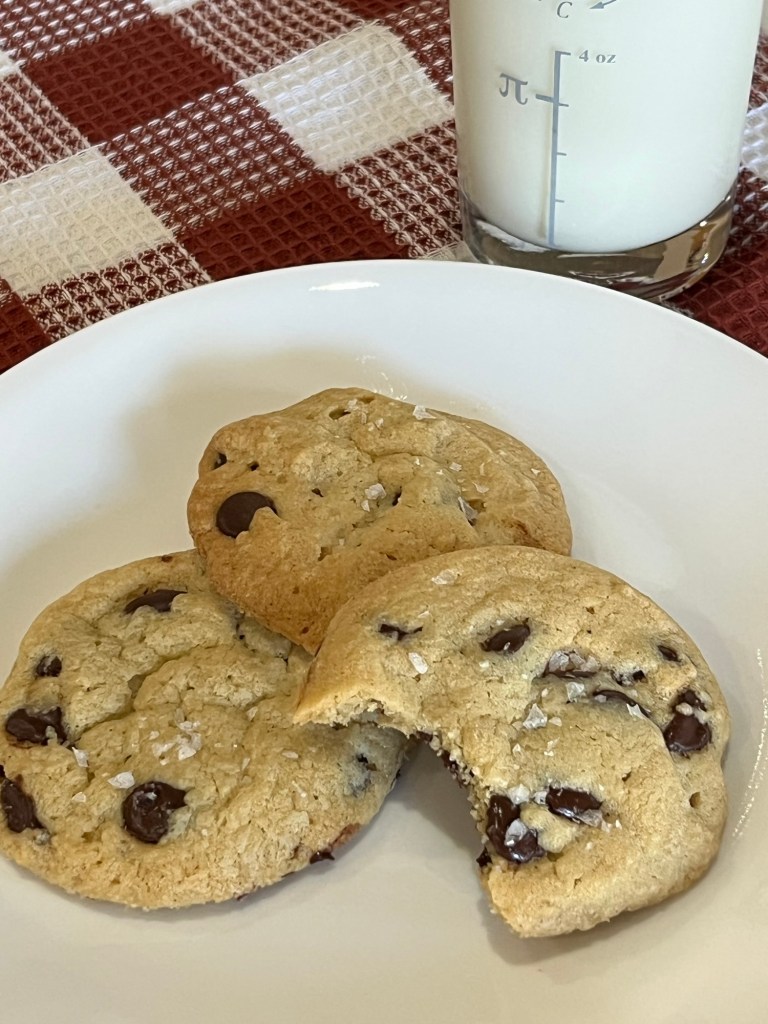
Wanting to try something different than my standard chocolate chip cookie, I made these. I never used tahini before and found they had a pleasant, nutty flavor. Kinda like a very mild peanut butter.
The cookies were crispy, (maybe overbaked a couple of minutes?) front weighted with chocolate, as if that were a problem, delicious and worthy to be made again (and again.)
Salted Tahini Chocolate Chip Cookies
INGREDIENTS Yield: 18 to 24 cookies • 113g (8 Tbl) RT unsalted butter • 120g (½ c) tahini, well stirred • 200g (1 c) granulated sugar • 1 large RT egg • 1 egg RT yolk • 1 tsp vanilla extract • 150g (1 c + 2 Tbl) all-purpose flour • ½ tsp baking soda • ½ tsp baking powder • 1 tsp kosher salt • 230g (1¾ c) chocolate chips or chunks, bittersweet or semisweet • Flaky salt, like Maldon
METHOD
In the bowl of an electric mixer fitted with the paddle attachment, cream butter, tahini and sugar at medium speed until light and fluffy, about 5 minutes. Add egg, egg yolk and vanilla and continue mixing at medium speed for another 5 minutes.
Sift flour, baking soda, baking powder and kosher salt into a large bowl and mix with a fork. Add flour mixture to butter mixture at low speed until just combined. Use a rubber spatula to fold in chocolate chips. Dough will be soft, not stiff. Refrigerate at least 12 hours (or freeze for 2 hours); this ensures tender cookies.
When ready to bake, heat oven to 325⁰F and line a baking sheet with parchment paper or nonstick baking mat. Use a medium. ice cream scoop or spoon to form dough into 18 to 24 balls.
Place the cookies on the baking sheet at least 3 inches apart to allow them to spread. Bake 13 to 16 minutes until just golden brown around the edges but still pale in the middle to make thick, soft cookies. As cookies come out of the oven, sprinkle sparsely with salt. Let cool at least 20 minutes on a rack.
I had some over ripe bananas and not being one to thrown them out (or eat them) I looked for a use for over ripe bananas. Sally once again to the rescue!
Everything she said about them is true. Very nice banana flavor and delicious cream cheese frosting. As it contains bananas, which is a traditional breakfast food, and cream cheese, which is a natural on breakfast bagels, I advertised this cake as a breakfast dessert with a clear conscience.
QC Cadre comments were: “Cake is to die for” (hope not!); “Very Delicious”; “The cake is so moist and good and that frosting is fabulous. Very breakfasty.”
Banana Cake – Sally
INGREDIENTS Banana Cake • 345g (1 ½c) mashed bananas (about 4 medium or 3 large bananas) • 375g (3 c) all-purpose flour (spooned & leveled) • 1 tsp baking powder • 1 tsp baking soda • ½ tsp ground cinnamon • ½ tsp salt • 170g (¾ c;12 Tbl) unsalted butter, softened to room temperature • 200g (1 c) granulated sugar • 100g ( ½ c) packed light or dark brown sugar • 3 large eggs, at room temperature • 2 tsp pure vanilla extract • 360 g (1 ½ c) buttermilk, at room temperature* Cream Cheese Frosting • 226 (8 oz) full-fat brick cream cheese, softened to room temperature • 113g ( ½ c; 8 Tbl) unsalted butter, softened to room temperature • 360g (3 c) confectioners’ sugar, plus an extra 1/4 cup if needed • 1 tsp pure vanilla extract • ⅛ tsp salt
METHOD
Preheat the oven to 350°F (177°C) and spray a 9×13-inch pan. Make the cake:
Mash the bananas using stand mixer with paddle on high speed for 1 minutes. Set mashed bananas aside.
Whisk the flour, baking powder, baking soda, cinnamon, and salt together. Set aside.
Using a handheld or stand mixer fitted with a paddle attachment, beat the butter on high speed until smooth and creamy—about 1 minute.
Add both sugars and beat on high speed for 2 minutes until creamed together. Scrape down the sides and up the bottom of the bowl with a rubber spatula as needed.
Add the eggs and the vanilla. Beat on medium-high speed until combined, then beat in the mashed bananas. Scrape down the sides and up the bottom of the bowl as needed. With the mixer on low speed, add the dry ingredients in three additions alternating with the buttermilk and mixing each addition just until incorporated. Do not over-mix. The batter will be slightly thick and a few lumps is OK.
Spread batter into the prepared pan. Bake for 45–50 minutes. Baking times vary, so keep an eye on yours. The cake is done when a toothpick inserted in the center comes out clean. If you find the top of the cake is browning too quickly in the oven, loosely cover it with aluminum foil.
Remove the cake from the oven and set on a wire rack. Allow to cool completely. After about 45 minutes, I usually place it in the refrigerator to speed things up. Make the frosting:
In a large bowl using a handheld or stand mixer fitted with a paddle or whisk attachment, beat the cream cheese and butter together on high speed until smooth and creamy. Add 3 cups confectioners’ sugar, vanilla, and salt. Beat on low speed for 30 seconds, then switch to high speed and beat for 2 minutes. If you want the frosting a little thicker, add the extra 1/4 cup of confectioners sugar (I add it). Spread the frosting on the cooled cake. Refrigerate for 30 minutes before serving. This helps sets the frosting and makes cutting easier.
Cover leftover cake tightly and store in the refrigerator for 5 days.
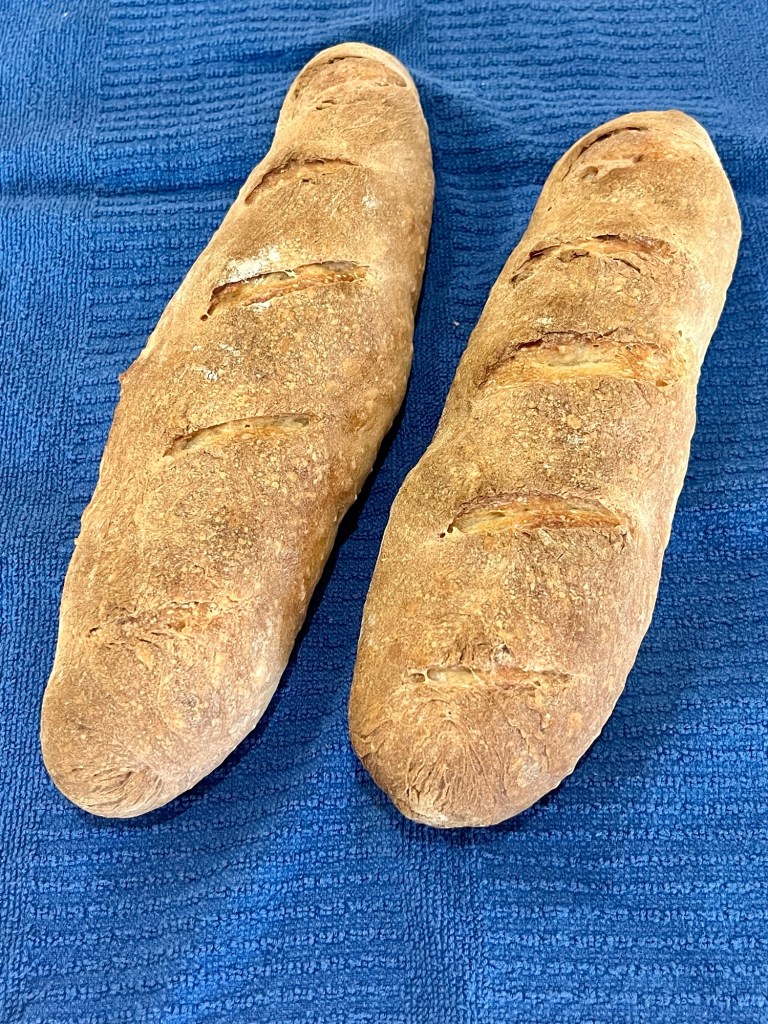
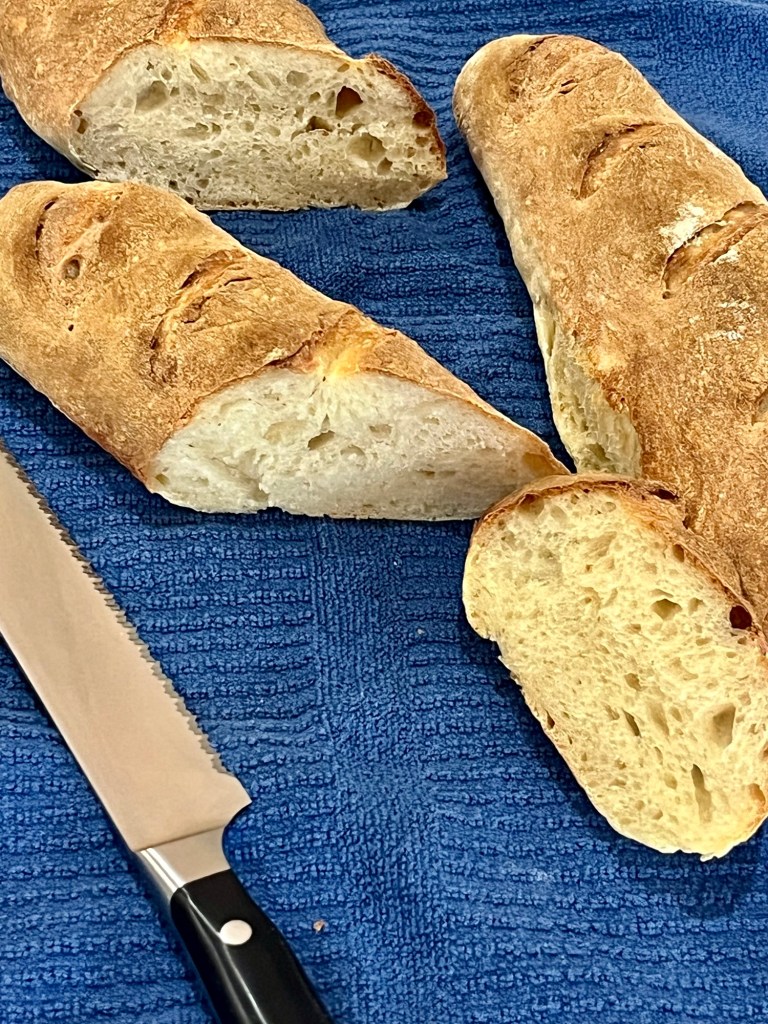
Bilbo and Frodo lived in the Shire, in the village of Hobbiton, in their home called Bag End. For those who don’t know their last name was Baggins and Bag End was a play on their name. While I love both the books and movies, I actually prefer Bag Uette. No one lives there, but everyone loves them anyway.
These are classic French Baguettes made with AP flour for the soft interior and baked hot for the crisp crust. They require at lease 12 hours of fermentation so it’s best to start it the night before you plan to devour them.
Baguettes Classic French
INGREDIENTS
• 500 g all purpose flour • 360 g water • 10 g salt • 3 g instant yeast about 1 tsp • 25 g honey about 1 Tbsp
METHOD
Mix all ingredients in a bowl, cover with a plastic wrap and let rest for 15 minutes.
Over a period of 1½ hours, do 3 sets of stretch and folds, flipping the dough upside down after each set.
Cover the bowl with a plastic wrap and place in refrigerator overnight for about 12-14 hours.
Turn the dough on a lightly floured work surface. Divide into 3 equal parts and shape into rectangles each ~10 inches long. Cover and let rest for 45-60 minutes.
Preheat the oven to 500F, with a baking stone positioned in the upper half the oven and a bread pan filled with hot water on the bottom rack.
Stretch each dough rectangle slightly and fold into a cylinder, sealing the seams as you roll. Using your hands, roll the cylinders gently stretching them from the center towards the ends to desired length, about 14-15 inches.
Place on a lightly floured couche, seam side up. Cover and proof at a room temperature for about 30-60 minutes, or until the dough has sufficiently proofed. Press dough with a finger. If it springs back slowly it is sufficiently proofed.
Transfer the baguettes to a piece of parchment paper, seam side down and dust off excess flour. Using a bread lame, a sharp knife or a razor blade, make 5 diagonal scores on each baguette. When scoring, use a swift and firm motion to ensure nice and clean cuts.
Open the oven, taking caution not to get burned by steam, and slide the baguettes and parchment paper off onto the baking stone. Close the oven and reduce temperature to 475F. Bake for 15 minutes.
Remove the water pan, rotate the baguettes, drop the temperature to 450F and continue baking for another 15 minutes or until deep golden brown.
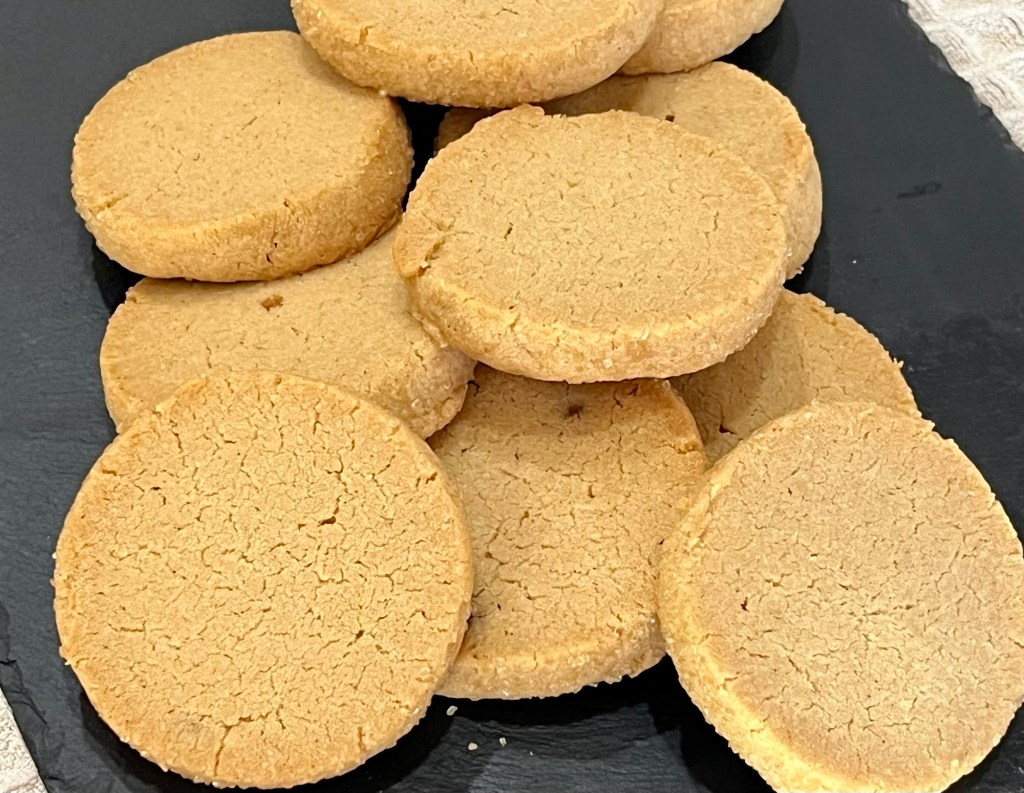
Sally rides again, (as opposed to astronaut Sally Ride.) I make a great shortbread cookie (although currently with some chocolate drizzle issues,) but Sally published a Brown Sugar Shortbread cookie, and of course, I couldn’t resist.
These cookies have a slightly higher (brown) sugar and flour content and as slice and baked coolies are rolled into logs rather than flat disks before chilling, but otherwise the methods are similar.
QC commented how good they smelled while baking, and when sampling, said they taste just like they smell. They’re sweeter than my usual shortbread cookie, no surprise and definitely will be added to the cookie wheel of fortune. (I really should invent one of those someday.)
Brown Sugar Shortbread Cookies
Yield: 24 cookies INGREDIENTS • 170g (¾ cup ;12 Tbl) unsalted butter, softened to room temperature • 200g (1 c) packed light or dark brown sugar • 1 ½ tsp vanilla extract • 281g (2¼ c) all-purpose flour (spooned & leveled) • ¼ teaspoon salt For Rolling • 100g ( ½ c) coarse sugar (such as Sparkling or Sugar in the Raw) METHOD
In a large bowl using a handheld mixer or a stand mixer fitted with a paddle attachment, beat the butter and brown sugar together on medium-high speed until completely smooth and creamy. Add the vanilla and beat until combined.
Add the flour and salt and beat on low speed until incorporated. Turn the mixer up to medium-high speed and beat until the dough comes together. If the dough is too crumbly and won’t come together after a couple minutes of beating, stop the mixer, pour the dough crumbles on a work surface, and use your hands to bring it together. You can also try sprinkling the dough with a few drops of water and then beat again; or get your hands wet, then press the dough clumps together tightly until it forms one large clump of thick dough.
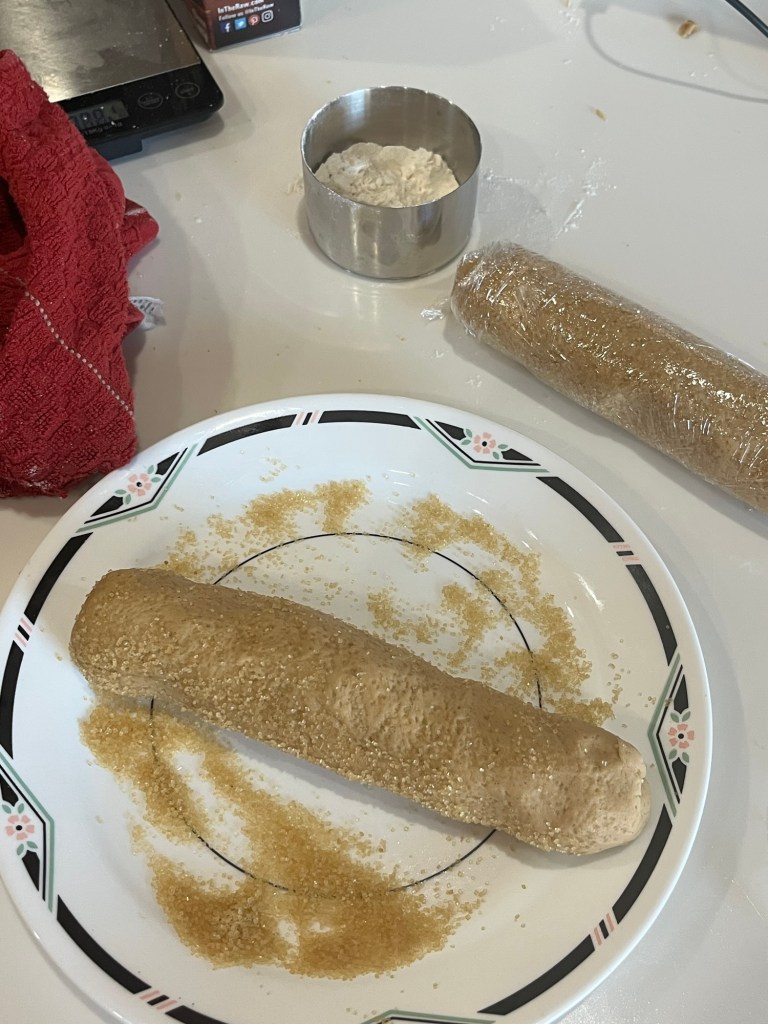
With lightly floured hands, divide the dough in two. (If you want to be precise, the dough should weigh about 650g, so each half will be about 325g.) Roll and shape each piece of dough into an 8-inch log.
For Rolling: Pour coarse sugar onto a large plate. One at a time, roll the logs in the sugar until the exterior is fully coated.
Tightly wrap the logs in plastic wrap and chill in the refrigerator for at least 4 hours and up to 5 days. Chilling is mandatory for this cookie dough. I always chill mine overnight.
Preheat oven to 350°F. Line two large baking sheets with parchment paper or silicone baking mats. Set aside.
Remove logs from the refrigerator. Slice each log into 12 equally thick cookies and place cookies on baking sheets about 2 inches apart. Bake the cookies for 14–16 minutes, or until set and lightly browned around the edges. Do not over-bake. Allow to cool for 5 minutes on the baking sheet, then transfer to cooling rack to cool completely.
Cover and store leftover cookies at room temperature for up to 1 week. After day 1, the cookies will taste crunchier.
Notes Make Ahead Instructions: Baked cookies freeze well up to 3 months. Thaw overnight in the refrigerator and bring to room temperature, if desired, before serving. You can make/assemble the cookie dough logs and chill in the refrigerator for up to 5 days (see step 5). Cookie dough logs freeze well too, up to 3 months. Allow the logs to thaw overnight in the refrigerator, then continue with step 6. See if you’d like to see a video tutorial for freezing various types of doughs.
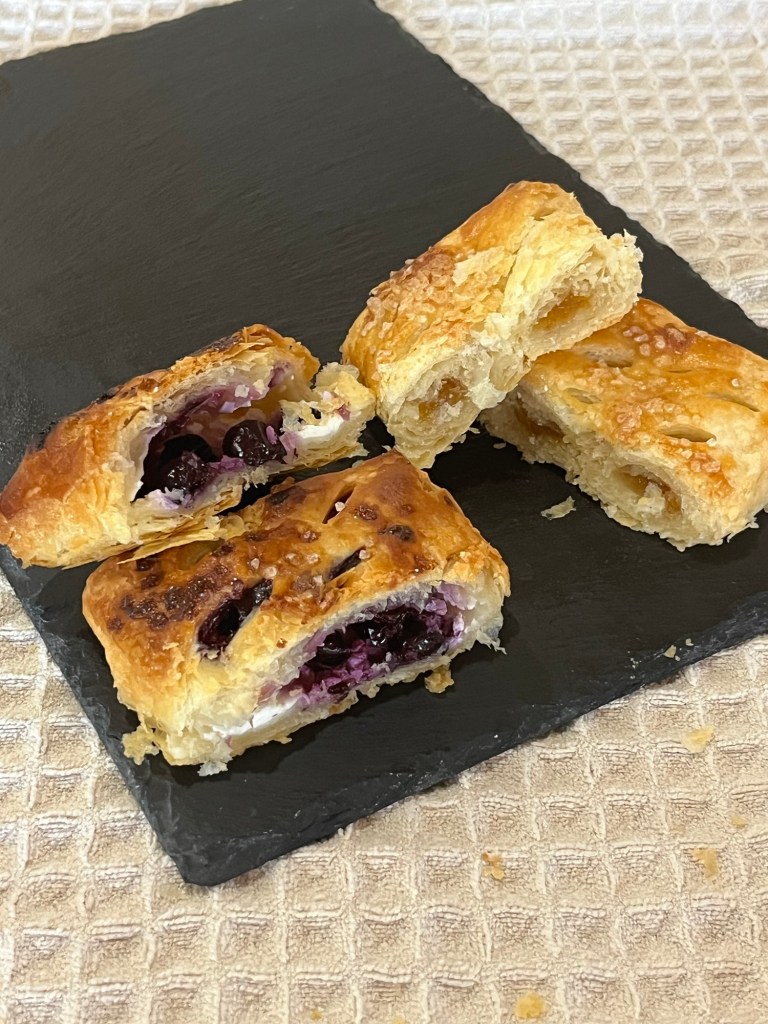
Sally’s Rough Puff Pastry is near perfect (my only changes are to tweak it for my baking style. Sally is catering to a larger, international audience while I am catering to myself and my QC Cadre neighbors.)
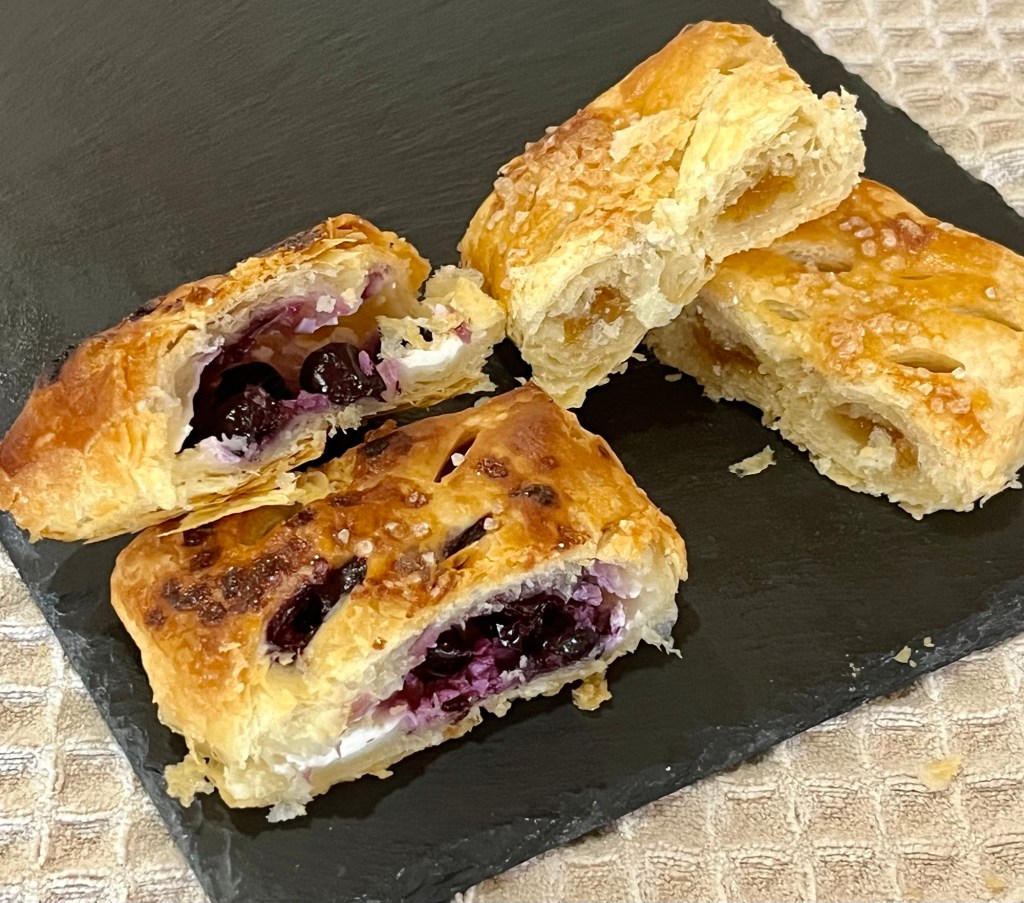
This bake required a little planning and forethought for me to make/create these pastries, (i.e. where to put the cream cheese or fig, where to place the berries and where/when to slit the dough.) I actually made a life size paper model.
The proof is in the pudding, err… pastry. The Cadre returned a unanimous decision: “Delicious”, “Flakey and Good”, “Wow. Very delicious!! They leave a lingering taste of warm sweetness ! Good job!”
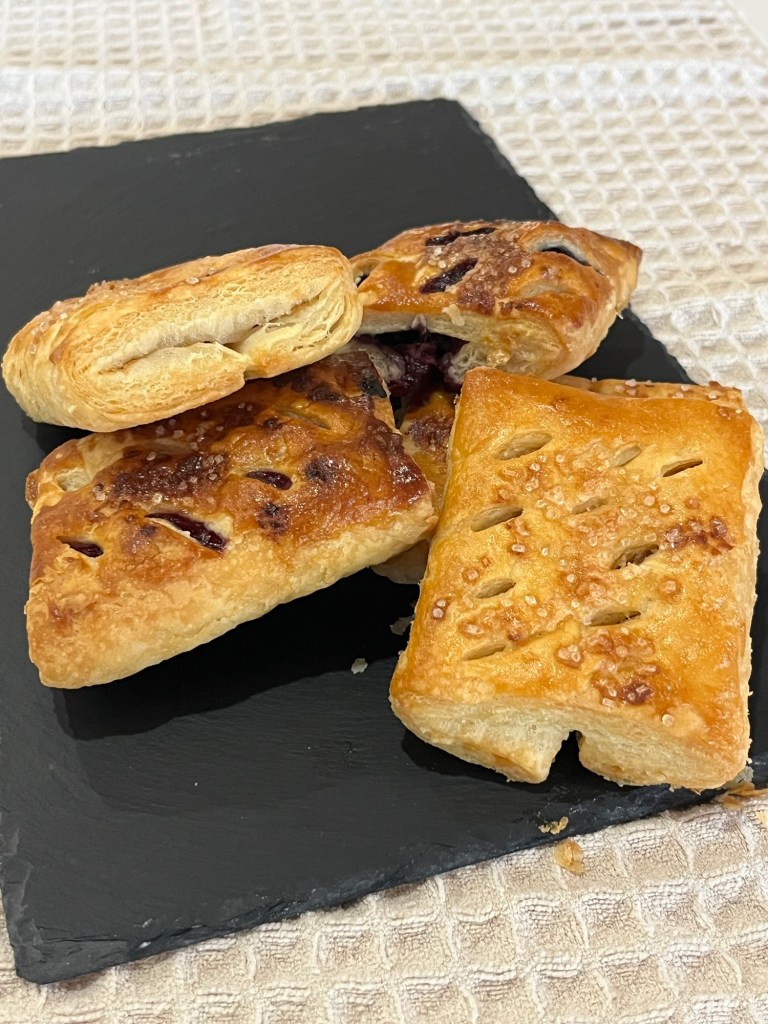
Spread Cream Cheese, Blueberries and folded pastrySpread Fig Preserves, Slits and folded pastryFig Pasty in front, Blueberry in backBoth Pastries cut in half to show layers.
Blueberry-Cream Cheese or Fig Puff Pastry
INGREDIENTS • Puff Pastry (either store bought or recommended rough puff from recipe below) • 1 Tbl Sugar • ~ ½ c. Blueberries (~9 blueberries/pastry) • Cream Cheese (It’s easiest to use spreadable cream cheese) • (For fig pastry replace sugar, blueberries and cream cheese with fig preserves)
METHOD
Wash blueberries and toss with a tablespoon of sugar.
Roll puff (or rough puff) pastry out to a 13”x13” square.
Measure and cut with a pizza cutter six 4”x6” rectangles and position horizontally. (There will be some left over after squaring up the sides.)
Cut staggered diagonal slits on middle 3” of the rectangle
Spread cream cheese on 1½” x 4” edge of the rectangle, being careful not to coat the edges of the pastry.
Place blueberries on the center of the pastry (over the slits). I used ~ 12 blueberries per pastry.
Use your finger to wet the outer 4” edge of the pastry and fold over to the center of the pastry. Repeat with the other cream cheese coated edge, butting the end up against the first fold. Press gently to seal.
Use your fingers, with a little flour if the dough is sticky, to seal the ends. Turn over and place on a parchment paper line baking sheet.
Bake at 400 F for 25-30 minutes, rotating the pans midway.
Rough Puff Pastry
INGREDIENTS • 166 g (1⅓ c) all-purpose flour, plus more for flouring hands, surface, and dough • 1 tsp granulated sugar • ½ tsp salt • 170 g (¾ c or 1½ sticks) unsalted Kerry Gold butter, very cold and cubed • 6–8 Tbl ice cold water
METHOD
Cut the butter into ~1/4” cubes then return to the fridge to chill for 30 minutes.
Whisk the flour, sugar, and salt together in a large bowl. Place the cold and cubed butter on top. Gently toss the flour and butter together with your hands, and then briefly rub the butter into the flour to begin combining. Do not break down the butter too much in this step. This step is only possible if the butter is very cold.
Begin adding the ice cold water 1 Tablespoon at a time until dough forms 1 large shaggy clump with big chunks of butter in your bowl. Use your hands to toss the mixture together after you add each Tablespoon. (Start with 2 Tablespoons of water before tossing together.) As the dough begins to hydrate after about 4 Tablespoons of water, you can start lightly squeezing or clumping the dough together with your hands to help bring it together. Mixture will still be very shaggy. If your dough feels sticky and wet before adding 6 Tablespoons of water, your butter was likely too warm– you can continue with the recipe, but the dough will not be as flaky.
Pour the shaggy clump of dough out onto a lightly floured work surface. There will still be large chunks of butter at this point and that’s a good thing. Begin patting the dough down with lightly floured hands until it’s ¾ – 1” thick, about a 5×8” rectangle. Fold the dough into thirds as if you were folding a business letter. Use your hands to gently flatten and smooth out any cracks in your dough. Wrap it up tightly in plastic wrap.
1st refrigeration: Refrigerate dough for at least 2 hours and up to 24 hours.
Roll & Fold: Take the dough out of the refrigerator to begin the “rolling and folding” process. If the dough chilled for longer than about 3 hours, it’s likely very stiff so let it rest for about 5 minutes before you begin rolling. Lightly flour a work surface. The dough gets sticky, so make sure you have more flour nearby as you roll and fold. Use your hands to gently flatten the dough into a small square. Using a rolling pin, roll the dough into a 6”×12”x ½” thick. The exact dimensions are not important, but the thickness is. As you roll, it’s best to flip the dough over once or twice to make sure it’s not sticking to your work surface. Lightly flour your work surface as needed. Fold the rectangle into thirds as if it were a business letter. Turn it clockwise or counter clockwise and roll it out into a 6”×12”x ½” thick rectangle again. Then, fold into thirds again. Turn it clockwise or counter clockwise. You’ll repeat rolling and folding 4 more times for a total of 6 times.
2nd Refrigeration: Wrap up/seal tightly and refrigerate for at least 15 minutes and up to 24 hours before using in your recipe. You can also freeze the dough at this point. See freezing instructions.
Use wherever you would use frozen store-bought puff pastry. To bake plain, roll pastry dough into a 10×16” rectangle and cut into desired portions. Fill if desired, and paint with an egg wash (1 egg beaten with 1 Tbl water.)
Bake 400°F until golden brown and puffy, about 25-28 minutes.
NOTES
Make Ahead & Freezing Instructions: Prepare as instructed in steps 1-3. At this point the dough can be refrigerated up to 24 hours (see step 4). You can also prepare the dough through step 5. At this point the dough can be refrigerated for up to another 24 hours (see step 6).
During or after this second chilling time, you could also freeze the dough for up to 1 month. (I don’t recommend freezing the dough before the rolling and folding step.) Thaw overnight in the refrigerator before using in a recipe that calls for 1 lb puff pastry dough (or 1 store-bought package with 2 sheets puff pastry).
I made Sally’s rough puff pastry for the first time about three weeks ago. It was delicious, and while a little time consuming, totally worth it. My first attempt was a puff pastry wrapped Brie cheese, topped with fig jam and covered with roasted plum compote. EVERYONE including those who professed to not like plum, and/or Brie loved it.
I used Sally’s recipe again to make some “cover versions” of a blueberry/cream cheese pastry and a Feuillete au Chocolat (puff pastry and chocolate.)
Today, I used yet another third batch of her pastry to make my own version of the blueberry/cream cheese pastry and a fig filled (figs are ripe in my backyard) pastry.
Over the course of these bakes I mildly modified Sally’s recipe. In the first two trials I used high fat content (and expensive) Kerrygold butter. Today I used my standard Costco unsalted butter. I could not discern and difference in baking, taste of flake.
I also cut the butter into 1/4” cubes, then return it to the refrigerator for 30 minutes to really firm up and chill the butter. (It’s worth it.)
I try to turn, roll and fold the dough 6-8 times, I really do, but usually lose count and simple repeat until it feels right. I chilled it overnight and I chilled it for 3 hours, other than it’s being hard to roll, no difference. I also froze one batch for 3 days and when thawed could not tell the difference between it and the unthawed batch.
Since I do all the measuring I can in grams, my version lists weights before volumes, but other than that, I follow her recipe to the letter.
Rough Puff Pastry – Sally
INGREDIENTS • 166 g (1⅓ c) all-purpose flour, plus more for flouring hands, surface, and dough • 1 tsp granulated sugar • ½ tsp salt • 170 g (¾ c or 1½ sticks) unsalted Kerrygold butter, very cold and cubed • 6–8 Tbl ice cold water
METHOD
Cut the butter into ~1/4” cubes return to the fridge to chill.
Whisk the flour, sugar, and salt together in a large bowl. Place the cold and cubed butter on top. Gently toss the flour and butter together with your hands, and then briefly rub the butter into the flour to begin combining. Do not break down the butter too much in this step. This step is only possible if the butter is very cold.
Begin adding the ice cold water 1 Tablespoon at a time until dough forms 1 large shaggy clump with big chunks of butter in your bowl. Use your hands to toss the mixture together after you add each Tablespoon. (Start with 2 Tablespoons of water before tossing together.) As the dough begins to hydrate after about 4 Tablespoons of water, you can start lightly squeezing or clumping the dough together with your hands to help bring it together. Mixture will still be very shaggy. If your dough feels sticky and wet before adding 6 Tablespoons of water, your butter was likely too warm– you can continue with the recipe, but the dough will not be as flaky.
Pour the shaggy clump of dough out onto a lightly floured work surface. There will still be large chunks of butter at this point and that’s a good thing. Begin patting the dough down with lightly floured hands until it’s ¾ – 1” thick, about a 5×8” rectangle. Fold the dough into thirds as if you were folding a business letter. Use your hands to gently flatten and smooth out any cracks in your dough. Wrap it up tightly in plastic wrap.
1st refrigeration: Refrigerate dough for at least 2 hours and up to 24 hours.
Roll & Fold: Take the dough out of the refrigerator to begin the “rolling and folding” process. If the dough chilled for longer than about 3 hours, it’s likely very stiff so let it rest for about 5 minutes before you begin rolling. Lightly flour a work surface. The dough gets sticky, so make sure you have more flour nearby as you roll and fold. Use your hands to gently flatten the dough into a small square. Using a rolling pin, roll the dough into a 6”×12”x ½” thick. The exact dimensions are not important, but the thickness is. As you roll, it’s best to flip the dough over once or twice to make sure it’s not sticking to your work surface. Lightly flour your work surface as needed. Fold the rectangle into thirds as if it were a business letter. Turn it clockwise or counter clockwise and roll it out into a 6”×12”x ½” thick rectangle again. Then, fold into thirds again. Turn it clockwise or counter clockwise. You’ll repeat rolling and folding 4 more times for a total of 6 times.
2nd Refrigeration: Wrap up/seal tightly and refrigerate for at least 15 minutes and up to 24 hours before using in your recipe. You can also freeze the dough at this point. See freezing instructions.
Use wherever you would use frozen store-bought puff pastry. To bake plain, roll pastry dough into a 10×16” rectangle and cut into desired portions. Fill if desired, and paint with an egg wash (1 egg beaten with 1 Tbl water.)
Bake 400°F until golden brown and puffy, about 25-28 minutes.
NOTES
Make Ahead & Freezing Instructions: Prepare as instructed in steps 1-3. At this point the dough can be refrigerated up to 24 hours (see step 4). You can also prepare the dough through step 5. At this point the dough can be refrigerated for up to another 24 hours (see step 6).
During or after this second chilling time, you could also freeze the dough for up to 1 month. (I don’t recommend freezing the dough before the rolling and folding step.) Thaw overnight in the refrigerator before using in a recipe that calls for 1 lb puff pastry dough (or 1 store-bought package with 2 sheets puff pastry).