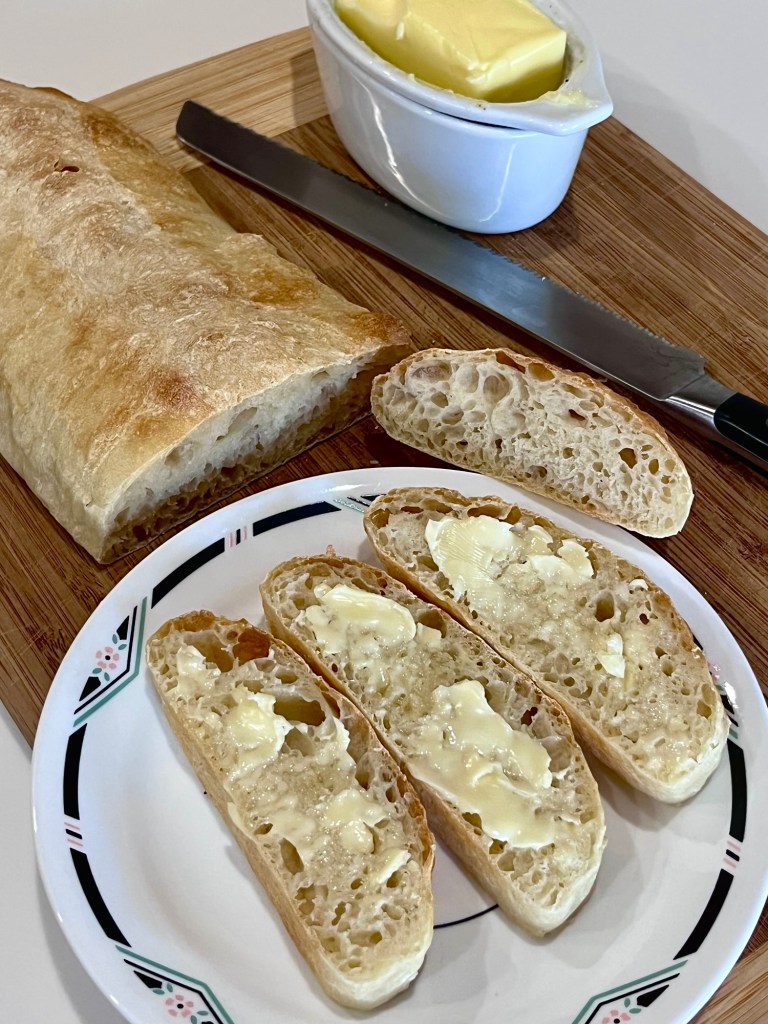
Vive la France!

I gotta stop reading all those recipes on Facebook! It’s just they look so appetizing.😒

These french bread rolls are a basic bread dough, slightly enriched by 20 g of butter. They was easy to make and only required 2 1/2 hours of elapsed time and 30 minutes of hands on. Next time I may form the logs and batards a little longer. These were 6” and I think 7” might be better.

In any event, they were flavorful, had a good crust and crumb.

French Bread Rolls

INGREDIENTS
Starter
• 35g Bread flour
• 7g Instant dry yeast
• 40g Warm water

Dough
• 380g AP flour
• 10g Sugar
• 7g Salt (1 ½ tsp)
• 20g Unsalted butter
• 210g Cold water

METHOD
Starter

  1. Mix 40g water with 7g yeast, stir to mix
  2. Add 35g bread flour, mix thoroughly then cover and set aside for 20 minutes
    Bread dough
  3. In a large bowl mix 380g AP flour and 10g sugar, mix thoroughly
  4. Add 210g cold water, sponge from above, and mix thoroughly
  5. Knead the dough in the bowl for 2-3 minutes
  6. Add 7g salt and continue to knead/mix for 2-3 minutes
  7. Cover and let rest 20 minutes
  8. Transfer dough to a floured counter and spread into a thick rectangle
  9. Spread 20g room temperature butter over the rectangle
  10. Knead until smooth 8-10 minutes
  11. Cover and rest 20 minutes
  12. Transfer to a floured counter and divide into 6 equal parts, each ~120g
  13. Spread into a rough circle 5-6” diameter. Fold edges to center in 6 places, fold together and form a ball.
  14. Roll ball against the counter with an open cupped hand to tension the surface
  15. Roll into an oval log ~ 5×2”, cover and rest 20 minutes
  16. Flatten log and roll into an oval ~ 4×7”. Starting at the furthest short end fold the “shoulders” inward toward the center, followed by folding the top center down to meet the folded shoulders. Repeat until fully rolled up
  17. Pinch the seams, including the ends tightly together, roll back and forth under a cupped hand to tension the surface
  18. Rest until doubled in size
  19. Score each batard with a razor, lame or sharp knife. One long cut the length of the batard with a very slight curve
  20. Bake in preheat 400⁰ F oven for 13 – 15 minutes

Pain Français et l’Europe

I decided to bake a tour of Europe. Over the past month I made Russian Dark Rye, German Light Rye and Italian bread and today was French Bread

I made them all before but randomly, not with a plan. As with the pretzels having a plan and executing it is very rewarding.

The French bread is good but not exceptional when compared to the two ryes and Italian breads. I don’t find a distinctive flavor, but the texture and crust is very good

French Bread

INGREDIENTS
Starter
• 1 c (227g) cool to lukewarm water (90°F to 100°F)
• ½ teaspoon active dry yeast
• 1 ¼ c (149g) Unbleached Bread Flour
• ¼ c (28g) Premium 100% Whole Wheat Flour
Dough
• all of the starter (above)
• 1 cup (227g) lukewarm water (100°F to 115°F)
• ¾ tsp active dry
• 1 Tbl (14g) sugar
• 3 ¾ to 4 c (450g to 480g) Unbleached Bread Flour
• 1 ½ to 2 ¼ tsp salt, to taste
• Egg wash (1 egg yolk and 1 Tbl milk)

METHOD

  1. To make the starter: Stir all the starter ingredients together to make a thick, pudding-like mixture. Cover with plastic wrap and let it rest for at least 2 hours. For best flavor, let the starter rest longer; overnight (up to 16 hours) is best.
  2. To make the dough: Stir down the starter with a spoon and add the water, yeast, sugar, 3 ¼ cups (390g) of the flour, and the salt. The dough will be a loose, messy mass. Let it rest for 12 to 15 minutes, then stir it again; it should become more cohesive and a bit smoother. Dough handles better once it’s had time for the flour to absorb the water while resting and relaxing. By using this method, you’ll tend to add less flour and have much bigger holes in your finished bread.
  3. Knead the dough, adding up to an additional ¾ cup (90g) flour (as necessary to make a soft dough), 10 to 12 minutes. The dough should weigh ~1100g.
  4. Place the dough in a lightly greased bowl or plastic container, cover with lightly greased plastic wrap, and let it rise until almost doubled (depending on the weather, this could be 1 to 2 hours). If you’re going out, or if you prefer, let the dough rise slowly in the fridge. If your dough was refrigerated, allow it to come to room temperature before shaping; it’ll warm up and rise at the same time. I used my proofing oven with only the light on for warmth. The same for the final proof below.
  5. Deflate the dough gently, but don’t knock out all the air. This will create those “holes” so important to French bread. For one large loaf, form the dough into a round ball; for two loaves, divide the dough in half and shape into two balls. For loaves, form into a batard (~500g) and a longer thin batard about 2” diameter and 4” shorter than bread tray (~600g). Place on semolina floured or parchment paper lined French bread tray to rise.
  6. Place a semolina or cornmeal-dusted piece of parchment paper onto a baking sheet. (Note to self: Don’t go crazy with semolina. It WILL fall off the paper and onto the floor when transferring the loaves from the peel onto the baking stone in the oven.) Gently place the ball(s) of dough on the baking sheet, seam-side down. It is easiest to roll the loaves onto the baking peel.
  7. Cover the bread gently with lightly greased plastic wrap, and let it rise until it’s puffy and about 50% larger, anywhere from 30 to 45 minutes if using the proofing drawer.
  8. Preheat your oven to 475°F.
  9. Dust each loaf with a little flour. Slash or crosshatch it with a sharp knife or lame. Coat with egg wash, then spritz water into the oven with a clean plant mister and place the bread in the oven. Reduce the heat to 425°F and spritz with water every few minutes for the first 15 minutes of baking.
  10. If you are using parchment paper, remove it after the first 15 minutes of baking.
  11. Bake the bread for about 25 to 30 minutes, or until it’s a rich golden brown, and its interior temperature registers at least 190°F on a digital thermometer. The smaller loaves will bake more quickly, so keep your eye on them.
  12. Remove the bread from the oven and cool it on a rack. Store bread, loosely wrapped in paper, for a couple of days at room temperature; wrap it in plastic and freeze for longer storage.

My Grammie Wasn’t French

YouTube posted a video demonstrating how someone’s Grandmother made an easy french bread. Well, apparently my Grammie wasn’t French.

My bread tasted fine and was fairly fast and easy to make. My problem was with fermenting and proofing the dough. Although I followed the directions and used the standard “poke test,” my loaves were under-proofed.

When I mixed the water, milk, sugar and yeast I didn’t see the usual activation of the yeast. To test it I mixed a tablespoon of water with teaspoons of sugar and yeast. Within 5 minutes the yeast was bubbly so, it tested good.

I continued on with the instructions, while in retrospect, should have extended the proofing time.

The final baked bread resulted in a good color, a minimal rise, nice crust and flavor. It needed a better, more open structure to be a good loaf.

French Bread from a French Grandmother

INGREDIENTS
• 200 ml of warm water.
• 200 ml of warm milk.
• 1 Tbl of sugar.
• 8g (2½ tsp) dry yeast.
• 1 egg, separated
• 90 ml of vegetable oil.
• 700 g of bread flour, divided (600g & 100g)
• 1 tsp of salt.

METHOD

  1. Whisk water, milk, sugar and yeast, cover, and leave for 5 minutes until the yeast dissolves.
  2. Separate the egg, cover the yolk with cling film for later use.
  3. Add egg white and vegetable oil to bowl and mix well with a spoon.
  4. Sift in 600 g of bread flour and 1 teaspoon of salt mix well with a spoon
  5. Sift in the remaining 100 g of flour and mix by hand.
  6. Sprinkle the table with flour.
  7. The dough should be medium soft and formed into a large ball.
  8. Coat the bowl with vegetable oil, place ball, smooth side, up in the oiled bowl, cover and set aside in a warm place for 40 minutes.
  9. Place on lightly floured table, de-gas, roll into a ball and divide into 3 parts and roll each part into a ball, cover, and leave to rise for 20 minutes.
  10. Roll out the dough into a ~12 x 16” rectangle on the lightly floured table.
  11. Roll from the smaller side into a batard, pinch the edges and ends together, place on parchment paper, cover and leave for 15 minutes.
  12. Coat the surface with milk. (Or egg wash?)
  13. Make 6 diagonal cuts on each batard, dust top with flour.
  14. Bake in a preheated oven at 180°C/360°F for 35-40 minutes.

The Baguette Challenge – #1

I was in Versailles, Fr last month and had what was undoubtedly the best baguette of my life. The crust had the exact right crunch and the interior was soft and light. Then and there I decided I needed to perfect my baguette baking to at least approach this level of perfection.

My go-to recipe is from King Arthur and it served me well. Upon returning home I searched for differences in recipe ingredients and methods keying on authors who tauted the bread qualities that I wanted.

From what I understand the hydration level, (this recipe is 72%) at least in part, determines the size of the holes in the bread. By using the stretch and fold technique with a long rest (45 min) between each helps develop the gluten. These two properties contribute to the characteristics I desire.

This is the first attempt of “perfecting” my baguette. Do you remember my five attempts at baking an acceptable rye bread? Well, here we go again,

Classic French Baguettes

INGREDIENTS

• 500 g all purpose flour
• 360 g water
• 10 g salt
• 3 g instant yeast about 1 tsp
• 25 g honey about 1 Tbsp

METHOD

  1. Mix all ingredients in a bowl, cover with a plastic wrap and let rest for 15 minutes.
  2. Stretch and fold every 45 minutes and repeat at 3 times, flipping the dough upside down after each set. The rest time between stretch and folds is important.
  3. Cover the bowl with a plastic wrap and place in refrigerator overnight for about 12-14 hours.
  4. Turn the dough on a lightly floured work surface. Divide into 3 equal parts and gently shape into rectangles without knocking the air out of the dough. Cover and let rest for 45-60 minutes.
  5. Preheat the oven to 500F, with a baking stone positioned in the upper half the oven. I like to use a small cast iron skillet with water to provide steam. Add the water below when the loaves are put into the oven.
  6. Stretch each dough rectangle slightly and fold into a cylinder, sealing the seams as you roll. Using your hands, roll the cylinders gently stretching them from the center towards the ends to desired length, about 14-15 inches.
  7. Place each loaf on a lightly floured couche, seam side up. Cover and proof at a room temperature for about 30-60 minutes, or until the dough has sufficiently proofed. Press dough with a finger. If it springs back slowly it is properly proofed. If it never springs back it is over proofed and if it springs back quickly it is under proofed.
  8. Transfer the baguettes to a piece of parchment paper, seam side down and dust off excess flour. I like to use a serrated break knife to make 5 scores on each baguette. Don’t cut straight across the loaf, but with a shallow long cut down the length. Each cut should be 4-5” longWhen scoring, use a swift and firm motion to ensure nice and clean cuts.
  9. Carefully open the oven, and slide the rack with the baking stone out. Slide the baguettes off the parchment paper and onto the baking stone. Add a cup of water to the cast iron skillet, close the oven and reduce temperature to 475F. Bake for 15 minutes.
  10. Remove the water pan, rotate the baguettes, drop the temperature to 450F and continue baking for another 10- 15 minutes, Check how brown the baguettes are after 10 minutes and every couple of minutes thereafter. They should be a nice dark brown, but not too dark. Over baking will make the crust and interior too hard. Experience will tell you when it is Goldilocks just right.

Il est temps pour un pain français batard

I wonder if my 9th grade French teacher would be proud of me? I looked up how to say “it’s time for a french bread batard” in French on Google Translate all by myself!

This is not my first rodeo with this bread, but it is the best loaf to date. While the Covid travesty has been horrible, my baking skills have improved enormously. Most of the METHOD steps are from KAB, but I added my own comments in places.

(Oh, I also baked a dozen chocolate chip cookies from dough I have in the freezer. The oven was on! What choice did I have?)

French Bread – Recipe and method from KAF which should be KAB now.

INGREDIENTS

Starter
• 1 cup (227g) cool to lukewarm water (90°F to 100°F)
• 1/2 teaspoon active dry or instant yeast
• 1 1/4 cups (149g) King Arthur Unbleached Bread Flour
• 1/4 cup (28g) King Arthur Premium 100% Whole Wheat Flour
Dough
• all of the starter (above)
• 1 cup (227g) lukewarm water (100°F to 115°F)
• 3/4 teaspoon active dry or 1/2 teaspoon instant yeast
• 1 tablespoon (14g) sugar
• 3 3/4 to 4 cups (450g to 480g) King Arthur Unbleached Bread Flour
• 1 1/2 to 2 1/4 teaspoons salt, to taste

METHOD

  1. To make the starter: Stir all of the starter ingredients together to make a thick, pudding-like mixture. Cover with plastic wrap and let it rest for at least 2 hours. For best flavor, let the starter rest longer; overnight (up to 16 hours) is best.
  2. To make the dough: Stir down the starter with a spoon and add the water, yeast, sugar, 3 1/4 cups (390g) of the flour, and the salt. The dough will be a loose, messy mass. Let it rest for 12 to 15 minutes, then stir it again; it should become more cohesive and a bit smoother. Dough handles better once it’s had time for the flour to absorb the water while resting and relaxing. By using this method, you’ll tend to add less flour, and have much bigger holes in your finished bread.
  3. Knead the dough, adding up to an additional 3/4 cup (90g) flour (as necessary to make a soft dough), 10 to 12 minutes. I use the dough hook on my stand mixer. For me, the dough should clean the sides of the mixer bowl. That’s how I know when adequate flour has bee added.
  4. Place the dough in a lightly greased bowl or plastic container, cover with lightly greased plastic wrap, and let it rise until almost doubled (depending on the weather, this could be 1 to 2 hours). If you’re going out, or if you prefer, let the dough rise slowly in the fridge. If your dough has been refrigerated, allow it to come to room temperature before shaping; it’ll warm up and rise at the same time. I used my proofing oven with only the light on for warmth. The same for the final proof below.
  5. Deflate the dough gently, but don’t knock out all the air; this will create those “holes” so important to French bread. For one large loaf, form the dough into a round ball; for two loaves, divide the dough in half and shape into two balls. For loaves, form into a battard about 2” diameter and 4” shorter than bread tray. Place on semolina floured French bread tray to rise..
  6. Place a semolina- or cornmeal-dusted piece of parchment paper onto a baking sheet. (Note to self: Don’t go crazy with semolina. It WILL fall off the paper and onto the floor when transferring the loaves from the peel onto the baking stone in the oven,) Gently place the ball(s) of dough on the baking sheet, seam-side down. It is easiest to roll the loaves onto the baking peel.
  7. Cover the bread gently with lightly greased plastic wrap, and let it rise until it’s puffy and about 40% to 50% larger, anywhere from 30 to 45 minutes if using the proofing drawer..
  8. Preheat your oven to 475°F.
  9. Dust each loaf with a little flour. Slash or cross-hatch it with a sharp knife or lame. Spritz water into the oven with a clean plant mister, and place the bread in the oven. Reduce the heat to 425°F and spritz with water every few minutes for the first 15 minutes of baking.
  10. If you are using parchment paper, remove it after the first 15 minutes of baking.
  11. Bake the bread for about 25 to 30 minutes, or until it’s a rich golden brown, and its interior temperature registers at least 190°F on a digital thermometer. The smaller loaves will bake more quickly, so keep your eye on them.
  12. Remove the bread from the oven, and cool it on a rack. Store bread, loosely wrapped in paper, for a couple of days at room temperature; wrap it in plastic and freeze for longer storage.