We Have A Winner, Winner, Chicken Dinner

Sorry, no chicken or dinner here,

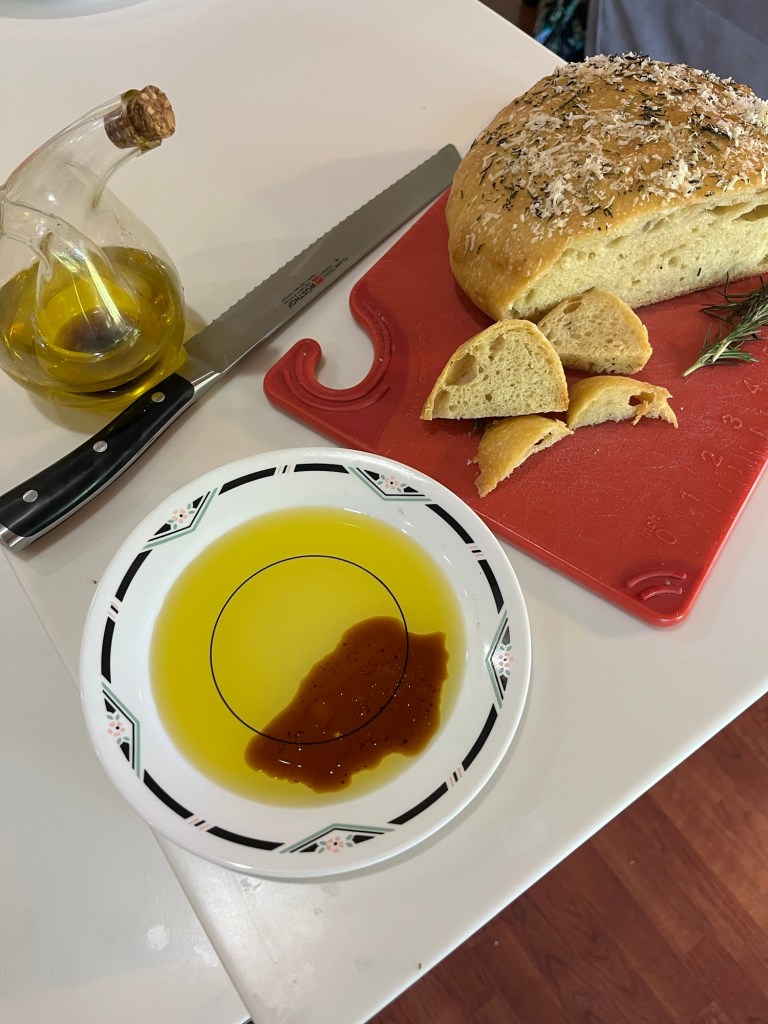
FB posted this Rustic No Knead Rosemary Garlic Bread by Jacques Pepin. I made a few changes to the method (as if I know more than M. Pepin.)

I followed the ingredients as published and the bread was fantastic, but next time I will increase the amount of garlic. All changes have been incorporated in the recipe below.

I did a stretch and fold before shaping the loaf, This is a 100% hydration bread and has little structure before baking, i.e it is very soft, wet, and hard to handle.. There was no reference to scoring the bread, but on reviewing the published photo realized it was scored with large cross cuts. (Next time, which will be very soon.)

My baking time was also much longer (nearly double) what was published. My modifications are incorporated below.)

Rustic No Knead Rosemary Garlic Bread – Jacques Pepin

INGREDIENTS
• 360g (3 c) AP flour
• 1 tsp salt
• 1 tsp active dry yeast
• 355g(1 ½ c) warm water (about 105-115⁰ F)
• 5 cloves garlic, minced
• 2 Tbl olive oil
• 1 Tbl chopped fresh rosemary
• ¼ c grated Parmesan cheese

METHOD

  1. In a large bowl, whisk together the flour, salt, and yeast.
  2. Add the warm water, minced garlic, and olive oil to the flour mixture. Stir with a wooden spoon until a shaggy dough forms.
  3. Cover the bowl with plastic wrap and let the dough rest at room temperature for 12-18 hours.
  4. Preheat oven and prepare dough: Preheat oven to 450⁰ F .
  5. Sprinkle a light coating of flour around the edge of the bread and use your fingers to lightly tuck the flour into the edge of the dough. With floured fingers (you may need to re-flour your fingers after each time you touch the bread) stretch and fold the bread, turning 90⁰ and repeat a total of 10-12 stretch and folds to make the dough firmer and easier to handle. Turn the dough out onto a lightly floured surface and gently shape it into a loaf.
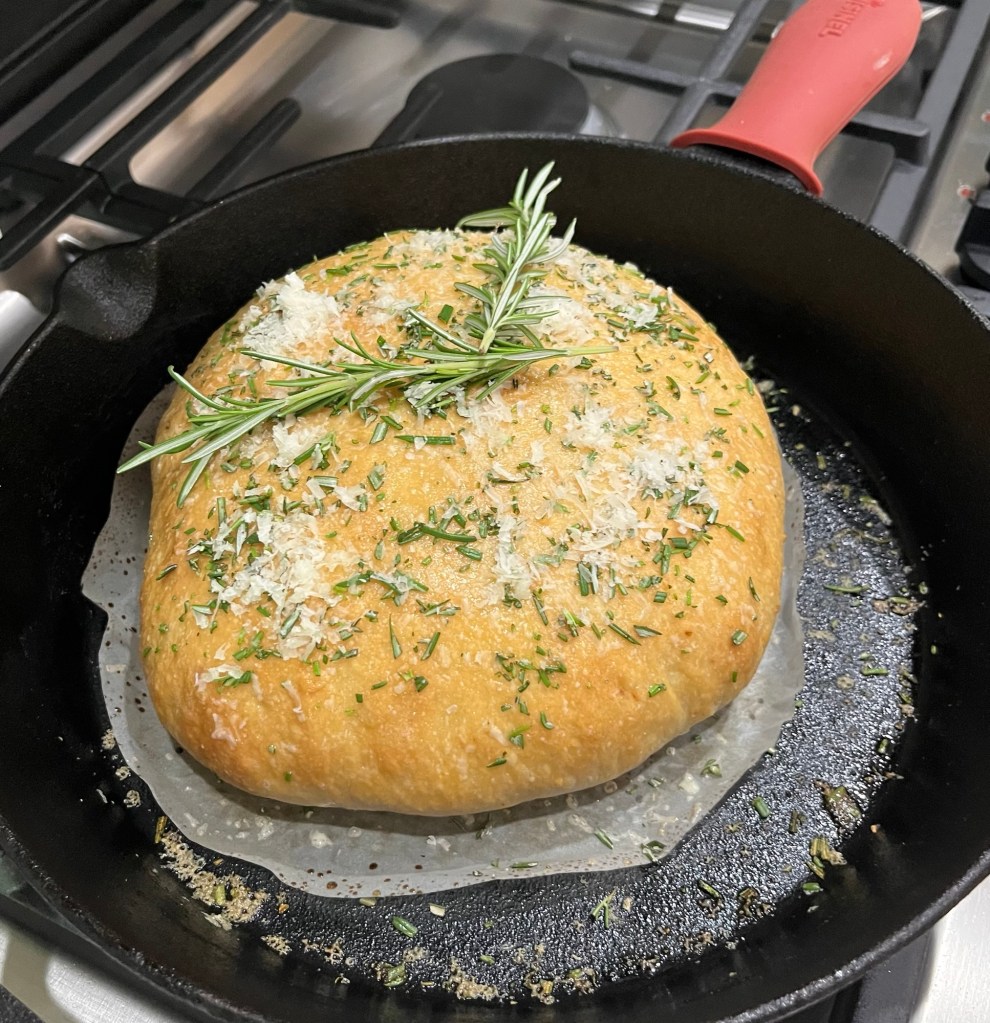
  6. Lightly oil a 10-inch cast iron skillet or coat with nonstick spray, sprinkle with cornmeal. Score a large cross in the bread with a lame or sharp knife.
  7. Place the loaf in the skillet for 30-40 minutes, checking the internal temperature every 5 minutes after the first 20, or until golden brown and cooked through.
  8. While the bread is still warm, brush with melted butter and sprinkle with chopped rosemary and Parmesan cheese.
  9. Let the bread cool slightly before slicing and serving. Try this with an oil and vinegar dip.

No-Knead Honey Oat Bread

Well, Sally did it again. I subscribe to the sallysbakingaddiction.com mailing list. Along with its featured content it contains links to other enticing bakes and I found one yesterday. First of all “no-knead” always catches my attention. It requires much less hands on action. “Oat” is a second tick in the box as I bought oats at Costco a couple of weeks ago and have lots and lots and lots to use. And finally, “honey” is my go-to sweetener. Plus, the smallest amount Costco sells is three jars!

This is a 92% hydration bread (360g water::390g flour) so do not expect it to behave like the way a 65% hydration bread will. The dough is so soft the lame (or knife) tears it, rather than cuts. You cannot tension the surface as you can with lower hydration bread, but I found freezing it for 30 minutes before baking then slashing helped.

All that being said, this is a delicious honey oat bread. (I am eating a QC test slice right now.) The hint-o-cinnamon sets it off perfectly. (To confirm the evaluation, I had to have a second slice.)

No-Knead Honey Oat Bread

https://sallysbakingaddiction.com/no-knead-homemade-honey-oat-bread/print/76423/
(Modified for my use.)

INGREDIENTS
• 390g (3 c) bread flour
• 85g (1 c) old-fashioned whole oats
• 1½ tsp Platinum Yeast from Red Star or any instant or active dry yeast
• 1½ tsp salt
• ½ tsp ground cinnamon
• 360g (1 ½ c water, close to room temperature at about 70°F (21°C)
• 128g (6 Tbl) honey
• 25g (30ml or 2 Tbl) vegetable oil (or other neutral tasting oil)

METHOD

  1. The evening before baking: In a large ungreased bowl, whisk 3 cups (390g) bread flour, the oats, yeast, salt, and cinnamon together. Set aside. In a medium bowl or large liquid measuring cup, whisk the water, honey, and oil together. Pour water mixture into flour mixture and gently stir together with a dutch dough whisk, silicone spatula or wooden spoon to combine. Dough will be heavy and very wet/sticky. Do not overwork dough.
  2. 1st rise: Cover the dough tightly with plastic wrap or aluminum foil and set on the counter at room temperature for 12-18 hours. (See note if you need to extend this time.) You want it to almost double in size during this time.
  3. Gently shape: Turn the dough out onto a lightly floured work surface and, using lightly floured hands, shape into a ball as best you can. Transfer dough to a large piece of parchment paper. Lift the parchment paper and dough up and place it all into a banneton (oval or round depending on the shape of your dutch oven.) Using a very sharp knife or bread lame, gently score an X into the top. Cover dough lightly with plastic wrap and leave alone for 30 minutes. (The dough is very slack, typical of a 90+% hydration bread. To firm the surface of the dough I put it, still in the banneton, into the freezer for 30 minutes, then slashed it.
  4. Bake: Heat the oven, with dutch oven and lid inside, to 425°F (218°C) for 30 minutes. After 30 minutes place the dough inside the dutch oven by lifting it up with the parchment paper and sticking it all–the parchment paper included–inside the pot.
  5. Cover with the lid. Bake for 30 minutes with the lid on. Carefully remove the lid and continue baking for 10-12 more minutes or until the bread is golden brown. The bread is done when an instant read thermometer reads the center of the loaf as 195°F (90°C).
  6. Remove dutch oven from the oven, carefully remove the bread, and allow to cool on the counter for 30 minutes before breaking/slicing/serving.
  7. Cover leftover bread and store at room temperature for up to 3 days or in the refrigerator for up to 10 days.

NOTES

  1. Make Ahead Instructions: This recipe is wonderful for making ahead because the 1st rise time (step 2) is so long. If needed, you can extend the 1st rise time by letting the dough rest in the refrigerator instead of at room temperature for up to 18 hours. Then, after refrigerating, let the dough sit at room temperature to warm and rise, about 4-6 hours. You want it to mostly double in size during this time. Do not extend these times further because the dough may begin to deflate.
  2. Freezing Instructions: Prepare recipe through step 4 and feel free to use a disposable loaf pan since it will be going into the freezer. Cover loaf tightly and freeze for up to 3 months. On the day you serve it, let the loaf thaw and rise for about 5 hours at room temperature. Bake as directed. You can also freeze the baked bread loaf. Allow the bread to cool completely and then freeze for up to 3 months. Thaw in the refrigerator or at room temperature and reheat if/as desired.
  3. If You Want to Top with Oats or Cinnamon-Sugar: If you want to top the dough with oats prior to baking, carefully brush the dough after the 2nd rise (step 5) with 1 egg white beaten with 1 Tbsp water, and then sprinkle 2 Tbsp of oats on top. (The oats do not stick without the egg white and the bread will no longer be egg-free by doing this.) You can skip the egg white/oats and sprinkle cinnamon-sugar on top instead. Combine 1 Tablespoon granulated sugar and 1/8 teaspoon cinnamon. Sprinkle on top of the loaf right before baking.

Memorial Day Bake

Dede’s bakery opened early this morning. QC (Fran) loves the smell of fresh bread when she wakes. It had been a while since I made the hi-hydration honey bread, so… I also made some shortbread cookies which will be part of the decorations for a cake this weekend

I need to flood the cookies to finish them, but I have lots of time. I also need to practices some Italian buttercream as I had major issues the last time I made some.

Both bakes were excellent and a good treat for elevensies.

No Nothin’ Rustic Bread

I often make a no knead bread which uses the stretch and fold technique and is delicious, has a good crumb, crust and air holes.

I saw this recipe in my Facebook feed and I was skeptical it could compete with my usual recipe/method.. After a trial bake it was every bit as good as my go-to recipe with NO stretch and fold or kneading. Prep time was about 10 minutes. Total “hands-on” time was about 15 minutes.

We all know you don’t need to knead (I love saying that) to create gluten. Gluten development starts on hydration of the dough. Thorough mixing equals good hydration which enables gluten formation.

I mixed the three ingredients (plus water) with my danish dough whisk assuring all the dry ingredients were well hydrated before covering and placing in the fridge overnight.

In the morning I let the dough warm to room temperature and rise for about 3 hours. I placed it on a well floured parchment paper, folded it into a round boule, flipped it over so the folded side is down. Before placing in the Dutch oven I cut a deep X in the top.

No Knead Bread – 3 Ingredient

INGREDIENTS

  • 3 1/2 cups bread flour
  • 2 teaspoons sea salt
  • 1 teaspoons instant yeast
  • 1 2/3 cups water (100 degrees F

METHOD

  1. Mix dry ingredients in a large bowl. Using a wooden spoon or Dutch dough whisk blend warm water into the dry ingredients. This dough will be wet and shaggy, also very forgiving. Mix until
    no dry flour is seen. Cover with plastic wrap and put a towel on top to proof for 8-10 hours at room temperature or for several days in the fridge.
  2. If refrigerated, take the dough out and place on parchment before heating the oven so it gets to room temperature, then preheat the oven to 450 F with the covered Dutch oven inside.
  3. Dust a large square of parchment paper with flour and turn out the dough carefully. (It will be sticky but try to preserve the proof.) Dust the top with flour and using a dough scraper gently
    fold the dough over and create a round boule. Use the sharp edge of the scraper to score lines in the dough. Cover with the plastic wrap and let rest until pot and oven are up to temperature.
  4. Remove the pot from the oven. Place the parchment paper and dough into the Dutch oven and replace lid. Bake, covered, for 35 minutes. Then, anywhere from 5 to 10 minutes uncovered
    (this is a personal taste issue about the crispness of the crust). Let the bread rest 30 minutes. It will be hard, but you will wreck the loaf by cutting into it immediately.

The Baguette Challenge – #1

I was in Versailles, Fr last month and had what was undoubtedly the best baguette of my life. The crust had the exact right crunch and the interior was soft and light. Then and there I decided I needed to perfect my baguette baking to at least approach this level of perfection.

My go-to recipe is from King Arthur and it served me well. Upon returning home I searched for differences in recipe ingredients and methods keying on authors who tauted the bread qualities that I wanted.

From what I understand the hydration level, (this recipe is 72%) at least in part, determines the size of the holes in the bread. By using the stretch and fold technique with a long rest (45 min) between each helps develop the gluten. These two properties contribute to the characteristics I desire.

This is the first attempt of “perfecting” my baguette. Do you remember my five attempts at baking an acceptable rye bread? Well, here we go again,

Classic French Baguettes

INGREDIENTS

• 500 g all purpose flour
• 360 g water
• 10 g salt
• 3 g instant yeast about 1 tsp
• 25 g honey about 1 Tbsp

METHOD

  1. Mix all ingredients in a bowl, cover with a plastic wrap and let rest for 15 minutes.
  2. Stretch and fold every 45 minutes and repeat at 3 times, flipping the dough upside down after each set. The rest time between stretch and folds is important.
  3. Cover the bowl with a plastic wrap and place in refrigerator overnight for about 12-14 hours.
  4. Turn the dough on a lightly floured work surface. Divide into 3 equal parts and gently shape into rectangles without knocking the air out of the dough. Cover and let rest for 45-60 minutes.
  5. Preheat the oven to 500F, with a baking stone positioned in the upper half the oven. I like to use a small cast iron skillet with water to provide steam. Add the water below when the loaves are put into the oven.
  6. Stretch each dough rectangle slightly and fold into a cylinder, sealing the seams as you roll. Using your hands, roll the cylinders gently stretching them from the center towards the ends to desired length, about 14-15 inches.
  7. Place each loaf on a lightly floured couche, seam side up. Cover and proof at a room temperature for about 30-60 minutes, or until the dough has sufficiently proofed. Press dough with a finger. If it springs back slowly it is properly proofed. If it never springs back it is over proofed and if it springs back quickly it is under proofed.
  8. Transfer the baguettes to a piece of parchment paper, seam side down and dust off excess flour. I like to use a serrated break knife to make 5 scores on each baguette. Don’t cut straight across the loaf, but with a shallow long cut down the length. Each cut should be 4-5” longWhen scoring, use a swift and firm motion to ensure nice and clean cuts.
  9. Carefully open the oven, and slide the rack with the baking stone out. Slide the baguettes off the parchment paper and onto the baking stone. Add a cup of water to the cast iron skillet, close the oven and reduce temperature to 475F. Bake for 15 minutes.
  10. Remove the water pan, rotate the baguettes, drop the temperature to 450F and continue baking for another 10- 15 minutes, Check how brown the baguettes are after 10 minutes and every couple of minutes thereafter. They should be a nice dark brown, but not too dark. Over baking will make the crust and interior too hard. Experience will tell you when it is Goldilocks just right.

Rustic Italian Bread

I ran across a four ingredient, no knead, no stretch and fold, Italian bread. I am on my third bake of this bread, each with minor tweaks.

Version 1 was as presented. Version 2 was as presented but baked in a Dutch oven (my preferred baking method.) Version 3 included Cake and Bread Enhancer (fifth ingredient) and was baked flat on a baking stone.

Version 1 was excellent. Version 2 was excellent. Version 3 was excellent. All three had great, crispy crusts and a soft tender crumb on the inside.

My current favorite is (was) my high hydration honey no-knead bread, but this may be my new go to. It’s even easier than the honey no-knead. Simply mix everything together the let it ferment for 2 hours. Gently pour out, (I do mean pour, it is high hydration, slack and sticky,) minimally shape and bake. All done!

My goal is to create larger holes in the bread. Version 2 (center) and 3 (right) were the best. I overworked the fermented dough a little too much in Version 1. Try, try, and try again!

Rustic Italian Bread

INGREDIENTS
• 380 g AP flour + more for dusting
• 20 g (3 Tbl) Bread Enhancer
• 1 tsp sea salt
• 350 g warm water
• 2 tsp active dry yeast

METHOD

  1. Add the flour, enhancer, salt and yeast to your stand mixer. Use the paddle attachment to mix and combine so no dry patches remain.
  2. Add the warm water and mix until everything is incorporated and a soft, wet dough forms. It will be a slack, sticky dough.
  3. Loosely cover the bowl with plastic and let the dough rise at room temperature (See tip below) for 2 to 3 hours or until doubled in size.
  4. Dust your kitchen counter with flour and scrape the very sticky dough out with a bowl scraper.
  5. With floured hands shape the dough into a ball (or batard,) deflating it as little as possible.
  6. Line a banneton with parchment paper. (See tip below)
  7. Place the ball of dough in the lined banneton smooth side up and let it rest while your oven heats up.
  8. Use a sharp knife or lame to lightly slash an X in the top of the loaf.
  9. Preheat your oven to 450 F with a dutch oven inside for about 45 minutes before baking the bread. Fill an oven proof bowl with 2 inches of water and place it on the bottom rack.
  10. Once hot, carefully transfer the bread loaf into the dutch oven using the parchment paper.
  11. Cover with the lid and bake for 30 minutes. Remove lid and bake another 5 minutes until golden brown on top. The internal temperature should be 205 F
  12. Remove the bread from the dutch oven and transfer to a cooling rack or it won’t stay crispy.

TIPS

  1. Lining a round banneton: Crumple parchment paper starting from the edges. You should end up with a ball which will smooth out to fill the round banneton
  2. Room temperature proofing: I like to put the bowl in an “off” oven with the light on. In the winter my kitchen tends to be cool (62-65 F) My “off” oven with the light on is 78o F.

From King Arthur Baking’s Cake and Bread Enhancer: A “miracle” ingredient for your cakes!

(From KAB) Our bakers have called this the “miracle” ingredient for many reasons: it makes cakes and other baked goods softer, moister, and helps them stay fresher longer. Our blend contains vegetable fats that act as emulsifiers, allowing the fats and liquids in your favorite recipe to combine more easily. The enhancer also acts as a stabilizer and texture enhancer. Cake enhancers are commonly used in professional bakeries to keep breads fresh and soft, and help cakes stay light and fluffy. It’s especially great for making soft sandwich loaves.

Dede’s Bakery President’s Day Continued

While I was waiting for other items to mix/chill/rise/etc I made a few other items this morning.

We were nearly out of bread (amazing.) I made a loaf of my honey high-hydration no-knead bread. This may be the prettiest loaf I have made. The slashes on top were well defined and kept the bread from blowing out anywhere else.

Oh, by the way, there are three-berry scones in the background. I like to freeze them, then on golf days take them from the freezer and snack on them on the course. They don’t seem to help my game, but do make it more enjoyable.

This time, I made the scones bigger than usual. I used some frozen berries we had (ever frugal) and had trouble incorporating them into the dough. They ended up being delicious!

Pan de Cristal

I subscribe to King Arthur Baking’s newsletter and occasionally they distribute a new recipe, or technique that I cannot resist trying. Well, this is one of those times. They included a video that demonstrated the techniques required to handle very high hydration breads. This one is 100%, which means 1:1 water to flour ratio and I could never have made this bread without their technique, (which worked perfectly.)

QC says it’s like eating air.

Big holes and perfect crust. Pair with butter, honey, or oil and vinegar. Oh my!
This was my dessert tonight. Buttered Pain de Cristal and honey.

While KAF’s videos demonstrating the bowl and coil folds I decided to make my own. (Theirs are better quality, mine may be truer to life.)

Mix all ingredients then let rest 20 minutes
First fold with extremely slack dough. With wet hand stretch a portion of the dough up and into the middle of the dish. Repeat at least 12 times then rest, covered, 20 minutes
This is the second (or third, I forget) coil fold. With wet hands pick up the dough about 3/4ths of the way, stretch it up and let it fall back under the bulk of the dough. Repeat with the other end, then repeat the entire fold several times. Note the dough becomes easier to handle and less sticky with each coil fold. There are a total of 4 coil folds.
Tip the dough out onto a heavily floured surface. Cover top with more flour so there are no sticky spots. Use a bench knife to cut into four equal pieces and flour the edges where you cut.
Carefully, without deflating, shape the dough and place on parchment paper. Let rest for 2 hours.
Note the bubbles formed in the dough. For future bakes I would let the dough rest longer than 2 hours to develop more aeration, bubbles and holes in the final brea.

Ingredients

  • 500g water (80 F in warm weather, 100F if cold)
  • 500g Bread Flour
  • 2.5g (3/4 teaspoon) instant yeast
  • 10g salt
  • 15g olive oil


METHOD

  1. Pretty much see the captions in the above videos.