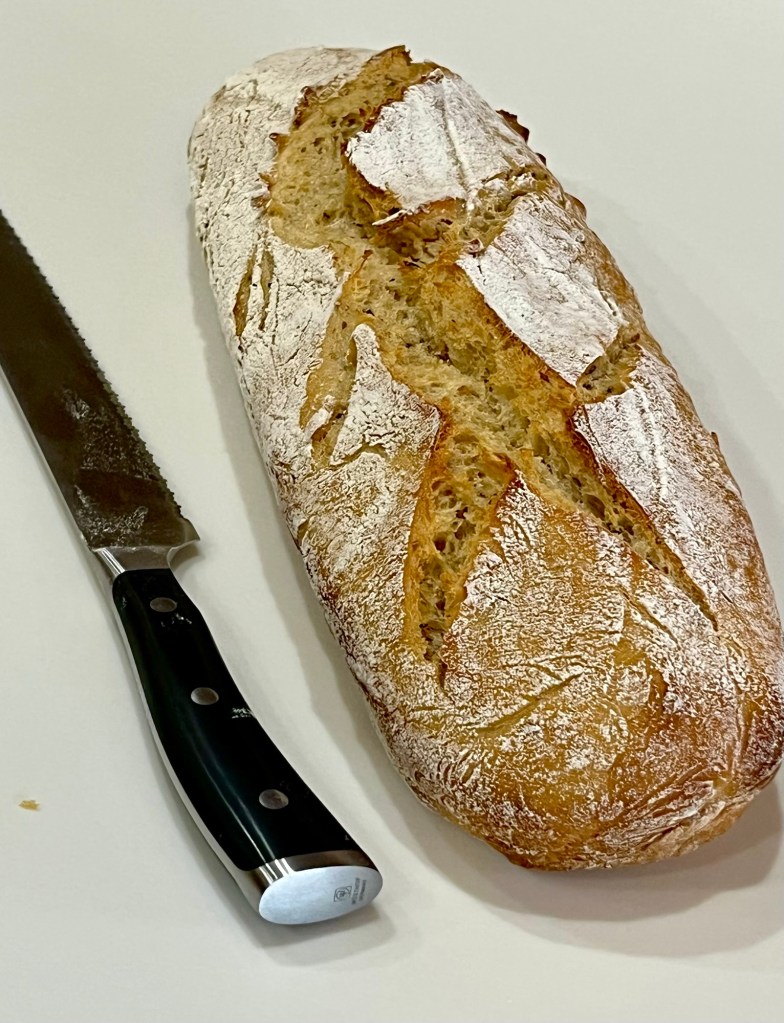
We love a good rye bread with soft, chewy interior and crisp, crunchy crust. If you do also, this breads for you.
It’s simple to make, it’s the first overnight rise that takes time. Combining the ingredients takes 15-20 minutes, then rise for 2 hours. Refrigerate overnight and the next day let it rise at room temperature for 2-3 hours, then bake for ~30 minutes.
Light Rye Bread – KAB
INGREDIENTS
• 340g (1 ½ c) lukewarm water • 280g (2 ⅓ c) bread flour • 163g (1 ½ c) light rye flour • 28g ( ¼ c) nonfat dry milk • 1 ½ tsp table salt • 1 ½ tsp instant yeast • 1 ½ tsp Deli Rye Flavor, optional • 25g (2 Tbl) vegetable oil • 1Tbl caraway seeds
METHOD
Place the water in the bowl of a stand mixer.
Combine the flours with the remaining ingredients with the warm water. Mix until there are no dry spots and all of the flour is moistened. The texture of the dough will be soft and sticky due to the pumpernickel flour.
Cover the bowl and let the dough rise at room temperature for 2 hours. Then refrigerate overnight, or for up to 48 hours.
Grease your hands, and scoop the dough out onto a lightly greased or floured work surface. Shape it into a ball or boule and place it, smooth side down, in a floured brotform. Let the dough rise, covered, for 2 to 3 hours.
About 45 minutes before the end of the rising time, preheat the oven to 450°F with an appropriate Dutch oven.
When the loaf is fully risen, remove the hot Dutch oven bottom from the oven, carefully grease it, and tip the risen ball of dough into it. Make several slashes in the dough. Cover with the lid, and place it on a middle rack in the oven.
Bake the bread for 25 minutes. Check the interior temperature with a digital thermometer. When fully baked it should register at least 195°F. If not, remove the lid and bake for an additional 5 to 10 minutes until the loaf should be lightly browned.
Remove the bread from the oven and turn it out of the crock onto a rack. Cool for several hours before slicing.
This noon we are co-hosting a soup and bread lunch for a group of friends. I decided to make some of my favorite breads to share. They are all documented in this blog, so I am not including any recipes here.
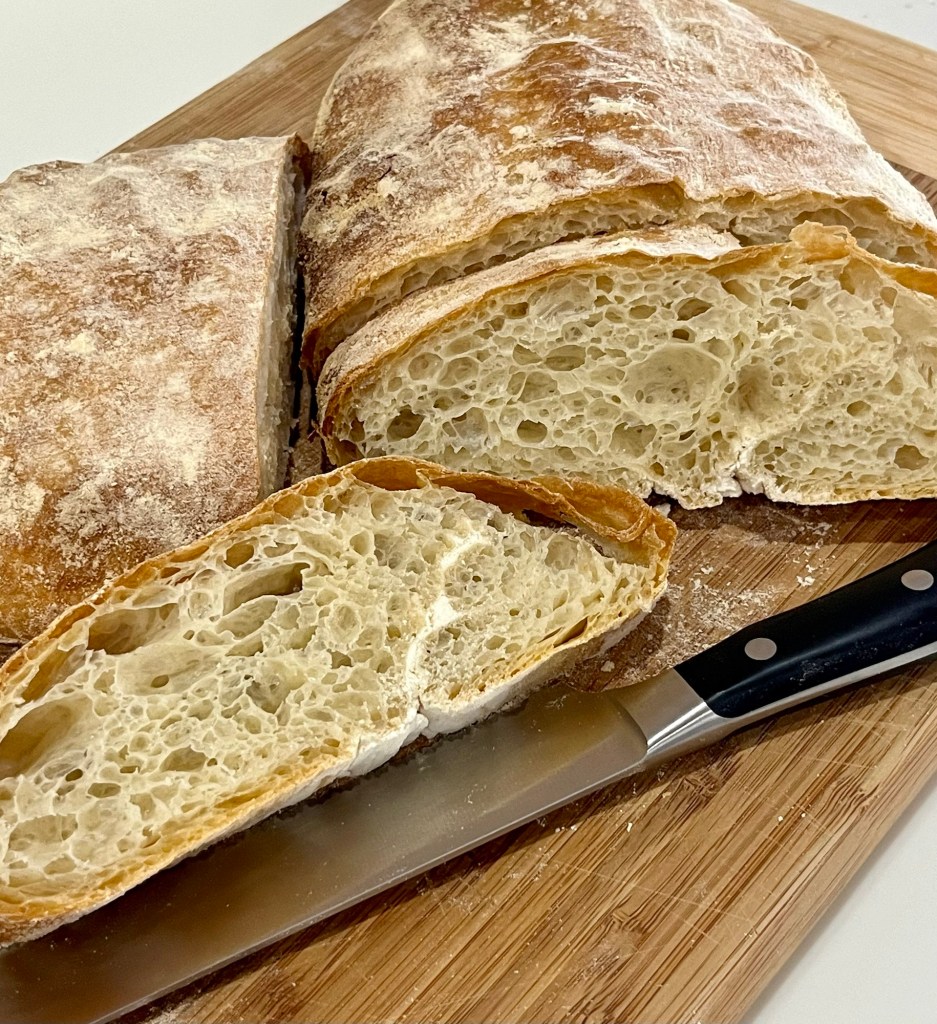
Pan de Cristal, or ice bread, is one of my favorites. It’s an open structure and crisp crust bread, and so good.
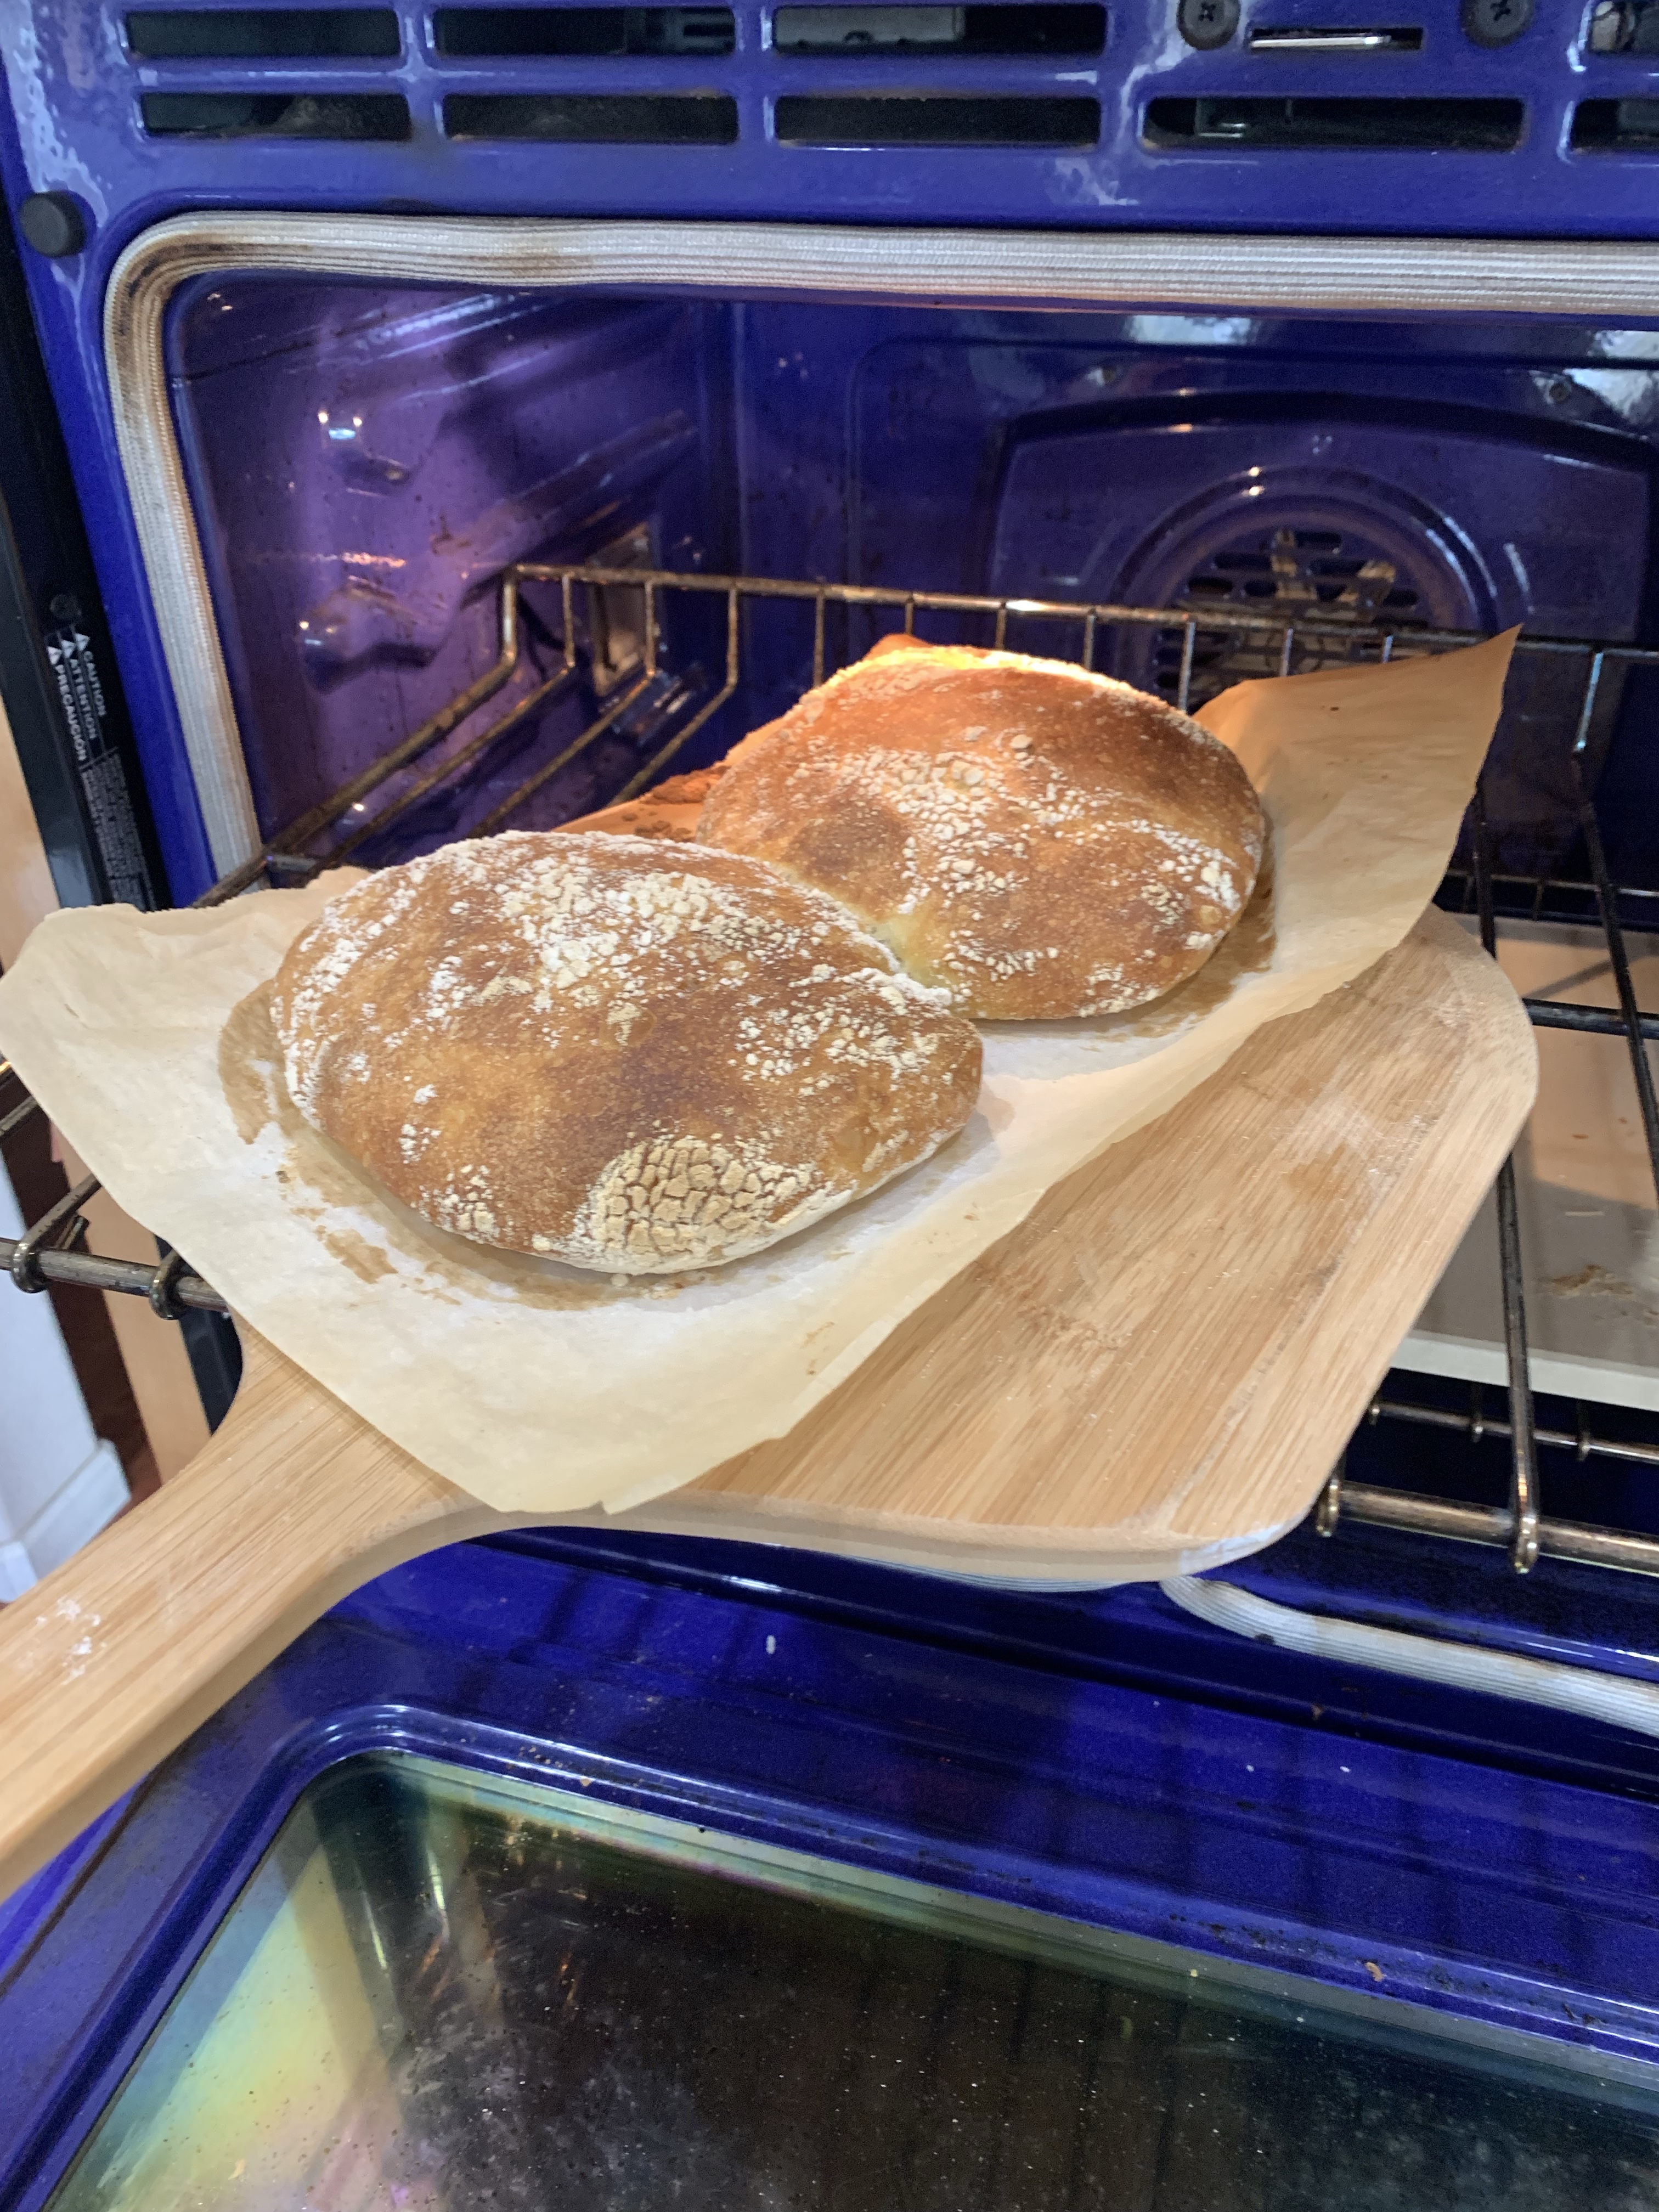
Artisan bread rolls are easy to make and are always delicious. I simply formed my normal artisan bread into small rolls and baked for a shorter time.
Pan de Cristal is an open structure, high hydration, crispy-crust bread from the Catalonian region (Barcelona) of Spain. The great crust and soft chewy interior make it perfect for dipping in oil and vinegar or coating with some good butter.
For those who are not “breadies,” high hydration bread is not for the faint of heart. The entire bake will require about 6 1/2 hours start to finish. Most of the time is resting the dough, but the day is broken up with bowl and coil folds every 20 minutes.
I like to start 2 timers at the beginning. One for 20 minutes and I restart that after every fold. The other is for 3 hours so I don’t need to keep track of all the subsequent folds, just coil fold every 20 minutes until the second timer rings.
Pan de Cristal
INGREDIENTS • 500g water (80 F in warm weather, 100F if cold) • 500g Bread Flour • 3 g (1 tsp) instant yeast • 10g salt • 15g olive oil (for the casserole pan)
METHOD Below is KAB’s method, slightly modified.
To make the dough: Weigh your flour.
In a medium bowl, mix the water, flour, yeast, and salt until thoroughly combined and homogenous. Note: The dough starts off very slack and wet and resembles pancake batter. It will transform itself through time and folds.
Oil a two-quart rectangular baking dish, or casserole pan, (10” x 7”) with the olive oil. The sides should be greater than 1.5” high.
Pour the dough into the pan. Check the dough’s temperature by inserting a digital thermometer into the center. If it’s less than 72°F, move the pan to a warmer spot, e.g., your oven with the light turned on. The dough MUST ferment at a constant 72-78 F.
Cover the pan and allow the dough to rest for 20 minutes.
Start with a bowl fold: Use your wet hands to grab a section of dough from one side, lift it up, then press it down into the middle. Repeat 8 to 12 times going around the periphery of the baking dish 2 or 3 times.
Cover the dish and allow the dough to rest for 20 minutes.
Next do a coil fold: With wet hands, reach under the dough and stretch the middle upward until the dough releases from the dish. Roll it forward off your hands, allowing it to fold over (or “coil”) on itself. Rotate the dish 90 degrees (a quarter turn) and repeat. Continue performing this folding action until the dough will stretch and elongate easily, usually four to five times initially.
Cover the pan and allow the dough to rest for 20 minutes.
Repeat the coil fold: Note: Do coil folds three more times, covering each time, to build strength and developing the dough. (60 more minutes.)
At this point, the dough should be easier to handle and feel tighter. Repeat the coil fold using only two or three folds this time. Cover the bowl and allow the dough to rest for 20 minutes.
Repeat the coil fold one last time, using only one or two folds if the dough is relatively strong and large bubbles should have formed. Transfer the dough to a larger, oil coated dish, cover the dish and allow the dough to rest for about 80 minutes. It should about triple in size. After this rest 4 hours should have elapsed.
Divide the dough: Coat the top of the dough with flour. Use a bowl scraper to gently release the dough from the sides of the pan.
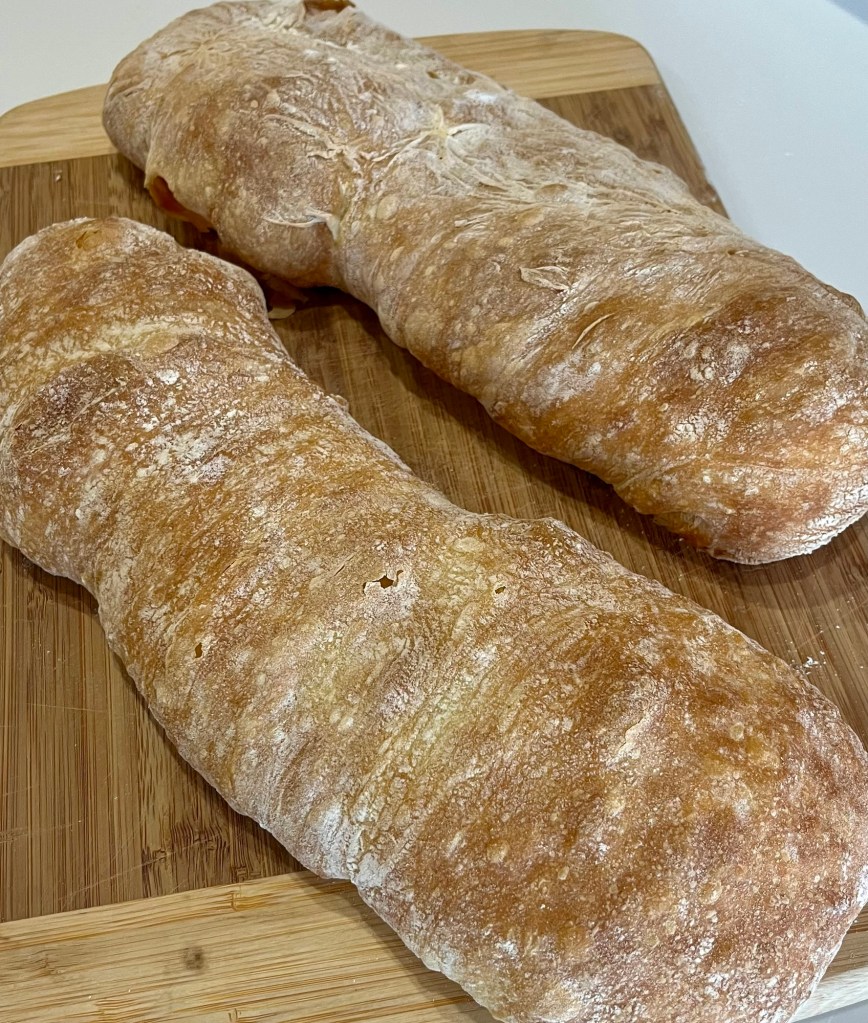
As gently as possible, turn the dough out onto a heavily floured surface, keeping the rectangle or square shape – be careful not to deflate the delicate dough. Sprinkle a generous amount of flour on top of the dough, leaving no exposed sticky spots. a. For four small loaves: Working as gently as possible, use a bench knife or other sharp knife to divide it into four pieces. Gently place two pieces on a piece of parchment, leaving space between them. b. For two long loaves: lay two pieces of parchment paper, overlapping 2”. Carefully divide the dough in half lengthwise. Using a bench knife carefully slide some flour under each loaf and shape into regular rectangles. As gently as possible slide the loaves onto separate pieces of parchment paper.
Allow the loaves to rest at room temperature for 2 hours, uncovered until large bubbles appear on the sides and surface. The dough flattened out while proofing for 2 hours. Try a shorter time and watch for bubbles. While the loaves are resting, preheat the oven to 475°F with a baking stone on a lower rack. The loaves are ready for the oven when there are a few large bubbles on the surface of each loaf, and they feel light and airy.
To bake the bread: Carefully slide the two loaves (still resting on the parchment) into the oven onto the preheated stone or steel. If space is tight and the full sheet of parchment won’t fit on the stone or steel, cut the parchment between the two loaves and arrange them as best you can. Allow the other two loaves to continue to rest.
Bake the loaves for 15 minutes, then transfer them, from the stone or steel, directly onto a rack in the upper third of the oven for an additional 13 to 15 minutes. Moving them allows the baking stone or steel to become hot again in preparation for the next two loaves. After a total of 30 minutes of baking, remove the loaves from the oven and allow them to cool on a rack.
Repeat the process with the two remaining loaves or loaf. Cool the bread fully before slicing.
Storage information: Wrap the bread loosely and store it at room temperature for up to several days; freeze for longer storage.
I first made this bread about two years ago. I was hesitant to make it again as it isn’t the easiest loaf to make. It’s 100% hydration which means equal parts flour and water. This makes a very soft, slack, tricky dough to handle, However, this weekend I saw a great tutorial on YouTube by Martin Philip at King Arthur Baking. He demonstration how to make it much easier, I decided to give it another try. (My no golf weekend is not over.)
Watch his tutorial and give it a try. It still isn’t the easiest, even with his help, but it is well worth the effort. It has a crisp crust and the texture of air inside. A little butter, or some oil and vinegar REALLY sets this bread off.
Pan de Cristal
INGREDIENTS • 500g water (80 F in warm weather, 100F if cold) • 500g Bread Flour • 2.5g (3/4 teaspoon) instant yeast • 10g salt • 15g olive oil
METHOD
To make the dough: Weigh your flour; or measure it by gently spooning it into a cup, then sweeping off any excess.
In a medium bowl, mix the water, flour, yeast, and salt until thoroughly combined and homogenous. Note: The dough starts off very slack and wet. That’s OK; it will transform itself through time and folds.
Oil a two-quart rectangular baking dish (10” x 7”) with the olive oil. If you don’t have a 2-quart dish, an 8” or 9” square pan will work. Don’t worry about any pan you use being oven-safe; you won’t be baking the bread in it.
Pour the dough into the pan. Check the dough’s temperature by inserting a digital thermometer into the center. If it’s less than 72°F, move the pan to a warmer spot, e.g., your oven with the light turned on.
Cover the pan and allow the dough to rest for 20 minutes.
Start with a bowl fold: Use your wet hands to grab a section of dough from one side, lift it up, then press it down into the middle. Repeat this around the pan eight to 12 times.
Cover the dish and allow the dough to rest for 20 minutes.
Then do a coil fold: With wet hands, reach under the dough and stretch the middle upward until the dough releases from the dish. Roll it forward off your hands, allowing it to fold over (or “coil”) on itself. This is called a coil fold. Rotate the dish 90 degrees (a quarter turn) and repeat. Continue performing this folding action until the dough feels like it won’t stretch and elongate easily, usually four to five times initially. Note: You’ll be doing this three more times, each time building strength and developing the dough.
Cover the pan and allow the dough to rest for 20 minutes.
Repeat the coil fold. Cover the bowl and allow the dough to rest for 20 minutes.
At this point, the dough should be easier to handle and feel tighter. Repeat the coil fold using only two or three folds this time. Cover the bowl and allow the dough to rest for 20 minutes.
Repeat the coil fold one last time, using only one or two folds if the dough is relatively strong. Cover the bowl and allow the dough to rest for about 80 minutes.
To divide the dough: As gently as possible, turn the dough out onto a heavily floured surface, maintaining the rectangle or square shape – be careful not to deflate the delicate dough. Sprinkle a generous amount of flour on top of the dough, leaving no exposed sticky spots. Then, working as gently as possible, use a bench knife or other sharp knife to divide it into four pieces. Gently place two pieces on a piece of parchment, leaving space between them. Repeat with the remaining two pieces of dough, placing them on another piece of parchment.
Allow the loaves to rest at room temperature for 2 hours, uncovered. While the loaves are resting, preheat the oven to 475°F with a baking stone or steel on a lower rack. Allow the oven to preheat for 1 hour to ensure it’s thoroughly heated. The loaves are ready for the oven when there are a few large bubbles on the surface of each loaf and they feel light and airy.
To bake the bread: Carefully slide the two loaves (still resting on the parchment) into the oven onto the preheated stone or steel. If space is tight and the full sheet of parchment won’t fit on the stone or steel, cut the parchment between the two loaves and arrange them as best you can. Allow the other two loaves to continue to rest.
Bake the loaves for 15 minutes, then transfer them, from the stone or steel, directly onto a rack in the upper third of the oven for an additional 13 to 15 minutes. Moving them allows the baking stone or steel to become hot again in preparation for the next two loaves. After a total of 30 minutes of baking, remove the loaves from the oven and allow them to cool on a rack.
Repeat the process with the two remaining loaves. Cool the bread fully before slicing.
Storage information: Wrap the bread loosely and store it at room temperature for up to several days; freeze for longer storage.
I subscribe to King Arthur Baking’s newsletter and occasionally they distribute a new recipe, or technique that I cannot resist trying. Well, this is one of those times. They included a video that demonstrated the techniques required to handle very high hydration breads. This one is 100%, which means 1:1 water to flour ratio and I could never have made this bread without their technique, (which worked perfectly.)
QC says it’s like eating air.
Big holes and perfect crust. Pair with butter, honey, or oil and vinegar. Oh my!Left: Removing loaves using peel. R: Four loaves coolingThis was my dessert tonight. Buttered Pain de Cristal and honey.
While KAF’s videos demonstrating the bowl and coil folds I decided to make my own. (Theirs are better quality, mine may be truer to life.)
Mix all ingredients then let rest 20 minutesFirst fold with extremely slack dough. With wet hand stretch a portion of the dough up and into the middle of the dish. Repeat at least 12 times then rest, covered, 20 minutesThis is the second (or third, I forget) coil fold. With wet hands pick up the dough about 3/4ths of the way, stretch it up and let it fall back under the bulk of the dough. Repeat with the other end, then repeat the entire fold several times. Note the dough becomes easier to handle and less sticky with each coil fold. There are a total of 4 coil folds.Tip the dough out onto a heavily floured surface. Cover top with more flour so there are no sticky spots. Use a bench knife to cut into four equal pieces and flour the edges where you cut.Carefully, without deflating, shape the dough and place on parchment paper. Let rest for 2 hours.Note the bubbles formed in the dough. For future bakes I would let the dough rest longer than 2 hours to develop more aeration, bubbles and holes in the final brea.