OK, I realize you can’t hit ‘em all out of da park, and I realize that accidents do happen when baking, but sometimes there is simply a “perfect storm” that is unavoidable.
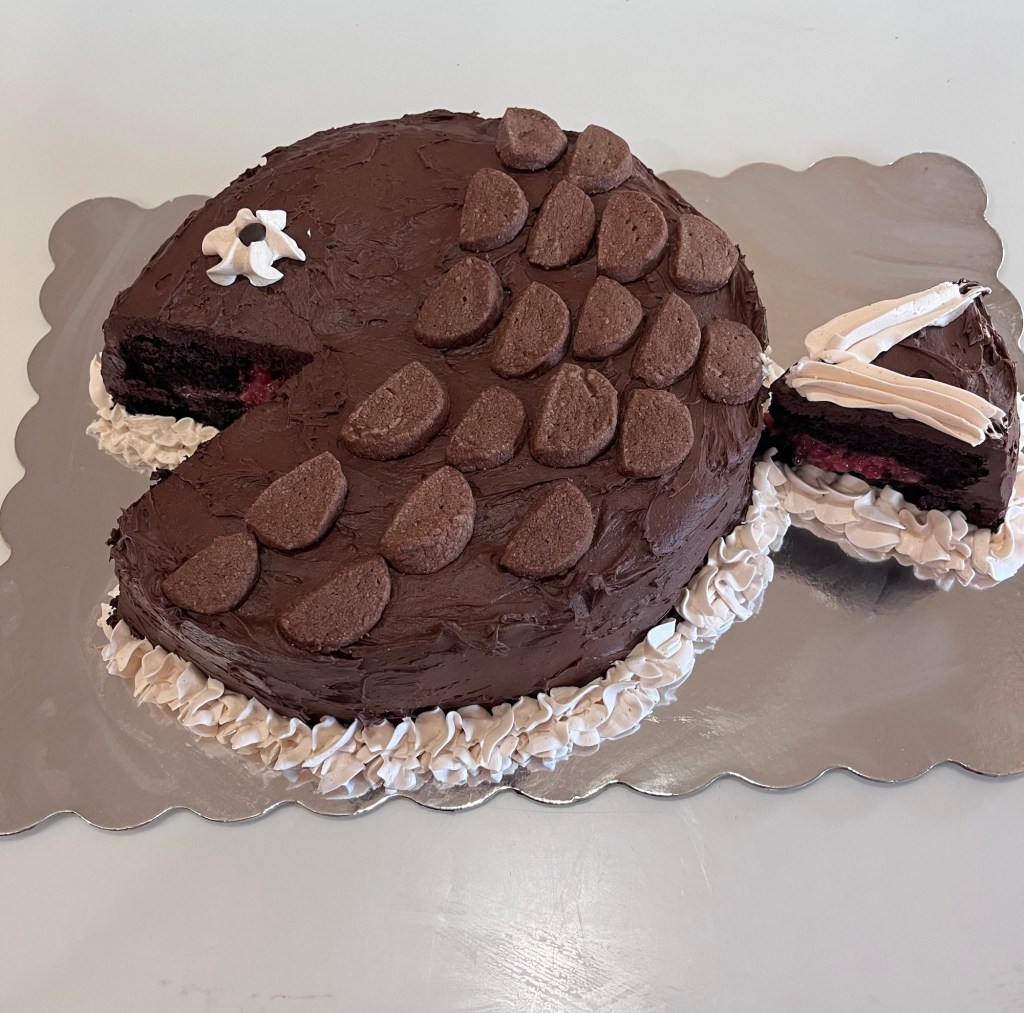
I saw a picture of a cake shaped like a fish which was perfect for the Fish Fry fundraiser dinner last night.
In no particular order here are the mistakes I made with my “Fish Cake”
I chose the wrong cake recipe for my cake. It was too fragile for the required shaping. I needed a denser cake to hold everything together. I considered starting over with a firmer cake, but it was like I was in a baking contest and had a time limit. As it turned out I baked most of the day and finished with 15 minutes left. Whew!
The visual appeal was uninspiring for high value bids. While it may be a delicious cake, it must appeal to people to bid.
I didn’t check my supplies and ran out of cocoa powder before finishing. (However, the QC Cadre came through in many ways to help out!)
The chocolate shortbread cookie scales were almost perfect, but should have been lighter shade of brown than the frosting.
The cake ended up selling, but for much less than previous years entries. Note to self: Remember lessons learned this past week.
I used my standard Extreme Chocolate Cake and frosting. The flavor is outstanding. I used a new recipe for the chocolate shortbread cookies and they are delicious.
I filled the cake with a raspberry curd mixed with mashed fresh raspberries for the fresh berry tartness. ( It was so good I almost bought the cake so the QC Cadre and I could share it.)
Chocolate Shortbread Cookies
INGREDIENTS
226g (1 c) butter (use salted butter, see note)
113g (1 c) powdered sugar
20g (¼ c) unsweetened cocoa powder
1 teaspoon vanilla extract
217g (1 ¾ c) all-purpose flour
½ tsp salt
METHOD
Cream butter and sugar in the bowl of a stand mixer (or in a very large bowl using a hand mixer), until fluffy and creamy, about 1 minute. Scrape the sides and bottom of the bowl.
Mix in cocoa powder and vanilla, then again scrape the sides and bottom of the bowl.
Add flour and mix until smooth, scraping the sides and bottom of the bowl (especially down in the bottom of the stand mixer bowl where things get caught) once during mixing.
Lay out a piece of plastic wrap on a clean work surface. Scoop the dough onto the plastic and use your hands to form it into a log. Wrap up the log and roll to make into a uniform size. How long your roll is determines how many cookies you’ll get (or if you want small bite size cookies, make two rolls).
Chill the rolls at least 1 hour, or until firm, before slicing and baking (or as long as overnight). To help the roll stay round, place it standing up in a tall drinking glass to chill in (this way it won’t flatten on one side).
Preheat oven to 350°F. Line 2 cookie sheets with parchment paper or silicone baking mats.
Slice log into ¼-inch thick slices and place 2-inches apart on cookie sheets. Bake for 14-17 minutes or until they just loose their glossy sheen. Cool completely before removing from cookie sheets.
Extreme Chocolate Frosting
Ingredients • 168g ( ¾ c butter ½ c • 125g (1 ½ c) unsweetened cocoa powder 1 c • 624g (5 2/3 confectioners’ sugar 624g 3 ½ c • 162g (⅔ c) milk .45 c • 1 tsp vanilla extract
Directions
Cream butter until light and fluffy.
Stir in the cocoa and confectioners’ sugar alternately with the milk and vanilla.
The only date that is also a command sentence (guesses anyone?) observed two birthdays of QC members AND the addition of two new members (we are up to 13 now!)
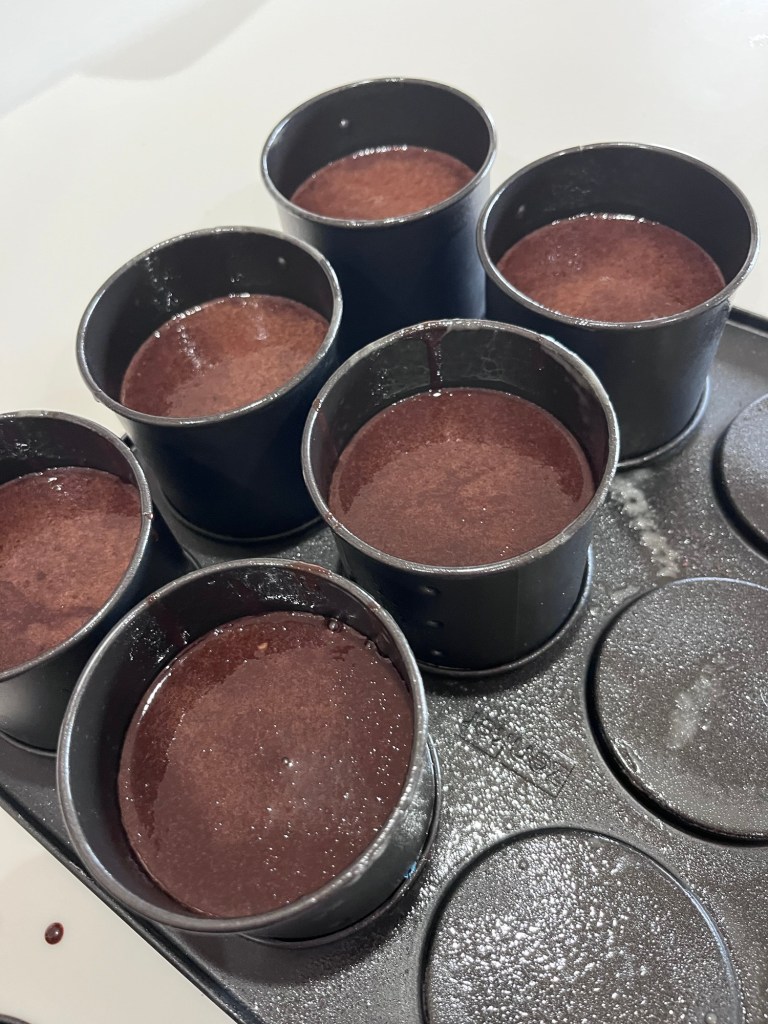
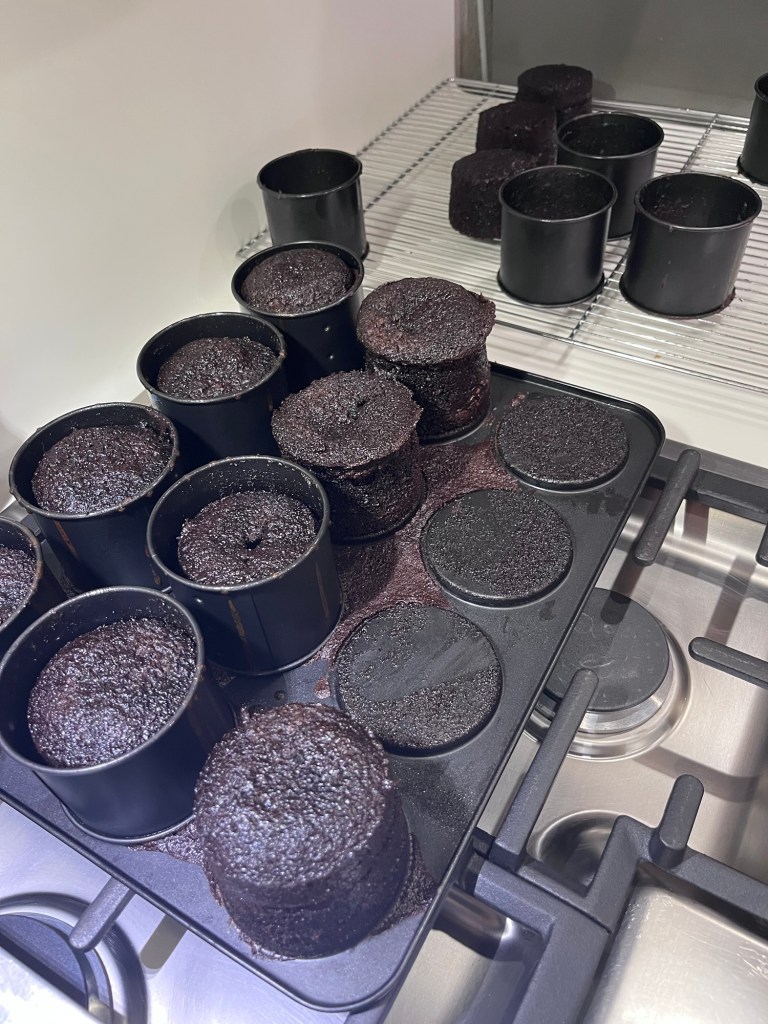
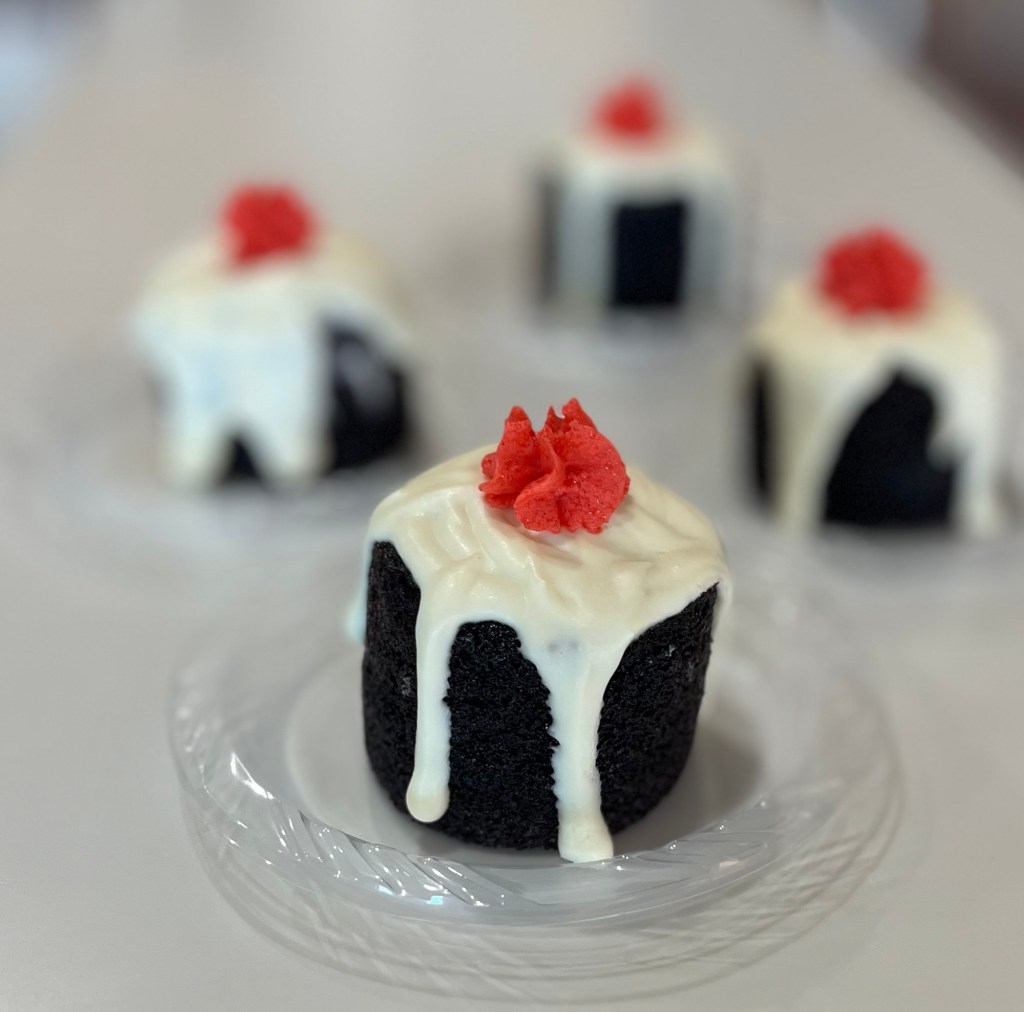
To celebrate, I made individual extreme chocolate cakes both dripped and filled with cream cheese/white chocolate ganache. To fill the cakes I used an apple corer to hollow out the cake, piped about a tablespoon of ganache into each cake and “plugged” the bottom with a piece of the removed cake-core. (Tip: don’t cut the cake all the way through.)
Fill pans half full and…they won’t overflow…And they will look like this.
White Chocolate Cream Cheese Ganache
Makes 3 cups
INGREDIENTS • 200 g white chocolate • 200 g heavy cream • 300 g cream cheese full fat, not skim or low fat
METHOD
Finely chop the white chocolate and place it in a heatproof bowl.
Heat the cream on the stovetop until just below boiling point, or heat in microwave (stirring between bursts) in 30 second then 15 second then 5 second bursts until the cream is scalding (not boiling) 170-180 deg
Pour the hot cream over the chocolate.
Use a hand whisk to mix until the chocolate has fully melted and the mixture is smooth.
Cover the surface with cling wrap, ensuring it touches the surface, and refrigerate overnight or until completely chilled.
In a new bowl, use a hand mixer to beat the cream cheese until smooth, light, and fluffy. Scrape the bowl occasionally to ensure even mixing.
Add the whipped cream cheese to the chilled chocolate mixture. Mix until well combined, stiff, and thick. The ganache should have a smooth, silky texture.
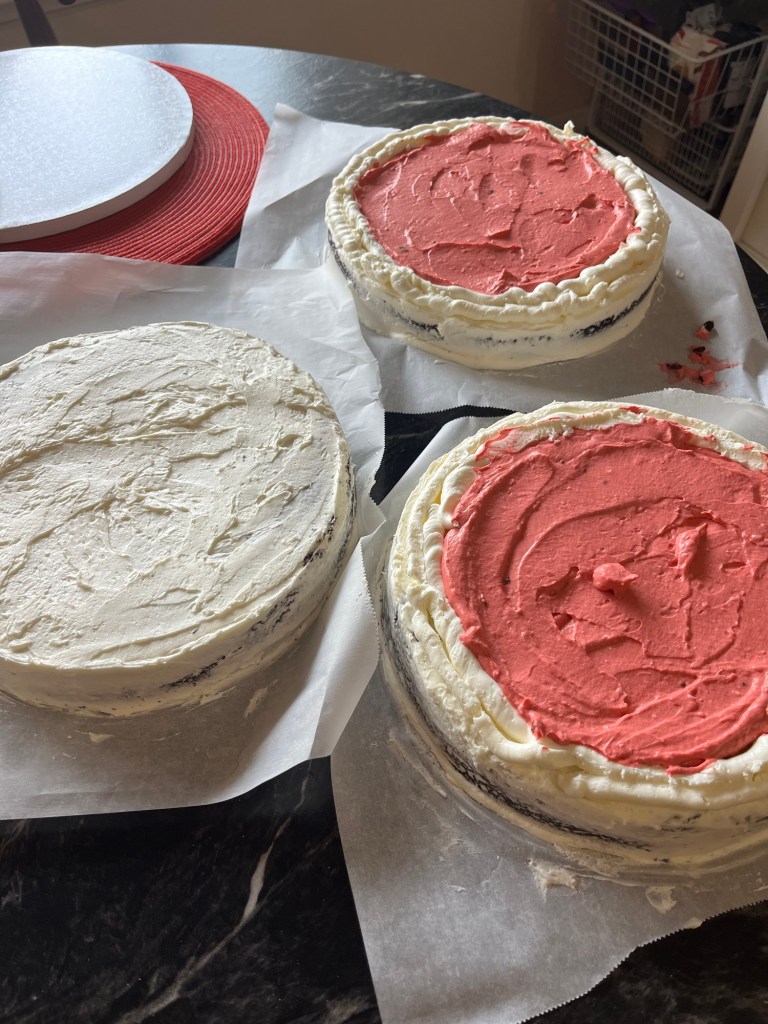
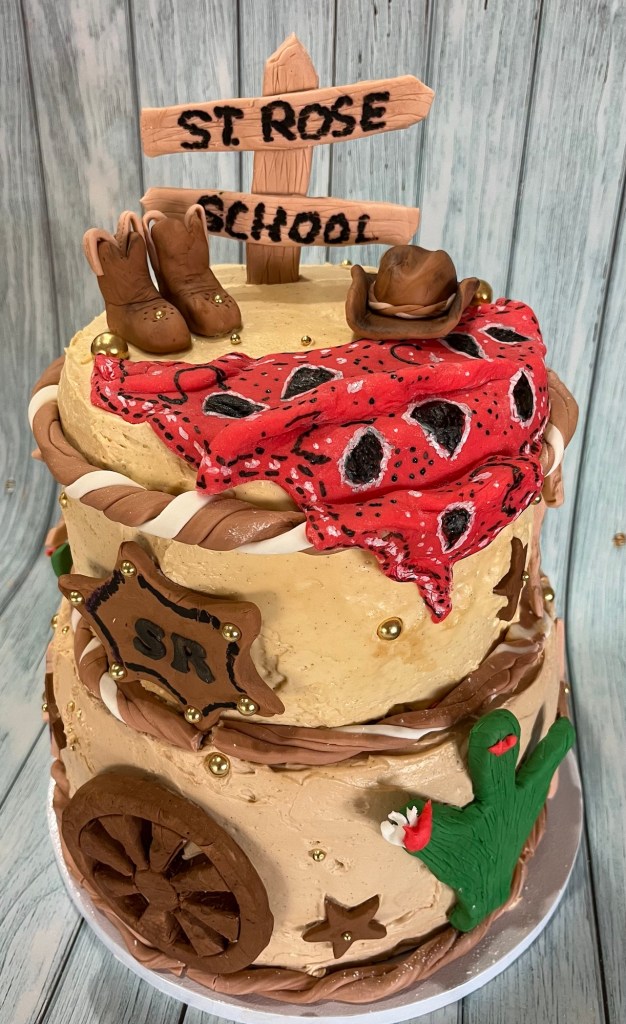
I made a western themed cake for this year’s annual auction-fundraiser for the girls school. My extreme chocolate cake (six full layers, not torted) is 12 inches high and weighs 18 lbs. Whew!
Fresh raspberry mousse filled the layers. I developed the mousse last year and found using fresh raspberries resulted in a much better mousse than using frozen berries.
I made and froze all the cakes two weeks in advance and made all the fondant decorations a week later. The bandana was the most difficult decoration as the fondant needs to be exactly the right texture and strength to fold and arrange without stretching or tearing.
Crumb CoatingButtercream DamsMousse FilledFrosted CakesBeginning to DecorateFinished
Extreme Chocolate Cake Single Recipe
Makes two 9” round cakes INGREDIENTS • 2 cups white sugar • 1 3/4 cups all-purpose flour • 3/4 cup unsweetened cocoa powder • 1 1/2 teaspoons baking soda • 1 1/2 teaspoons baking powder • 1 teaspoon salt • 2 eggs • 1 cup milk • 1/2 cup vegetable oil • 2 teaspoons vanilla extract • 1 cup boiling water
METHOD
Preheat oven to 350 degrees F (175 degrees C). Grease and flour two 9 inch cake pans.
Use the first set of ingredients to make the cake. In a medium bowl, stir together the sugar, flour, cocoa, baking soda, baking powder and salt. Add the eggs, milk, oil and vanilla, mix for 3 minutes with an electric mixer. Stir in the boiling water by hand. Pour evenly into the two prepared pans.
Bake for 30 to 35 minutes in the preheated oven, until a toothpick inserted comes out clean or 205F internal temp. Cool for 10 minutes before removing from pans to cool completely.
Combine raspberries and 2 Tbl confectioners’ sugar in a small bowl and add to a food processor and pulse until berries are reduced
Sieve the mixture allowing enough time for most of the raspberry juice to drip into a bowl, (enough to make 200ml (2/3 c) puree)
In a large bowl, add raspberry juice, 1 Tbl vanilla pudding, softened cream cheese and 1/4 cup powdered sugar, raspberry powder and ouzo and beat until well combined (3-4 minutes on high.) Mix in red food coloring in 2 or 3 aliquots until desired color is attained.
In the bowl of a stand mixer whip the heavy cream, vanilla pudding mix and confectioners’ sugar.
Add red food coloring (in several small amounts until desired color is attained) and whip to firm peaks.
Fold the raspberry mixture into the whipped cream until combined.
Marshmallow Fondant
INGREDIENTS • 1 package (10 ounces) white mini marshmallows • 2-5 tablespoons water • 851 g (1 ¼ lbs or 20 oz) sifted confectioners’ sugar, divided in half • 1/4 cup solid vegetable shortening
METHOD
Grease your mixing bowl and a glass bowl that can be used to melt marshmallows in the microwave.
Place the marshmallows, water and flavoring of your choice in greased glass bowl and microwave on high at 30 second intervals.
Stir every 30 seconds until marshmallows are completely melted, about 2 minutes.
Sift half of the confectioner’s sugar in a greased mixing bowl. Make a well in the center of the confectioner’s sugar and pour in the melted marshmallows.
I use the paddle attachment for my KitchenAid mixer for this first part of the mixture.
Mix until all the melted marshmallows are incorporated in the confectioner’s sugar.
Add any food coloring at this point.
Mixture will be thick but still runny.
Sift the remaining half of confectioner’s sugar into the melted marshmallows.
Mix on low until it comes together.
Change to your dough hook attachment as this will get extremely thick.
Fondant will be very thick and have a dough like consistency
Wrap fondant in saran and make sure no air gets to it.
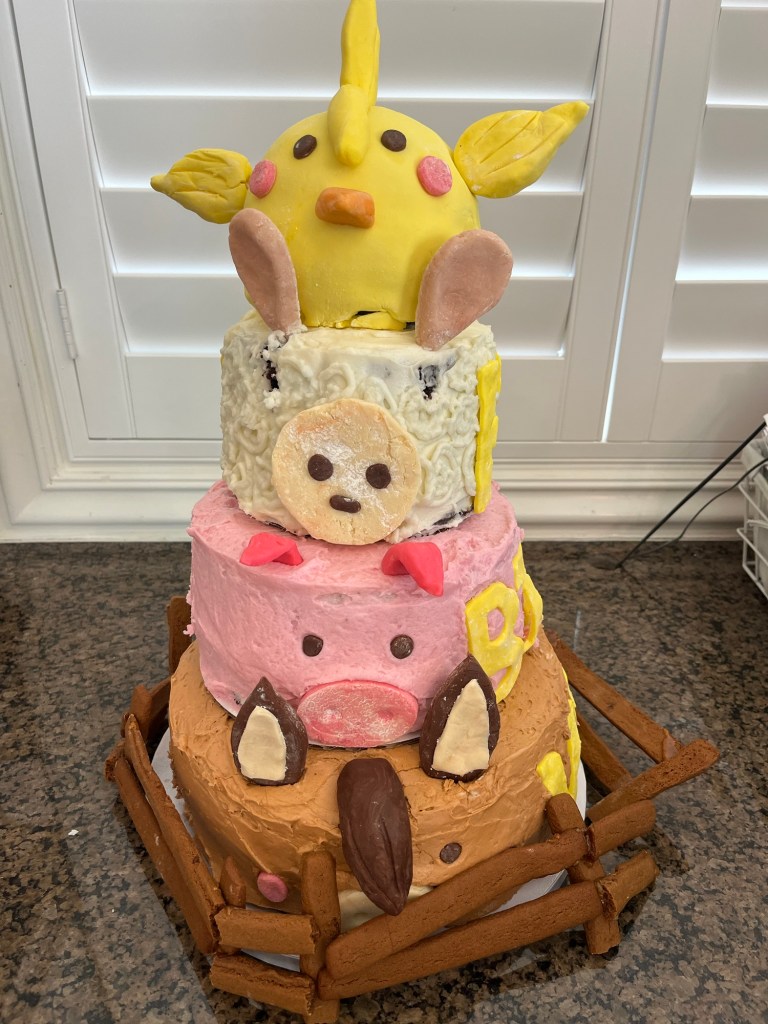
It’s not every day you are able to make a “Farm Animal” birthday cake for your granddaughter’s 6th birthday! I made a horse, a pig, a sheep and a chick and surrounded them with a barnyard fence.
I was directed to make all the cakes chocolate, but that was the only order… er.. guidance I was give. All but the chick were frosted with a basic buttercream and the chick was coated with marshmallow fondant and adorned with fondant wings, comb, beak and eyes. The other animals features are semisweet and white modeling chocolate and held on with embedded toothpicks (which were all removed before slicing.
The barnyard fence is gingerbread with hot caramel gluing the parts together. (The blisters on my fingers and hands attest to the temperature of the caramel.)
(Note to self: stabilize cakes above 4 layers with a dowel driven down the center of the cakes. This should reduce the sadness when the cake collapses in the heat. Oh well, stuff happens.)
THE BEST BUTTERCREAM FROSTING
INGREDIENTS • 452 g (4 cups) of powdered sugar (or 1 box) • 1 Cup (2 sticks) of softened butter • 2-3 teaspoons of vanilla • 1-2 tablespoons of whipping cream (for crumb coat frosting add cream as needed) Optional • 2 Tbl Meringue Powder to make crusting frosting. • Violet food coloring (a very small amount will make the frosting white)
METHOD
Add powdered sugar to mixing bowl.
Add softened sticks of butter
Add vanilla. If you want white frosting add a very small amount of violet food coloring
Add 1 tbsp of cream.
Beat on low until powdered sugar is incorporated. Then move mixer up to medium-high speed. Scrape sides and bottom of bowl often. When completely mixed the frosting may appear dry. (See option below.)
Add more cream, a little bit at a time, beating at slowest speed, until frosting is the proper consistency. For optional raspberry flavor
Add raspberries and 2 Tbl sugar to a food processor and pulse to macerate the berries
Sieve to remove pulp and seeds. You should have about ½ cup puree.
Add puree to soft peak mixture and red food coloring if desired.
Modeling Chocolate With Real Chocolate
INGREDIENTS Dark modeling chocolate • 1 ⅓ cups (227g) chopped semisweet chocolate (not chips)* • ⅓ cup (103g) light corn syrup White modeling chocolate • 1 ⅓ cups (227g) chopped white chocolate (not chips)* • ⅓ cup (103g) light corn syrup
METHOD
In a heatproof bowl set over simmering water (or in a double boiler), melt the chocolate. Stir constantly until melted; don’t let its temperature rise above 110°F. Remove from the heat.
Warm the corn syrup to 110°F, (10 seconds in a 1000W microwave for a full recipe) add to the melted chocolate, and stir until the mixture is uniform. It will look grainy at first but smooth out as you keep stirring.
Allow the mixture to cool, then cover and let rest at room temperature for 2 hours. It will set up and become quite stiff.
When you’re ready to use it, take a chunk and work it in your hands until it softens. From this point you can tint it with gel colors, roll it out and cut it with decorative cutters, or shape it any way you choose, like modeling clay; the chocolate will set once more as it cools. See our blog post, Modeling chocolate 101, for step-by-step instructions on how to make chocolate roses, letters, and other kinds of decorations.
Carmel Glue
INGREDIENTS • 200g caster sugar • 60ml cold water
METHOD
Put the sugar and water in a large, low-sided frying pan over a medium-high heat. Without stirring, bring to 320°F on a sugar thermometer. If you don’t have one, the syrup is ready when the sugar has dissolved, and it turns a light golden color.
Swirl the syrup gently in the pan to even out the color. Take the pan off the heat and leave to cool for a few moments to thicken slightly to the consistency of honey.
If the syrup begins to harden in the pan, put it back over a gentle heat until it has returned to the required consistency.
Gingerbread Cookies
INGREDIENTS • 3 ½ cups (440g) all-purpose flour • 1 teaspoon baking soda • 1/2 teaspoon salt • 1 Tablespoon ground ginger • 1 Tablespoon ground cinnamon • ½ teaspoon ground allspice • ½ teaspoon ground cloves • 10 Tablespoons (2/3 cup; 145g) unsalted butter, softened to room temperature • 3/4 cup (150g) packed light or dark brown sugar • 2/3 cup (160ml; about 200g) unsulphured or dark molasses • 1 large egg, at room temperature • 1 teaspoon pure vanilla extract
METHOD
In a large bowl, whisk together the flour, baking soda, salt, ginger, cinnamon, allspice, and cloves. Set aside.
In a large bowl using a handheld mixer or stand mixer fitted with a paddle attachment, beat the butter for 1 minute on medium speed until completely smooth and creamy. Add the brown sugar and molasses and beat on medium high speed until combined and creamy. Scrape down the sides and bottom of the bowl as needed. Next, beat in egg and vanilla on high speed for 2 full minutes. Scrape down the sides and bottom of the bowl as needed. The butter may separate; that’s ok.
Add the flour mixture to the wet ingredients and beat on low speed until combined. The cookie dough will be quite thick and slightly sticky. Divide dough in half and place each onto a large piece of plastic wrap. Wrap each up tightly and pat down to create a disc shape. Chill discs for at least 3 hours and up to 3 days. Chilling is mandatory for this cookie dough. I always chill mine overnight.
Preheat oven to 350°F (177°C). Line 2-3 large baking sheets with parchment paper or silicone baking mats. Set aside.
Remove 1 disc of chilled cookie dough from the refrigerator. Generously flour a work surface, as well as your hands and the rolling pin. Roll out disc until 1/4-inch thick. Tips for rolling—the dough may crack and be crumbly as you roll. What’s helpful is picking it up and rotating it as you go. Additionally, you can use your fingers to help meld the cracking edges back together. The first few rolls are always the hardest since the dough is so stiff, but re-rolling the scraps is much easier. Cut into shapes. Place shapes 1 inch apart on prepared baking sheets. Re-roll dough scraps until all the dough is shaped. Repeat with remaining disc of dough.
Bake cookies for about 9-10 minutes. If your cookie cutters are smaller than 4 inches, bake for about 8 minutes. If your cookie cutters are larger than 4 inches, bake for about 11 minutes. My oven has hot spots and yours may too—so be sure to rotate the pan once during bake time. Keep in mind that the longer the cookies bake, the harder and crunchier they’ll be. For soft gingerbread cookies, follow my suggested bake times.
Allow cookies to cool for 5 minutes on the cookie sheet. Transfer to cooling rack to cool completely. Once completely cool, decorate as desired.
Cookies stay fresh covered at room temperature for up to 1 week.
Extreme Chocolate Cake
Makes two 9” round cakes (double for this cake) INGREDIENTS (Makes one 10’ ROUND CAKE [and two 5”] – quantities are in parenthesis. Or one 11”x15”x2” sheet cake.) • 2 cups white sugar (3) • 1 3/4 cups all-purpose flour (2 2/3) • 3/4 cup unsweetened cocoa powder (1 ¼) • 1 1/2 teaspoons baking soda (2 ¼) • 1 1/2 teaspoons baking powder (2 ¼) • 1 teaspoon salt (1 ½) • 2 eggs (3) • 1 cup milk (1 ½) • 1/2 cup vegetable oil (¾) • 2 teaspoons vanilla extract (3) • 1 cup boiling water (1 ½)
METHOD
Preheat oven to 350 degrees F (175 degrees C). Grease and flour two 9 inch cake pans.
Use the first set of ingredients to make the cake. In a medium bowl, stir together the sugar, flour, cocoa,baking soda, baking powder and salt. Add the eggs, milk, oil and vanilla, mix for 3 minutes with an electric mixer. Stir in the boiling water by hand. Pour evenly into the two prepared pans. (For cupcakes,portion ¼ scant cups in each cupcake paper.
Bake for 30 to 35 minutes in the preheated oven, until a toothpick inserted comes out clean or 205F internal temp. Cool for 10 minutes before removing from pans to cool completely.
Prepare two 5-inch cake pans with parchment paper circles in the bottom and baking spray or grease the sides. Preheat oven to 350°F (176°C).
Combine the flour, baking powder and salt in a medium sized bowl and set aside.
Add the butter, sugar, oil and vanilla extract to a large mixer bowl and beat together until light in color and fluffy, about 2-3 minutes. Do not skimp on the creaming time.
Add the eggs one at a time, mixing until mostly combined after each. Scrape down the sides of the bowl as needed to be sure all ingredients are well incorporated.
Add half of the dry ingredients to the batter and mix until mostly combined.
Slowly add the milk and mix until well combined. The batter will look curdled, but that’s ok.
Add the remaining dry ingredients and mix until well combined and smooth. Scrape down the sides of the bowl as needed to be sure all ingredients are well incorporated. Do not over mix the batter.
Wrap each pan with wet cake pan strips then divide the batter evenly between the cakes pans (~320g per cake pan.) and bake for ~28 minutes, or until a toothpick comes out with a few crumbs. (205°F) If the tops of the cakes brown too much, cover with foil after ~20 minutes.
Remove the cakes from the oven and allow to cool for about 2-3 minutes, then remove to cooling racks to cool completely.
If you follow me you likely know I am a Vermonter and anyone from New England is known to be… um… frugal. I made some baseball cakes this week and when the cake rises in the hemispherical molds there is a portion that needs to be trimmed off. Well, I am not one to waste anything, especially chocolate cake.
I made what QC termed mini chocolate cakes from the remnants. Really all I did was to make some White Meringue Frosting and cover the tops of the cakes and add a few sprinkles. Easy, peasy.
RemnantsFirm Peak White Meringue FrostingVoila!
White Meringue Frosting
INGREDIENTS
¾ cup (170 g) confectioner’s sugar
3 large egg whites
2 Tbl cold water
1 tsp lemon juice
1 ½ tsp vanilla extract
METHOD
Place all ingredients in the stand mixer bowl and whisk until well combined.
Chose a saucepan large enough so the mixer bowl will rest on the rim but not touch 1-2” of water in the saucepan.
Once the water is almost boiling, place the mixer bowl on the saucepan and whisk the mixture. Turn the burner to low. The water should be not quite boiling. The mixture must not boil. Whisk until all the sugar is dissolved or you will end up with a grainy looking frosting. Check to see if it has reached 160-170⁰ F.
Place the bowl in the kitchen mixer with the whisk attachment on. Whisk the meringue frosting until stiff peaks forms and has a glossy look. This can take up to 12 -15 minutes or more. But don’t over-beat. You will beat air into the frosting. It needs to be easily spreadable
When the white meringue frosting is ready, if desired it can be colored with food gel colors. This frosting will crust over time, but the center of the frosting swirl will still be thick and fluffy.
Cakes and cupcakes with white meringue frosting can be stored in the refrigerator for two days.
Tip: Makes enough to frost 12 cupcakes. If using it on cupcakes, use a plastic piping bag and a large piping tip for great cupcake swirls
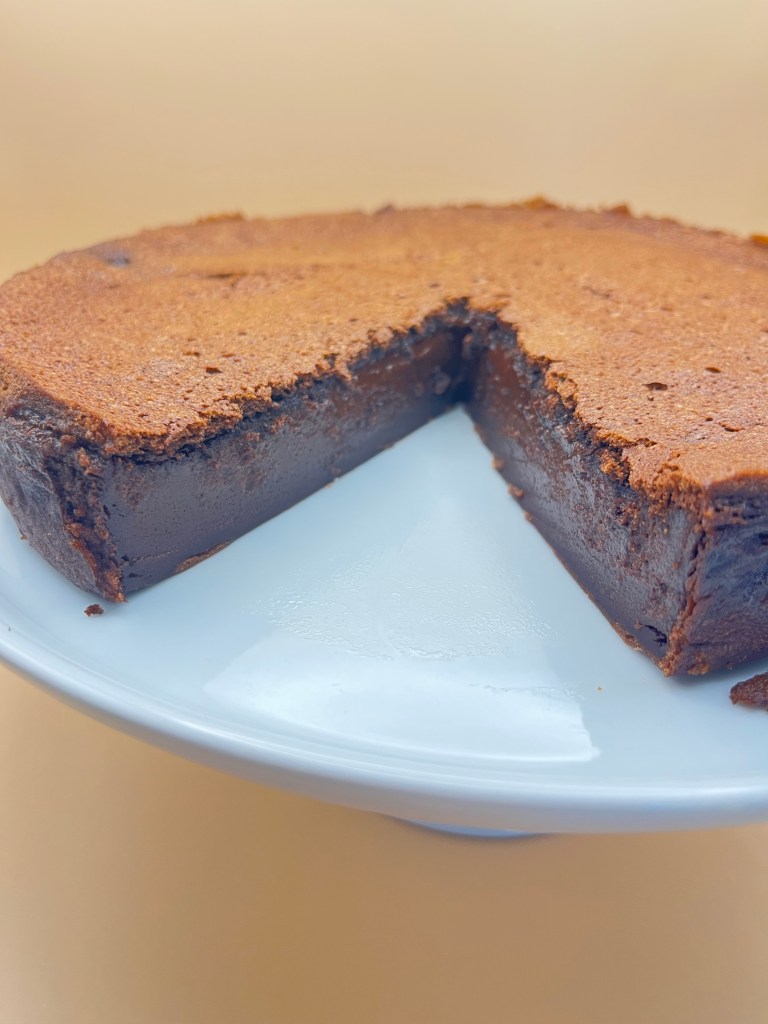
This recipe for a chocolate magic custard cake flew by my Facebook stream and I knew I was going to make it.
Baked in one pan the resultant cake has three distinct layers, hence, the magic. The bottom is a typical, albeit dense, cake. The center is a delicious chocolate custard, much like a smooth, rich pudding. The top has the consistence of a very thin brownie.
The originators of this recipe have a number of “magic” cakes, Zerrin and Yusuf Gunaydin. Try them, they are worthy.
Ingredients, prepped in advanceCooled cakeYou can see the layers on the left side.
CHOCOLATE MAGIC CUSTARD CAKE
INGREDIENTS • 4 eggs, room temperature, separated • 1 teaspoon vanilla extract • 1 ¼ cup sugar • 110g butter (½ cup), melted and cooled • ½ cup AP flour • ⅓ cup and 2 tablespoons unsweetened cocoa powder • 2 cups lukewarm milk • 1 tablespoon powdered sugar for dusting
METHOD
Preheat oven to 320F (160C).
Grease an 8×8 inch square (or 9-inch round) baking pan line it with parchment paper.
Beat egg whites in a bowl until stiff and put aside.
Whisk egg yolks, vanilla extract and sugar until creamy.
Add melted butter and mix for half a minute.
Add the flour and unsweetened cocoa powder. Mix with a whisk (whisk attachment with hand mixer) until well incorporated.
Pour the milk gradually and continue whisking.
Add in the egg whites, one third at a time and gently stir with a whisk. (Full disclosure: I used a hand mixer with the whisk attachment at the slowest speed.) Stir until combined, do not over mix. There will be some small bits of egg white visible in the batter. Don’t worry about it.
Pour this runny batter into the baking pan and bake for 60 minutes. I started checking doneness at 45 minutes, then every 5 minutes thereafter. (I stopped at 55 minutes.)
The centre of the cake will still be jiggly when removed from oven.
Let it cool for about half an hour and then remove from the pan. When it reaches room temperature, chill it at least for an hour. (I couldn’t wait and cut a QC piece in 30 minutes, cooling at room temperature. It was fine.)
Slice it in the size you like and dust with powdered sugar right before serving and/or garnish it with fresh fruit
The problem with New Year Eve is… I can’t stay up past east coast midnight anymore. I made a cake for New Year’s 2022 that went over so well, I was asked to make one for this year. If you follow/know me, you know I said “Yes” before the question was complete.
As usual I searched the internet for ideas until I found a design I liked. It had a nice dark midnight blue frosting so with another search found the ratio of food coloring to approach that color. It’s always good to try new techniques and develop new skills with big bakes like this, (four layer 9” cake to augment cheese cakes for about 60 people.)
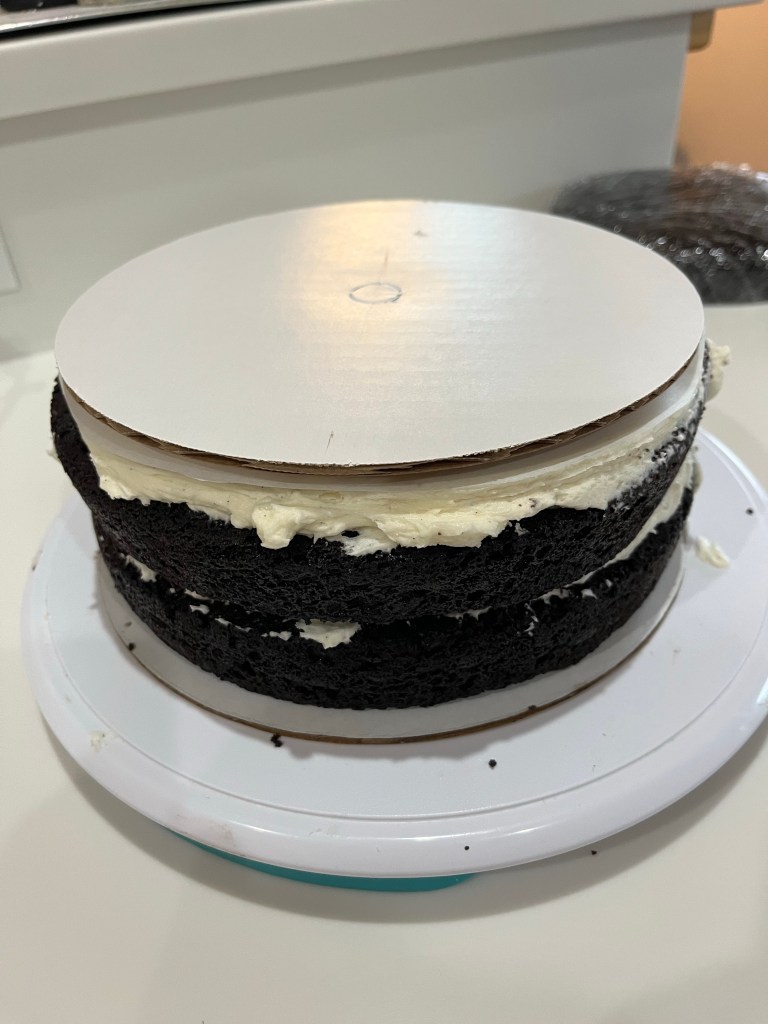
I made the four 9” Extreme Chocolate Cakes, wrapped them in plastic wrap and placed them on flat surfaces in the freezer. I will take them out to thaw the day before New Year’s Eve. (New Year’s Eve eve?)
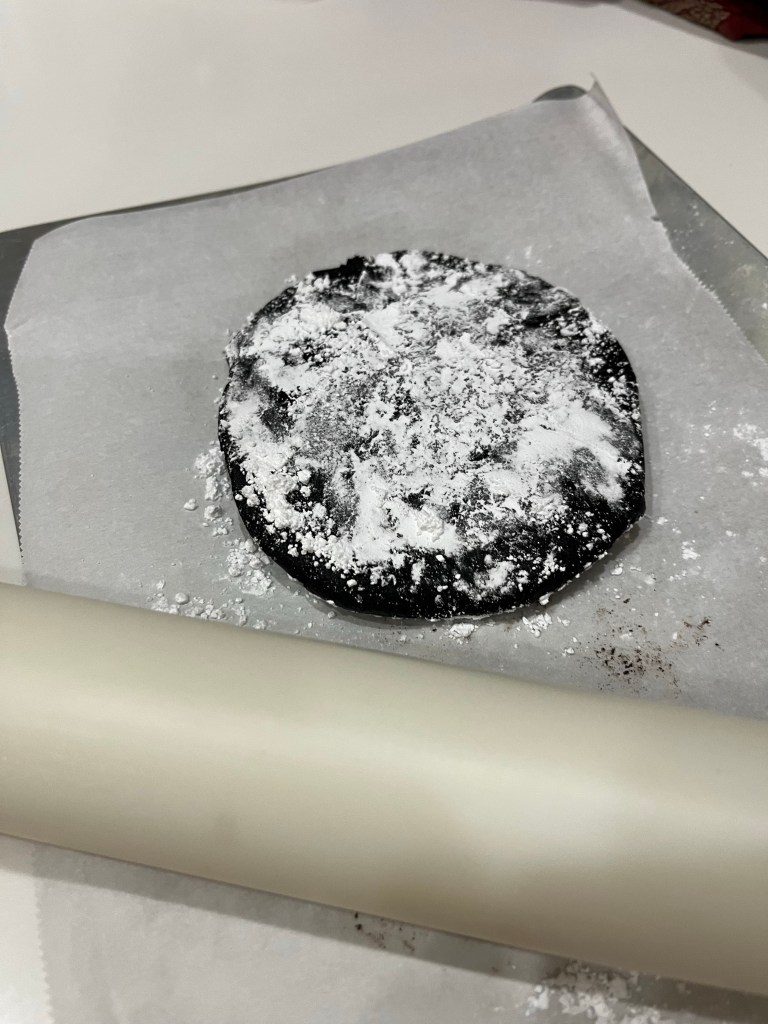
Making the black chocolate cookies is straightforward. I use Modern Mountain Black Cocoa rather than Hershey’s Special Dark (my go to.)
The dough should be pliable, not softRoll the dough out between parchment paper and dust with powdered sugar.
Making black royal icing isn’t as easy as making the cookies. I made a regular royal icing and added two tablespoons of the black cocoa and about 20 drops of black food coloring. Even that much food coloring in about a cup of royal icing only turns it dark gray, and detracts (big time) from the taste. The black cocoa (be sure to sift it before adding) turns the royal icing black.
Retained cookie shape after chillingThis is pure black royal icing.Oops! My damn dam wasn’t high enough
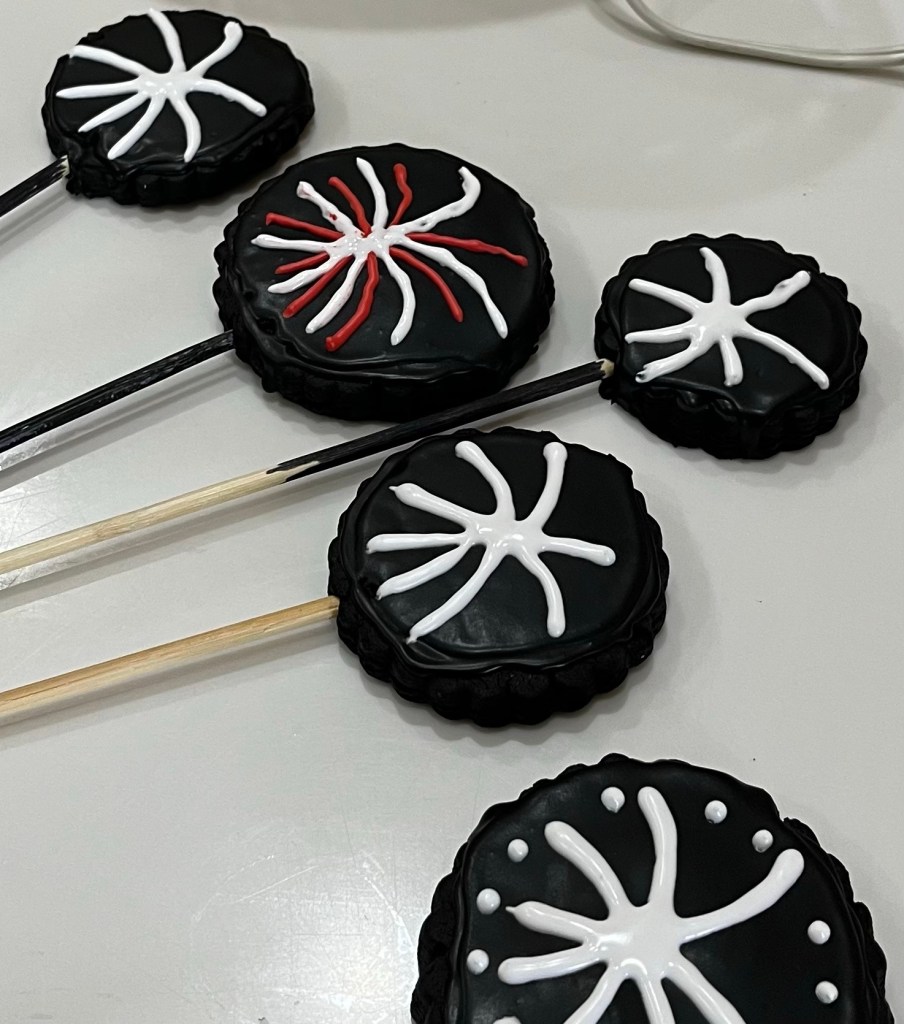
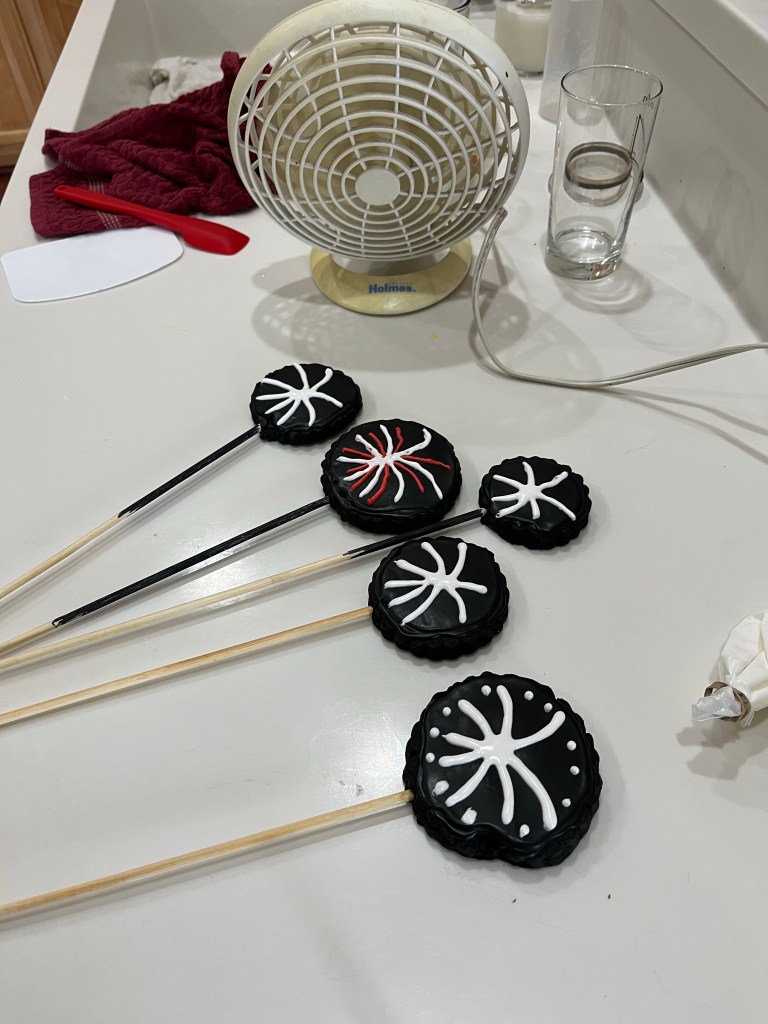
Chilling the cookie dough preserves the “star burst” shape after baking. As soon as the cookies come out of the oven insert skewers most of the way through them. Later you will paint them black. (On second thought, why not paint them with edible black paint before baking the cookies? Next time.) These cookies are VERY crispy and taste like chocolate cake.
I tried an edible black marker to paint the skewers. Not worth the effort and ordered some edible black paint.Allow each color to dry before piping another colorPiped white royal icingFinished “Fireworks” cookies.
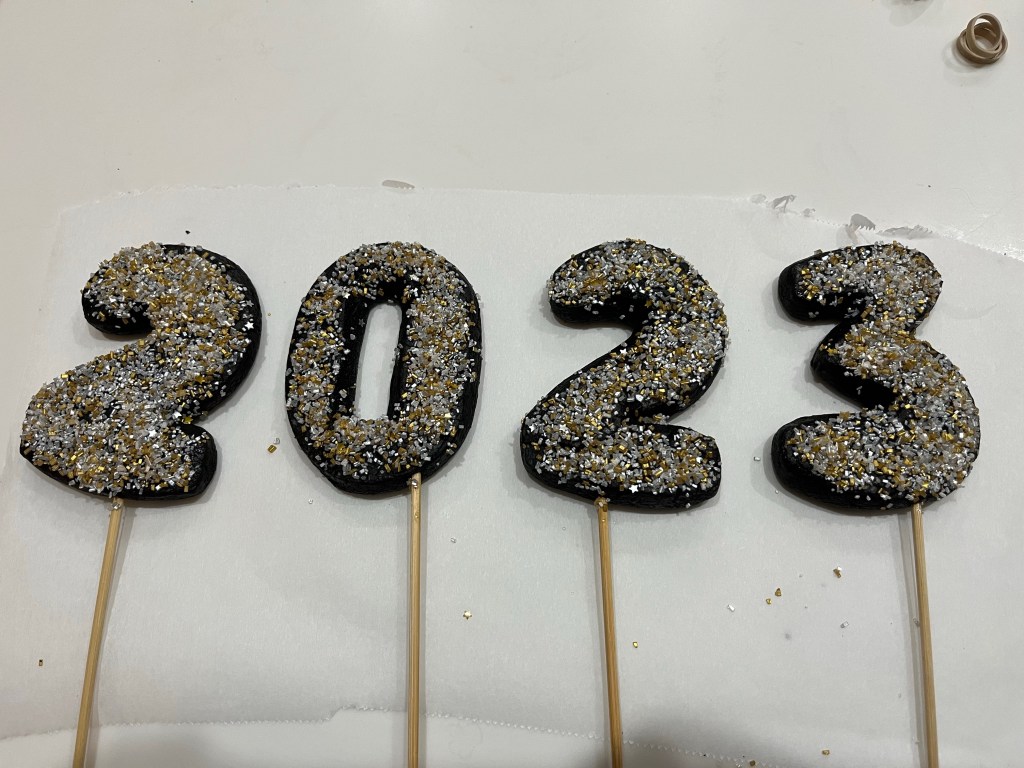
Finally, Amazon delivered my number cookie cutters. (To be fair, we only ordered them last night.) I made the second batch of chocolate cookie dough yesterday so when they arrived I started the over, cut the numbers (and a bunch of smaller cookies for QC and I to enjoy) and baked them. Once done I immediately inserted a small skewer into each number and let them cool and turn crispy. Once cool, I made a concentrated sugar water, painted the cookies then coated them with star shaped sprinkles.
It required 6 cups of white buttercream to crumb coat the whole cake. 4 more cups of midnight blue buttercream frosting finished the cake. I wish I could make my surfaces as smooth and clean as seen online. Oh well.
Crumb coated bottom two layersParchment paper circle and 8” cake plate on top of bottom 2 yayersMidnight Blue frosted cake.
Black Royal Icing
INGREDIENTS
• 4 cups (480g) confectioners’ sugar, sifted • 3 Tablespoons meringue powder (not plain egg white powder) • 5 drops black food coloring • 2 Tbl Black Cocoa (sifted) • 9–10 Tablespoons room temperature water
METHOD
Pour confectioners’ sugar, meringue powder, black food coloring, black cocoa and 9 Tablespoons of water into a large bowl.
Using a hand mixer or a stand mixer fitted with a whisk attachment, beat icing ingredients together on high speed for 1.5 – 2 minutes.
When lifting the whisk up off the icing, the icing should drizzle down and smooth out within 5-10 seconds. If it’s too thick, beat in more water 1 Tablespoon at a time. I usually need 10 Tablespoons but on particularly dry days, I use up to 12-14 Tablespoons. Keep in mind that the longer you beat the royal icing, the thicker it becomes. If your royal icing is too thin, just keep beating it to introduce more air OR you can add more confectioners’ sugar.
When applied to cookies or confections in a thin layer, icing completely dries in about 2 hours at room temperature. If icing consistency is too thin and runny, it will take longer to dry. If the icing is applied very thick on cookies, it will also take longer to dry. If you’re layering royal icing onto cookies for specific designs and need it to set quickly, place cookies in the refrigerator to help speed it up. You can also use a fan to help set the icing.
Black Chocolate Cookies
INGREDIENTS
• 1 1/2 cups (195g) AP flour • 3/4 cup (70g) unsweetened black cocoa powder • 1 teaspoon baking soda • 1/4 teaspoon kosher salt • 1/2 teaspoon espresso powder • 1 stick (110g) unsalted butter, room temperature • 3/4 cup (150g) sugar • 1 large egg • 1 1/2 teaspoons vanilla • 1 teaspoon molasses
METHOD
In a large bowl, vigorously whisk together the flour, cocoa, baking soda, salt, and espresso powder.
Cream the butter and sugar until light and fluffy, (2-3 min on medium.)
Beat in the egg, vanilla, and molasses.
Add the dry ingredients to the wet in 3 additions. When well mixed, remove the dough from the mixer, and form it into a ball. It should have the consistency of soft clay. If it’s stiff and unmanageable, massage some water into it, a tablespoon at a time until easily pliable.
Wrap it in plastic wrap, and chill it in the refrigerator for at least one hour.
When you are ready to roll-out the dough, preheat the oven to 350°F (175° C). Break off a chunk of dough from the ball of dough (about a quarter of it) and place it between two pieces of parchment paper. Use a rolling pin to roll the dough out to an even 1/2-inch thickness.
Use a cookie cutter or the rim of a small glass to cut out cookie shapes from the rolled out dough. Place on a parchment paper or silicone-lined baking sheet, allowing at least 1 inch between cookies on the cookie sheet.
Bake at 350°F (175° C) in the middle rack for 12 to 14 minutes, less or more, depending on the size and thickness of the cookies.
The cookies should bounce back when you press on their centers and be a little dark around the edges. When cool, they should be crispy.
Remove from oven and let cool for 5 minutes before removing the cookies from the tray to cool on a rack.
Extreme Chocolate Cake
Makes two 9” round cakes (double for this cake) INGREDIENTS (Makes one 10’ ROUND CAKE [and two 5”] – quantities are in parenthesis. Or one 11”x15”x2” sheet cake.) • 2 cups white sugar (3) • 1 3/4 cups all-purpose flour (2 2/3) • 3/4 cup unsweetened cocoa powder (1 ¼) • 1 1/2 teaspoons baking soda (2 ¼) • 1 1/2 teaspoons baking powder (2 ¼) • 1 teaspoon salt (1 ½) • 2 eggs (3) • 1 cup milk (1 ½) • 1/2 cup vegetable oil (¾) • 2 teaspoons vanilla extract (3) • 1 cup boiling water (1 ½)
METHOD
Preheat oven to 350 degrees F (175 degrees C). Grease and flour two 9 inch cake pans.
Use the first set of ingredients to make the cake. In a medium bowl, stir together the sugar, flour, cocoa,baking soda, baking powder and salt. Add the eggs, milk, oil and vanilla, mix for 3 minutes with an electric mixer. Stir in the boiling water by hand. Pour evenly into the two prepared pans. (For cupcakes,portion ¼ scant cups in each cupcake paper.
Bake for 30 to 35 minutes in the preheated oven, until a toothpick inserted comes out clean or 205F internal temp. Cool for 10 minutes before removing from pans to cool completely.
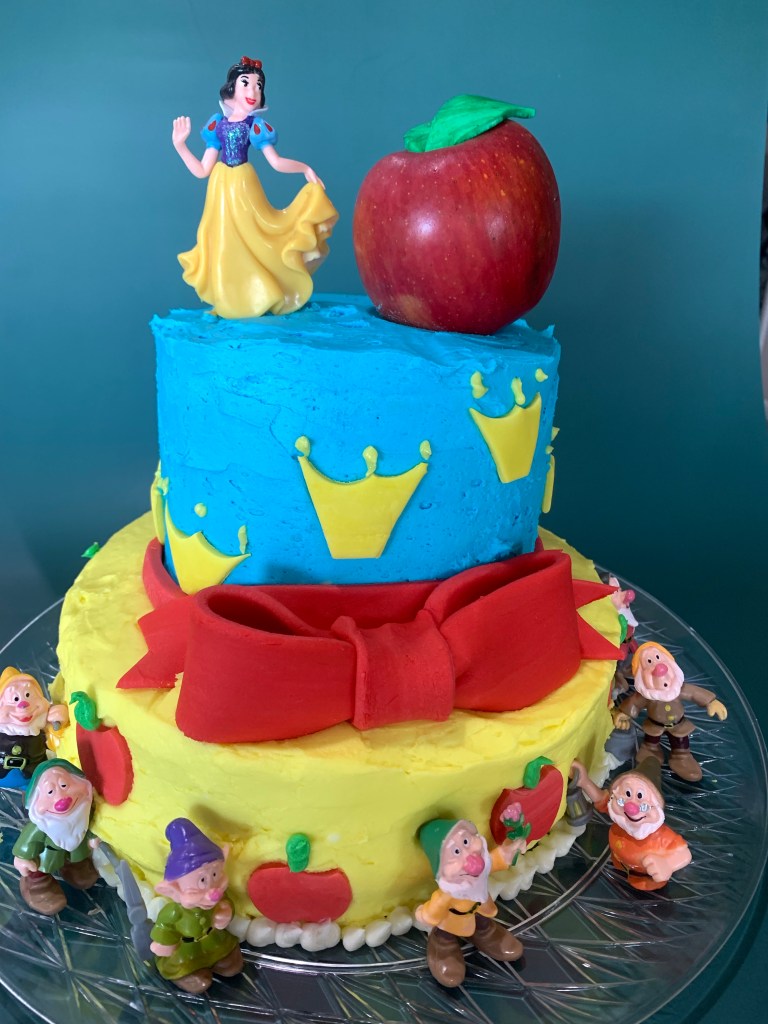
I realized I didn’t post at least a picture of my Snow White cake. I made this cake for my DIL Frances’ birthday last week. It’s an Extreme Chocolate Cake with buttercream frosting. (I am not the best at frosting smooth buttercream cakes.) The apple is real, but the leaves on the top are gum paste.
The ribbons, yellow crowns and red apples are also gum paste. The figurines are all purchased, but I thought my granddaughters would like to play with them.
Another week, another birthday cake, except this one wasn’t a themed cake, just a plain cake. Whew! Deep breath.
Today is my son Dan’s birthday. This summer I made Grace’s “Galaxy Cake” and Vivian’s “Princess Aurora “ and Mommy Frances’ “Snow White Cake.” Today was just plain Daddy Dan’s birthday cake. Let me say up front, there is and has never been anything “just plain” about Dan. I don’t have adequate adjectives to describe what a fantastic person, father, husband and son he is.
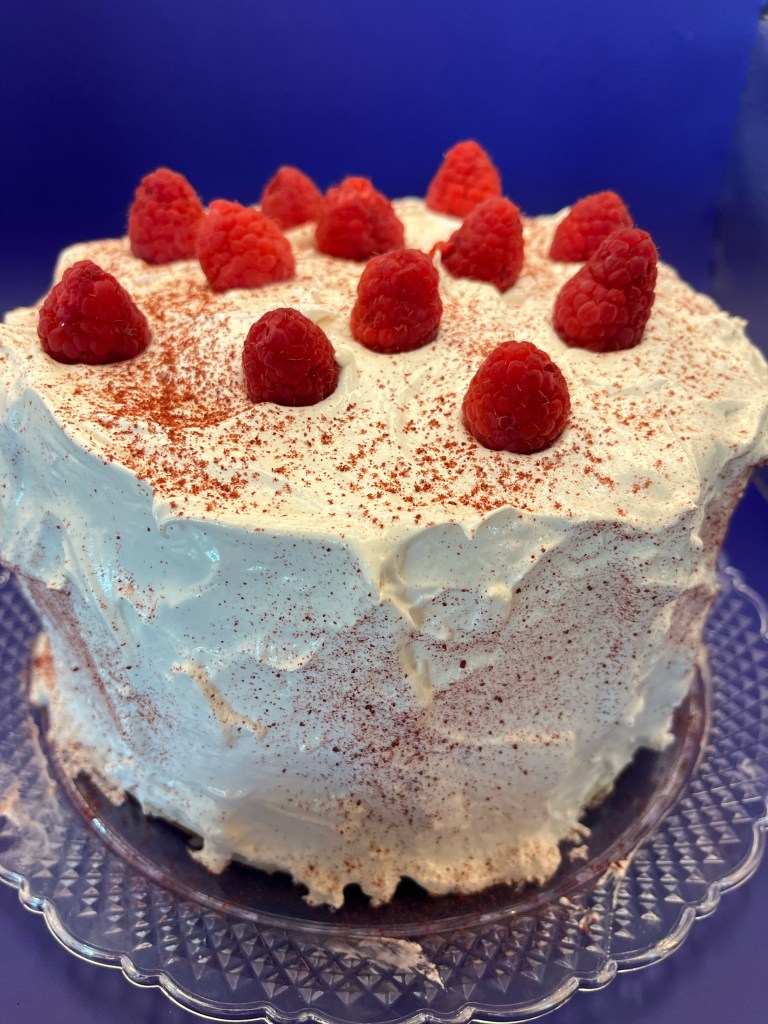
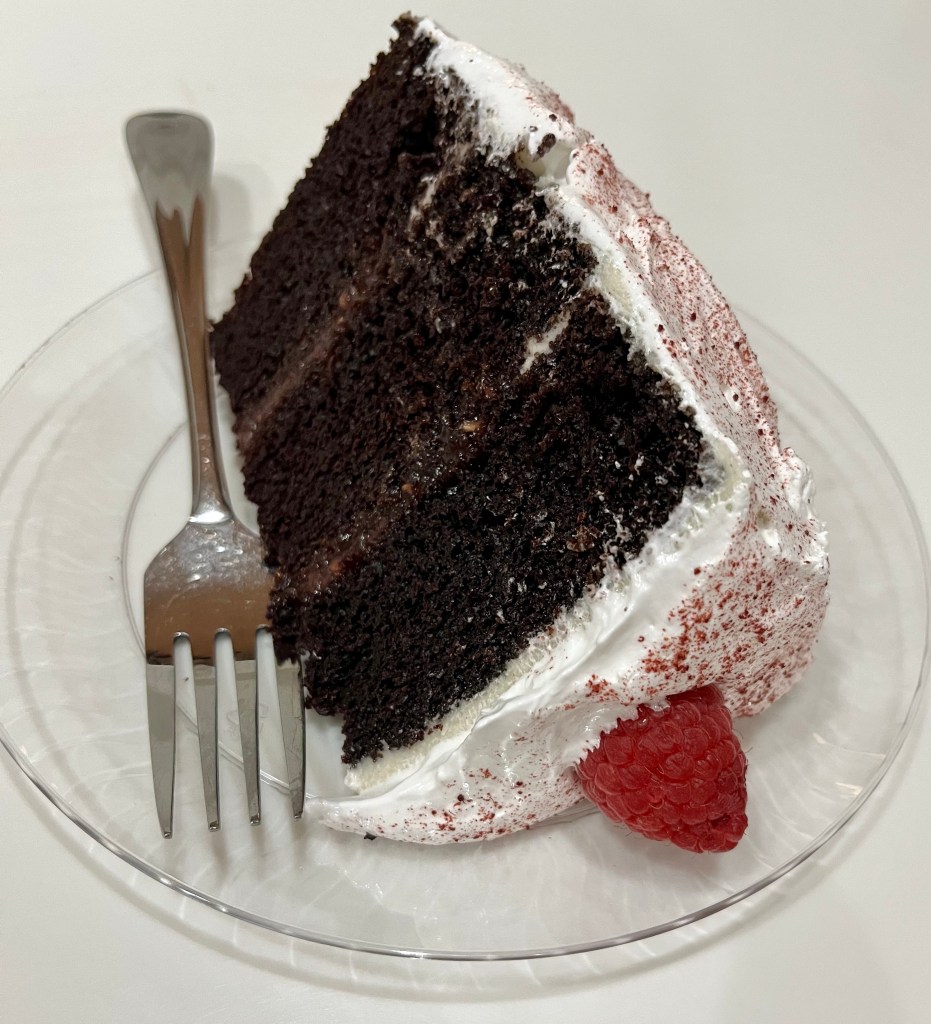
The cake is my Extreme Chocolate Cake, which is everyone’s favorite. This time I frosted it with marshmallow frosting (my favorite.) A light dusting of freeze dried raspberry powder added a nice tart contrast to the cake and frosting. I made the 10” Round Cake size which perfected filled three 8” cake pans. Wrapping them with wet cake pan strips kept the cakes from doming.
The filling between layers was home made raspberry jam. I piped a ring of buttercream to dam the raspberry filling in place. I used the rest of the buttercream to crumb coat the cake. (Not the smoothest crumb coating. It was fixed after setting in the fridge for a while.)
This is Version 1.1 because after I baked the cakes QC asked if I put jammy bits into the cake. What a great idea, a couple of hours too late, but never fear, there will be another chocolate cake and will certainly have jammy bits included in the batter!
Extreme Chocolate Cake
(Sorry, this blog software doesn’t let me create nice columns.)
INGREDIENTS
Cake 10” ROUND CAKE
9” ROUND CAKE Or 11”x15” or HALF Sheet Cake (18”X13”
Preheat oven to 350 degrees F (175 degrees C). Grease and flour two 9 inch cake pans. (SEE QTY FOR 10” CAKES, AND SHEET CAKES)
Use the first set of ingredients to make the cake. In a medium bowl, stir together the sugar, flour, cocoa, baking soda, baking powder and salt. Add the eggs, milk, oil and vanilla, mix for 3 minutes with an electric mixer. Stir in the boiling water by hand. Pour evenly (1000g in each 9” cake pan) into the two prepared pans. (For cupcakes, portion ¼ scant cups in each cupcake paper.
Bake for 30 to 35 minutes in the preheated oven, until a toothpick inserted comes out clean or 205 internal temp. Cool for 10 minutes before removing from pans to cool completely.
To make the frosting, use the second set of ingredients. Cream butter until light and fluffy. Stir in the cocoa and confectioners’ sugar alternately with the milk and vanilla. Beat to a spreading consistency. (This recipe will frost 36 cupcakes.)
Split the layers of cooled cake horizontally, cover the top of each layer with frosting, then stack them onto a serving plate. Frost the outside of the cake.
NOTES
Do NOT let the internal temp exceed 210 deg F or the cake will be overdone.
Fill cupcake papers 2/3rds full. This will allow space for the cupcakes to expand and create a nice domed shape.
Marshmallow Frosting
INGREDIENTS
2 egg whites
5 tablespoons cool water, plus more for the double boiler
1/4 teaspoon cream of tartar
1 1/3 cups granulated sugar
2 egg whites, room temperature
1 tablespoon light corn syrup
1 teaspoon vanilla extract
METHOD
Pour about 2 inches of water into a saucepan to create a double boiler. Bring the water to a gentle simmer.
In a clean, grease free large mixing bowl, combine 5 tablespoons of cool water, cream of tartar, sugar, egg whites and corn syrup. Place the bowl over the simmering water. Turn off the heat. Use an electric hand beater to whip the mixture. Do not leave mixture unattended and do not stop beating any time during this process.
After about 3 minutes, remove the bowl from the heat and quickly take the temperature of the egg whites. They need to reach 140 degrees F. If the mixture is less than 140 degrees F put the bowl back over the water and resume beating until they are finished, an additional 2 to 3 minutes.
Remove the bowl from the water and fold in the vanilla extract. It should look like marshmallow fluff. Allow the frosting to cool. Frost and serve immediately