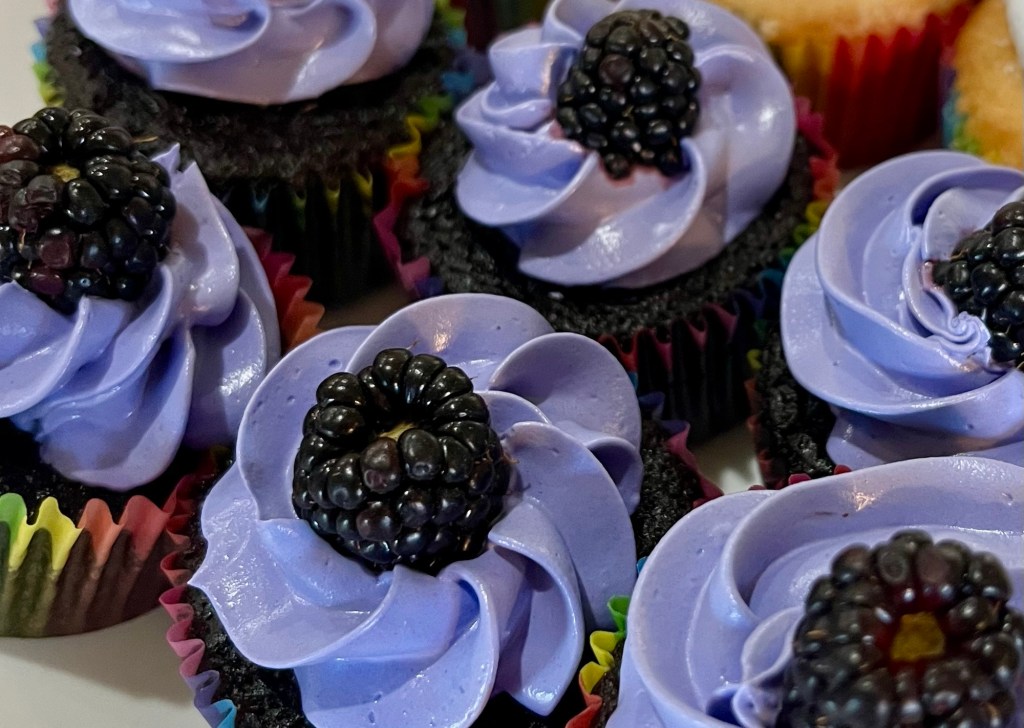
I am a big berry buff and when I saw this recipe I knew I would make these.
I followed the recipe exactly on my first bake, but made changes the second time around. Mainly, I swapped the blackberry buttercream for a blackberry meringue frosting. I used some purple food coloring and added some freeze dried blackberry powder. Blackberry is not an overpowering flavor but this added just enough to complement the dark chocolate cupcake.
Dark Chocolate Blackberry Cupcakes
Makes 18 cupcakes
INGREDIENTS For the cupcakes: • 1 c AP flour • ½ c unsweetened cocoa powder • 1 tsp baking soda • ½ tsp salt • ½ c unsalted butter, melted • ¾ c brown sugar • 2 large RT eggs • 1 tsp vanilla extract • ½ c buttermilk (milk with ½ Tbl lemon juice) • ½ c hot water • ½ c mashed, fresh blackberries Blackberry Italian Meringue • 3 egg whites room temperature • 2/3 cup caster sugar • 1/4 cup water • 1/4 teaspoon cream of tartar • 1 Tbl freeze dried blackberry powder
METHOD
Wash 2 c fresh blackberries in cold water
Blend cleaned blackberries until totally broken down.
Add 1 Tbl sugar and blend again.
Separate into ¼ c and ½ c portions. Set both portions aside. (Use any leftover on ice cream or in a margarita, etc.)
Preheat oven to 350°F (175°C). Line a cupcake pan with liners.
In a bowl, whisk flour, cocoa powder, baking soda, and salt.
In another bowl, mix melted butter and brown sugar until smooth. Add eggs and vanilla, then stir in ½ c mashed blackberries.
Alternately add dry ingredients and buttermilk, mixing gently. Stir in hot water until just combined.
Fill cupcake liners ¾ full and bake for 18-20 minutes or until a toothpick comes out clean. Let cool completely.
For the frosting, beat butter until creamy. Add powdered sugar, ¼ c blackberry puree, and vanilla. Beat until fluffy, adding cream if needed. Be sure the frosting is thick enough to hold its shape after piping.
Pipe frosting onto cooled cupcakes and enjoy!
Italian Meringue Method
Wipe down all tools with white vinegar.
Place sugar and water mixture over medium heat for 5 minutes. Do not stir it at all during this time. The mixture will look cloudy.
Gently stir the mixture for 1 minute. There should be little to no granules of sugar left at this point.
Once the mixture begins to bubble from the bottom, 3 to 5 minutes, place the digital thermometer in the pot and increase to medium-high heat. Do not stir it at all after this.
In the bowl of an electric mixer, whip the eggs whites on low speed until foamy. Add the cream of tartar, increase the speed to medium, and beat until soft peaks form.
Allow the sugar mixture to come to a boil and watch carefully. Once it reaches 230 °F turn stand mixer on highest speed to whip egg whites to peaks.
7. Once the sugar syrup reaches 240 °F, remove from heat and remove the probe. This takes about 4- 6 minutes.
Allow the boiling to come to a slow bubble before moving on.
Slowly pour sugar syrup (steady stream) into whisked egg whites. Avoid the whisk attachment or it will fling your mixture all over the bowl.
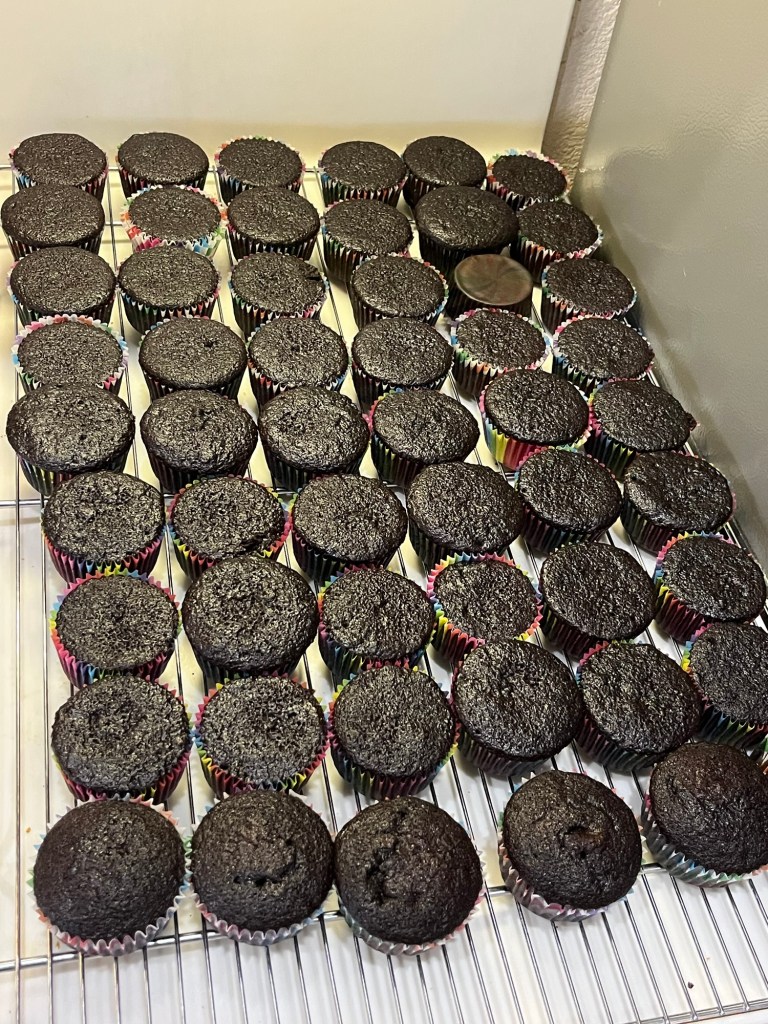
Today is the 80th birthday of one of our good friends, and golf buddy. She asked me to make cupcakes for the 15 guests coming to her bowling/birthday party. I decided to make cupcakes using my Extreme Chocolate Cake recipe with Italian Meringue frosting, because that combination is my fav. I did ask her what her favorite color is, and pink was among her answer, so I made a bi-color frosting.
My notes in my recipe said the recipe would make 36 cupcakes, but of the 3 different sizes of cakes in the recipe, it didn’t say which one made the 36. I decided to go with the medium size cake (10” round.) Well long story shorter, that made 54 cupcakes. I have since modified the recipe.
The cupcakes are soft and delicious and the meringue isn’t too sweet and pairs nicely.
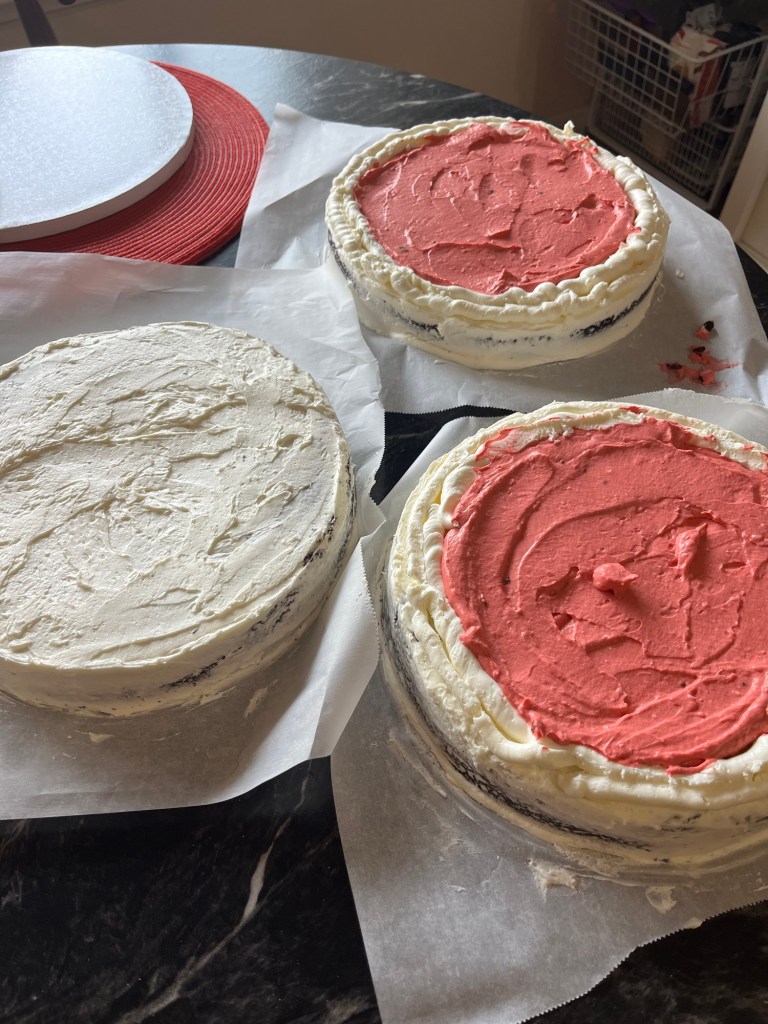
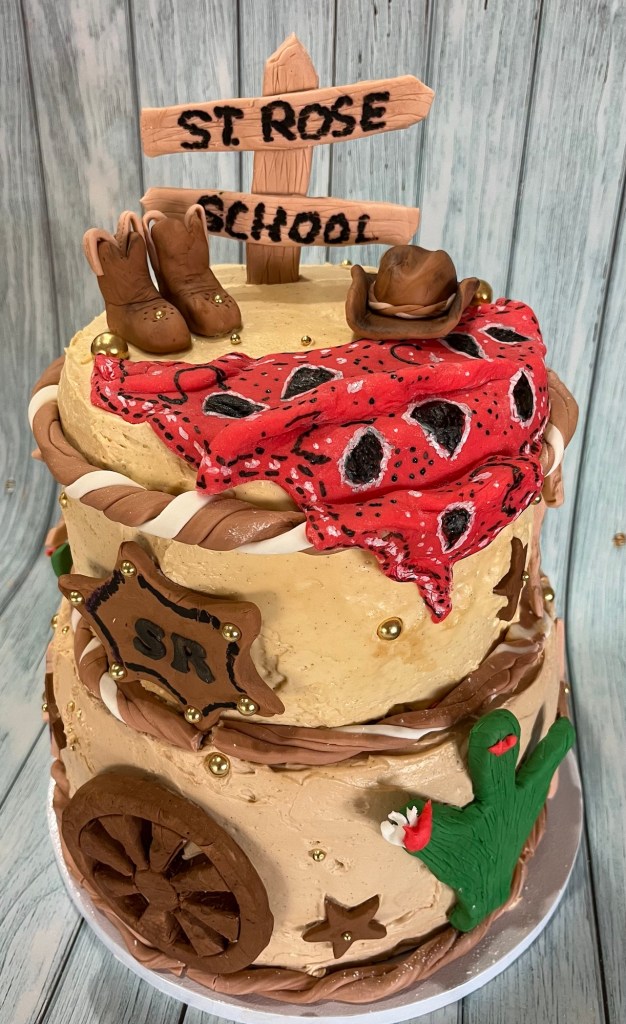
I made a western themed cake for this year’s annual auction-fundraiser for the girls school. My extreme chocolate cake (six full layers, not torted) is 12 inches high and weighs 18 lbs. Whew!
Fresh raspberry mousse filled the layers. I developed the mousse last year and found using fresh raspberries resulted in a much better mousse than using frozen berries.
I made and froze all the cakes two weeks in advance and made all the fondant decorations a week later. The bandana was the most difficult decoration as the fondant needs to be exactly the right texture and strength to fold and arrange without stretching or tearing.
Crumb CoatingButtercream DamsMousse FilledFrosted CakesBeginning to DecorateFinished
Extreme Chocolate Cake Single Recipe
Makes two 9” round cakes INGREDIENTS • 2 cups white sugar • 1 3/4 cups all-purpose flour • 3/4 cup unsweetened cocoa powder • 1 1/2 teaspoons baking soda • 1 1/2 teaspoons baking powder • 1 teaspoon salt • 2 eggs • 1 cup milk • 1/2 cup vegetable oil • 2 teaspoons vanilla extract • 1 cup boiling water
METHOD
Preheat oven to 350 degrees F (175 degrees C). Grease and flour two 9 inch cake pans.
Use the first set of ingredients to make the cake. In a medium bowl, stir together the sugar, flour, cocoa, baking soda, baking powder and salt. Add the eggs, milk, oil and vanilla, mix for 3 minutes with an electric mixer. Stir in the boiling water by hand. Pour evenly into the two prepared pans.
Bake for 30 to 35 minutes in the preheated oven, until a toothpick inserted comes out clean or 205F internal temp. Cool for 10 minutes before removing from pans to cool completely.
Combine raspberries and 2 Tbl confectioners’ sugar in a small bowl and add to a food processor and pulse until berries are reduced
Sieve the mixture allowing enough time for most of the raspberry juice to drip into a bowl, (enough to make 200ml (2/3 c) puree)
In a large bowl, add raspberry juice, 1 Tbl vanilla pudding, softened cream cheese and 1/4 cup powdered sugar, raspberry powder and ouzo and beat until well combined (3-4 minutes on high.) Mix in red food coloring in 2 or 3 aliquots until desired color is attained.
In the bowl of a stand mixer whip the heavy cream, vanilla pudding mix and confectioners’ sugar.
Add red food coloring (in several small amounts until desired color is attained) and whip to firm peaks.
Fold the raspberry mixture into the whipped cream until combined.
Marshmallow Fondant
INGREDIENTS • 1 package (10 ounces) white mini marshmallows • 2-5 tablespoons water • 851 g (1 ¼ lbs or 20 oz) sifted confectioners’ sugar, divided in half • 1/4 cup solid vegetable shortening
METHOD
Grease your mixing bowl and a glass bowl that can be used to melt marshmallows in the microwave.
Place the marshmallows, water and flavoring of your choice in greased glass bowl and microwave on high at 30 second intervals.
Stir every 30 seconds until marshmallows are completely melted, about 2 minutes.
Sift half of the confectioner’s sugar in a greased mixing bowl. Make a well in the center of the confectioner’s sugar and pour in the melted marshmallows.
I use the paddle attachment for my KitchenAid mixer for this first part of the mixture.
Mix until all the melted marshmallows are incorporated in the confectioner’s sugar.
Add any food coloring at this point.
Mixture will be thick but still runny.
Sift the remaining half of confectioner’s sugar into the melted marshmallows.
Mix on low until it comes together.
Change to your dough hook attachment as this will get extremely thick.
Fondant will be very thick and have a dough like consistency
Wrap fondant in saran and make sure no air gets to it.
I am often asked “Why don’t you open a bake shop?” (Then it wouldn’t be a hobby.) Or, “Why don’t you enter a baking contest? (Because if I don’t have a recipe in front of me, I am useless.)
I have followed Sally’s Baking Addiction for quite a while. She is one of the several that I refer to when I need advice or another opinion (not that anyone knows they are doing this for me.) For nebulous reasons I entered Sally’s monthly challenge this week. First, she provides the recipe, second I can bake in my own kitchen at my own pace
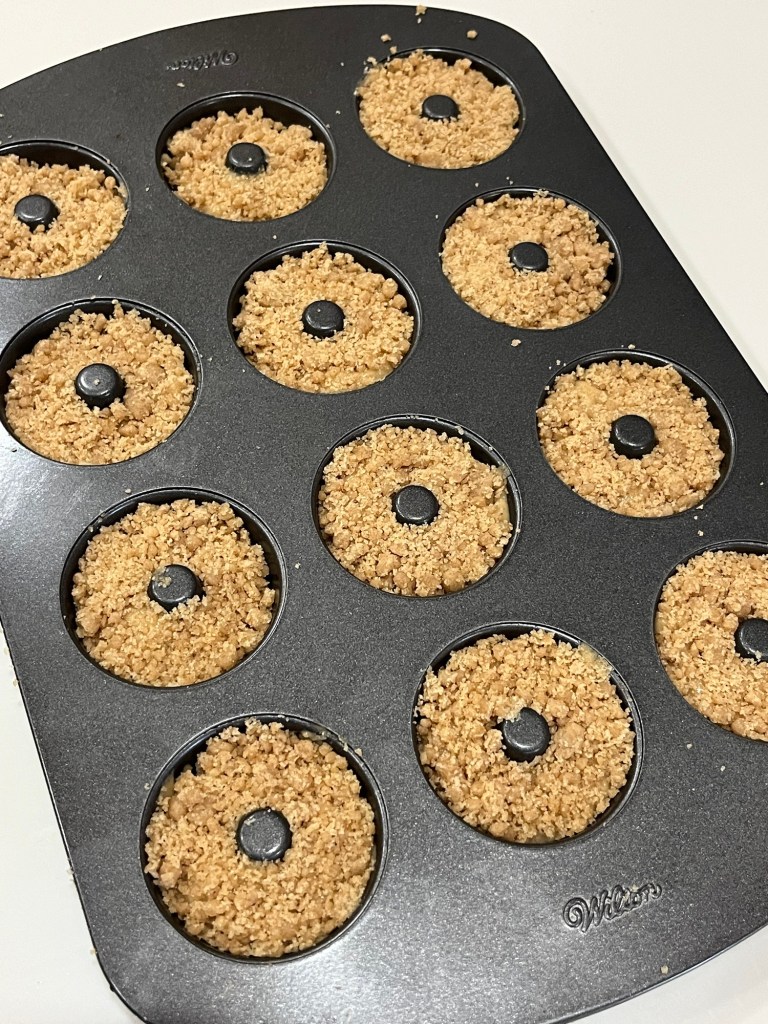
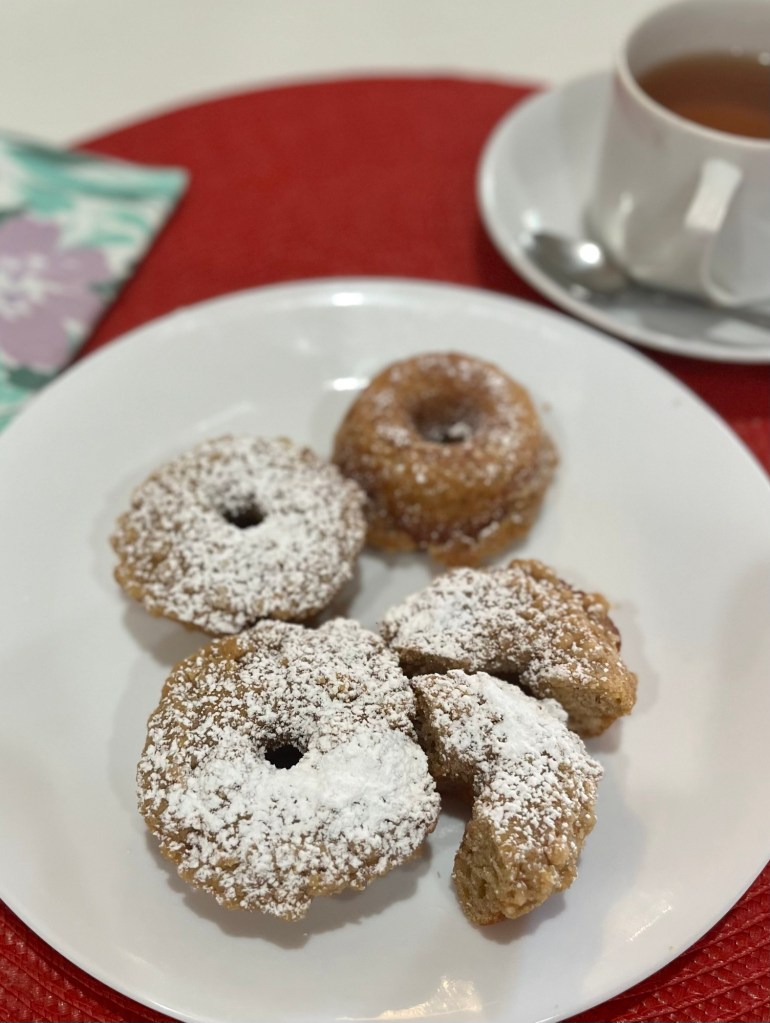
Also, I like baked, cake donuts and these are good ones. There are a lot of ingredients, but nothing too challenging. The method does not have a lot steps and the donuts come together quickly. The instructions were spot on and the results excellent.
Crumb Cake Donuts
INGREDIENTS Crumb Topping • 1/3 cup (67g) packed light or dark brown sugar • 1/3 cup (67g) granulated sugar • 1 and 1/2 teaspoons ground cinnamon • 1/2 cup (8 Tbsp; 113g) unsalted butter, melted • 1 cup + 2 Tablespoons (140g) all-purpose flour (spooned & leveled)
Donuts • 2 cups (250g) all-purpose flour (spooned & leveled) • 2 teaspoons baking powder • 1/2 teaspoon baking soda • 3/4 teaspoon salt • 1 teaspoon ground cinnamon • 1/4 teaspoon ground nutmeg • 1/4 cup (4 Tbsp; 56g) unsalted butter, melted and slightly cooled • 2 large eggs, at room temperature • 2/3 cup (135g) packed light brown sugar • 1/2 cup (120ml) milk, at room temperature • 1/2 cup (120g) plain yogurt or sour cream, at room temperature • 2 teaspoons pure vanilla extract • confectioners’ sugar for dusting
METHOD
Preheat oven to 350°F (177°C). Spray donut pan with non-stick spray. Set aside.
Make the crumb topping: Mix the brown sugar, granulated sugar, and cinnamon together in a medium bowl. Stir in the melted butter using a fork, then add the flour. Mix and crumble with a fork. Set aside.
Make the donuts: Whisk the flour, baking powder, baking soda, salt, cinnamon, and nutmeg together in a large bowl. Set aside. Whisk the melted butter, eggs, brown sugar, milk, yogurt, and vanilla together until completely combined.
Pour the wet ingredients into the dry ingredients and mix until just combined. Do not over-mix. The batter will be very thick.
Pipe the batter into the donut cavities filling about halfway. Grab a handful of crumb-topping and press down onto the batter of each donut. Pressing it snug into the batter helps prevent the crumb coating from falling off the donuts. (If you only have 1 donut pan, keep the remaining batter in the bowl at room temperature until you can bake the next batch.)
Bake for 10-11 minutes or until the edges and tops are lightly browned. Allow to cool for about two minutes then transfer to a wire rack set on a large piece of parchment paper. Bake the remaining donut batter and once baked, transfer to the wire rack. Dust the tops of each with a light coating of confectioners’ sugar, if desired.
Donuts are best served immediately. Leftovers keep well covered tightly at room temperature or in the refrigerator for 2 days.
Freezing Instructions: Freeze the baked and cooled donuts for up to 3 months. Thaw overnight in the refrigerator, then warm up to your liking in the microwave.
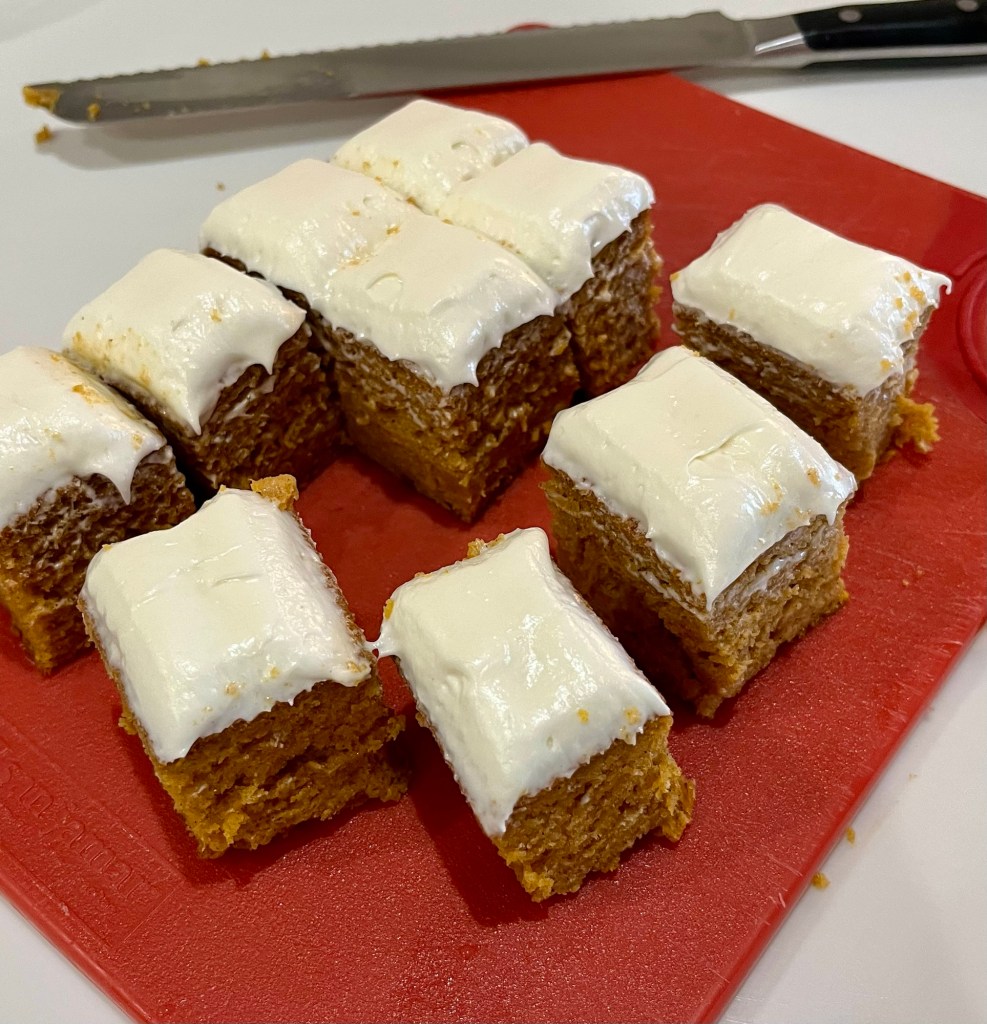
The neighborhood Halloween decorations aren’t even up and I am making Thanksgiving-ish desserts! However, these are exceptional. I used Kim’s gluten free flour so one of our friends could enjoy them.
It is moist, not too pumpkin-pie-ish and not too sweet. Easy, quick and delicious.
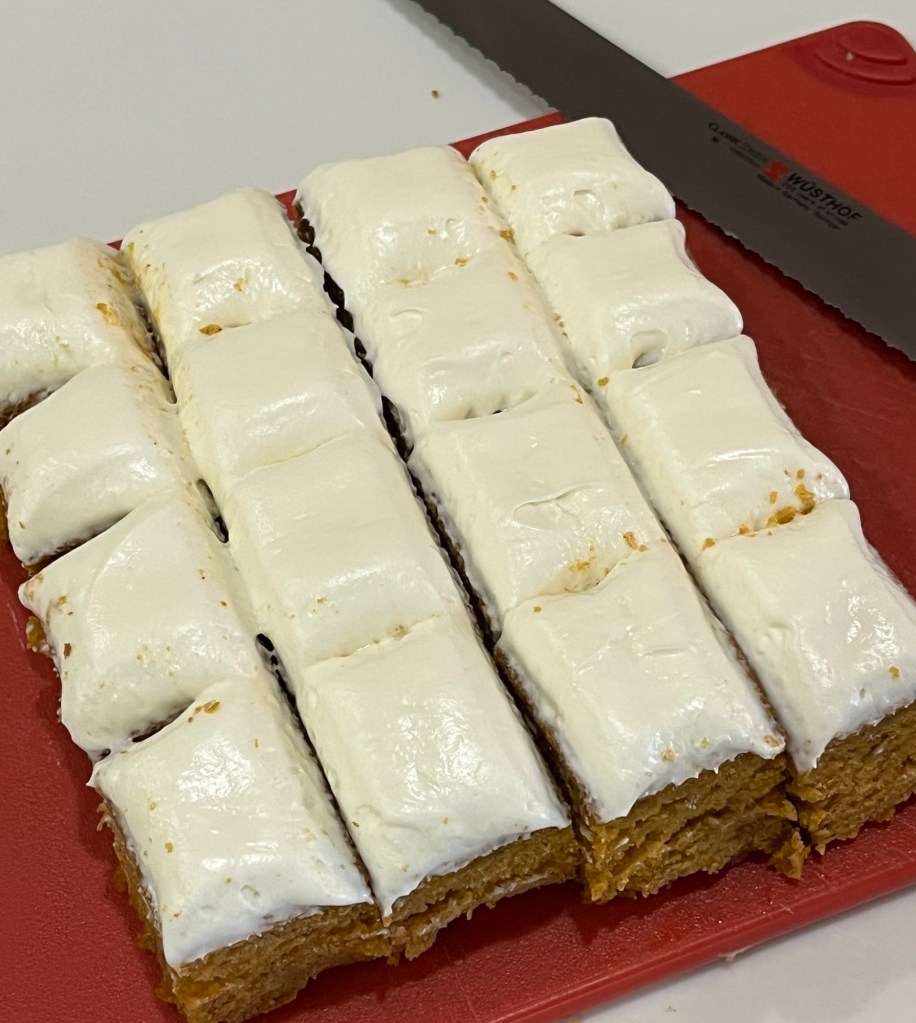
Pumpkin Cake
INGREDIENTS • 14.5 ounces pumpkin puree • ½ cup plain whole milk yogurt • ½ cup unsalted butter (melted) • 2 eggs (lightly beaten) • 2 teaspoons vanilla extract • 2 cups all-purpose flour (Optional: use Kim’s gluten free AP flour.) • ⅔ cup sugar • 2 teaspoons pumpkin pie spice • 2 teaspoons baking powder • 1 teaspoon baking soda • ½ teaspoon salt Cream Cheese Frosting • 226g full-fat brick cream cheese, softened to room temperature • 113g unsalted butter, softened to room temperature • 360g confectioners’ sugar, plus an extra 1/4 cup (30g) if needed • 1 teaspoon pure vanilla extract • 1/8 teaspoon salt METHOD
Preheat the oven to 375 F and line an 8×8-inch pan with parchment paper.
Stir together the pumpkin puree, yogurt, melted butter, egg, and vanilla in a large bowl.
Stir in the flour, sugar, pumpkin pie spice, baking powder, baking soda, and salt.
Pour batter into the prepared pan. Bake for 30-34 minutes or until a cake tester inserted into the center comes out clean. If the top of the cake darkens, tent with aluminum foil, reduce the heat to 350F and bake an additional 5 minutes until internal temperature reaches 195-200F.
Let the cake cool in the pan for 5 minutes. Then use the parchment paper to lift the cake out of the pan onto a wire rack to cool completely.
Cream Cheese Frosting
In a large bowl using a handheld or stand mixer fitted with a paddle or whisk attachment, beat the cream cheese and butter together on high speed until smooth and creamy.
Add confectioners’ sugar, the vanilla, and salt. Beat on low speed for 30 seconds, then switch to high speed and beat for 2 minutes. If you want the frosting a little thicker, add the extra 30g (1/4 c) of confectioners’ sugar (I add it).
Cover and store leftover frosting for up to 5 days in the refrigerator or up to 3 months in the freezer. After freezing, thaw in the refrigerator then beat the frosting for a few seconds so it’s creamy again.
Frost with cream cheese frosting, slice, and serve.
I had no reason whatsoever to make a cake, then fortuitously I ran across two new recipes, one for a supposedly moist, tender sponge cake, and the other for a less (than buttercream) sweet white chocolate ganache frosting.
I made the cakes yesterday and wrapped them in heavy plastic wrap then this morning made the frosting. I was amazed both the cakes and frosting were as light and tasty as promised.
I was surprised beating the egg yolks into the initial meringue would result in the promised light fluffy batter, but it did. I was equally surprised after chilling the diluted white chocolate ganache it whisked into a light, spreadable frosting, but it did.
I did a poor job of adding some raspberry drizzle, sorry. It won’t hurt the taste!
Sponge Cake
INGREDIENTS • 6 large eggs, separated and at room temperature • ½ teaspoon white vinegar • 175 g (¾ c plus 2 tbsp) granulated sugar • ¼ teaspoon salt • 142 g (1 c) all-purpose flour • 30 g (¼ c) tapioca starch • 80 ml (⅓ c) 35% heavy cream, heated to just below simmering • 1 tsp (5ml) pure vanilla extract
METHOD
Preheat the oven to 350°F. Lightly grease and flour two 8-inch round cake pans and line them with rounds of parchment paper.
First separate the eggs: Place the yolks in a small bowl and place the egg whites in the bowl you intend to whip them in – in a large mixing bowl if using an electric hand mixer or the bowl of a stand mixer.
Sift the dry ingredients: Sift flour and tapioca starch into a medium bowl and whisk to blend evenly.
Heat the cream: Place the cream in a small saucepan and heat it until it almost simmers. It should be hot but not boiling. Set it aside, but keep warm.
Whip egg whites: Place the room temperature egg whites in the bowl of a stand mixer fitted with the whisk attachment (or in a large bowl if using a hand mixer), add the vinegar and beat on high speed for 1-2 minutes until very frothy and doubled in volume.
Add sugar gradually in about 3 or 4 stages while beating for 1-2 minutes after each addition. After the last addition, beat until the meringue is thick and glossy and holds firm peaks, a total of 7 minutes at least. Yhe meringue is whipped sufficiently when you lift up the beaters and the meringue holds a peak that just curls over slightly. If it is still very soft and curls down immediately, then whip it longer.
Whip in salt and egg yolks 2 at a time until evenly combined and the mixture is pale yellow and fluffy.
Add dry ingredients. Place a fine mesh sieve over the bowl and sift half of the flour and tapioca starch again over the egg mixture. Whisk to gently fold it in until just until combined. Sift the remaining dry ingredients on top and fold it in.
Add the hot cream. Pour the hot cream around the sides of the bowl, add the vanilla extract and gently fold it in with a wide spatula. The batter should weigh ~728 g.
Divide the batter evenly between the prepared pans and then run a knife around in the batter to pop any very large air bubbles. Bake for 20 minutes until evenly golden and it springs back when pressed gently. It should feel slightly firm when you press the surface. Transfer pan to a wire rack to cool for a few minutes, then while the cake is still hot, gently run a knife or offset spatula gently around the sides in an up and down motion and invert the cakes on a wire rack while warm.
Vanilla Whipped White Chocolate Ganache Frosting
INGREDIENTS
200 g (7 oz) pure white chocolate
355 ml (1 ½ c) 35% heavy whipping cream
2 tsp vanilla bean paste
½ tsp pure vanilla extract METHOD
Chop the chocolate: Finely chop the white chocolate and place it into a large bowl. Or, use couverture white chocolate chips.
Heat the cream: Pour ½ cup of cream into a 1-quart stainless steel saucepan with the vanilla bean paste and place over medium heat. Watch it as it comes to a simmer.
Make the ganache: Once simmering, immediately pour the hot cream over the chopped chocolate, cover the bowl and let stand for 2 minutes. Uncover the bowl and whisk until the chocolate is completely melted and the mixture is smooth and silky. Let it cool for 5 minutes so it is no longer hot.
Add cold cream: Pour in the remaining cold cream while whisking until combined.
Chill the ganache: Place the bowl in the fridge and chill for at least 2 hours or overnight until completely cold. If you choose to chill overnight, then cover the bowl after 20 minutes.
Whip it until thick and fluffy: Once thoroughly chilled, add the vanilla extract and beat with an electric hand mixer or stand mixer fitted with the whisk attachment on medium speed until thick, airy and fluffy. This will take about 2 minutes, depending on your mixer.
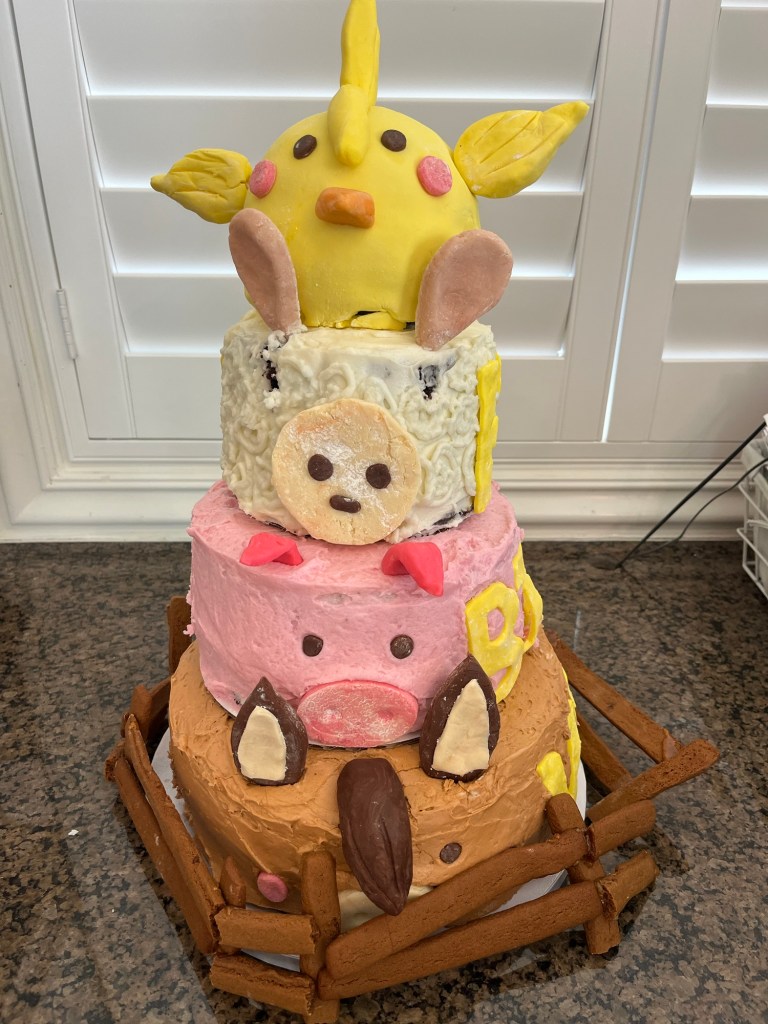
It’s not every day you are able to make a “Farm Animal” birthday cake for your granddaughter’s 6th birthday! I made a horse, a pig, a sheep and a chick and surrounded them with a barnyard fence.
I was directed to make all the cakes chocolate, but that was the only order… er.. guidance I was give. All but the chick were frosted with a basic buttercream and the chick was coated with marshmallow fondant and adorned with fondant wings, comb, beak and eyes. The other animals features are semisweet and white modeling chocolate and held on with embedded toothpicks (which were all removed before slicing.
The barnyard fence is gingerbread with hot caramel gluing the parts together. (The blisters on my fingers and hands attest to the temperature of the caramel.)
(Note to self: stabilize cakes above 4 layers with a dowel driven down the center of the cakes. This should reduce the sadness when the cake collapses in the heat. Oh well, stuff happens.)
THE BEST BUTTERCREAM FROSTING
INGREDIENTS • 452 g (4 cups) of powdered sugar (or 1 box) • 1 Cup (2 sticks) of softened butter • 2-3 teaspoons of vanilla • 1-2 tablespoons of whipping cream (for crumb coat frosting add cream as needed) Optional • 2 Tbl Meringue Powder to make crusting frosting. • Violet food coloring (a very small amount will make the frosting white)
METHOD
Add powdered sugar to mixing bowl.
Add softened sticks of butter
Add vanilla. If you want white frosting add a very small amount of violet food coloring
Add 1 tbsp of cream.
Beat on low until powdered sugar is incorporated. Then move mixer up to medium-high speed. Scrape sides and bottom of bowl often. When completely mixed the frosting may appear dry. (See option below.)
Add more cream, a little bit at a time, beating at slowest speed, until frosting is the proper consistency. For optional raspberry flavor
Add raspberries and 2 Tbl sugar to a food processor and pulse to macerate the berries
Sieve to remove pulp and seeds. You should have about ½ cup puree.
Add puree to soft peak mixture and red food coloring if desired.
Modeling Chocolate With Real Chocolate
INGREDIENTS Dark modeling chocolate • 1 ⅓ cups (227g) chopped semisweet chocolate (not chips)* • ⅓ cup (103g) light corn syrup White modeling chocolate • 1 ⅓ cups (227g) chopped white chocolate (not chips)* • ⅓ cup (103g) light corn syrup
METHOD
In a heatproof bowl set over simmering water (or in a double boiler), melt the chocolate. Stir constantly until melted; don’t let its temperature rise above 110°F. Remove from the heat.
Warm the corn syrup to 110°F, (10 seconds in a 1000W microwave for a full recipe) add to the melted chocolate, and stir until the mixture is uniform. It will look grainy at first but smooth out as you keep stirring.
Allow the mixture to cool, then cover and let rest at room temperature for 2 hours. It will set up and become quite stiff.
When you’re ready to use it, take a chunk and work it in your hands until it softens. From this point you can tint it with gel colors, roll it out and cut it with decorative cutters, or shape it any way you choose, like modeling clay; the chocolate will set once more as it cools. See our blog post, Modeling chocolate 101, for step-by-step instructions on how to make chocolate roses, letters, and other kinds of decorations.
Carmel Glue
INGREDIENTS • 200g caster sugar • 60ml cold water
METHOD
Put the sugar and water in a large, low-sided frying pan over a medium-high heat. Without stirring, bring to 320°F on a sugar thermometer. If you don’t have one, the syrup is ready when the sugar has dissolved, and it turns a light golden color.
Swirl the syrup gently in the pan to even out the color. Take the pan off the heat and leave to cool for a few moments to thicken slightly to the consistency of honey.
If the syrup begins to harden in the pan, put it back over a gentle heat until it has returned to the required consistency.
Gingerbread Cookies
INGREDIENTS • 3 ½ cups (440g) all-purpose flour • 1 teaspoon baking soda • 1/2 teaspoon salt • 1 Tablespoon ground ginger • 1 Tablespoon ground cinnamon • ½ teaspoon ground allspice • ½ teaspoon ground cloves • 10 Tablespoons (2/3 cup; 145g) unsalted butter, softened to room temperature • 3/4 cup (150g) packed light or dark brown sugar • 2/3 cup (160ml; about 200g) unsulphured or dark molasses • 1 large egg, at room temperature • 1 teaspoon pure vanilla extract
METHOD
In a large bowl, whisk together the flour, baking soda, salt, ginger, cinnamon, allspice, and cloves. Set aside.
In a large bowl using a handheld mixer or stand mixer fitted with a paddle attachment, beat the butter for 1 minute on medium speed until completely smooth and creamy. Add the brown sugar and molasses and beat on medium high speed until combined and creamy. Scrape down the sides and bottom of the bowl as needed. Next, beat in egg and vanilla on high speed for 2 full minutes. Scrape down the sides and bottom of the bowl as needed. The butter may separate; that’s ok.
Add the flour mixture to the wet ingredients and beat on low speed until combined. The cookie dough will be quite thick and slightly sticky. Divide dough in half and place each onto a large piece of plastic wrap. Wrap each up tightly and pat down to create a disc shape. Chill discs for at least 3 hours and up to 3 days. Chilling is mandatory for this cookie dough. I always chill mine overnight.
Preheat oven to 350°F (177°C). Line 2-3 large baking sheets with parchment paper or silicone baking mats. Set aside.
Remove 1 disc of chilled cookie dough from the refrigerator. Generously flour a work surface, as well as your hands and the rolling pin. Roll out disc until 1/4-inch thick. Tips for rolling—the dough may crack and be crumbly as you roll. What’s helpful is picking it up and rotating it as you go. Additionally, you can use your fingers to help meld the cracking edges back together. The first few rolls are always the hardest since the dough is so stiff, but re-rolling the scraps is much easier. Cut into shapes. Place shapes 1 inch apart on prepared baking sheets. Re-roll dough scraps until all the dough is shaped. Repeat with remaining disc of dough.
Bake cookies for about 9-10 minutes. If your cookie cutters are smaller than 4 inches, bake for about 8 minutes. If your cookie cutters are larger than 4 inches, bake for about 11 minutes. My oven has hot spots and yours may too—so be sure to rotate the pan once during bake time. Keep in mind that the longer the cookies bake, the harder and crunchier they’ll be. For soft gingerbread cookies, follow my suggested bake times.
Allow cookies to cool for 5 minutes on the cookie sheet. Transfer to cooling rack to cool completely. Once completely cool, decorate as desired.
Cookies stay fresh covered at room temperature for up to 1 week.
Extreme Chocolate Cake
Makes two 9” round cakes (double for this cake) INGREDIENTS (Makes one 10’ ROUND CAKE [and two 5”] – quantities are in parenthesis. Or one 11”x15”x2” sheet cake.) • 2 cups white sugar (3) • 1 3/4 cups all-purpose flour (2 2/3) • 3/4 cup unsweetened cocoa powder (1 ¼) • 1 1/2 teaspoons baking soda (2 ¼) • 1 1/2 teaspoons baking powder (2 ¼) • 1 teaspoon salt (1 ½) • 2 eggs (3) • 1 cup milk (1 ½) • 1/2 cup vegetable oil (¾) • 2 teaspoons vanilla extract (3) • 1 cup boiling water (1 ½)
METHOD
Preheat oven to 350 degrees F (175 degrees C). Grease and flour two 9 inch cake pans.
Use the first set of ingredients to make the cake. In a medium bowl, stir together the sugar, flour, cocoa,baking soda, baking powder and salt. Add the eggs, milk, oil and vanilla, mix for 3 minutes with an electric mixer. Stir in the boiling water by hand. Pour evenly into the two prepared pans. (For cupcakes,portion ¼ scant cups in each cupcake paper.
Bake for 30 to 35 minutes in the preheated oven, until a toothpick inserted comes out clean or 205F internal temp. Cool for 10 minutes before removing from pans to cool completely.
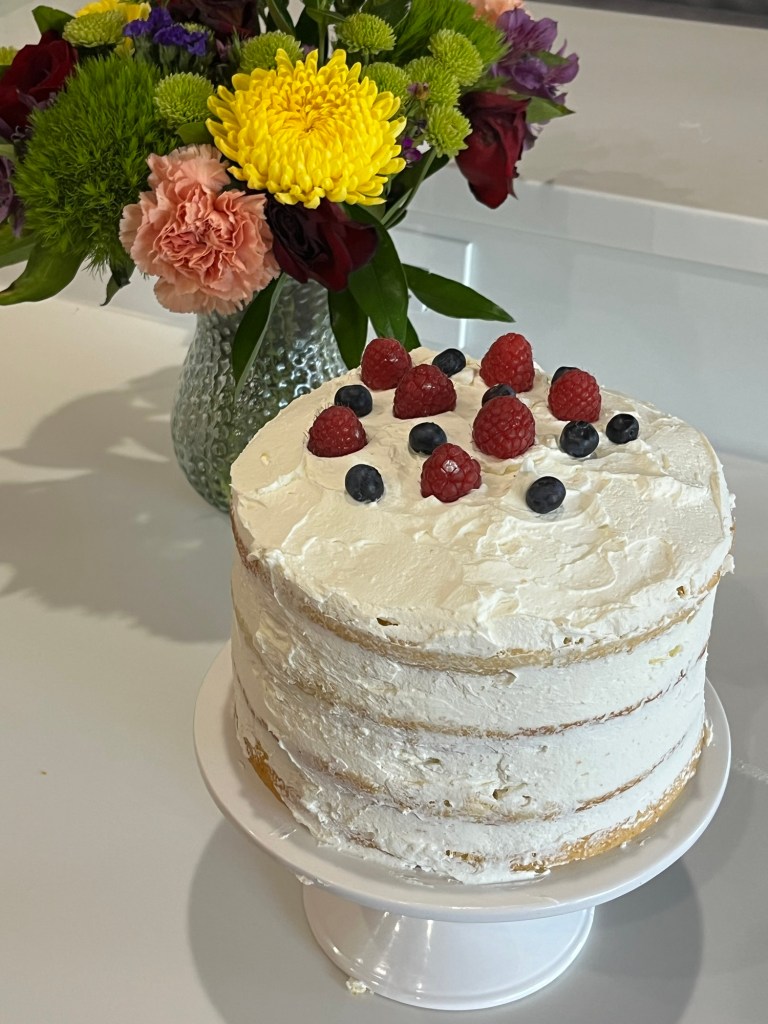
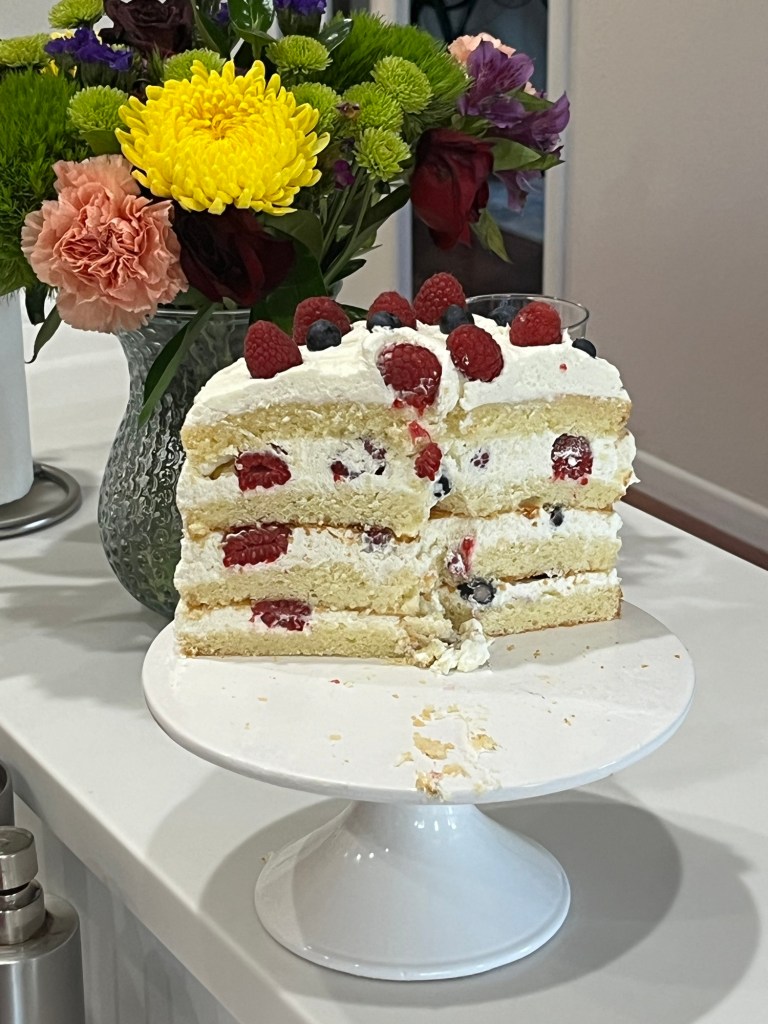
While still on an early summer berry theme I decided to bake this Gluten Free Berry Chantilly Cake.
The Chantilly cake first came onto the scene in 1829 when it was created by French chefs at Antoine’s Restaurant in New Orleans. Long ago QC and I dined at Antoine’s. While we were waiting in a long line for a table for two the Maîtred‘ asked if there were any parties of four as there was a table ready. The couple behind us leaned forward and asked if we wanted to join them, we did, and were shown to the available table. They were a delightful couple and a great time was had by all. 😁
Next time I think I will bake more Chantilly cream. I ended up making this a naked cake because I needed more whipped cream. I might also try an Italian meringue although it might be too sweet.
Berry Chantilly Cake
INGREDIENTS • 2 ½ c all-purpose flour (or Kim’s for Gluten Free) • 2 ½ tsp baking powder •1 tsp salt • ¾ c unsalted butter, softened • 1 ⅓ c granulated sugar • 3 large eggs, room temperature • 1 tsp vanilla extract • 1 tsp almond extract • 1 ½ c whole milk Chantilly cream and berries • 3 ½ c heavy cream • ½ c whipped cream cheese • ⅓ c powdered sugar • ¼ tsp cream of tartar
METHOD Cake
Preheat oven to 350F. Grease and line two 8-inch cake pans with a circle of parchment paper.
In a large bowl, sift together the flour, baking powder, and salt. Set aside.
In another large bowl, use an electric mixer to cream the softened butter and sugar until light and fluffy. Beat, scraping down the sides as necessary, for 3 minutes.
Add the eggs one at a time, mixing well after each addition. Blend in the vanilla and almond extracts.
Add the dry ingredients to the creamed mixture alternately with milk, starting and ending with the flour mixture. Mix until just combined. Do not over-mix to keep the cake light and fluffy.
Divide the batter evenly between the prepared pans. (Batter should weigh ~1800g.) Bake in the preheated oven for 30-35 minutes, or until a toothpick inserted into the center comes out clean or temperature reaches 190⁰F.
Let the cake layers cool before carefully slicing each layer in two, horizontally through the middle. Use a long-serrated knife.
Chantilly cream and berries
Using a stand mixer with balloon whisk or a bowl with electric beaters begin whipping the cream cheese, then add the cream, powdered sugar, and cream of tartar. Whip until the cream holds peaks, but be careful not to over beat the cream.
Place one cake layer, cut side up. Spread about a cup of whipped cream over the surface. Add a layer of berries over the cream. Smaller berries can be left whole, but strawberries should be sliced.
Continue layering 2 more layers in the same manner. Place the final cake layer on top.
Spread more whipped cream on the sides and top of the cake. Decorate with whole berries. Refrigerate the cake for at least 2 hours before serving.
Kim’s Gluten Free Flour
Yield: 700g (5 c) INGREDIENTS
285g Bob’s Red Mill potato starch
250g superfine white rice flour (DON’T use regular rice flour, ie Bob’s Red Mill)
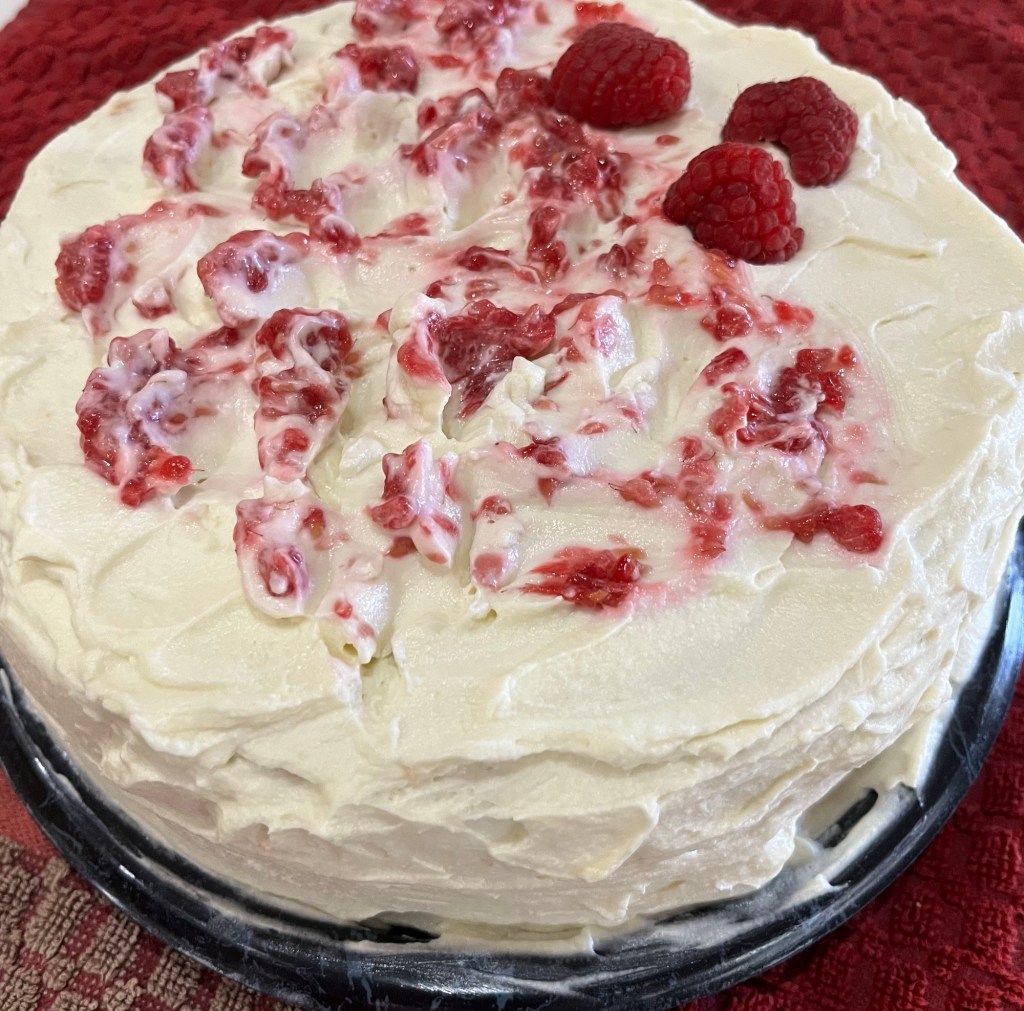
Last week I made a two layer vanilla sheet cake with raspberry mousse filling. It was moist and delicious… but I wanted a more tender crumb… so today I made a practice nearly-naked vanilla cake with raspberry buttercream. (Nearly naked – as it wasn’t heavily frosted and some cake was visible.) For a little contrast I added a dark chocolate ganache drip.
I believe I made one mistake with this cake. After baking I refrigerated the cake for a couple of hours as I ran errands. I feel the cake was more tender before chilling. Next time, I will frost the cake as soon as it cools to room temperature.
Vanilla Cake Recipe
INGREDIENTS • 2½ cups all-purpose flour (280g) • 2¼ tsp baking powder • ¾ tsp salt • 1⅔ cups granulated sugar (333g) • ¾ cup unsalted butter room temperature (170g) • 3 large eggs room temperature • 1 Tbsp vanilla (15mL) • 1 cup buttermilk (240mL) METHOD
Preheat oven to 350F and line two 8-inch pans with parchment paper and butter the sides. Sift the flour, baking powder, and salt into a bowl, then whisk together and set aside.
Cream the butter in a stand mixer fitted with a whisk attachment or an electric hand mixer. Add the sugar and beat on high for 3-4 minutes, scraping the bowl down as needed. Add the vanilla, then eggs one at a time while mixing on medium speed, then scrape the bowl down and mix in high for a minute.
Reduce speed to low and add the flour in three batches alternating with the buttermilk. Once almost combined, remove the whisk attachment and fold in any remaining butter/flour using a spatula. Do not over-mix the batter.
Divide batter equally between the two pans, then bake at 350F for 30-40 minutes or until the edges pull away from the pan, and a toothpick inserted in the center comes out clean.
Allow to cool in pan for about two minutes, then invert cake pan onto a cooling rack. After 10 minutes remove pan from layers, remove the paper, and set aside to cool completely.
Raspberry Buttercream Frosting
INGREDIENTS • 226 g (1 c) of powdered sugar (or 1/2 box) • 1/2 c (1 stick) of softened butter • 1-2 tsp of vanilla • ~1 Tbl whipping cream (for crumb coat frosting as needed)
Optional • 2 Tbl Meringue Powder to make crusting frosting. • 12 oz fresh raspberries • 1 Tbl Raspberry Freeze Dried Powder • Red food coloring METHOD
Add powdered sugar to mixing bowl.
Add softened sticks of butter
Add vanilla. If you want white frosting add a very small amount of violet food coloring
Add 1 tbsp of cream.
Beat on low until powdered sugar is incorporated. Then move mixer up to medium-high speed. Scrape sides and bottom of bowl often. When completely mixed the frosting may appear dry. (See option below.)
Add more cream, a little bit at a time, beating at slowest speed, until frosting is the proper consistency.
For optional raspberry flavor
Add raspberries and 2 Tbl sugar to a food processor and pulse to macerate the berries
Sieve to remove pulp and seeds. You should have about ½ cup puree.
Add puree to soft peak mixture and red food coloring if desired.
Last week I was asked to make some (~6-7 dozen) dessert pastries for our temples gala fundraiser, This week I made the First Holy Communion cake for our granddaughter Grace, and her cousin Joe. What fun!
This cake is the second time I made a cake for 60 people. It is a two layer cake with fresh raspberry mousse filling, as requested by Grace. It took me 5 attempts to develop the mousse that fulfilled my requirements of fresh taste but firm enough to be a cake filling, without being too dense. Oddly, it also took me 5 attempts to perfect the chalice and the circular disk which represents the Eucharist. I ended up with simple fondant cut outs. The chalice was sprayed with edible gold glitter. A cross was impressed on the disk with a fondant tool. The sun rays were fondant cut at a thin taper with a pizza cutter, then dried.
The vanilla cake (as requested) is two 3” layers, each 11×15”. They were crumb coated with basic buttercream. I built a dam to hold the mousse b adding some meringue powder to a portion of the buttercream and piped it around the edge of the lower cake layer. Another portion of the buttercream was dyed in an attempt to color it gold. A few drops of yellow and one of orange was the prescribed ratio. I would have added a very small amount of brown, if I had the courage. To add very small amounts, just dip the end of a toothpick in the food dye and wipe it through the buttercream, then beat.
The fondant is basic marshmallow fondant, but a lot of it. I needed it to be 16×25” to cover the cake. One issue I had was the fondant was drying out as I kneaded and rolled it out. (Next time, don’t make it 2 days in advance.)
Yellow Sheet Cake (2 required)
YIELD: SERVES 25-30 INGREDIENTS
• 570 g all-purpose flour (spoon & leveled) • 2tsp baking soda • 1 tsp salt • 460 g unsalted butter, softened to room temperature • 700 g granulated sugar • 4 large eggs, at room temperature • 4 tsp pure vanilla extract • 240 g (1 c) sour cream, at room temperature • 480 ml (2 c) whole milk, at room temperature METHOD
Preheat oven to 350°F (177°C). Generously grease and lightly flour a 11x15x3” cake pan. Set aside.
Whisk the flour, baking soda, and salt together in a large bowl. Set aside. Using a handheld or stand mixer fitted with a paddle attachment, beat the butter on high speed until smooth and creamy – about 1 minute. Add the sugar and beat on high speed for 3 full minutes until creamed together. The mixture should be a light yellow color. Scrape down the sides and up the bottom of the bowl with a rubber spatula as needed. On medium-high speed, add 1 egg at a time, beating well after each addition until both are mixed in. On high speed, beat in the vanilla extract and sour cream. Scrape down the sides and up the bottom of the bowl with a rubber spatula as needed.
With the mixer running on low speed, add the dry ingredients to the wet ingredients alternating with the milk. Start and end with the dry ingredients. Mix each addition just until incorporated. Do not overmix this batter. The batter will be smooth, velvety, and slightly thick.
The full recipe yields 2000g of batter. Spread the cake batter into the prepared pan. Smooth it out into a thin, even layer. Bake for 20-22 minutes (for the jelly roll pan, less for a half recipe or 45-50 minutes for a double in an 11×15” pan.) Actual times depend on pan used, less time for shallow pan, more for deeper, or until the top is lightly browned and a toothpick inserted in the center comes out clean, or 200F. (Two 8” round pans required 30 minutes to bake in my oven.) Make sure you rotate the cake pan once or twice during bake time if your oven has hot spots. Remove from the oven and allow the cake to cool in the pan placed on a wire rack. As the cake is cooling, make the frosting.
Make ahead tip: Cake can be made 1 -2 days in advance, wrapped in plastic wrapped tightly at room temperature.
I suggest freezing the wrapped cake for a couple of hours before assembling the cake. They are very tender and fragile when at room temperature and much more stable when chilled/frozen.
• 1 cup heavy whipping cream, chilled • 2 Tbl instant vanilla pudding powder (substitute corn starch if desired.) • 2-3 Tbl powdered sugar
METHOD
Combine raspberries and 2 Tbl confectioners’ sugar in a small bowl and add to a food processor and pulse until berries are reduced
Sieve the mixture allowing enough time for most of the raspberry juice to drip into a bowl, (enough to make 200ml (2/3 c) puree)
Add 1 Tbl vanilla pudding, softened cream cheese and 1/4 cup sweetener, raspberry powder and ouzo and beat until well combined (3-4 minutes on high.) Mix in red food coloring in 2 or 3 aliquots until desired color is attained.
In a large bowl, whip the heavy cream and confectioners sugar. Add red food coloring (in several small amounts until desired color is attained) and whip to firm peaks.
Add the vanilla pudding mix near the end and stir slowly. It will start setting the mousse quickly.
Fold the raspberry mixture into the whipped cream until combined. Divide the mousse among 6 dessert cups, cover, or fill a piping bag and chill until set, about 1 hour.
Marshmallow Fondant (2 required)
INGREDIENTS
• 1 package (16 ounces) white mini marshmallows • 2-5 tablespoons water • 2 pounds sifted confectioners’ sugar • 1/4 cup solid vegetable shortening
METHOD
Grease a mixing bowl and a glass bowl that can be used to melt marshmallows in the microwave.
Place the marshmallows, water and flavoring of your choice in greased glass bowl and microwave on high at 30 second intervals.
Stir every 30 seconds until marshmallows are completely melted, about 2 minutes.
Sift one half of the 2-pound bag of confectioner’s sugar in a greased mixing bowl. Make a well in the center of the confectioner’s sugar and pour in the melted marshmallows.
I use the paddle attachment for my KitchenAid mixer for this first part of the mixture.
Mix until all the melted marshmallows are incorporated in the confectioner’s sugar.
Add any food coloring at this point.
Mixture will be thick but still runny.
Sift the remaining half bag of confectioner’s sugar into the melted marshmallows.
Mix on low until it comes together.
Change to your dough hook attachment as this will get extremely thick.
Fondant will be very thick and have a dough like consistency. I like to knead by hand to assure everything is well mixed.
Wipe a thin layer of vegetable shortening over the surface and wrap the fondant in plastic to make sure no air gets to it.
Rest fondant for at least an hour before use. Store at room temperature for no more than a day.
Buttercream Frosting (May need 2-3 recipes)
INGREDIENTS
• 452 g (4 cups) of powdered sugar (or 1 box) • 1 Cup (2 sticks) of softened butter • 2-3 teaspoons of vanilla • 1-2 tablespoons of whipping cream (for crumb coat frosting add cream as needed) Optional • 2 Tbl Meringue Powder to make crusting frosting. • Violet food coloring (a very small amount will make the frosting white)
METHOD
Add powdered sugar to mixing bowl.
Add softened sticks of butter
Add vanilla. If you want white frosting add a very small amount of violet food coloring
Add 1 tbsp of cream.
Beat on low until powdered sugar is incorporated. Then move mixer up to medium-high speed. Scrape sides and bottom of bowl often. When completely mixed the frosting may appear dry.
Add more cream, a little bit at a time, beating at slowest speed, until frosting is the proper consistency.