I have been remiss in posting bakes recently. There are TMI reasons, but I am back now.
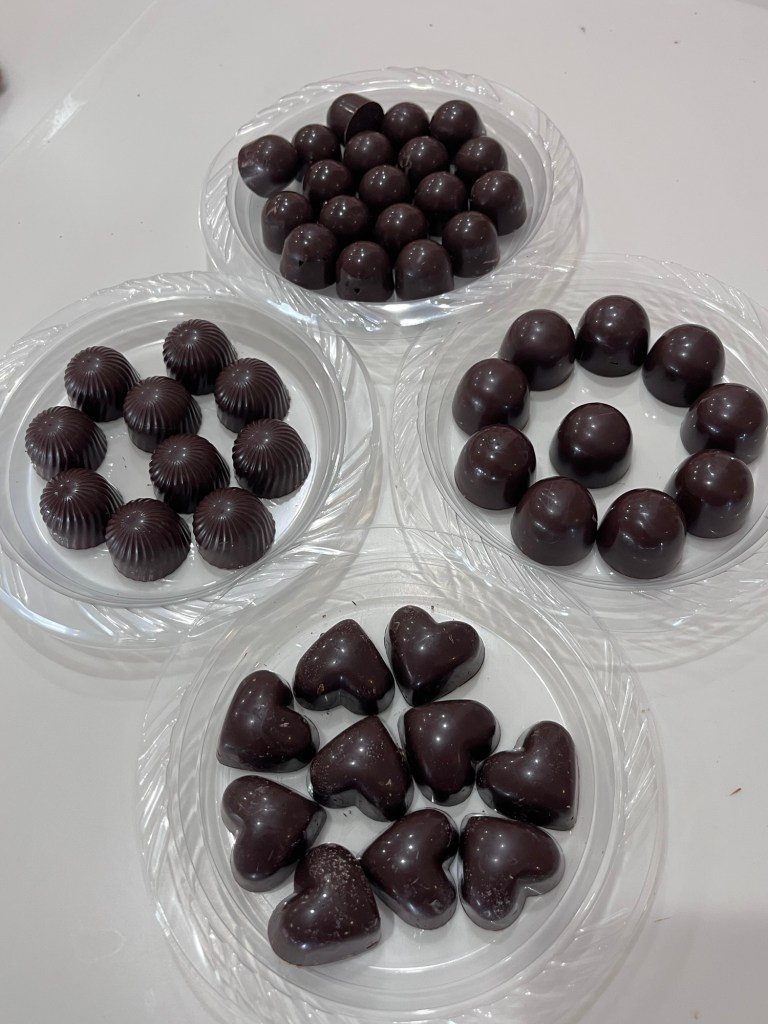
I haven’t made filled chocolate confections in a while and Valentines Day is one of my reasons for making them again.
These are all 54% dark chocolate and clockwise from top we have, raspberry jelly, orange jelly, orange creme and caramel creme confections. Not shown are dipped caramel cubes.
The oranges were poached (with permission) from our neighbors trees. It took a few attempts to achieve the correct tartness and consistency of the jelly and creme, but they have LOTS of oranges. Basically, the same with the raspberry, but this time of year I bought them.
It was fun going back and making these, most rewarding was when tapped upside down 100% released from the mold with a beautiful tempered chocolate shine.
Orange Jelly
Makes ~ 1 ½ cup of jelly
INGREDIENTS • 2 c orange juice (3-4 oranges) • 1 ½ Tbl pectin • ½ tsp butter or margarine • 300g (1 ½ c) sugar • 2 Tbl lemon juice
METHOD
Add the juice to a clean pot. Stir in the lemon juice, butter and pectin.
Bring the mixture to a full rolling boil (a boil that doesn’t stop bubbling when stirred) over high heat.
Stir in the sugar (175g) all at once. Return the mixture to a full rolling boil and boil hard for exactly 1 minute, stirring constantly.
Remove from heat and skim off any foam. Ladle the hot jelly into sterilized jars, leaving ¼ inch of headspace.
Wipe the rims, apply lids, and process in a boiling water bath for 10 minutes. Let sit undisturbed for 24 hours to set
Notes:
Optionally add zest from one orange to the orange juice
To soften firm jelly: Heat small amount of water in a bowl, then place a portion of jelly in a smaller bowl such that the water from the larger does not flood the jelly. Stir for about a minute until the jelly softens and becomes pipeable.
Raspberry Creme
INGREDIENTS
• 265g (2 ½ c) frozen raspberries • zest of 2 lemons • 60g (¼ c) freshly squeezed lemon juice • 190g ( ¾ c plus 2 Tbl) granulated sugar • 3 large eggs • 85g (6 Tbl) softened butter • 1 tablespoon cornstarch for a thicker curd (use when baking into a pie or bars)
METHOD
Set out two bowls, one with the butter in it and one with a fine mesh sieve over it.
Place the frozen raspberries, the zest and the lemon juice in a small pot. Cook on medium to low heat until the raspberries soften and burst and it’s mostly liquid.
Press the raspberry mix through the fine mesh sieve to remove the seeds and zest, scraping the bottom of the sieve. You should have ¾ cup raspberry lemon juice. Discard the seeds and rinse the sieve and pat dry, and set it over the bowl with the butter in it.
Return the raspberry juice to the pot and add the sugar and stir. The mix should have cooled quite a bit by now, if it’s hot, wait a bit. Whisk in the eggs (and starch if using) then return the pot to the stove, cooking at medium heat and whisking until the curd is thick at the bottom and covers the back of a wooden spoon or rubber spatula.
Pour the curd through the sieve and press to get as much curd out as possible, scraping the bottom of the sieve. Stir the curd and the butter until the butter is fully melted and you have a shiny, smooth curd. Transfer to a mason jar and chill, then store in the fridge. The curd will become more tart-tasting and stronger in flavor as it chills.
Orange Creme
INGREDIENTS • 65g (⅓ c) granulated sugar • Zest of 2 large oranges • 3 large eggs • 120g (½ c) freshly squeezed orange juice • 2 Tbl freshly squeezed lemon juice • 58g (4 Tbl) butter cold and sliced • Pinch fine sea salt • 1 Tbl cornstarch
METHOD
Slice the butter and place it into a bowl and set a fine mesh sieve over it. Set aside.
Pour the sugar in a pot, and zest the oranges over the sugar. Use your fingers to rub the zest into the sugar until you feel it begin to release its oils and become like wet sand. Add the orange juice and lemon juice.
Add the eggs and starch to the pot and whisk well to combine. Do your best to break up the egg bits. Set over medium low heat and begin cooking.
Use a rubber spatula or wooden spoon to stir the creme as it cooks. You’ll keep stirring as it warms and thickens. It will thicken on the bottom first, keep stirring until it reaches about 165⁰ F (it should cover the back of a spoon).
Pour the thickened creme into the bowl through the sieve. Scrape it to get as much curd out as possible, and scrape the bottom of the sieve too.
Stir until the butter fully melts and you have a runny, silky creme. Transfer to a heatproof jar and let come to room temperature. Then set it in the fridge to store.
I had the occasion to provide some desserts for an event last week. I chose Sally’s apple hand pies with salted caramel and mini blueberry amuse-bouche cheesecakes. Both were delicious. The cheesecake is an amalgamation of several other bakes I previously made, so I think I can now safely say “adapted” from Sally’s.
Apple Hand Pie – Sally
INGREDIENTS • Homemade Pie Crust (makes 2 crusts, use both) • 300g (3 medium apples, 2 ½ c) peeled and diced into small bite-size pieces • 70g (⅓ c) granulated sugar • 28g (2 Tbl) unsalted butter • 1 tsp ground cinnamon • 1/4 tsp ground nutmeg • 1/4 tsp ground allspice • egg wash: 1 large egg beaten with 1 Tablespoon (15ml) milk • homemade salted caramel for topping
METHOD Preliminary note:
You can shape the hand pies whatever shape you want. I use a 3”round cookie cutter for the bottom crust and a 3 ½ “ for the top. The larger top crusts allows more filling for each pie.
The crust:
Prepare my pie crust recipe through step 5. The dough must chill for 2 hours in the refrigerator.
The filling:
Combine the diced apples, granulated sugar, butter, cinnamon, nutmeg, and allspice together in a medium saucepan or skillet over low-medium heat. While occasionally stirring, bring to a simmer. Allow to simmer for 2 minutes. Remove from heat and allow to cool uncovered at room temperature for 30 minutes.
Roll out the pie dough: On a lightly floured work surface, roll out one of the discs of chilled dough (keep the other one in the refrigerator). Turn the dough about a quarter turn after every few rolls. At any sign of sticking, sprinkle some flour underneath then keep rolling. Roll out until it’s about 1/8” thick. Using your cookie cutter, cut into circles and put the circles into the refrigerator. Form a ball with the scraps and roll out into a thin sheet and put into the refrigerator for 10 minutes. Then roll the chilled dough into a 1/8” thin sheet and cut into circles. Place cut circles in the refrigerator to keep cold. The colder the shaped dough, the easier it is to work with. Repeat with 2nd pie dough and refrigerate cut circles using the other size cookie cutter for at least 15 minutes before filling the hand pies.
Meanwhile, preheat oven to 375°F (191°Can ). Line two large baking sheets with parchment paper or silicone baking mats. Fill the hand pies:
Leaving the smaller, bottom crusts in the fridge and using a sharp knife, cut two parallel slits into the larger circles. These are the top crusts. (The slits act as vents to allow steam to escape as the hand pies bake.) Arrange the smaller circles about 3 inches apart on prepared baking sheets. These are the bottom crusts. Place about 2 tablespoons of filling in the center of each bottom crust. (Or however much fits while leaving the edges bare.) Paint the edge of the bottom crust with water then place top crust on top. Press your fingers all around the edges to seal, then crimp the pie crust edges with a fork. If the hand pies lost some shape, use your hands to form a round circle again. It’s OK if some filling juice is leaking out. Lightly brush the top of the pie crust with egg wash mixture. Sprinkle with coarse sugar, if desired.
At this point the hand pies can be baked, but if they don’t feel cool to touch anymore, freeze for 10 minutes before baking. The colder they are going into the oven, the better they’ll hold their shape.
Bake for about 28–32 minutes or until they’re golden brown on top and around the edges. Rotate pans halfway through baking. Remove from the oven and allow the hand pies to cool on the baking sheets for 5 minutes, then transfer to a wire rack to cool until ready to handle. You can serve warm or at room temperature. If desired, serve with a drizzle of warm salted caramel.
Cover leftovers and store in the refrigerator for up to 5 days. Notes
Make Ahead / Freezing Instructions: A couple ways to make ahead of time! a. The pie crust dough can be prepared ahead of time and stored in the refrigerator for up to 5 days or in the freezer for up to 3 months. Thaw in the refrigerator before using. b. Filling can also be prepared ahead of time. Cover tightly and store in the refrigerator for up to 2 days. Prepared filling can be frozen up to 3 months. Thaw in the refrigerator before using. c. Assembled and unbaked hand pies can be covered and refrigerated for up to 3 days or frozen for up to 3 months. If frozen, no need to thaw before baking; simply add an extra couple minutes of bake time. d. Baked hand pies can be frozen for up to 3 months. Thaw in the refrigerator, then bring to room temperature before serving.
Cheesecakes – Mini No-Bake
INGREDIENTS Graham Cracker Crust • 240 g (2 c) graham cracker crumbs (about 16 full sheet graham crackers) • 67 g (⅓ c) packed light or dark brown sugar • 113 g (½ c; 8 Tbl; 1 stick) unsalted butter, melted Filling • 240 (1 c) cold heavy cream or heavy whipping cream • 452 g (16 oz) RT full-fat brick cream cheese • 67 g (⅓ c) granulated sugar • 30 g (2 Tbl) RT sour cream • 1 tsp fresh lemon juice • ½ tsp pure vanilla extract optional: your desired toppings (see recipe Note)
METHOD Crust:
Line two standard 12-count mini muffin pans with cupcake liners. Make sure you have room in your refrigerator for three pans. (You refrigerate them in step 6.)
Use a food processor to pulse the graham crackers into fine crumbs. Pour crumbs into a medium bowl and stir in the brown sugar and melted butter until combined. Mixture will have the consistency of wet sand. Spoon tsp of the crust mixture into each cupcake liner and use the back of the spoon to pack it down tightly. (The bottom of the liner should have 1/8” of packed crust.)
Bake the crusts for 5 minutes in a 350°F (177°C) oven. The crusts are a little sturdier this way. Let the warm crusts cool for 10 minutes before adding the filling on top. Make Filling:
Place metal stand mixer bowl and whisk in freezer for 30 minutes before proceeding. Whip the cold heavy cream into stiff peaks on medium-high speed, about 2-3 minutes. Set aside.
Using a hand mixer or a stand mixer fitted with a whisk or paddle attachment, beat the cream cheese and granulated sugar together on medium speed until smooth and creamy. Scrape down the sides and up the bottom of the bowl with a silicone spatula as needed. Add the sour cream, lemon juice, and vanilla extract. Beat on medium-high speed until smooth and combined, about 1 minute. Make sure there are no large lumps of cream cheese. If there are lumps, keep beating until smooth.
With a silicone spatula, fold the whipped cream into the cheesecake filling until combined. This takes several turns of your rubber spatula. Combine slowly as you don’t want to deflate all the air in the whipped cream.
Use piping bag to transfer the filling on top of the crusts. Pipe about 2 Tablespoons of filling over each crust. Fit your piping bag with a large star or round piping tip, then transfer the filling to the bag and pipe. Use the back of a spoon to smooth the tops so they are flat.
Refrigerate the mini cheesecakes in the pans for at least 3 hours and up to 2 days. If refrigerating for longer than 3 hours, cover with plastic wrap.
Keep refrigerated until ready to serve. Serve with optional toppings (see recipe Note). The cheesecakes begin to soften and stick to the liners after about 30–60 minutes at room temperature.
Cover and store leftover mini cheesecakes in the refrigerator for up to 5 days. NOTES
Make Ahead & Freezing Instructions: The mini cheesecakes can be made 1-2 days in advance and refrigerated for up to 2 days before serving, as noted in step 6. Another way to prep these mini no-bake cheesecakes is to freeze them. Refrigerate them as directed in step 6, then remove them from the muffin pan (keep the liners on them) and line in a single layer in a large freezer-friendly container. Cover tightly and freeze for up to 3 months. Thaw in the refrigerator for at least 24 hours before serving.
Optional Toppings: Right before serving, you can add toppings to the mini cheesecakes. You can also add the following toppings after the cheesecakes have chilled in the refrigerator for just 1–2 hours (step 6), then store the topped cheesecakes in the refrigerator for the remaining time. Use 3/4 cup strawberry sauce divided over each chilled mini cheesecake. (Spoon about 1/2 Tablespoon over each.) And/or use 1 cup mixed berries, plus a few mint leaves, divided over each for additional garnish. Instead of strawberry sauce, try the same amount of lemon curd, apple butter, or your favorite fruit preserves. You can also top with chocolate ganache. I recommend spooning a little over each mini cheesecake before refrigerating so the ganache can set up too.
Lemon Juice: Lemon juice brightens up the flavor. This cheesecake does not taste like lemon. For lemon flavored mini no-bake cheesecakes, replace the sour cream with 2 Tablespoons fresh lemon juice (in addition to the 1 teaspoon lemon juice that it already calls for) and add 2 teaspoons lemon zest.
Room Temperature Ingredients: Bring the cream cheese and sour cream to room temperature before beginning. Room temperature ingredients guarantee a smooth cheesecake filling. Beating cold ingredients together will result in a chunky cheesecake filling. (The heavy cream, however, MUST be cold in order to whip into stiff peaks.)
Strawberry Sauce
INGREDIENTS • 1 Tablespoon cornstarch • 3 Tablespoons (45ml) warm water • 1 lb strawberries, hulled and sliced in half (you can use frozen; don’t thaw) • Zest and juice from 1/2 small lemon • 1/4 cup (50g) granulated sugar
METHOD
Whisk the cornstarch and water together until all the cornstarch has dissolved. (I just use a fork to mix—very easy.)
Place the cornstarch mixture, along with the rest of the ingredients, into a small saucepan over medium heat. Using a wooden spoon or rubber spatula, stir the mixture as it cooks. Break up some of the strawberries as you stir. For smoother sauce blend the strawberries in advance.
Bring it to a simmer and allow to simmer for 5 minutes, stirring constantly. After 5 minutes, remove pan from the heat and allow to cool. The mixture will thicken as it cools.
You can serve the sauce warm before it cools completely if desired, or store in the refrigerator for up to 1 week. Strawberry topping will be thick after refrigeration, so microwave for 15 seconds or warm on the stove to thin out, if desired.
It’s a challenge to find a granola bar that doesn’t melt when golfing in the summer where the temperature can be over 100 degrees
I made these peanut butter granola bars with rolled oats, honey, peanut butter and eggs. While it hasn’t been over 98 this month these bars held up.
Predominantly peanut butter flavor I added raisins and the bars held up to the heat.
Peanut Butter Granola Bars
INGREDIENTS • 3 cups old-fashioned rolled oats • 3/4 cup peanut butter • 1/3 cup honey or maple syrup • 1/2 cup mini chocolate chips (optional) • 2 whole eggs • Optional add-ins: pinch of salt (omit if peanut butter is salted), walnuts, pecans, almonds, chia, sunflower, or pumpkin seeds, or dried fruit
METHOD
Preheat oven to 350℉.
In a large bowl, combine all ingredients and mix well. *If your peanut butter is solid at room temperature, heat it for 10-15 seconds to make it a more drizzly consistency before adding to the mix.
Line a 9×9 inch baking dish or pan with parchment paper. This makes it much easier to remove the bars from your dish once baked.
Transfer the mixture to the prepared dish or pan. Very firmly press the mixture into the pan in an even layer — the firmer you press, the better the bars will stick together. If you’re using chocolate chips, sprinkle them on top, then press them down into the bars.
Bake for 15-17 minutes or until the center is baked through and the edges are just starting to brown. Start checking at 14 minutes, as all ovens are different.
Remove from the oven and place pan on a cooling rack.
Let the bars cool completely (this is important) before cutting into 16 squares with a sharp knife
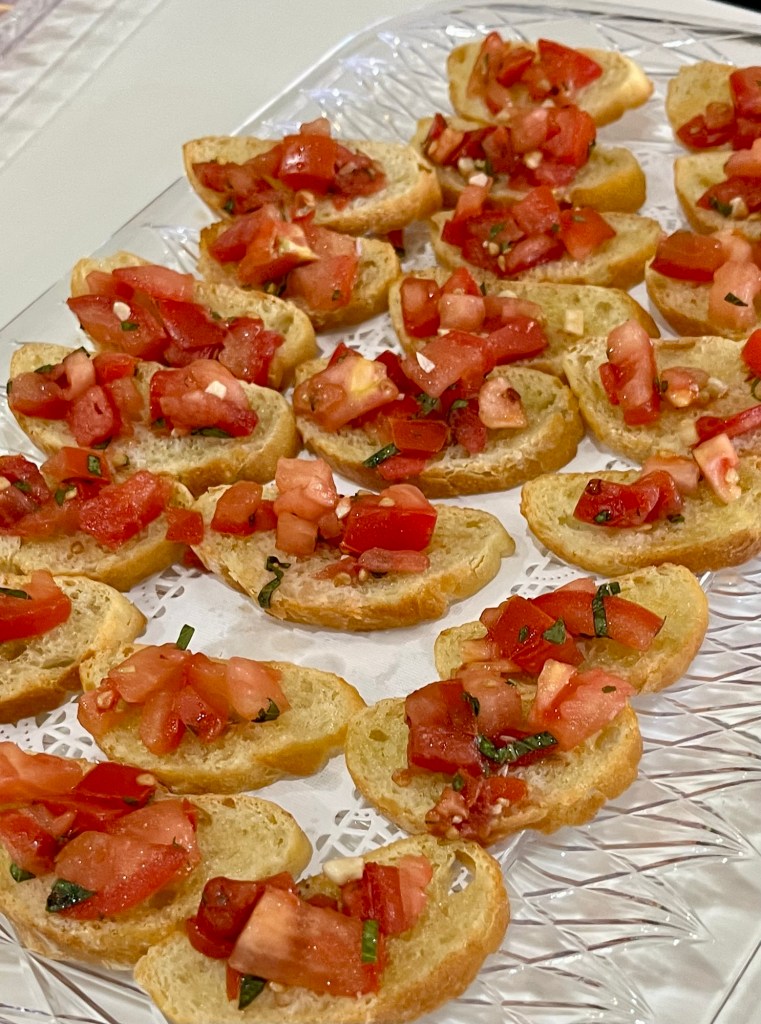
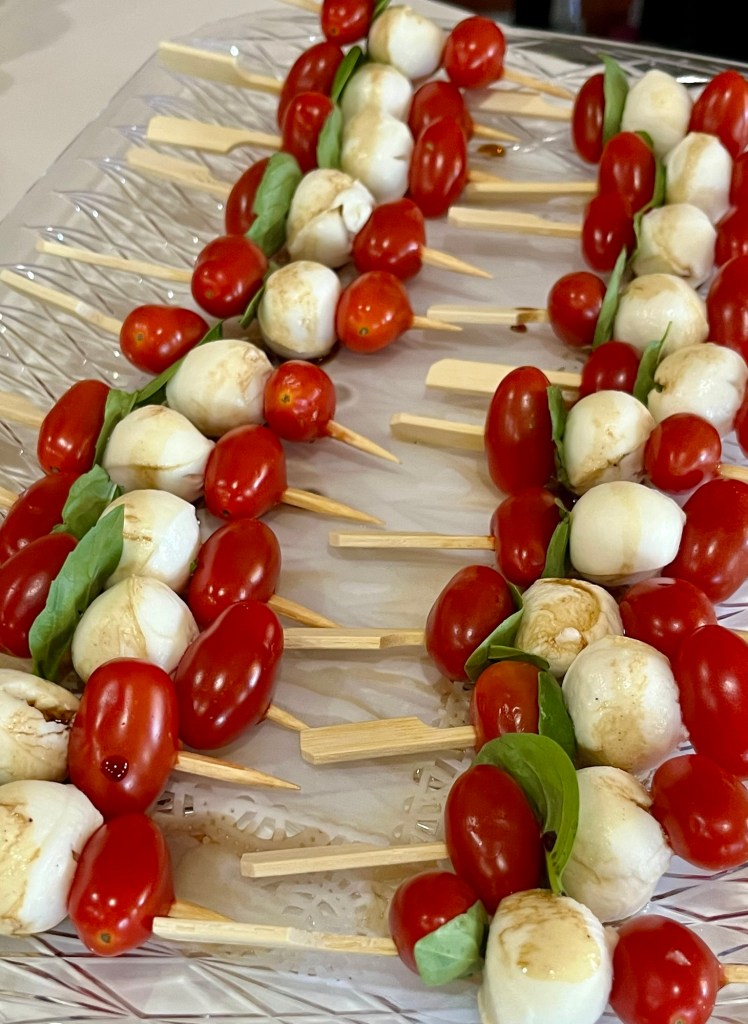
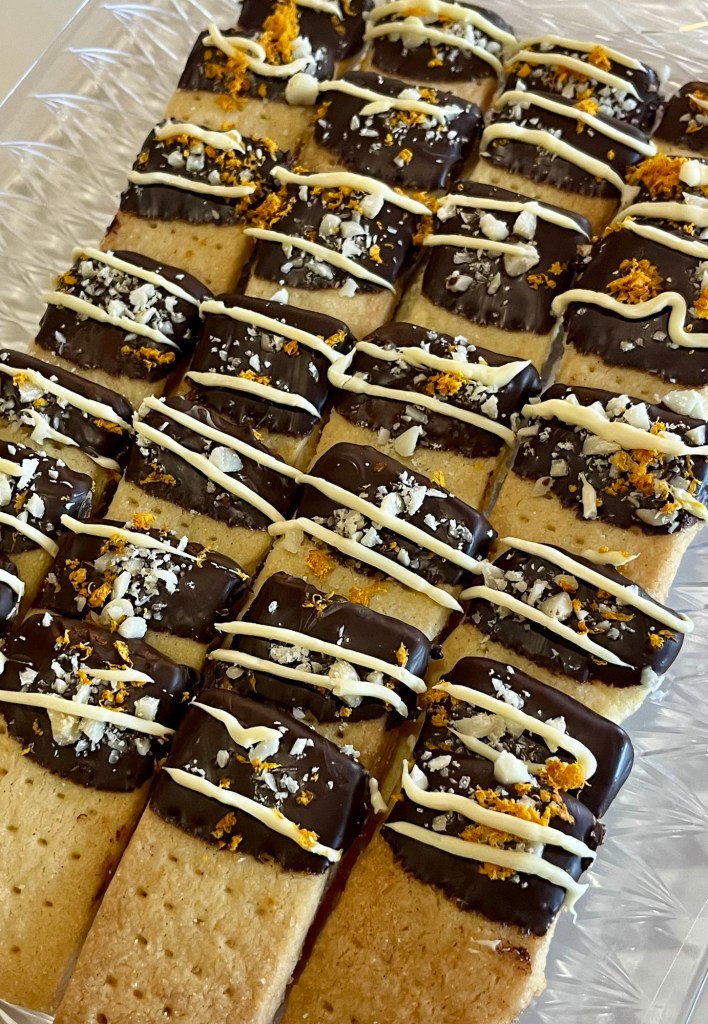
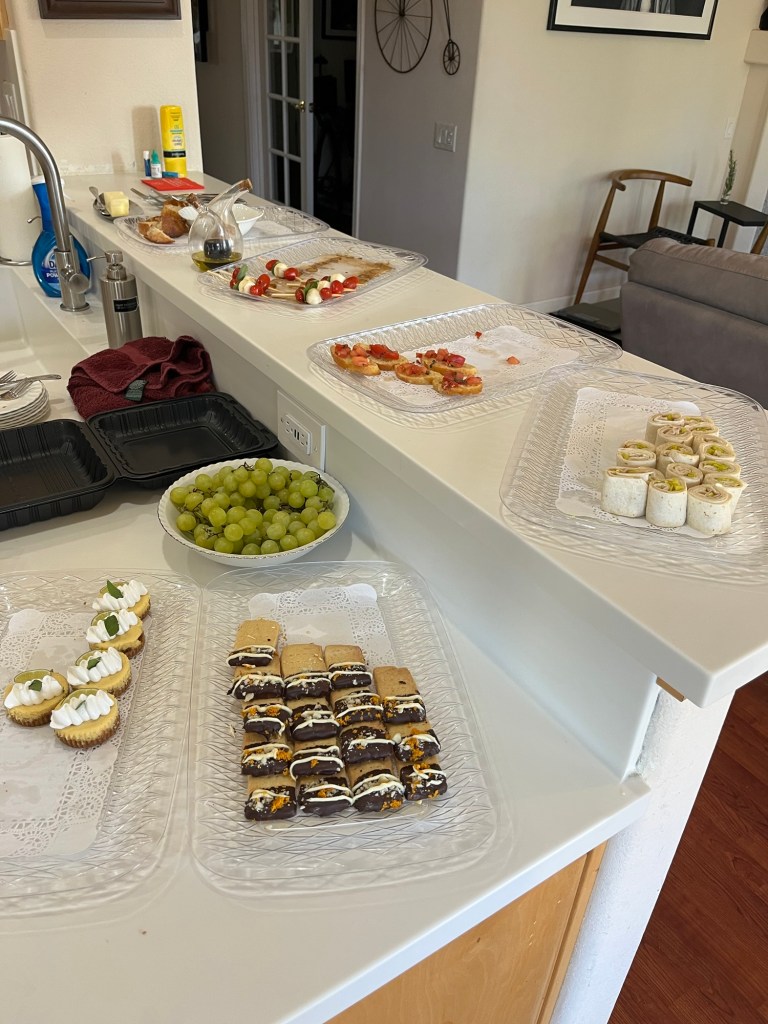
This is the second Gathering of the immediate neighbors, plus a few others who comprise the QC Cadre. The Quality Control Cadre taste and review my bakes on a regular basis. This Gathering was offered both savory and sweet selections.
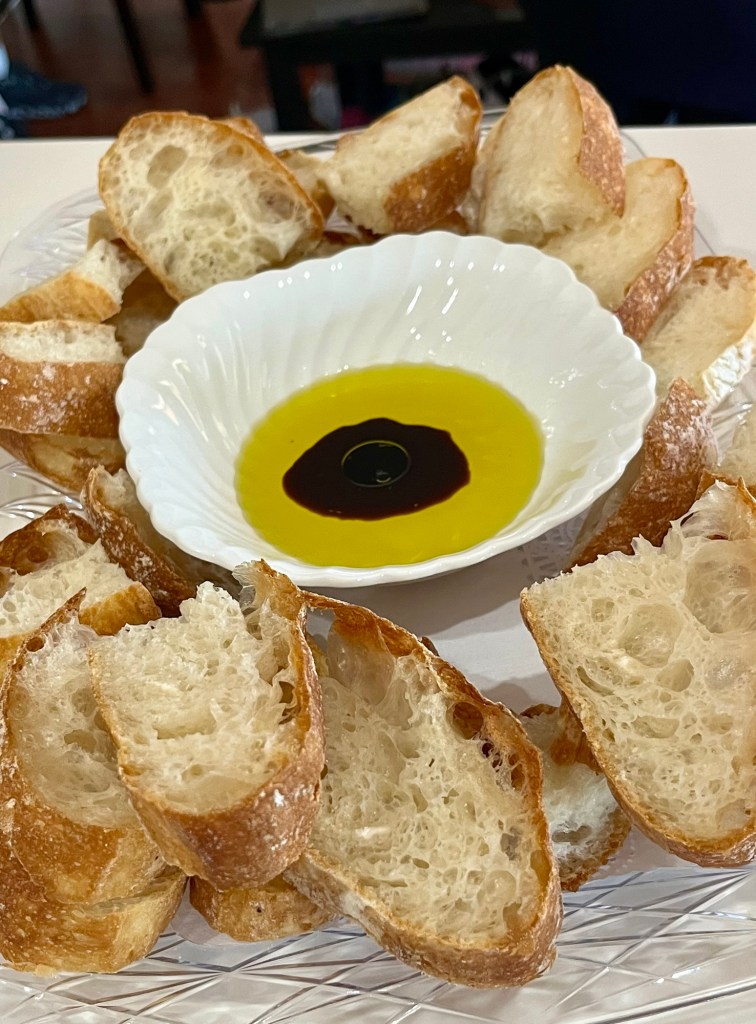
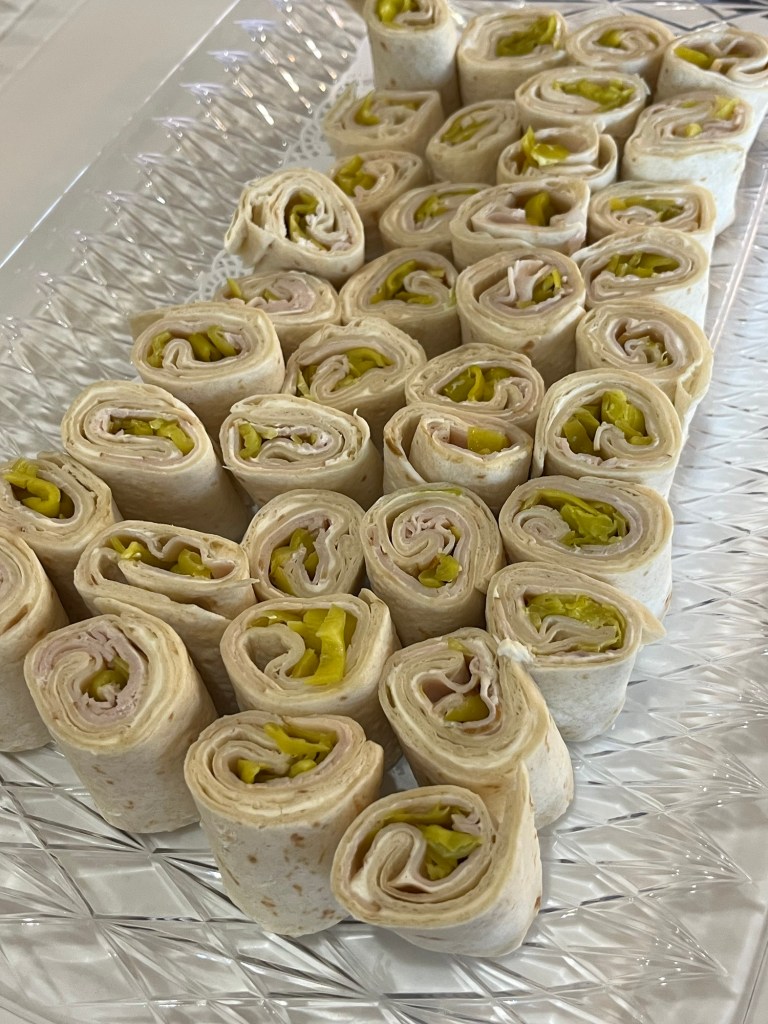
Pain de CristalPain de Cristal with oil and vinegar Turkey Peperocini wrapsBruschettaCaprese BitesOrange Flavored Shortbread Cookies with Chocolate and Crushed MacadamiasMini Key Lime PiesLots of Drinks with Ilayne’s Punch as the StarDecimated Offerings
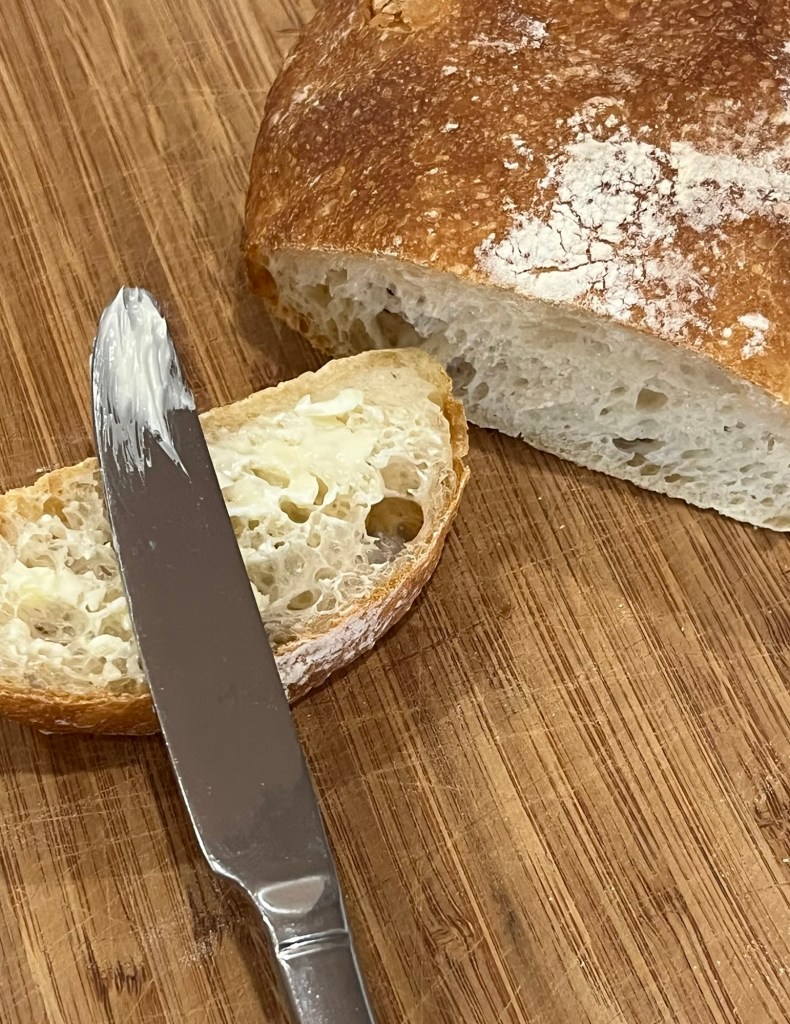
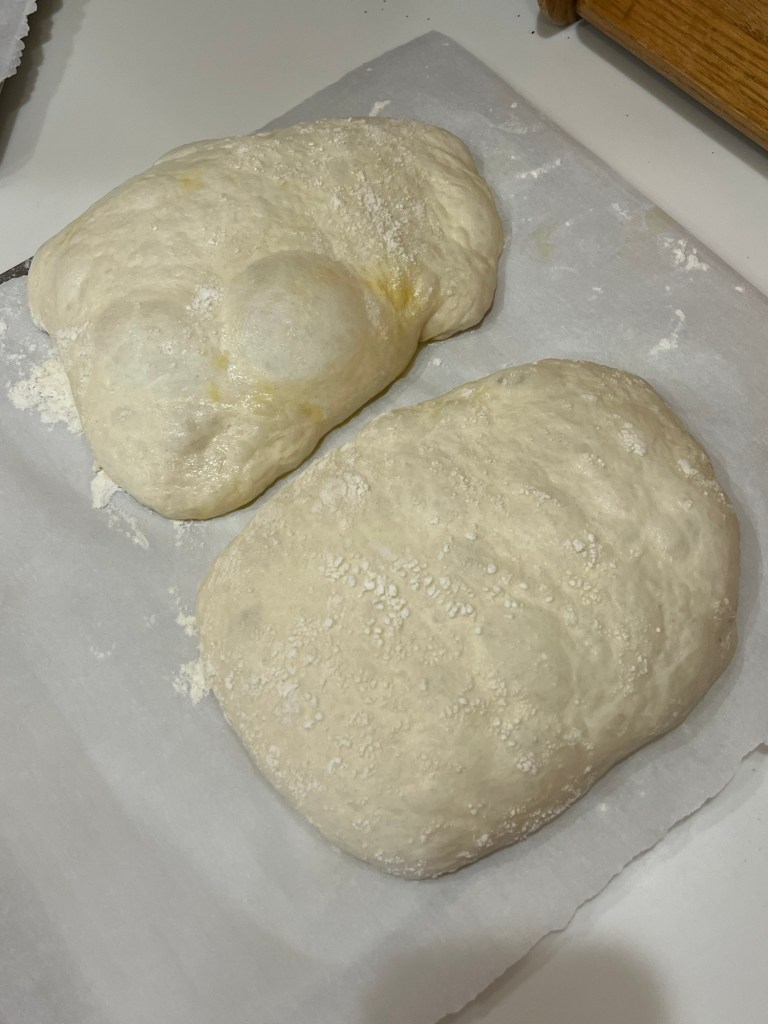
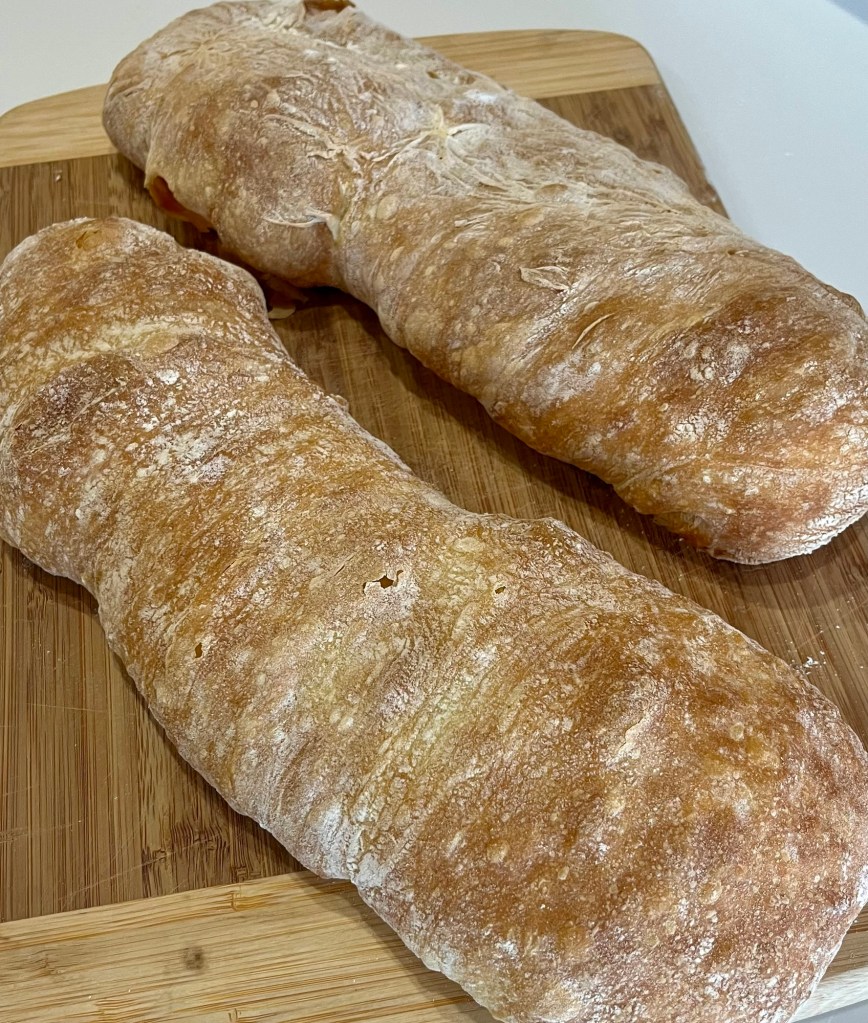
Without doubt my favorite bread, but it is a pain to make (heh, heh.) This bread takes about 7 hours, start to finish, with hands on about every 20 minutes for the first 5 hours, but it’s so worth every minute.
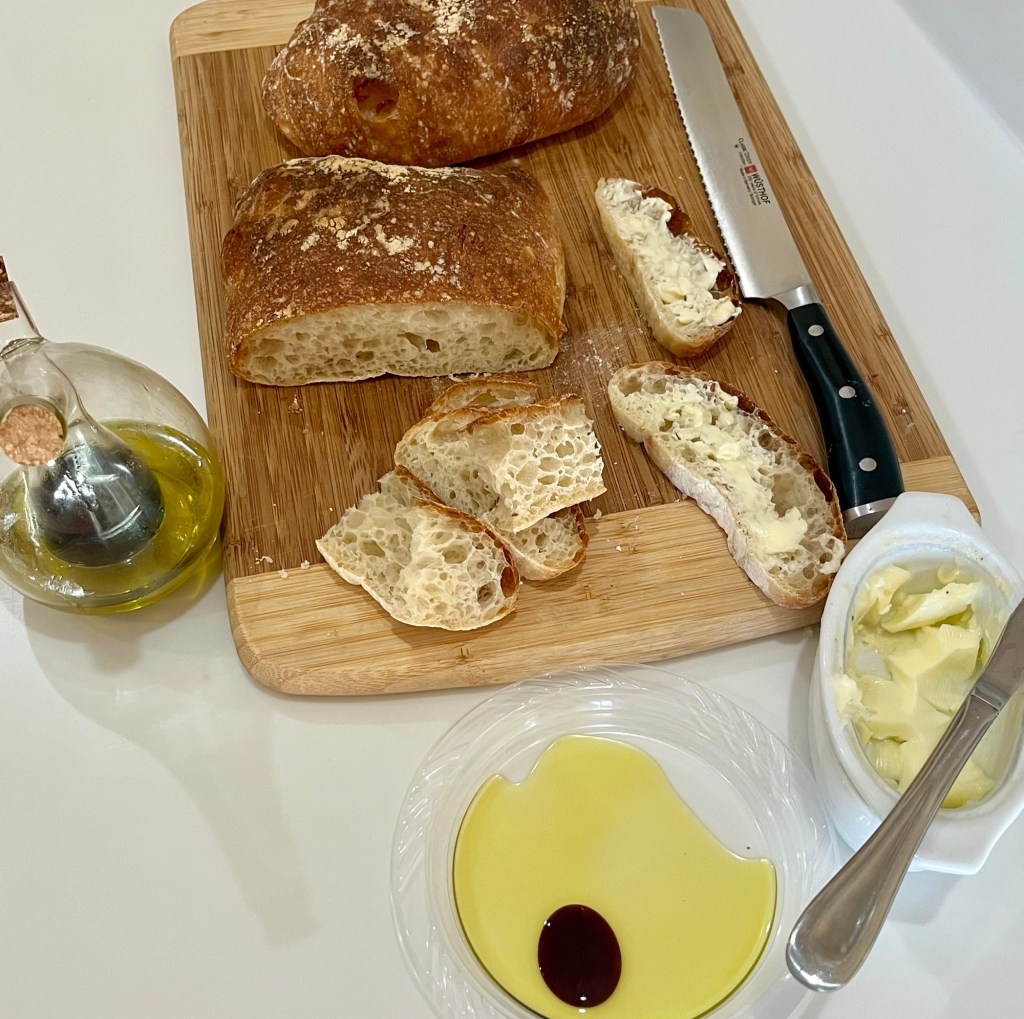
Pain de Cristal is “Glass Bread” developed in the Catalan region of Spain. It has a crispy thin crust that fractures like glass. The interior has large air pockets and an amazingly light, soft, chewy crumb, perfect to dipping in oil and vinegar. This is another addition to our QC Cadre Gathering, and may be my best bake of this bread ever!
It’s a 100% hydration bread, meaning equal parts water and flour. Initially, it looks like pancake batter, but after a few folds and coils begins to exhibit some structure. It is alway fragile so a tender touch is required to may this tender bread.
Pre-bake with large bubblesPost-bakedFinal, with oil and vinegar or butter.
Pain de Cristal
INGREDIENTS • 500g water (80 F in warm weather, 100F if cold) • 500g Bread Flour • 3 g (1 tsp) instant yeast • 10g salt • 15g olive oil (for the casserole pan)
METHOD This is KAB’s method
To make the dough: Weigh your flour.
In a medium bowl, mix the water, flour, yeast, and salt until thoroughly combined and homogenous. Note: The dough starts off very slack and wet and resembles pancake batter. It will transform itself through time and folds.
Oil a two-quart rectangular baking dish, or casserole pan, (10” x 7”) with the olive oil. The sides should be greater than 1.5” high.
Pour the dough into the pan. Check the dough’s temperature by inserting a digital thermometer into the center. If it’s less than 72°F, move the pan to a warmer spot, e.g., your oven with the light turned on. The dough MUST ferment at a constant 72-78 F.
Cover the pan and allow the dough to rest for 20 minutes. (Elapsed time: 30 minutes)
Start with a bowl fold: Use your wet hands to grab a section of dough from one side, lift it up, then press it down into the middle. Repeat 8 to 12 times going around the periphery of the baking dish 2 or 3 times.
Cover the dish and allow the dough to rest for 20 minutes. (Elapsed time: 70 minutes)
Next do a coil fold: With wet hands, reach under the dough and stretch the middle upward until the dough releases from the dish. Roll it forward off your hands, allowing it to fold over (or “coil”) on itself. Rotate the dish 90 degrees (a quarter turn) and repeat. Continue performing this folding action until the dough will stretch and elongate easily, usually four to five times initially.
Cover the pan and allow the dough to rest for 20 minutes. (Elapsed time: 90 minutes)
Repeat the coil fold: Note: Do coil folds three more times, covering each time, to build strength and developing the dough. (60 more minutes.) (Elapsed time: 150 minutes)
At this point, the dough should be easier to handle and feel tighter. Repeat the coil fold using only two or three folds this time. Cover the bowl and allow the dough to rest for 20 minutes. (Elapsed time: 170 minutes)
Repeat the coil fold one last time, (5th coil fold) using only one or two folds if the dough is relatively strong and large bubbles should have formed. Transfer the dough to a larger, oil coated dish, cover the dish and allow the dough to rest for about 80 minutes. It should about triple in size. (After this rest 4 hours 10 minutes should have elapsed.)
Divide the dough: Coat the top of the dough with flour. Use a bowl scraper to gently release the dough from the sides of the pan.
As gently as possible, turn the dough out onto a heavily floured surface, keeping the rectangle or square shape – be careful not to deflate the delicate dough. Sprinkle a generous amount of flour on top of the dough, leaving no exposed sticky spots. a. For four small loaves: Working as gently as possible, use a bench knife or other sharp knife to divide it into four pieces. Gently place two pieces on a piece of parchment, leaving space between them. b. For two long loaves: lay two pieces of parchment paper, overlapping 2”. Carefully divide the dough in half lengthwise. Using a bench knife carefully slide some flour under each loaf and shape into regular rectangles. As gently as possible slide the loaves onto separate pieces of parchment paper. (Elapsed time: 5 hours) c. Allow the loaves to rest at room temperature for 1 hour, uncovered until large bubbles appear on the sides and surface. While the loaves are resting, preheat the oven to 475°F with a baking stone on a lower rack. The loaves are ready for the oven when there are a few large bubbles on the surface of each loaf, and they feel light and airy. (Elapsed time: 6 hours)
To bake the bread: Carefully slide the two loaves (still resting on the parchment) into the oven onto the preheated stone or steel. If space is tight and the full sheet of parchment won’t fit on the stone or steel, cut the parchment between the two loaves and arrange them as best you can. Allow the other two loaves to continue to rest. a. Bake the loaves for 15 minutes, then transfer them, from the stone or steel, directly onto a rack in the upper third of the oven for an additional 13 to 15 minutes. Moving them allows the baking stone or steel to become hot again in preparation for the next two loaves. After a total of 30 minutes of baking, remove the loaves from the oven and allow them to cool on a rack. (Elapsed time: 6 ½ hours)
Repeat the process with the two remaining loaves or loaf. Cool the bread fully before slicing.
Storage information: Wrap the bread loosely and store it at room temperature for up to several days; freeze for longer storage.
First of all, thank you to all my friends and family for your suggestions on what substrate to use as a carrier for the maple cream-cheese buttercream I could not resist. (There is a nerdish play on words in that sentence. In semiconductor fabrication, a resist is a thin layer used to transfer a circuit pattern to the semiconductor substrate which it is deposited upon. Sorry. Plus that explanation ends with a preposition, which is acceptable in modern English although it still annoys me.)
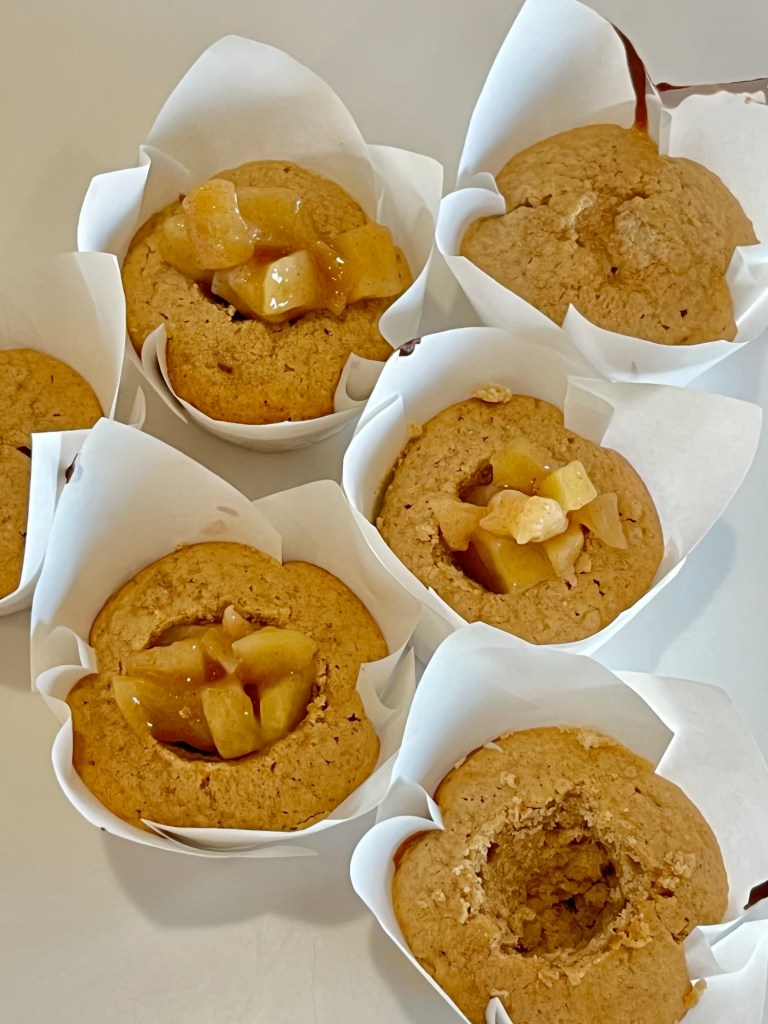
Most of the QC Cadre cast their votes within minutes of delivery of their sample and universally they loved them, (I did too!)
I hollowed out a cone from the center of each cupcake so I could fit extra apple pie filling. I piped the buttercream frosting to cover any exposed cupcake and all the filling. I then sprinkled a little allspice to add some color and counter the sweetness of the maple syrup.
Apple Pie Cupcakes with Maple Cream-cheese Buttercream
INGREDIENTS For the Apple Pie Filling • 2 apples (prefer granny smith), peeled, cored, and chopped • 3 Tbsp granulated sugar • 2 Tbsp water, divided • 1 Tbsp unsalted butter • ½ tsp ground cinnamon • ½ Tbsp cornstarch For the Cupcakes – makes twelve 78g cupcakes • 1 ⅔ cups (220g) cake flour • ½ c (124g) granulated sugar • ½ c (127g) light brown sugar • 1 ½ tsp baking powder • ½ tsp kosher salt • 1 ½ tsp ground cinnamon • ½ tsp ground allspice • ¼ tsp ground nutmeg • ½ c (1 stick) unsalted butter, melted • 2 large eggs at room temperature • 1 tsp pure vanilla extract • ½ c (114g) whole milk at room temperature • ½ c (112g) sour cream at room temperature For the Buttercream • 250 g (2 ¼ c) butter unsalted • 62 g (½ c) cream cheese • 198 g (7oz) sweetened condensed milk • 107 g (5 ½ Tbl) pure maple syrup
METHOD For the Apple Pie Filling
Melt butter in a saucepan over medium heat. Stir in apples, sugar, 1 Tbsp water, and cinnamon.
Cover and cook, stirring occasionally, for 4 to 6 minutes or until very slightly softened.
In a small dish combine cornstarch and 1 Tbsp water. Add the mixture to the pan while stirring and continue to cook over medium heat until apples are tender, and mixture has thickened.
Remove from heat, pour into an airtight container, and chill in the refrigerator at least 1 hour before adding to cupcakes. For the Cupcakes
Preheat the oven to 350°F. Line a muffin tin with cupcake liners.
Mix together cake flour, sugars, baking powder, salt, cinnamon, allspice, and nutmeg in the bowl of a stand mixer fitted with the paddle attachment.
Beat in butter, whisking until combined. Add eggs, one at a time, beating well after each addition. Beat in vanilla.
Beat in the milk and sour cream, mixing just until the batter is smooth. Scrape down the sides of the bowl and mix for 10 seconds more on medium speed. Divide the batter among muffin cups, filling each 2/3-full (you should get 14 to 15 cupcakes out of this batter).
Bake 15 to 18 minutes or until a toothpick inserted into the center of a cupcake comes out clean.
Cool cupcakes in pans 10 minutes before moving to a cooling rack. For the Cream Cheese Buttercream
Start with the butter in a mixing bowl. It should be soft enough to mix but still cool to the touch.
Using a hand or stand mixer, beat the butter for 2-3 minutes until it becomes light and fluffy.
Add the cream cheese to the bowl and continue mixing for another minute until it’s thoroughly combined with the butter.
Add the chilled sweetened condensed milk and mixing for about a minute, ensuring it blends smoothly into the mixture.
Should the mixture start to curdle, simply keep mixing. It will eventually blend into a smooth texture.
Finally, pour in the maple syrup and mix for one more minute to fully incorporate.
Store the buttercream in the refrigerator for up to one week or in the freezer for up to two months. When ready to use, allow it to reach room temperature and mix well to regain smoothness. Assembly
Cool cupcakes completely before filling with apple pie filling, then frosting with maple cream-cheese buttercream frosting. Dust with nutmeg or cinnamon or …
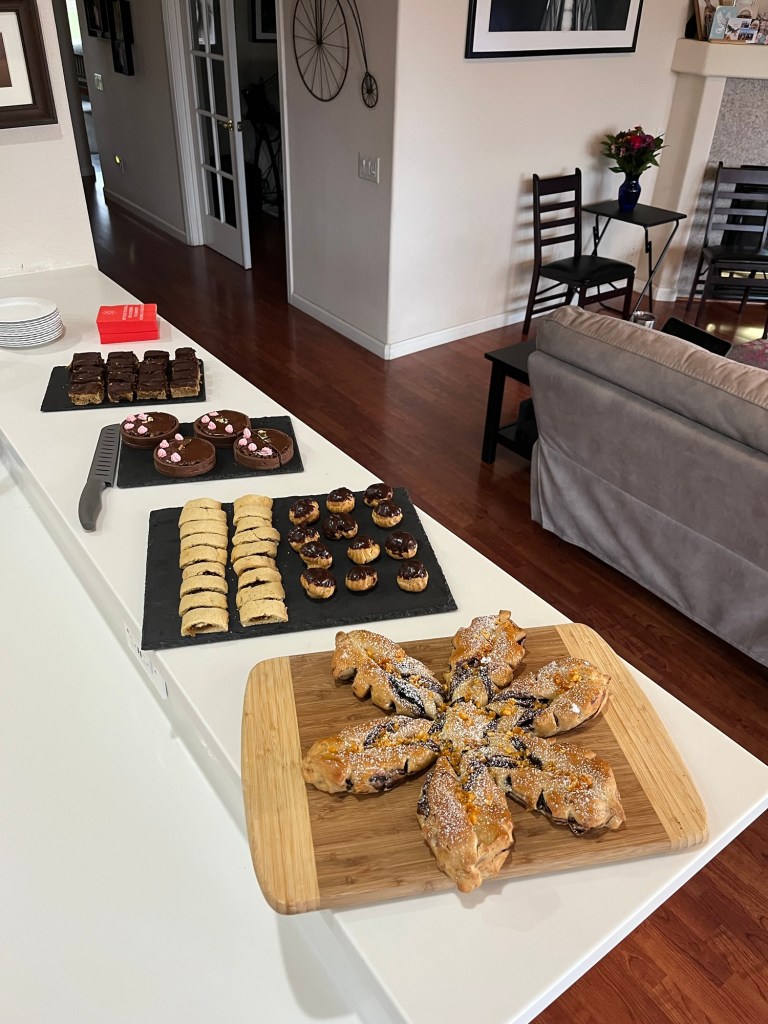
Yesterday we held our first ever QC Cadre Fete at our house. For those not in the know the Quality Control Manager (QC) is my wife, Fran. The QC Cadre incudes all our immediate neighbors, and significant others. To thank everyone for their reviews over the past year I made a selection of heretofore untried pastries and bread.
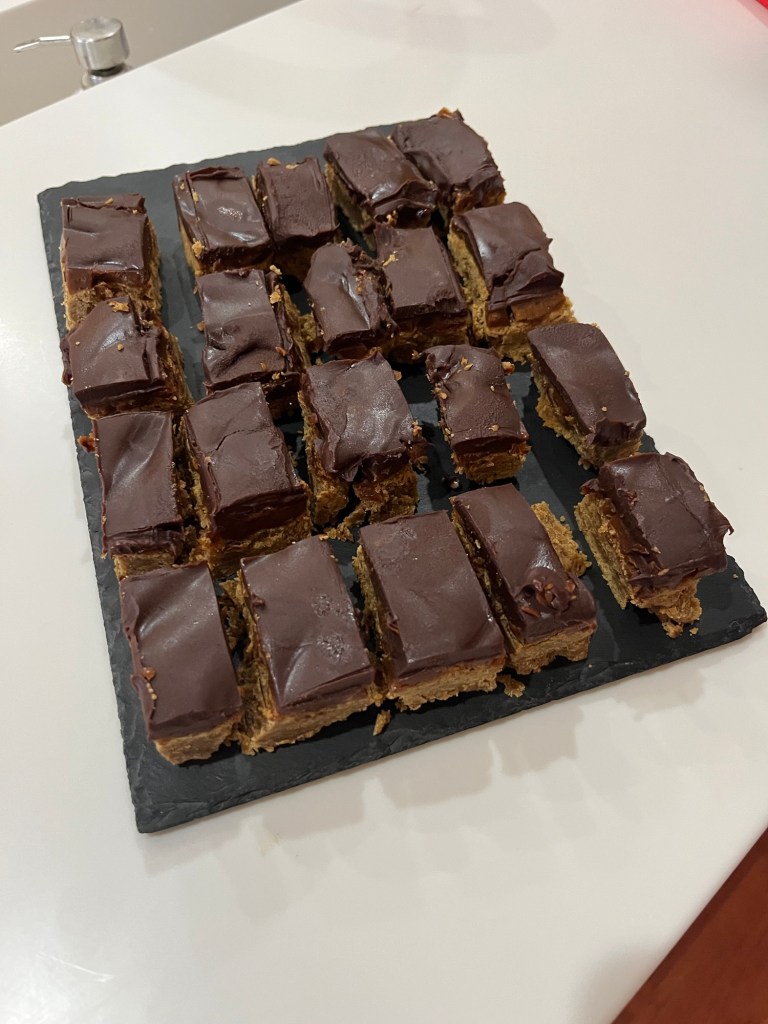
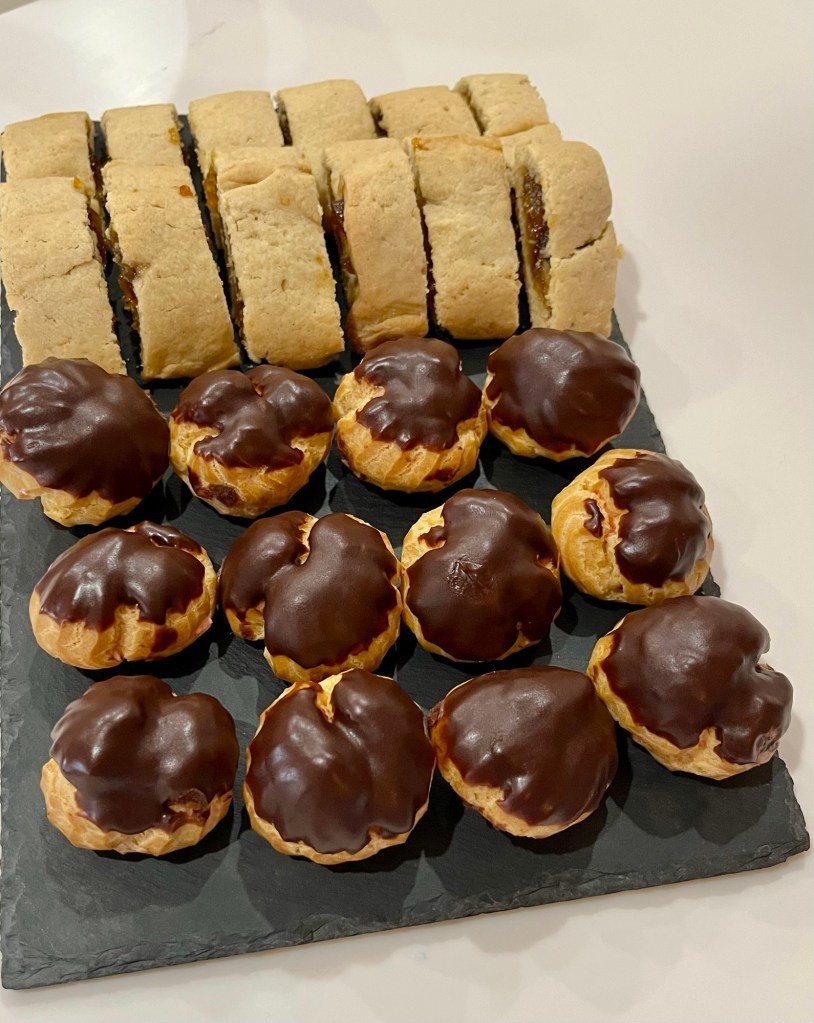
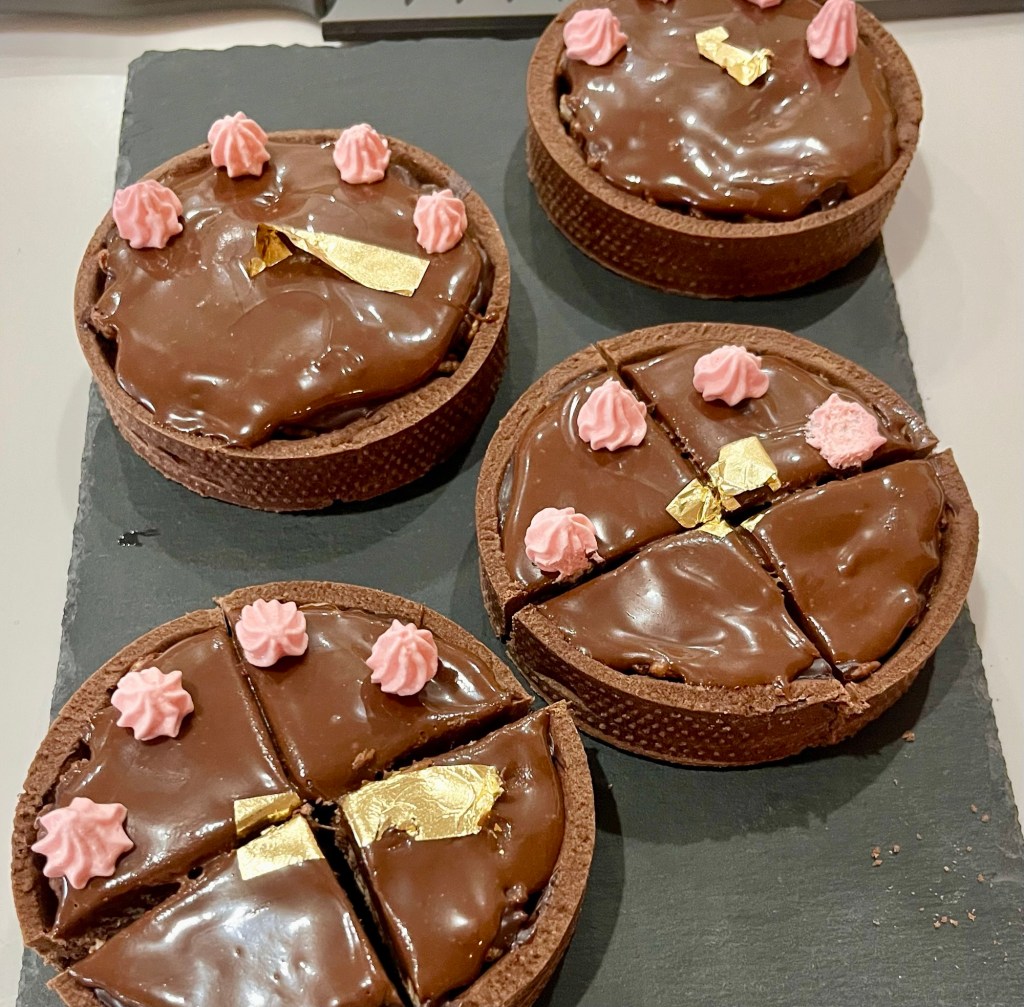
From front to back are” Snowflake Bread, fig newtons and raspberry filled profiteroles, chocolate glazed chocolate filled chocolate tarts with a croustillant layer and finally gingerbread millionaires bars.
Sadly, I pulled the gingerbread millionaires bars before the fete began. I over cooked the caramel and while it tasted good, it was a very hard crack and once you started to chew it, your mouth could be glued shut. As I said, this was the first attempt at each bake so accidents will happen, but not again!
Chocolate Orange Snowflake Bread
INGREDIENTS For the Dough: • 1c milk, plus 1 tbsp extra • 30g (2 Tbl) cubed butter • 2 Tbl olive oil • 2 Tbl sugar • 7g (2 ¼ tsp) instant yeast • 175g AP white • 175g bread flour, plus extra for dusting • 1 tsp cinnamon • A pinch of salt • 1 orange, zested? For the Filling: • 100g cream cheese • 2 Tbl sugar • 2 Tbl cacao powder • 1 Tbl cinnamon • 1 Tbl cornstarch • 1 orange, zested For Decoration • Candy orange peel
METHOD
Combine the milk and butter and warm until just melted and lukewarm. Stir in the olive oil, sugar, and yeast. Let rest for 5 minutes.
In a large bowl whisk flour, cinnamon, and salt. Pour in the yeast-milk and bring to a shaggy dough with a spoon. Tip onto a lightly floured work surface and knead for 1 minute to make a smooth ball of dough. Place in a lightly greased bowl, cover and leave somewhere warm for 30 minutes, to rise. Meanwhile, pre-heat the oven to 350ºF.
Whisk together all the filling ingredients until smooth (you can microwave the mix for 10 seconds, if needed, to make it smoother to combine).
Punch down the dough and form into 2 balls. (I like to weigh the dough and divide the total weight by 2 to make equal sized balls. My dough weighed 1630 g therefore, each ball should be ~815g.)
Divide each ball into two smaller balls, each ~400g and form each into a rough circle ~6” diameter, then roll out into circles ~10”
Place one circle down and coat with 1/3rd of the filling, leaving the outer 1” un-coated. Repeat for the next two layers and leave the top layer uncoated.
Center a 10” cake pan and trim the circles to an even circle.
Set a 3” bowl in the center of the stack of circles and press down making an impression
Cut the dough from the perimeter to the outside of the 3” circle into 16 equal portions
Twist adjacent portions away from each other and pinch the ends into a point
Snip each dendrite is several places to form fronds, or feathers.
Cover and let rise 20-30 min.
Beat the egg with 1 Tbl water to use as the egg wash
Brush the pastry evenly with the 1 tbsp egg wash and place in the middle of the oven for 22-25 minutes, until well-risen, golden and springy.
Remove from the oven sprinkle with candied orange peel and cool for 20 minutes.
Homemade Fig Newtons
INGREDIENTS • 1 pint fresh or preserved figs or 12 ounces dried figs 2 Pints • 1 ½ cups AP flour 3 cups • ¼ teaspoon baking powder ½ tsp • ¼ teaspoon salt ½ tsp • ¼ tsp ground cinnamon ½ tsp • 1 stick butter 2 sticks • 1/3 cup sugar 2/3 cup • 1 egg 2 • 1 teaspoon vanilla extract 2 tsp • 2 tablespoons orange juice 4 Tbl If you are using: • Fresh figs: Remove stems and boil figs with 2 cups of sugar in 1 cup of water for 45 minutes. Drain and cool. This seemed to be too much sugar and water. Try cutting in half. If too thin, cook down until temp reaches about 210. • Dried figs: In a bowl, pour boiling water over figs (stems removed) and let rest 10 minutes. Drain all but 2 tablespoons water and stir in 2 tablespoons corn syrup + ¼ teaspoon cinnamon. • Preserved figs: Drain syrup.
METHOD
Puree figs in food processor into a thick paste (if too thick or thin to spread evenly, add a little water or flour until spreadable consistency is reached).
Combine flour, baking powder, cinnamon, and salt together and set aside.
Cream butter and sugar in a mixing bowl.
Add egg and vanilla, mix until smooth
Add orange juice and combined dry ingredients to bowl and mix until dough forms.
Optional: form dough into a flat thick disk and chill to set butter and make it easier to roll and fold.
Roll dough out on a floured surface into an 8”x14” rectangle about ¼” thick.
Cut rectangle in half lengthwise.
Spread fig paste onto half of each rectangle, lengthwise.
Cut the rectangle in half crosswise, or even thirds to facilitate folding.
Fold dough in half lengthwise to cover fig paste and pinch edges to seal.
Slide each newton log onto a parchment lined baking sheet.
Bake 25 minutes at 350 degrees until crust begins to brown.
Slice into cookie-sized segments and cool. Slice while warm to reducing flaking.
Raspberry Italian Meringue Profiteroles
INGREDIENTS Choux Pastry: • ½ c (65 grams) AP flour • ½ tsp granulated white sugar • ¼ tsp salt • 4 tbsp (55 grams) unsalted butter, cut into pieces • ½ c (120 ml) water • 2 large eggs, lightly beaten Raspberry Italian Meringue • egg whites room temperature • 2/3 cup caster sugar • 1/4 cup water • 1/4 teaspoon cream of tartar • 2 drops raspberry flavor • 1-2 drops red food coloring • Optional: 1 tsp freeze dried raspberry powder Chocolate Glaze: • 2 ounces (55 grams) semisweet chocolate, finely chopped • ¼ c (60 ml) heavy “whipping” cream (cream with 35% butterfat content) • ¼ tsp pure vanilla extract • ½ tbsp light corn syrup (or golden syrup or glucose)
METHOD
Preheat oven to 375o F (190o C) and place rack in center of oven.
In a bowl whisk the flour with the sugar and salt.
Place the butter and water in a saucepan over medium high heat and bring to a boil.
Remove from heat and, with a wooden spoon, add the flour mixture, all at once, and stir until combined. It will look like mashed potatoes. Return saucepan to the heat and stir constantly until the dough comes away from the sides of the pan and forms a thick smooth ball (about 1-2 minutes). The dough will film the bottom and sides of the saucepan and make cleaning a pain.
Transfer the dough to an electric mixer and beat on low speed to release the steam from the dough (about 1 minute).
Once the dough is lukewarm start adding the lightly beaten eggs (dough will separate and then come together) and continue to mix until you have a smooth thick paste (dough will fall from a spoon in a thick ribbon).
Place the dough in a pastry bag fitted with a large plain tip and pipe round mounds of dough (about 1 ½ inch) onto the parchment lined baking sheet. (When piping, hold the bag at a 90-degree angle, ie straight up.)
Bake for 15 minutes and then reduce the oven temperature to 350o F (180o C).
Remove from oven, pierce the bottom of each profiterole with a small skewer to release the interior steam.
Continue to bake for a further 25 minutes or until the shells are a nice amber color and when split, are almost dry inside. Remove from oven and place on a wire rack to cool. Raspberry Italian Meringue
Wipe down all tools with white vinegar or lemon juice to remove any trace of fat.
Place sugar and water mixture over medium heat for 5 minutes. Do not stir it at all during this time. The mixture will look cloudy.
Gently stir the mixture for 1 minute. There should be little to no granules of sugar left at this point.
Once the mixture begins to bubble from the bottom, 3 to 5 minutes, place the digital thermometer in the pot and increase to medium-high heat. Do not stir it at all after this.
In the bowl of an electric mixer, whip the eggs whites on low speed until foamy. Add the cream of tartar, increase the speed to medium and beat until soft peaks form.
Allow the sugar mixture to come to a boil and watch carefully. Once it reaches 230 °F turn stand mixer on highest speed to whip egg whites to peaks.
Once the sugar syrup reaches 240 °F, remove from heat and remove the probe. This takes about 4- 6 minutes.
Allow the boiling to come to a slow bubble before moving on.
Slowly pour sugar syrup (steady stream) into whisked egg whites. Avoid the whisk attachment or it will fling your mixture all over the bowl.
Allow mixture to whisk for another 3-5 minutes until the mixer bowl is cool/room temperature to the touch.
Add raspberry flavoring and if desired, the freeze-dried raspberry powder. (In my first attempt at adding the powder I added it prior to adding the sugar syrup and it ruined the soft peaks. I think adding at the end should work.) Chocolate Glaze:
Place the chocolate in a heatproof bowl.
Heat the cream just until boiling and immediately pour it over the chocolate.
Gently stir until the chocolate has melted.
Stir in the vanilla extract and corn syrup, mixing to ensure incorporation.To complete:
Fill a piping bag equipped with a filling tip (such as Wilton 230). Inject crème pat into the hole you made to allow the steam to escape. When you feel the side of the profiterole begin to bulge, the éclair is full.
Dip the top of each profiterole into the warm, thin ganache and set on a piece of waxed or parchment paper to dry. (I use the parchment paper previously used to line the baking sheet.)
Gingerbread Millionaire Bars
INGREDIENTS FOR THE GINGER SHORTBREAD BOTTOM: • 1 c butter • ½ c packed dark brown sugar • ¼ c (85g) un-sulfured molasses • 1 large egg • 1 tsp cinnamon • 1 tsp powdered ginger • ¼ tsp cloves • ½ tsp salt • 2 ½ c all-purpose flour FOR THE CHEWY CARAMEL: • ¾ cup packed light brown sugar • ⅓ cup sweetened condensed milk • ⅓ cup butter • 3 tbsp. golden cane syrup (or honey as a substitute) • 1 tsp. flaky sea salt FOR THE CHOCOLATE TOP: • 7 oz dark chocolate, chopped
METHOD
Preheat oven to 350°F. Grease and line a 9×9 baking pan with parchment paper.
In a standing mixer fitted with a paddle attachment, cream the butter, brown sugar, and molasses together until light and fluffy, about 2 minutes.
Add in the egg, spices, fresh ginger, and salt, whipping an additional minute. Fold in flour, mixing only until combined.
Transfer dough to prepared baking pan, patting down evenly. Bake for 15-18 minutes, until a knife inserted in the center of the shortbread comes out clean. Allow to cool while you make your caramel.
In a small saucepan over medium low heat, combine the sweetened condensed milk, sugar, and honey. Use a rubber spatula to mix slowly but continuously for about ten minutes. The mixture will slowly turn a light golden color and begin to pull away from the sides of ithe pan. Heat until mixture reaches a nice golden caramel color then add the butter and mix until incorporated, then remove from heat and mix in salt.
Pour mixture over ginger shortbread and use spatula to spread evenly. Place in the fridge to harden completely, about 2 hours.
Once the bars have cooled, put the chocolate into a large glass measuring cup and heat in 30 second intervals. (My 1000W microwave requires 90 second total heating, but the chocolate should be stirred after each 30 second interval.
Pour over chilled bars, then place back in fridge to harden.
Cut into 1″x1″ cubes and serve! Will last up to 1 week when sealed tightly in a container in the fridge.
This noon we are co-hosting a soup and bread lunch for a group of friends. I decided to make some of my favorite breads to share. They are all documented in this blog, so I am not including any recipes here.
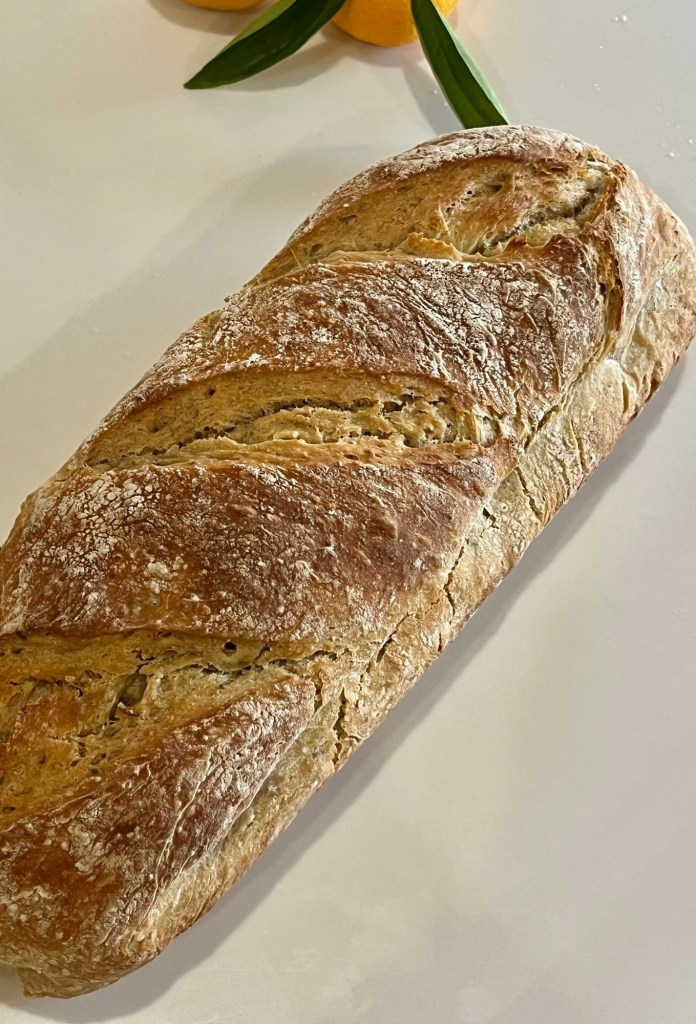
Pan de Cristal, or ice bread, is one of my favorites. It’s an open structure and crisp crust bread, and so good.
Artisan bread rolls are easy to make and are always delicious. I simply formed my normal artisan bread into small rolls and baked for a shorter time.
J. R. R. Tolkien used that phrase in The Two Towers and I modifyied it to a “rye face”. I decided to continue my rye bread recipe experiment and made a dark rye bread this morning using my new rustic rye “breadboard” recipe.
In the first experiment I used White Rye Flour and used Dark Rye Flour for the second round. I baked a loaf using Medium Organic Rye this morning and still and Organic Pumpernickel to go. (I am not endorsing any particular brand of flour, it’s simply what is my cupboard.)
The dark rye bread had a stronger rye flavor than the white rye (no surprise,) but was just as delicious with a similar soft interior. The medium rye (today’s loaf) has a great interior and crunchy crust and surprise, surprise, the flavors is between the white and dark ryes.
Medium Rye FlourWhite Rye FlourDark Rye Flour
Next up will probably be the pumpernickel. Stay tuned.
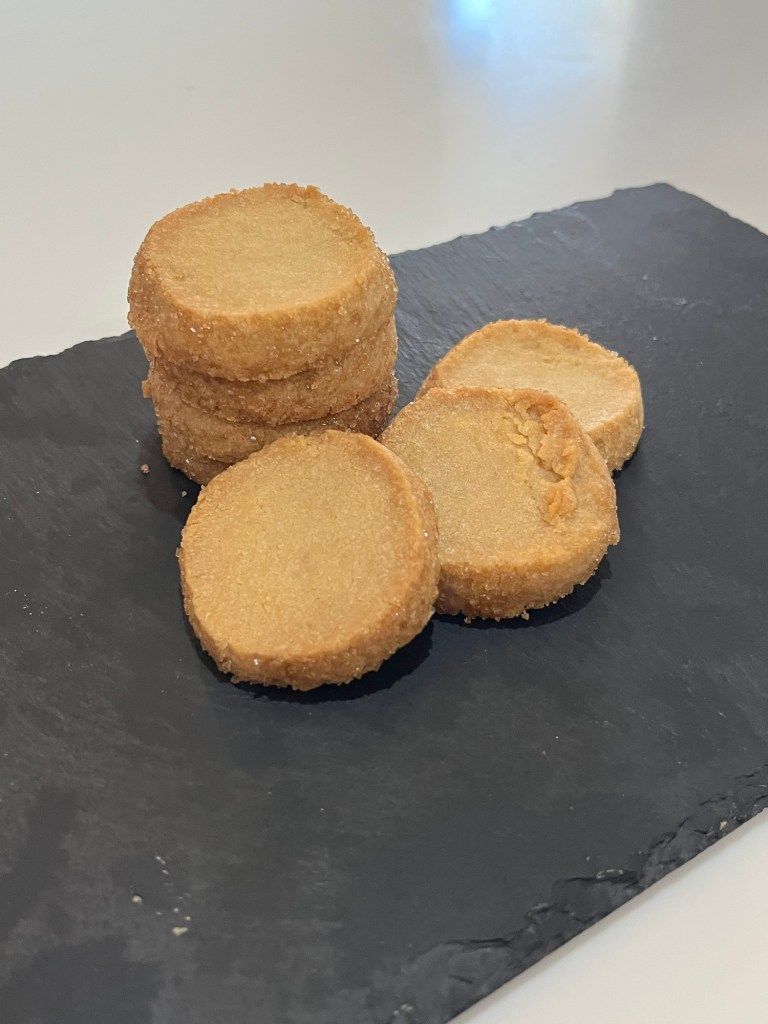
SallysBakingAddiction strikes again! Once again I need refreshments for QCs Mah Jongg ladies tomorrow so, of course, I made these Demerara encrusted brown sugar cookies today to be sure they were worthy of this esteemed group.
I baked these in two batches. Both of them were baked 2-4 minutes too long. The cookies should still be a little soft and not firm in the last few minutes in the oven. REALLY good though. We will cut these in half to prevent any dental distress when eating them.
Brown Sugar Shortbread Cookies
INGREDIENTS • 3/4 cup (12 Tbsp; 170g) unsalted butter, softened to room temperature • 1 cup (200g) packed light or dark brown sugar • 1 1/2 teaspoons pure vanilla extract • 2 1/4 cups (281g) all-purpose flour (spooned & leveled) • 1/4 teaspoon salt For Rolling • 1/2 cup (100g) Demerara sugar or Turbinado (Sugar in the Raw)
METHOD
In a large bowl using a handheld mixer or a stand mixer fitted with a paddle attachment, beat the butter and brown sugar together on medium-high speed until completely smooth and creamy. Add the vanilla and beat until combined.
Add the flour and salt and beat on low speed until incorporated. Turn the mixer up to medium-high speed and beat until the dough comes together. If the dough is too crumbly and won’t come together after a couple minutes of beating, stop the mixer, pour the dough crumbles on a work surface, and use your hands to bring it together. (I often have to do this, so don’t worry.) You can also try sprinkling the dough with a few drops of water and then beat again; or get your hands wet, then press the dough clumps together tightly until it forms one large clump of thick dough.
With lightly floured hands, divide the dough in two. (If you want to be precise, the dough should weigh about 650g, so each half will be about 325g.) Roll and shape each piece of dough into an 8-inch log.
For Rolling: Pour coarse sugar onto a large plate. One at a time, roll the logs in the sugar until the exterior is fully coated.
Tightly wrap the logs in plastic wrap and chill in the refrigerator for at least 4 hours and up to 5 days. Chilling is mandatory for this cookie dough. I always chill mine overnight.
Preheat oven to 350°F (177°C). Line two large baking sheets with parchment paper or silicone baking mats. (Always recommended for cookies.) Set aside.
Remove logs from the refrigerator. Slice each log into 16 equally thick cookies and place cookies on baking sheets about 2 inches apart. Bake the cookies for 14–16 minutes, or until set and lightly browned around the edges. Do not over-bake. Allow to cool for 5 minutes on the baking sheet, then transfer to cooling rack to cool completely.
Cover and store leftover cookies at room temperature for up to 1 week. After day 1, the cookies will taste crunchier.
Notes
Make Ahead Instructions: Baked cookies freeze well up to 3 months. Thaw overnight in the refrigerator and bring to room temperature, if desired, before serving. You can make/assemble the cookie dough logs and chill in the refrigerator for up to 5 days (see step 5). Cookie dough logs freeze well too, up to 3 months. Allow the logs to thaw overnight in the refrigerator, then continue with step 6. See How to Freeze Cookie Dough if you’d like to see a video tutorial for freezing various types of doughs.
Special Tools (affiliate links): Electric Mixer (Handheld or Stand) | Coarse Sparkling Sugar | Baking Sheets | Silicone Baking Mats or Parchment Paper | Cooling Rack
Old Version: The old recipe called for: 2 and 1/4 cups (281g) all-purpose flour; 1/4 teaspoon salt; 1 cup (2 sticks; 226g) unsalted butter, softened to room temperature; 1 cup (200g) packed light brown sugar; 1/3 cup (67g) packed dark brown sugar; 1 and 1/2 teaspoons pure vanilla extract; optional: 2/3 cup (135g) coarse sugar, for rolling. Same baking instructions. The cookies usually over-spread, so I updated the amounts of ingredients.
Be sure to check out my top 5 cookie baking tips AND these are my 10 must-have cookie baking tools.