I didn’t realize there would be a test on this vacation. We started our 50th anniversary/baseball stadium tour last week and are now resting in Vermont for a few days before trekking down to Boston for our 3rd stadium then going to New York City for our 4th.
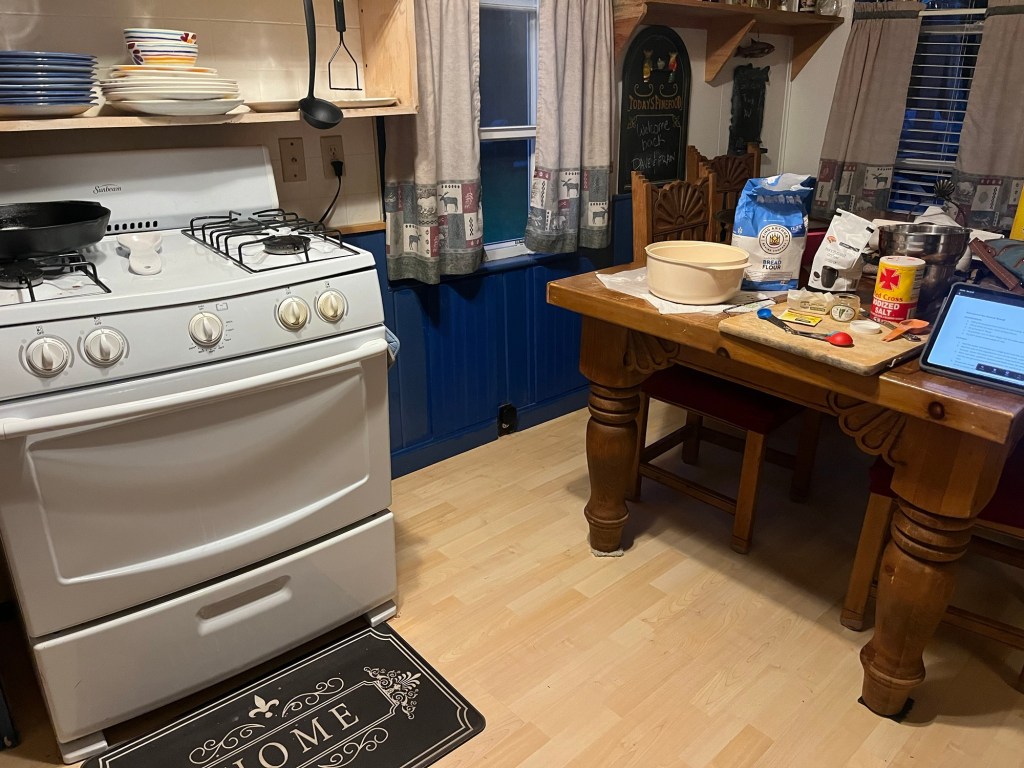
Being away from baking in my kitchen for a whole week I started to get anxious. On our way to Lake Dunmore I stopped and bought some flour and yeast. Our first day here I made two loaves of bread using a cast iron skillet with a second frypan for a lid to substitute for my Dutch Oven. It worked pretty good, except the bottom of the bread burnt slightly due to the dark cast iron. I adjusted temperature and baking time and each one improved, right up to the 4th loaf when I removed the loaf from the pan and placed it on a cookie sheet for the last 30 minutes of baking time. Perfection!! It took 4 tries, but successfully passed the test.
Improve Baking Station“Test” KirchenImprove Dutch OvenShaggy Dough Before Stretch and FoldSmooth Dough after Stretch and FoldFinished Loaf
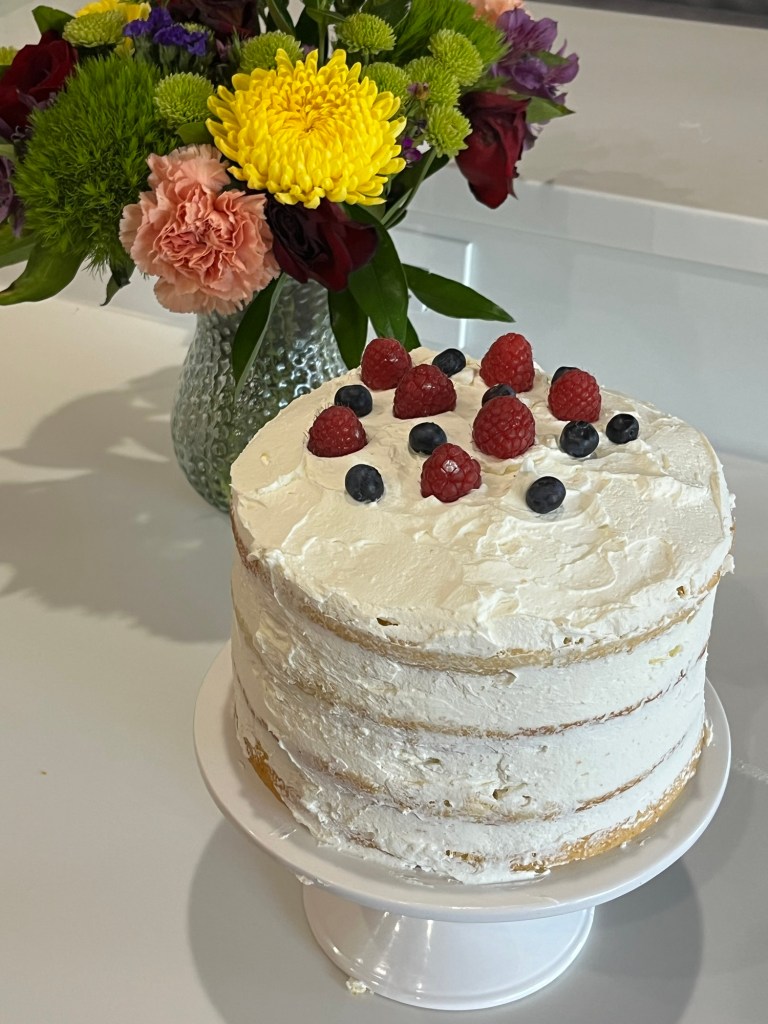
While still on an early summer berry theme I decided to bake this Gluten Free Berry Chantilly Cake.
The Chantilly cake first came onto the scene in 1829 when it was created by French chefs at Antoine’s Restaurant in New Orleans. Long ago QC and I dined at Antoine’s. While we were waiting in a long line for a table for two the Maîtred‘ asked if there were any parties of four as there was a table ready. The couple behind us leaned forward and asked if we wanted to join them, we did, and were shown to the available table. They were a delightful couple and a great time was had by all. 😁
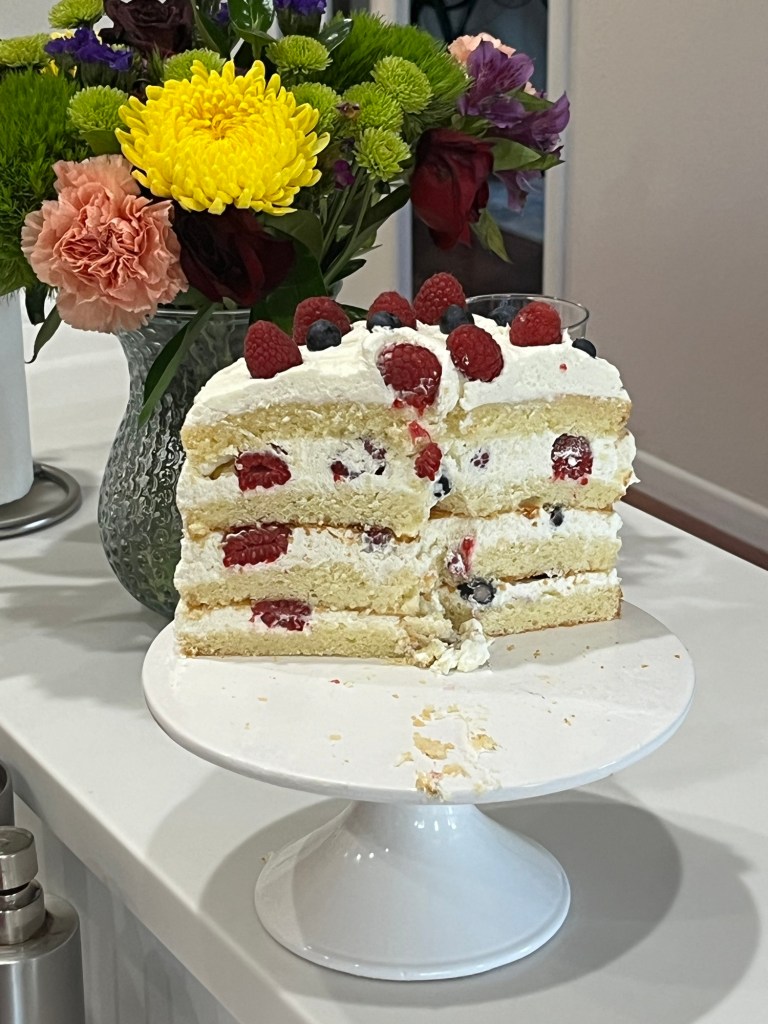
Next time I think I will bake more Chantilly cream. I ended up making this a naked cake because I needed more whipped cream. I might also try an Italian meringue although it might be too sweet.
Berry Chantilly Cake
INGREDIENTS • 2 ½ c all-purpose flour (or Kim’s for Gluten Free) • 2 ½ tsp baking powder •1 tsp salt • ¾ c unsalted butter, softened • 1 ⅓ c granulated sugar • 3 large eggs, room temperature • 1 tsp vanilla extract • 1 tsp almond extract • 1 ½ c whole milk Chantilly cream and berries • 3 ½ c heavy cream • ½ c whipped cream cheese • ⅓ c powdered sugar • ¼ tsp cream of tartar
METHOD Cake
Preheat oven to 350F. Grease and line two 8-inch cake pans with a circle of parchment paper.
In a large bowl, sift together the flour, baking powder, and salt. Set aside.
In another large bowl, use an electric mixer to cream the softened butter and sugar until light and fluffy. Beat, scraping down the sides as necessary, for 3 minutes.
Add the eggs one at a time, mixing well after each addition. Blend in the vanilla and almond extracts.
Add the dry ingredients to the creamed mixture alternately with milk, starting and ending with the flour mixture. Mix until just combined. Do not over-mix to keep the cake light and fluffy.
Divide the batter evenly between the prepared pans. (Batter should weigh ~1800g.) Bake in the preheated oven for 30-35 minutes, or until a toothpick inserted into the center comes out clean or temperature reaches 190⁰F.
Let the cake layers cool before carefully slicing each layer in two, horizontally through the middle. Use a long-serrated knife.
Chantilly cream and berries
Using a stand mixer with balloon whisk or a bowl with electric beaters begin whipping the cream cheese, then add the cream, powdered sugar, and cream of tartar. Whip until the cream holds peaks, but be careful not to over beat the cream.
Place one cake layer, cut side up. Spread about a cup of whipped cream over the surface. Add a layer of berries over the cream. Smaller berries can be left whole, but strawberries should be sliced.
Continue layering 2 more layers in the same manner. Place the final cake layer on top.
Spread more whipped cream on the sides and top of the cake. Decorate with whole berries. Refrigerate the cake for at least 2 hours before serving.
Kim’s Gluten Free Flour
Yield: 700g (5 c) INGREDIENTS
285g Bob’s Red Mill potato starch
250g superfine white rice flour (DON’T use regular rice flour, ie Bob’s Red Mill)
I received a personalized email from King Arthur Baking (along with probably a million other customers) proclaiming their selection of the recipe of the year for 2024. How could I resist.?
There were two interesting techniques that I never used in cookies. The first was making brown butter. This adds a rich caramel taste. The other was tangzhong, which is used in many Japanese breads to provide a soft, fluffy texture.
I never made brown butter before (but will again) and was an unsure when it was “done.” The recipe states it will foam near the end, but it also foams near the beginning. The second foam is very fine and if you stir the butter and you can see the browned butter with some bits stuck to the bottom of the pan.
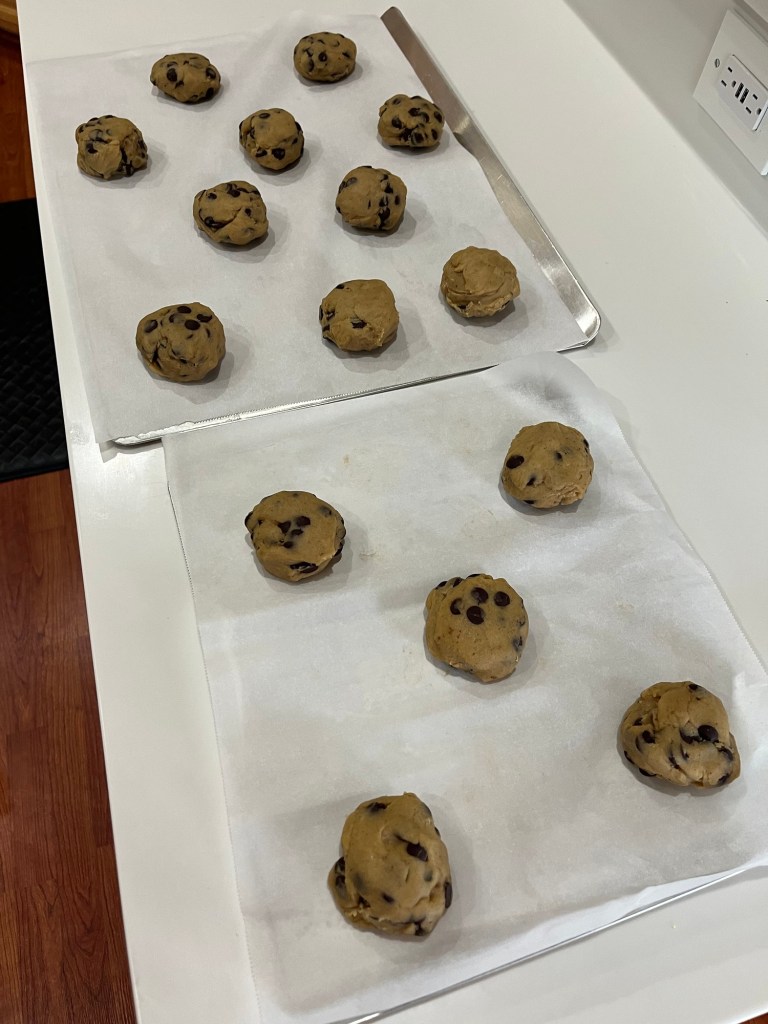
I also formed the dough into balls before refrigerating overnight. It seemed like s sensible step.
All the ingredients are readySecond “fine” foamIt looks lumpy bit thats okAn ice cream scoop was about right to make 90g balls of dough. They can be close together until ready to bake.Balls need to be well spaced or they will meld together.Well, they were not spaced out enough!Soft and chewy as claimed, great flavor with hints of caramel.
Chocolate Chip Cookies – Supersized, Super Soft from KAB
PREP-45 mins: BAKE-15 to 22 mins: TOTAL-1 day 1 hr: YIELD-16 to 17 large (4″) cookies or 28 medium (3″) cookies
INGREDIENTS • 2 cups (426g) light brown sugar, packed • 2 teaspoons table salt • 16 tablespoons (226g) unsalted butter, cut into 1″ pieces • 1/2 cup (113g) milk, whole preferred • 2 3/4 cups (330g) King Arthur Unbleached Bread Flour, divided • 2 large eggs, cold from the refrigerator • 1 tablespoon King Arthur Pure Vanilla Extract • 1 3/4 teaspoons baking powder • 1/4 teaspoon baking soda • 2 cups (340g) semisweet chocolate, preferably 60% to 65% cocoa content* *Use chopped wafers or bars for best results; if using chocolate chips, chop them roughly before incorporating. (My chocolate chips were small so I didn’t chop them.)
METHOD
In a large bowl, combine the brown sugar and salt. Set aside.
To brown the butter: In a saucepan over medium-high heat, melt the butter. After several minutes, the butter will sizzle and may spatter. Continue to cook the butter, swirling the pan regularly, for about 5 to 7 minutes, until it’s a dark golden brown color and brown bits start collecting at the bottom of the pan; the butter will have stopped sizzling and may also have a layer of foam on the surface.
Once the butter is browned, immediately pour it over the sugar mixture (be sure to scrape out the brown bits at the bottom) and whisk vigorously to combine; this helps dissolve the sugar slightly and creates the shiny surface of the baked cookies. (The mixture will stay lumpy and won’t become smooth at this point.) Set the empty saucepan aside to cool slightly.
To make the tangzhong: In the same saucepan used to brown the butter, combine the milk with 3 tablespoons (23g) of the bread flour and whisk until no lumps remain.
Place the saucepan over low heat and cook the mixture, stirring regularly with a whisk and then a flexible spatula, until it’s thickened, paste-like, and starts to come together into one mass, about 2 to 3 minutes.
Remove from the heat and transfer directly to the bowl with the butter and sugar. Whisk until mostly smooth; some lumps of the tangzhong mixture are OK.
Add the eggs and vanilla and continue whisking until smooth.
Weigh or measure the remaining 2 1/2 cups plus 1 tablespoon (307g) bread flour by gently spooning it into a cup, then sweeping off any excess. Add the bread flour to the bowl with the butter and sugar, then add the baking powder and baking soda. Using a whisk or flexible spatula, stir until well combined and no dry spots remain.
Place the bowl, uncovered, in the refrigerator and allow it to cool for 10 to 15 minutes.
While the batter is cooling, use a serrated knife to roughly chop the chocolate into coarse pieces. Avoid chopping the chocolate too fine, as small pieces will melt when mixed into the dough.
Remove the dough from the refrigerator and fold in the chopped chocolate. (Dough weighs 1440g. This will make sixteen 90g cookies before baking.)
Return the dough to the refrigerator for 1 – 2 hours.
Remove the dough from the refrigerator and form the dough into 85g to 90g balls, (50g for small cookies,) flatten slightly with the palm of your hand to about 3” diameter circles, cover and return to the refrigerator for 24 to 72 hours to allow the flavors to intensify.
To bake the cookies: When you’re ready to bake, remove the chilled cookie dough from the refrigerator and let it rest at room temperature for about 10 to 15 minutes to allow it to warm up slightly. Meanwhile, preheat the oven to 350°F with a rack in the center.
Arrange the cookie dough balls on parchment-lined baking sheets, them 3″ to 4″ apart. (Five dough balls fit perfectly on a half-sheet pan. The 90g cookies can be arranged in a 2-1-2 pattern; the 50g cookies can be arranged in a slightly staggered 4 x 2 pattern.) For consistently shaped cookies, roll each piece of dough into a smooth ball before baking.
Bake the large (90g) chocolate chip cookies for 18 to 22 minutes or the smaller (50g) cookies for 15 to 18 minutes, until the edges are set and the cookies are browned, rotating the pan halfway through baking to ensure even browning. (For best results, bake one pan of cookies at a time.) Remove the cookies from the oven and let them rest on the baking sheets until cool enough to handle, at least 15 minutes.
Storage information: Store leftover chocolate chip cookies, covered, for up to 5 days; their slightly crispy edges will soften and the cookies will maintain a soft texture. Freeze baked cookies for longer storage.
I love key lime. I saw a recipe that inspired me to make two pastries featuring whipped key lime (like a chiboust with key lime curd mixed with stabilized whipped cream.)
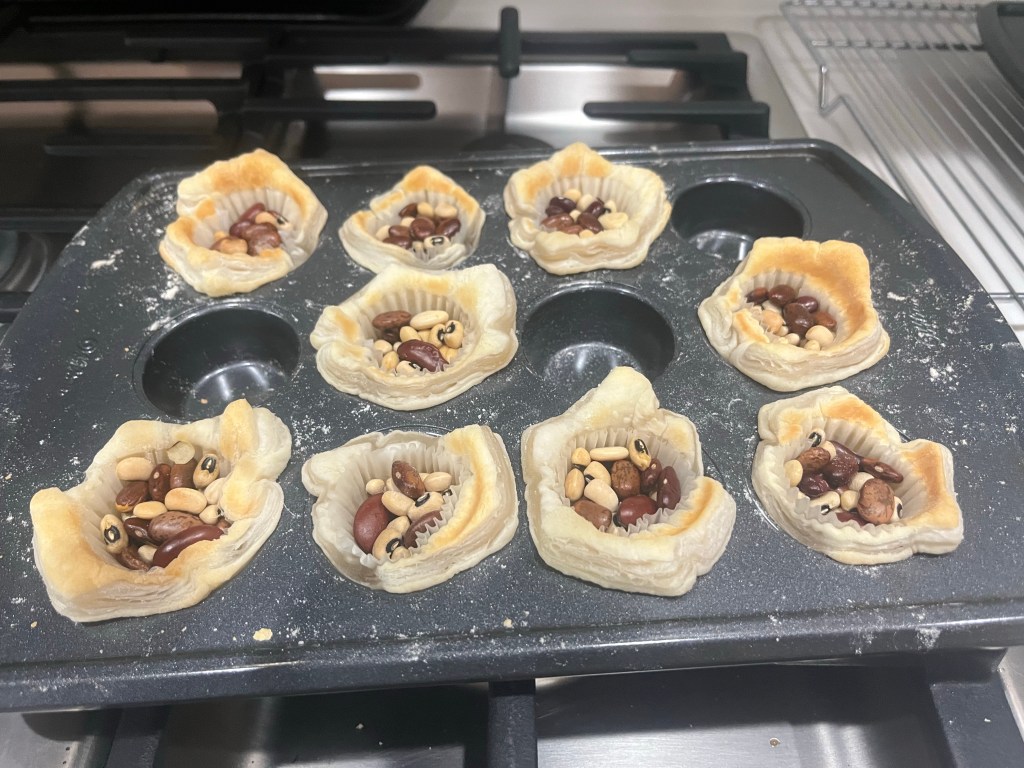
My first attempt used Pepperidge Farm puff pastry to form the pastry cups. This puff pastry “puffed” up too much. My second try used Trader Joe’s puff pastry which only puffs about 25% of Pepperidge Farm’s. This pastry worked better.
Pastry in pan with cupcake papers and beans“Sandwiched” puff pastry, cupcake papers, beans and second cupcake panBaked puff pastry
Cut the puff pastry into circles (I use hexagons as they don’t waste as much pastry) about 2” larger than the diameter of the cupcake pan pocket. Fit the circles into each pocket. Try not to fold them over along the sides and more than necessary. Place a mini-cupcake paper in each and fill with baking beans (not baked beans,) then cover with an identical cupcake pan. This will retard the “puff” of the pastry.
Raspberry coulisCoulis filled bottom of shellKey lime whipped cream piped into shell
Bake about 15 minutes at 400F. Remove the upper pan, the cupcake paper and beans, turn the oven off and return the baked shells to the over to dry the bottoms. This should take ~5 minutes.
Raspberry drizzled profiterolesRaspberry drizzled pastry shellsFinal pastriesI could have done a better job drizzling (should have!) When the first attempt failed I made profiteroles as well.
Whipped Cream Key Lime Curd: • ½ c white sugar • 2 Tbl cornstarch • ¼ tsp kosher salt • 1 large egg, plus 2 large egg yolks • 2 tsp lime zest • ⅔ c key lime juice • ⅔ c sweetened condensed milk • 2 Tbl butter • ¾ c heavy whipping cream
Key Lime Drizzle: • 3 c confectioners’ sugar • 2 tsp lime zest • 4-6 Tbl key lime juice • ¼ tsp Agar agar.
Alternative Raspberry Drizzle • 12 oz raspberries – fresh or frozen; about 320g • ~4 to 6 Tbl granulated sugar – to taste • ~1 tsp lemon (or lime) juice • ¼ tsp Agar agar.
METHOD
Curd: In a medium saucepan, whisk together the sugar, cornstarch, and salt.
Whisk in the egg yolks, lime zest, and juice. Bring to a boil, over medium-high heat. Whisk constantly and cook for about 1 minute.
Remove from heat, whisk in sweetened condensed milk, and bring back to a boil.
Remove from heat again and strain the mixture through a sieve. Add in butter and whisk until smooth.
Cover with plastic wrap, and chill for at least 3 hours, or overnight.
Puff Pastry Shell: Cut defrosted and pliable puff pastry into circles 2” larger than the cupcake pan pocket. I use hexagon cutters as they are more efficient and don’t waste as much pastry dough.
Fill each cupcake pan pocket with pastry, put small cupcake paper in each pocket, fill with beans and cover with an identical cupcake pan.
Bake at 400 F for 15 minutes, or until pastry is golden brown. Remove the upper pan, beans and cupcake papers and bake another 5 minutes to dry the bottoms of the shells.
Cool pastry cups to room temperature.
Drizzle: Whisk together confectioners’ sugar, key lime zest, and lime juice. Add more powdered sugar/lime juice if needed for the right dripping consistency.
Assembly: Spread a thin layer pf curd in the bottom of each cup.
Whip heavy cream to stiff peaks and fold into the the balance of the curd.
Refrigerate the mixture until ready to use.
Transfer the whipped cream key lime curd to a piping bag, with a large star tip.
Alternative raspberry drizzle:
Add the raspberries, sugar, agar-agar and lemon juice to a saucepan and bring to a boil while mashing the raspberries to break them down. Once it boils, turn off the heat and adjust with more sugar or lemon juice as needed.
Strain the raspberry sauce through a fine mesh sieve to remove the seeds. Press firmly to extract all of the pulp as that is what thickens the sauce.
Thin with a teaspoon of water at a time, (if desired) keeping in mind the sauce thickens as it cools.
With perfect timing this recipe crossed my FaceBook feed a while ago when I needed a dessert like this for a reception coming up in a couple of weeks.
The first rendition of the original recipe was sampled by QC and me and was subsequently “binned.” There was too much caramel and it was too runny. As I was making in accordance with the recipe I felt, and even told QC that this was wrong, but I persevered and it failed.
Next, I researched several other recipes, combining the parts that I thought were sensible and voila!
Fruit basting in caramelPuff pastry covering tart with edges tucked under,Finished tarte tartin, still in frypan
I cut the pears in halves and cut out the cores. I cut the apples in eighths to position three thick slices between each pear half. I did siphon off a half cup of caramel as I felt it was too “soupy”and if I cooked it down too much more the apples would disintegrate.
Apple And Pear Tarte Tatin
INGREDIENTS 1/3 cup water 2/3 cup granulated sugar 100 g butter 2 large Granny Smith apples, peeled, cut in eighths 1 large Bosch pears, peeled, quartered 2 sheets frozen butter puff pastry, slightly thawed 1 egg-yolk, beaten ½ cup water ¼ cup caster sugar thickened cream, to serve
METHOD
Preheat oven to very hot, 425°F.
Heat an 8-inch frying pan on medium. Add sugar and water and heat, stirring, until it starts to bubble.
Then, simmer without stirring, for 4-5 minutes, until it begins to turn golden.
Add butter and swirl to mix.
Add apples, cut side up, firmly packed. Simmer, gently stirring and basting for 12-15 minutes, until beginning to caramelize.
Add pears and simmer an additional 3-5 minutes. The pears will break down faster than the apples so should be caramelized for a shorter time. (I removed some caramel at this point to remove some liquid.)
Brush one sheet of pastry with a little egg yolk. Place second sheet on top and press firmly to sandwich together. Roll out slightly. Place over fruit to cover, tucking excess overhang inside pan.
Cover handle of pan with foil, if necessary, and bake for 15-20 minutes, until pastry is golden and crisp.
Place a rimmed serving dish over pan. Invert pan and carefully lift pan off (remember to use an oven mitt).
Add the water and extra sugar to same pan. Cook, stirring, until sugar and caramel residue dissolves.
Bring to boil and cook, uncovered, for 3 minutes, until thickened and golden. Drizzle over tart. Serve warm with thickened cream.
Thickened Cream
Mix cold water with equal parts cornstarch to form a paste-like substance
Blend the mixture with a hand whisk to avoid clumping.
Heat your cream to just below boiling
Add the cornstarch mixture, constantly whisking.
Let it simmer for a few minutes until the desired thickness of the cream.
It will require about 2 tablespoons of the water and cornstarch mixture for about 1 cup of cream to be thickened.
Thanks to my friend Beth here is a new chocolate chip cookie recipe. I can’t even tell you how long Beth and I have been friends. Our parents were life long friends before us and we simply continued the relationship.
This recipe has slightly different ingredient ratios than my “go-to” recipe. Plus it doesn’t use light brown sugar but substitutes turbinado sugar for the white granulated sugar, which adds a light caramel flavor. The author did not specify what kind of sugar to use, but the video showed a non-white sugar. The turbinado would add some of he flavor removed by not using the light brown sugar. (Full disclosure, I didn’t have any turbinado but did have some demarara which is similar to turbinado but a little darker and coarser.)
This author (Emojoie) only made 4 cookies (mine were 123g each) whereas next time I will make a dozen (~40g each) or so.
Chocolate Chip Cookies Best Ever from YouTube
INGREDIENTS • 100g butter, softened. • 80g Demerara or turbinado sugar • 1g salt • 50 g (1 large egg) • ½ tsp vanilla extract • 160g all-purpose flour • 3g baking soda • 100 g (3/4 c) chocolate chips • 50g hazelnuts (optional)
METHOD
Preheat oven to 375° F.
Beat by hand: butter, sugar and salt in large bowl until creamy. (Don’t over beat.)
Fork whip the egg and add in two additions mixing to incorporate after each addition
Add vanilla and mix well
Gradually add flour mixture mixing by hand. (Again, don’t over beat.) it should form one large ball between wet and dry dough.
Stir in morsels and optional hazelnuts and mix by hand.
Chill in the fridge for 30 minutes.
Divide the dough into 135 g portions
Form into balls with hands and add more chocolate to the top
Bake for 13 – 14 minutes or until golden brown. Do NOT overbake!
Cool on baking sheets for 2 minutes; remove to wire racks to cool completely.
QC asked if I could bake something for a friend of ours who is gluten intolerant. I instantly thought of these key lime tartlets. They are delicious. I’m also baking a loaf of gluten free artisan bread and while searching for the recipes I found one for gluten free berry scones. Bingo!
For brevity I am posting each bake under a different title. Otherwise the post would be looooonnnnnggggg,
Adding the juice of a lime to the filling adds some acidity and tartness that really makes the bake.
Key Lime Tartlets Using Kim’s Bread Flour
INGREDIENTS SHELL • 100 g cold butter cut into small cubes • 60 g icing sugar • 200 g Kim’s Bread flour • ½ tsp vanilla • ¼ tsp salt • 2 eggs – 1 for the dough and the other 1 reserved for an egg wash
FILLING (For the tart, double the amount filling.) • zest (grated rind) of 1 lime • 4 large egg yolks • 14-ounce can (397g) sweetened condensed milk, (1 1/4 cups) • 3/4 cup (170g) Key lime juice • Juice of 1 lime
METHOD SHELL
Mix butter with sugar until well incorporated 3-5 min
Add salt then vanilla.
Add egg and mix 3-5 min
Stir in flour. Mix by hand until incorporated and forms a thick smooth(ish) sticky dough
Cover with plastic and refrigerate for 30 min.
Butter or lightly spray tartlet pans or use non-stick pans.
Roll dough between parchment paper to about ⅛” thick
Pre-heat oven to 350 degrees
Refrigerate rolled dough still between parchment paper until firm: 20 – 30 minutes
Remove from fridge and while still firm, cut dough to rounds about 1” larger diameter than the mold. Cut all the rounds at once while still firm. If necessary, return to the fridge to firm up. Again, if necessary, use an offset spatula to remove the circles from the parchment paper. Keep the spatula clean.
Lay tart dough circles over molds. This allows the dough to thaw slightly and be pressed into the molds and fill all crevices.
Return to fridge for 15 – 20 min to firm up the shell
Prick holes in bottom of formed dough
Place a mini cupcake paper in each tart and fill with with pastry weights (or beans)
Paint edges of the tartlet with an egg-white wash. (Whisk one egg white with 1 Tbl water)
Bake in preheated oven 350 deg F (175 C) for 8 min until edges are dry
Remove pastry weights and bake an additional 4-6 minutes to dry the bottoms. Bake until the edges begin to turn light brown and the bottom is nearly dry.
Immediately remove from pans and cool on a wire rack
FILLING
Whisk the lime zest and egg yolks at high speed of an electric mixer for about 4 minutes. The mixture will lighten in color and thicken somewhat, appearing similar to Hollandaise sauce.
Stir in the sweetened condensed milk, mixing until smooth. Beat at high speed for 3 minutes; the filling will become slightly thicker and gain a bit of volume.
Add the lime juice, stirring just to combine. The mixture will thicken again. Add lime oil to taste.
PIPE the filling into the crust and return the tart (on the baking sheet) to the oven. Bake the tart for 12 to 18 minutes, until it appears set around the edges though still a bit wobbly in the center. The center should read about 145°F on a digital thermometer.
Remove the tart from the oven and cool to room temperature. Refrigerate for several hours before serving.
Once chilled, serve the key lime pies cold with whipped cream, or merengue and a lime slice or zest, if desired.
Store leftover pies in the refrigerator (covered) for up to 1 week. If they last that long!
ITALIAN MERINGUE (NOTE: Alternatively use whipped cream)
INGREDIENTS • 80g (or 0.4 cup or 6.5 Tbl) granulated sugar • 30ml (or 1/8 cup) water • 60g (or ¼ cup) egg whites (about 2 large egg whites) • 20 g icing sugar
METHOD
Whisk the egg whites into a light and fluffy foam, using an electric (stand) mixer.
Add the icing sugar and continue whipping until you’ve got a glossy stable foam. It should stay in place if you turn the bowl upside down. Set aside.
Add the granulated sugar and water to a pan and bring to a boil. Once all the sugar has dissolved, refrain from stirring. Continue boiling at moderate/high heat while continuously keeping an eye on the temperature.
Once the solution has reached 121°C (250°F), take it from the heat immediately*.
While SLOWLY beating the egg whites, gently pour the hot sugar solution into the whipped egg whites (this is where the stand mixer comes in handy!).
Once all the sugar syrup is in, turn up the speed to high and continue whisking until the foam is lukewarm.
Use the meringue immediately to top whatever it is you want to cover.
Kim’s Gluten Free Bread Flour Blend
Yield: 700g (5 c) INGREDIENTS
285g Bob’s Red Mill potato starch
250g superfine white rice flour (DON’T use regular rice flour, ie Bob’s Red Mill)
75g Tapioca flour
75g Whey protein isolate or egg white protein.
15g Xanthan gum
METHOD
Weigh all ingredients and add to a stand mixer bowl
The GGBO is a very bad influence. I saw this cake (again) and thought it would be a great summer dessert. (It is.) Once again, Mary Berry does not disappoint. Maybe I should stop re-watching the show…
This is a pretty technical bake with lots of steps requiring careful timing. The genoise needs to be baked and cooled. The strawberry syrup needs to be heated twice. The agar has to be microwaved to boiling, then added to the pastry cream as it begins to boil but not before it thickens too much. The finished pastry cream must be room temperature before the whipped cream is added or it will melt the whipped cream.
Other than that, it’s pretty straightforward.
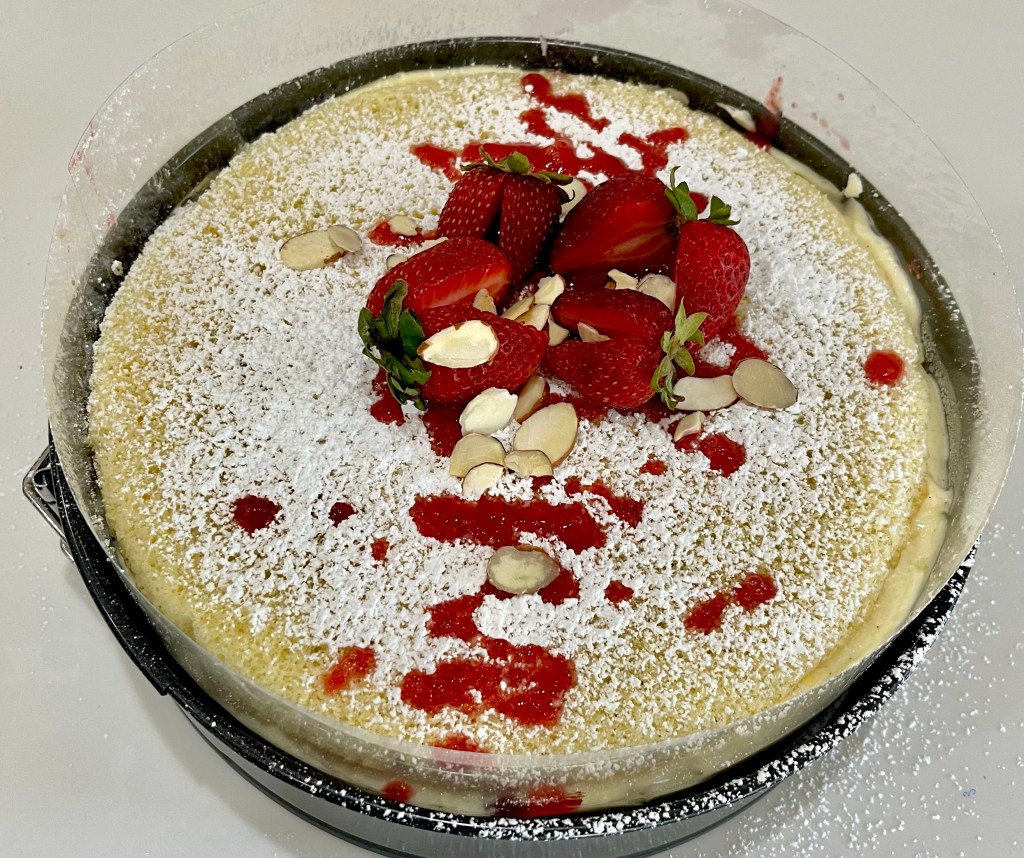
Still in the springform pan.It held together after removing the acetate!And it cut and held its layers well.
Fraisier Cake
INGREDIENTS Genoise Sponge • 4 Eggs • 60 g (1/4 c) Caster Sugar • 100 g (2/3 c) Plain Flour • 20 g (2 ½ Tbl) Cornstarch Strawberry Syrup • 120 g Fresh Strawberries • 118 g (1/2 c) Water • 90 g (6 Tbl) Caster Sugar Crème Diplomat • 500 ml (2 c) Full Cream Milk • 1 tsp Vanilla Paste – or 1 fresh Vanilla Bean • 1 tsp Orange extract – optional • 4 Egg Yolks • 30 g (2 Tbl) Caster Sugar • 35 g (1/4 c) Cornstarch • 1 tsp Agar-Agar Powder • 4 Tbl of water • 250 ml (1 c) Whipping Cream + 1 Tbl cornstarch Cake Filling • 500 g (about 1 pound) Fresh Strawberries – or more to taste • 20 g (1/4 c) Flaked Almonds – optional Cake Toppings • Icing Sugar – to taste • Fresh Strawberries – to taste • Flaked Almonds – to taste • Mint Leaves – to taste
METHOD
Genoise Sponge
Preheat your oven on 160’C/325’F. Line two 8” round springform pans with parchment paper and set aside.
In the bowl of a stand mixer, whisk the eggs and caster sugar on medium/high speed for 5 to 8 minutes, or until very pale, frothy and doubled in size.
Sift the flour and cornstarch over the sugar/eggs and gently fold in with a spatula until it’s all incorporated. Pour over the lined springform pans and gently spread with an offset spatula to level the batter. Weigh each pan/batter to assure they are the same weight and therefore size.
Bake for 10 to 12 minutes or until puffed and golden. Transfer over a cooling rack and leave to cool down completely before releasing the pan and removing the baking paper.
Strawberry Syrup
Blend the strawberries (thawed if using frozen) then place the strawberry puree, water and sugar into a small pot on low to medium heat. Cook for about 5 minutes, occasionally stirring, or until the sugar has dissolved and the liquid has started to slightly thicken.
Sieve the mixture through a fine sieve to remove everything except the liquid.
Set aside to cool.
(NOTE: After coating one side of both genoise sponges return the syrup to the heat and cook until it thickens. Then cool, covered with plastic wrap directly on the syrup.)
Crème Diplomat
Mix agar-agar and water in a small bowl. Microwave for 30 seconds and mix until it is a clear gelatinous liquid. Let cool to the touch, but still warm.
Whisk eggs and milk together and add to all other ingredients (except extracts and agar-agar gel) to a medium saucepan.
Bring to boil whisking constantly
Add the still warm agar-agar gel to the pastry cream
Cook until thickened (it will look lumpy, its ok)
Sieve lumpy mixture into a bowl, add extracts whisk until dissolved and combined. Transfer the pastry cream into a clean bowl or tray, cover with plastic wrap touching the surface and place in the fridge to cool down.
Once the pastry cream has reached room temperature, start whipping the cold cream until you reach stiff peaks.
Whisk the pastry cream to loosen it then gently fold in the whipped cream in 3 or 4 portions. Transfer into a piping bag with large round piping tip (Wilton #A1.)
Assembling the Cake
Pick strawberries that have about the same height to create the edges of the cake. Remove the stems and slice them in half to form a triangle. Cut the rest of the strawberries into small cubes and set aside.
Surround the interior of a 8×2 inch springform pan with an Acetate Strip.
Put the first layer of genoise at the bottom of the ring and brush it with strawberry syrup.
Place the strawberries sliced in half around the edges of the cake, sliced side facing out. Try to place them as tightly against each other as possible.
Pipe the crème diplomat between each strawberry, going as high as the pastry ring. Add about half the of the crème over the genoise and spread with an offset spatula if needed.
Cover the cream with the cubed strawberries and almond flakes (optional). Gently press on them to avoid any large air pockets.
Pipe the rest of the crème diplomat over the cubed strawberries and almonds, going all the way to the edges of the pastry ring (and over the strawberries on the edges).
Brush the second layer of genoise with the strawberry syrup (on one side only) and cover the cream with it, brushed side facing in. Gently press on it to even it out.
Place in the fridge to set for 2 to 3 hours, or overnight.
Cake Toppings
To finish the cake, sprinkle icing sugar over the genoise. Use the thickened and cooled strawberry syrup to drizzle a design on the genoise.
Add some slices of fresh strawberries in the centre of the cake with fresh mint leaves and flaked almonds.
Carefully remove the pastry ring and acetate strip before serving.
Carefully remove the pastry ring and acetate strip before serving.
I saw this cookie design online and as the timing was perfect, how could I resist? I used my Macadamia Nut Shortbread and a basic royal icing recipe. The cookies are delicious, timely and fun to make.
Oddly, I tried piping the blue circle inside the red one (center cookie) but they just didn’t look as good. I could only frost a couple cookies at a time or the flood/fill would dry before I could feather the colors.
I used these small squeeze bottles to pipe the required small amounts of icing. I find I have better control than if I use a piping bag.
4th of July Cookies 2023
Macadamia Nut Shortbread Cookies
INGREDIENTS • 1 cup butter, room temperature • 3/4 cup powdered sugar • 1 tsp vanilla extract • 2 cups flour • 1 cup macadamia nuts, finely chopped
METHOD
Beat the butter until smooth and add in the powdered sugar and vanilla. Gradually add flour then mix in the 1 cup of chopped macadamia nuts.
Transfer the batter to a sheet of parchment paper. Lay a second sheet over top and roll to 1/4-inch thickness. Place it onto a cookie sheet and refrigerate until firm.
Preheat oven to 300°F and remove dough from refrigerator.
Cut the cookies using a star cookie cutter. Re-roll the scraps and use as much as possible.
Place the stars onto a parchment lined cookie sheet, cover, and chill for 30 minutes.
Bake for 20 minutes until edges begin to brown.
Cool the cookies completely.
Royal Icing
INGREDIENTS • 4 cups (480g) confectioners’ sugar, sifted • 3 Tablespoons meringue powder (not plain egg white powder) • 9–10 Tablespoons room temperature water
METHOD
Pour confectioners’ sugar, meringue powder, and 9 Tablespoons of water into a large bowl.
Using a hand mixer or a stand mixer fitted with a whisk attachment, beat icing ingredients together on high speed for ~2 minutes.
When lifting the whisk up off the icing, the icing should drizzle down and smooth out within 5-10 seconds. If it’s too thick, beat in more water 1 Tablespoon at a time.
The longer you beat the royal icing, the thicker it becomes. If your royal icing is too thin, just keep beating it to introduce more air OR you can add more confectioners’ sugar.
Assembly
Pipe a thin bead of white royal icing around the edges of the cookies and let dry.
Flood/fill 2 or 3 cookies and while still wet pipe a drop of red and a drop of blue in the center of the cookie.
Pipe a ring of red royal icing around the blue and white drops, then pipe a blue ring outside the red circle.
Use a toothpick to draw a line through the icing from the center to the tip of each star then leave to dry.
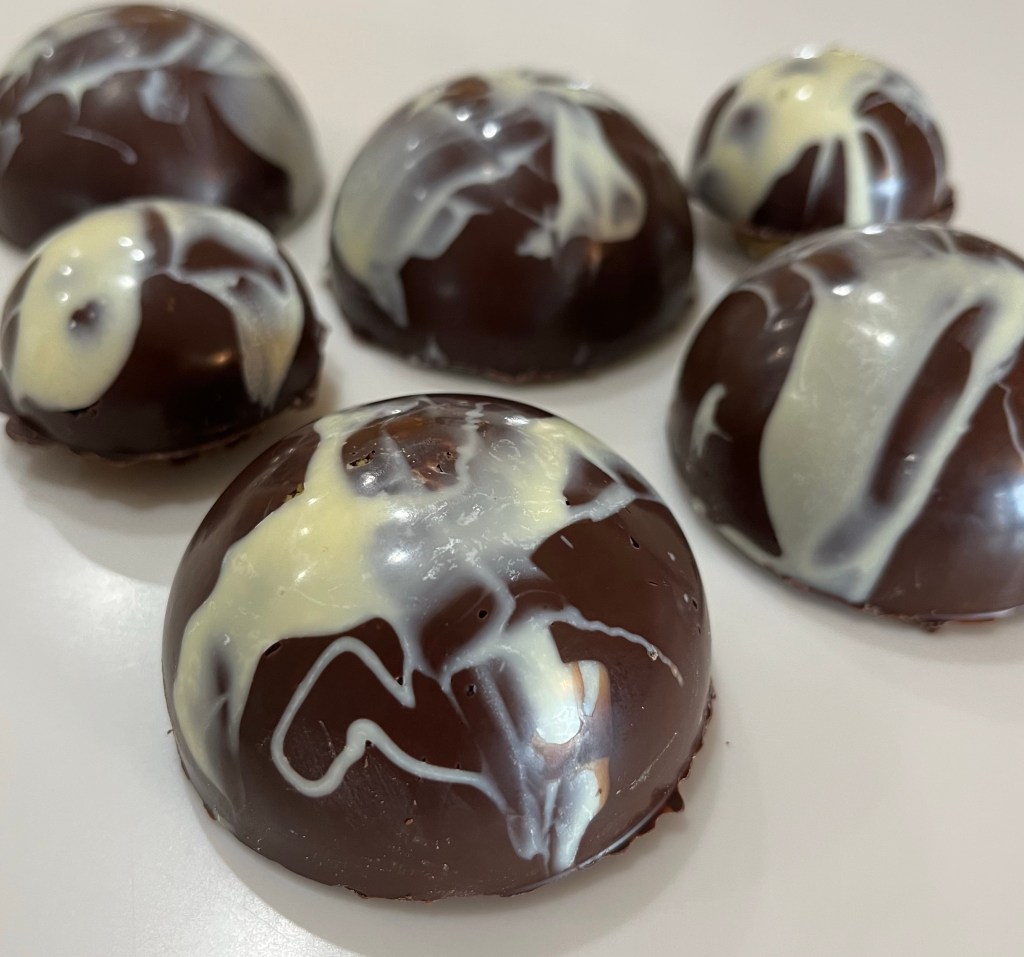
I had a few oranges left over from “poaching” my neighbors, John and Amy’s, trees. Luckily, I saw a Jaffa cake on GBBO which gave me the idea of created a Jaffa-ish dessert. Populate in Britain, Jaffa cakes include sponge, orange and chocolate.
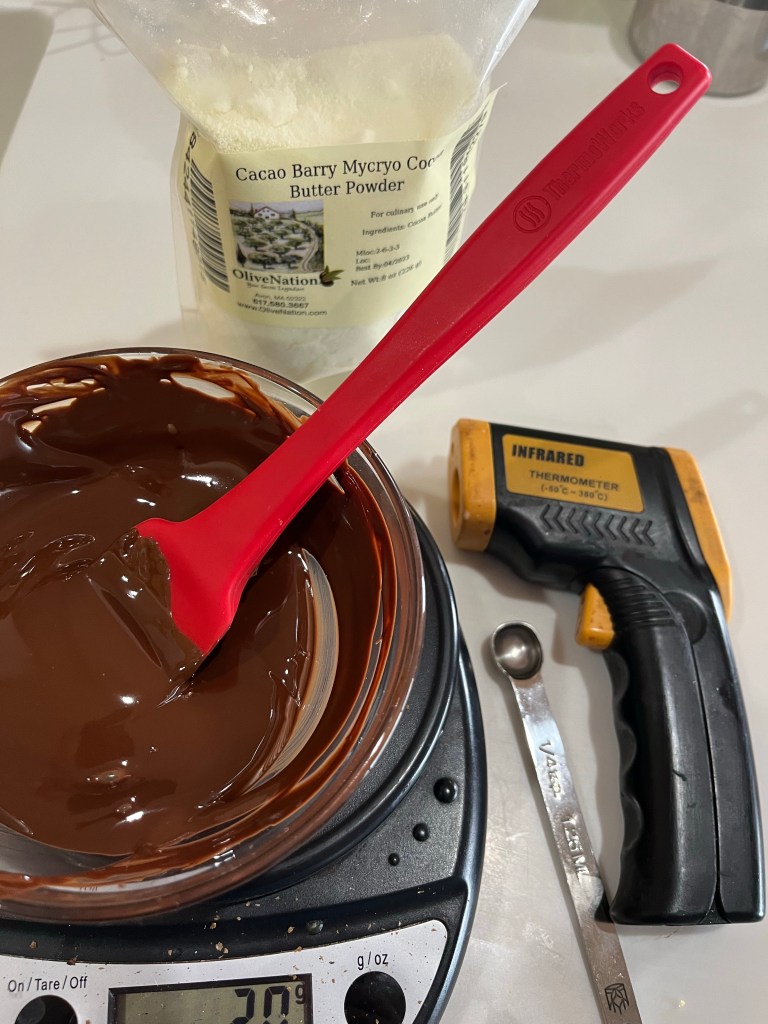
I also had some pistachios left over from another project so I made the “cake” a pistachio flavored one. Actually, I didn’t make a cake, I made cookies, where they should have been biscuits. Whew! That’s a convoluted way to say I made pistachio flavored – mouse filled – cookie based tempered chocolate domes. Hmmm, that’s not much shorter, is it?
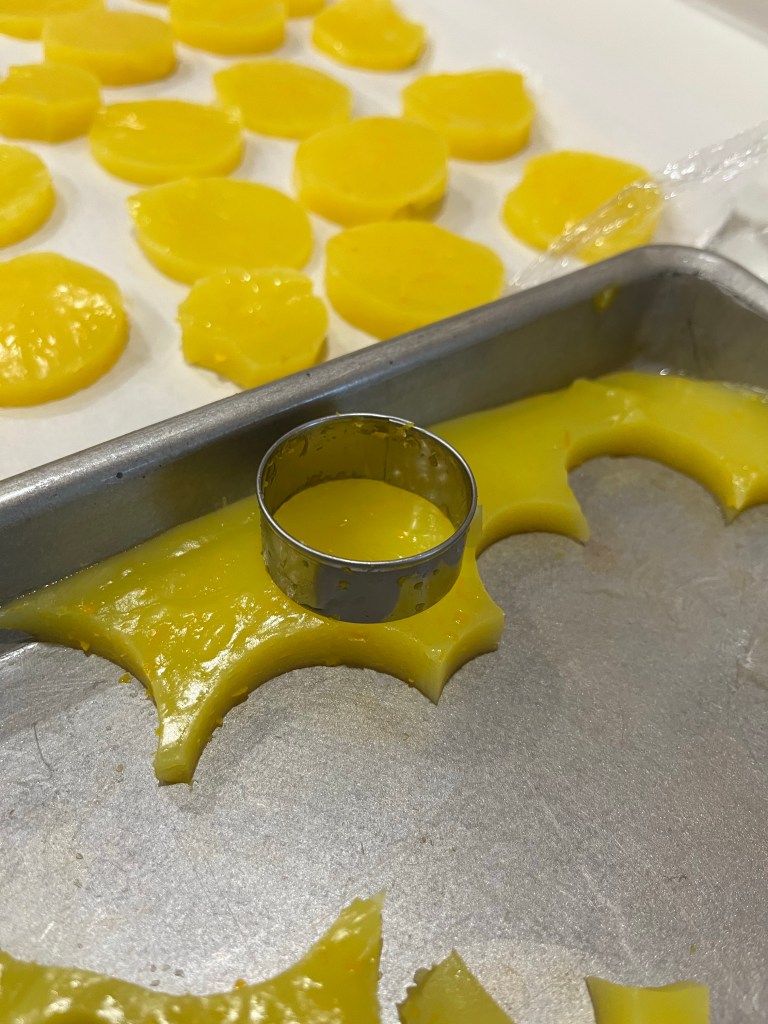
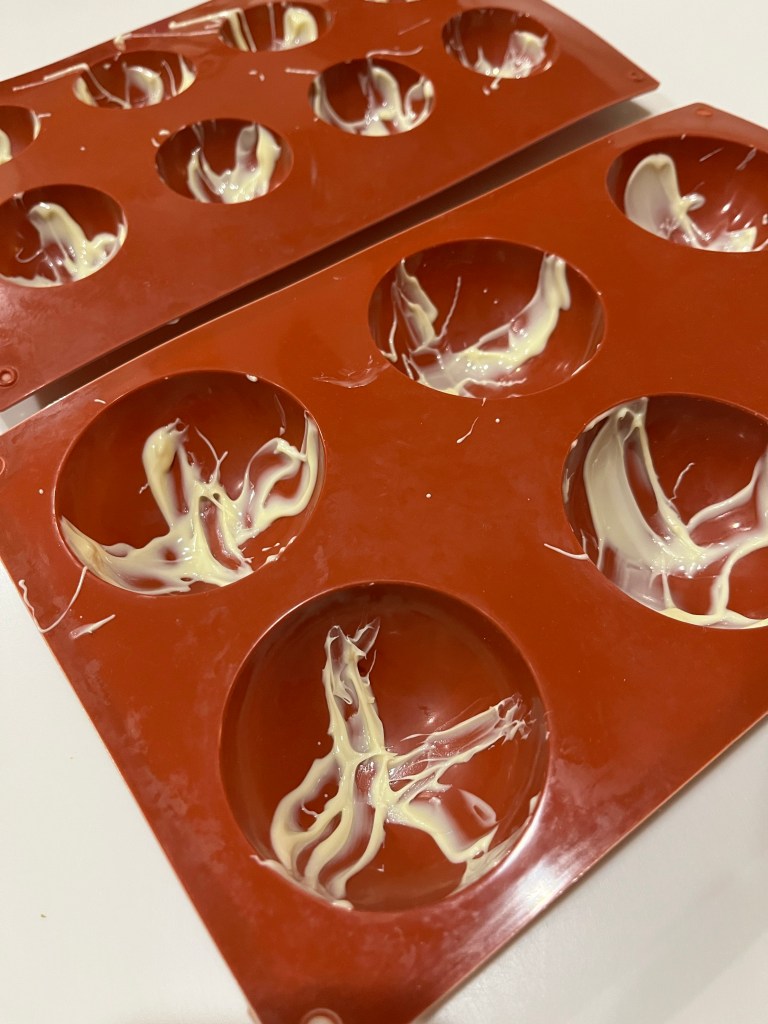
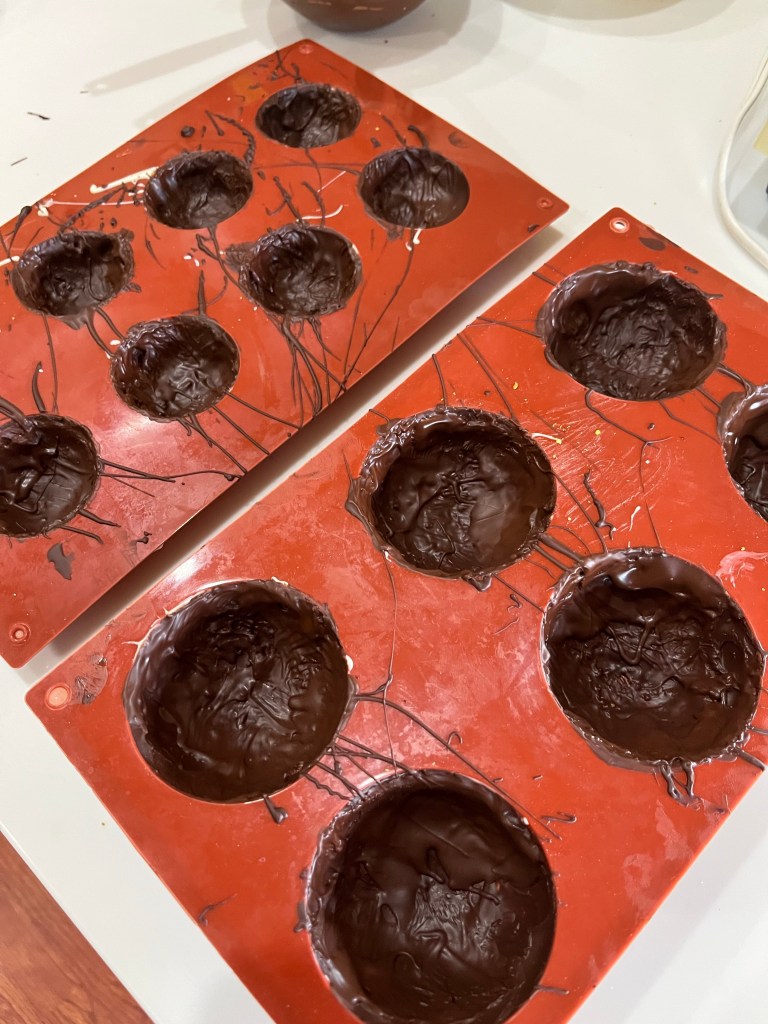
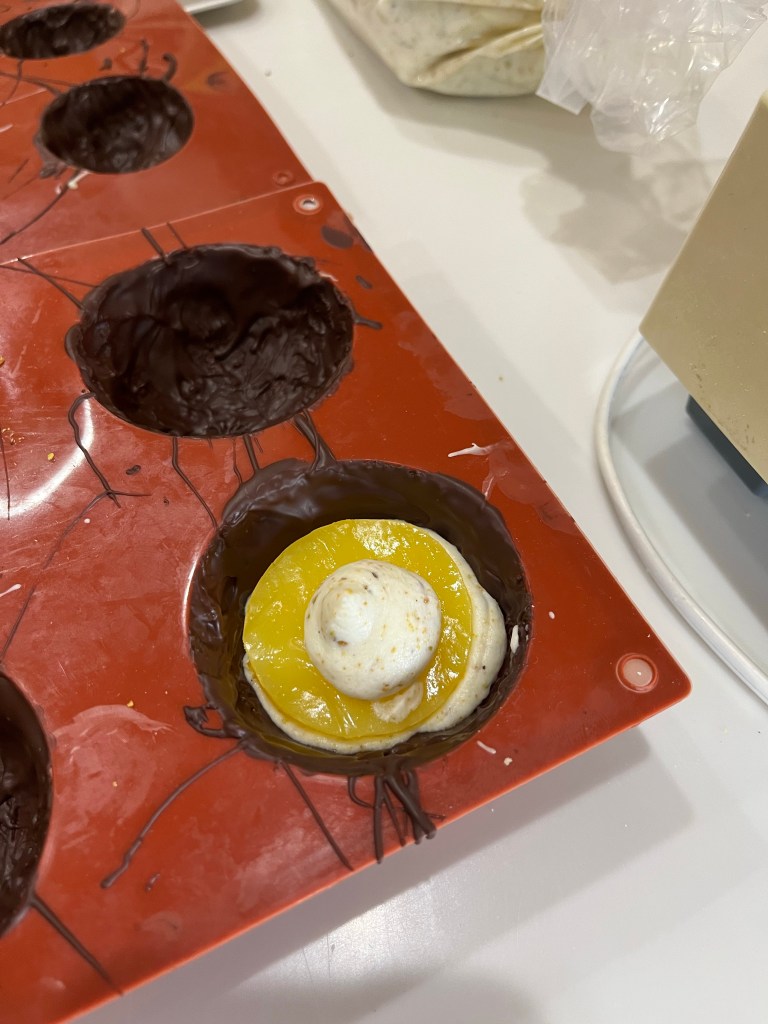
Cutting jelly disks2 sizes of jelly disksWhite chocolate streaked silicone moldTempering chocolateCoating silicone moldsSecond coat assures a well coated moldMousse filled moldsAdd biscuit to moldAdd mousse on top of biscuitSealed Jaffa domed “cake”Completed Jaffa domed dessert
The orange paired nicely with the chocolate but the combination of those flavors overpowered the pistachio. I made some plain pistachio cookies with leftover dough and they were excellent. To make the pistachio cookies leave the rolled dough about 1/4” thick.
JAFFA DOME “CAKE”
Procedure Outline:
Make orange jelly 1/8” thick – refrigerate
Make whipped cream – refrigerate
Streak silicone molds with melted white chocolate – allow to cool
Coat white chocolate streaked silicone molded with tempered dark chocolate – 2x – allow to cool between each coating
Make pistachio biscuit 1/8” thick – allow to rest a couple of minutes a. While warm, cut into appropriately sized disks to fit in silicone molds – b. allow to cool. They should snap like a biscuit.
Make vanilla mousse
Fill domes ~ ¼ full with mouse (piping is easiest)
Insert appropriately sized cut disk of orange jelly into each mold
Cover jelly with vanilla mousse
Fit pistachio biscuit over bottom of mold
Cover biscuit with vanilla mousse
Pipe tempered chocolate around the edge of the bottom.
Cover bottom with a layer of tempered dark chocolate – approx 1/8” thick.
(Note: my orange jelly and biscuit were too thick (1/4” each) so I reduced the amount of mousse in each cup and couldn’t cover the bottom of the dome with chocolate. The directions reflect appropriate changes. Next time!)
Orange Jelly
INGREDIENTS
600 ml (2½ c) Orange juice, about 5-6 oranges
Orange zest from 3 oranges
50 g ( ¼ c) Sugar
¼ teaspoon Salt
65 g( ½ c) Cornstrach METHOD
Grease 9-inch (24cm) square pan or similar size pan with oil and set aside.
Zest two oranges and place it in a sauce pan.
Squeeze the juice from the oranges and measure 2½ cups (600ml). pour the juice into the pan. Add the sugar, salt and cornstarch.
Place the saucepan over medium heat and cook, stirring constantly until thickened, about 6-8 minutes.
Pour the mixture into prepared pan, spread to 1/8” thick, allow to cool to room temperate, then refrigerate for at least 2 hours, or overnight.
Vanilla Mousse – Vegetarian
INGREDIENTS WHIPPED CREAM – YIELDS 1 ½ CUPS OF WHIPPED CREAM • 1 c whipping cream • 4 tbl confectioners sugar • 1 ½ tsp Cream of tartar • 1 tsp vanilla WHITE CHOCOLATE • 1 cup white chocolate chips • 3 tbl whipping cream AGAR AGAR • 2 tsp Agar Agar • 2 tbl warm water
METHOD
WHIPPED CREAM
Before beginning with the recipe, place the mixing bowl and whisk in the freezer for at least 10 minutes to chill.
Once the bowl has chilled, add heavy cream and vanilla and beat on low speed until the cream starts to thicken slightly.
Add the cream of tartar and powdered sugar and beat with increasingly higher speed until stiff peaks form. Once done, set it in the fridge to chill.
AGAR AGAR MIX
Mix 2 tsp Agar agar powder with 2 Tbl lukewarm water
Whisk to combine
Let set 4 – 5 minutes for the agar agar to bloom
VANILLA MOUSSE
Heat the white chocolate in a glass bowl in the microwave. Start with one minute, stir. If not melted try 15 seconds and stir again, then 10 seconds.
Add agar agar mix and stir for 5 minutes. It will be thick like jelly, that’s ok. The white chocolate and agar agar will turn smooth and shiny.
Add 2-5 Tbl warm milk and mix until the chocolate is thick but runny. Don’t add too much
If desired add a few drops of white food coloring to lighten the yellowish mixture and mix well
Gently fold the cool to touch white chocolate [and agar] mixture into the cool whipped cream until combined. Do not beat and deflate the mousse
Add remaining 1/3 cup of ground pistachios and gently fold into vanilla mousse.
Pistachio Shortbread Cookie
INGREDIENTS • 1 cup (230g) unsalted butter, softened to room temperature • 1/2 cup (100g) granulated sugar • 1/4 cup (50g) light brown sugar • 1 teaspoon pure vanilla extract • 1 teaspoon salt • 2 and 1/4 (281g) cups all-purpose flour • 1 cup (100g) finely chopped pistachios, divided
METHOD
Preheat oven to 325°F (163°C). Line a double layer cookie sheet with parchment paper.
Using a hand mixer or a stand mixer fitted with paddle attachment, beat the butter on high speed until completely smooth, about 1 minute. Add the granulated sugar and brown sugar and beat together until smooth and creamy, about 1 minute. Add the vanilla, salt, and flour and beat on low speed, gradually increasing to high speed as the mixture combines. Don’t over mix. Add 2/3 cup of the finely chopped pistachios, reserving the rest to add to the mousse.
Roll the dough out between sheets of parchment paper on the cookie sheet.
Bake the shortbread for 15-20 minutes or until lightly browned on top and around the edges.
Remove from the oven and allow to cool slightly.
Cut appropriate sized circles. Be sure the circles are ¼” less diameter than the molds, allowing 1/8” space around the cookie for chocolate.
I ended up cutting 1/8” bits off the circumference of the large cookies.