Unknown's avatar

About Dave Oney

Dave Oney was born mid last century in Middlebury, Vermont. He received his BS in Chemistry and worked as a polymer chemist in Massachusetts and New Jersey. He became a microscopist (someone who studies little bitty things using a microscope) and photomicrographer (someone who photographs little bitty things) before settling into a 35-year career in technical sales of scientific imaging equipment (the science of digitally recording itty bitty things, sending the image to a computer for analysis.) He designed and created a number of products contributing to this field. He is (was) proficient in several computer languages and is currently working on mastering English. After making a few more paradigm shift career changes Dave and his wife, Fran, retired and moved closer to their children and granddaughters and now live in the foothills of the Sierra Nevadas.

Homemade Fig Cookies

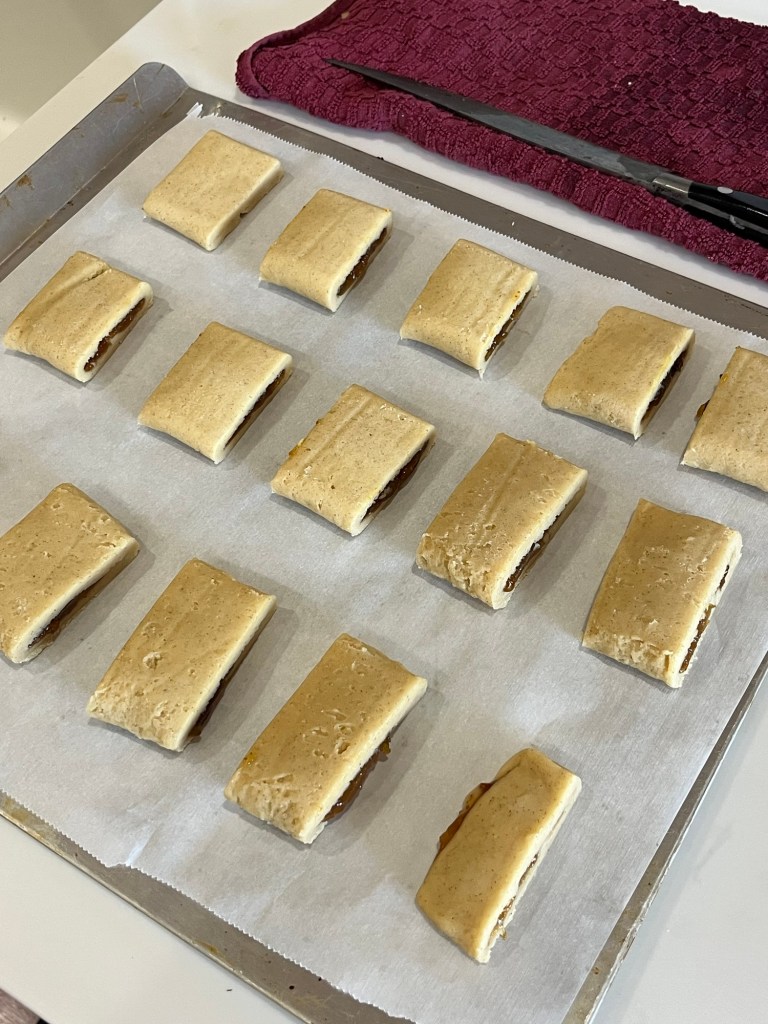
I make these cookies occasionally and love them (almost as much as those 2-serving-packages available commercially.) My issue with mine was it never looked right to seal the dough on the side of the cookie. I saw another method to wrap and seal the fig so today, was a method development bake..

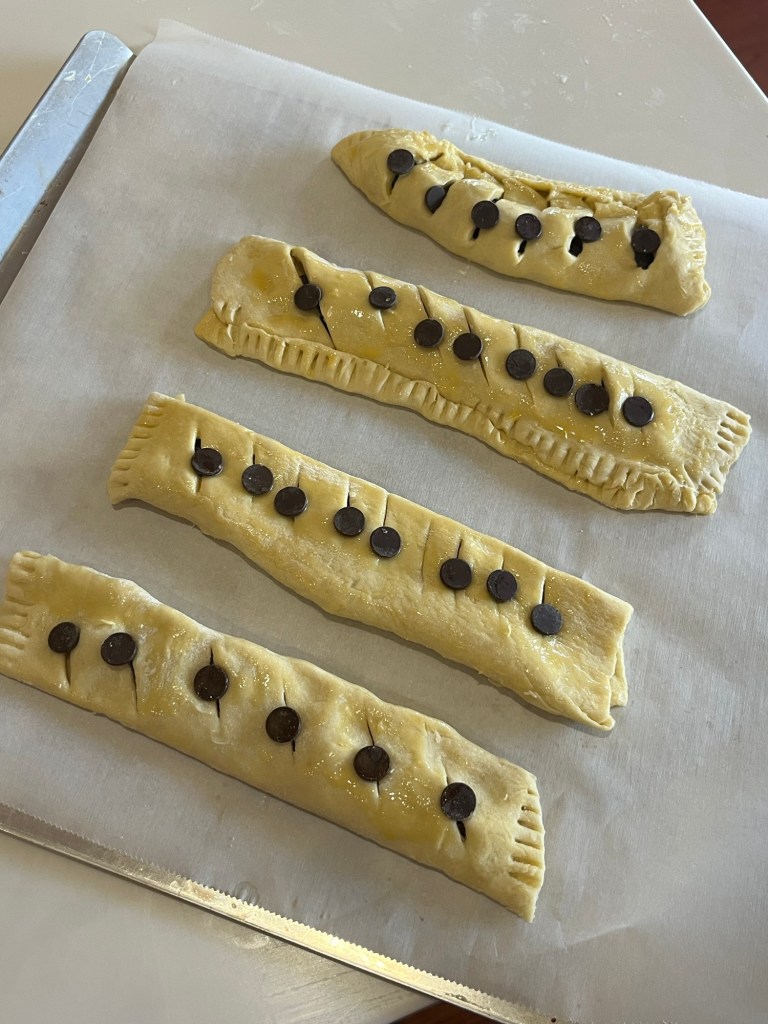
Instead of sealing the dough by pinching the edges together and pressing with the tines of a fork, I wrapped the dough around the fig filling and pressed the edges together on the bottom of the cookie. It took a little thought and work to figure out the mechanics.

The method to make the dough and filling is the same as previously published. One change I will make is to cut the cookies apart after the log is baked. If done when the log is hot, they cut nicely and result in a nice sharp edge, unlike these (right photo) that flowed slightly.

Homemade Fig Cookies – Bookend Fold Seal


INGREDIENTS
• 1 pint fresh or preserved figs or 12 ounces dried figs
• 1 ½ cups AP flour
• ¼ teaspoon baking powder
• ¼ teaspoon salt
• ¼ tsp ground cinnamon
• 1 stick butter
• ⅓ cup sugar
• 1 egg
• 1 teaspoon vanilla extract
• 2 tablespoons orange juice

If you are using:
• Fresh figs: Remove stems and boil figs with 2 cups of sugar in 1 cup of water for 45 minutes. Drain and cool. (This seemed to be too much sugar and water.) Try cutting in half. If too thin, cook down until temp reaches about 210⁰F.
• Dried figs: In a bowl, pour boiling water over figs (stems removed) and let rest 10 minutes. Drain all but 2 tablespoons water and stir in 2 tablespoons corn syrup + ¼ teaspoon cinnamon.
• Preserved figs: Drain syrup.
METHOD

  1. Puree figs in food processor into a thick paste (if too thick or thin to spread evenly, add a little water or flour until spreadable consistency is reached).
  2. Combine flour, baking powder, cinnamon, and salt together and set aside.
  3. Cream butter and sugar in a mixing bowl.
  4. Add egg and vanilla, mix until smooth
  5. Add orange juice and combined dry ingredients to bowl and mix until dough forms.
  6. Divide dough in half and roll into two rectangles ~4”x ~10 x ~½” and chill for 30 min to set butter and make it easier to roll and fold. It’s helpful to make make the rectangles as even as possible to make the next step easier.
  7. Roll dough out between parchment paper into an 5”x14” rectangle ~ ¼” thick.
  8. Return to the refrigerator for another 30 minutes, repeat for the second disk.
  9. Flip rectangle over to release the dough from the parchment paper.
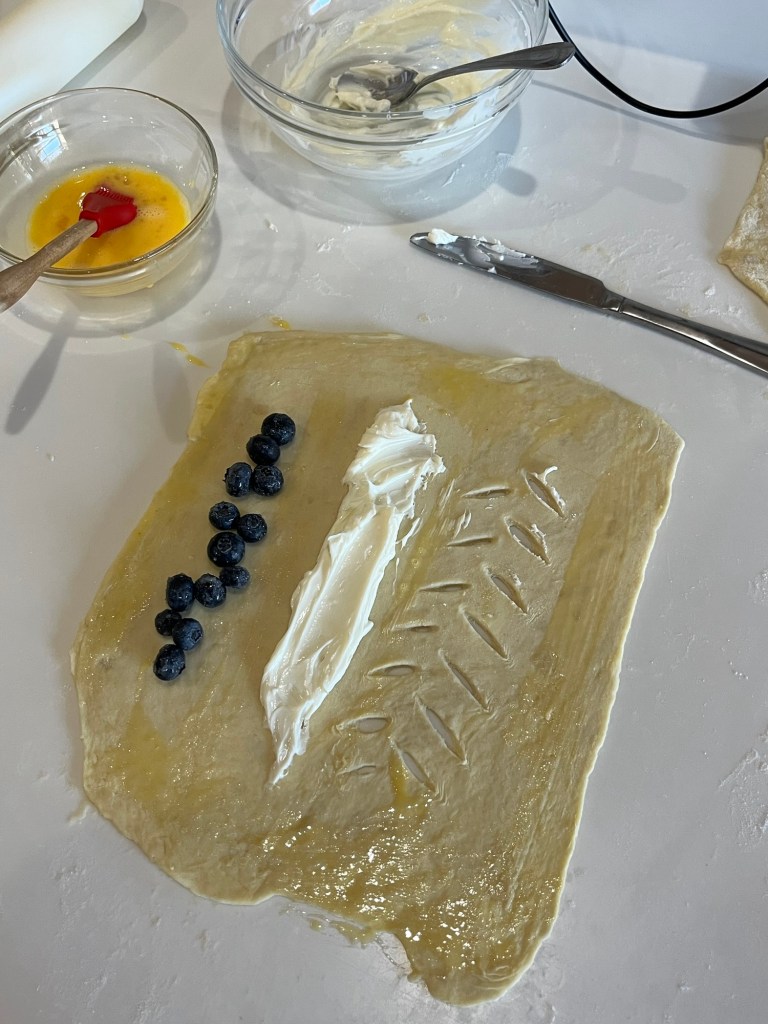
  10. One rectangle at a time, spread fig paste onto the center 1½ ” of each rectangle, lengthwise.
  11. Using the parchment paper to help, fold uncovered dough over fig paste.
  12. Butt the two edges of the dough together and push together to seal then flip the cookie right side up.
  13. Move to a clean piece of parchment paper and place on a baking sheet.
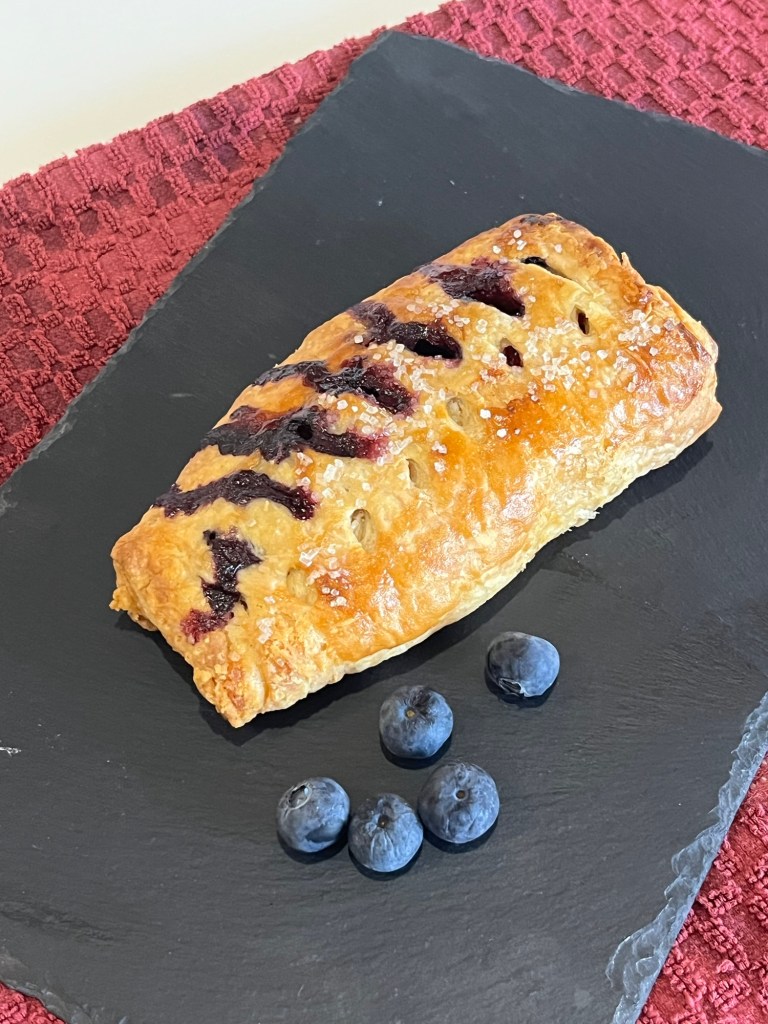
  14. Bake 25 minutes at 350⁰F until crust begins to brown.
  15. While still warm cut each log into 2” pieces

Note:

  1. Try to either spray or lightly flour the parchment paper to help when removing the dough rectangle from the paper.
  2. If necessary wet the edges of the fold over portions of the dough to help seal.

Extreme Chocolate, Chocolate, Chocolate Cake

My instructions for Vivian’s birthday cake were that it was to be a “Chocolate, chocolate, chocolate cake.” This is neither the prettiest or most imaginative cake I have made but it’s the most chocolate.

The cake (#1 chocolate) is my Extreme Chocolate Cake, which is universally loved and complimented, (by me also.) The frosting is new to me, a cream cheese chocolate frosting (#2 chocolate.) It is whipped up into a lighter, less sweet frosting when compared to my usual buttercream frosting. (My fav, however, is Italian Meringue.) The top of the cake is covered with chocolate shards (#3 chocolate) created during my failed attempt to make chocolate tubes. To be continued.

Around the bottom of the cake are shortbread cookies, shaped like 7’s with a chocolate foot (#4 chocolate.) Mission accomplished and she was very happy. (Me too.) There is also a golden shortbread trophy on the top as a result of her fabulous year swimming.

Extreme Chocolate Cake

Makes two 9” round cakes and can be scaled up, as this cake was
INGREDIENTS
• 2 cups white sugar
• 1 3/4 cups all-purpose flour
• 3/4 cup unsweetened cocoa powder
• 1 1/2 teaspoons baking soda
• 1 1/2 teaspoons baking powder
• 1 teaspoon salt
• 2 eggs
• 1 cup milk
• 1/2 cup vegetable oil
• 2 teaspoons vanilla extract
• 1 cup boiling water

METHOD

  1. Preheat oven to 350⁰F (175 degrees C). Grease and flour two 9 inch cake pans.
  2. Use the first set of ingredients to make the cake. In a medium bowl, stir together the sugar, flour, cocoa, baking soda, baking powder and salt. Add the eggs, milk, oil and vanilla, mix for 3 minutes with an electric mixer. Stir in the boiling water by hand. Pour evenly into the two prepared pans.
  3. Bake for 30 to 35 minutes in the preheated oven, until a toothpick inserted comes out clean or 205⁰F internal temp. Cool for 10 minutes before removing from pans to cool completely.

Chocolate Cream Cheese Frosting – Sally

INGREDIENTS
• 339g (12 oz) full-fat brick cream cheese, softened to room temperature*
• 170g (¾ c; 12 Tbl) unsalted butter, softened to room temperature
• 420g (3½ c) confectioners’ sugar
• 55g (⅔ c) unsweetened natural or dutch-process cocoa powder
• 1 tsp pure vanilla extract
• 1–2 tbl heavy cream
• pinch salt

METHOD

  1. In a large bowl using a stand mixer fitted with a paddle or whisk attachment, beat the cream cheese for 1 minute on high speed until completely smooth and creamy.
  2. Beat in the butter until combined. Add the confectioners’ sugar, cocoa powder, vanilla extract, 1 Tablespoon milk, and salt and beat on medium-high speed until combined and creamy.
  3. Add 1 more Tablespoon of milk to slightly thin out, if desired. Taste, then add another pinch of salt if desired.
  4. Cover and store leftover frosting for up to 5 days in the refrigerator or up to 3 months in the freezer. After freezing, thaw in the refrigerator then beat the frosting for a few seconds so it’s creamy again.

Notes

  1. Make Ahead Instructions: Cover and store leftover frosting for up to 5 days in the refrigerator or up to 3 months in the freezer. After freezing, thaw in the refrigerator then beat the frosting for a few seconds so it’s creamy again.
  2. Tip for Piping Cream Cheese Frosting: Refrigerate the frosting inside the piping bag for at least 30 minutes prior to piping. Cream cheese frosting holds its shape much better when it’s piped cold.
  3. This recipe is enough to frost 18-24 cupcakes, one 9×13-inch sheet cake, or one 3 layer cake.

Chewy Chocolate Chip Cookies – Sally

Sometimes you think something couldn’t be improved, but in this case you would be so wrong. I was about to make a new (to me) recipe of Tahini chocolate chip cookies when Sally sent out her recipe. Stand aside Tahini there is a new cookie in town

These cookies are thicker and are more cohesive than my standard Nestles recipe. It shows to go, even childhood favorites (until today,) can be replaced.

Chewy Chocolate Chip Cookies – Sally

INGREDIENTS
• 281g (2 ¼ c) all-purpose flour
• 1 teaspoon baking soda
• 1 ½ teaspoons cornstarch
• 1/2 teaspoon salt
• 170g (12 Tbl) unsalted butter, melted & cooled for 5 minutes
• 150g (3/4 c) packed light or dark brown sugar
• 100g ( ½ c) granulated sugar
• 1 large egg + 1 egg yolk, at room temperature
• 2 teaspoons pure vanilla extract
• 225g (1 ¼ c) semi-sweet chocolate chips or chocolate chunks

METHOD

  1. In a large bowl, whisk the flour, baking soda, cornstarch, and salt together. Set aside.
  2. In a medium bowl, whisk the melted butter, brown sugar, and granulated sugar together until no lumps remain. Whisk in the egg and egg yolk until combined, then whisk in the vanilla extract. The mixture will be thin. Pour into dry ingredients and mix together with a large spoon or spatula. The dough will be very soft, thick, and shiny. Fold in the chocolate chips. The chocolate chips may not stick to the dough because of the melted butter, but do your best to combine them.
  3. Cover the dough tightly and refrigerate for at least 2 hours or up to 3 days. I highly recommend chilling the cookie dough overnight to prevent overspreading.
  4. Preheat oven to 325°F. Line large baking sheets with parchment paper or silicone baking mats. If the dough has chilled for longer than 2 hours, let it sit at room temperature for about 15 minutes.
  5. Using a cookie scoop or Tablespoon measuring spoon, scoop the chilled cookie dough, about 3 scant Tablespoons (about 2 ounces, or 60g) of dough for XL cookies or 2 heaping Tablespoons (about 1.75 ounces, or 50g) of dough for medium-large cookies. Roll into a ball, then use your fingers to shape the cookie dough so that it’s taller rather than wide—almost like a cylinder. This helps the cookies bake up thicker. Repeat with remaining dough. Arrange the cookies 3 inches apart on the prepared baking sheets.
  6. Bake the cookies for 13–14 minutes or until the edges are very lightly browned. The centers will look very soft, but the cookies will continue to set as they cool. Cool on the baking sheet for 10 minutes before transferring to a cooling rack to cool completely. While the cookies are still warm, I like to press a few more chocolate chips into the tops—this is optional and only for looks!
  7. Store tightly covered at room temperature for up to 1 week.

Feuillete au Chocolat

Another desirable looking (and delicious) pastry at Paris Baguette is this Feuillete au Chocolat. This is my first attempt to make something similar. It was very good, but will take a couple of more practice to bakes for me to be satisfied. (Oh darn!)

Feuillete au Chocolat translates as Chocolate Puff Pastry. More accurately feuillete translates to “leaf through” which is a pretty accurate description of puff pastry, (especially when it is this good and flaky.)

Feuillete au Chocolat

INGREDIENTS
• Puff Pastry
• High Quality dark chocolate callets
• 1 egg for wash
For pastry glaze
• ¼ c water
• ¼ c sugar
• ¼ c corn syrup

METHOD

  1. Roll puff pastry to a 6”X24”rectangle then cut into four 6”x8” pieces. Most important is the dough must be ~ 1/16” thick. If the dough shrinks back cover it and let it rest 5 minutes to allow the gluten to relax.
  2. Place a row of chocolate 1” from one side, then cut 6 slits ~1” long at and angle and centered between the row of chocolate and the edge of the pastry. Do not cut through the edge (away from the chocolate) of the pastry.
  3. Trim the pastry above and below the chocolate leaving ~ ½ “ of dough.
  4. Fold the wide edge of pastry over so the slits will align with the chocolate. Leave the excess pastry loose and refrigerate while the oven pre-heats to 400⁰ F.
  5. Once the oven is at 400⁰ F remove the pastries from the refrigerator, flip over and egg wash the perimeter of the loose flap before folding it over the bottom of the pastry and above and belo the chocolate row. Press firmly to seal.
  6. Flip pastry over, egg wash and sprinkle sparkling sugar on top.
  7. Bake 30 minutes, tenting after 20 minutes if the pastry is darkening.

Next Step – make pastry custard and spread a line under where the chocolate will go. There is some disagreement over whether you should use crème patisserie or custard. Experimentation awaits. Even without the custard this pastry was wonderful.

SallysBakingAddiction Rough Puff Pastry

I keep referring to Sally’s Rough Puff Pasty but I made a few changes to reflect my personal quirks and how I use the recipe. Here is my version, which is, of course Sally’s.

Rough Puff Pastry – Sally


INGREDIENTS
• 166 g (1⅓ c) all-purpose flour, plus more for flouring hands, surface, and dough
• 1 tsp granulated sugar
• ½ tsp salt
• 170 g (¾ c or 1½ sticks) unsalted Kerry Gold butter, very cold and cubed
• 6–8 Tbl ice cold water

METHOD

  1. Cut the butter into ~1/4” cubes return to the fridge to chill.
  2. Whisk the flour, sugar, and salt together in a large bowl. Place the cold and cubed butter on top. Gently toss the flour and butter together with your hands, and then briefly rub the butter into the flour to begin combining. Do not break down the butter too much in this step. This step is only possible if the butter is very cold.
  3. Begin adding the ice cold water 1 Tablespoon at a time until dough forms 1 large shaggy clump with big chunks of butter in your bowl. Use your hands to toss the mixture together after you add each Tablespoon. (Start with 2 Tablespoons of water before tossing together.) As the dough begins to hydrate after about 4 Tablespoons of water, you can start lightly squeezing or clumping the dough together with your hands to help bring it together. Mixture will still be very shaggy. If your dough feels sticky and wet before adding 6 Tablespoons of water, your butter was likely too warm– you can continue with the recipe, but the dough will not be as flaky.
  4. Pour the shaggy clump of dough out onto a lightly floured work surface. There will still be large chunks of butter at this point and that’s a good thing. Begin patting the dough down with lightly floured hands until it’s ¾ – 1” thick, about a 5×8” rectangle. Fold the dough into thirds as if you were folding a business letter. Use your hands to gently flatten and smooth out any cracks in your dough. Wrap it up tightly in plastic wrap.
  5. 1st refrigeration: Refrigerate dough for at least 2 hours and up to 24 hours.
  6. Roll & Fold: Take the dough out of the refrigerator to begin the “rolling and folding” process. If the dough chilled for longer than about 3 hours, it’s likely very stiff so let it rest for about 5 minutes before you begin rolling. Lightly flour a work surface. The dough gets sticky, so make sure you have more flour nearby as you roll and fold. Use your hands to gently flatten the dough into a small square. Using a rolling pin, roll the dough into a 6”×12”x ½” thick. The exact dimensions are not important, but the thickness is. As you roll, it’s best to flip the dough over once or twice to make sure it’s not sticking to your work surface. Lightly flour your work surface as needed. Fold the rectangle into thirds as if it were a business letter. Turn it clockwise or counter clockwise and roll it out into a 6”×12”x ½” thick rectangle again. Then, fold into thirds again. Turn it clockwise or counter clockwise. You’ll repeat rolling and folding 4 more times for a total of 6 times.
  7. 2nd Refrigeration: Wrap up/seal tightly and refrigerate for at least 15 minutes and up to 24 hours before using in your recipe. You can also freeze the dough at this point. See freezing instructions.
  8. Use wherever you would use frozen store-bought puff pastry. To bake plain, roll pastry dough into a 10×16” rectangle and cut into desired portions. Fill if desired, and paint with an egg wash (1 egg beaten with 1 Tbl water.)
  9. Bake 400°F until golden brown and puffy, about 25-28 minutes.

NOTES

  1. Make Ahead & Freezing Instructions: Prepare as instructed in steps 1-3. At this point the dough can be refrigerated up to 24 hours (see step 4). You can also prepare the dough through step 5. At this point the dough can be refrigerated for up to another 24 hours (see step 6).
  2. During or after this second chilling time, you could also freeze the dough for up to 1 month. (I don’t recommend freezing the dough before the rolling and folding step.) Thaw overnight in the refrigerator before using in a recipe that calls for 1 lb puff pastry dough (or 1 store-bought package with 2 sheets puff pastry).

Blueberry and Cream Cheese Pastry

Our son, Neil was visiting from Seattle for Vivian’s birthday this weekend, which provided an excellent excuse (as if I needed one) tp practice making puff pastry and creating the method of this pastry.

I bought a “professionally prepare” blueberry and cream cheese pastry at Paris Baguette and it was delicious. Today, I made my version of the same pastry and while not professional looking, it was delicious as well.

I have to say that SallysBakingAddiction’s directions to make rough puff pastry are tremendous. This is now my go-to puff pastry. Yes, it takes longer than running to the market an buying some, but it is more satisfying to make it, and most the time is a result of chilling and resting the dough during the process.

Blueberry and Cream Cheese Pastry

INGREDIENTS
• One 9”x9” sheet of puff pastry
• 60g ( ¼ c) cream cheese
• 1 Tbl + 1 tsp (divided) sugar
• 60g Blueberries
• 1 egg for egg wash
Clear Glaze
• ¼ c water
• ¼ c sugar
• ~¼ c corn syrup
METHOD

  1. Toss the blueberries with the teaspoon of sugar in a small bowl and set aside,
  2. Mix the cream cheese and the tablespoon of sugar in a small bow and mix to combine into a smooth paste.
  3. On a lightly floured workspace roll puff pastry out into a 9”x9” sheet. If it shrinks back, cover and let it rest a few minutes then continue rolling. Dust the pastry with flour, flipping several times as it’s rolled to ~ 1/16 “ thick
  4. Place a row of blueberries ~1” from one edge of the pastry then spoon a row of cream cheese/sugar mixture ~1” from the blueberries.
  5. Cut 6 parallel slits at an angle ~1” from the cream cheese and a second row of slits, herringbone angled opposite the first row of slits.
  6. Fold the puff pastry over the rows of cream cheese and blueberries such that one row of slits covers the blueberries and the other covers the cream cheese. There should be a 1-2” “flap” of pastry extending beyond the edge near the blueberries.
  7. Refrigerate for 15-20 minutes until the pastry is firm enough to manipulate. This is a good time to preheat the over to 400 ⁰F
  8. Remove pastry from the refrigerator and flip over on its top. Egg wash the flap and ends of the pastry and press firmly to seal onto what will be the bottom of the pastry. Press the ends together and trim as desired.
  9. Flip the pastry right side up and egg wash the top and sprinkle with sparkling sugar.
  10. Bake at 400⁰ F on a lower oven rack. After 20 minutes it may be necessary to tent the pastry with aluminum foil to prevent excessive browning as the bottom, thicker, layer of the pastry bakes.
  11. Mix sugar and water and bring to a rolling boil. Once the sugar is completely dissolved transfer to a heat proof bowl, combine ¼ cup of the mixture with ¼ c of corn syrup and mix well.
  12. Brush mixture onto the pastry and let dry to a shiny, non sticky surface.

Note:
I make SallysBakingAddiction rough puff pastry. It is easy to make and while mostly rest and chilling, time consuming results in a beautiful puff pastry that rivals any commercially available product. (Incidentally, I use Kerry Gold high fat content butter.)

Fresh Peach Cobbler- Sally

My neighbors, Donna and Alex (QC Cadre members,) gave me some huge peaches from their tree. I could barely finish the smallest so I decided to use two pounds of the rest to make Sally’s Fresh Peach Cobbler. Her recipe calls for about four pounds which would be baked in a 9”x13” dish, so I scaled it in half, used two pounds and used a 8”x8” dish. (I knew a full recipe would be too much for us to eat.)

Other than the scaling down I followed the recipe exactly and it was (and still is) delicious.

Fresh Peach Cobbler- Sally

INGREDIENTS
Peach Filling
• 0.9kg (~2 lbs) fresh peaches, peeled and cut into 1- to 1.5-inch chunks
• 25g (⅛ c) packed light or dark brown sugar
• ½ Tbl cornstarch
• 8ml (½ Tbl) fresh lemon juice
• ½ tsp pure vanilla extract
• ¼ tsp ground cinnamon
• 1/16 tsp ground nutmeg
• 1/16 tsp ground ginger
• 1/16 tsp salt
Biscuit Topping
• 125g (1 c) all-purpose flour
• 50g (½ c) granulated sugar
• ¾ tsp baking powder
• 1/8 tsp baking soda
• ¼ tsp salt
• 56g (1/8 c; 4 Tbl) unsalted butter, cold and cubed
• ¼ cup (120ml) buttermilk, cold*
• egg wash: 1 large egg beaten with 1 Tablespoon (15ml) milk or buttermilk
• optional: 2 Tablespoons (25g) granulated sugar mixed with 1/2 teaspoon ground cinnamon

METHOD

  1. Preheat oven to 350°F (177°C). Lightly grease a 9×13-inch baking pan. Any 3- to 4-quart baking dish works.
  2. For the filling: Mix all of the filling ingredients together in a large bowl, then spread into the baking pan. Bake for 10 minutes. Remove from the oven and set aside as you prepare the topping. Keep the oven on.
  3. For the topping: Whisk the flour, sugar, baking powder, baking soda, and salt together in a large bowl. Using a pastry cutter or 2 forks, cut in the cold butter until the mixture resembles coarse pea-sized crumbles. A pastry cutter makes this step very easy and quick! You could also pulse in a food processor. Pour in the buttermilk, and gently mix until evenly combined. Dough should be slightly sticky once completely combined, but if it’s too dry, add 1 more Tablespoon of buttermilk.
  4. Assemble the cobbler: Take handfuls of dough and use your hands to gently flatten out into patties. Place dough all over the top of the warm peach filling. There’s no special trick to this—just flatten the dough in sections and cover most of the peaches.
  5. Brush the top of the biscuit dough with egg wash, then sprinkle with cinnamon-sugar, if using.
  6. Bake for 40–50 minutes, or until the biscuit topping is golden brown and peach filling is bubbling around the edges. To test for doneness, stick a toothpick into the biscuit topping; if it comes out clean, it’s done.
  7. Remove cobbler from the oven, and set the pan on a cooling rack. Cool for 5 minutes before serving. Serve warm with vanilla ice cream or whipped cream.
  8. Cover and store leftovers in the refrigerator for up to 5 days.

New Jersey Crumb Cake

QC wanted a New Jersey Crumb Cake and who am I to object? She asked for a layer of apples sandwiched between the cake and crumble topping. It was suggested, next time, to make the layer of apples thicker, so I adjusted the recipe accordingly.

The finished cake was quite sweet, due to the very thick layer of crumble topping, (no complaint, just fact.)

The overall cake was very good and well worth making again.

New Jersey Crumb Cake

INGREDIENTS
Topping
• 1 ½ c brown sugar
• 1 ½ Tbl ground cinnamon
• ¾ tsp kosher salt
• 2 ¼ c cake flour
• ¾ c RT butter melted (1 ½ sticks)
• 2 sweet apples, sliced ¼” thick
Cake
• 1 ½ cups all-purpose flour
• ½ c sugar
• 2 tsp baking powder
• ¼ tsp baking soda
• ½ tsp kosher salt
• 1 RT large egg
• ½ c RT buttermilk
• Spray canola oil
• 2 tsp vanilla
• Confectioners sugar

METHOD
Preheat oven to 325°

  1. Cut 16-inch length parchment paper or aluminum foil and fold lengthwise to 8-inch width. Cut excess. Spray 9-inch square baking pan with nonstick cooking spray and fit parchment into pan, pushing it into corners and up sides.
  2. Let excess paper hang over the sides of the pan. Affix to the sides of the pan with metal binder clips. Spray the piece of parchment paper and repeat with a piece of parchment laying in the opposite direction.
    Crumb topping
  3. Whisk sugar, cinnamon, salt, and all purpose flour in medium bowl to combine. Add melted butter and mix with sturdy rice paddle or wooden spoon until mixture resembles thick, crumbly dough. Refrigerate while you make the cake batter.
    Cake batter
  4. Sauté apples to at denté in a frying pan with 1 tablespoon butter
  5. Whisk flour, sugar, baking powder, baking soda, and kosher salt together in a medium bowl. Set aside.
  6. Mix buttermilk, vanilla and egg until combined.
  7. Pour the wet ingredients into the dry ingredients and fold until just combined.
    Assemble and bake
  8. Transfer the batter to the prepared pan. Spread evenly.
  9. Add sautéed apples evenly in two layers across the batter.
  10. Break crumb topping apart, with your fingers, into pea-sized and slightly larger pieces and spread in even layer over batter, beginning with edges and then working toward center. It will seem like a lot of topping, but it’s worth it!
  11. Bake for 40 to 45 minutes, or until a toothpick comes out clean, rotating the pan after 20 minutes then continue baking.
  12. Let cool at least 15 minutes. Remove cake from pan by lifting parchment overhang. Dust powdered sugar over the top of the cake.

Black Chocolate Cookies

I find it hard to believe I never posted theses Black Chocolate Cookies. They are among our favorite 5… um… 6…um… 10, yeah thats the ticket. They are among our 10 favorite cookies.

KAB says “black cocoa powder is ultra-Dutch processed, meaning it is treated with an alkaline solution to reduce its acidity. This gives it a smooth texture, dark color, and unsweetened-chocolate highlights.”

Whatever the reason, we really, really, really like these cookies.

Black Chocolate Cookies

INGREDIENTS
• 1 ½ cups (195g) AP flour
• ¾ cup (70g) unsweetened black cocoa powder
• 1 teaspoon baking soda
• ¼ teaspoon kosher salt
• ½ teaspoon espresso powder
• 1 stick (110g) unsalted butter, room temperature
• ¾ cup (150g) sugar
• 1 large egg
• 1 ½ teaspoons vanilla
• 1 teaspoon molasses

METHOD

  1. In a large bowl, vigorously whisk together the flour, cocoa, baking soda, salt, and espresso powder.
  2. Cream the butter and sugar until light and fluffy, (2-3 min on medium.)
  3. Beat in the egg, vanilla, and molasses.
  4. Add the dry ingredients to the wet in 3 additions. When well mixed, remove the dough from the mixer, and form it into a ball. It should have the consistency of soft clay. If it’s stiff and unmanageable, massage some water into it, a tablespoon at a time until easily pliable.
  5. Wrap it in plastic wrap, and chill it in the refrigerator for at least one hour.
  6. When you are ready to roll-out the dough, preheat the oven to 350°F (175° C). Break off a chunk of dough from the ball of dough (about a quarter of it) and place it between two pieces of parchment paper. Use a rolling pin to roll the dough out to an even 1/2-inch thickness.
  7. Use a cookie cutter or the rim of a small glass to cut out cookie shapes from the rolled out dough. Place on a parchment paper or silicone-lined baking sheet, allowing at least 1 inch between cookies on the cookie sheet.
  8. Bake at 350°F (175° C) in the middle rack for 12 to 14 minutes, less or more, depending on the size and thickness of the cookies.
  9. The cookies should bounce back when you press on their centers and be a little dark around the edges. When cool, they should be crispy.
  10. Remove from oven and let cool for 5 minutes before removing the cookies from the tray to cool on a rack.

Back Home Day 2 in Dede’s Bakery

While we were away my blackberry bushes flourished. I needed 6 cups to make a blackberry pie, but only harvested 4 cups from the bushes this morning. Luckily, I had 2 cups of fresh frozen raspberries in the freezer, so I compromised my desired blackberry pie into a “berry” pie. It’s all good.

Don’t be afraid or intimidated by the thought of making a delicious, flaky pie crust. John Kanell’s Preppy Kitchen will calm your nerves. Every time I made this pie crust, including the very first time, the result was a perfect crust, and a perfect companion to any pie.

I also had one sheet of puff pastry left over from a bake prior to our Vermont trip and needed to use it up. At my brothers we were fortunate enough to sample some traditional Portuguese palmiers, which are puff pastry coated with granulated sugar, rolled and baked. Once again John Kanell solved my problem with a spare piece of puff pastry.

I need to remember to use the convection oven to achieve a more even bake.