While we were away my blackberry bushes flourished. I needed 6 cups to make a blackberry pie, but only harvested 4 cups from the bushes this morning. Luckily, I had 2 cups of fresh frozen raspberries in the freezer, so I compromised my desired blackberry pie into a “berry” pie. It’s all good.
Don’t be afraid or intimidated by the thought of making a delicious, flaky pie crust. John Kanell’s Preppy Kitchen will calm your nerves. Every time I made this pie crust, including the very first time, the result was a perfect crust, and a perfect companion to any pie.
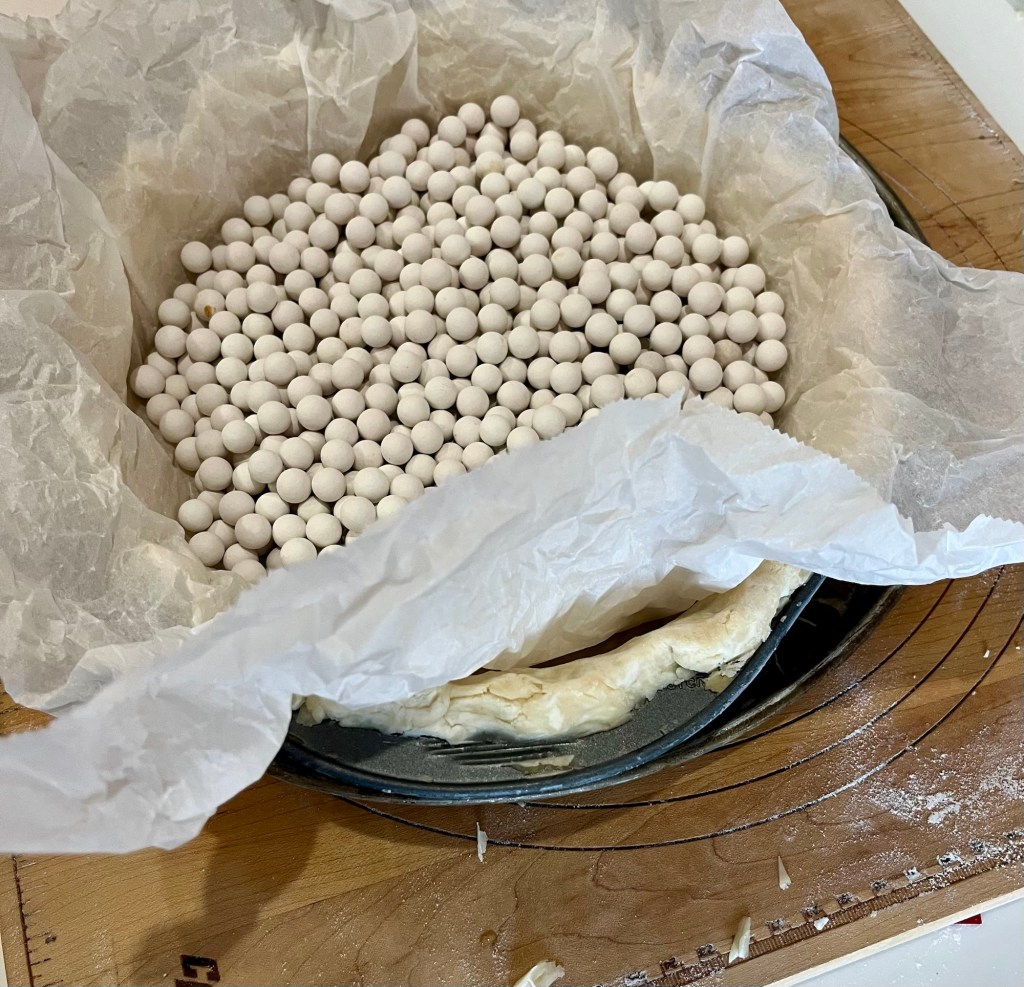
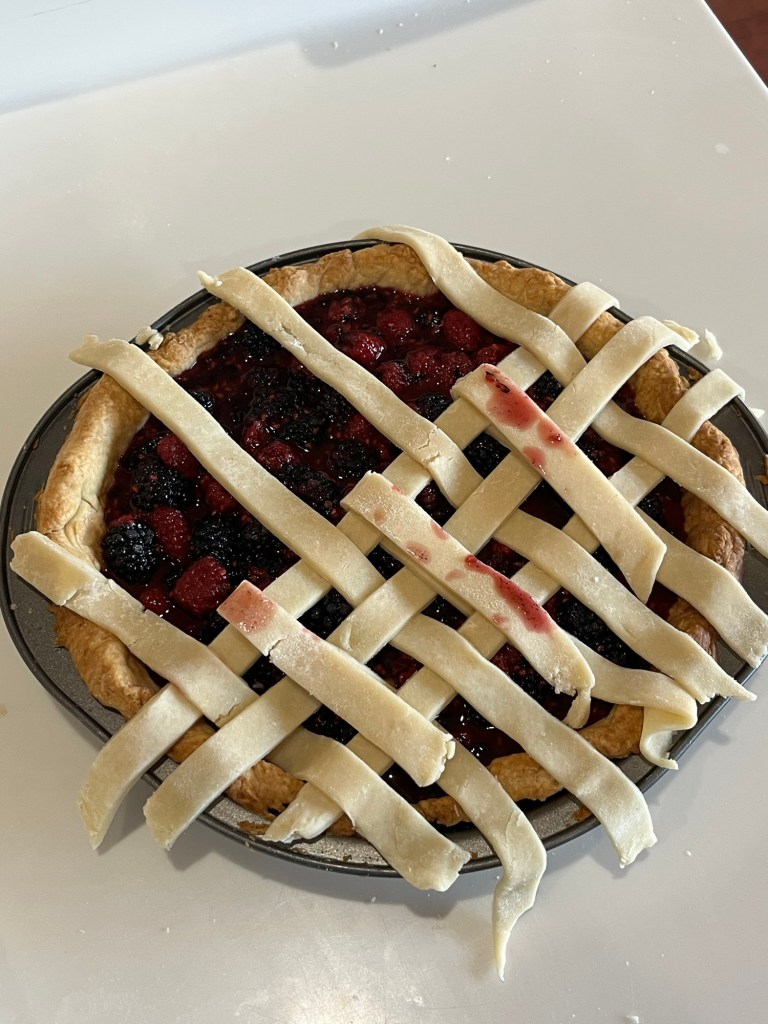
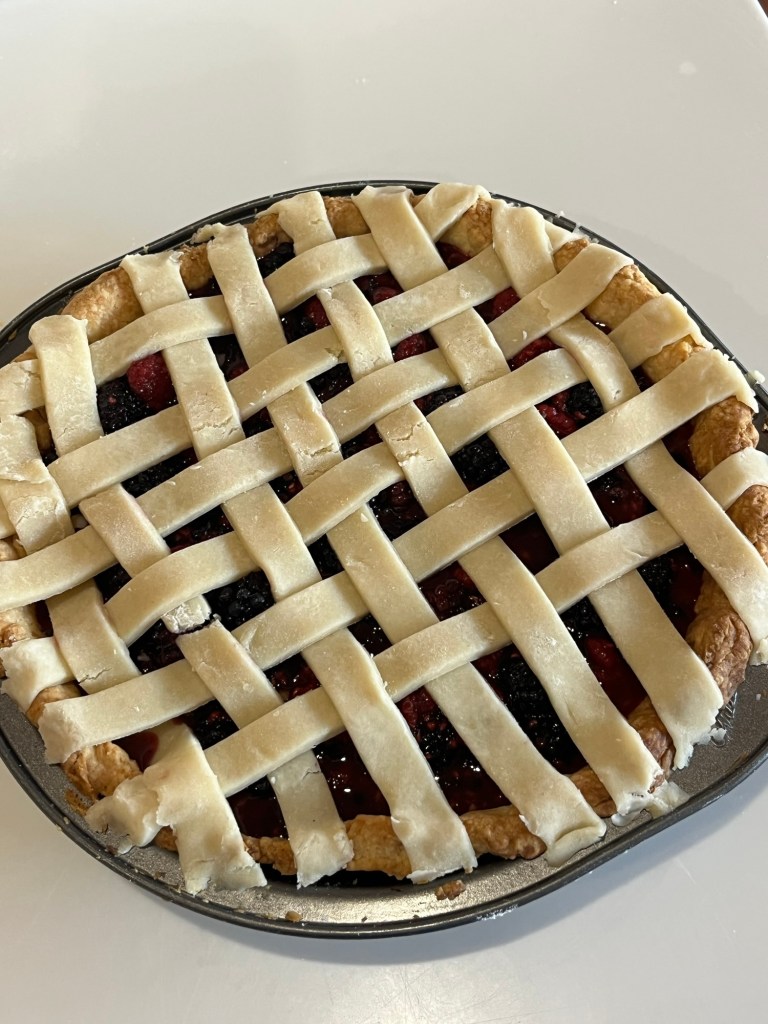
This is all you needPlus some pie weightsTo make a perfect pie crustWhich can be filled with whatever you want.Fresh berriesMixed berries with other pie stuffMaking the lattice topCompleted lattice topCompleted pie
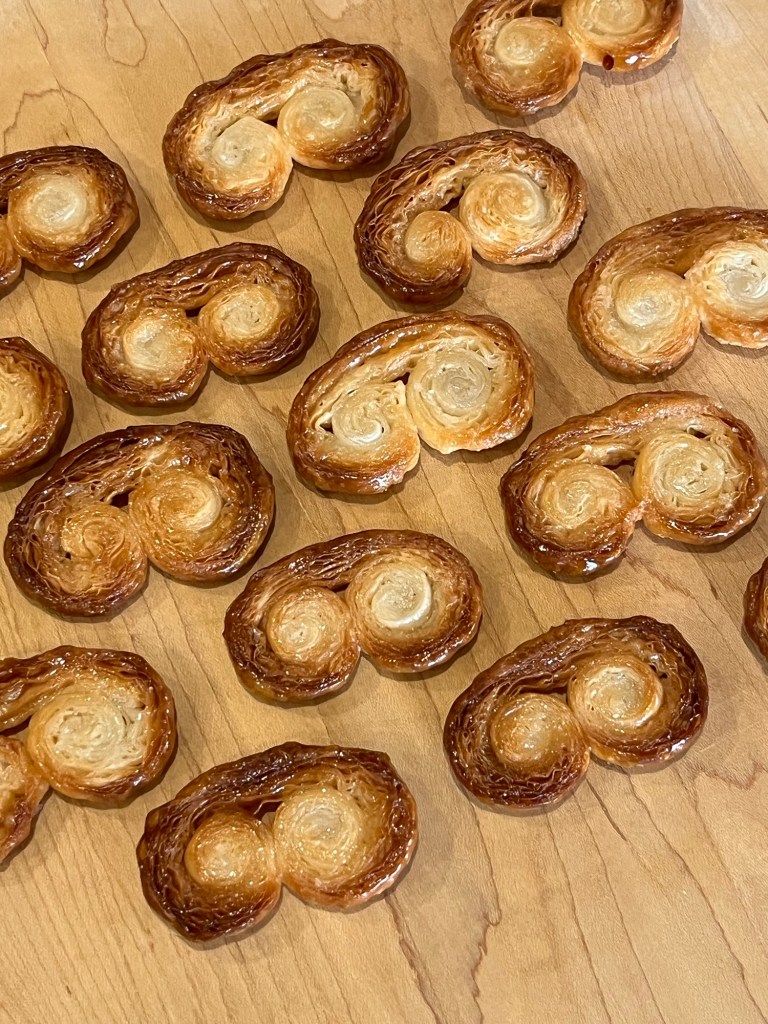
I also had one sheet of puff pastry left over from a bake prior to our Vermont trip and needed to use it up. At my brothers we were fortunate enough to sample some traditional Portuguese palmiers, which are puff pastry coated with granulated sugar, rolled and baked. Once again John Kanell solved my problem with a spare piece of puff pastry.
I need to remember to use the convection oven to achieve a more even bake.
Traditionally we have pizza on Pi Day, but other, more important obligations interfered with tradition. Instead, I made Berry Hand Pies (Blueberry and Raspberry) and while not pizza, they didn’t disappoint.
Berry hand pies are a piece of cake. (Sorry, I couldn’t resist.)
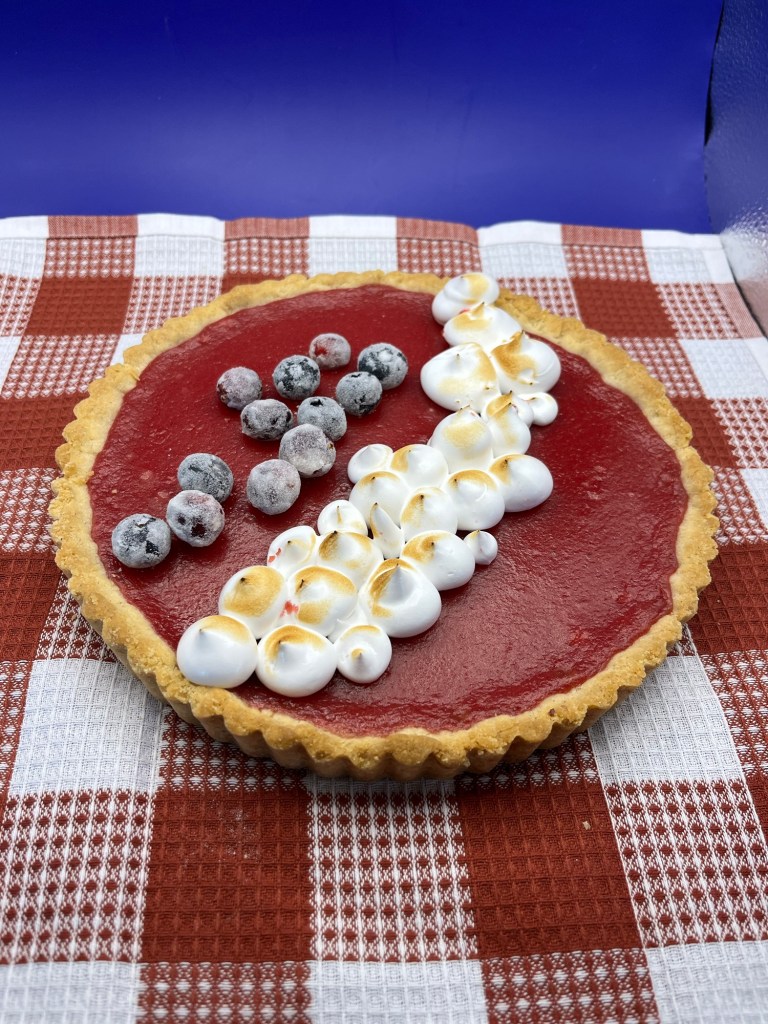
By special invitation is my almond-crust-cranberry-curd tart.
Today is Thanksgiving in the USA . Thanksgiving is a national holiday celebrating the harvest and other blessings of the past year. It is believed to be modeled on a 1621 harvest feast shared by the English colonists (Pilgrims) of Plymouth and the Wampanoag people.
For my whole life Thanksgiving centered around family and friends, old and new, sharing both a meal and each other. As a child Thanksgiving was held at our house and all our aunts, uncles and cousins would come for a huge mid-day meal. We had to finish early as our uncles had to go back to the farm to milk the cows. I had a lot of aunts and uncles and LOTS of cousins. Mostly I remember the pies, so many pies.
Since moving to California our son and daughter in law have hosted Thanksgiving and this year was no exception. There were over 20 people and enough food for 50.
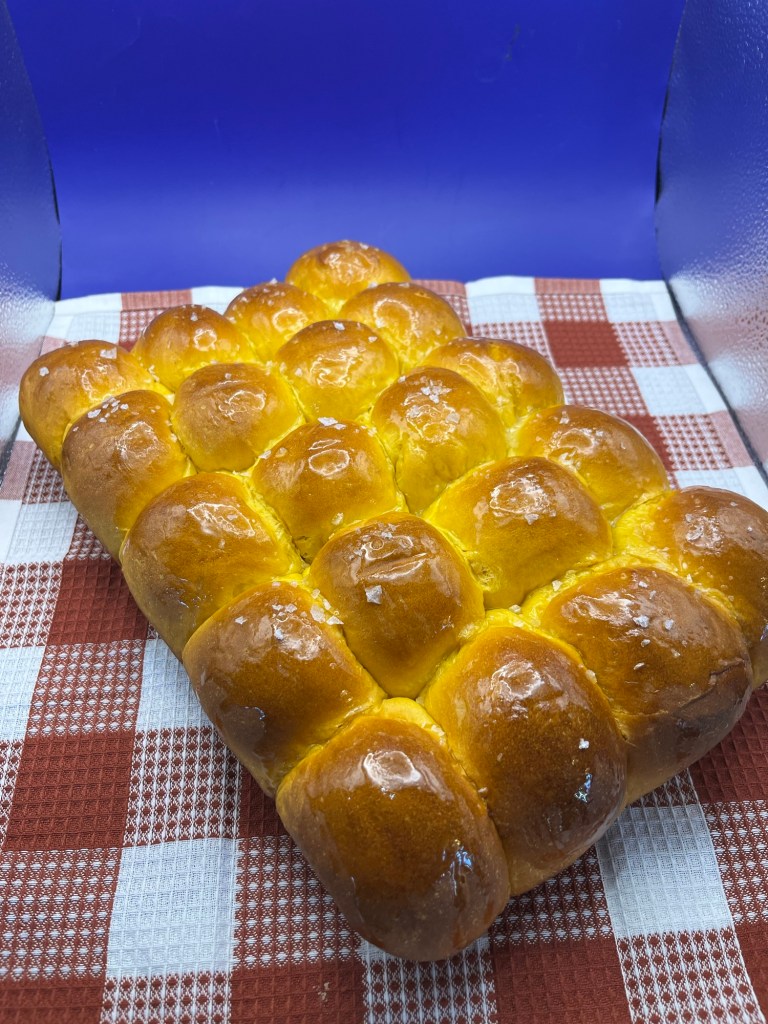
I made an apple pie, an almond-crust-cranberry-curd tart (see below) and sweet potato dinner rolls. There were also two pumpkin pies and very little left when we were done.
Cranberry Curd Tart Almond Crust
INGREDIENTS For the crust • 99g (½ c) granulated sugar • 113g (8 Tbl) unsalted butter, softened • ¼ tsp table salt • 1 tsp King Arthur Pure Vanilla Extract • ½ tsp almond extract • 180g (1½ c) King Arthur Unbleached All-Purpose Flour • 72g (¾ c) almond flour or finely ground sliced or slivered almonds
For the cranberry curd • 12 ounces cranberries (fresh or frozen) • juice of one orange (~ ¼ c) • 250g (1 ¼ c) sugar • 2 whole eggs • 2 egg yolks • 113g (½ c, 1 stick) unsalted butter • 1 teaspoon vanilla extract • 1 tablespoon orange liqueur, such as TripleSec or Grand Marnier (optional)
For the Italian meringue • 2 egg whites • 1/8 teaspoon cream of tartar • 1/2 cup sugar • 1/4 cup water
METHOD Crust
Mix butter with sugar then add salt then vanilla.
Add egg and mix until incorporated. Stir in flour. Mix by hand like you are kneading bread until incorporated
Cover with plastic and refrigerate for 30 min
Pre-heat oven to 350⁰F
Butter tartl pans, or use non-stick pans
Dock (prick holes in) bottom and sides of formed dough then refrigerate for 20 minutes
Line tart pan with crumpled then smoothed parchment paper and fill with pastry weights.
Paint edges of the tartlet with the egg wash.
Bake in preheated oven 350⁰ F (175⁰ C) for 15 min. Remove pastry weights 5 minutes before the end of the bake.
Immediately remove from pans and cool on a wire rack
Cranberry Curd
Heat the cranberries and orange juice in a medium saucepan over medium-high heat until the cranberries split. Mix with an immersion blender then strain through a food mill or fine mesh sieve and discard the skins.
Return the strained cranberry mixture to the saucepan and add the sugar, eggs, egg yolks, butter, vanilla, and orange liqueur (if using) to the pan and give everything a good stir. Heat gently over medium-low heat, stirring constantly, until the mixture thickens and registers 170°F on an instant read thermometer (this usually takes about 8-9 minutes). Immediately strain (again) through a fine mesh sieve into a large measuring bowl and then pour into the prepared crust. (The curd can be stored in an airtight container in the fridge for up to a week. You may need to bake it a few more minutes for the tart to set when baking from chilled)
Bake (still at 350°F) until the curd is set (it should jiggle but not slosh), about 10 minutes. (Curd was jiggly after 20 more minutes baking.)
Let cool at room temperature for about 1 hour, then transfer to the refrigerator to chill. You can serve this chilled or at room temperature.
Italian meringue
Add egg whites and cream of tartar to the bowl of a stand mixer fitted with a whisk attachment. Heat sugar and water in a small saucepan over medium high heat.
When the sugar mixture registers about 220°F turn on the mixer and begin beating the egg whites on medium speed.
When the sugar mixture registers 240°F remove from heat and carefully pour into the mixer over the egg whites. Increase the mixer speed to high and beat until the egg whites form stiff peaks.
Transfer to a piping bag (or zip top bag) and pipe onto cooled tart as desired. If you want, torch the meringue with a kitchen torch. (But since it is cooked, this is totally optional).
As long as the oven was on and I had time to wait for doughs to chill etc, I also made a loaf of artisan bread.
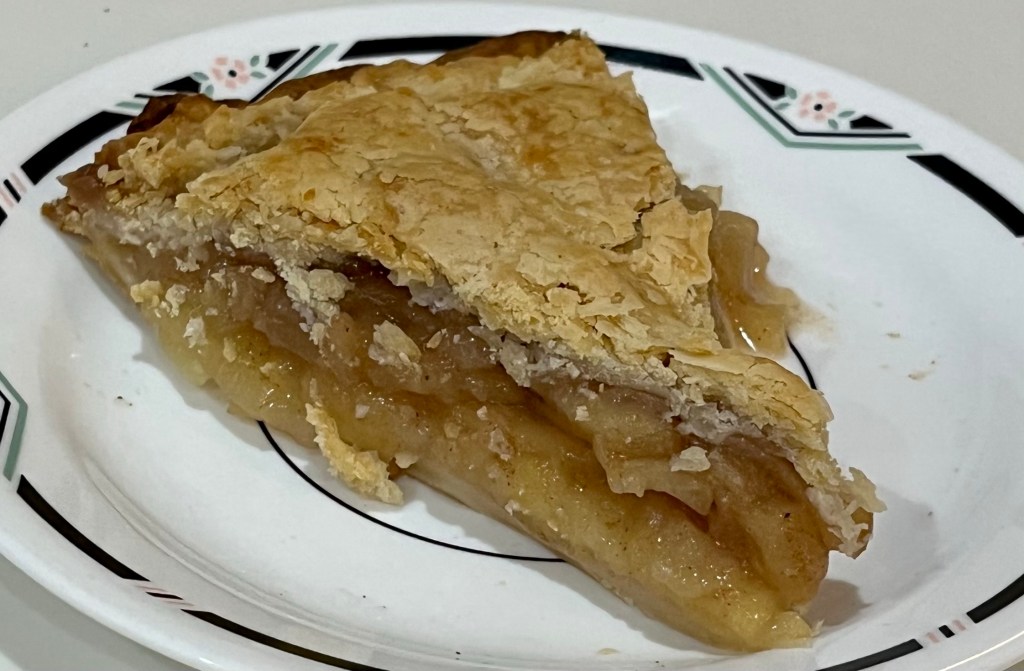
Sorry to be redundant, but I made PreppyKitchen’s amazing pie crust again. I filled the crust with some apple pie filling that I made a couple of weeks ago.
I did make PreppyKitchen’s pie crust last week and while delicious, it was tough. Hence, another try. I think I over worked the dough the last time as today the recipe resulted in a marvelous flaky, tender, delicious crust. I am now confident to bring an apple pie for Thanksgiving dinner.
Here are some of the comments from my QC Cadre:
Crust is excellent , very buttery !! Best crust we ever had !! Apple filling is to die for , perfect amount of cinnamon , apples —just right Thank you
Well, I don’t know anything about pie crust and I’m not sure what you’re looking for, but all I can say is to me that pie crust was just about perfect. The whole apple pie just delicious.
Absolute perfection! It was the perfect flakiness 😊
Some of the best pie crust I have ever tasted. Very flaky and light. Excellent 👍❤️🥧
I subscribed to Preppy Kitchen’s website and he posted his blueberry pie. He had me at blueberry.
I also used his flakey pie recipe and was once again very impressed. Although this pie is not par-baked it remained flakey and delicious with no soggy bottom!
I made a lattice top using a (new) fluted pastry wheel cutter.
Blueberry Pie – PreppyKitchen
INGREDIENTS • 1 recipe homemade pie crust (or 2 store-bought) • 900g (6 c) fresh blueberries • 1 tablespoon lemon zest • 2 tablespoons fresh lemon juice • 133g (⅔ c) granulated sugar • 31g (¼ c) AP flour • 14g (2 Tbl) cornstarch • ½ teaspoon ground cinnamon (optional) • Pinch of salt • 2 tablespoons butter diced • 1 large egg beaten with 2 teaspoons water for egg wash
METHOD
Preheat the oven to 425°F.
On a lightly floured surface, roll one disk of pie dough into a 13-inch circle. Place in a 9-inch pie pan and let the excess pie dough hang over the edge.
In a large mixing bowl, combine the blueberries, lemon zest, and lemon juice, tossing to combine. Add the sugar, flour, cornstarch, cinnamon, and salt and stir until the berries are well coated in sugar. Pour the filling into the pie crust and pat it out into an even layer. Dot the butter all over the top of the filling.
Roll the remaining pie crust into a 12-inch circle. Cut the dough into 10 to 12 strips, about 1-inch wide, using a pastry wheel or knife. Arrange the strips on top of the pie in a lattice pattern by weaving the strips over and under each other. Trim the excess dough (top and bottom crust), so there is about 1-inch of overhang from the edge of the pie dish. Tuck all of the excess under and crimp the edge.
Lightly brush the pie crust with egg wash, and if desired, sprinkle with more sugar. Place the pie on a rimmed baking sheet.
Bake for 20 minutes. Reduce the oven temperature to 350°F and continue baking for 35 to 45 minutes, or until the crust is a deep golden brown and filling is bubbling around the edges. Tent the pie with foil or the edges with a pie shield if the crust starts to brown too quickly. Let the pie cool completely before slicing, about 4 hours.
Last month I made an amazing, flaky, delicious pie crust with PreppyKitchen’s recipe. QC and I then made the best chicken pot pie ever!
We are making an apple pie for Thanksgiving and wanted to try the crust again. Not everything went as smoothly as the first try. (I believe when mixing the dough in the food processor I did not add enough water.) The dough held together when testing it, but just barely. When I tried to form a cohesive ball on the counter it wouldn’t come together, I should have popped it back into the food processor and added another tablespoon or two, but like a golf shot where I notice the club face isn’t aligned correctly, I assume I can fix it on the downswing.
I also had issues making an aluminum foil pie ring. I cut three pieces of foil 3” wide and folded them around the edge of the pie crust. They wouldn’t stay on and I had to adjust them several times. Since then I saw how to cut a single large hole one piece of foil, to cover the edge and leave the center open.Next time.
After freezing the dough I wet my hands and gently kneaded the dough as little as possible to have it come together so I could roll it out. It worked, but I probably lost some of the flakiness.
(This pie is for internal consumption and review by the QC Cadre, not for Thanksgiving dinner. I can take the well deserved criticism.)
I used apple pie filling that I made and froze after visiting Apple Hill in September. I froze it in a plastic film lined pie plate so it would perfectly fit into the par-baked pie shell. Apparently, I used a different pie-plate today. The resultant pie looked good. I guess I fixed in on my downswing.
The pie was baked at 425F for 30 minutes. The edges were covered and the pie was baked an additional 20 minutes, until the internal temperature reached 195F.
Pie Crust – PreppyKitchen
INGREDIENTS • 360g (3 c) all-purpose flour • 1 Tbl sugar • 1 tsp salt • 227g (1 c) cold unsalted butter cut into cubes • 4 to 6 Tbl ice water
METHOD
In the work bowl of a food processor, combine 1½ cups of flour, sugar, and salt. Pulse a few times to combine.
Add half of the butter. Process until very crumbly and starting to ball up, about 30 seconds. Scatter in the remaining butter and the remaining 1½ cups of flour. Pulse 2 times just to distribute.
Drizzle 4 tablespoons of ice water over the mixture. Pulse a few times. Add more water, a tablespoon at a time, as needed, and pulse once or twice after each addition. The mixture should easily stick together when squeezed, but not feel wet or dry.
Transfer the dough onto the counter and form it into a ball. Cut the ball in half and press each half into a disc. Wrap tightly in plastic wrap and refrigerate for at least 1 hour or up to 2 days. (Don’t worry if the dough seems `dry. The flour will hydrate as it rests in the fridge.) The disks can also be frozen for a few months and thawed in the fridge overnight before using.
To Blind or Par-Bake:
If required, prepare the crust as directed in the recipe until it’s ready to use.
Roll the pie crust into a 14-inch circle and line a pie-pan with the dough. Fold the ends under and crimp the edges as desired. Poke the bottom all over with the tines of a fork. Freeze for 30 minutes.
Meanwhile, position an oven rack in the bottom third and preheat the oven to 425⁰F.
Once the oven is hot, remove the pie from the freezer and place on a rimmed baking sheet. Line with a square of parchment paper. (I find it useful to crumple the parchment paper then smooth out. Repeating the crumple/smooth helps make the parchment paper more pliable.) Add enough dried beans or pie weights to fill the center.
Bake for 20 minutes. Peek under the parchment by carefully lifting an edge. If the bottom of the crust is pooled with melted butter, cook for another 5 minutes. (It should still appear wet and underbaked.)
Remove the pie crust from the oven. Carefully lift out the parchment paper and weights and set them aside to cool. At this point, your pie crust is par-baked and could be used in recipes that call for partially baking the crust before filling. (If a shiny crust is desired, you can brush the crust all over with egg wash.)
To Blind Bake:
Return the crust to the oven and continue baking until the bottom appears dry and begins to brown, about 10 more minutes.
Let the pie crust cool completely before filling.
Freezing Apples for Apple Pie
INGREDIENTS
• 5 cups Apples peeled & sliced apples (amount may vary) • 1 quart Water to prevent browning apples • 2 teaspoon salt to prevent browning apples • ½ cup Sugar for pie filling • ½ teaspoon Cinnamon for pie filling • 3 Tablespoons flour for pie filling • 1 pinch salt for pie filling
METHOD
Freezing Apples for Pie Filling
Peel, core and slice apples into a salt water soak. About 2 teaspoon salt dissolved in 1 quart water. This will prevent browning apples.
When all apples are sliced let them soak about 5 minutes and drain well.
Place apples in your pie plate to be sure you have the right amount. Pack them in and mound them up. I like lots of apples in my apple pie!
Remove these apples to a bowl, add sugar cinnamon mixture and mix to coat. ½ cup sugar, ½ tsp. cinnamon, 3 Tbsp flour, Dash of salt
Lay an oversized piece of foil or plastic wrap in your pie plate. You want enough to wrap around all of the apple filling.
Put the apples back into your lined pie plate. Include all the sugar mixture. Wrap the foil sides up and around the pie filling. If needed add another layer of foil or plastic wrap to be sure it is all covered.
Place the pie plate and contents in the freezer and allow to freeze.
When it is frozen take the wrapped pie filling out of the pie plate and place in freezer bag or wrap in freezer paper.
Remove air, seal, and label. Put back in the freezer for later baking.
A month ago, QC and I went to Apple Hill to buy some, wait for it,… apples! This is our traditional trip up past Placerville. It’s a nice drive up and we take a backroad home through the Sierra Nevada foothills. It looks a lot like Vermont.
I made a couple of dozen pints of applesauce, (we like applesauce.) and had leftover apples, beyond those we ate. I found a recipe for an apple pie designed to be prepared and frozen (for up to 2 months.) I also have a nice pie crust recipe I never used so along with the apples, the time was ripe. If you do not over-mix the fats and dry ingredients and do not over-work the dough the crust will be very flaky and delicious like this one.
Unfortunately, I couldn’t wait the full two months to complete the test, and baked it today, almost exactly one month from freezing. (Next time I will make two pies.)
Two Slices, two plates.
Apple Pie Ready for Freezing
PIE CRUST • 2 ½ cups (315g) all-purpose flour plus more for shaping and rolling • 1 teaspoon salt • 6 Tablespoons (85g) unsalted butter, chilled and cubed • 2/3 cup (130g) vegetable shortening, chilled • ½ cup (120ml) ice cold water
INGREDIENTS – PIE FILLING • 6 c thinly sliced, peeled apples (6 medium) • ¾ c sugar • 3 Tbl all-purpose flour • ¾ tsp ground cinnamon • ¼ tsp salt • ⅛ tsp ground nutmeg • 1 tsp lemon juice
METHOD CRUST
Whisk the flour and salt together in a large bowl.
Add the butter and shortening. Use a pastry cutter, cut the butter and shortening until it looks like coarse gravel. (A few larger bits of fat are OK). In this step, you’re only breaking up the cold fat into tiny little flour-coated pieces; you’re not completely incorporating it. Do not overwork the ingredients.
Measure ½ cup (120ml) of water in a cup. Add ice. Stir it around. From that, measure ½ cup (120ml) of water, since the ice has melted a bit. Drizzle the cold water in, 1 Tablespoon (15ml) at a time, and stir with a silicone spoon after every tablespoon has been added. Stop adding water when the dough begins to form large clumps. Do not add any more water than you need.
Transfer the pie dough to a floured work surface. Using floured hands, fold the dough into itself until the flour is fully incorporated into the fats. The dough should come together easily and should not feel overly sticky. Avoid overworking the dough. If it feels a bit too dry or crumbly, dip your fingers in the ice water and then continue bringing dough together with your hands. If it feels too sticky, sprinkle on more flour and then continue bringing dough together with your hands. Form it into a ball. DO NOT OVERWORK THE DOUGH!
Use a sharp knife to cut it in half. If it’s helpful, you should have about 1 lb, 8 oz dough total (about 680g). Gently flatten each half into 1-inch-thick discs using your hands.
Wrap each tightly in plastic wrap. Refrigerate for at least 2 hours and up to 5 days.
After the dough has chilled for at least 2 hours roll it out, one crust at a time, keeping the other in the refrigerator until you’re ready to roll it out. Lightly flour the work surface, rolling pin, and your hands, and sprinkle a little flour on top of the dough. Use gentle-medium force with your rolling pin on the dough—don’t press down too hard on the dough. When rolling dough out, start from the center and work your way out in all directions, turning the dough with your hands as you go. Between passes of the rolling pin, rotate the pie crust and even flip it, to make sure it’s not sticking to your work surface. Sprinkle on a little more flour if it’s sticking; don’t be afraid to use a little more flour. Roll the dough into a very thin 12-inch circle. Your pie dough will be about 1/8 inch thick, which is quite thin. Visible specks of butter and fat in the dough are perfectly normal and expected.
Carefully roll one end of the circle of dough gently onto the rolling pin, rolling it back towards you, slowly peeling it off the work surface as you go. Pick it up, and carefully roll it back out over the top of the pie dish.
METHOD – PIE FILLING
Place 1 pie crust in 9-inch disposable foil or metal pie plate (do not use glass). Press crust firmly against side and bottom of pie plate.
In large bowl, gently mix filling ingredients; spoon into crust-lined pie plate.
Top with second crust. Wrap excess top crust under bottom crust edge, pressing edges together to flute and seal.
Tightly wrap unbaked pie in 3 layers of plastic wrap, making sure all sides of pie are completely sealed and unexposed.
When ready to bake pie, heat oven to 450°F. Remove frozen pie from freezer; cut a few slits in top crust and place in oven. Do not thaw pie.
Bake 25 minutes. Reduce oven temperature to 375°F; bake 40 to 50 minutes longer or until crust is golden brown and apples are hot and soft when pricked with a fork. If necessary, tent the edges of the pie to reduce darkening and bake in 10-minute periods until the internal temperature of the pie is 190 – 200°F.
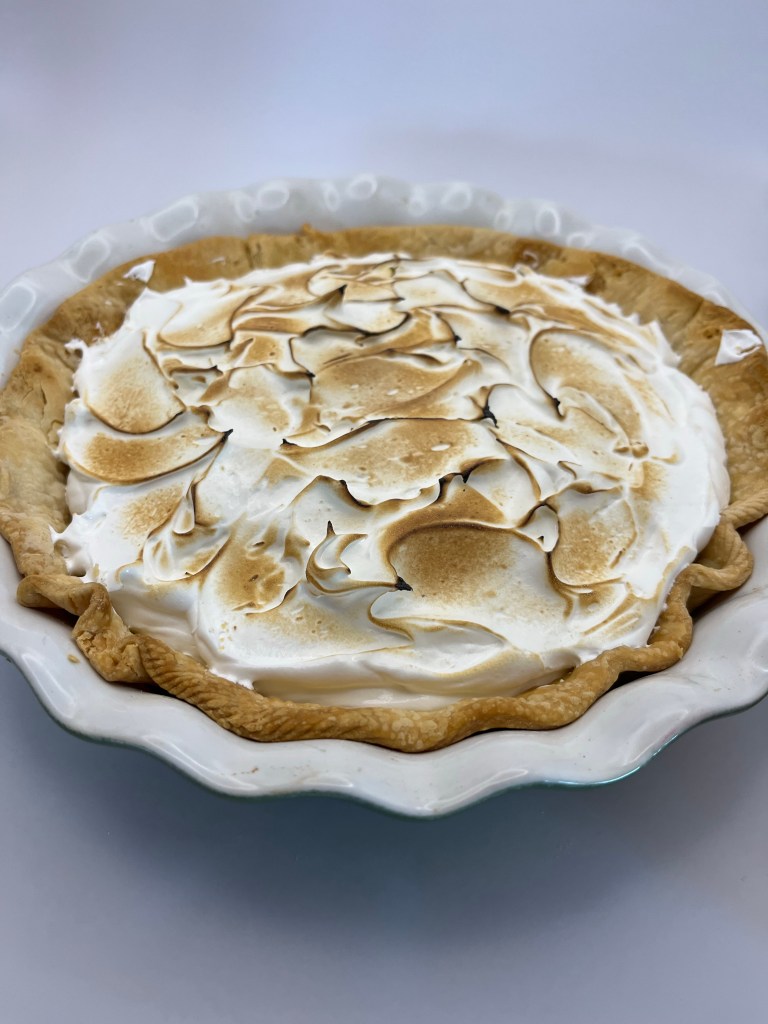
I needed a few cranberries for decoration on the Yule Cake, so with left over 11.75 oz of the 12 oz bag, I saw and made this recipe for a cranberry merengue pie. (You can take the boy out of Vermont…) Never having made one and needing a dessert to augment the smallish Yule Cake, I thought, Let’s give it a try, waste not, etc.
Macerating the cranberriesCooking berries, eggs and cornstarch until smoothPar-baked pie crustCranberry mixture poured into par-baked pie shellItalian Meringue, torch and cranberry pie.Meringue covered pie prior to torching.Torched Cranberry Meringue Pie
Cranberry Meringue Pie
INGREDIENTS For the filling: • 1 12-ounce bag whole cranberries, fresh or frozen • 3/4 cup water • 1 cup granulated sugar • 3 large egg yolks • 3 tablespoons cornstarch • 4 tablespoons cold salted butter, cubed • 1 8- or 9-inch pie crust, any kind, par-baked if necessary For the meringue: • 150g (or ¾ cup) granulated sugar • 60ml (or ¼ cup) water • 60g (or ¼ cup) egg whites (about 2 large egg whites)
METHOD To make the filling,
Combine the cranberries, water, and sugar in a medium saucepan with a lid. Cover the pot and bring to a boil over medium-high heat. Continue boiling for 3-5 minutes, or until the cranberries have totally disintegrated and the mixture is thick and gloopy. Use a potato masher to speed things up.
While the cranberries cook, whisk the egg yolks and cornstarch in a large mixing bowl.
When the cranberries are done, scrape the contents of the saucepan through a fine mesh sieve into the bowl with the eggs and cornstarch. Stir and press on the solids in the sieve until you’ve extracted all the liquid you possibly can, then scrape whatever’s on the bottom of the sieve into the bowl.
Whisk the cranberry-egg-cornstarch mixture together thoroughly, pour it back into the saucepan, and bring to a boil over medium heat, whisking constantly.
Cook at a full boil for 3 full minutes while whisking. Finally, whisk in the butter piece by piece until it’s completely incorporated and pour the filling into a prepared pie crust.
Cool on a rack at room temperature until there’s no heat coming off the bottom of the pan, then refrigerate overnight (or about three hours if you’re on deadline and like living dangerously).
ITALIAN MERINGUE
In a medium-sized saucepan, combine the sugar and water. Heat over low heat, stirring until the sugar has dissolved. Once the sugar has dissolved, turn the heat to medium-high and allow the syrup to come to a boil.
In the meantime, add the egg whites to a medium-sized, heatproof bowl and mix (with a mixer fitted with the whisk attachment) until foamy and the whites are almost able to hold soft peaks.
Once the syrup is boiling, clip on a candy (or sugar) thermometer.
Cook until the syrup reaches 116°C/240°F, then take the pan off the heat and slowly drizzle the hot syrup into the bowl with the foamy egg whites, mixing continuously to prevent the eggs from scrambling. Don’t pour the syrup onto the whisk, or the syrup may splatter against the sides of the bowl (or into your face!). Instead, aim for a spot close to the whisk.
Once all the syrup has been added, keep mixing until the bottom of the bowl feels cool to the touch and the meringue has cooled down to body temperature.
Use immediately or keep in the fridge (covered) until ready to use. It’s a very stable meringue, so it won’t start weeping, leaking or collapsing.
NOTES Italian meringue can be made two days in advance and stored in the fridge until needed (covered with plastic wrap,) or transferred to a piping bag, sealed, then placed in the fridge.