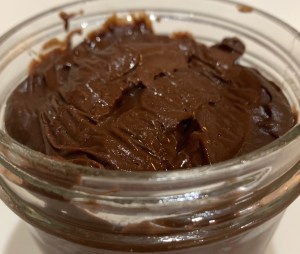
It’s the same old story, but with a different meaning. I had three egg yolks leftover from an earlier bake. As QC says (often) I am both frugal and whimsical and didn’t want to waste three whole egg yolks. As it happens home made scratch chocolate pudding requires three whole egg yolks.
I suppose a real photographer could make chocolate pudding look good, but probably couldn’t make it taste this good!
Chocolate Pudding from Scratch
Makes 4 cups; serves 8
INGREDIENTS • 4 ounces bittersweet chocolate • 3 tablespoons unsweetened cocoa powder • 3 tablespoons cornstarch • 1/4 teaspoon salt • 1 cup heavy cream • 3 large egg yolks • 2 1/2 cups whole or 2% milk • 1/2 cup granulated sugar • 1 teaspoon vanilla extract
METHOD
Use a serrated knife to chop the chocolate into fine flakes; set aside.
Whisk the cocoa powder, cornstarch, and salt together in a large, heatproof bowl. Slowly whisk in the cream, a little at a time, until you have a smooth mixture.
Whisk the egg yolks into the cream and cornstarch mixture.
Pour the milk into a 3-quart (or larger) saucepan. Add the sugar and warm over medium heat, stirring frequently, until the sugar is dissolved.
Bring the milk to a gentle simmer over medium heat. Watch for the surface of the milk to vibrate and for bubbles to form around the edges of the pot.
To temper the eggs, slowly pour most of the hot milk into the bowl of cream and egg yolks. Whisk until well-combined, then pour everything back into the pot.
Bring the mixture to a full boil over medium-high heat, stirring frequently. (It should look like lava boiling up!) At this point, the pudding will look much thicker.
Cook for 2 minutes more, whisking constantly and vigorously. Get your whisk into all corners of the pot.
Remove the pot from the heat and whisk in the vanilla. Add the chopped chocolate and let sit for 1 to 2 minutes or until melted. Whisk vigorously until the chocolate is fully incorporated.
Transfer the pudding to a storage container and press plastic wrap or wax paper directly onto the surface of the pudding. Cover with a lid and refrigerate.
Neil sent me a recipe for these cookies, knowing they are among QC’s and my favorite cookies.
Well, they weren’t exactly thin but they were minty. I am not exactly thin either so I don’t hold that against them.
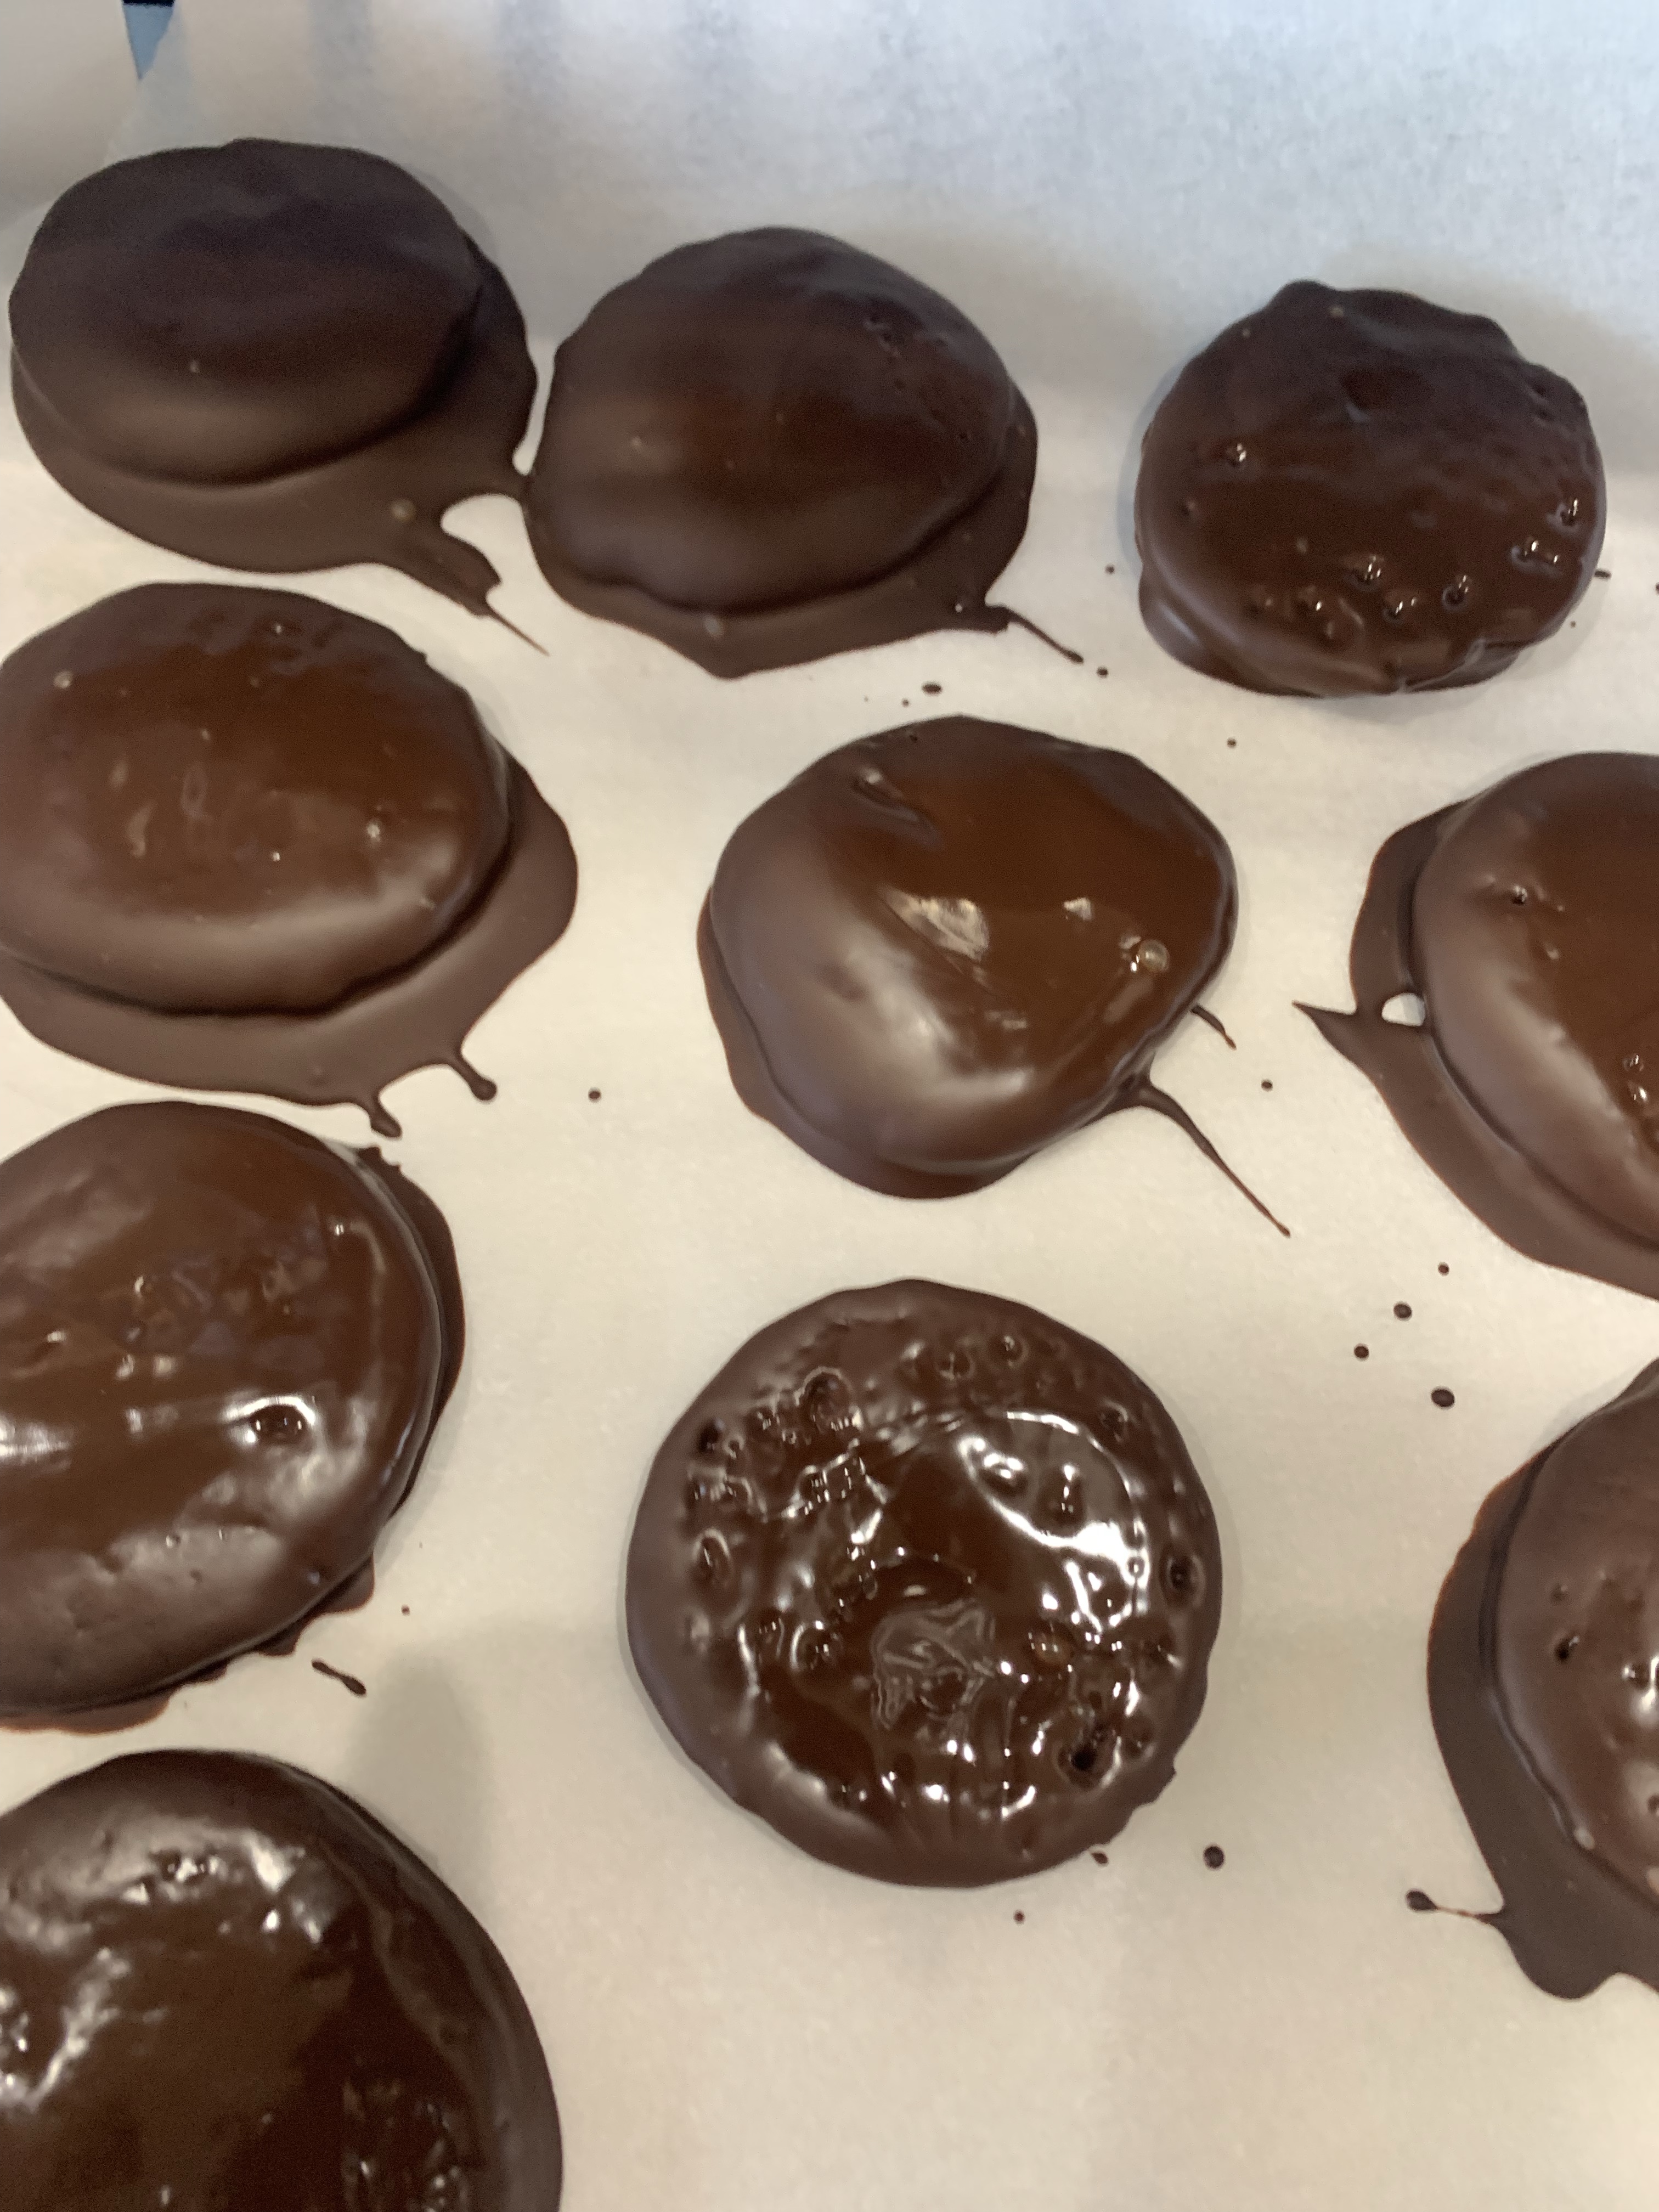
Not the prettiest cooking to photograph, but who cares?
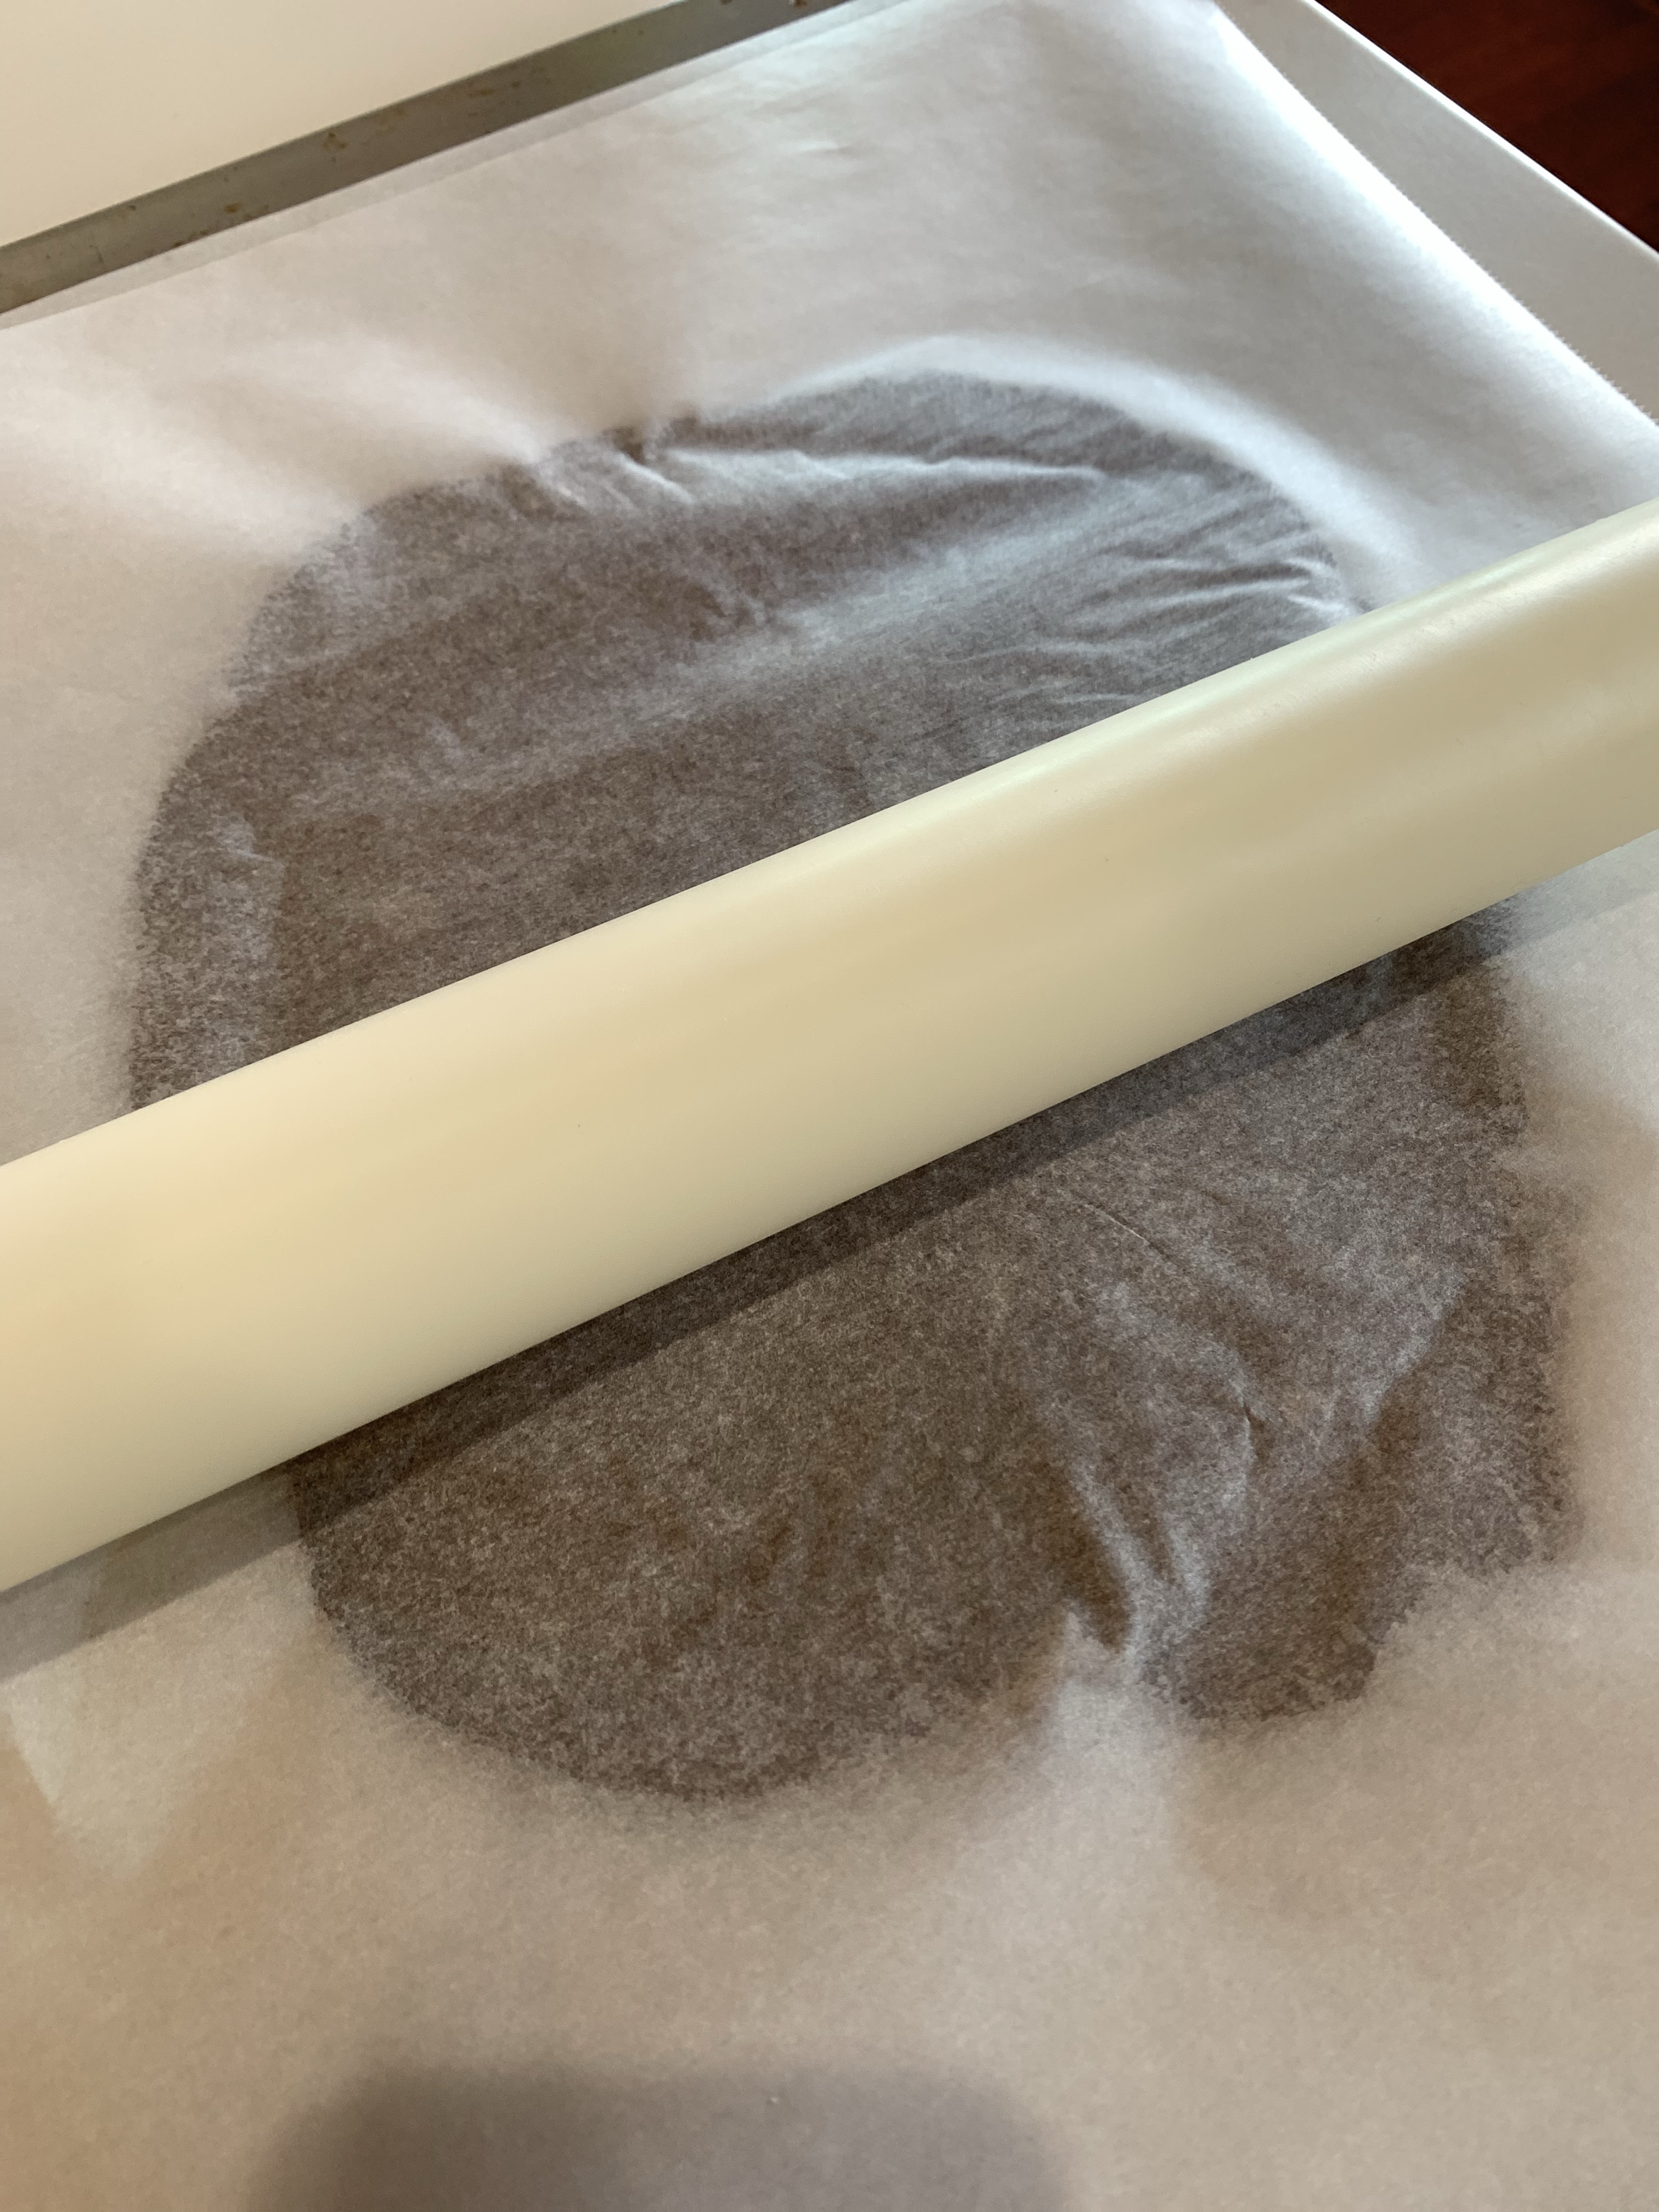
When I make these again, and rest assured I WILL be making these again, I will roll between waxed paper instead of parchment paper. The dough is quite sticky and distorted when trying to remove them from the paper and put on a baking sheet.
I also think coating in tempered chocolate might help as this chocolate will melt in your hands, as well as your mouth.
Rolling between parchment paperRolled, cut cookiesBaked, cooling cookiesCookies setting in the freezer
Thin Mint Cookies
INGREDIENTS ½ cup butter ½ cup granulated sugar ½ cup brown sugar 1 egg 1 cup AP flour ½ teaspoon baking powder ½ teaspoon salt 1/3 cup cocoa powder ½ teaspoon pure peppermint extract Chocolate Coating: 8 ounces baking chocolate ¼ teaspoon vegetable oil ¼ teaspoon pure peppermint extract
METHOD
Preheat the oven to 350°F.
In a bowl, combine the flour, baking powder, salt and cocoa powder. Whisk until smooth.
In a mixing bowl, cream the butter and sugars until light and fluffy. Mix in the egg and peppermint extract. Gradually mix in the dry ingredients until the dough comes together. Use your hands to form the dough into a ball.
Place the ball of dough onto a sheet of parchment paper. Flatten it into a disk and put another piece of parchment paper on top. It may be a good idea to use waxed paper as the dough is very sticky and did not remove from the parchment paper easily.
Use a rolling pin to roll out the dough to 1/4-inch thick. Transfer the rolled dough, with the parchment paper, onto a baking sheet.
Place the baking sheet in the freezer to chill for 10 minutes.
Transfer the flattened dough to a countertop. Remove the top sheet of parchment paper and use it to line the baking sheet.
Use a small, circular cookie cutter to cut out disks of dough. Transfer the cut disks onto the prepared baking sheet, leaving space in between. Because the dough is chilled, these cookies won’t spread too much while baking. I collected the excess dough, re-rolled and chilled to make about 8 more cookies.
Place the baking sheet in the oven and bake for 11 minutes. Once baked, remove the cookies from the oven, then transfer the parchment paper and cookies to a cooling rack to fully cool.
Set up a double boiler and chop the chocolate. Add the chopped chocolate into the bowl of the boiler and stir in the vegetable oil. Stir the chocolate until fully melted and stir in the peppermint extract. Next time I will temper the chocolate. These cookies much be refrigerated or the chocolate will melt in your hands.
Use a slotted wooden spoon to make the dipping process easier. Place a cookie on the wooden spoon. Dip it into the chocolate or use a large spoon to help cover the cookie. Tap the spoon gently against the bowl to remove excess chocolate. Once covered in chocolate, transfer each cookie back to the baking sheet lined with parchment paper. Place the baking sheet in the fridge for 20 minutes to allow the chocolate to fully set and harden.
• Thin Mints are best enjoyed cold. • Store in an airtight container in the freezer or fridge. • Keep in the freezer for one to two months, or in the fridge for two weeks. This will also keep the chocolate coating at its best. • Store in an airtight container for two days.
So what are you supposed to do when you wake early, and as you walk through the kitchen on you way to turn on the TV to watch the replay of the Olympics (that you slept through last night) and you see 3 small, very ripe bananas sitting there?
Answer: make raisin banana bread. As I opened the drawer where the bread pans live, I saw two small bread pans I bought to make some Tangzhong Pillowy White Bread. Knowing I would give half the bread away, I felt these would be a perfect size.
There is nothing exceptional or fancy about this bread other than it’s tender, has a great crumb, and is neither tough or dry. (Be sure to take it out of the oven when the internal temperature reaches 190 F. Over-baking can reverse all its good characteristics.)
Banana Raisin Bread
INGREDIENTS
2 cups flour
2 teaspoons baking powder
1 teaspoon salt
3⁄4 cup sugar
2 eggs
1⁄4 cup oil
1⁄4 cup milk
1 teaspoon vanilla
2 ripe bananas, mashed
1⁄2 cup raisins
1 tablespoon sparkling sugar
METHOD
Preheat oven to 350F
Mix dry ingredients in a mixing bowl.
Mix wet ingredients in another bowl.
Combine wet and dry ingredients.
Pour in loaf pan sprayed with Pam and sprinkle with 2 tablespoons coarse sparkling sugar.
Bake for about an hour, until golden brown. (In the small pans it only required 40 minutes of baking. Start checking internal temp at about 30 minutes.)
So, I started out Valentines Day morning making a chocolate Bundt cake, using a new recipe I found online. Everything looked fine after baking. The aroma was fantastic, the spring back was good, but when I turned it out of the pan it simply exploded in my hands. Testing a few scraps I found the cake dry, bitter and not particularly tasty. Straight to the bin!
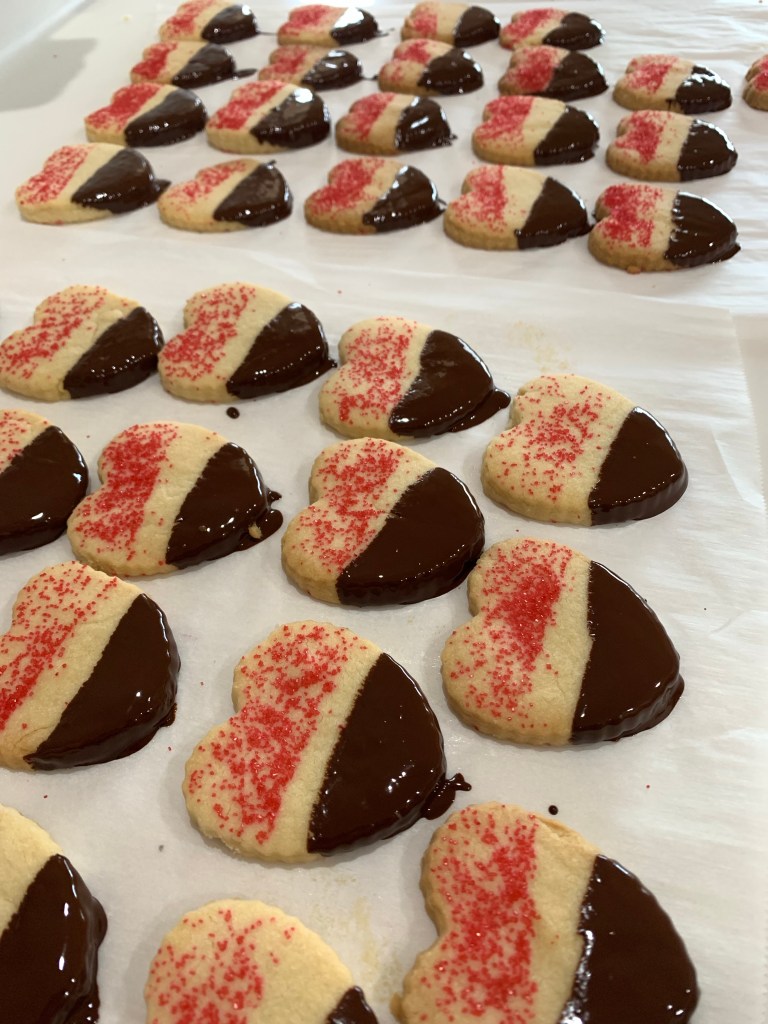
Undeterred, I quickly switched to make heart shaped shortbread cookies with red sprinkles on top and the bottom dipped in dark chocolate. They were buttery with a nice crisp snap. Good recovery.
I also made my second annual heart shaped pizza. All day I was calling it a Jackson Pollock pizza. Last years looked like I was on acid when I made it. Jackson would have been impressed with the abstract result.
Heart Shaped DoughAdded Fresh MozzerellaAdded Sauce Made and Canned Last Year
This years, with much thanks to the other grandpa, ‘Mike’, I put enough corn meal under the uncooked pizza to allow it to slide off the peel and onto the pizza stone in the barbecue grill (500 deg F) still heart shaped.
It cooked for 4-5 minutes (I didn’t time it) until it was browning, the crust was firm and the cheese was fully melted and just starting to brown.
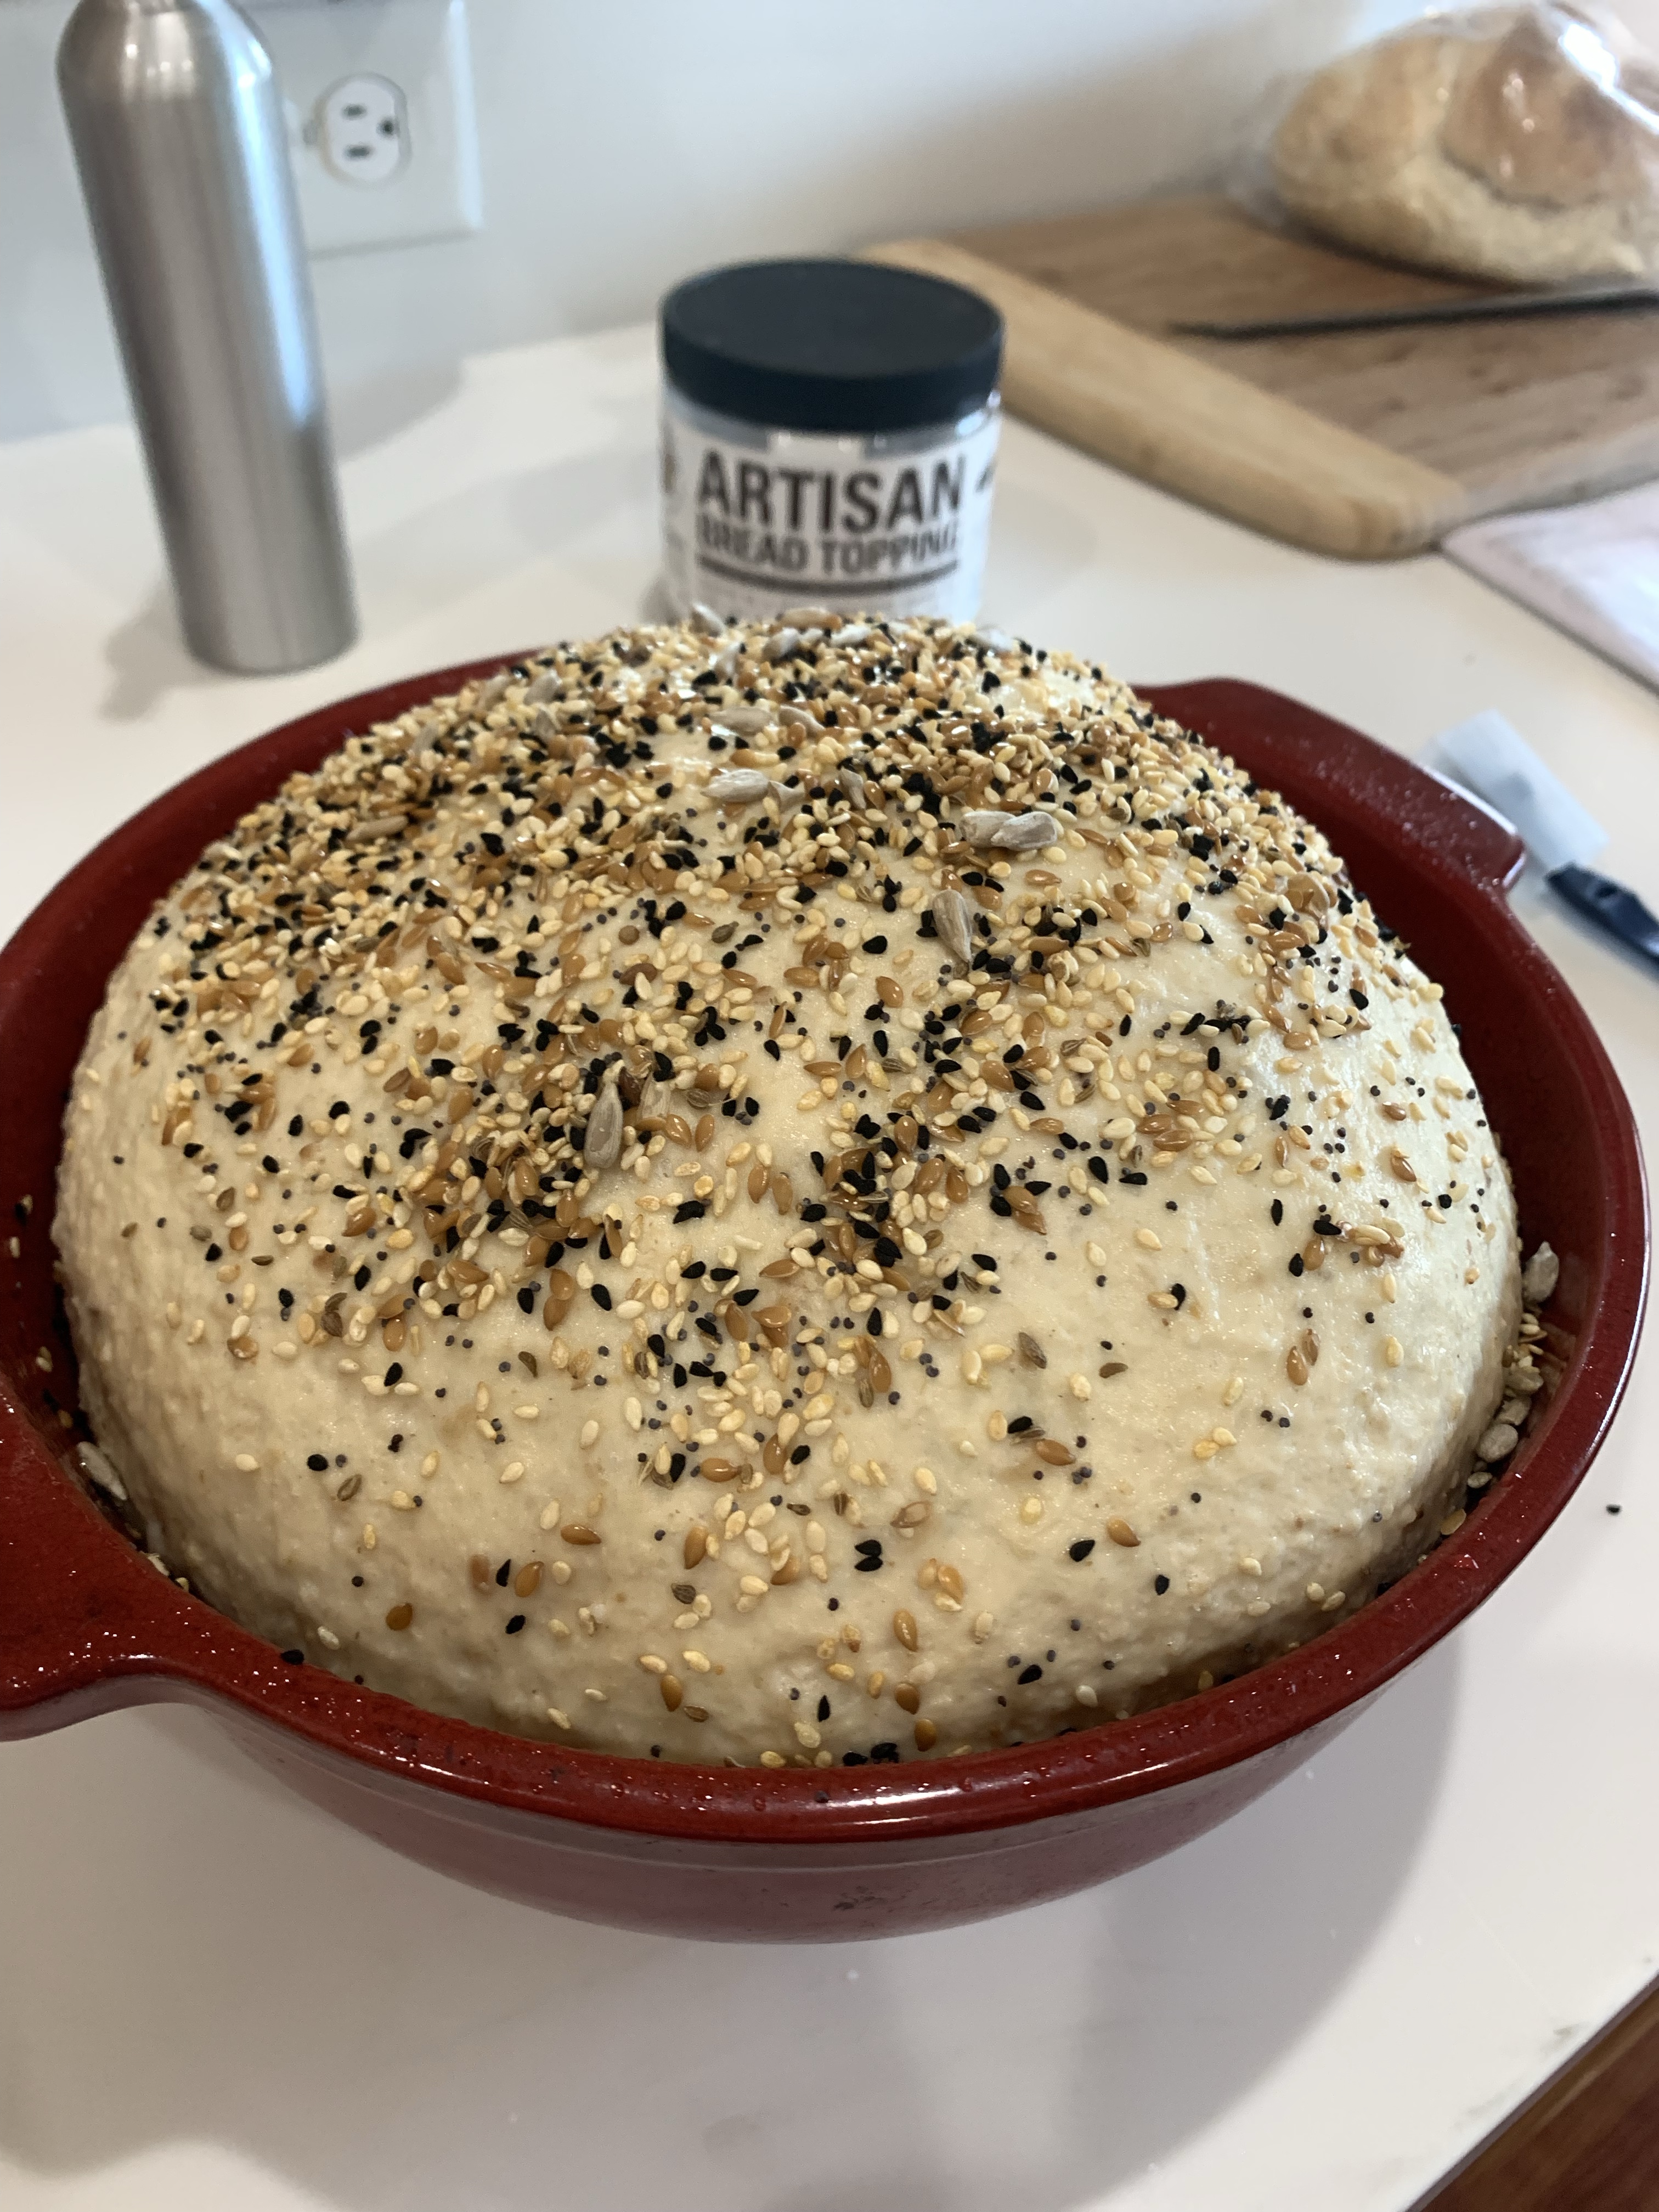
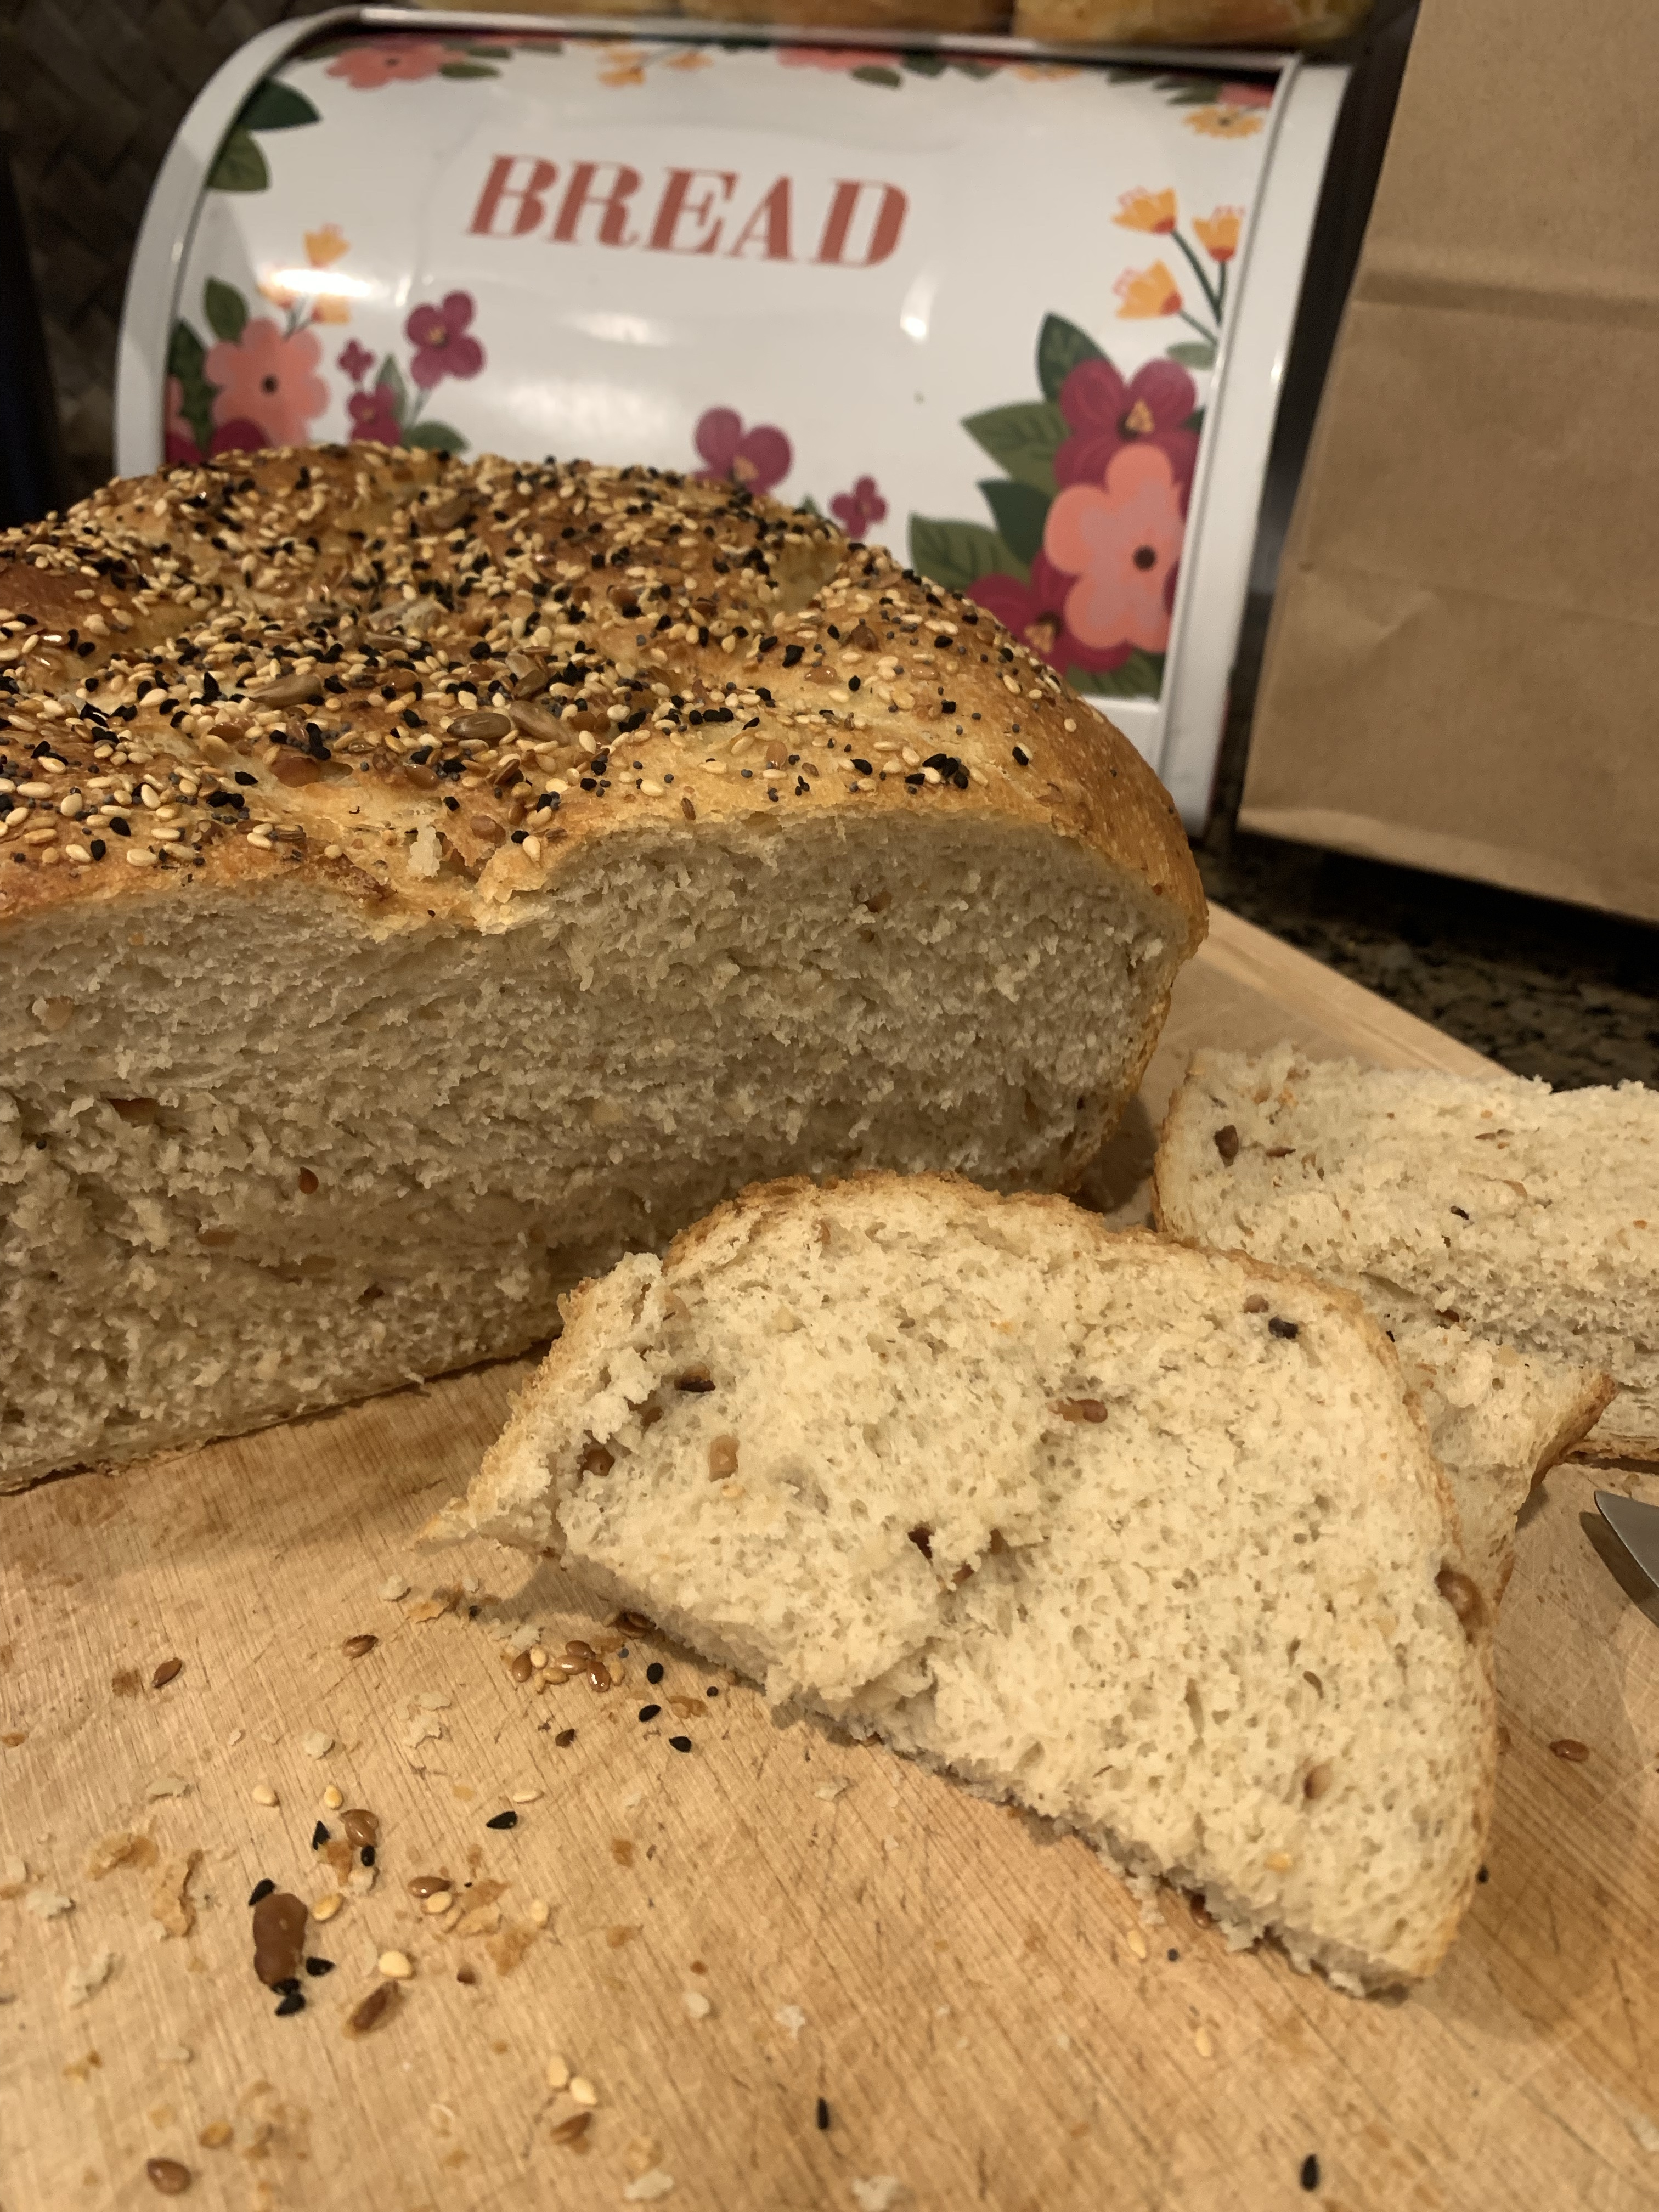
All through the pandemic’s shut downs, social isolations and maskings I resisted joining the crowd and never made sourdough bread. Things are starting to open up, so I made my first ever sourdough boule.
As it so happens I kept my copy of King Arthur Baking’s February 2022 catalog that has a recipe for multigrain sourdough, and as it happens, I bought a jar of King Arthur’s sourdough starter when I was in Vermont last summer. This starter has been nurtured in New England since the 1700’s. KAF recommends feeding their starter within 10 days after receiving it. Well, it was a bit longer for me… nearly 10 months. It was a lot of work to revive it, but it was certainly worth the effort!
Kneading DoughAfter Second Rise, Before BakingAfter Baking Half Way. Remove top to brown loaf. Internal Temp was about 130F.Finished BouleFinished, Cut Boule
I had most of the ingredients on hand, but had to make some substitutions. Apparently, malted wheat flakes are in short supply so I used rolled oats instead. To created the malt flavor I added 2 tablespoons of diastatic malt powder. I am also not a fan of sunflower seeds so substituted roasted pine nuts, which I crushed after roasting but before mixing into the dough. For some reason, lost in the mists of baking history, I had some KAF Artisan Bread Topping —perfect.
Other than those substitutions I followed KAF’s instructions below, which resulted in an outstanding loaf with a great crust and crumb. Oh! I almost forgot. I baked it in an Dutch over with extra steam from hot water poured in a hot pan at the bottom of the over when the bread was put in the over.
Sourdough Pine Nut Boule
INGREDIENTS Soaker • 1 cup (120g) rolled oatmeal • 2/3 cup (152g) boiling water • 2 Tbl Diastolic Malt Powder Dough • 1 cups (227g) ripe (fed) sourdough starter • ¾ cup (170g) to ¾ cup + 2 tablespoons (190g) lukewarm water • 3 ½ cup (420g) bread flour • ½ cup (71g) toasted pine nuts • 2 teaspoons salt • 1 ½ teaspoons instant yeast Topping • 1 – 2 tablespoon sesame seeds or The Works Bread Topping, or your favorite blend of seeds
METHOD For the soaker
Put the oatmeal and diastolic malt powder in a heat proof bowl and mix in boiling water.
Stir until combined and cool to lukewarm
For the dough
In the bowl of a stand mixer combine the ripe starter and ¾ cup of water, mix to combine
Add the soaker and remaining ingredients, and mix and knead approx 8 minutes until you’ve made a soft dough, adding additional water or flour as needed.
Cover the dough in the bowl, and let it rise until it’s almost doubled, about 1 to 1 ½ hours.
Turn the dough out onto a lightly greased work surface, and gently fold it over a few times to deflate it. Shape it into a large round.
Place the round in a covered baker, about 4.2-quart and 10″ diameter, that’s been sprayed with non-stick baking spray and put on the cover. Let the loaf rise until it’s very puffy, about 1 to 1 ½ hours. Towards the end of the rising time, preheat the oven to 425°F.
Just before baking, brush with water, and sprinkle with seeds. Use a lame or a very sharp knife to make four slashes across the top of the loaf, in a crosshatch pattern.
Bake the bread for 25 minutes. Reduce oven temperature to 375F and uncover the loaf if in a covered baker, and continue to bake 10 to 15 minutes, until the loaf is golden brown and an instant-read thermometer inserted into the center registers 190°F. (A loaf baked on a baking sheet will need to bake for 38 to 45 minutes total.)
Remove the bread from the oven, let sit in the baker for 5 minutes, then turn out and cool on a rack.
This morning some radio commentator mentioned St. Valentines Day is Monday. After reviewing my calendar I said to myself, myself I said, “Yikes! Time is running out to make my chocolate candies for friends and family.”
Last year I began using my sous vide to temper chocolate. It is easier to control the temperature of the chocolate than in a double boiler.
Sous Vide Chocolate Tempering Set-up
Here is the setup I use. A pot of water chosen to fit both the sous vide and small pan holding the chocolate. The pan with the chocolate fits snugly so it wouldn’t fall into the water. The dishcloth is used to wipe and water from the bottom of the pan, if necessary, like when removing hot water from the water bath and adding ice to cool the water. There are two acrylic molds in the background to make the candies and the blue silicone mold to hold any excess chocolate. The excess made some nice solid chocolate hearts. Barely visible at the top of the photo is my morning coffee, an essential part of any kitchen adventure.
TEMPERING CHOCOLATE
Weigh desired amount of chocolate remembering it is easier to control the temperature of larger amounts of chocolate.
For dark chocolate, set the sous vide to 126 deg and let the chocolate heat to 122 deg F and hold until it is all at temperature. That’s the beauty of using the sous vide to temper. It will hold indefinitely at any temperature you select.
Remove the sauce pan containing the melted chocolate, wipe the pan dry and set it aside
Replace 6-8 cups of water with 8-10 cups of ice. (Ice takes up more room than water. Add more cold water to the water bath if required.)
Set the sous vide to 75 deg.
When the chocolate cools to 82 deg, set the temperature to 95 to hold the chocolate in temper at 90 deg for over an hour.
NOTE FOR ACRYLIC MOLDS
Paint the inside of each mold with a silicone brush allowing the chocolate to dry before repainting. Leave the brush in the tempered chocolate
Paint three coats of chocolate being sure to examine the sides and corners closely to assure the entire inside of each mold is covered. Hold the coated mold up to the light and see if there are any holes in the coating.
I used different molds, the heart shaped one for the caramel filling and the domed one for the marshmallow. It required about 100 g of caramel to fill the 18 cells of hearts and 50 g of marshmallow to fill each of the domes.
FILLING CHOCOLATES
I warmed the caramel to piping consistency, filled a piping bag with the slightly warm caramel. When filling the chocolate shells be sure to leave adequate room to seal the bottoms of the chocolates. Repeat with about the marshmallow.
Cutting the chocolates for photos is always difficult. The tempering makes them hard and brittle. I used a very thin serrated knife. Any suggestions would be welcome.
Pour enough chocolate across the filled molds and spread to assure each cell is covered with chocolate. (NOTE: the chocolate was kept at 90 deg and remained tempered throughout all the steps. Yay sous vide!)
Once the bottom coat of chocolate is fairly cool scrape off the excess with a bench knife. Save the excess for you next adventure.
I wonder if my 9th grade French teacher would be proud of me? I looked up how to say “it’s time for a french bread batard” in French on Google Translate all by myself!
This is not my first rodeo with this bread, but it is the best loaf to date. While the Covid travesty has been horrible, my baking skills have improved enormously. Most of the METHOD steps are from KAB, but I added my own comments in places.
(Oh, I also baked a dozen chocolate chip cookies from dough I have in the freezer. The oven was on! What choice did I have?)
French Bread – Recipe and method from KAF which should be KAB now.
INGREDIENTS
Starter • 1 cup (227g) cool to lukewarm water (90°F to 100°F) • 1/2 teaspoon active dry or instant yeast • 1 1/4 cups (149g) King Arthur Unbleached Bread Flour • 1/4 cup (28g) King Arthur Premium 100% Whole Wheat Flour Dough • all of the starter (above) • 1 cup (227g) lukewarm water (100°F to 115°F) • 3/4 teaspoon active dry or 1/2 teaspoon instant yeast • 1 tablespoon (14g) sugar • 3 3/4 to 4 cups (450g to 480g) King Arthur Unbleached Bread Flour • 1 1/2 to 2 1/4 teaspoons salt, to taste
METHOD
To make the starter: Stir all of the starter ingredients together to make a thick, pudding-like mixture. Cover with plastic wrap and let it rest for at least 2 hours. For best flavor, let the starter rest longer; overnight (up to 16 hours) is best.
To make the dough: Stir down the starter with a spoon and add the water, yeast, sugar, 3 1/4 cups (390g) of the flour, and the salt. The dough will be a loose, messy mass. Let it rest for 12 to 15 minutes, then stir it again; it should become more cohesive and a bit smoother. Dough handles better once it’s had time for the flour to absorb the water while resting and relaxing. By using this method, you’ll tend to add less flour, and have much bigger holes in your finished bread.
Knead the dough, adding up to an additional 3/4 cup (90g) flour (as necessary to make a soft dough), 10 to 12 minutes. I use the dough hook on my stand mixer. For me, the dough should clean the sides of the mixer bowl. That’s how I know when adequate flour has bee added.
Place the dough in a lightly greased bowl or plastic container, cover with lightly greased plastic wrap, and let it rise until almost doubled (depending on the weather, this could be 1 to 2 hours). If you’re going out, or if you prefer, let the dough rise slowly in the fridge. If your dough has been refrigerated, allow it to come to room temperature before shaping; it’ll warm up and rise at the same time. I used my proofing oven with only the light on for warmth. The same for the final proof below.
Deflate the dough gently, but don’t knock out all the air; this will create those “holes” so important to French bread. For one large loaf, form the dough into a round ball; for two loaves, divide the dough in half and shape into two balls. For loaves, form into a battard about 2” diameter and 4” shorter than bread tray. Place on semolina floured French bread tray to rise..
Place a semolina- or cornmeal-dusted piece of parchment paper onto a baking sheet. (Note to self: Don’t go crazy with semolina. It WILL fall off the paper and onto the floor when transferring the loaves from the peel onto the baking stone in the oven,) Gently place the ball(s) of dough on the baking sheet, seam-side down. It is easiest to roll the loaves onto the baking peel.
Cover the bread gently with lightly greased plastic wrap, and let it rise until it’s puffy and about 40% to 50% larger, anywhere from 30 to 45 minutes if using the proofing drawer..
Preheat your oven to 475°F.
Dust each loaf with a little flour. Slash or cross-hatch it with a sharp knife or lame. Spritz water into the oven with a clean plant mister, and place the bread in the oven. Reduce the heat to 425°F and spritz with water every few minutes for the first 15 minutes of baking.
If you are using parchment paper, remove it after the first 15 minutes of baking.
Bake the bread for about 25 to 30 minutes, or until it’s a rich golden brown, and its interior temperature registers at least 190°F on a digital thermometer. The smaller loaves will bake more quickly, so keep your eye on them.
Remove the bread from the oven, and cool it on a rack. Store bread, loosely wrapped in paper, for a couple of days at room temperature; wrap it in plastic and freeze for longer storage.
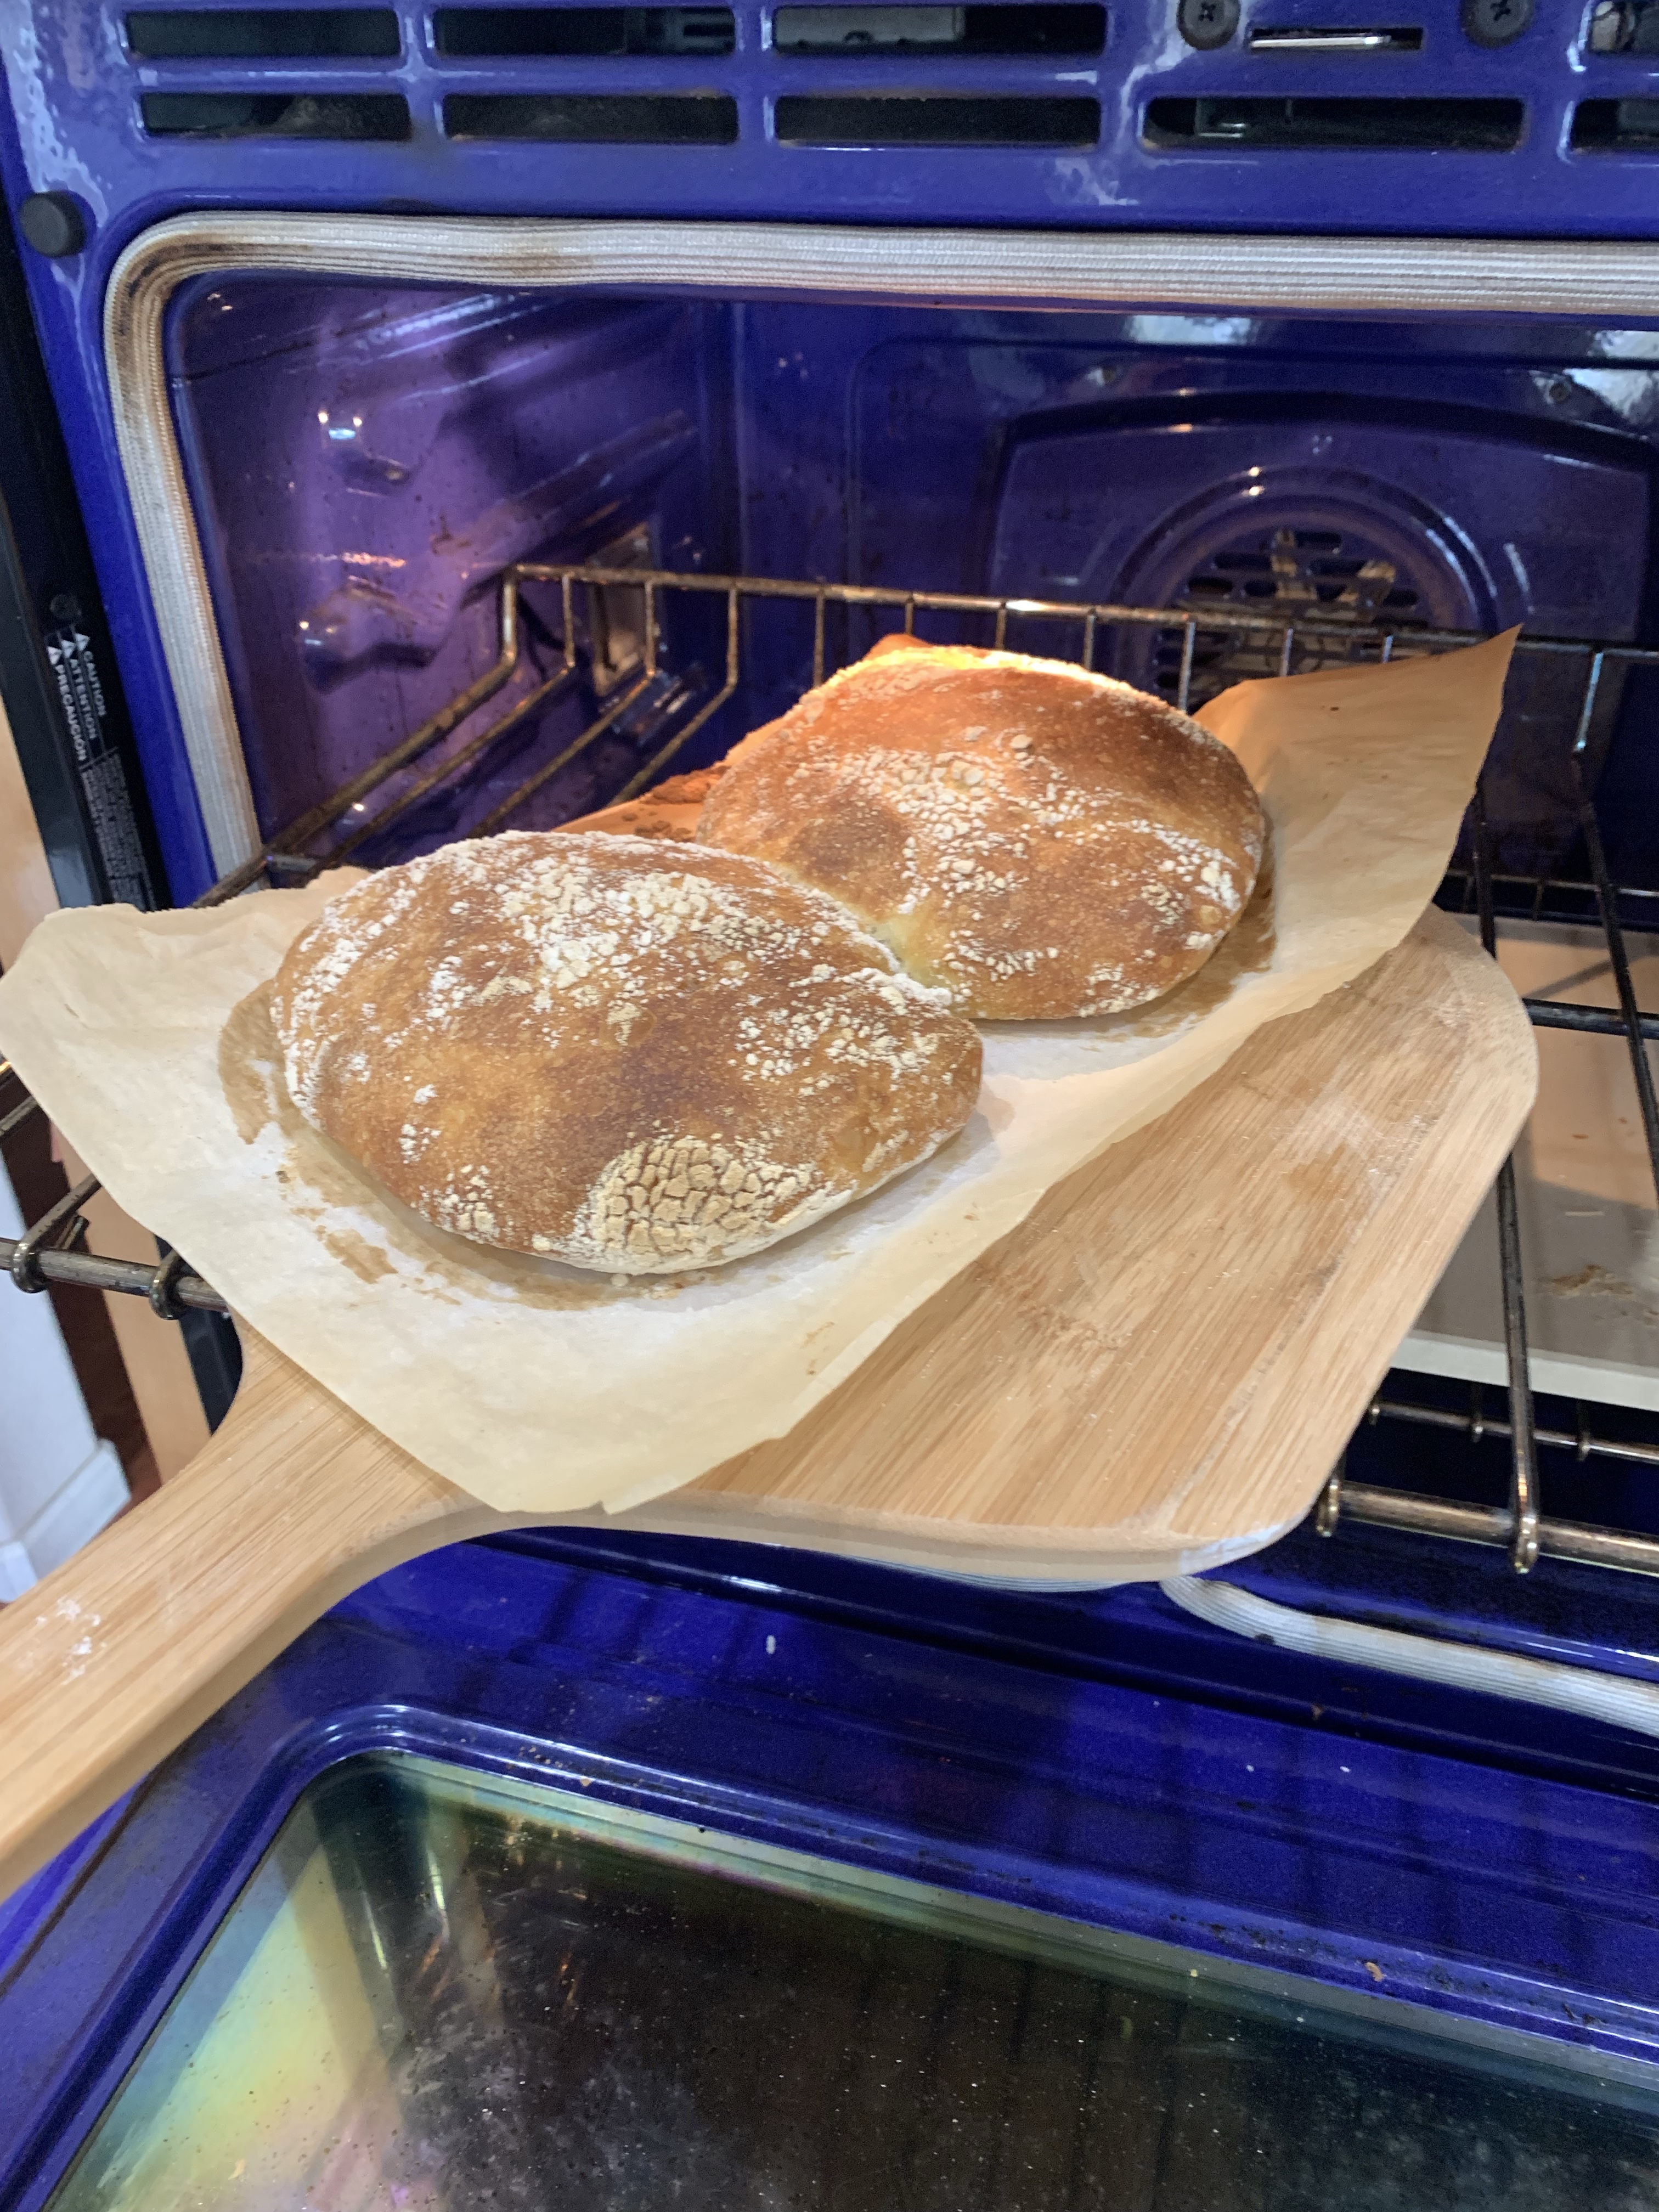
I subscribe to King Arthur Baking’s newsletter and occasionally they distribute a new recipe, or technique that I cannot resist trying. Well, this is one of those times. They included a video that demonstrated the techniques required to handle very high hydration breads. This one is 100%, which means 1:1 water to flour ratio and I could never have made this bread without their technique, (which worked perfectly.)
QC says it’s like eating air.
Big holes and perfect crust. Pair with butter, honey, or oil and vinegar. Oh my!Left: Removing loaves using peel. R: Four loaves coolingThis was my dessert tonight. Buttered Pain de Cristal and honey.
While KAF’s videos demonstrating the bowl and coil folds I decided to make my own. (Theirs are better quality, mine may be truer to life.)
Mix all ingredients then let rest 20 minutesFirst fold with extremely slack dough. With wet hand stretch a portion of the dough up and into the middle of the dish. Repeat at least 12 times then rest, covered, 20 minutesThis is the second (or third, I forget) coil fold. With wet hands pick up the dough about 3/4ths of the way, stretch it up and let it fall back under the bulk of the dough. Repeat with the other end, then repeat the entire fold several times. Note the dough becomes easier to handle and less sticky with each coil fold. There are a total of 4 coil folds.Tip the dough out onto a heavily floured surface. Cover top with more flour so there are no sticky spots. Use a bench knife to cut into four equal pieces and flour the edges where you cut.Carefully, without deflating, shape the dough and place on parchment paper. Let rest for 2 hours.Note the bubbles formed in the dough. For future bakes I would let the dough rest longer than 2 hours to develop more aeration, bubbles and holes in the final brea.
Ok, so I made fruit tarts in braided tart shells. Should the title be Braided Tarts with Fruit, or Fruit Braided Tarts, or Braided Fruit Tarts? Reminds me of Eats, Shoots and Leaves.
Did I fail to mention I had some frozen choux pastry, and as creme diplomat is made with creme patisserie which when piped inside choux and coated with chocolate makes profiteroles and as long as the oven was hot, decided to add some frozen chocolate chip cookies to conserve energy?
QC had the day off and was out with some friends, leaving me home alone, heh, heh, heh. What to do, oh what to do?
There were braided tart shells in the freezer and I recently bought a kiwi and picked an orange from my neighbor’s tree. I promised a couple of friends I would make them some fruit tarts when everything came together and yesterday all the stars aligned.
First freshen the frozen tart shells (notice the braided sides) in the over at 400F for 5-8 minutes, then an additional 5 minutes at 320F.
Peel and cut the kiwi into thin slices and slice the orange and strawberries.
Make the Crème Diplomat and pipe into the cool shells, add the fruit in your best imitation of a pretty pattern. Sprinkle a few blueberries around the other fruit for color.
Serve as soon as possible as the Crème Diplomat will deflate fairly quickly.
A good, quiet “me” day.
Crème Diplomat
INGREDIENTS • ½c sugar • ¼c corn starch • Pinch salt • 2 c whole milk • 4 egg yolks • 2 Tbl butter • 2 cups heavy cream, cold
METHOD
Whisk eggs and milk together and add to all other ingredients (except vanilla) to a medium saucepan.
Bring to boil whisking constantly
Cook until thickened (it will look lumpy, its ok)
Sieve lumpy mixture into a bowl and add 1 tsp vanilla, mix thoroughly
When incorporated, cover with plastic directly on the cream and cool about an hour.
Whip the cold heavy cream to medium peaks.
Fold a few spoonfuls of the custard into the cream. Gradually add the rest of the custard, being careful to not knock the air out.
Notes
You can make the custard or creme patisserie ahead of time, it will keep for a few days in an airtight container in the fridge. However, I would not add the whipped cream until you were ready to serve it. It is best served immediately.
Mix crème patisserie 1::1 with whipped cream if making crème patisserie in advance,
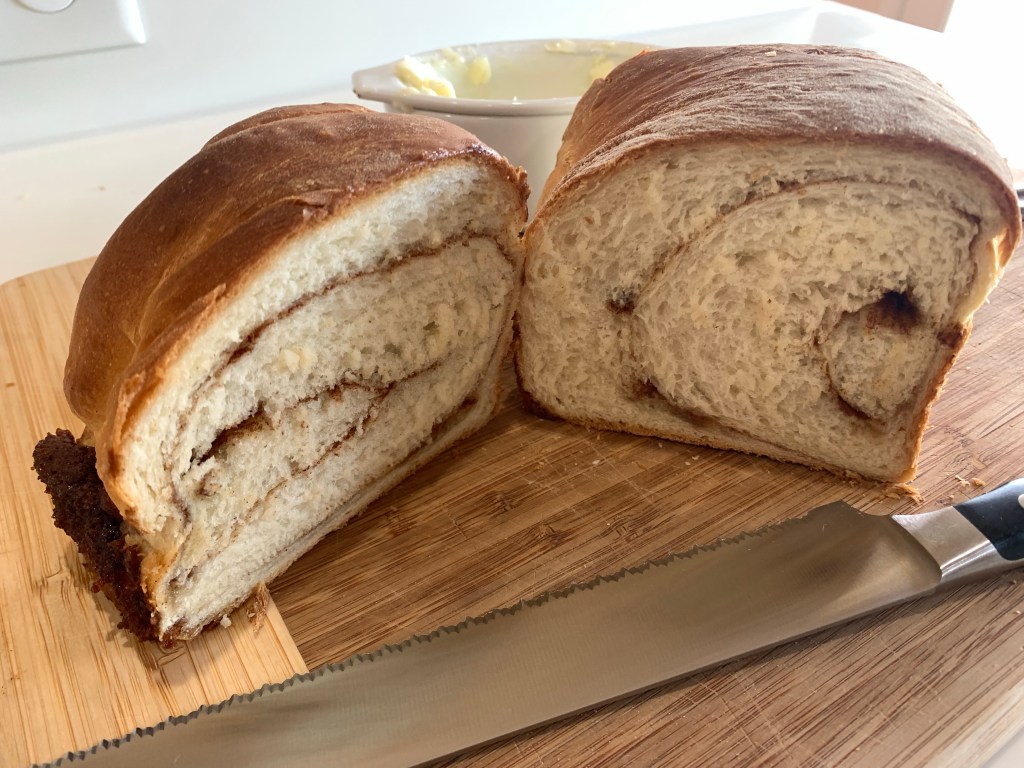
I saw a picture of a loaf of cinnamon swirl bread online and that was it. I knew I would make it. It’s an enriched bread dough, stretched into a long rectangle, filled, and rolled up to make a swirl. It doesn’t require kneading, which is nice, although my Kitchen-aid mixer doesn’t really mind.
A few things I discovered as making the bread. When rolled out, stretch the rectangle to at least 18” and better if you can make it 10” x 22”. The longer the rectangle, and thinner the dough, the more rolls there will be and the better the cinnamon/sugar filling will be distributed.
If you have spring back when stretching the dough let it rest 5-10 minutes. The gluten is trying to contract and letting it rest will help. Other than that, the recipe is pretty accurate. BTW: it is delicious.
No Knead Cinnamon Bread
Makes 2 loaves INGREDIENTS
DOUGH • 6 cups (768g) unbleached all-purpose flour • 1 tablespoon kosher salt • ¼ cup (55g) granulated sugar • 2½ teaspoons instant yeast • 1½ cups (340g) buttermilk or milk • 1 cup (236g) water • 6 tablespoons (¾ stick, or 86g)) unsalted butter, melted • Baking spray with flour FILLING • ¼ cup (32g) flour, for dusting the counter + 4 tsp to stabilize filling • ½ cup (110g) granulated sugar • 1 tablespoon ground cinnamon • 1 egg beaten with 1 teaspoon water • (Optional raisins, diced to less than ¼”)
METHOD DOUGH:
In the bowl of a stand mixer, whisk together the flour, salt, sugar and instant yeast.
In a medium bowl, combine the buttermilk and water. Stir to combine, then heat to 100 -110F.
Add the milk and water mixture then the melted butter. Mix until the liquid is absorbed and the mixture forms a sticky dough ball. (I added an additional ¼ c flour before it formed a good shaggy ball.)
Cover and set aside in a warm spot to rise until the dough has doubled in bulk, about 1½ hours.
Set a rack in the middle of the oven and preheat it to 375°F. Grease two 8.5-by-4.5-inch loaf pans generously with the softened butter.
Release the dough from the sides of the bowl and pull it toward the center, then tip out onto a lightly floured bench. Gently deflate the dough and form into a rough ball.
ASSEMBLE THE BREAD:
Separate the dough into two equal pieces. Using as much flour as necessary, dust your hands and the exterior of the dough, and shape each half into a ball. Let the dough balls rest, covered for 20 minutes without touching.
Transfer one round to the clean, flour dusted bench and gently stretch the dough into a rough 9×20-inch rectangle. (The thinner the rectangle, the more swirls and better distribution of the filling.) If the dough springs back while stretching, let it rest 5 minutes, covered.( In a small bowl, mix 4 tsp AP flour, the sugar and the cinnamon. Brush the dough with the egg wash. Use a small sieve and evenly distribute the filling over the dough with half of the flour-cinnamon-sugar mix, saving the other half for the other dough ball. (Optional: thoroughly mix and coat diced raisins, no more than ¼” in size, into the mix.)
Beginning with one short end, roll it tightly into a coil and place it in a sprayed loaf pan. Repeat with the remaining round. Do not cover the pans. Let the coils rise on the countertop near the oven (or another warm, draft-free spot) until the top of the dough just crowns the rim of the pans, about 10 minutes. (It took mine 20+ minutes in the proofing drawer)
Transfer the pans to the oven and bake until the tops are golden brown and firm to the touch, 40 to 45 minutes. Check the loaves after 20 minutes. The tops were browning and the internal temperature was only 135F. I tented each loaf with aluminum foil and set the timer for an additional 10 minutes. Check every 10 minutes until the internal temperature reaches 185F.
Remove the loaves from the oven, turn them out onto a cooling rack and cool on their sides for 20 minutes before slicing.
NOTES: According to KAF adding flour to the cinnamon/sugar mix and assuring any added fruit chunks are less than ¼” diameter, will reduce the gaps between the rolls of dough.