Dave Oney was born mid last century in Middlebury, Vermont. He received his BS in Chemistry and worked as a polymer chemist in Massachusetts and New Jersey. He became a microscopist (someone who studies little bitty things using a microscope) and photomicrographer (someone who photographs little bitty things) before settling into a 35-year career in technical sales of scientific imaging equipment (the science of digitally recording itty bitty things, sending the image to a computer for analysis.) He designed and created a number of products contributing to this field. He is (was) proficient in several computer languages and is currently working on mastering English.
After making a few more paradigm shift career changes Dave and his wife, Fran, retired and moved closer to their children and granddaughters and now live in the foothills of the Sierra Nevadas.
Last night I made a clone of the macadamia nut cookies we had in Kauai. Basically, they are a shortbread cookie with fine ground macadamia nuts in the batter, and a dark chocolate coating.
Roll the dough into an approximation of a rectangle to minimize waste and chill for two hours. Cut the chilled dough into 1”x2” rectangles and place on a parchment lined cookie sheet. They do not spread so they can be placed fairly close together (like 1/4” – 1/2” apart.)
Once baked and completely cooled melt ~200g of dark chocolate and 1 Tbl corn syrup and dip one corner in the mix. Transfer the remainder to a piping bag. Sprinkle some coarse crushed macadamia nuts on the still wet chocolate and let the piping bag of chocolate cool and thicken slightly. Snip the end off the bag and pipe a chocolate swirl across the cookie. Leave to dry at room temperature or in the fridge.
QC said these may be the best cookies Dede’s Bakery and Confectionery ever made! High praise indeed.
Macadamia Nut Shortbread Cookies
INGREDIENTS • 1 cup butter, room temperature • 3/4 cup powdered sugar • 1 tsp vanilla extract • 2 cups flour • 1 cup macadamia nuts, coarsely chopped • 8 oz. dark chocolate • 1 Tbl corn syrup • 1/4 cup macadamia nuts, finely chopped
METHOD
Beat the butter until smooth and add in the powdered sugar and vanilla. Gradually add flour then mix in the 1 cup of chopped macadamia nuts.
Transfer the batter to a sheet of parchment paper. Lay a second sheet over top and roll to 1/4-inch thickness. Try to shape into a rectangle as much as possible. Place it onto a cookie sheet and refrigerate for 2 hours.
Preheat oven to 300°F and remove dough from refrigerator.
Slice the cookie batter into 1×2 inch rectangles. Transfer to a cookie sheet lined with parchment and bake for 20 – 25 minutes. The edges should be slightly browned.
Cool the cookies completely.
Melt and mix the chocolate and corn syrup then dip the corner of the cookies in the chocolate. Gently remove any excess chocolate, lay it out on a sheet of parchment and sprinkle with some finely chopped macadamia nuts.
Place into the fridge to set the chocolate and then serve.
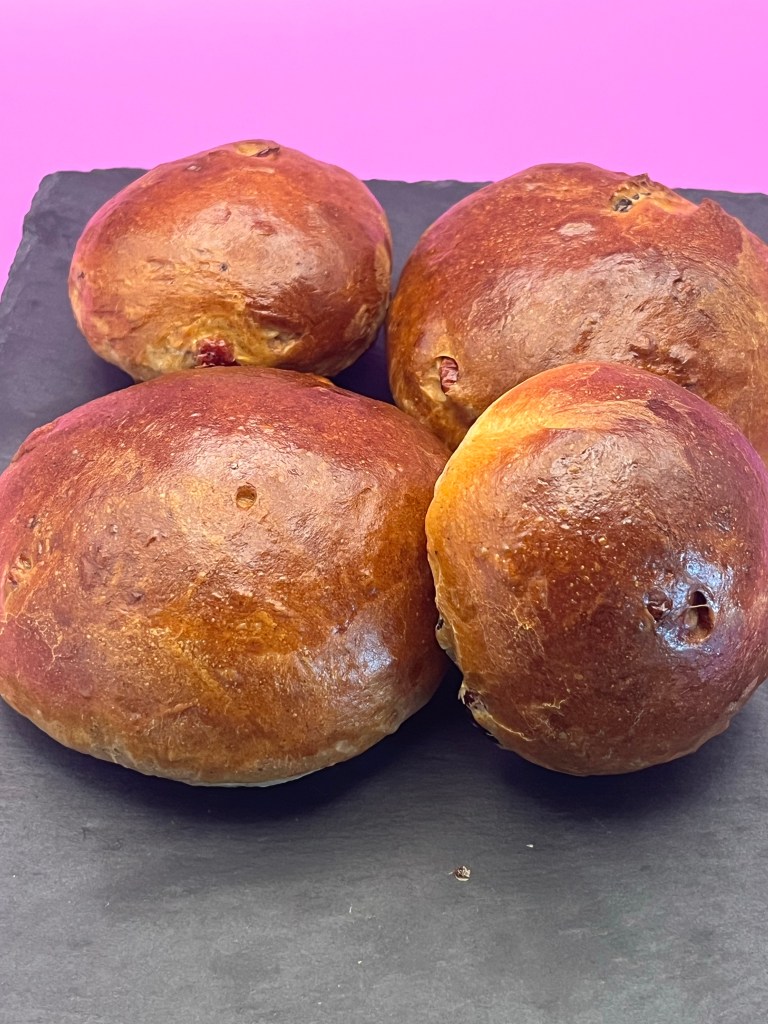
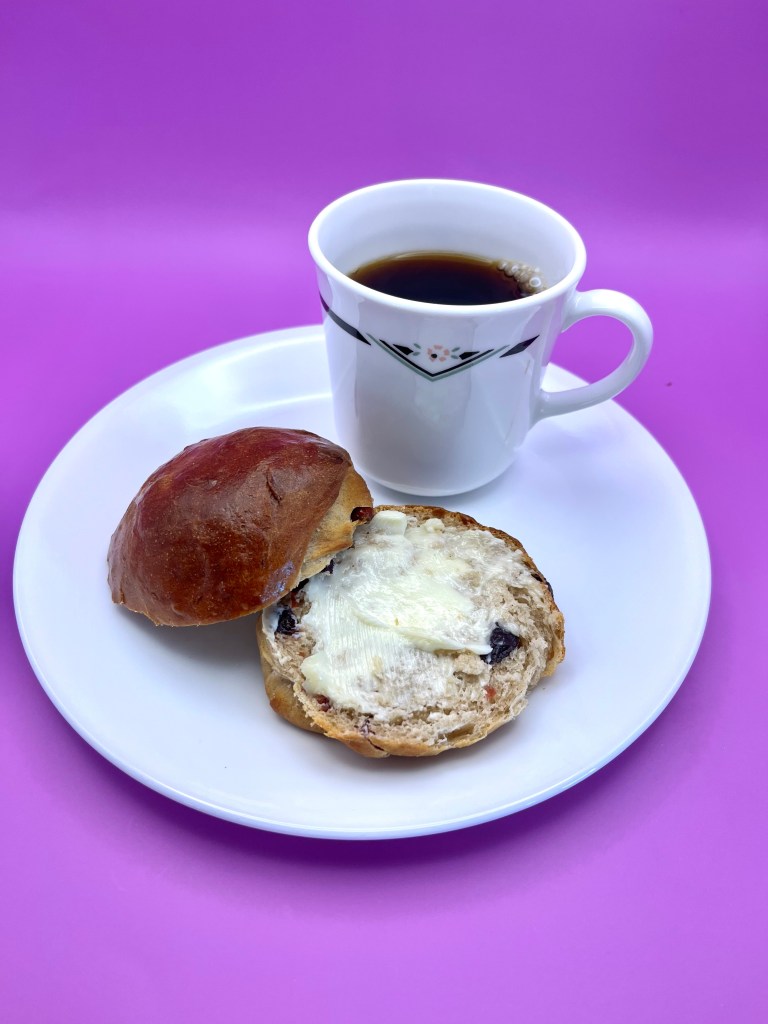
An early episode of GBBO featured English Teacakes. They simply called them Teacakes but as American Tea Cakes are very popular in the southern US, I added the ‘English’ modifier for clarity.
Teacakes are a classic sweet yeasted bun with dried fruit and aromatic spice. English cafes serve teacakes, usually toasted, liberally buttered along side a pot of tea.
The term, teacake, derives from a tradition of ‘yeast cakes’ and are more bread-like than cake-like. They are basically a simple bread dough enriched by adding extra fat (usually butter and/or eggs) so it becomes softer with a delicate crumb.
Teacakes – Traditional English
INGREDIENTS • 1 cup milk (236 ml) warmed to 100 – 110 °F (38 – 43°C) • 2 teaspoons instant dried yeast • 4 tablespoons sugar • 3 ½ cups (455 grams) all-purpose flour • 1 teaspoon salt • 1 teaspoon ground cinnamon • 1 teaspoon all spice • ¼ teaspoon ground ginger • 1 cup (128 grams) dried currants, raisins or cranberries • 6 tablespoons unsalted melted butter • 2 large beaten eggs • Zest of a large lemon – optional replacing some spices from above • 1 additional beaten egg combined with 1 Tbl water for an egg wash
METHOD
Line a large cookie sheet with parchment paper.
Combine the milk, yeast and sugar in a stand mixer bowl. Allow to sit for 3-5 minutes (maybe more) until you start to see it bubble a little.
Add the flour, salt, spices and currants and mix well.
Add the butter and beaten eggs. Use a flat beater to incorporate the liquids into the flour. When the dough comes together, use a dough hook and knead the dough for about 5 minutes until smooth and elastic. It should be slightly but not overly sticky. Add more flour by the tablespoon until that is achieved. It should not clean the walls of the bowl.
Place in an oiled bowl, cover with a towel and leave in a warm place for about 45 mins to rise.
Turn out the dough onto a floured surface and knead lightly for a few minutes until smooth. Divide the dough into 12 balls (~90g each) and shape each into a bun that is a flat round.
(12 balls will make a traditional teacake size. Divide into 45g balls for small snack sized cakes. Adjust the bake time accordingly.)
Place evenly spaced onto the baking sheet and cover loosely with a towel. Leave in a warm place for 30 minutes until they double in size.
Preheat oven to 400°F /200°C.
Brush the tops of the buns with the egg wash. Bake for 15-20 minutes until golden brown (time may vary depending on your oven). I rotate the pan after 8 minutes to compensate for uneven temperature in the oven.)
My friend Rita, and her daughter Sarah, recently returned from an Italian vacation. This bread’s for them!
I woke up this morning and decided to cut the Next Up list in Dede’s Bakery and Confectionary list with Italian bread. This loaf has a nice crumb, open structure, good chewy crust and great taste. “ ‘O sole mio!”
Italian Bread
INGREDIENTS • 2 ¼ tsp (7g) active dry yeast • 1 ¾ c (413g) warm water • 1 tsp (4g) sugar • 3 ¼ c (455g) bread flour • 2 tsp (12g) salt • 1 egg white
METHOD
In the bowl of your stand mixer, mix your yeast, warm water, and sugar. Allow the mixture to sit until the yeast becomes frothy, about 5 minutes.
Once the yeast is ready, add the flour and salt to the bowl. using the dough hook attachment, mix on low speed until the dough comes together, about 3-4 minutes. Increase the speed to medium and mix it for 3-5 minutes to develop the gluten. Add additional flour by the Tbl until the dough barely cleans the sides of the bowl.
Once the dough is done mixing, remove it from the mixer and place it into an oiled bowl. Cover and let the dough rest until it has doubled in size, about 1 hour. Prepare a baking sheet by lining it with parchment paper. It should weigh ~862g.
Dump the dough out onto a floured surface and pound the air out of it, fold it back in on itself into a round and place it back into the bowl, seam side down. Cover and let it rest for another 30-40 minutes.
Once it has rested and risen back up again, dump it out onto a lightly floured surface and degas it again. Cut the dough in half and toll them both up into 10 inch baguette-like loaves. Place the loaves onto your prepared baking sheet, seam side down and cover them. Preheat your oven to 375F.
Whisk egg white and 1 tbl water to use as an egg wash
Proof your loaves until they are nearly double in size about 30-45 minutes. Once the loaves are ready, score your loaves and bake them for 25-30 minutes After the first 15 minutes brush egg wash on the bread, sprinkle with sesame seeds and return to finish baking.
They should have a light golden crust and bake to interior temp of 190F.
While traveling last week I saw a recipe for 3 ingredient sugar cookies. QC loves sugar cookies so they moved to the top of DeDe’s Bakery and Confectionery ToDo list.
The original recipe called for just three ingredients, butter, powdered sugar and AP flour. After following the recipe I determined it was not nearly slack enough to pipe into swirls, so I added a fourth ingredient, milk.
I used the first attempted recipe to judge if, with modification, the batter could be modified to allow it to pipe. The second go round (below) I actually measured the amount of milk required to produce a very, very, firm peak, pipeable batter.
I used an Mi piping tip on the first attempt. The piped cookies were very nice, much like roses, but as expected they lost definition after baking. Typical of this type of cookie the butter melts out during baking.
For the second attempt, I used a B4 tip and expected the same result, but perhaps due to the less pronounced ridges it held its shape a bit better. Lucky guess in piping tips. Also, I froze the second attempt rather than just refrigerating.
Light, fluffy whipped cream-like butter and sugarB4 on the left, Mi on the rightM1 piped batterB4 piped batterB4 in the foreground, M1 behind
Swirled Butter Cookies
INGREDIENTS • 227g (1 c) Unsalted butter • 118g (1 c) Powdered Sugar • 256g (2 c) AP Flour • ¾ c + 2 Tbl milk to thin to piping consistency
METHOD
Preheat oven to 350°F (325°F Convection.) Line 2 large baking sheets with silicone baking mat or parchment paper.
In mixing bowl of a stand mixer, add butter and sugar. Cream at highest speed for about 5 minutes or until light and fluffy. The mixture should turn from yellow to white and look like whipped cream when you are done. Make sure to stop and scrape the sides of your bowl a few times with a spatula so that all the butter gets creamed.
Add in the flour ½ cup at a time. Mix in at low speed and then gradually increase speed once flour is incorporated. The mixture will be crumbly at first but then should form a thick, soft dough, almost like a thick paste.
Add milk sparingly until the dough achieves a firm piping consistency. (Think very firm peaks.)
Transfer the dough to a piping bag. Using a large open star tip (an M1 or B4 with a 1/2 inch opening), pipe swirls or whatever design you prefer. Space cookies 1 inch apart. Place piped cookies into freezer for 30 minutes so the dough is chilled. This will prevent them from spreading as much when they bake.
Place the cookie sheets into the middle of your oven. Bake for ~20 minutes or until edges and surface start to turn a light brown. (Rotate cookie sheet after 10 minutes). The fine detail of the piping will flow out as the butter melts, but the swirl should remain.
Let cookies cool on cookie sheet before removing. Store uneaten cookies in an airtight container.
I originally saw this brioche on FB. It was published by Cookist. I tried it as presented and it was a disaster. I decided to try again using my own brioche recipe and it was good. Maybe not good enough to make again, but perhaps with more modification it could be a success.
My brioche recipe is easy to make. It’s a basic bread recipe enriched by adding eggs and milk. To make the bicolor, divide the dough in half and add 2-3 tablespoons of cocoa, (enough to make a solid chocolate dough.) To incorporate the cocoa and end up with a soft pliable texture I added two more tablespoons of butter and two tablespoons of milk, You should have a soft, pliable but slightly sticky dough.
The resultant brioche crumb was tighter that this type of bread should have, however it was a nice soft bread with a pleasant taste. It’s probably not worth making again, however I plan to replace the chocolate component was a pumpernickel brioche. Stay tuned.
Rolled, cut and twisted doughPinch the ends together to reduce unrollingPretty loaf!Completed bicolor brioche.
BiColor Brioche
INGREDIENTS • 1 c milk – • 3 Tbl sugar • 5 g yeast • 2 eggs, separated • 4 Tbl softened butter – • 4 1/3 c AP flour • ½ tsp salt • 3 Tbl cocoa powder
METHOD
Whisk milk, sugar and yeast together in a stand mixer bowl
Add and whisk one egg
Cube butter and add with salt and flour
Mix with dough hook 8 minutes
Divide in half
Add cocoa powder to one of the halves and knead to mix thoroughly
Cover both halves (in separate bowls) for 2 hours
Roll the white dough into a rectangle approx 12×14”
Roll the chocolate dough into a rectangle 11×13”
Lay the chocolate dough over the white leaving ½” border
Roll the two layers together.
Use pizza cutter, cut approximately 1” wide cuts though half the rectangle
Add hazelnut cream to the uncut half of the dough. Spread to approximately 3” wide and 1” from the ends
Twist each 1” cut portion of the dough approx 8 times
Start rolling from the uncut end, carefully pick up and place in a bread pan
Preheat oven to 360 degrees
Let rest 30 minutes
Coat with egg wash
Bake 360 deg for 35 minutes
After 10 minutes, remove from bread pan to let cool
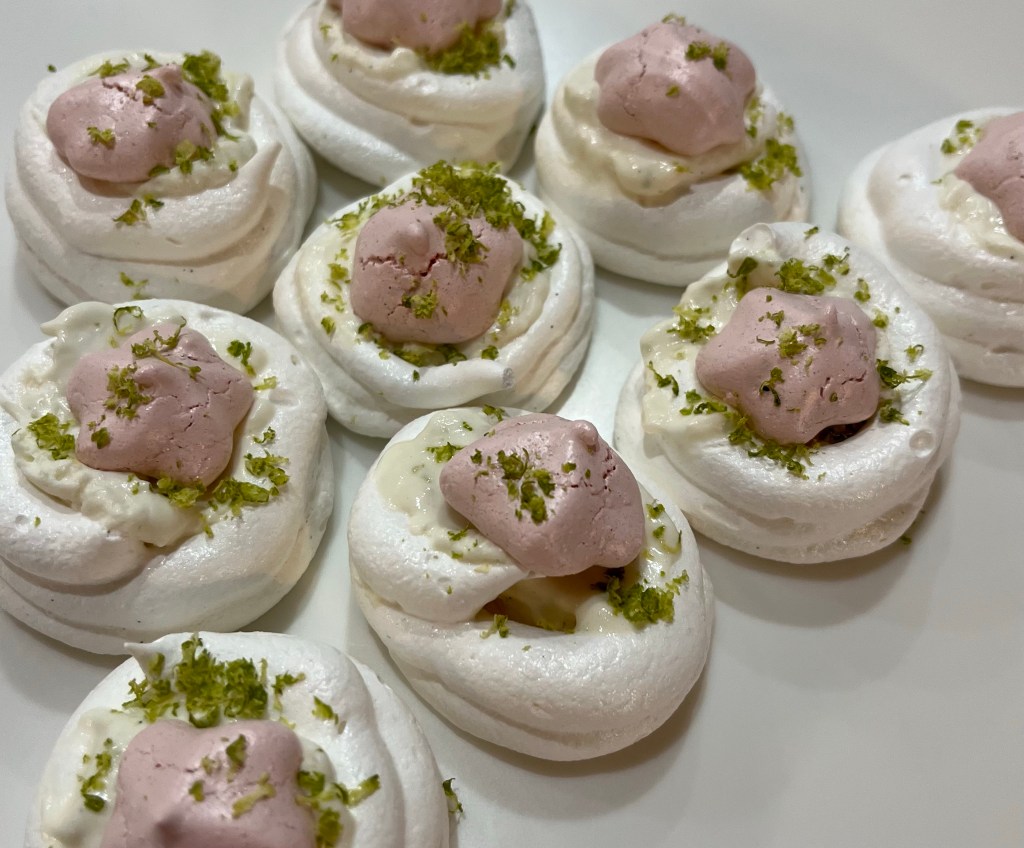
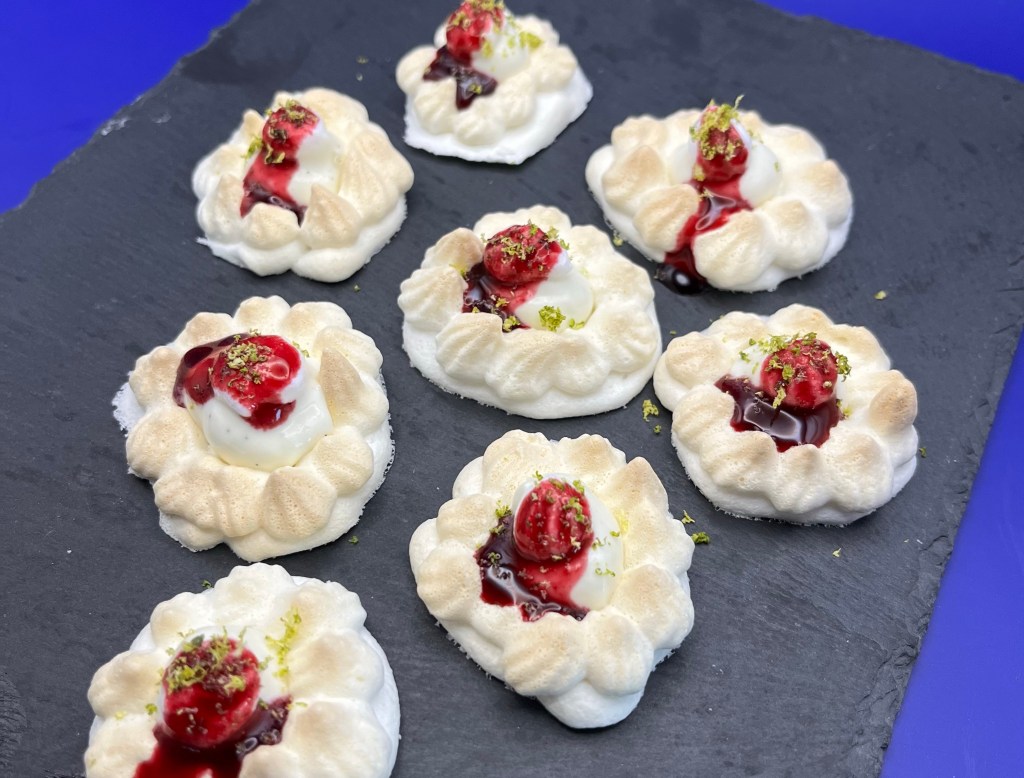
QC reported back that the mousse of the previous attempt wasn’t sharp enough to balance the sweetness of the meringue. I, on the other hand, didn’t think the meringue itself was up to snuff. (Interesting phrase, up to snuff.)
Today, I modified the mousse recipe to give it a bit of a punch and resurrected my pavlova recipe rather than use the Italian meringue recipe I used in the previous.
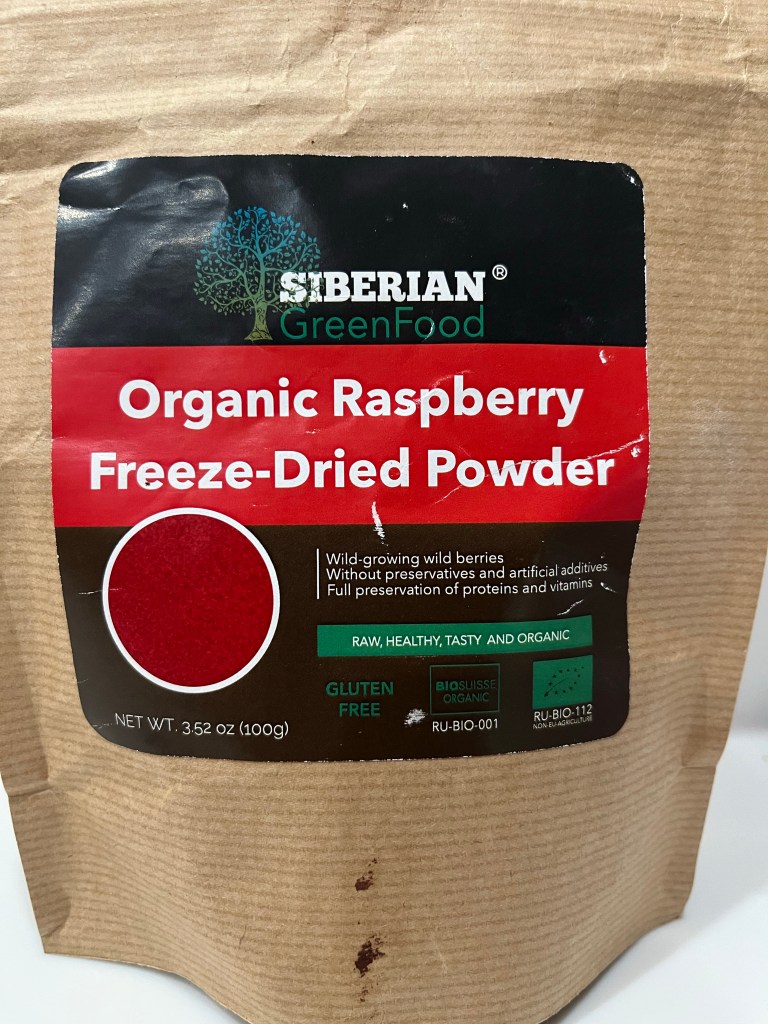
I added 1/2 teaspoon of freeze dried raspberry powder for a little more acidity.
Both revisions were spot on. (Another interesting phrase.)
Here is the new recipe and method for the Key Lime Merengue Tartlets.
Key Lime Mousse Meringue Tartlets
INGREDIENTS
MERINGUE 6 (180 g) large rm temp egg whites 1 ½ cups granulated sugar 2 tsp corn starch ½ tsp cream of tartar ½ Tbsp lemon juice ½ Tbsp vanilla ½ Tsp freeze-dried raspberry powder
MOUSSE 1 ½ c. heavy cream ¼ c. powdered sugar 1 c. sweetened condensed milk (try reducing to ½ c) 1/3 c. key lime juice 30 g of fresh squeezed lime juice 5 g of zest from the same lime 1 tsp. pure vanilla extract
METHOD
MOUSSE
In the bowl of a stand mixer fitted with the whisk attachment, beat cream and powdered sugar into stiff peaks.
Zest the lime, then squeeze and collect the juice.
In a medium bowl, mix condensed milk, key lime juice, lime juice, half the lime zest and vanilla until combined.
Add to bowl of whipped cream. Gently fold ¼ – ½ c. in until just combined. (It wasn’t thick enough. Try to cut the sweetened condensed milk in half. Slowly add the lime mixture to the whipped cream ¼ cup at a time. Refrigerate to thicken.)
Keep refrigerated until ready to fill the meringue cups.
MERINGUE
Preheat the Oven to 215˚ F. Line a large baking sheet with parchment (or Silpat) paper. Using your stand mixer, beat egg whites on high speed until soft peaks form.
Whisk together sugar and cream of tartar. With the mixer on high, gradually add sugar and cream of tartar one tablespoon at a time, waiting between each addition.
Beat 10 min on high speed, or until firm peaks form. It will be smooth and glossy.
Add the cornstarch, lemon juice and vanilla extract. Continue whipping until very firm peaks.
Divide meringue saving a few tablespoons for the kisses. Add the raspberry powder and whip until incorporated.
Pipe a disk of meringue about 2”-2 ½” diameter then pipe around the disk to make walls about ½” – ¾” high.
Pipe kisses of raspberry meringue on the silpat using a star piping tip. Each kiss should be ¼” – ½” high and ½” – ¾” diameter.
Bake for 30-45 min. If the temperature is too high, or you leave them in the oven to long they will begin to brown. Check after 30 minutes and add 15 additional minutes if necessary for the surface to no longer tacky.
Turn off the oven and leave the meringue cups in the oven to slowly cool.
Once cool, store in an airtight container for 3-5 days at room temperature (in a low humidity place).
TARTLETS
When both the mousse and meringue cups are cool, pipe the mousse into the well of each tart shell.
Place a kiss on each, sprinkle some lime zest on top of the tart and kiss.
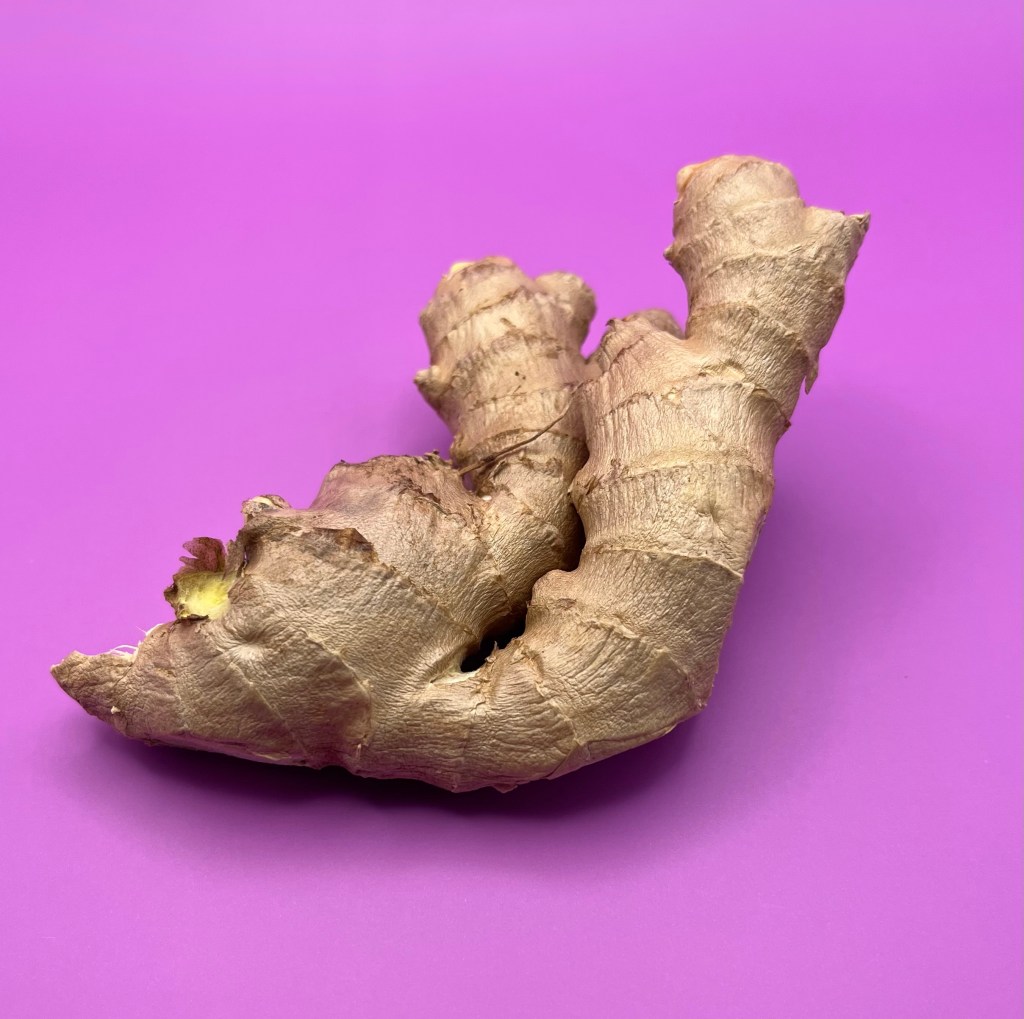
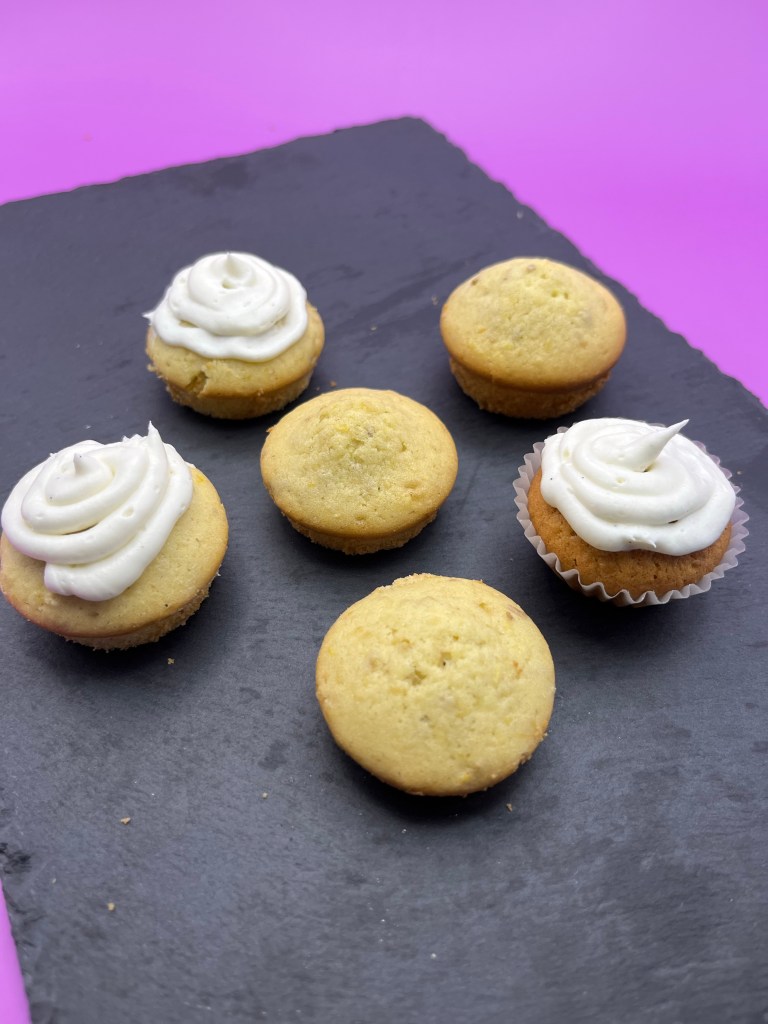
For the life of me I don’t know why I put off making these ginger muffins! They are delicious, have a great texture and are relatively easy to make. Oh! I used 1 1/16” inch diameter cupcake papers so they are bite sized.
One of the best things about making these is you don’t have to peel the fresh ginger. Just cut off the required amount and grind it up in a food processor.
Ginger Root Frosted and Unfrosted muffins
The unfrosted muffins have a nice heat from the ginger while the frosted ones have a nice balance of cool sweet and heat.
Fresh Ginger Muffins
INGREDIENTS Muffins • 2-oz (58g) piece unpeeled ginger root • ¾ c plus 3 tbl sugar • 2 tbl lemon zest with some pith • ½ c (1 stick) butter, room temperature • 2 eggs • 1 cup buttermilk • 2 cups all-purpose flour • ½ teaspoon salt • ¾ teaspoon baking soda Frosting • 8 oz (224g) full-fat block cream cheese, softened to room temperature • ½ c. (115g) unsalted butter, softened to room temperature • 3 c. (360g) confectioners’ sugar, plus an extra 1/4 cup (30g) if needed • 1 tsp vanilla • 1/8 tsp salt
METHOD
Preheat the oven to 375 degrees.
Grease 16 muffin pans. I used small cupcake papers to make mini muffins.
Process the ginger in a food processor until it is in tiny pieces. You should have about 1/4 cup. It is better too much ginger than too little.
Put the ginger and 1/4 cup of the sugar in a small skillet and cook over medium heat until the sugar has melted and the mixture is hot. Do not walk away from the pan – the sugar will melt quite quickly. Remove from the heat and let the mixture cool completely.
Put the lemon zest and 3 tablespoons sugar in the food processor and process until the peel is in small bits. Or, sprinkle the sugar over the zest and chop by hand. Add the zest and sugar mix to the ginger mixture and set aside.
In a mixing bowl, beat the butter slightly, then add the remaining 1/2 cup sugar and beat until smooth. Add the eggs and beat well. Add the buttermilk and mix until blended. Add the flour, salt and baking soda and beat until smooth. Add the lemon-ginger mixture and mix well.
Spoon the batter into the muffin cups so that each cup is about 3/4 full. Bake 15-20 minutes. Serve warm.
In the bowl of a stand mixer use the paddle to beat the cream cheese and butter together on high speed until smooth and creamy.
Add 3 cups confectioners’ sugar, vanilla, and salt. Beat on low speed for 30 seconds, then switch to high speed and beat for 2 minutes. If you want the frosting a little thicker, add the extra 1/4 cup of confectioners sugar.
Cover and store leftover frosting for up to 5 days in the refrigerator or up to 3 months in the freezer. After freezing, thaw in the refrigerator then beat the frosting for a few seconds so it’s creamy again.
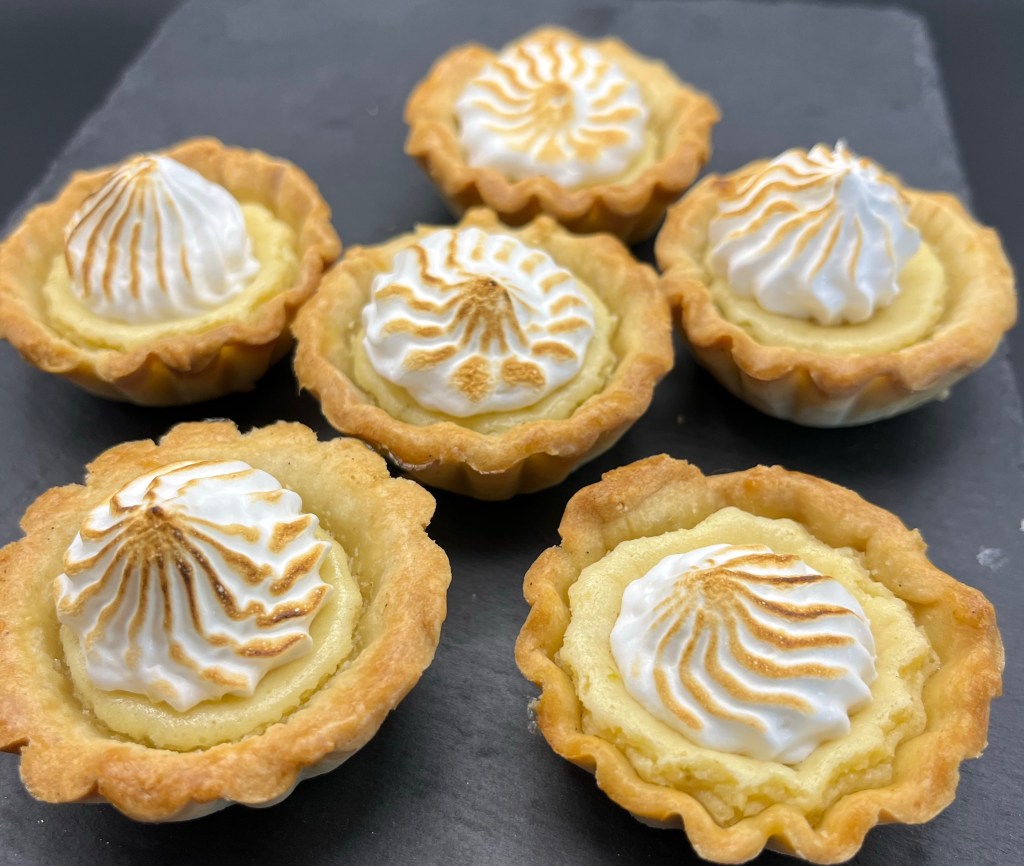
I had some key lime mousse left over from yesterday and didn’t want to waste it, so I made more key lime tartlets this morning. I did NOT have any tart shells left over so I decided to experiment with meringue “tart shells.” I needed to do that anyway as I am making them for Passover in April. I made some fresh blueberry syrup to add some color. I also need to “tart up” these tarts and the meringue is very sweet.
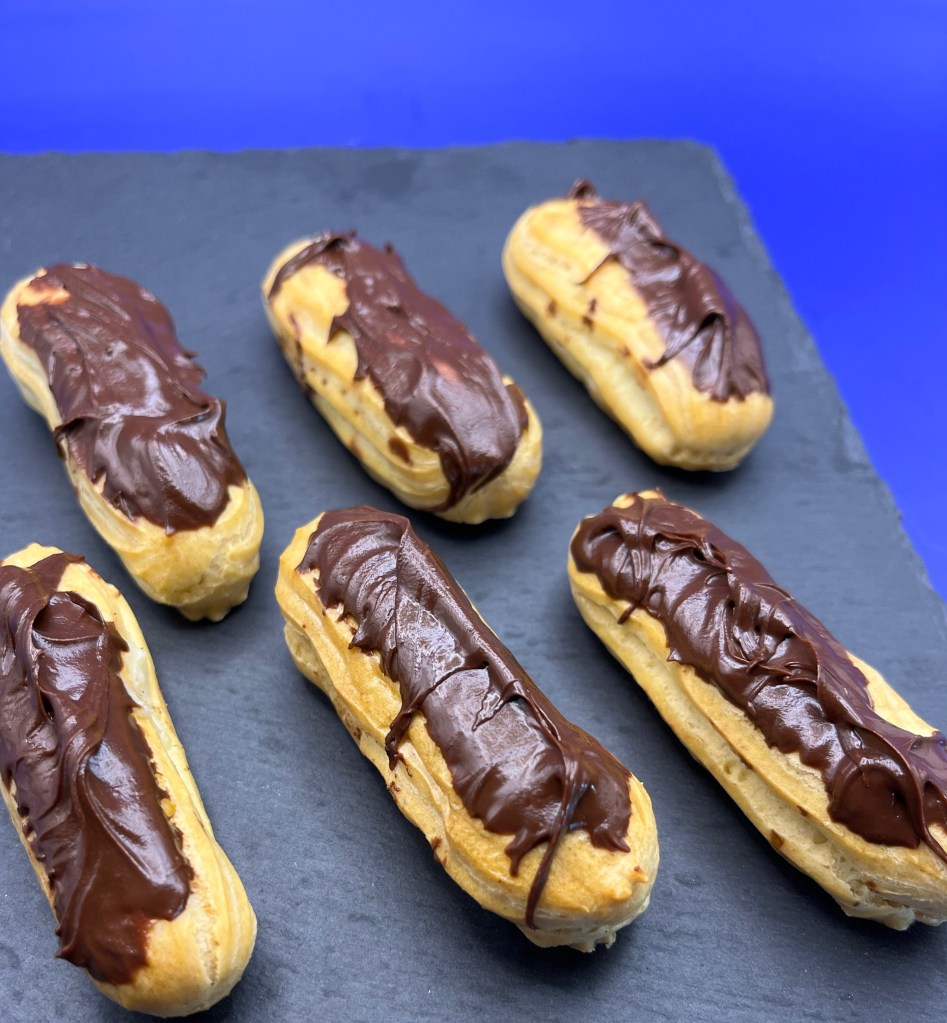
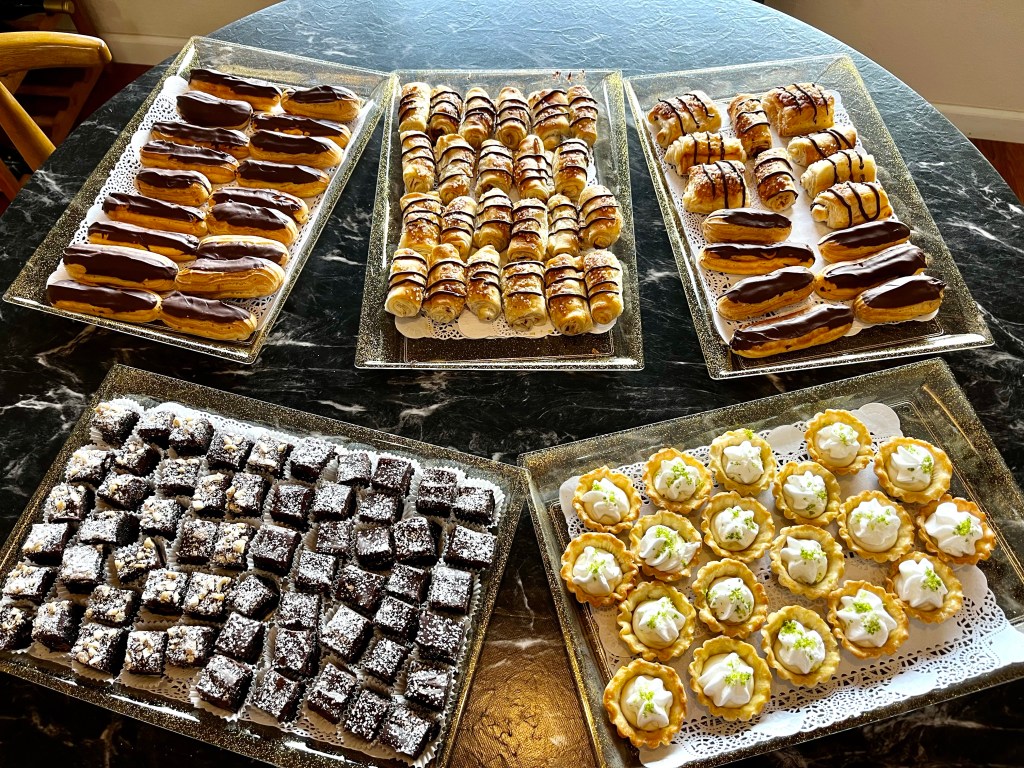
I also didn’t have room on my serving trays for all the eclairs I made so I finished them this morning.
The chocolate was a little thick but I managed to coat the eclairs with a nice, thick layer of chocolate. It’s a shame.
Time to update the Next Up in DeDe’s Bakery!
Key Lime Mousse Meringue Tartlets
INGREDIENTS
MERINGUE • 80g (or 0.4 cup or 6.5 Tbl) granulated sugar • 30ml (or 1/8 cup) water • 60g (or ¼ cup) egg whites (about 2 large egg whites) • ¼ tsp cream of tartar MOUSSE • 1 ½ c. heavy cream • ¼ c. powdered sugar • 1 c. sweetened condensed milk • 1/3 c. freshly squeezed key lime juice • Juice of one lime • Zest of the same lime • 1 tsp. pure vanilla extract • Key lime zest , for garnish
METHOD ITALIAN MERINGUE
Whisk the egg whites into a light and fluffy foam, using a stand mixer.
Add the cream of tartar and continue whipping until you’ve got a glossy stable foam. It should stay in place if you turn the bowl upside down. Set aside.
Add the granulated sugar and water to a pan and bring to a boil. Once all the sugar has dissolved, refrain from stirring. Continue boiling at moderate/high heat while continuously until the solution has reached 240°F, then remove from the heat.
While SLOWLY beating the egg whites, gently pour the hot sugar solution into the whipped egg whites.
Once all the sugar syrup is in, turn up the speed to high and continue whisking until the foam is lukewarm. This may take 15 minutes.
MOUSSE
In the bowl of a stand mixer fitted with the whisk attachment, beat cream and powdered sugar into stiff peaks.
Zest the lime, then squeeze and collect the juice.
In a medium bowl, combine condensed milk, key lime juice, lime juice, lime zest and vanilla. Add to bowl of whipped cream. Gently fold in until just combined.
Keep refrigerated until ready to serve.
TARTLETS
Pipe meringue into disks about ¼ “ thick and 3” diameter. Bake at 200F for 45 minutes, until they are dry to the touch.
Remove from oven and let cool, then pipe kisses of meringue around the edges of the disks. Each kiss should be ¼” – ½” high. Bake at 200F for 45 – 60 minutes, not letting the tips of the kisses brown. Turn the oven off and leave the meringue in the oven to cool before removing.
When cool, pipe the mousse into the well of each tart shell.
Pipe (or place, see NOTE) a small kiss on each tart. NOTE: After making these tartlets I realized making individual small ( ¼” – ½”) diameter kisses could be placed on the piped mousse. Pipe them at the same time, with the same piping tip as the edges of the tartlets. Then, just place them on the piped mousse.)
Spoon a small amount of berry juice (I used blueberry juice, but any tart juice would work.)
Our synagogue’s fundraiser is tonight and the administrator asked me to provide some of the deserts and something for the auction. To identify my goods I asked Dan to create a logo for me. For those who do not know, DeDe is my granddaughters name for me because they couldn’t pronounce Zayde (Yiddish for grandfather) when they were younger and it just stuck.
Over the last week or so I made and froze choux pastry for the eclairs and shells for the tarts. I made all the fillings yesterday and assembled everything this morning except the pain au chocolat which I made in its entirety this morning. (They don’t take very long.)
I am making key lime tartlets for a Gala/fundraiser in a week and wanted to practice. It’s a good thing I did. The meringue never whipped to peaks. I binned the first attempt and made some minor changes to the second, which resulted in perfect, smooth, silky Italian meringue.
I used a kitchen blowtorch to brown the tops. The lime zest incorporated in the filling and lightly dusted on the top added the tartness to balance the meringue.
Key Lime Tartlets
Gluten Free suggestions at the end
INGREDIENTS SHELL • 100 g cold butter cut into small cubes • 200 g all-purpose flour • 60 g icing sugar • ½ tsp vanilla • ¼ tsp salt • 2 eggs – 1 for the dough and the other 1 reserved for an egg wash (try egg white only for Almond flour.)
FILLING • zest (grated rind) of 1 lime • 4 large egg yolks • 14-ounce can (397g) sweetened condensed milk, (1 1/4 cups) • 3/4 cup (170g) Key lime juice or lime juice • 1/8 to 1/4 teaspoon lime oil, optional METHOD SHELL
Mix butter with sugar until well incorporated 3-5 min
Add salt then vanilla
Add egg and mix 3-5 min – for almond flour: suggest using only the egg white to reduce the moisture in the dough
Stir in flour. Mix by hand until incorporated and forms a thick smooth(ish) sticky dough
Cover with plastic and refrigerate for 30 min
Pre-heat oven to 350 degrees
Butter tartlet pans, or use non-stick pans For AP Flour a. Roll dough on floured surface b. Cut into circles 1” larger diameter than the mold c. Press into molds filling all parts of the mold For Almond Flour a. Roll dough between parchment paper to about ⅛” thick b. Freeze rolled dough still between parchment paper until firm: 20 – 30 minutes c. Cut frozen dough to rounds about 1” larger diameter than the mold. Cut all the rounds at once while still frozen. I used an offset spatula to remove the circles from the parchment paper. Keep the spatula clean. d. Lay tart dough circles over molds. This allows the dough to thaw slightly and be pressed into the molds and fill all crevices.
Pinch off excess with wet fingers. (Dough is sticky)
Prick holes in bottom and sides of formed dough
Fill tarts with pastry weights (I put beans in mini cupcake papers
Paint edges of the tartlet with the egg wash.
Bake in preheated oven 350 deg F (175 C) for 6-8 min
Remove pastry weights and bake an additional 4-6 minutes to dry the bottoms. Bake until the edges are begin to turn light brown
Immediately remove from pans and cool on a wire rack
FILLING
Whisk the lime zest and egg yolks at high speed of an electric mixer for about 4 minutes. The mixture will lighten in color and thicken somewhat, appearing similar to Hollandaise sauce.
Stir in the sweetened condensed milk, mixing until smooth. Beat at high speed for 3 minutes; the filling will become slightly thicker and gain a bit of volume.
Add the lime juice, stirring just to combine. The mixture will thicken again. Add lime oil to taste.
PIPE the filling into the crust and return the tart (on the baking sheet) to the oven. Bake the tart for 12 to 18 minutes, until it appears set around the edges though still a bit wobbly in the center. The center should read about 145°F on a digital thermometer.
Remove the tart from the oven and cool to room temperature. Refrigerate for several hours before serving.
Once chilled, serve the key lime pies cold with whipped cream, or merengue and a lime slice or zest, if desired.
Store leftover pies in the refrigerator (covered) for up to 1 week. If they last that long!
Notes Make Ahead & Freezing Instructions: Up to 1 day in advance, you can prepare the crust ingredients and the filling ingredients separately. Store each covered tightly in the refrigerator until ready to assemble and bake. You can bake the key lime pies and store in the refrigerator for 1 day before serving. Key lime pies freeze well, up to 2–3 months. Thaw overnight in the refrigerator before serving.
Gluten Free: Substitute Almond flour for AP flour or 1:1 Almond and coconut flours Add 1 Tbl psyllium husk per cup of almond flour.
ITALIAN MERINGUE
INGREDIENTS • 80g (or 0.4 cup or 6.5 Tbl) granulated sugar • 30ml (or 1/8 cup) water • 60g (or ¼ cup) egg whites (about 2 large egg whites) • 20 g icing sugar
METHOD
Whisk the egg whites into a light and fluffy foam, using an electric (stand) mixer.
Add the icing sugar and continue whipping until you’ve got a glossy stable foam. It should stay in place if you turn the bowl upside down. Set aside.
Add the granulated sugar and water to a pan and bring to a boil. Once all the sugar has dissolved, refrain from stirring. Continue boiling at moderate/high heat while continuously keeping an eye on the temperature.
Once the solution has reached 121°C (250°F), take it from the heat immediately*.
While SLOWLY beating the egg whites, gently pour the hot sugar solution into the whipped egg whites (this is where the stand mixer comes in handy!).
Once all the sugar syrup is in, turn up the speed to high and continue whisking until the foam is lukewarm.
Use the meringue immediately to top whatever it is you want to cover.
NOTES Italian meringue can be made two days in advance and stored in the fridge until needed (covered with plastic wrap). Store in a piping bag, sealing the tip,