Dave Oney was born mid last century in Middlebury, Vermont. He received his BS in Chemistry and worked as a polymer chemist in Massachusetts and New Jersey. He became a microscopist (someone who studies little bitty things using a microscope) and photomicrographer (someone who photographs little bitty things) before settling into a 35-year career in technical sales of scientific imaging equipment (the science of digitally recording itty bitty things, sending the image to a computer for analysis.) He designed and created a number of products contributing to this field. He is (was) proficient in several computer languages and is currently working on mastering English.
After making a few more paradigm shift career changes Dave and his wife, Fran, retired and moved closer to their children and granddaughters and now live in the foothills of the Sierra Nevadas.
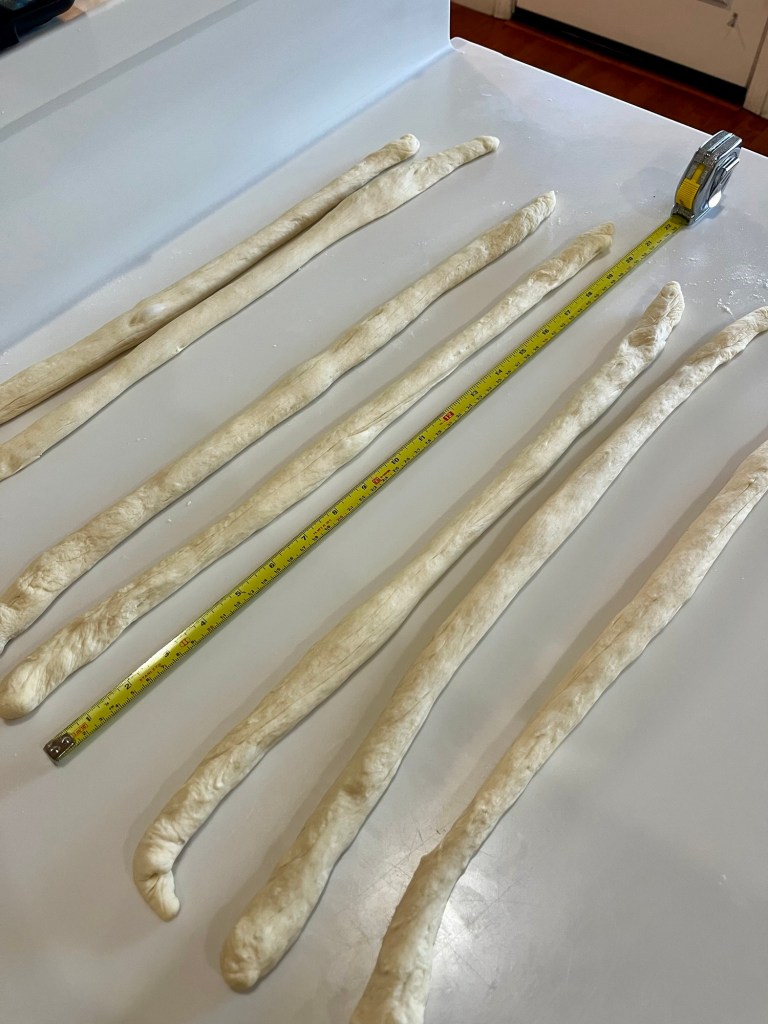
Mostly I followed Paul Hollywood’s recipe. I wanted a larger wreath so I extended each strand by a few inches. I plan to add some Easter eggs to the center for our brunch next Sunday. Hopefully there is room enough for an egg for each kids in attendance.
Paul Hollywood’s Seven-Strand Plaited Wreath
INGREDIENTS • 500g bread flour • 7g fast-action dried yeast • 10g fine salt • 340ml of water • 1½ tbsp olive oil, plus extra for greasing • 1 egg, lightly beaten with a pinch of salt METHOD
Make the dough. Place the flour in a large mixing bowl. Add the yeast and salt, and stir to mix.
Pour three-quarters (225ml) of the water into the flour mixture. Add the olive oil and mix by hand until combined, then mix in the rest of the water to form a dough.
Turn out the dough onto a lightly floured work surface and knead by hand for about 10 minutes, until the dough looks silky and stretchy. Place the dough in a lightly oiled mixing bowl. Cover with a tea towel and leave to rise for about 45 minutes, until doubled in size.
Turn out the dough onto a lightly floured work surface again and knead it to knock it back. Shape the dough into a ball. It should weigh ~930 g. Divide the ball into 7 equal pieces, (~133g each) then roll each piece into a strand about 80cm long.
Make the plait. Lay out the strands on a lightly floured work surface like an octopus, with the legs fanned out from a central, top point, stretching towards you. Stick all the ends at the central point to the work surface with your thumb. Take the outside strand on the right and cross it over 3 strands towards the middle while gently stretching it, then take the outside strand on the left and cross it over 3 strands towards the middle. Stretching the strands makes a slightly tighter braid.
Repeat this process, always taking the outside strand (first on the right and then on the left) and crossing it over 3 strands into the middle until you have plaited all of the strands.
Shape the plait. Trim each end of the plait to neaten, then form the plait into a wreath, pinching the ends together to join them and tucking the join underneath to give a neat finish. Trim enough off so the join is about the same diameter as the rest of the plait. Optionally put a small oven safe bowl in the center of the wreath to maintain the size and shape. As a treat roll the end trimmings into a ball and bake on the same sheet as the wreath. Don’t forget to egg wash it.
Place on the parchment paper lined baking tray, then into a proving bag and leave the shaped loaf to prove for 45 minutes, until almost doubled in size.
Heat the oven to 425°F. Brush the top of the loaf with the beaten egg and bake for 25 minutes, until golden brown, and the loaf sounds hollow when tapped underneath.
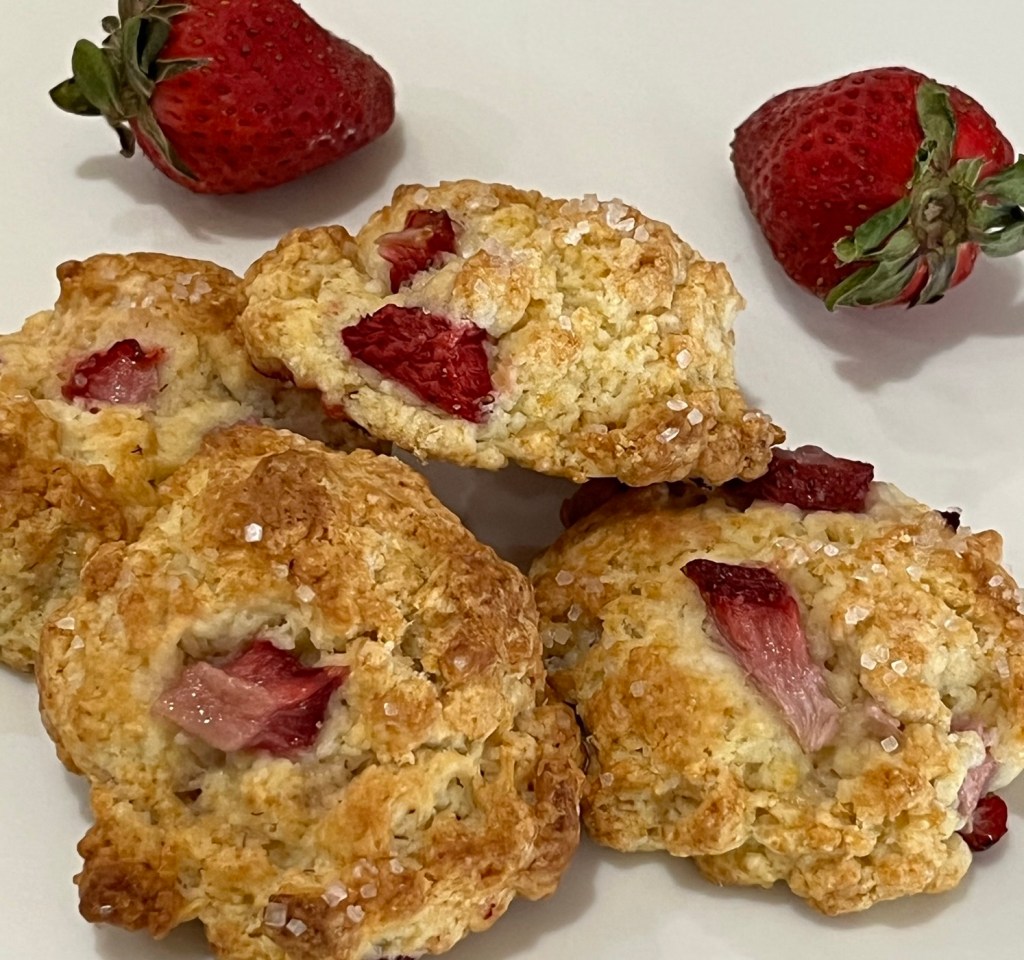
I make these drop scones with whatever berries I have on hand. I would rather spend a half hour making scones, than throwing slightly old berries away.
I made some Caramel Coconut Macaroon Thumbprints for Sally’s Baking Addiction April Challenge and had some strawberries left over. (They were BOGO.) Waste not, want more.
Berry Drop Scones
INGREDIENTS
2 ½ cups (312g) all-purpose flour
1 tablespoon baking powder
3/4 teaspoon kosher salt
1/3 cup (67g) sugar
Zest of 1 small lemon (or orange or lime)
½ cup (115g) unsalted butter, chilled and cut into cubes
150-175g berries. Use any berries that you like.
1 cup heavy cream + extra if required
Coarse or turbinado sugar for topping
METHOD
Preheat oven to 400. Line a baking sheet with parchment paper.
In the bowl of a food processor, add the flour, baking powder, salt, sugar and zest. Pulse a few times to incorporate.
Add the cubed butter and pulse to incorporate. The mixture should resemble very coarse sand.
Empty the flour mixture into a mixing bowl. Add the cream and stir until just barely incorporated. Add additional cream by the tablespoon to help the dough come together
Gently fold in the berries. (It’s fine if the raspberries or blackberries break up a little – it adds a nice pink stain to the dough.) The dough should just be moist, not wet, but also not crumbly or powdery looking. If it looks too dry, add a tablespoon of cold water.
Spoon the dough into 12 equally sized pieces on the parchment lined baking sheet. Sprinkle some coarse or turbinado sugar over the top, if desired.
Bake for 16-19 minutes, rotating the pan halfway through. The scones should be lightly golden and cooked through. I rotate the pan after 10 minutes
Cool in the pan for 5-10 minutes then carefully remove to a cooling rack.
While not exactly a baking item, my deep dish pan pizza does incorporate a home made pizza dough, which combined with the other ingredients makes an easy, delicious meal.
Before Baking
Pan Pizza
INGREDIENTS
Crust • 2 cups (240g) King Arthur Unbleached All-Purpose Flour • 3/4 teaspoon salt • 1/2 teaspoon instant yeast or active dry yeast • 3/4 cup (170g) lukewarm water • 1 tablespoon (13g) olive oil + 1 1/2 tablespoons (18g) olive oil for the pan Topping • 6 ounces (170g) mozzarella, grated (about 1 1/4 cups, loosely packed)* • 1/3 to 1/2 cup (74g to 113g) tomato sauce or pizza sauce, homemade or store-bought • freshly grated hard cheese and fresh herbs for sprinkling on top after baking, optional* • *See “tips,” below.
Weigh your flour; or measure it by gently spooning it into a cup, then sweeping off any excess.
METHOD
Place the flour, salt, yeast, water, and 1 tablespoon (13g) of the olive oil in the bowl of a stand mixer or other medium-large mixing bowl.
Stir everything together to make a shaggy, sticky mass of dough with no dry patches of flour. This should take 30 to 45 seconds in a mixer using the beater paddle; or about 1 minute by hand, using a spoon or spatula. Scrape down the sides of the bowl to gather the dough into a rough ball; cover the bowl.
After 5 minutes, uncover the bowl and reach a bowl scraper or your wet hand down between the side of the bowl and the dough, as though you were going to lift the dough out. Instead of lifting, stretch the bottom of the dough up and over its top. Repeat three more times, turning the bowl 90° each time. This process of four stretches, which takes the place of kneading, is called a fold.
Re-cover the bowl, and after 5 minutes do another fold. Wait 5 minutes and repeat; then another 5 minutes, and do a fourth and final fold. Cover the bowl and let the dough rest, undisturbed, for 40 minutes. Then refrigerate it for a minimum of 12 hours, or up to 72 hours. It’ll rise slowly as it chills, developing flavor; this long rise will also add flexibility to your schedule.
About 3 hours before you want to serve your pizza, prepare your pan. Pour 1 1/2 tablespoons (18g) olive oil into a well-seasoned cast iron skillet that’s 10” to 11” diameter across the top, and about 9” across the bottom. Heavy, dark cast iron will give you a superb crust; but if you don’t have it, use another oven-safe heavy-bottomed skillet of similar size, or a 10” round cake pan or 9” square pan. Tilt the pan to spread the oil across the bottom, and use your fingers or a paper towel to spread some oil up the edges, as well.
Transfer the dough to the pan and turn it once to coat both sides with the oil. After coating the dough in oil, press the dough to the edges of the pan, dimpling it using the tips of your fingers in the process. The dough may start to resist and shrink back; that’s OK, just cover it and let it rest for about 15 minutes, then repeat the dimpling/pressing. At this point the dough should reach the edges of the pan; if it doesn’t, give it one more 15-minute rest before dimpling/pressing a third and final time.
Cover the crust and let it rise for 2 hours at room temperature. The fully risen dough will look soft and pillowy and will jiggle when you gently shake the pan.
About 30 minutes before baking, place one rack at the bottom of the oven and one toward the top (about 4″ to 5″ from the top heating element). Preheat the oven to 450°F.
When you’re ready to bake the pizza, sprinkle about three-quarters of the mozzarella (a scant 1 cup) evenly over the crust. Cover the entire crust, no bare dough showing; this will yield caramelized edges. Dollop small spoonfuls of the sauce over the cheese; laying the cheese down first like this will prevent the sauce from seeping into the crust and making it soggy. Sprinkle on the remaining mozzarella.
Bake the pizza on the bottom rack of the oven for 18 to 20 minutes, until the cheese is bubbling and the bottom and edges of the crust are a rich golden brown (use a spatula to check the bottom). If the bottom is brown but the top still seems pale, transfer the pizza to the top rack and bake for 2 to 4 minutes longer. On the other hand, if the top seems fine but the bottom’s not browned to your liking, leave the pizza on the bottom rack for another 2 to 4 minutes. Home ovens can vary a lot, so use the visual cues and your own preferences to gauge when you’ve achieved the perfect bake.
Remove the pizza from the oven and place the pan on a heatproof surface. Carefully run a table knife or spatula between the edge of the pizza and side of the pan to prevent the cheese from sticking as it cools. Let the pizza cool very briefly; as soon as you feel comfortable doing so, carefully transfer it from the pan to a cooling rack or cutting surface. Sprinkle with a few basil leaves.
Serve the pizza anywhere from medium-hot to warm. A pizza cutter, kitchen shears or a large pair of household scissors are good tools for cutting this thick pizza into wedges.
St. Honoré cake is a pastry dessert named for the French patron saint of bakers and pastry chefs and when created correctly is amazing.
The various components of my cake were delicious. The size of the patisserie cream filled profiteroles were slightly large. I will know better next time. Bake and learn,
The cake is basically a circular (7” diameter) base of puff pastry with a ring of choux pastry about 1/2” thick piped around the perimeter. With the excess choux pastry a dozen or so profiteroles (about 1” to 1.5” diameter. are piped on the same baking sheet. This is baked, then cooled.
While the base is cooling make the cream patisserie and chantilly cream. Fill the profiteroles with cream patisserie and set aside. Using a St Honoré piping tip fill the base with a nice pattern of the traditional piping style.
Make the caramel and use it to stick the profiteroles to the edges of the round base. Add another filled profiterole to the center then drizzle caramel over all the profiteroles.
INGREDIENTS Puff Pastry • 1 sheet of puff pastry • Or home made rough puff pastry Pate a Choux • 1/4 cup unsalted butter • 1/2 cup water • 1/2 tsp granulated sugar • 1/4 tsp salt • 1/2 cup all-purpose flour • 2 eggs Creme patisserie • 1 cup milk • 1/4 tsp vanilla bean paste, or 1/2 tsp vanilla extract • 1/3 cup granulated sugar • 2 tbsp cornstarch • 2 tbsp all-purpose flour • 1 egg • 1 egg yolk Chantilly cream • 1/2 cup heavy whipping cream • 2 tbsp powdered sugar • 1/4 tsp vanilla extract Salted Caramel • 2/3 cup granulated sugar • ¼ c water • 1/3 cup heavy cream • 1/2 tsp salt, or more to taste
METHOD Pate a Choux
Preheat the oven to 425°F. In a medium saucepan over medium heat, warm the water, unsalted butter, sugar and salt together. Once the butter has melted, remove the saucepan from the heat.
Pour in the all-purpose flour and stir together to combine. Move the saucepan over to low heat, and stir the now-formed dough/paste until it no longer sticks to the bottom of the pan (about 30 seconds to 1 minute).
Remove the saucepan from the heat and stir in the eggs, one at a time. It will be slightly difficult to mix the egg into the dough, but just keep vigorously stirring and eventually they’ll become incorporated. Temporarily set this aside. Puff Pastry Base and Pastry Puffs
Cut out a 7″ round from the puff pastry. You can use a bowl, pan, pot lid – whatever you have that will help you cut out a nice 7″ circle (or simply trace it after measuring with a ruler – perfection isn’t necessary!). Place this puff pastry circle on one side of a baking sheet fitted with parchment paper or a silicone mat.
Fill a pastry bag (with no tip) with the pate a choux dough that you created in your saucepan. In one continuous motion, pipe the dough out along the edge of the puff pastry circle (creating a sort of wall for the puff pastry). Now, pipe out approximately 16 small mounds on the open side of the baking sheet, spacing the mounds slightly apart. Smooth out any ridges or pointed tips using your fingers.
Bake the pastry for 10 minutes at 425°F, then WITHOUT opening the oven door, bake the pastry for another 12-16 minutes at 375°F, until they’re a deep golden color. Place the pastry ring and pastry puffs on a wire cooling rack to cool completely.
Creme Patisserie
Meanwhile, heat the milk in a medium saucepan over medium-low heat. In a medium bowl, whisk the sugar, cornstarch, flour, egg, and egg yolk together.
Once the milk is hot and steam is beginning to rise from it, stir in the vanilla bean paste (if using extract, hold off for now). Then, pour half of the milk into the egg mixture, whisking the egg mixture vigorously as you do. Pour the rest of the milk in, and continue to whisk vigorously.
Transfer the entire batter back into the saucepan and whisk over medium heat. It will take about 5 minutes for the cream to thicken up into a pudding-like consistency. Just keep whisking the whole time.
Once the cream is starting to look like pudding, quickly remove the cream from the heat. If you’re using vanilla extract, stir the extract in now. If there are any lumps in your cream, just whisk the cream really vigorously to smooth them out.
Transfer the cream to a clean bowl and cover the cream with a sheet of plastic wrap placed directly onto the cream (this will prevent a filmy layer from forming). Chill the pastry cream in the refrigerator.
Chantilly Creme
In the bowl of a stand mixer, whisk the heavy cream on high speed until indentations begin to appear. Pour in the vanilla extract and powdered sugar, then whisk on high speed until a frosting-like consistency is formed.
Caramel
In a medium saucepan, add the sugar and 1/4 cup of water. Do NOT stir the two together. Simply place the saucepan over medium-high heat, and allow the mixture to come to a simmer. Watch the sugar-water bubble for approximately 7 to 8 minutes, watching it go from white-ish/clear to a medium amber color. Do NOT step away from the caramel as it can burn in a matter of seconds.
Once the caramel has reached a medium amber color and is JUST beginning to smoke, quickly remove the caramel from the heat. Carefully pour the heavy cream into the caramel (it will bubble), then stir to combine. Add the salt, and again stir to combine. Assembly
Fit a pastry bag with a long, narrow filling tip. Fill the pastry bag with the creme patisserie and then pipe this into the pastry puffs. Flip the pastry puff upside down so that the flat side is facing you, then dip the top in the salted caramel. Gently give it a shake to pour off excess caramel, then carefully dip the bottom of the pastry puff in caramel too.
Place the pastry puff onto the pate a choux wall that you created on top of the puff pastry circle. The caramel will act like a glue. Continue until you’ve got a ring of pastry puffs.
Scoop the remaining creme patisserie onto the center of the puff pastry. Fill a new pastry bag fitted with whatever tip you like (plain, star, st. honore) with the creme Chantilly, and pipe the creme on top of the pastry cream.
Stick one final pastry puff in the center of the dessert, then drizzle caramel all over. Refrigerate until ready to serve.
Two more days before I can return to golfing! This forced time off is not helping my health.
I wanted to improve the cake in the Lady Baltimore cupcakes I am making for a friends birthday tbis weekend, but was not a fan of the traditional filling and frosting. Today I re-made the cake (3rd time is a charm) but filled the cupcake with creme patisserie and frosted them with my favorite chocolate frosting, topped with a white chocolate curl.
This modification of the cake recipe was excellent and what could be wrong with the rest?
Boston Cream-ish Cupcakes
INGREDIENTS Cupcakes: • 171 g (1½ c) cake flour • 150 g (¾ c) sugar • 2 tsp baking powder • ¼ tsp of salt • 84 g ( 6 Tbl) unsalted RT butter, cut into small pieces • 90 g (3) egg whites • 113 g (½ c) whole milk • 2 Tbl KAB Bread and Cake Enhancer • 1 Tbl sour cream • ¾ teaspoon vanilla • Optional: 1 Tbl vanilla pudding mix OR • Optional: 1 Tbl vegetable oil Frosting • 62 g (3 Tbl) butter • 63 g (¾ c) unsweetened cocoa powder • 312 g (2⅔ c) confectioners’ sugar • ⅓ c milk • ½ teaspoon vanilla extract Crème Patisserie • ¾ c 2% milk + 2 Tbl heavy cream • 2 (40g) egg yolks • ¼ cup sugar • 2 Tbl corn starch • Pinch salt • 1 Tbl butter • ½ tsp vanilla
METHOD
Heat an oven to 350⁰ F. Line 12 wells of a muffin pan with paper liners and set the pan aside.
Add the flour, sugar, baking powder, and salt to a large bowl and whisk to combine.
Add the butter and mix by hand with a Danish whisk until the mixture resembles coarse crumbs, about 5 minutes.If necessary use you hands to break up butter balls as if you were making pastry.
Mix the egg whites, milk, and vanilla in a small bowl, then pour it into the mixer bowl.
Beat vigorously with a Danish whisk for 5 minutes until the batter is creamy and homogeneous. (Makes 2 c batter)
Evenly distribute the batter among the lined muffin tins (50g/tin) and bake until the edge of the cupcakes are light golden brown and a toothpick comes out clean, 14-16 minutes.
Set the pan on a wire rack and let the cupcakes cool in the pan for 15 minutes, then remove them from the pan and let them completely cool on the rack.
Use an apple corer to to cut a cylinder out of the top of the cupcake. Slice the removed cylinder so that you have a ¼” thick disk of cake. Reserve the disk and discard (or eat) the rest of the cylinder.
Frosting
Cream butter until light and fluffy.
Stir in the cocoa and confectioners’ sugar alternately with the milk and vanilla.
Beat and add additional milk to achieve a spreading or piping consistency
Crème Patisserie
Whisk eggs and milk together and add to all other ingredients (except vanilla) to a medium saucepan.
Bring to boil whisking constantly
Cook until thickened (it will look lumpy, its ok)
Vigorously whisk mixture, add vanilla, and vigorously whisk thoroughly
When incorporated, cover with plastic directly on the crème patisserie and cool about an hour.
Alternatively, slide the piping tip you would use to fill the pâte à choux into the piping bag but don’t cut off the tip. Spoon the hot batter directly into the piping bag with sealed end.
When the crème patisserie is cool, cut the tip off, force the bag around the piping tip and squeeze the crème pat to fill the end.
Pipe crème patisserie into each cylinder. Place a reserved cake disk on top of the filling and press down on it to seal the cupcake.
Frost the cupcakes with the chocolate frosting.
For Flavored Cream Patisserie with Liqueur Replace vanilla with 3 Tbl banana liqueur or an other flavored liqueu
I forget where I first saw this recipe but there are plenty on YouTube .
It’s best if you can make your own seedless raspberry jam, but alas, I couldn’t this time. These are very flavorful cookies with a hint ‘o almond flavor Well worth your time to make them
Buttery Raspberry Crumble Cookies
INGREDIENTS • 1 cup unsalted butter, softened • 1/4 cup granulated sugar • 1/3 cup powdered sugar • 1 teaspoon vanilla extract • 1 teaspoon almond extract • 2 1/4 cups all-purpose flour • 1/4 teaspoon kosher salt • 1/2 cup seedless raspberry jam For the Crumble Topping: • 1/2 cup all-purpose flour • 1/4 cup granulated sugar • 1/4 cup unsalted butter, cold and cut into small cubes • 1/4 tsp cinnamon (optional)
METHOD
Combine the softened unsalted butter with granulated sugar and powdered sugar. Use a stand mixer on medium speed until the mixture is light and fluffy, about 2-3 minutes. The butter should be a pale color, and the sugars fully incorporated, leaving no grainy texture.
Mix in the vanilla extract and almond extract.
Gradually add the all-purpose flour and kosher salt into the butter mixture. Mix on low speed until just combined. The dough should be smooth and a bit crumbly, yet it should hold together when pressed between your fingers.
Wrap the dough in plastic wrap and refrigerate for at least 30 minutes.
Make the crumble topping: In a small bowl, combine flour, sugar, and cinnamon (if using). Cut in the cold butter with a pastry cutter or fork until the mixture forms coarse crumbs.
Preheat your oven to 350°F (175°C) and line two baking sheets with parchment paper.
Once chilled, roll the dough into small balls (about 1 inch). Place them onto the prepared baking sheets, spacing them about 2 inches apart to allow for spreading.
Using your thumb or the back of a small spoon, press gently into the center of each dough ball to create a well. You’ll want a depth sufficient to hold the raspberry jam without breaking through the bottom.
Spoon a small amount of seedless raspberry jam into each indentation. Ensure the jam does not overflow, just to the brim, then sprinkle the crumble topping over the cookies. Do not be afraid to pile a lot of crumble topping on.
Place the baking sheets in the oven and bake for 15–18 minutes or until the edges are lightly golden.
Remove the cookies from the oven and let them cool on the baking sheets for a few minutes before transferring to wire racks to cool completely. The cookies should have a slightly crisp edge and a soft, crumbly center.
This month SallysBakingAddiction Baking Challenge is Caramel Coconut Macaroon Thumbprints. She always gives an alternate recipe for those (raises hand and waves) who do not resonate with the main challenge recipe. The alternate is a Mini No-Bake Cheesecake, (my choice.)
These are plain mini cheesecakes with a graham cracker biscuit base topped with berries, a mint leaf, and strawberry sauce. Sally’s picture displayed a blackberry on top but unfortunately someone all all my blackberries. (Raises hand a waves again.) They are easy to make and delicious.
Mini No-Bake Cheesecakes – Sally
INGREDIENTS Graham Cracker Crust • 240 g (2 c) graham cracker crumbs (about 16 full sheet graham crackers) • 67 g (⅓ c) packed light or dark brown sugar • 113 g (½ c; 8 Tbl; 1 stick) unsalted butter, melted Filling • 240 (1 c) cold heavy cream or heavy whipping cream • 452 g (16 oz) RT full-fat brick cream cheese • 67 g (⅓ c) granulated sugar • 30 g (2 Tbl) RT sour cream • 1 tsp fresh lemon juice • ½ tsp pure vanilla extract optional: your desired toppings (see recipe Note)
METHOD
Line two standard 12-count muffin pans with cupcake liners. Make sure you have room in your refrigerator for both pans. (You refrigerate them in step 6.)
Use a food processor to pulse the graham crackers into fine crumbs. Pour crumbs into a medium bowl and stir in the brown sugar and melted butter until combined. Mixture will have the consistency of wet sand. Spoon 1 ½ Tablespoons of the crust mixture into each cupcake liner and use the back of the spoon to pack it down tightly.
Bake the crusts for 5 minutes in a 350°F (177°C) oven. The crusts are a little sturdier this way. Let the warm crusts cool for 10 minutes before adding the filling on top.
Place metal stand mixer bowl and whisk in freezer for 30 minutes before proceeding. Whip the cold heavy cream into stiff peaks on medium-high speed, about 2-3 minutes. Set aside.
Using a hand mixer or a stand mixer fitted with a whisk or paddle attachment, beat the cream cheese and granulated sugar together on medium speed until smooth and creamy. Scrape down the sides and up the bottom of the bowl with a silicone spatula as needed. Add the sour cream, lemon juice, and vanilla extract. Beat on medium-high speed until smooth and combined, about 1 minute. Make sure there are no large lumps of cream cheese. If there are lumps, keep beating until smooth.
With a silicone spatula, fold the whipped cream into the cheesecake filling until combined. This takes several turns of your rubber spatula. Combine slowly as you don’t want to deflate all the air in the whipped cream.
Use piping bag to transfer the filling on top of the crusts. Pipe about 2 Tablespoons of filling over each crust. Fit your piping bag with a large star or round piping tip, then transfer the filling to the bag and pipe. Use the back of a spoon to smooth the tops so they are flat.
Refrigerate the mini cheesecakes in the pans for at least 3 hours and up to 2 days. If refrigerating for longer than 3 hours, cover with plastic wrap.
Keep refrigerated until ready to serve. Serve with optional toppings (see recipe Note). The cheesecakes begin to soften and stick to the liners after about 30–60 minutes at room temperature.
Cover and store leftover mini cheesecakes in the refrigerator for up to 5 days. NOTES
Make Ahead & Freezing Instructions: The mini cheesecakes can be made 1-2 days in advance and refrigerated for up to 2 days before serving, as noted in step 6. Another way to prep these mini no-bake cheesecakes is to freeze them. Refrigerate them as directed in step 6, then remove them from the muffin pan (keep the liners on them) and line in a single layer in a large freezer-friendly container. Cover tightly and freeze for up to 3 months. Thaw in the refrigerator for at least 24 hours before serving.
Optional Toppings: Right before serving, you can add toppings to the mini cheesecakes. You can also add the following toppings after the cheesecakes have chilled in the refrigerator for just 1–2 hours (step 6), then store the topped cheesecakes in the refrigerator for the remaining time. Use 3/4 cup strawberry sauce divided over each chilled mini cheesecake. (Spoon about 1/2 Tablespoon over each.) And/or use 1 cup mixed berries, plus a few mint leaves, divided over each for additional garnish. Instead of strawberry sauce, try the same amount of lemon curd, apple butter, or your favorite fruit preserves. You can also top with chocolate ganache. I recommend spooning a little over each mini cheesecake before refrigerating so the ganache can set up too.
Lemon Juice: Lemon juice brightens up the flavor. This cheesecake does not taste like lemon. For lemon flavored mini no-bake cheesecakes, replace the sour cream with 2 Tablespoons fresh lemon juice (in addition to the 1 teaspoon lemon juice that it already calls for) and add 2 teaspoons lemon zest.
Room Temperature Ingredients: Bring the cream cheese and sour cream to room temperature before beginning. Room temperature ingredients guarantee a smooth cheesecake filling. Beating cold ingredients together will result in a chunky cheesecake filling. (The heavy cream, however, MUST be cold in order to whip into stiff peaks.)
Strawberry Sauce
INGREDIENTS • 1 Tablespoon cornstarch • 3 Tablespoons (45ml) warm water • 1 lb strawberries, hulled and sliced in half (you can use frozen; don’t thaw) • Zest and juice from 1/2 small lemon • 1/4 cup (50g) granulated sugar
METHOD
Whisk the cornstarch and water together until all the cornstarch has dissolved. (I just use a fork to mix—very easy.)
Place the cornstarch mixture, along with the rest of the ingredients, into a small saucepan over medium heat. Using a wooden spoon or rubber spatula, stir the mixture as it cooks. Break up some of the strawberries as you stir. For smoother sauce blend the strawberries in advance.
Bring it to a simmer and allow to simmer for 5 minutes, stirring constantly. After 5 minutes, remove pan from the heat and allow to cool. The mixture will thicken as it cools. I strained the mixture with a fine mesh strainer and ended up with a cup of clear sauce.
You can serve the sauce warm before it cools completely if desired, or store in the refrigerator for up to 1 week. Strawberry topping will be thick after refrigeration, so microwave for 15 seconds or warm on the stove to thin out, if desired.
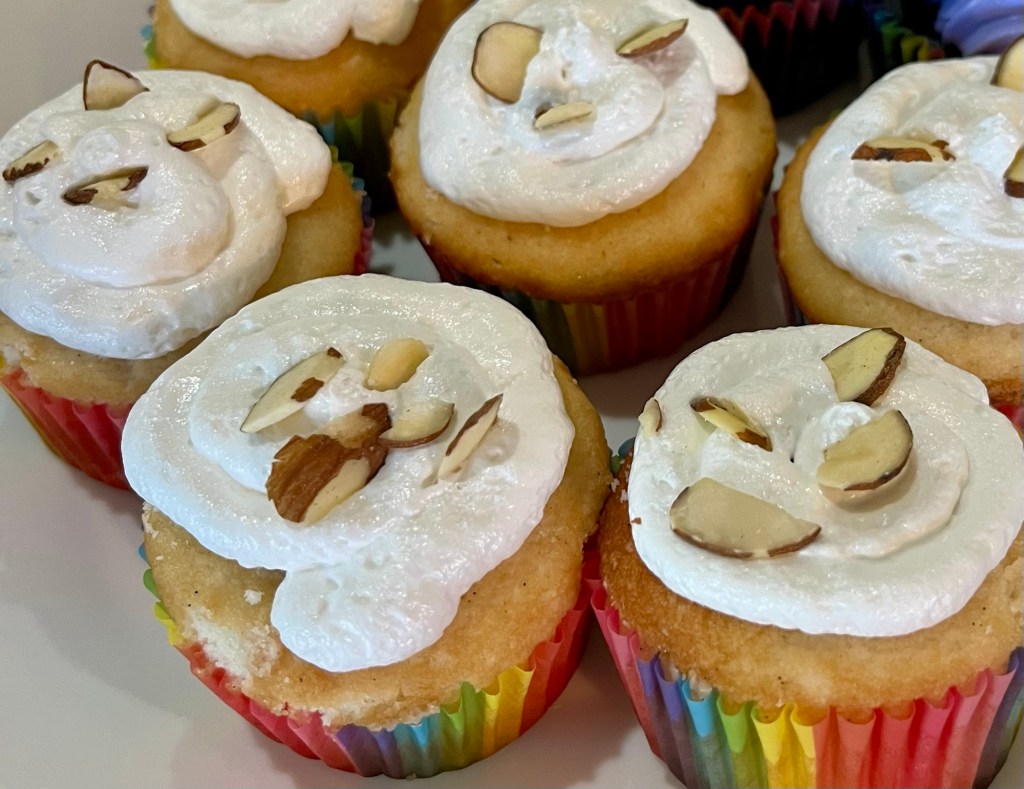
I don’t bake for hire. It’s a hobby for me. But, when a once-neighbor asked me to make Lady Baltimore cupcakes as a surprise for his wife’s birthday (they were one of her favorites but not available near here) I was intrigued. I told him I don’t bake for “hire” but as I had never heard of Lady Baltimore cupcakes I couldn’t resist.
Lady Baltimore cake (or cupcakes in this case) is a light, delicate white cake, hollowed out and filled with a mixture of slivered almond flakes, raisins and figs bound with Italian meringue frosting. It (they) are frosted with more of the Italian meringue frosting and topped with a few almond slivers.
Current reports are they are delicious. Still waiting for reviews from the QC Cadre.
Cupcakes in various stages of productionFinished Lady Baltimore cupcakes.
Lady Baltimore Cupcakes
(makes 24 cupcakes)
INGREDIENTS For the cupcakes: • 3 c cake flour • 1½ cup sugar • 3 ¾ tsp baking powder • ½ tsp of salt • 1 ½ sticks unsalted RT butter, cut into small pieces • 6 egg whites • 1 cup whole milk (2% + 1 Tbl heavy cream) • 1 ½ teaspoon vanilla For the filling: • 9 tablespoons slivered almonds, coarsely chopped • 6 tablespoons golden raisins, coarsely chopped • 6 dried California or Turkish figs, chopped • 1/3 c fig jam • ¾ cup Italian meringue frosting Frosting: • 3 ¾ cups Italian meringue frosting METHOD
Heat an oven to 350⁰ F. Line 24 wells of a muffin pan with paper liners and set the pan aside.
Add the flour, sugar, baking powder, and salt to the bowl of a mixer (or a large bowl) and mix to combine (mixer: lowest speed; by hand: whisk). Add the butter and mix on low speed until the mixture resembles coarse crumbs, about 2 minutes.
Whisk the egg whites, milk, and vanilla in a small bowl, then pour it into the mixer bowl. Beat on medium-high speed for 2 minutes, scraping down the sides of the bowl halfway through.
Evenly distribute the batter among the lined muffin tins and bake until the edge of the cupcakes are light golden brown and a toothpick comes out clean, 14-16 minutes.
Set the pan on a wire rack and let the cupcakes cool in the pan for 15 minutes, then remove them from the pan and let them completely cool on the rack.
Mix the filling ingredients in a bowl.
Use a small paring knife to cut an inverted cone out of the top of the cupcake. Flip the cone over and slice it so that you have a ¼” thick disk of cake. Reserve the disk and discard the rest of the cone. If necessary, use a small spoon to scoop out some of the cake to make the hole larger.
Use a small spoon to evenly distribute the filling among the cupcakes. Place the reserved cake disk on top of the filling and press down on it to seal the cupcake.
Frost the cupcakes with the Italian meringue frosting.
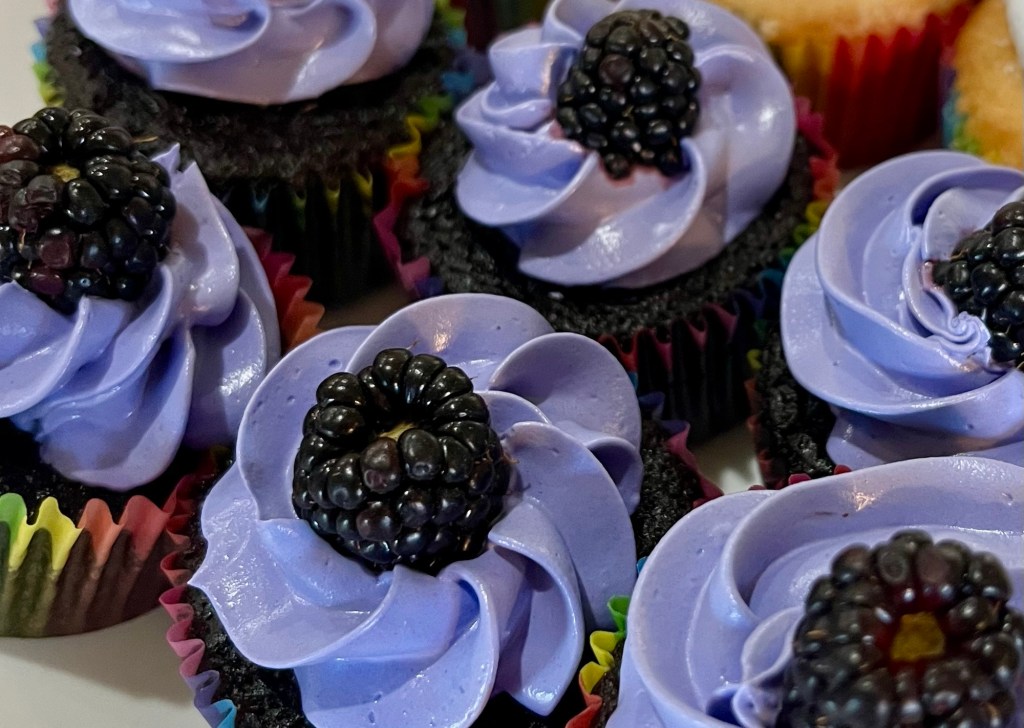
I am a big berry buff and when I saw this recipe I knew I would make these.
I followed the recipe exactly on my first bake, but made changes the second time around. Mainly, I swapped the blackberry buttercream for a blackberry meringue frosting. I used some purple food coloring and added some freeze dried blackberry powder. Blackberry is not an overpowering flavor but this added just enough to complement the dark chocolate cupcake.
Dark Chocolate Blackberry Cupcakes
Makes 18 cupcakes
INGREDIENTS For the cupcakes: • 1 c AP flour • ½ c unsweetened cocoa powder • 1 tsp baking soda • ½ tsp salt • ½ c unsalted butter, melted • ¾ c brown sugar • 2 large RT eggs • 1 tsp vanilla extract • ½ c buttermilk (milk with ½ Tbl lemon juice) • ½ c hot water • ½ c mashed, fresh blackberries Blackberry Italian Meringue • 3 egg whites room temperature • 2/3 cup caster sugar • 1/4 cup water • 1/4 teaspoon cream of tartar • 1 Tbl freeze dried blackberry powder
METHOD
Wash 2 c fresh blackberries in cold water
Blend cleaned blackberries until totally broken down.
Add 1 Tbl sugar and blend again.
Separate into ¼ c and ½ c portions. Set both portions aside. (Use any leftover on ice cream or in a margarita, etc.)
Preheat oven to 350°F (175°C). Line a cupcake pan with liners.
In a bowl, whisk flour, cocoa powder, baking soda, and salt.
In another bowl, mix melted butter and brown sugar until smooth. Add eggs and vanilla, then stir in ½ c mashed blackberries.
Alternately add dry ingredients and buttermilk, mixing gently. Stir in hot water until just combined.
Fill cupcake liners ¾ full and bake for 18-20 minutes or until a toothpick comes out clean. Let cool completely.
For the frosting, beat butter until creamy. Add powdered sugar, ¼ c blackberry puree, and vanilla. Beat until fluffy, adding cream if needed. Be sure the frosting is thick enough to hold its shape after piping.
Pipe frosting onto cooled cupcakes and enjoy!
Italian Meringue Method
Wipe down all tools with white vinegar.
Place sugar and water mixture over medium heat for 5 minutes. Do not stir it at all during this time. The mixture will look cloudy.
Gently stir the mixture for 1 minute. There should be little to no granules of sugar left at this point.
Once the mixture begins to bubble from the bottom, 3 to 5 minutes, place the digital thermometer in the pot and increase to medium-high heat. Do not stir it at all after this.
In the bowl of an electric mixer, whip the eggs whites on low speed until foamy. Add the cream of tartar, increase the speed to medium, and beat until soft peaks form.
Allow the sugar mixture to come to a boil and watch carefully. Once it reaches 230 °F turn stand mixer on highest speed to whip egg whites to peaks.
7. Once the sugar syrup reaches 240 °F, remove from heat and remove the probe. This takes about 4- 6 minutes.
Allow the boiling to come to a slow bubble before moving on.
Slowly pour sugar syrup (steady stream) into whisked egg whites. Avoid the whisk attachment or it will fling your mixture all over the bowl.
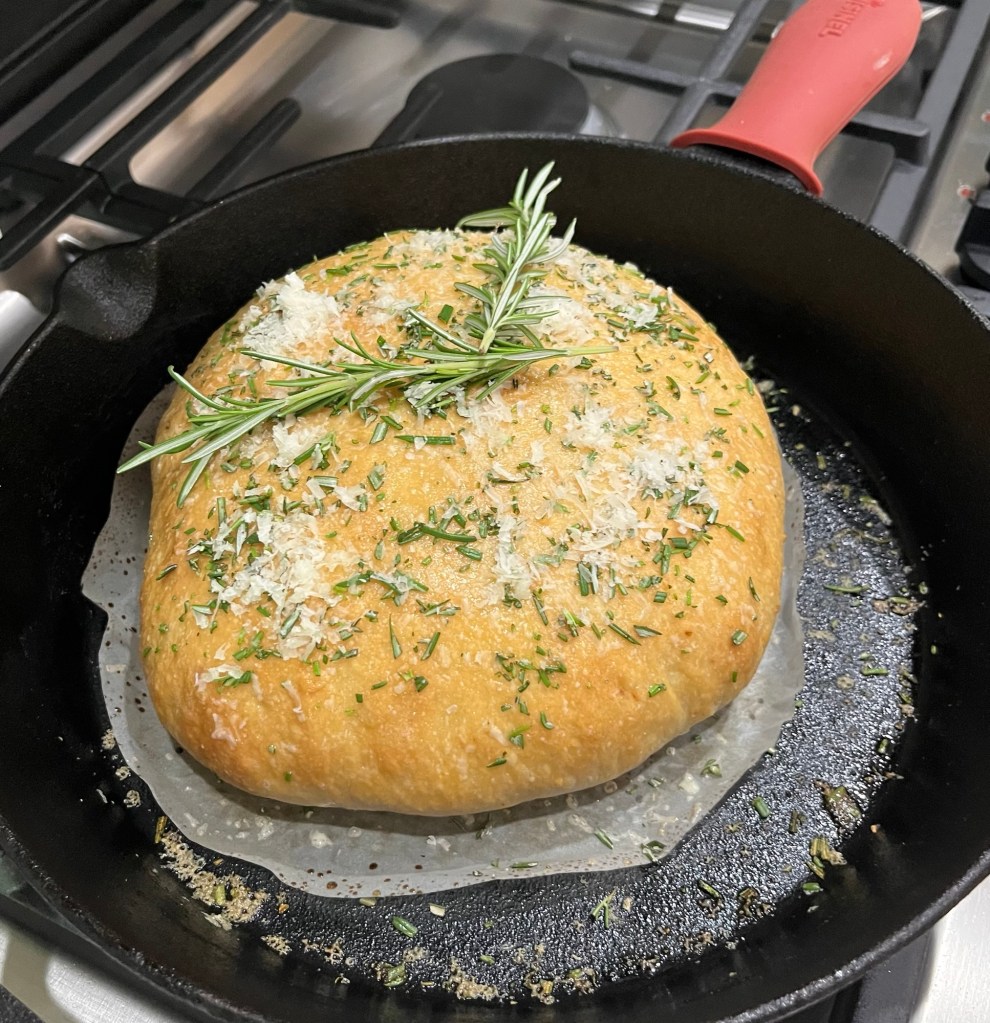
FB posted this Rustic No Knead Rosemary Garlic Bread by Jacques Pepin. I made a few changes to the method (as if I know more than M. Pepin.)
I followed the ingredients as published and the bread was fantastic, but next time I will increase the amount of garlic. All changes have been incorporated in the recipe below.
I did a stretch and fold before shaping the loaf, This is a 100% hydration bread and has little structure before baking, i.e it is very soft, wet, and hard to handle.. There was no reference to scoring the bread, but on reviewing the published photo realized it was scored with large cross cuts. (Next time, which will be very soon.)
My baking time was also much longer (nearly double) what was published. My modifications are incorporated below.)
Rustic No Knead Rosemary Garlic Bread – Jacques Pepin
INGREDIENTS • 360g (3 c) AP flour • 1 tsp salt • 1 tsp active dry yeast • 355g(1 ½ c) warm water (about 105-115⁰ F) • 5 cloves garlic, minced • 2 Tbl olive oil • 1 Tbl chopped fresh rosemary • ¼ c grated Parmesan cheese
METHOD
In a large bowl, whisk together the flour, salt, and yeast.
Add the warm water, minced garlic, and olive oil to the flour mixture. Stir with a wooden spoon until a shaggy dough forms.
Cover the bowl with plastic wrap and let the dough rest at room temperature for 12-18 hours.
Preheat oven and prepare dough: Preheat oven to 450⁰ F .
Sprinkle a light coating of flour around the edge of the bread and use your fingers to lightly tuck the flour into the edge of the dough. With floured fingers (you may need to re-flour your fingers after each time you touch the bread) stretch and fold the bread, turning 90⁰ and repeat a total of 10-12 stretch and folds to make the dough firmer and easier to handle. Turn the dough out onto a lightly floured surface and gently shape it into a loaf.
Lightly oil a 10-inch cast iron skillet or coat with nonstick spray, sprinkle with cornmeal. Score a large cross in the bread with a lame or sharp knife.
Place the loaf in the skillet for 30-40 minutes, checking the internal temperature every 5 minutes after the first 20, or until golden brown and cooked through.
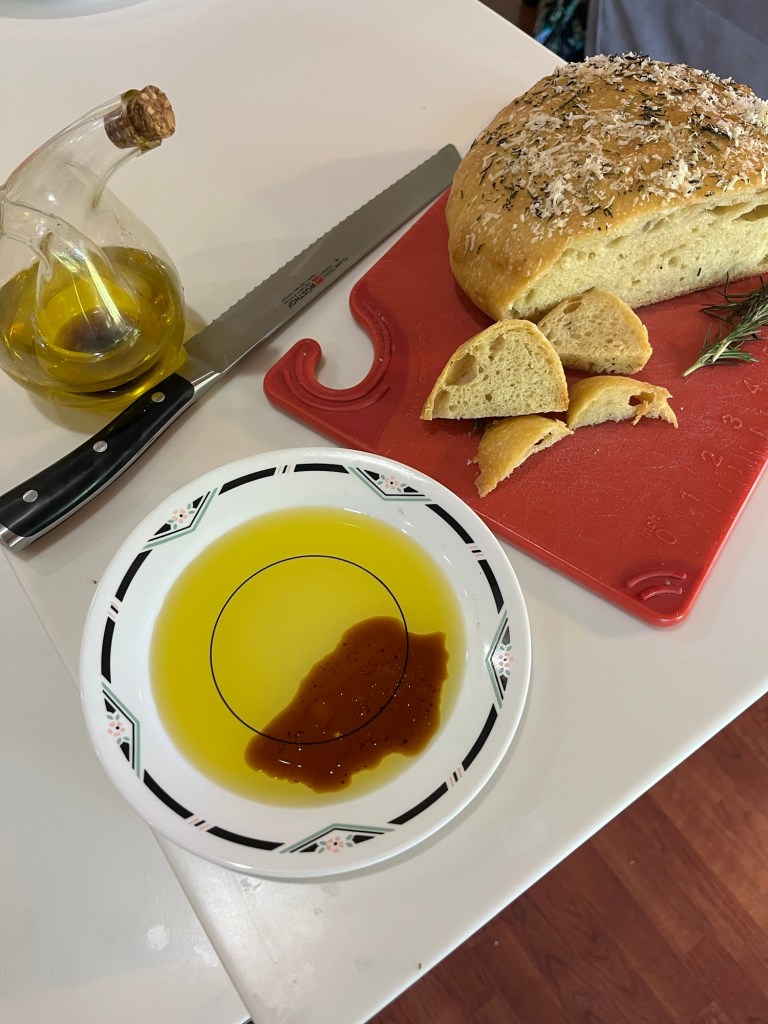
While the bread is still warm, brush with melted butter and sprinkle with chopped rosemary and Parmesan cheese.
Let the bread cool slightly before slicing and serving. Try this with an oil and vinegar dip.