I gotta stop reading all those recipes on Facebook! It’s just they look so appetizing.😒
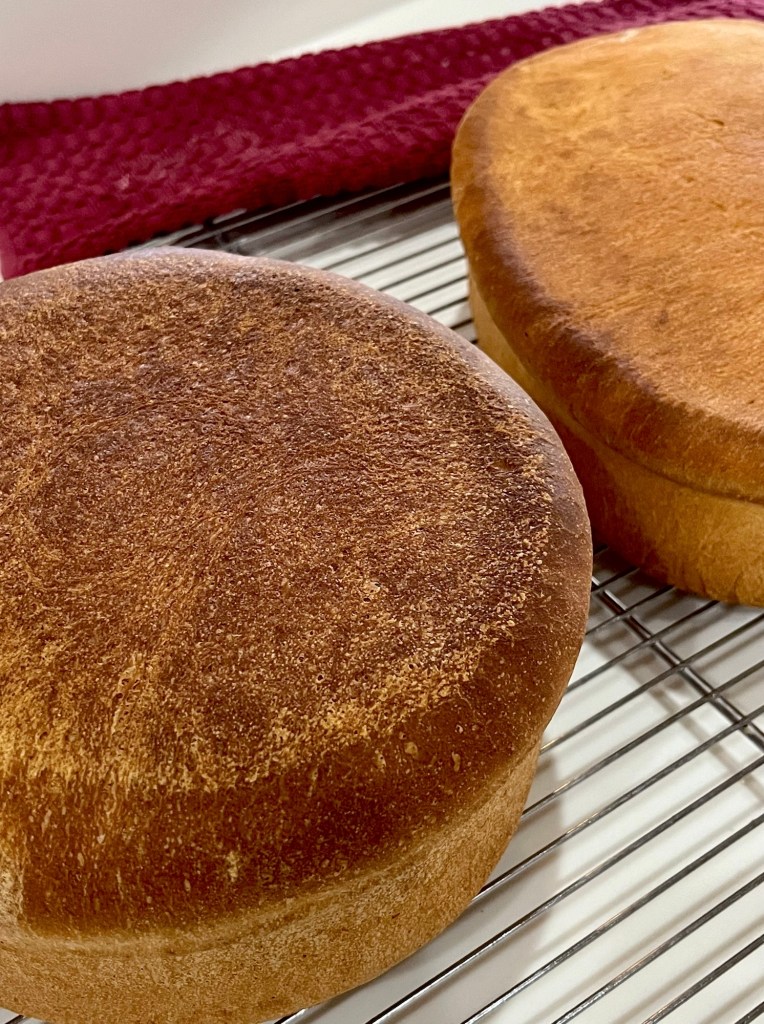
These french bread rolls are a basic bread dough, slightly enriched by 20 g of butter. They was easy to make and only required 2 1/2 hours of elapsed time and 30 minutes of hands on. Next time I may form the logs and batards a little longer. These were 6” and I think 7” might be better.
In any event, they were flavorful, had a good crust and crumb.
Dough • 380g AP flour • 10g Sugar • 7g Salt (1 ½ tsp) • 20g Unsalted butter • 210g Cold water
METHOD Starter
Mix 40g water with 7g yeast, stir to mix
Add 35g bread flour, mix thoroughly then cover and set aside for 20 minutes Bread dough
In a large bowl mix 380g AP flour and 10g sugar, mix thoroughly
Add 210g cold water, sponge from above, and mix thoroughly
Knead the dough in the bowl for 2-3 minutes
Add 7g salt and continue to knead/mix for 2-3 minutes
Cover and let rest 20 minutes
Transfer dough to a floured counter and spread into a thick rectangle
Spread 20g room temperature butter over the rectangle
Knead until smooth 8-10 minutes
Cover and rest 20 minutes
Transfer to a floured counter and divide into 6 equal parts, each ~120g
Spread into a rough circle 5-6” diameter. Fold edges to center in 6 places, fold together and form a ball.
Roll ball against the counter with an open cupped hand to tension the surface
Roll into an oval log ~ 5×2”, cover and rest 20 minutes
Flatten log and roll into an oval ~ 4×7”. Starting at the furthest short end fold the “shoulders” inward toward the center, followed by folding the top center down to meet the folded shoulders. Repeat until fully rolled up
Pinch the seams, including the ends tightly together, roll back and forth under a cupped hand to tension the surface
Rest until doubled in size
Score each batard with a razor, lame or sharp knife. One long cut the length of the batard with a very slight curve
From a special request from QC, here is a first time bread for me: Sheepherders Bread.
During the California Gold Rush, Basque immigrants in the Owen’s Valley missed their home country’s bread. The loaves were hand shaped and baked in stone ovens. They still do so in bakeries where this traditional bread is produced.
I, on the other hand, used a stand mixer to mix and knead the bread and a built-in oven to bake it. Time rolls on.
I changed the measurements to grams from volume, because that is who I am. I also divided the dough into two loaves after proofing. This made it easier to distribute the finished bread to my QC Cadre (neighbors.) Also, this bread is enormous and I don’t have a baking vessel large enough to handle it.
Sheepherders Bread AP Flour
INGREDIENTS • 708 g (3 c) water (110 -120⁰F) • 112 g (½ c) butter or ½ cup shortening • 67 g (1/3 c) sugar • 15 g (2 ½ tsp) salt • 13.5 g (4 ½ tsp) active dry yeast • 1330 g (9 ½ c) AP unsifted
METHOD
In a bowl, combine water, butter, sugar and salt. Stir until butter melts and cool to 110-115⁰ F. Stir in yeast, cover and set in warm place until bubbly, about 15 minutes.
Add 700 g (5 cups) flour and beat to form thick batter. Stir in enough of remaining flour (about 490g or 3 ½ cups) to form stiff dough. Turn out on floured board and knead until smooth and elastic (about 10 minutes), adding flour as needed to prevent sticking.
Turn dough into greased bowl, cover and let rise in warm place until doubled, about 1 ½ hours. Punch down and knead to form smooth ball.
Grease inside of dutch oven and inside of lid with olive oil. Place dough in dutch oven and cover with lid to let rise in a warm place for ~30 min, until dough pushes up lid about ½ inch (watch closely).
Bake covered with lid in 375⁰ F oven for 12 minutes, carefully remove lid and bake for another 30 to 35 minutes, or until loaf is golden brown and sounds hollow when tapped. Remove from oven and turn out on rack to cool.
A friend of ours and I are planning a Soup & Bread dinner with a variety of each. I always experiment with new bread recipes before allowing them to leave my kitchen. (Of course, that means QC and I have lots of bread on hand.)
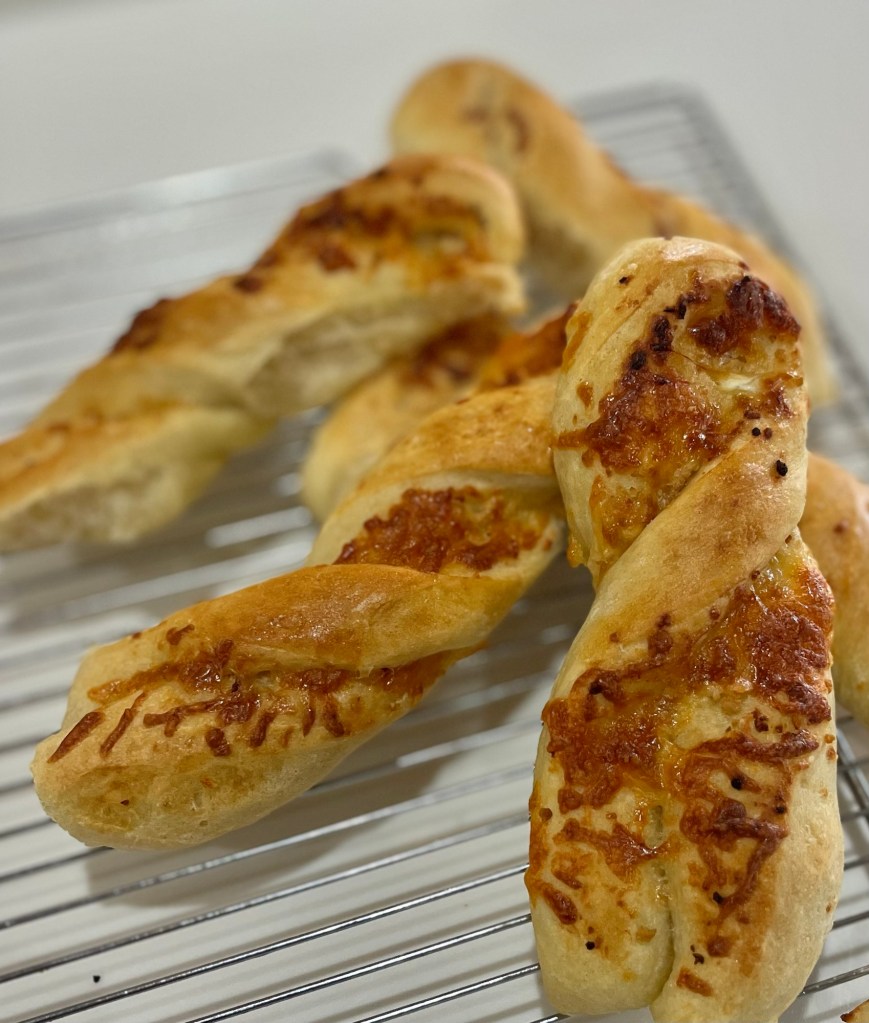
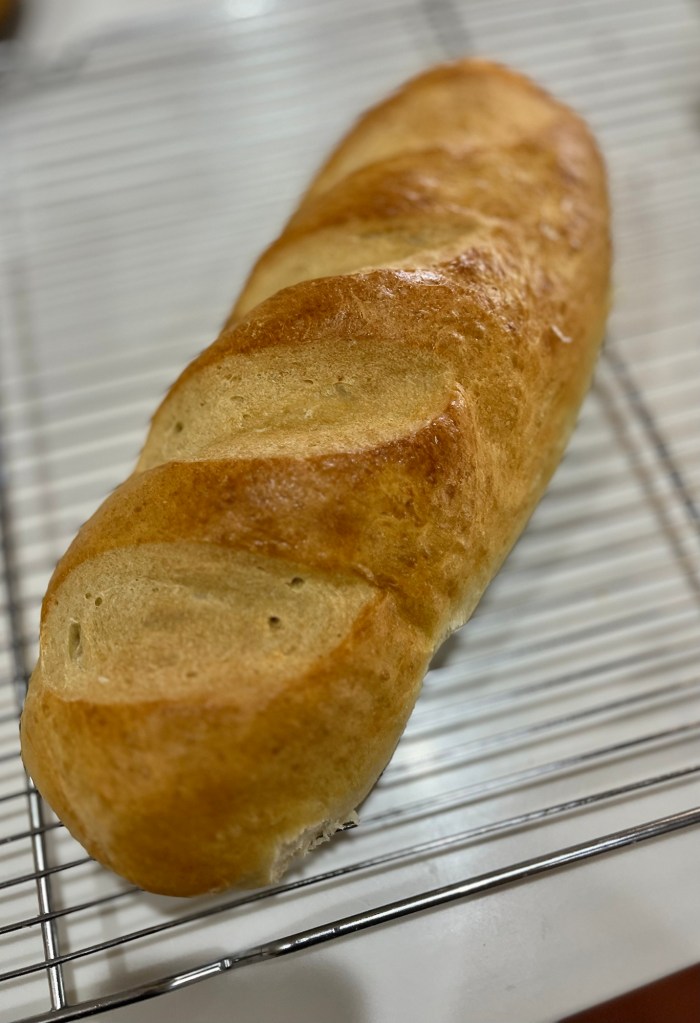
Today I used the versatile bread bowl recipe to make garlic knots and garlic cheese breadsticks. While at it I made a batard of sandwich bread, AND while all that was rising I completed my bread tour of Europe with a loaf of Irish Soda Bread. (Blushing, all were amazing!)
To make the batard I used half the recipe and formed it into a loaf. I used one fourth of the recipe to make the knots and the rest to make the breadsticks.
Roasted Garlic Breadsticks
INGREDIENTS DOUGH • 2 cups (250g) all-purpose flour • 1 teaspoon Platinum Yeast • 1 teaspoon granulated sugar • 1 teaspoon table salt • 2/3 cup (155ml) lukewarm water (90-100°F) • 1 tablespoon olive oil • 1 egg and 1 Tbl milk, mixed for egg wash FOR THE FILLING: • 1 head of garlic • 3 tablespoons olive oil (divided) • 1 cup (100g) shredded mozzarella cheese • 1/4 cup (15g) grated Parmesan cheese
METHOD
In a large mixing bowl with dough hook attachment, combine flour, sugar, salt and yeast. Add water and mix on low speed until the dough comes together. (Alternatively, you can make this dough by hand.)
Once the dough starts coming together, add olive oil and knead for 2-3 minutes on medium speed. If kneading by hand, knead for 5 minutes. The dough should be soft and slightly sticky.
Drizzle a little bit of oil into the bowl and coat the dough. Cover with a kitchen towel and place in warm place to rise for 1-2 hours, or until doubled in size.
Preheat the oven to 400°F (200°C).
Cut the top of the garlic head, exposing the garlic cloves, and place it in the middle of aluminum foil cut side up. Drizzle 1 tablespoon of olive oil and wrap the garlic. Roast for 45-75 minutes, or until the garlic is golden and soft. Start checking it after 45 minutes, at this point it should be ready, but for more color and flavor, continue to roast for another half hour.
Once the garlic is roasted, cool it slightly and squeeze garlic cloves out. Press through garlic press into a small bowl and mix with remaining 2 tablespoons of olive oil.
On a floured surface, roll the dough into 10×12-inch (25x30cm) rectangle.
Spread the garlic-olive oil all over the dough.
Sprinkle about half of mozzarella and Parmesan cheeses over dough.
Fold the short side of the dough over so that cheeses are covered. The rectangle should now be 5×12 inches. Cut the dough into 12 strips.
Twist each strip and arrange them on a baking sheet lined with a silicone mat or parchment paper.
Egg wash then sprinkle remaining cheese over the breadsticks. Cover with a kitchen towel and rest for at least 30 minutes to rise.
Bake for 20-25 minutes, or until golden brown.
Homemade Garlic Knots
INGREDIENTS DOUGH • 1 1/3 cups (320ml) warm water (100-110°F / 38-43°C) • 1 (0.25oz) package (7g) or 2 1/4 teaspoons yeast • 1 tablespoon (13g) granulated sugar • 2 tablespoons (30ml) olive oil • 3/4 teaspoon salt • 3 1/2 cups (420g) all-purpose flour TOPPING • 5 tablespoons (70g) unsalted butter (melted) • 3 garlic cloves (minced, or 1/2 teaspoon garlic powder) • 1 teaspoon Italian Seasoning (see notes) • 1/4 teaspoon table salt • 1/4 cup canned or freshly grated Parmesan cheese • 2 tablespoons chopped fresh parsley (optional, after baking)
METHOD
Prepare the dough: Whisk the warm water, yeast, and granulated sugar together in the bowl of your stand mixer fitted with a dough hook or paddle attachment. Cover and allow to rest for 5 minutes.
Add the olive oil, salt, and half of the flour. Beat for 15 seconds, then add the remaining flour. Beat on low speed for 2 minutes. Turn the dough out onto a lightly floured surface. With lightly floured hands, knead the dough for 3-4 minutes, until the dough is soft and elastic. The dough can be a little too heavy for a mixer to knead it, but you can certainly use the mixer on low speed instead. After kneading, the dough should still feel a little soft. Poke it with your finger – if it slowly bounces back, your dough is ready to rise. If not, keep kneading.
Lightly grease a large bowl with oil or nonstick spray– just use the same bowl you used for the dough. Place the dough in the bowl, turning it to coat all sides in the oil. Cover the bowl with aluminum foil, plastic wrap, or a clean kitchen towel. (See notes for overnight option) Allow the dough to rise at room temperature for 1-2 hours or until double in size. Poke index finger into the dough, down to the second knuckle; if the indent remains after removing finger, dough has risen enough.
Shape the dough: When the dough is ready, punch it down to release the air. Using floured hands on a lightly floured work surface, shape the dough into a 16×5-inch log. Using a very sharp knife, pizza cutter, or bench scraper, slice into 16 1-inch strips. Roll each strip into 8-inch ropes. Tie each into knots. You can tuck the two ends of the knots underneath the knot or leave them out, that’s up to you. Arrange the knots on the baking sheets.
Lightly cover the shaped knots and let them rest for at least 30 minutes and up to 45 minutes. They will slightly puff up during this time. Lightly touch the dough with index finger, if indent remains then dough is ready to be baked.
Preheat oven to 400°F (204°C). Line two large baking sheets with parchment paper or silicone baking mats.
Topping: Stir the melted butter, garlic, Italian seasoning, and salt together. Brush on the knots. Reserve some of the topping for when the knots come out of the oven.
Bake for about 18-23 minutes or until golden brown on top. Remove from the oven and brush the warm knots with remaining garlic butter. Sprinkle with Parmesan cheese and/or parsley, if using.
Serve plain or with marinara sauce for dipping.
Cover and store leftover knots at room temperature for up to 2 days or in the refrigerator for up to 1 week. Freeze baked and cooled knots for up to 3 months. Thaw on the counter, then reheat as desired.
Homemade Versatile Bread
INGREDIENTS • 4 ½ teaspoons active dry yeast • 2 ¼ cups (540ml) warm water (110°F – 115°F) • 2 tsp granulated sugar • 2 tsp salt • 2 Tablespoons (30ml) olive oil • 780 g (6 c) bread flour • egg wash: 1 large egg beaten with 1 Tablespoon water or milk
METHOD
Pour the warm water over yeast in the bowl of a stand mixer fitted with a dough hook attachment. Cover the bowl with a towel. The mixture should be frothy and foamy after 5 minutes.
With the stand mixer running on low speed, add the sugar, salt, olive oil, 4 cups of bread flour, and seasonings. Beat on low speed for 1 minute, then add remaining 2 cups of flour.
Keep the dough in the mixer and knead for an additional 5-6 full minutes. If the dough becomes too sticky during the kneading process, sprinkle 1 teaspoon of flour at a time on the dough or on the work surface/in the bowl to make a soft, slightly tacky dough. Do not add more flour than you need because you do not want a dry dough. After kneading, the dough should still feel a little soft. Poke it with your finger—if it slowly bounces back, your dough is ready to rise.
Turn it out onto a lightly floured surface and form into a ball. Then place into a large, greased bowl, turning once to grease the top. (I just use the same mixing bowl—remove the dough, grease it with nonstick spray or olive oil, put the dough back in.) Cover the bowl with plastic wrap and place it in a warm environment to rise until doubled, about 90 minutes.
Once doubled in size, punch down the dough to release any air bubbles. Remove dough from the bowl and turn it out onto a lightly floured surface. Punch down again to release any more air bubbles if needed.
Using a sharp knife or dough scraper, cut into 6 even pieces. Form each into a large ball.
Line 2 large baking sheets with parchment paper or silicone baking mats. Place 3 dough balls onto each. Cover lightly and set aside to rest for 20 minutes as the oven preheats.
Preheat oven to 400°F (204°C). Brush each dough ball with egg wash and, using a sharp knife, score an X into the tops of each.
Bake for 30 minutes or until golden brown. For a more accurate test for doneness, the bread bowls are done when an instant-read thermometer reads the center as 195°F (90°C).
Cool until ready to handle. The longer you cool, the easier they are to cut open. For serving, cut a large round out of the top of each bread bowl. Scoop out the center (save the center to dunk into soup!) and fill with soup.
Cover and store leftover bread bowls at room temperature for a couple days or in the refrigerator for 1 week. You can also freeze the baked bread bowls for up to 3 months, then thaw overnight in the refrigerator. Bring to room temperature before serving.
Make Ahead Instructions: After dough has risen in step 3, punch down the dough inside the mixing bowl and cover the bowl tightly with plastic wrap. Refrigerate overnight or for up to 2 days, then remove from the refrigerator and continue with step 4. OR freeze for up to 2 months, then allow to thaw overnight in the refrigerator and continue with step 4.
Pizza Dough: Makes 4 12-inch pizza crusts, which is likely more than you need, but you can freeze half of the dough for later. Prepare dough through step 4. Instead of forming into 6 balls in step 5, divide the dough in half. Freeze half of the dough for later use (see make ahead tip) and form the other half into 2 large balls. Cover lightly and set aside to rest for 20 minutes. Flatten each ball of dough 1 at a time on a lightly floured surface or on a silicone baking mat. You could also do this directly on your greased pizza pan. Flatten and stretch into a 12-inch round circle. Brush with a little olive oil (no need for egg wash). Add toppings and bake in a super hot oven at 475°F (246°C). Pizzas typically take 12-15 minutes.
Crusty Bread Loaves: Makes about 3 loaves of crusty bread. Prepare dough through step 4. Instead of forming into 6 balls in step 5, divide the dough into 3 pieces. You can freeze 1 or 2 pieces for later use (see make ahead tip). Round into a ball as best you can and place onto a lined baking sheet. Cover lightly and set aside to rest for 30 minutes. The dough will spread out a bit. Brush with egg wash, score with an X, and bake at 400°F (204°C) for 30 minutes or until the tops and edges are golden brown.
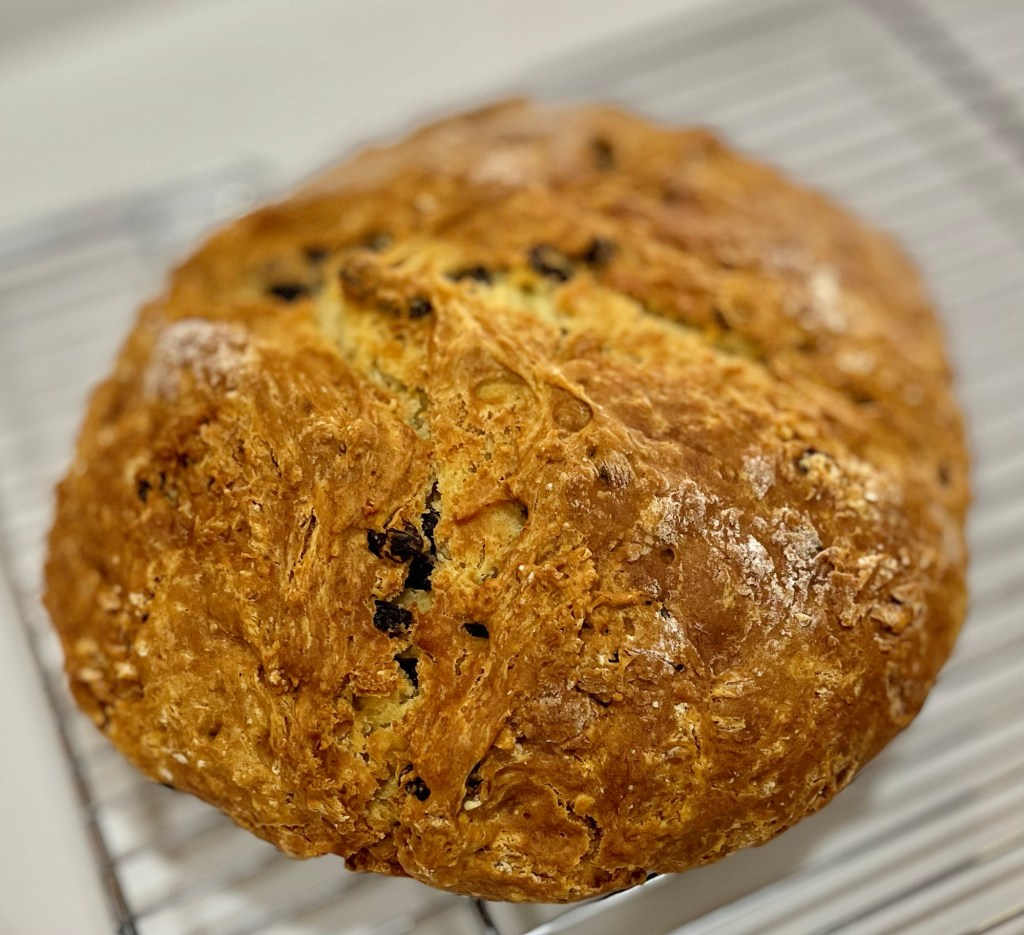
This bread concludes my tour or Europe. I previously made this bread but this time I made some modifications to the method, and I am not sure it worked.
First, I cut the butter into the flour using a food processor. I use this method for scones so thought I would give it a try. The result seemed ok, but the rise wasn’t what I wanted.
Second, I used the “alternative” to buttermilk by mixing 1 tablespoon of lemon juice to 1 3/4 cups of milk Previously I cut the butter in by hand and used store bought buttermilk.
This loaf did not rise like the previous. Oh well, try, try again, I guess.
Current LoafPrevious Loaf
Irish Soda Bread
INGREDIENTS • 1 and 3/4 cups (420ml) buttermilk* • 1 large egg (optional, see note) • 4 and 1/4 cups (531g) all-purpose flour (spooned & leveled), • 3 Tablespoons (38g) granulated sugar • 1 teaspoon baking soda • 1 teaspoon salt • 5 Tablespoons (71g) unsalted butter, cold and cubed* • optional: 1 cup (150g) raisins
METHOD
Preheat oven & pan options: Preheat oven to 400°F (204°C). Bake in a seasoned 10–12-inch cast iron skillet (no need to preheat the cast iron unless you want to).
Whisk the buttermilk and egg together. Set aside.
Whisk the flour, granulated sugar, baking soda, and salt together in a large bowl. Cut in the butter using a pastry cutter, a fork, or your fingers. Mixture is very heavy on the flour but do your best to cut in the butter until the butter is pea-sized crumbs.
Stir in the raisins. Pour in the buttermilk/egg mixture. (*Adding all of the mixture yielded an overly wet dough. Try reserving ½ cup, adding more as necessary.) Gently fold the dough together until dough it is too stiff to stir.
Pour crumbly dough onto a lightly floured work surface. With floured hands, work the dough into a ball as best you can, then knead for about 30 seconds or until all the flour is moistened. If the dough is too sticky, add a little more flour.
Transfer the dough to the prepared skillet. Using a very sharp knife or bread lame, score the dough with a slash or X about 1/2 inch deep. (“Score” = shallow cut.)
Bake until the bread is golden brown, and center appears cooked through, about 45-55 minutes. Loosely tent the bread with aluminum foil if you notice heavy browning on top. The bread is done when an instant read thermometer reads the center of the loaf as 195°F.
Remove from the oven and allow bread to cool for 10 minutes, and then transfer to a wire rack. Serve warm, at room temperature, or toasted with desired toppings/spreads.
Cover and store leftover bread at room temperature for up to 2 days or in the refrigerator for up to 1 week. We usually wrap it tightly in aluminum foil for storing. NOTES
Freezing Instructions: Baked and cooled bread freezes well up to 3 months. Freeze the whole loaf or individual slices. Thaw in the refrigerator or at room temperature, then reheat as desired.
Special Tools (affiliate links): Cast Iron Skillet, 9-Inch Round Cake Pan, 9-Inch Pie Dish, Dutch Oven, or Baking Sheet with Silicone Baking Mat or Parchment Paper | Glass Mixing Bowl | Whisk | Pastry Cutter | Instant Read Thermometer
Baking Pan: There are options for the baking pan (see Special Tools Note above). You can use a lined large baking sheet (with or without a rim), a seasoned 10-12 inch cast iron skillet, or a greased or lined 9-10 inch cake pan or pie dish. I don’t recommend a loaf pan because the loaf may not bake evenly inside. This dough is best as a flatter loaf.
Buttermilk: Using cold buttermilk is best. Buttermilk is key to the bread’s flavor, texture, and rise. The bread will not rise without it. If you don’t have any buttermilk on hand, you can make a homemade “DIY” version. Whole milk or 2% milk is best, though lower fat or nondairy milks work in a pinch. Add 1 Tablespoon of lemon juice or white vinegar to a liquid measuring cup. Add enough cold milk to make 1 and 3/4 cups. Whisk together, then let sit for 5 minutes before using in the recipe.
Egg: 1 egg adds richness and density. Feel free to skip it to make a slightly lighter loaf. No other changes necessary, simply leave out the egg.
Cold Butter: The colder the butter, the less sticky the dough will be. Make sure it’s very cold, even frozen cubed butter is great.
Smaller Loaves: You can divide this dough up to make smaller loaves. The bake time will be shorter, depending how large the loaves are. An instant read thermometer will be especially helpful. Bake the loaves until an instant read thermometer reads the center of the loaf as 195°F (90°C).
You may know I am a big fan of Sally’s Baking Addiction and maintain that baking as a hobby is a real sickness (as is golf.)
I received a post from Sally with a recipe for bread bowls and knew it would soon be in my baking queue. This morning was the time. A friend and I are planning a soup and bread dinner party for sometime around December and this is my first experiment with soup bread bowls.
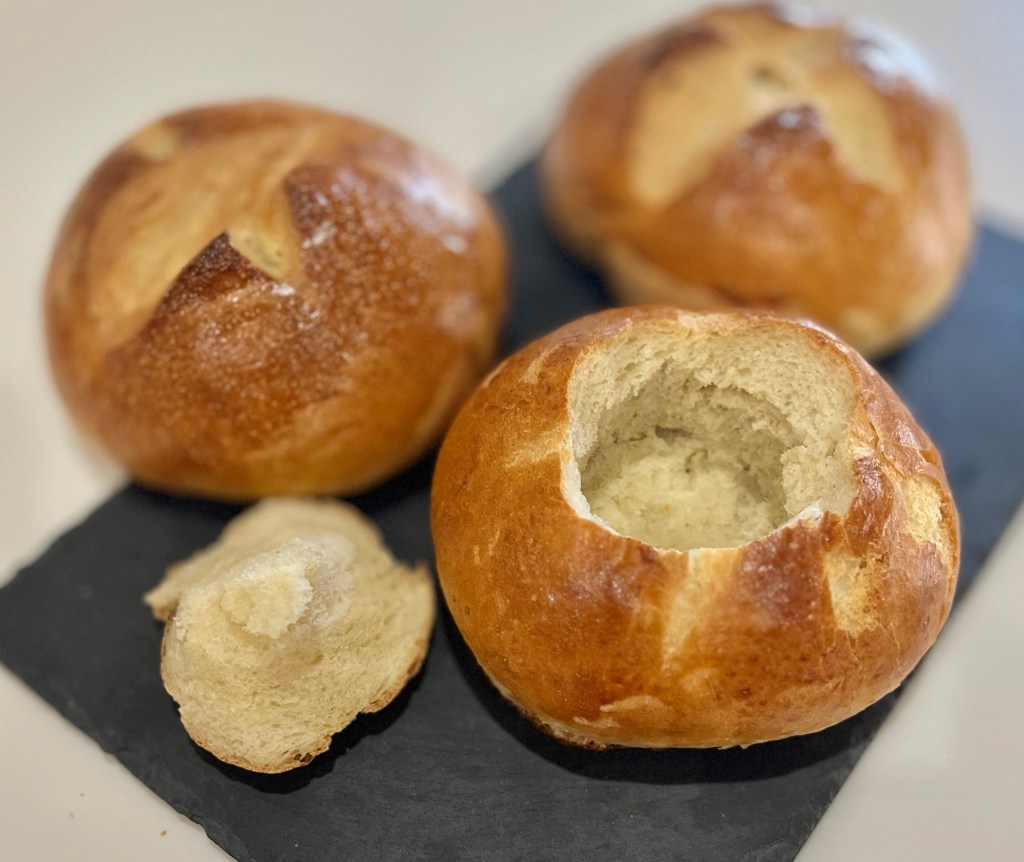
The bread has a nice crisp crust and soft crumb, but should be firm enough to hold a cup of hearty soup. Broths or something like chicken noodle would likely soak through. I plan on making Italian bread, garlic bread knots and soft pretzel bites for the thinner soups.
I set aside one proofed but not baked loaf in the fridge to use as pizza dough for dinner tonight. A double wrapped finished loaf went into the freezer to check the make ahead quality. I will use it for lunch Sunday.
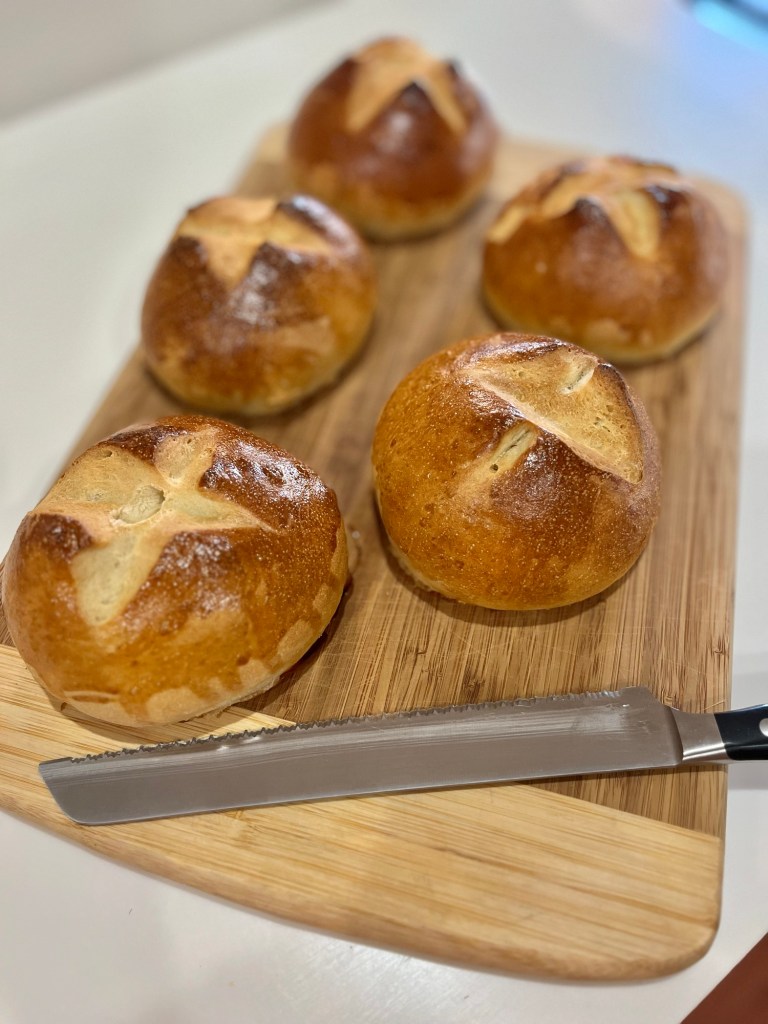
The dough weighs ~1380 g or ~230g once divided and the final loaf size is ~5”. I used an egg-yolk and milk wash for this bake. It results in a slightly darker crust than a whole egg and water wash. Use whichever you like, they will all be good.
Homemade Bread Bowls
INGREDIENTS • 4 ½ teaspoons active dry yeast • 2 ¼ cups (540ml) warm water (110°F – 115°F) • 2 tsp granulated sugar • 2 tsp salt • 2 Tablespoons (30ml) olive oil • 780 g (6 c) bread flour • egg wash: 1 large egg beaten with 1 Tablespoon water or milk
METHOD
Pour the warm water over yeast in the bowl of a stand mixer fitted with a dough hook attachment. Cover the bowl with a towel. The mixture should be frothy and foamy after 5 minutes.
With the stand mixer running on low speed, add the sugar, salt, olive oil, 4 cups of bread flour, and seasonings. Beat on low speed for 1 minute, then add remaining 2 cups of flour.
Keep the dough in the mixer and knead for an additional 5-6 full minutes. If the dough becomes too sticky during the kneading process, sprinkle 1 teaspoon of flour at a time on the dough or on the work surface/in the bowl to make a soft, slightly tacky dough. Do not add more flour than you need because you do not want a dry dough. After kneading, the dough should still feel a little soft. Poke it with your finger—if it slowly bounces back, your dough is ready to rise.
Turn it out onto a lightly floured surface and form into a ball. Then place into a large, greased bowl, turning once to grease the top. (I just use the same mixing bowl—remove the dough, grease it with nonstick spray or olive oil, put the dough back in.) Cover the bowl with plastic wrap and place it in a warm environment to rise until doubled, about 90 minutes.
Once doubled in size, punch down the dough to release any air bubbles. Remove dough from the bowl and turn it out onto a lightly floured surface. Punch down again to release any more air bubbles if needed.
Using a sharp knife or dough scraper, cut into 6 even pieces. Form each into a large ball.
Line 2 large baking sheets with parchment paper or silicone baking mats. Place 3 dough balls onto each. Cover lightly and set aside to rest for 20 minutes as the oven preheats.
Preheat oven to 400°F (204°C). Brush each dough ball with egg wash and, using a sharp knife, score an X into the tops of each.
Bake for 30 minutes or until golden brown. For a more accurate test for doneness, the bread bowls are done when an instant-read thermometer reads the center as 195°F (90°C).
Cool until ready to handle. The longer you cool, the easier they are to cut open. For serving, cut a large round out of the top of each bread bowl. Scoop out the center (save the center to dunk into soup!) and fill with soup.
Cover and store leftover bread bowls at room temperature for a couple days or in the refrigerator for 1 week. You can also freeze the baked bread bowls for up to 3 months, then thaw overnight in the refrigerator. Bring to room temperature before serving.
Make Ahead Instructions: After dough has risen in step 3, punch down the dough inside the mixing bowl and cover the bowl tightly with plastic wrap. Refrigerate overnight or for up to 2 days, then remove from the refrigerator and continue with step 4. OR freeze for up to 2 months, then allow to thaw overnight in the refrigerator and continue with step 4.
Pizza Dough: Makes 4 12-inch pizza crusts, which is likely more than you need, but you can freeze half of the dough for later. Prepare dough through step 4. Instead of forming into 6 balls in step 5, divide the dough in half. Freeze half of the dough for later use (see make ahead tip) and form the other half into 2 large balls. Cover lightly and set aside to rest for 20 minutes. Flatten each ball of dough 1 at a time on a lightly floured surface or on a silicone baking mat. You could also do this directly on your greased pizza pan. Flatten and stretch into a 12-inch round circle. Brush with a little olive oil (no need for egg wash). Add toppings and bake in a super hot oven at 475°F (246°C). Pizzas typically take 12-15 minutes.
Crusty Bread Loaves: Makes about 3 loaves of crusty bread. Prepare dough through step 4. Instead of forming into 6 balls in step 5, divide the dough into 3 pieces. You can freeze 1 or 2 pieces for later use (see make ahead tip). Round into a ball as best you can and place onto a lined baking sheet. Cover lightly and set aside to rest for 30 minutes. The dough will spread out a bit. Brush with egg wash, score with an X, and bake at 400°F (204°C) for 30 minutes or until the tops and edges are golden brown.
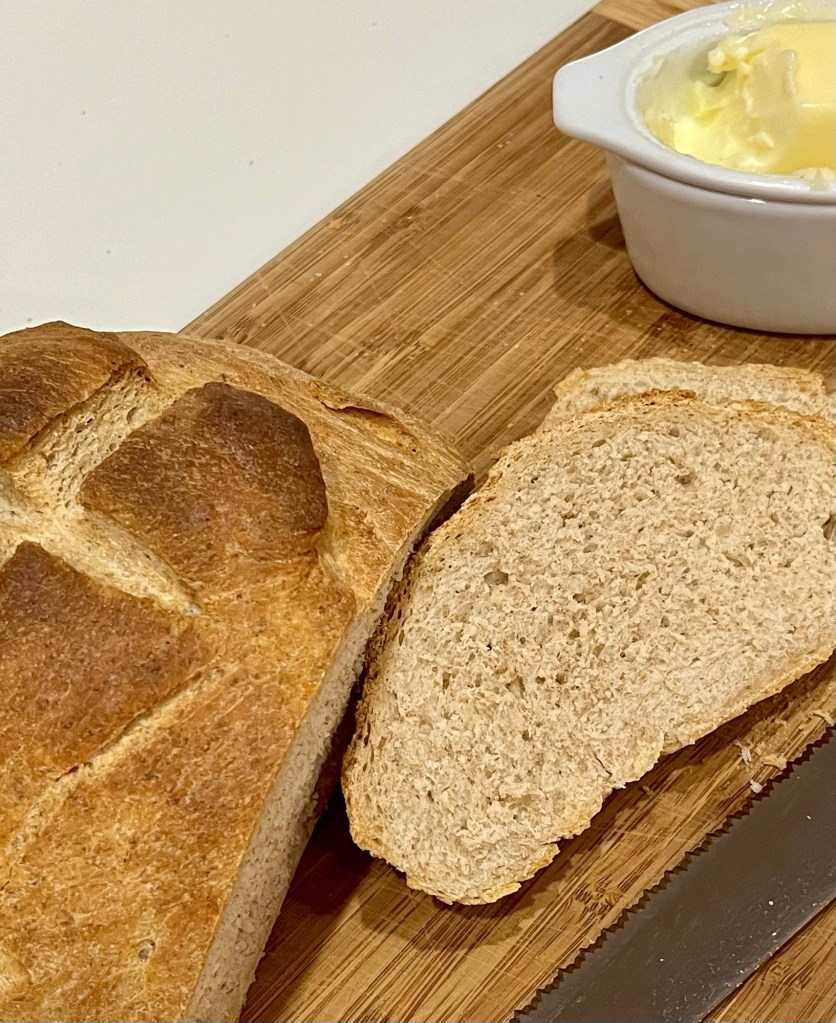
So, I recently forgot about Greek bread but rectified the omission today. I made Greek Country Bread. This is a whole grain bread made with a shorter than usual knead but pretty standard fermentation and proof.
In rural Greece bakers were limited to the grains available to mill into flour. The whole grain flour used here gives the loaf a rustic appearance and more earthy taste. If you don’t have whole wheat flour handy, you can use most any grain, think barley or semolina.
Coating the top of the loaf with water before baking and after 30 minutes yields a beautiful, crunchy crust and the whole wheat flour provides a wonderful crumb and flavor.
Greek Country Bread (Whole Grain) Recipe
INGREDIENTS • 2 ¼ tsp active dry yeast • 1 tsp sugar • 1 c whole wheat flour • 1 c warm water (~100⁰ F) • 2 c unbleached all-purpose flour • 1 ½ tsp salt • 2 Tbl olive oil, plus extra for the baking sheets • Extra all-purpose flour for your hands and the work surface
METHOD
Add the yeast, sugar, ¼ cup of the whole wheat flour, and the water to a small bowl and mix together well using a whisk. Leave the mixture uncovered and set it aside in a warm place until it has a spongy appearance. You can let the mixture sit for up to 1 ½ hours, depending on how sour you want the dough to taste.
Add the all-purpose flour, salt, and the rest of the whole wheat flour to a large bowl and whisk well with a clean, dry whisk. Pour the yeast mixture on top of the dry ingredients and stir well with a wooden spoon. When the dough starts to come together, knead the dough for 5 minutes, continuing to add small amounts of all-purpose flour until the dough is smooth and no longer sticky.
Wipe the large bowl clean and coat it with oil. Place the dough in bowl and flip it over to coat top of the dough with oil. Cover the pan with plastic wrap or a large, clean towel and set aside in a warm place until the dough doubles in size, ~ 2 ½ hours.
Punch down the dough after it rises and lightly flour the work surface once again. Knead for about 2 minutes, or until the dough is elastic. Spray a baking sheet with nonstick cooking spray. Form the dough into a round loaf shape and place on the baking sheet. Coat the top of the loaf with more olive oil. Set the baking sheet aside until the loaf doubles in size.
Slice the top of the loaf with a lame or sharp knife.
When the loaf is ready to bake, preheat the oven to 400⁰ F. Brush the top of the loaf with water and place the baking sheet in the center of the oven and bake for 30 minutes. Remove the loaf from the oven and brush it again with water. Place the loaf back in the oven and cook for an additional 15 minutes. You’ll know the loaf is done because when you knock on it with your knuckles, it will sound hollow. Remove the loaf from the oven and let it cool on the counter for at least 5 minutes before cutting into it.
The Pão de Mafra has a soft and fluffy interior and a crispy crust. Proper baking requires specific times of kneading and baking. This will provide the honeycomb structure and a crunchy, golden crust. (Full disclosure: this attempt did not have a fluffy interior, but a great flavor and nice crust.)
To be “true” Mafra bread it should be made with wild yeast native to the Mafra region of Portugal and traditionally the flour is artisanal ground, which really means it was processed locally by whatever means were available in Mafra (west central Portugal.)
This is a very high hydration (~78%) bread. It is supposed to have a short knead and rise. This results in a very slack dough, even after rising, portioning and resting. I tried to just wet my hand and form the dough into boules. It was just too wet and wouldn’t form a ball. I ended up dusting my work surface with some extra flour and dusted the tops of each boule. I was able to tension the rolls to provide some shape.
Next time I may do a stretch and fold rather than standard kneading. I doubt any Portuguese will be critiquing them anyway.
Bolas de Mafra Rolls – Portugal
INGREDIENTS Starter 4 g (½ tsp) active dry yeast 37 g water 63 g bread flour
Mafra bread dough 400 g water 100 g starter 500 g bread flour 1 Tbl salt 7 g (2 ¼ tsp) active dry yeast
METHOD Starter
Mix 37 g of ~100º F water and ½ tsp of yeast and let rest for 10 min.
Then add 63 g of flour and mix
Cover with a clean and damp cloth and let it rest until it doubles in size. Mafra bread dough
Mix 100 g water at ~100º F and 20 g yeast and rest for 10 min.
Mix in 100 g of flour until well combined
Add the remaining 400 g flour, the starter, salt and water.
Knead with a dough hook for 8 minutes in a stand mixer
Transfer the dough to a large lightly oiled bowl and let it rise for about 1 hour or until doubled.
Preheat the oven to 400º F
Shape the dough into a boule or ball and let it rest for another 15 minutes (I like to mold in the ball shape).
Bake for 30 – 45 minutes until the internal temperature reaches 200º F.
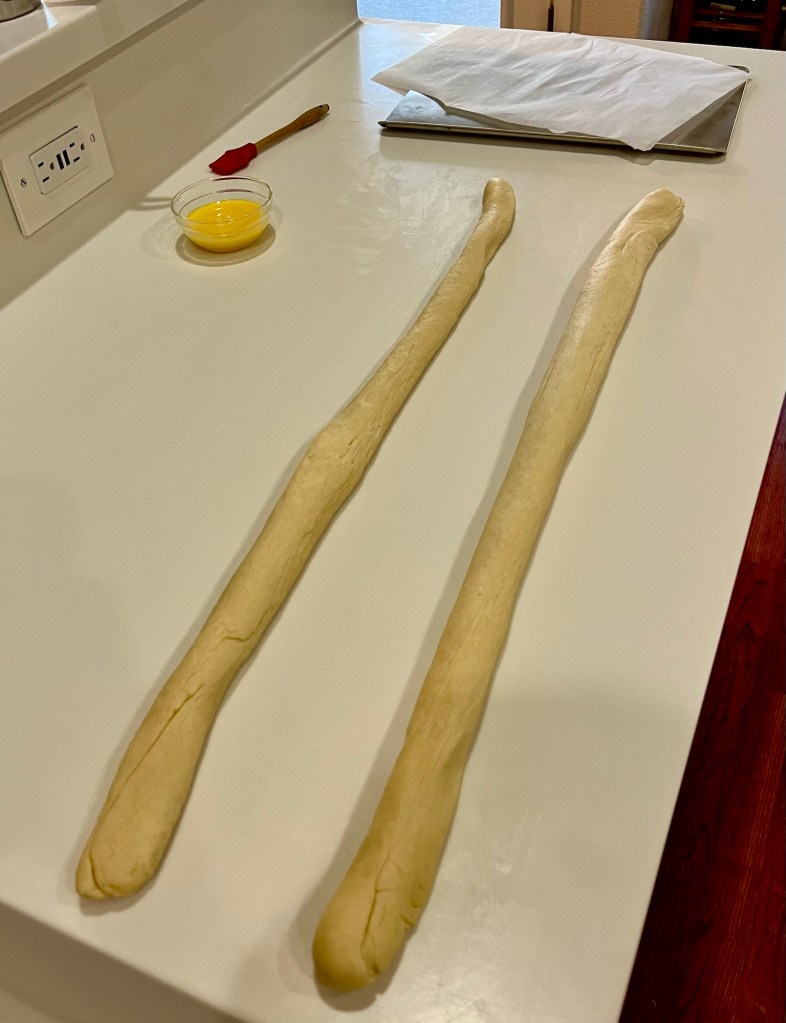
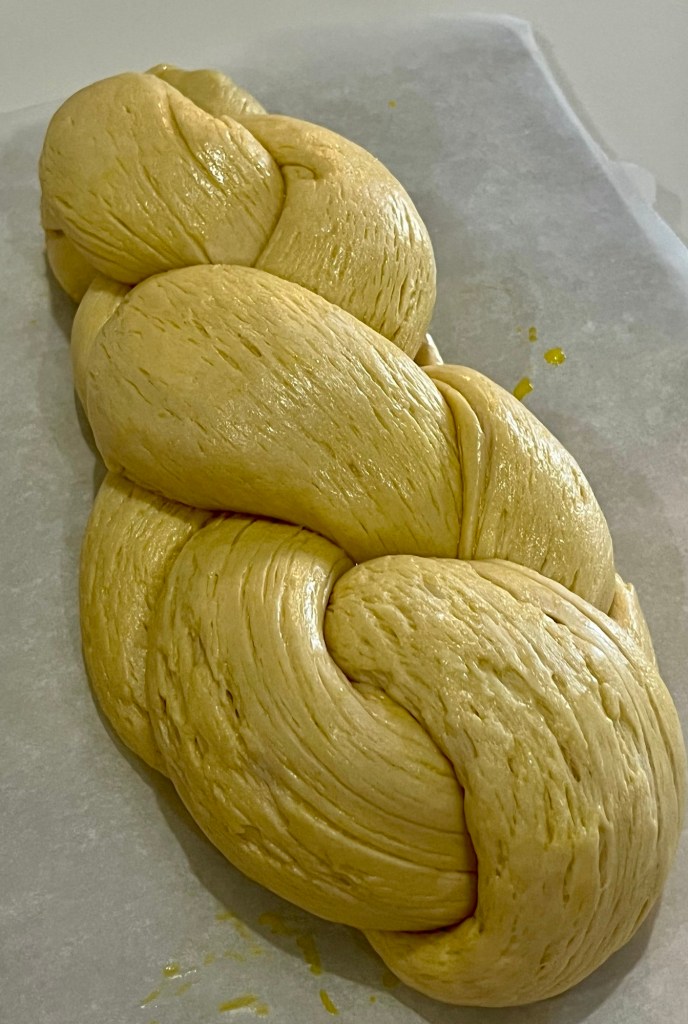
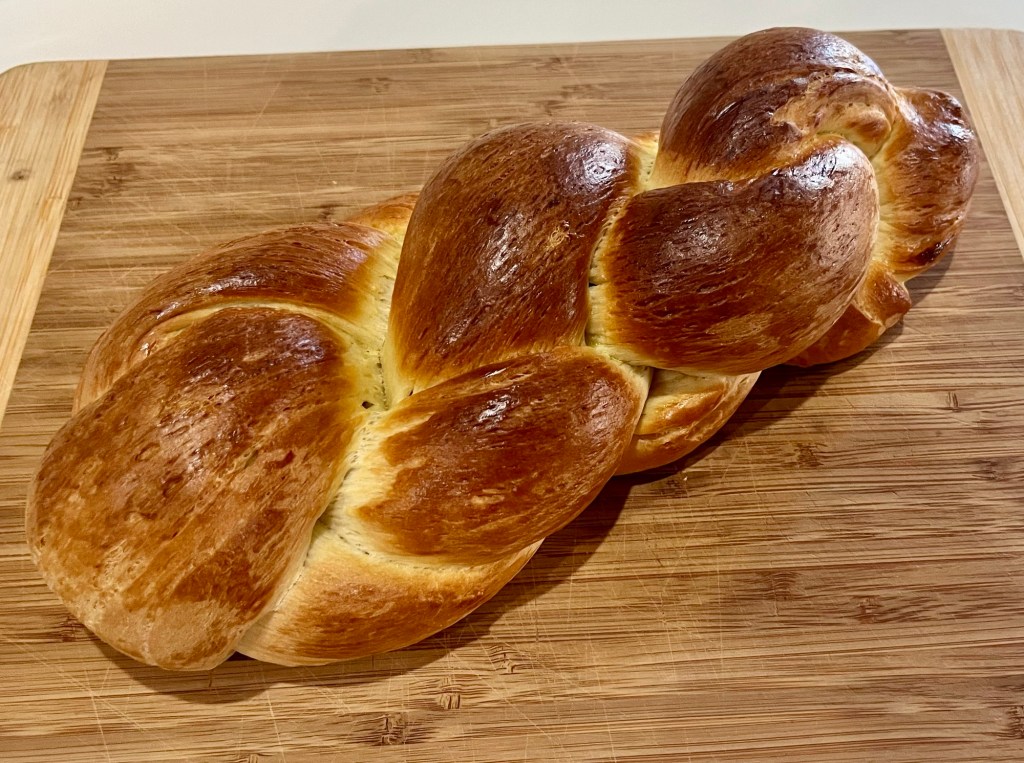
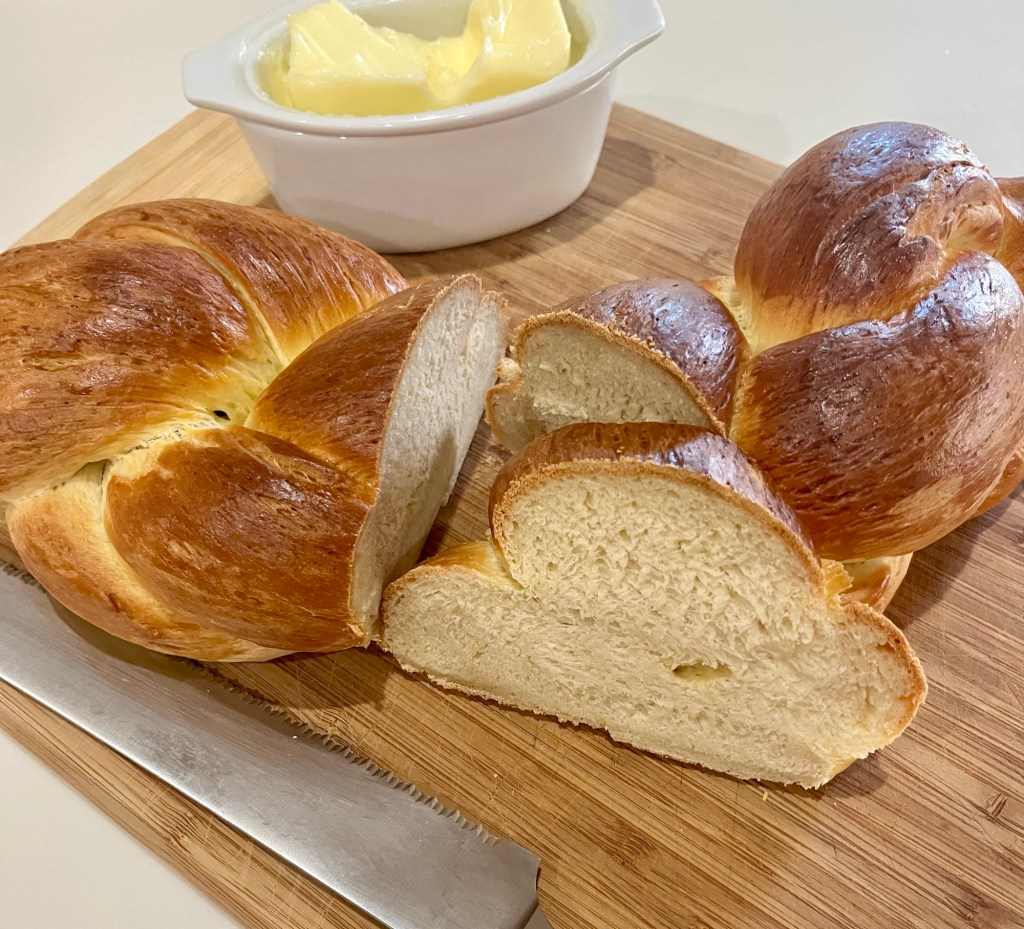
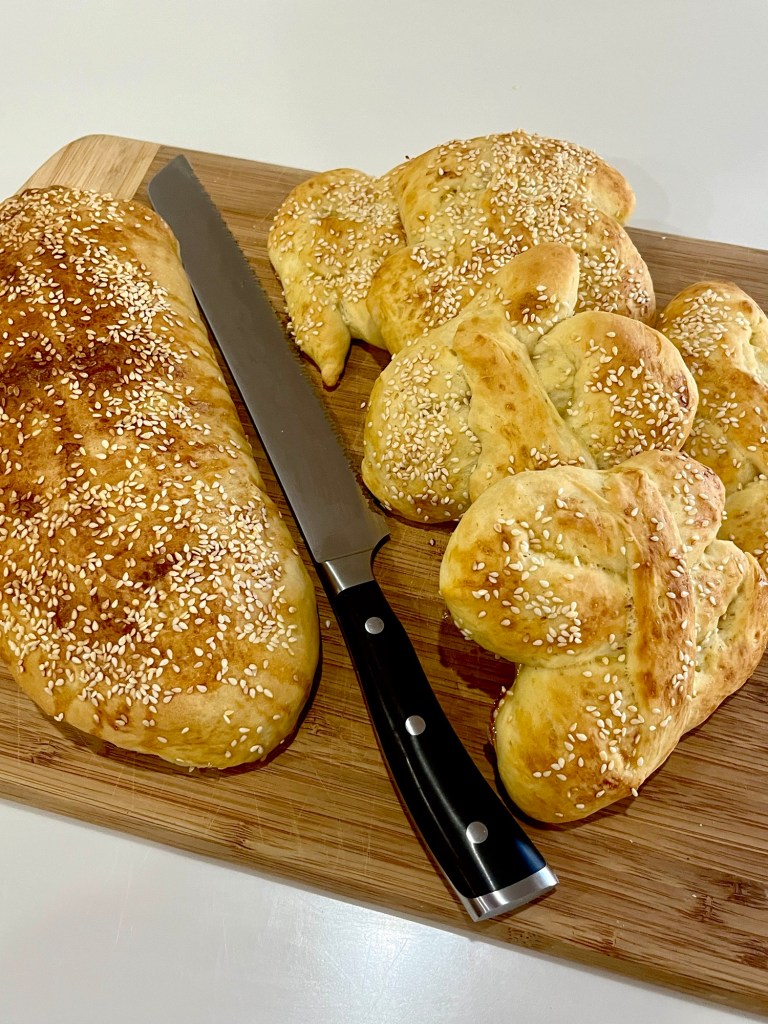
Well, the bread journey ends soon. Today is what is reportedly the most popular bread in Switzerland, Zopf . This is an enriched braided dough which is fairly easy to make and is delicious.
Irish Soda Bread remains to be baked.
Ropes rolled out to ~36”Braided loaf after second rise
Zopf – Swiss Loaf
INGREDIENTS • 560g (4 c) bread flour • 1 1/2 tsp salt • 2 ¼ tsp dry yeast (1 packet) • 1 tsp sugar • 72g (5 Tbl) melted butter • 1 c + 2 Tbl milk (more or less) • 1 egg yolk mixed with 1 Tbsp milk or water to brush on the dough
METHOD
Melt the butter and add milk. Mixture should be lukewarm, ~100
Add yeast and sugar, stir to dissolve
Add flour and salt to a mixer with a bread hook, start the mixer and add most of the milk, mix on low speed for 10-15 minutes. If necessary, add more milk to make it a smooth dough
Cover the bowl with plastic and let it rise for 1-2 hours at room temp.
Cut the dough in half, roll into about 2 ft long lengths and braid (you can braid it anyway you like, but Helvetic Kitchen braiding Zoph has an easy video showing a traditional Zopf braid). Roll each portion out to thin roles. The gluten is tight and the ropes will shrink back and fight you, Don’t worry. Rest another 15 minutes (covered) and try again. If they still will not roll out thin and long rest them again to relax the gluten. Keep them covered so they don’t dry.
Place on a baking sheet with baking paper so it won’t stick.
Thin down one beaten egg yolk with a little milk or water and brush it liberally over the dough. (Thinning with milk results in a darker brown crust.)
At this point, you can wrap it and keep it overnight in the fridge. It will rise some, but slowly, and you’ll need to let it warm up to room temperature for an hour or more before baking.
Set oven to 400°F, let the braided loaf rise for 20-30 minutes
Well, I should have put quotes around “Austrian” because they are not authentic sweet rolls. I used gluten free flour and apple compute in the first batch and AP flour and fresh made raspberry jelly in the second batch. What can I say, I didn’t have any apricot filling.
The texture of the apple filled resembled a biscuit more than bread, but a friend whose mother is Austrian said they were very close (except it should be filled with apricot jam.) The raspberry filed Buchteln were delicious, tender and above all, had raspberry in them.
Apple Compote FilledFresh Raspberry Jelly Filled
Buchteln – Sweet Austrian Yeast Buns
Yield: 12 Buchteln
INGREDIENTS • 150 ml (½ c plus 2 Tbl) warm milk • 5 g (1 ½ tsp g) active dry yeast • 40 g (3 Tbl) sugar • 1 large egg • 77 g (5 ½ Tbl) melted butter • ½ tsp vanilla extract • ¼ tsp salt • 325 g (about 2 ½ c) all-purpose flour Filling • About 5 Tbl apple compote with fine texture (no chunks) • 3 Tbl melted butter for the pan • Confectioners sugar for dusting
METHOD
In a large mixing bowl sprinkle the yeast over the warm milk and set it aside for 10 minutes for the yeast to dissolve and activate.
Stir in sugar, egg, melted (lightly cooled) butter, vanilla and salt with a hand whisk.
Stir in about 1 ½ cups (200 g) of the flour to get a thick batter and stir vigorously with the whisk until no lumps remain. Time to change your tools: Get rid of the whisk and use a sturdy (wooden) cooking spoon to gradually stir in the rest of the flour.
When all ingredients come together bowl fold the edges into the center for a couple of minutes. The dough will be sticky but refrain from adding more flour. It helps if you oil your clean hands before you knead a sticky dough. Knead until smooth, about 5 minutes.
Let the dough rise, covered at warm room temperature until doubled in volume (about 3/4 to 1 hour).
Transfer the dough onto a lightly floured surface and divide it into 10-12 60 g portions. Keep pieces you don’t need right away covered.
Fold the edges of each piece into the middle a couple of times so you will get a nice ball with a smooth surface on the bottom side. Flatten each ball with your palm to a circle with a diameter of 3 to 3 ½ inch, keeping the center slightly thicker than the edges. Usually this part works without using any additional flour. If the dough keeps sticking to your countertop, add some.
Put 1/2 teaspoon of filling (not more) in the center of every circle. Wrap the dough around the filling, pinching and sealing it tightly. Round the buns again, creating a bit of surface tension. If you use too much filling, it’s difficult to seal them. Also avoid getting filling onto your edges, because this way it is almost impossible to seal them.
Put every Buchtel (singular of Buchteln) with the sealed side down onto a lightly floured surface until you have finished filling all of them.
Brush a baking pan (I used a round 9-inch ceramic pan) with melted butter, just until coated.
Place the Buchteln in your baking pan. You can do this tightly packed (traditional way) or give them a little, but not too much space. They will still rise during the second proofing and baking. If you feel there are too many of them, you can place the remaining in a lined muffin tin.
Let them proof a second time for about 20-30 minutes at warm room temperature until puffy. It is best to cover the whole pan with a lid or cling wrap in this step. If you have a rather shallow pan, don’t cover the Buchteln, since they will stick to the plastic wrap. Brush with melted butter.
Bake them at 375 °F/ 190 °C in the preheated oven (center) for about 25 minutes (minimum 20 minutes). When they are golden-brown in color, take them out of the oven.
Let the Buchteln cool for 5-10 minutes and serve them dusted with confectioner’s sugar. Enjoy!
Continuing my European Bread Journey today’s selection s Mafalda, a popular bread in Sicily.
This bread uses semolina flour which is made from ground durum wheat. It’s high protein and fiber and makes a denser texture than bread or AP flour. It is a nice crumb and good firm texture and excellent flavor.
Shaping the rollsA boule for sandwichesBaked MafaldaGreat with a little fig, or cheese.
On my first attempt I added more water during the mixing/kneading to help the dough come together. This resulted in a very slack risen dough that was difficult to shape. Next time I will use the amount noted in the recipe, otherwise the plan was executed perfectly .
Mafalda Sicilian Sandwich Bread
INGREDIENTS • 500 g re-milled durum wheat semolina flour (I use Mulino Caputo) • 2 ¼ tsp (7 g) dry instant yeast (If baking the next day use 1 ¼ tsp instead of 2 tsp) • 35 g (30 ml) extra virgin olive oil • 15 g salt • 7 g (1 tsp) honey • 1 ¼ c (300 ml) room temperature water (1st try I used 350 ml and the dough was too slack) • 1 egg yolk + 1 Tbl milk well mixed for wash • Sesame seeds
METHOD
Mix oil and honey and set aside
In the bowl of a stand mixer, mix the sifted flour and yeast.
Add the water and mix well, then add oil and honey. Use the paddle in these first steps of mixing.
When it is all combined (3 mins), add salt and mix to incorporate it.
Cover the bowl with a kitchen towel and leave it for 15/20 mins to give the flour the time to hydrate.
Switch to the hook attachment and knead the dough at medium-low speed (Kitchen Aid is speed 2), until smooth, ~5-8 mins. (The dough should weigh ~875 g)
At this point, the Mafalda dough can be refrigerated and baked the next day after. (Be sure the bowl is well oiled and tightly covered.
Put the dough in a well-oiled bowl, flip over to coat the dough with oil and cover tightly, and let the Mafalda bread rise until it doubles (~ 1 hour).
After the first rise, punch down the dough, cut it into 8-9 pieces of 100 g each.
Roll each piece out to Form one piece into a boule to make a small sandwich loaf, or two sandwich buns.
Shape into the classic Mafalda shape (a 2 humped snake and fold the “tail” back on top and pressed into the far side, again like a pretzel.) Place well separated on a parchment paper line baking sheet.
Cover the buns with oiled cling wrap and let rise a second time in a warm place like in the oven turned off with the light on. My kitchen was 76⁰ F and the dough required 60 min to double in size,
Egg wash the rolls and sprinkle with sesame seeds.
Place a pan suitable for steaming on the bottom of the oven then pre-heat the oven to 400⁰F, and when hot, add one cup of boiling water to the steam pan and bake small buns for 15-20 mins, a bigger loaf 30-40 mins.
Halfway through cooking time, rotate the pan, and if your bread is still pale (which may happen with a gas oven), switch to convection mode for the rest of the baking time for a nice golden-brown color. Watch closely; it might color too quickly.