Happy Valentine’s Day 2023

For your (meaning our) indulgence I prepared filled chocolates and a tri-colored macaron tower for this years Valentine’s Day.

Macaron Tower

I had problems with the macaron tower. Being frugal, I used left over almond flour. Mistake! The flour was too coarse, even after running through a fine mesh sieve. The resultant batter was grainy and too thick to pipe properly. However, the taste was fine and they were crisp on the outside, had good legs, and were chewy on the inside.

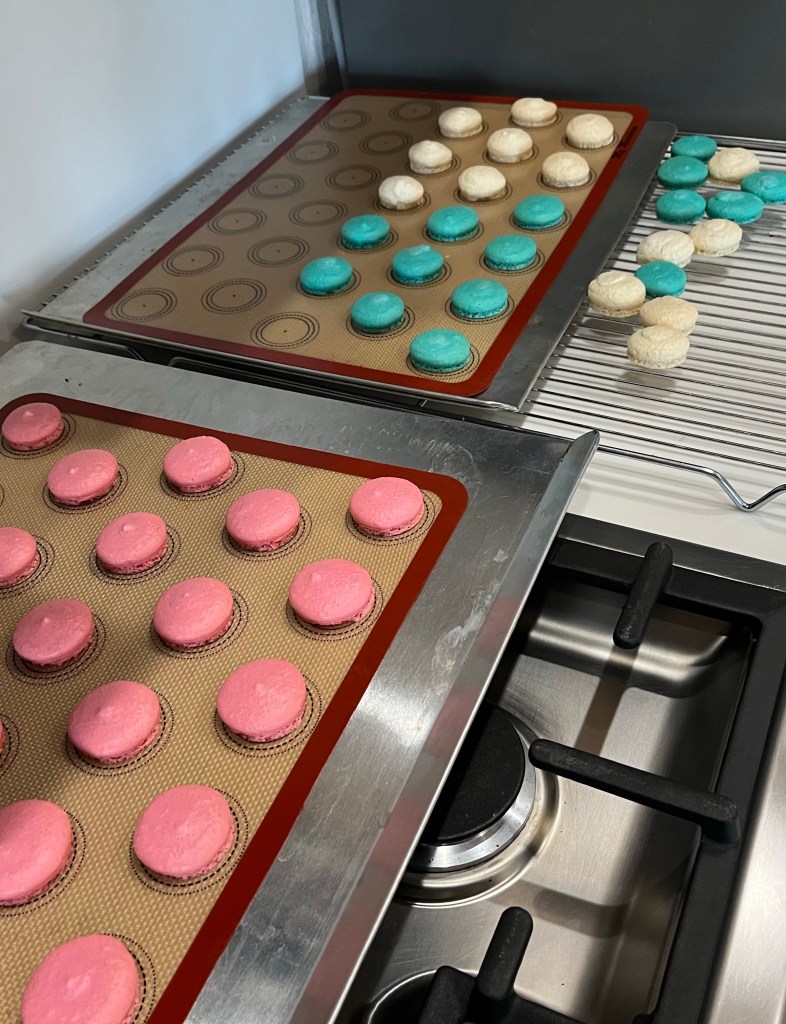
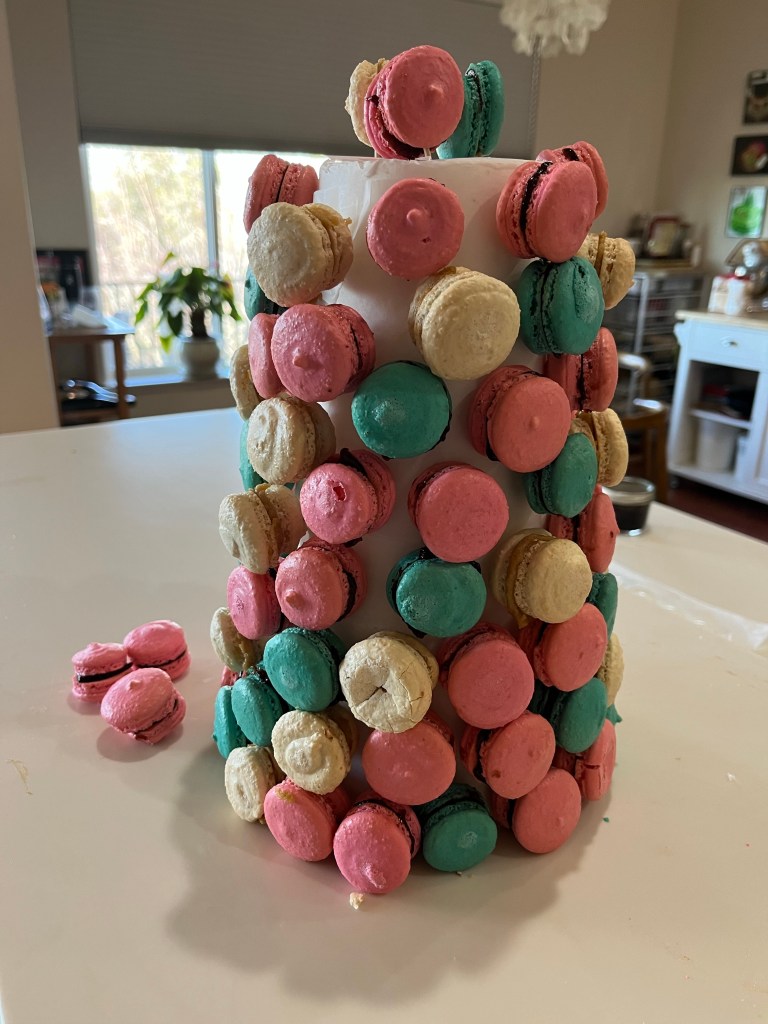
I thought building the tower on my parchment-lined-styrofoam-cone would be easy if I started with a nice even base, then add macarons in a logical sequence row by row. Let’s just say it failed, not due to any ineptitude on my part but rather from geometrical issues with the cone. (It becomes smaller as you go up. Who knew?) I deconstructed the tower (breaking several macarons in the process) and re-built it by placing a single color in a spiral from bottom to top. (The nice teal one.) This method was better, but next time (and there will be a next time) I need to compensate the spiral with basic Euclidean geometric principles.

The teal macarons are filled with homemade plum jam, the pink with plum/raspberry jam and the white with hazelnut butter. They all taste good, but the hazelnut butter didn’t adhere well and the cookies tended to separate. QC suggests using a tart filling like lime or lemon curd to balance the sweetness of the macaron.
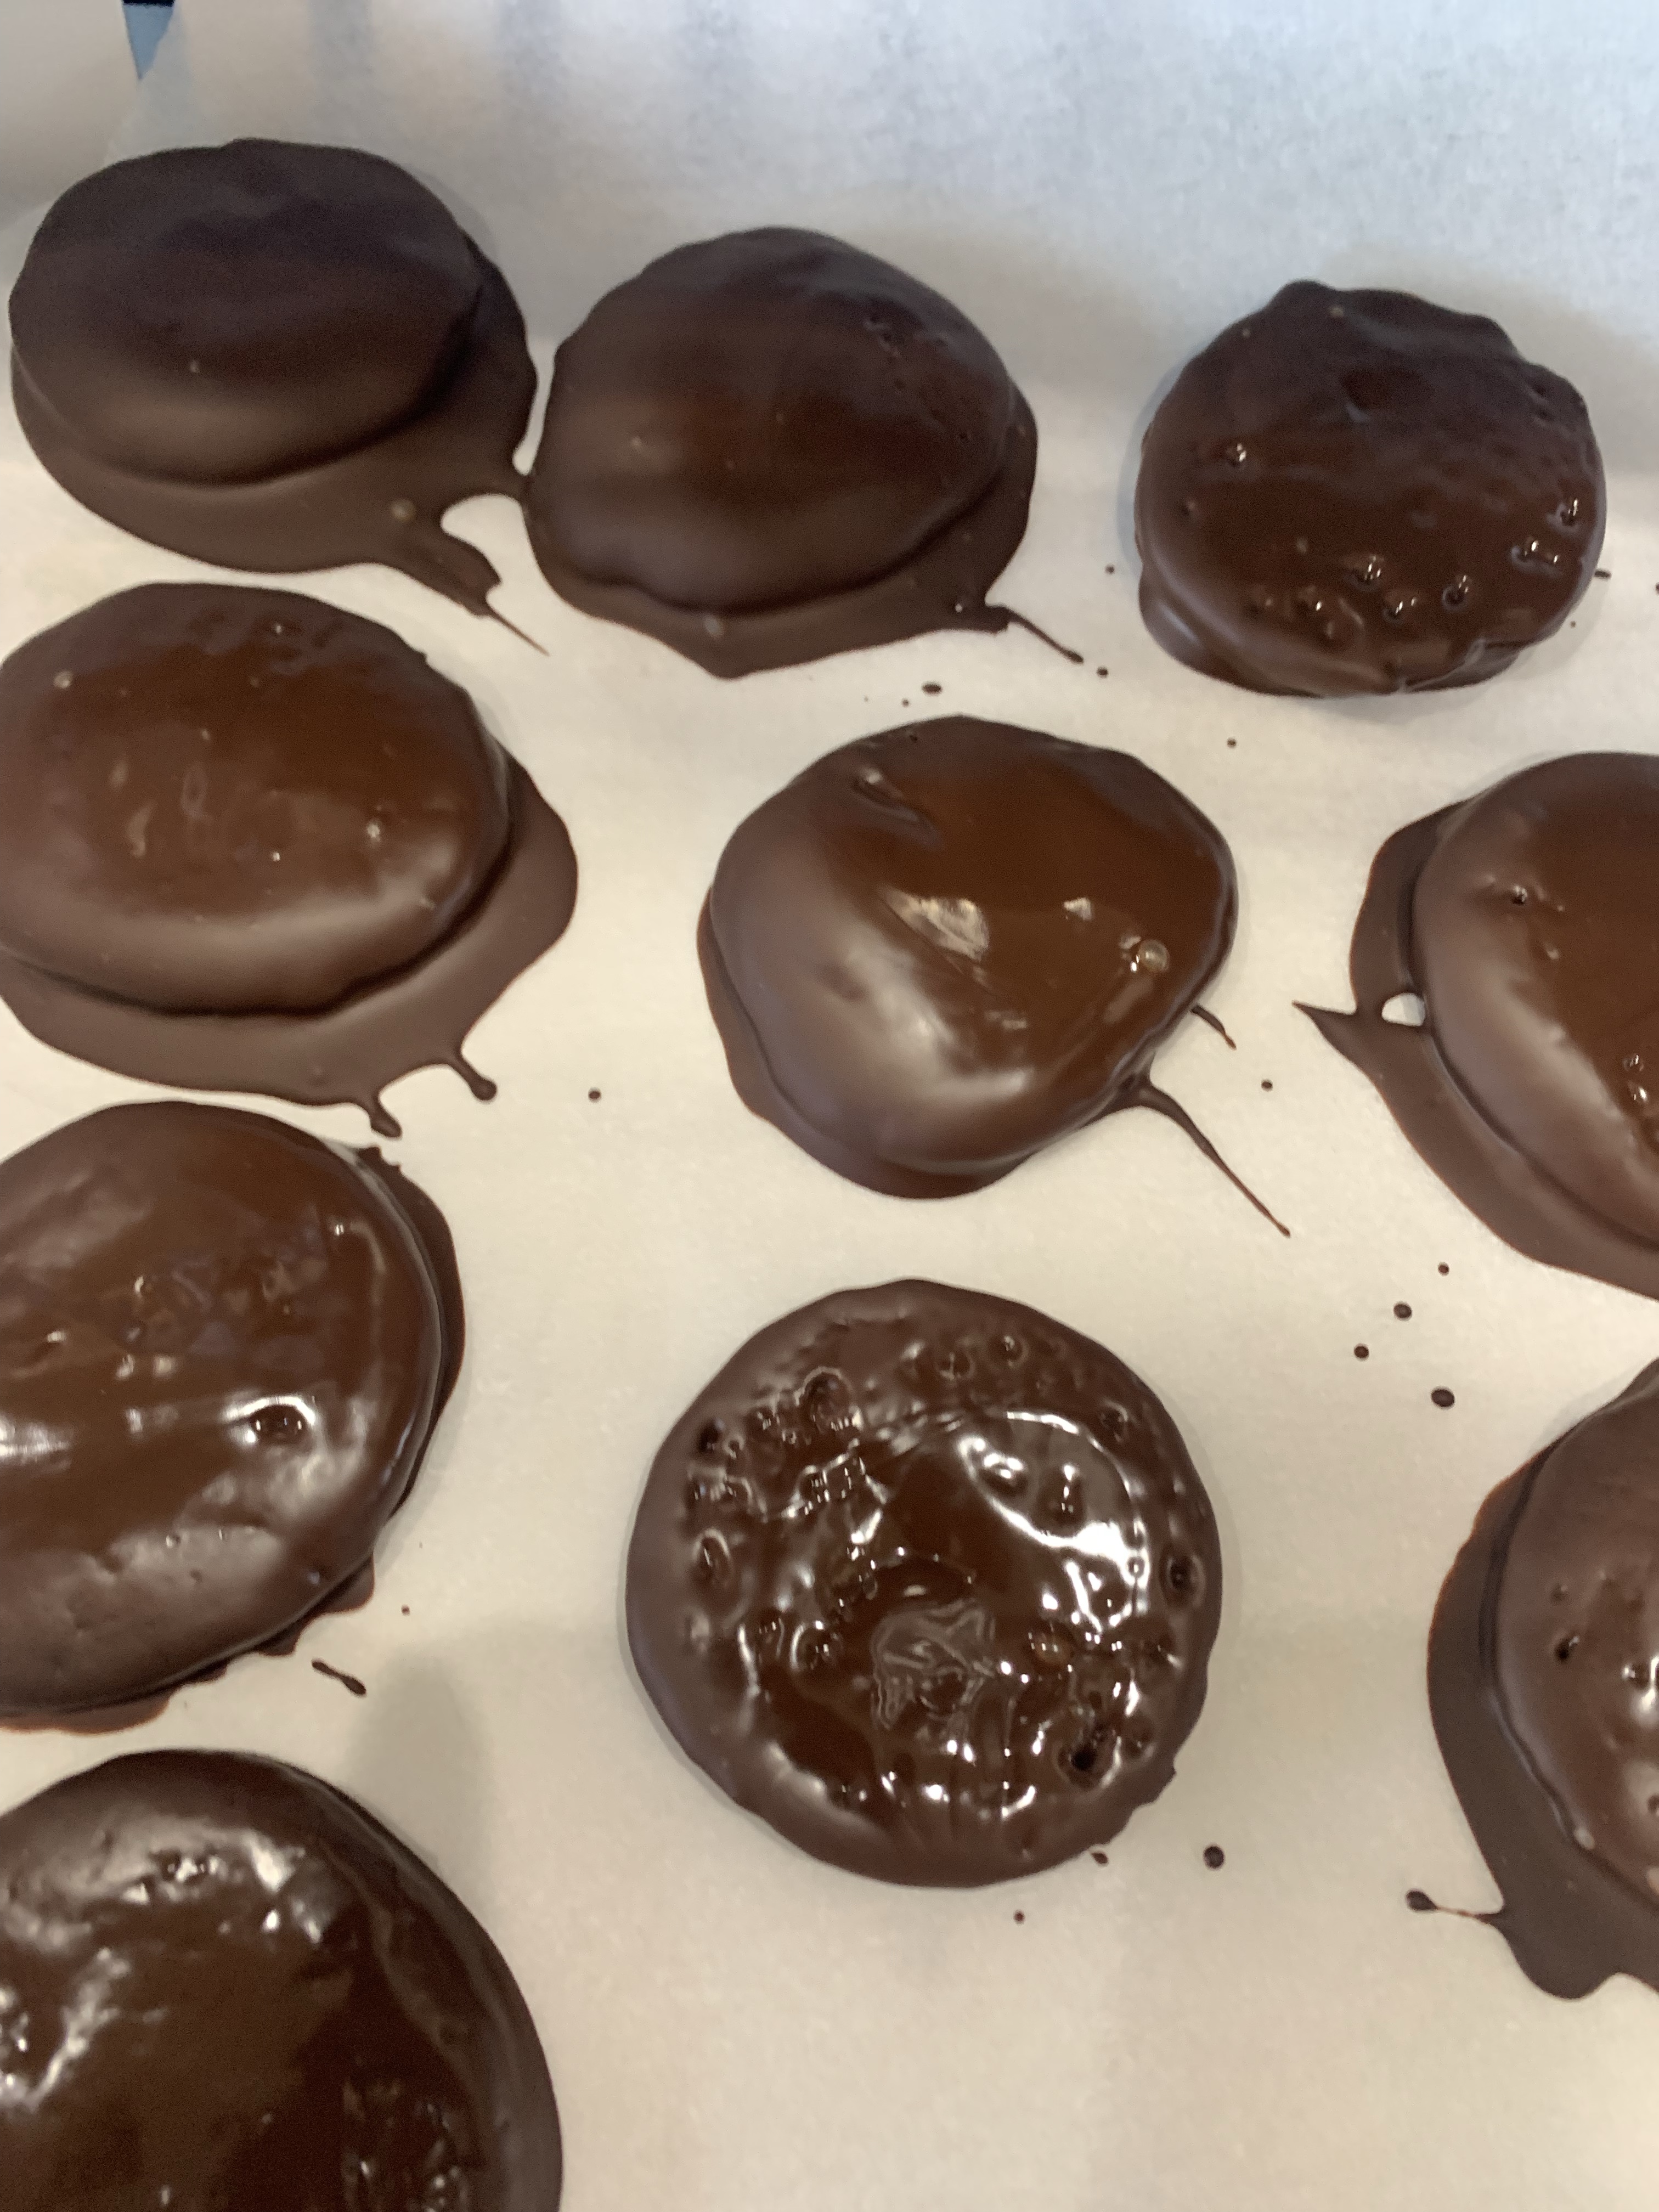
Filled Chocolates

I made three trays of chocolates, each with a different shape. To make them a bit special I piped lines of tempered white chocolate in two of the molds and let it cool before filling with tempered 64% chocolate. For the third, I piped some white chocolate into the bottom of each well and used a toothpick to made a star pattern. It worked reasonably well but led to my major mistake with this treat.

I attended a seminar on working with chocolate in Hawaii last year. The most important takeaway was the use of Mycryo to temper chocolate. I changed how to heat the chocolate and now use the microwave. 200g of dark chocolate requires 90 – 120 seconds with a 1000w microwave. After 60 seconds use small bursts and check the temperature between each one. If the temperature exceeds 104F it’s ok, just don’t go too high.

I failed to allow enough time between my golf round in the morning and our traditional happy hour dinner/drinks at our favorite pizza/bar. I tried to un-mold the chocolates too soon and broke many. In fact only six of the orange jelly confections survived. I should have allowed time to put the in the freezer for a few minutes to help them release. Oh well.

Notice the lack of shine on the macarons, and the points. Plus they were too thick, but had good feet. You can see a chip in the chocolate in the center candy, but also see how the white chocolate lines came out.

The confection with the faint stripes (left) are filled with fresh orange juice jelly, the hearts with soft caramel and the dome shaped ones (right) with coconut cream (think the inside of a Mounds bar. )

Overall, everything tasted good and that’s the most important!

Chocolate Orange Shortbread Cookies

Recently I invited our new neighbors, John and Amy, to join my small cadre of baked goods tasters. As it turns our they have several orange trees (not that that had any influence on my asking them to join the group) and they offered me as many oranges as I liked. That is the very good news.

Here is the other side of the coin. QC’s Mah Jongg group (who I made the key lime tarts in the previous post for) cancelled Tuesday’s game, so I gave away most of the tarts I made for them. Then, they changed their minds and decided to play (with 6 tartlets and some of one of the 6” pies left.)

Then, they decided they would try to gather enough players for another game on Wednesday. As it turns out, for some reason, I had some extra oranges in my possession and no plans other than juicing, so… chocolate orange shortbread cookies for Wednesday’ game, and more samples for my tasting cadre.

I like to melt the chocolate in the microwave using short bursts (first is 1 minute, each other 30 seconds) while stirring between each burst. The white chocolate wasn’t tempered, nor was it quite fluid enough to pipe nicely. I made a second batch and it was much better.

I used my bench knife to act as an end block, lined up six cookies and spread dark chocolate over them all. While the dark chocolate was still liquid I piped the white in thin (occasionally straight) lines and ran a tooth pick across the top of the cookie to make the feathering.

The orange flavor comes through, but isn’t too strong. Next time, I may add some essence as the chocolate nearly overpowers the orange.

Orange Shortbread Cookies

INGREDIENTS
• 1 cup sugar, plus extra for sprinkling
• 3 sticks unsalted butter, at room temperature
• Zest from 2 large oranges
• 1 teaspoon pure vanilla extract
• 3 ½ cups all-purpose flour
• ¼ teaspoon salt
• 6 ounces finely chopped, dark or semisweet chocolate, your choice

METHOD

  1. Combine the sugar and zest, blending with a fork until thoroughly mixed and fragrant.
  2. In the bowl of an electric mixer fitted with a paddle attachment, mix together the butter and 1 cup of sugar/zest mixture until they are just combined. Add the vanilla.
  3. In a medium bowl, sift together the flour and salt, then add them to the butter and sugar/zest mixture. Mix on low speed until the dough starts to come together. Dump onto a surface dusted
    with flour and shape into a flat disk. Wrap in plastic and chill for 30 minutes.
  4. Preheat the oven to 375 F.
  5. Roll the dough ¼ inch thick and cut to 3 by 1-inch with a pizza cutter. Place the cookies on an parchment paper lined baking sheet and sprinkle with sugar. Bake for 20 to 25 minutes (rotate pans after 10 minutes), until the edges begin to brown. Allow to cool to room temperature.
  6. When the cookies are cool, place them on a baking sheet lined with parchment paper.

TEMPERING DARK CHOCOLATE.
Weigh 1% of the mycryo butter so it’s ready to add.
To calculate:
• 100g/3.5oz chocolate + 1/2 teaspoon (1g) mycryo cocoa butter
• 200g/7oz chocolate + 1 teaspoon (2g) mycryo cocoa butter
• 1kg/35.27oz chocolate + 5 tsp (10g) mycryo cocoa butter.

METHOD

Melt the chocolate on a bain-marie (or use a microwave, melting in 30 second bursts, stirring well between each burst and checking the temperature, reducing to 3 or 5 second bursts when almost ready).

Make sure the chocolate reaches a temperature of 122º F (a few degrees higher is OK). Take it off the bain-marie as soon as it gets near and give it a good stir then if necessary return 5 seconds or so at a time, stir and check the temperature.

Once off the heat (and off the bain-marie) let the chocolate cool to 94ºF. Sprinkle on the mycryo cocoa butter and wait a few seconds as it melts then stir in to combine. Use a rubber spatula to scrape the chocolate off the sides and fold into the middle. Stir well and continue to stir well
fairly frequently. Keep the tempered chocolate in the sous vide, or Bain-marie at 90 F.

Black Chocolate Cookies

I made these cookies as the base for decorations for my NYE 2023 cake. They were so good I decided to post the recipe alone

The secret to these cookies is the black cocoa. I bought this for another project a year or so ago, but now use it regularly. If you want BLACK frosting, royal icing or other goodies, this should be your go to ingredient.

The recipe made about four dozen 2” cookies . No tricks or tips, just follow the recipe.

Black Chocolate Cookies

INGREDIENTS
• 1 1/2 cups (195g) AP flour
• 3/4 cup (70g) unsweetened black cocoa powder
• 1 teaspoon baking soda
• 1/4 teaspoon kosher salt
• 1/2 teaspoon espresso powder
• 1 stick (110g) unsalted butter, room temperature
• 3/4 cup (150g) sugar
• 1 large egg
• 1 1/2 teaspoons vanilla
• 1 teaspoon molasses

METHOD

  1. In a large bowl, vigorously whisk together the flour, cocoa, baking soda, salt, and espresso powder.
  2. Cream the butter and sugar until light and fluffy, (2-3 min on medium.)
  3. Beat in the egg, vanilla, and molasses.
  4. Add the dry ingredients to the wet in 3 additions. When well mixed, remove the dough from the mixer, and form it into a ball. It should have the consistency of soft clay. If it’s stiff and unmanageable, massage some water into it, a tablespoon at a time until easily pliable.
  5. Wrap it in plastic wrap, and chill it in the refrigerator for at least one hour.
  6. When you are ready to roll-out the dough, preheat the oven to 350°F (175° C). Break off a chunk of dough from the ball of dough (about a quarter of it) and place it between two pieces of parchment paper. Use a rolling pin to roll the dough out to an even 1/2-inch thickness.
  7. Use a cookie cutter or the rim of a small glass to cut out cookie shapes from the rolled out dough. Place on a parchment paper or silicone-lined baking sheet, allowing at least 1 inch between cookies on the cookie sheet.
  8. Bake at 350°F (175° C) in the middle rack for 12 to 14 minutes, less or more, depending on the size and thickness of the cookies.
  9. The cookies should bounce back when you press on their centers and be a little dark around the edges. When cool, they should be crispy.
  10. Remove from oven and let cool for 5 minutes before removing the cookies from the tray to cool on a rack.

A Delicious Old Glory!

This 4th of July dessert is either the largest cookie, or one of the smallest cakes I ever made. That is not to say it is either the least flavorful, or not the prettiest cookie/cake I ever made. I am very happy with the result in both attractiveness and flavor.

There were no real trick in making this. Once the cookie cooled a few minutes in the pan I turned it out onto a cooling rack to let it cool to room temperature. I trimmed it to fit the available serving tray and to remove the more well done edges.

I coated the cookie with a thin layer (<1/4”) of white buttercream and first outlined the upper left corner and set blueberries in a rectangle approximating the aspect ratio of Old Glory.

I just noticed I squeezed some raspberries into the third from the bottom row on the left. Probably should have used a larger berry there and left a bit more white showing. Judgement call, could have gone either way.

Chocolate Chip Cookies/Sheet Cake

INGREDIENTS
• 2 ¼ cups all-purpose flour
• 1 teaspoon baking soda
• 1 teaspoon salt
• 1 cup (2 sticks) butter, softened
• ¾ cup granulated sugar
• ¾ cup packed brown sugar
• 1 teaspoon vanilla extract
• 2 large eggs
• 2 cups (12 oz) chocolate chips

METHOD

  1. Preheat oven to 375° F.
  2. Combine flour, baking soda and salt in small bowl.
  3. Beat butter, granulated sugar, brown sugar and vanilla extract in large mixer bowl until creamy.
  4. Add eggs, one at a time, beating well after each addition.
  5. Gradually beat in flour mixture.
  6. Stir in morsels and nuts.
  7. Drop by rounded tablespoon onto ungreased baking sheets.
  8. Bake for 9 to 11 minutes or until golden brown.
  9. Cool on baking sheets for 2 minutes; remove to wire racks to cool completely.

Pan Cookie Variation:
Preheat oven to 350° F. Grease 15 x 10-inch jelly-roll pan. Prepare dough as above. Spread into prepared pan. It’s easier to pat down into an even layer with wet/damp hands. Bake for 20 to 25 minutes or until golden brown. Cool in pan on wire rack.

Pavlova’s Dog?

Pavlovas are a meringue type confection with a crisp exterior and marshmallow like interior. They were named for ballerina Anna Pavlova and are quick and easy to make. They will keep at room temperature for 3-5 days if sealed in an airtight container in low humidity.

I made them for Independence Day and topped them with red (fresh raspberry or strawberry sauce) and blue (fresh blueberries) for the red, white and blue theme, and chocolate because, well….it’s chocolate!

The tartness of the sauces compliments and tempers the sweetness of the pavlova. These are a delicious, light, refreshing dessert.

Mini Pavlova

INGREDIENTS

• 6 (180 g) large egg whites, room temperature
• 1 ½ cups granulated sugar
• 2 tsp corn starch
• ½ tsp cream of tartar
• ½ Tbsp lemon juice
• ½ Tbsp vanilla extract

METHOD

  1. Preheat the Oven to (I used 215˚ F as my oven runs hot. Many recipes call for 250˚ F. But my pavlovas were over baked and light brown at this temperature. Because this contains eggs, it should be heated to more than 160˚ F. at a minimum.)
  2. Line a large baking sheet with parchment (or Silpat) paper. Using your stand mixer, beat 6 egg whites on high speed until soft peaks form. With the mixer on high, gradually add 1 ½ cups sugar and cream of tartar and beat 10 min on high speed, or until soft peaks form. It will be smooth and glossy.
  3. Add the cornstarch, lemon juice and vanilla extract. The mini pavlovas can be formed by piping, or for a more irregular look I used a spoon.
  4. Bake for 30-45 min. If the temperature is too high, or you leave them in the oven to long they will begin to brown. After 30 minutes add 15 additional minutes if necessary for the surface to no longer tacky.
  5. Slide the pavlova with the parchment paper onto the counter or a cooling rack and allow it to come to room temperature.
  6. Once cool, you can top them with your choice of topping or store in an airtight container for 3-5 days at room temperature (in a low humidity place).

Berry Sauce

INGREDIENTS

• ½ cup water
• 1 tsp corn starch
• 1 cup blueberries, raspberries or strawberries
• ½ cup granulated sugar
• 1 Tbl lemon juice
• ½ tsp vanilla extract

METHOD

  1. Combine water and cornstarch in a small saucepan and bring to a boil, stirring until the cornstarch dissolves
  2. Add the berries, sugar and lemon juice. Crush the berries with a potato masher.
  3. Place over medium-high heat. Bring to a boil, then reduce heat to a simmer. Simmer for 15 minutes, stirring occasionally.
  4. Remove from heat and using an immersion blender blend the sauce for 30 to 60 seconds
  5. Strain the sauce through a fine-mesh sieve, pushing the berries to extract as much juice as possible. Stir in vanilla extract.
  6. Cover with plastic wrap directly on the sauce to prevent skimming
  7. Serve warm or at room temperature

BISCOFF COOKIES

During my first airplane flight in a year, and second in two years, the airline (Delta) served Biscoff cookies. (That was about the ONLY thing Delta did right) I love those cookies. They have a wonderful blend of spices, a crispness, and refreshing taste that is perfect. I said to myself, “Self, you can bake. Make you own damn Biscoff cookies!” And I did. First try the are nearly there. I think a couple more minutes baking they would have been nearly perfect. They flavor and crispness is just about right and the flavor is spot on. Lots of ingredients, mostly spices but I had them in the pantry anyway, but well worth it.

BISCOFF COOKIES

INGREDIENTS

• 250g (2 cups) all-purpose flour
• 1 tablespoon ground cinnamon
• ½ teaspoon ground nutmeg
• ¼ teaspoon ground cloves
• ¼ teaspoon ground cardamom
• ½ teaspoon salt
• ¼ teaspoon baking soda
• ¼ teaspoon baking powder
• 227g (1 cup) unsalted butter room temperature
• 100g (½ cup) sugar
• 55g (¼ cup) dark brown sugar firmly packed

METHOD

  1. Preheat oven to 350 F.
  2. In a medium-sized bowl, mix flour, spices (cinnamon, nutmeg, cloves, and cardamom), baking soda, baking powder, and salt.
  3. In a large mixing bowl, cream butter, sugar, and brown sugar.
  4. Gradually blend the flour and butter mixtures until well combined.
  5. Divide the dough into flat discs. Wrap in plastic and refrigerate for at least 30 minutes. (Overnight works well too.)
  6. Roll half of the dough at time to 1/4 inch thickness between two sheets of parchment paper or two silicone mats. Cut out using your favorite cookie cutters. They do spread a little bit so don’t choose something with an intricate shape.
  7. Bake for 20 minutes or until the edges of the cookies are lightly browned. Be sure they are browned! They will still be soft. The cookies crisp up as they cool.
  8. Cool on cooling rack before serving

Not Very Thin Mint Cookies

Spring is thin mint cookie season. At QC’s request. I made Not Very Thin Mint Cookies for her Mah Jongg group. This was not my first thin mint rodeo. The mint flavor was strong the first time, so this time I didn’t add mint extract to the chocolate coating and the hint ‘o mint was perfect.

I coated the cookies with milk chocolate (31% cacao) rather than the dark chocolate (first attempt) or the second attempt with semi-sweet chocolate coating. The dark (64%) and semi-sweet (46%.)

The dark chocolate did not add enough sweetness to counter the strong mint flavor. The semi-sweet was a big improvement, so why not go a little sweeter yet? I am not a big fan of milk chocolate and I felt the last attempt was past the mark. I remember back when I was a professional photographer—when printing photos always go past what you think the perfect exposure/contrast is… just to be sure. Semi-sweet is the winner.

The liquidity of the chocolate is inversely proportional to the sweetness. This means the thickness of the chocolate coating increases with sweetness, which if you are not a fan of milk chocolate, is not a plus.

Thin Mint Cookies

INGREDIENTS
• ½ cup butter
• ½ cup granulated sugar
• ½ cup brown sugar
• 1 egg
• 1 cup AP flour
• ½ teaspoon baking powder
• ½ teaspoon salt
• 1/3 cup special dark cocoa powder
• ½ teaspoon pure peppermint extract
Chocolate Coating:
• 8 ounces baking chocolate
• ¼ teaspoon vegetable oil
• ¼ teaspoon pure peppermint extract

METHOD

  1. Preheat the oven to 350°F.
  2. In a bowl, combine the flour, baking powder, salt and cocoa powder. Whisk until smooth.
  3. In a mixing bowl, cream the butter and sugars until light and fluffy. Mix in the egg and peppermint extract. Gradually mix in the dry ingredients until the dough comes together. Use your hands to form the dough into a ball.
  4. Place the ball of dough onto a sheet of parchment paper. Flatten it into a disk and put another piece of parchment paper on top.
  5. Use a rolling pin to roll out the dough to 1/4-inch thick. (I like to use chopsticks on either side of the dough to control the thickness.) Transfer the rolled dough, with the parchment paper, onto a baking sheet.
  6. Place the baking sheet in the freezer to chill for 10 minutes.
  7. Transfer the flattened dough to a countertop. Remove the top sheet of parchment paper and use it to line the baking sheet.
  8. Use a small, circular cookie cutter to cut out disks of dough. Transfer the cut disks onto the prepared baking sheet, leaving space in between. Because the dough is chilled, these cookies won’t spread while baking.
  9. Place the baking sheet in the oven and bake for 11 minutes. Once baked, remove the cookies from the oven, then transfer the parchment paper and cookies to a cooling rack to fully cool.
  10. I temper chocolate using a sous vide. I find it is easier to control the temperature to modify the chocolate’s crystal structure. It is also easier to maintain the proper temper temperature while you dip and coat the cookies. Stir the chocolate until fully melted and stir in the peppermint extract.
  11. Use two forks to tip and flip the cookies. Once covered in chocolate, transfer each cookie back to the baking sheet lined with parchment paper. Place the baking sheet in the fridge for 20 minutes to allow the chocolate to fully set and harden.

• Thin Mints are best enjoyed cold.
• Store in an airtight container in the freezer or fridge.
• Keep in the freezer for one to two months, or in the fridge for two weeks. This will also keep the chocolate coating at its best.
• Store in an airtight container for two days.

Thin Mint Cookies

Neil sent me a recipe for these cookies, knowing they are among QC’s and my favorite cookies.

Well, they weren’t exactly thin but they were minty. I am not exactly thin either so I don’t hold that against them.

Not the prettiest cooking to photograph, but who cares?

When I make these again, and rest assured I WILL be making these again, I will roll between waxed paper instead of parchment paper. The dough is quite sticky and distorted when trying to remove them from the paper and put on a baking sheet.

I also think coating in tempered chocolate might help as this chocolate will melt in your hands, as well as your mouth.

Thin Mint Cookies

INGREDIENTS
½ cup butter
½ cup granulated sugar
½ cup brown sugar
1 egg
1 cup AP flour
½ teaspoon baking powder
½ teaspoon salt
1/3 cup cocoa powder
½ teaspoon pure peppermint extract
Chocolate Coating:
8 ounces baking chocolate
¼ teaspoon vegetable oil
¼ teaspoon pure peppermint extract

METHOD

  1. Preheat the oven to 350°F.
  2. In a bowl, combine the flour, baking powder, salt and cocoa powder. Whisk until smooth.
  3. In a mixing bowl, cream the butter and sugars until light and fluffy. Mix in the egg and peppermint extract. Gradually mix in the dry ingredients until the dough comes together. Use your hands to form the dough into a ball.
  4. Place the ball of dough onto a sheet of parchment paper. Flatten it into a disk and put another piece of parchment paper on top. It may be a good idea to use waxed paper as the dough is very sticky and did not remove from the parchment paper easily.
  5. Use a rolling pin to roll out the dough to 1/4-inch thick. Transfer the rolled dough, with the parchment paper, onto a baking sheet.
  6. Place the baking sheet in the freezer to chill for 10 minutes.
  7. Transfer the flattened dough to a countertop. Remove the top sheet of parchment paper and use it to line the baking sheet.
  8. Use a small, circular cookie cutter to cut out disks of dough. Transfer the cut disks onto the prepared baking sheet, leaving space in between. Because the dough is chilled, these cookies won’t spread too much while baking. I collected the excess dough, re-rolled and chilled to make about 8 more cookies.
  9. Place the baking sheet in the oven and bake for 11 minutes. Once baked, remove the cookies from the oven, then transfer the parchment paper and cookies to a cooling rack to fully cool.
  10. Set up a double boiler and chop the chocolate. Add the chopped chocolate into the bowl of the boiler and stir in the vegetable oil. Stir the chocolate until fully melted and stir in the peppermint extract. Next time I will temper the chocolate. These cookies much be refrigerated or the chocolate will melt in your hands.
  11. Use a slotted wooden spoon to make the dipping process easier. Place a cookie on the wooden spoon. Dip it into the chocolate or use a large spoon to help cover the cookie. Tap the spoon gently against the bowl to remove excess chocolate. Once covered in chocolate, transfer each cookie back to the baking sheet lined with parchment paper. Place the baking sheet in the fridge for 20 minutes to allow the chocolate to fully set and harden.

• Thin Mints are best enjoyed cold.
• Store in an airtight container in the freezer or fridge.
• Keep in the freezer for one to two months, or in the fridge for two weeks. This will also keep the chocolate coating at its best.
• Store in an airtight container for two days.

Idle Hands Make…

This afternoon’s ‘to do’ list contained nothing pressing. Tuesday I hard boiled eggs to include in our dinner salad and to make egg salad Wednesday. Today I baked a loaf of sandwich bread because I love egg salad on fresh baked bread. And as long as I was making bread I decided to replace the hamburger rolls I froze a few weeks ago. (I wasn’t happy with the rise of those whole wheat buns.) Today I mixed a double recipe of bread dough and shaped half into a loaf to bake at 425 deg and the rest into hamburger rolls to be baked at 375 deg.

To make a softer crust I coated the top of the loaf with melted butter before baking (hence the darker crust) and once again after it was baked, but still hot.

I also had a cup of heavy cream to use before it expired, and as long as the oven was on, I dropped the temperature and made some multi berry scones, baked at 400 deg.

Remember the hamburger rolls that baked at 375 deg? Well, as long as the oven was going to be dropped to 375 deg and as long as I had some frozen chocolate chip cookie dough that also bakes at 375 deg, I figured, what the heck.?

I have to find more chores to add to the ‘to do’ list. Today was exhausting.

The best part of the day was participating in the Grandparents Drive-Thru Car Parade at Grace’s school! (Unicorn car. You can’t see the fuzzy pink tail.)

Speaking of Grace, here we are making the aforesaid chocolate chip cookies.

Like Molasses in… September

Before teeing off on the 8th hole yesterday, I flashed back to my mom’s molasses cookies. I don’t have her recipe, but as she was always a Betty Crocker kinda gal I found Betty’s recipe, made some this morning and they were exactly as I remembered!

(Betty’s recipe didn’t say, but I flattened the sugar coated balls a little. They may have flattened on their own, but I was concerned the centers and the edges may not cook evenly. Whatever the reason, they were excellent!)

Now, this may be childhood folklore or faulty memories, but growing up I had a neighbor named Betty Crocker. That was her married name after she and George wed. As a single woman her last name was Taylor, and of course her formal first name was Elizabeth but was known as Betty. Even without this celebrity, I was raised in a fabulous neighborhood and remain friends with MOST of my classmates from that time. So fortunate.

Soft Molasses Cookies

INGREDIENTS

• 1 cup packed brown sugar
• ¾ cup shortening
• ¼ cup molasses
• 1 egg
• 2 ¼ cups all-purpose flour
• 2 teaspoons baking soda
• 1 teaspoon ground cinnamon
• 1 teaspoon ground ginger
• ½ teaspoon ground cloves
• ¼ teaspoon salt
• 3 tablespoons granulated sugar

METHOD

  1. Heat oven to 325°F. In large bowl, beat brown sugar, shortening, molasses and egg with electric mixer on medium speed, or mix with spoon. Stir in remaining ingredients except granulated sugar.
  2. Shape dough by rounded tablespoonfuls into 1 ½ – inch balls. Dip tops into granulated sugar. On ungreased cookie sheet, place balls, sugared sides up, about 2 inches apart.
  3. Bake 13 to 16 minutes or just until set and cookies appear dry. Immediately remove from cookie sheet to cooling rack.

Expert Tips From Betty Crocker

o Purchase shortening formed in oblong packages marked for easy cutting and measuring. It eliminates messy measuring in cups.
o There are reasons for using shortening versus butter when mixing up a cookie dough. Shortening has a higher melting point, so cookies will hold their shape longer in the oven before the fat melts in the dough (and shortening doesn’t release any steam like butter) so results in moist, chewy cookies. While butter melts more quickly and releases some steam so that cookies will spread more and be crisper, with a distinctly buttery flavor. Some recipes use a combination of the two fats.
o There is enough fat in these tender cookies that they won’t stick to the baking sheets. But for easier clean-up, line the baking sheets with baking parchment. The parchment can be used several times before composting or recycling it.
o What type of molasses should you keep in your pantry? Choices include light, cooking, unsulphured and blackstrap. Each style is a by-product of the sugar making process and offer mild to robust levels of flavor in baked goods. A good all-purpose molasses is an unsulphured one, made from sun-ripened sugar cane; it has a full, smooth flavor without being bitter.
o Measuring flour accurately is key in baking. Stir flour a bit before spooning into measuring cup then level off top using a flat-edge utensil such as a knife.