Yes Need No-Knead Oat Bread

King Arthur Baking occasionally sends me catalogs containing lots of cool stuff. I am not a fan of the mixes, but understand why they’re treading towards them. I have LOTS of their equipment and some supplies, but my favorite part are the recipes.

I know I could go online and search for ideas, but the catalog provides inspiration for new bakes.

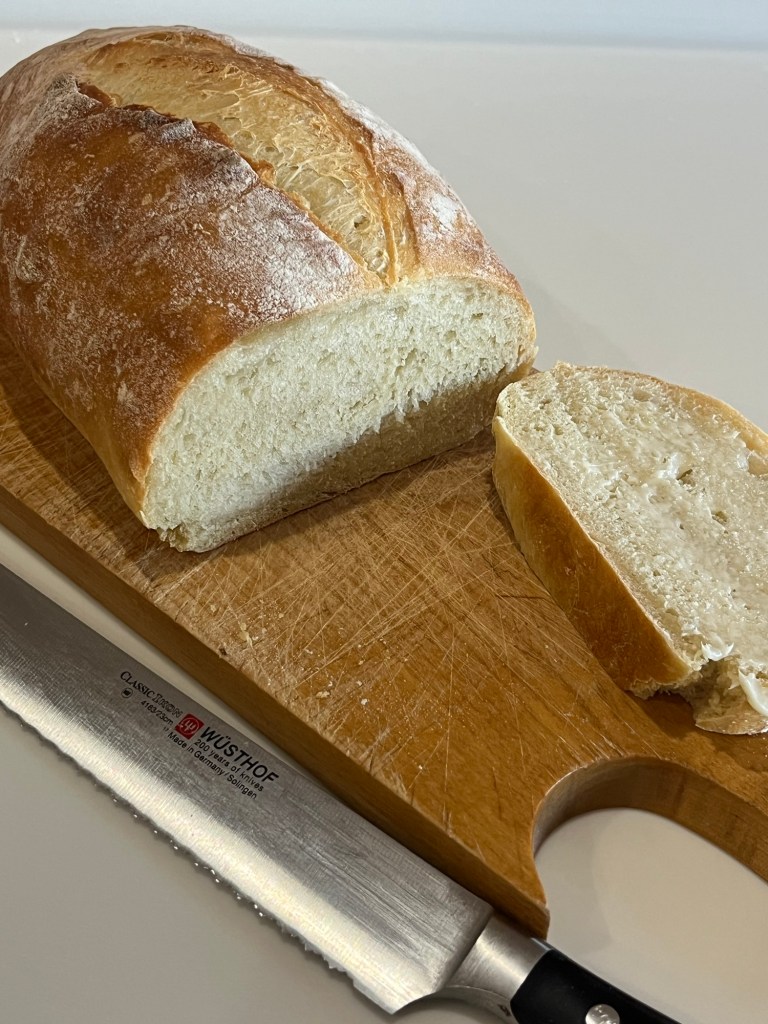
This no-knead oat bread is delicious. It has a nice soft, chewy crumb, (which is not a given with 25% of the dough being whole wheat flour,) plus the crust was crunchy.

The dough is ready in 15-20 minutes which is perfect for a quick after dinner “chore”. It ferments and doubles in size overnight at room temperature, proofs in the morning, and is ready for breakfast, (depending on when you rise and eat.) It also made a killer roast beast, lettuce and tomato sandwich. Definitely a keeper
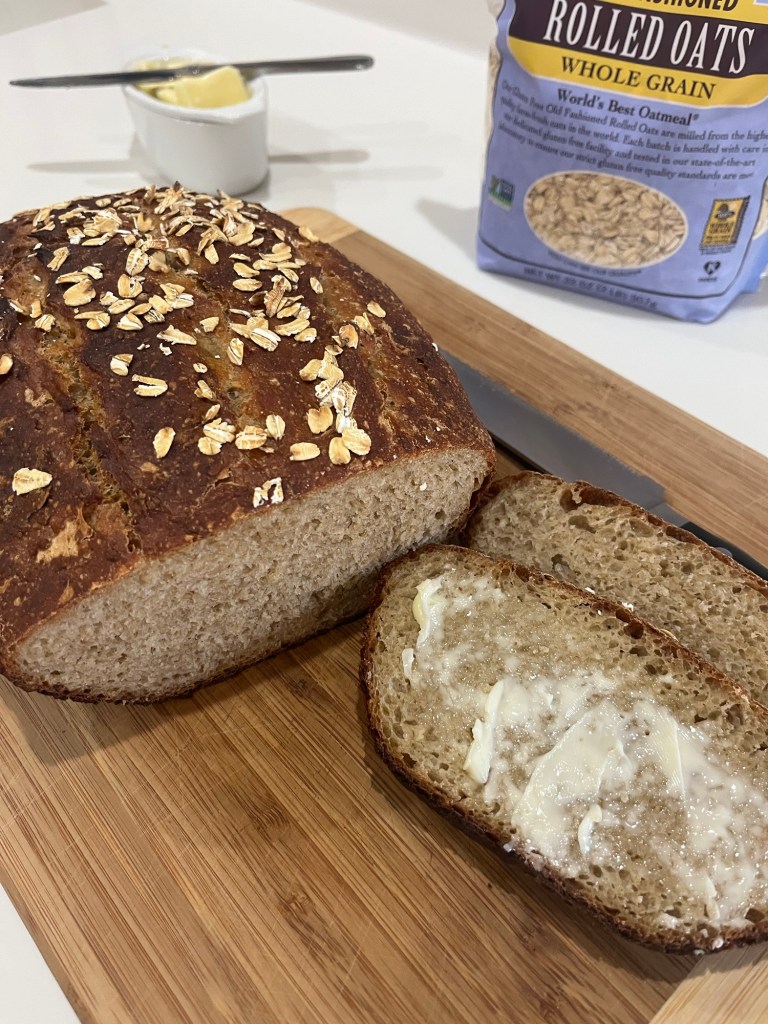
No-Knead Oat Bread


https://www.kingarthurbaking.com/recipes/no-knead-oat-bread-recipe
(Edited to suit my technique)

INGREDIENTS
• 1/3 c (71g) light brown sugar or dark brown sugar, packed
• 4 c (480g) unbleached bread flour
• 4 Tbl (57g) butter, softened
• 1 c (113g) whole wheat flour
• 1 1/2 c (134g) old-fashioned rolled oats
• 2 tsp (12g) table salt
• 1/2 tsp instant yeast
• 2 1/4 c (510g) water, cool

METHOD

  1. Put all of the ingredients into a large bowl. Stir, then use a stand mixer to mix up a sticky dough. Continue to beat for several minutes in a stand mixer to incorporate all the flour.
  2. Cover the bowl with plastic wrap, and let it rest at room temperature overnight, or for at least 8 hours; it will become bubbly and rise quite a bit, so be sure your bowl is large enough.
  3. Turn the dough out onto a lightly floured surface. To make a single loaf, choose a 14″ to 15″ long lidded stoneware baker.
  4. Shape the dough to fit and place it in the lightly greased pan of your choice, smooth side up. Cover and let rise at room temperature for about 1 hour, until dough has become puffy and fills the pan about 3/4 full. (I used an oblong Dutch oven.)
  5. Garnish by sprinkling a handful of oats on top. (If baking a round loaf, slash a hash mark pattern (#) on top.)
  6. Place the pan into a cold oven. To keep the bread’s bottom crust from burning, set the rack in the middle, not at or near the bottom. Set the oven temperature to 450°F. Bake the bread for 45 to 50 minutes, then remove the lid and continue to bake for another 5 to 15 minutes, until the bread is deep brown, and an instant-read thermometer inserted into the center registers about 205°F.
  7. Remove the bread from the oven, turn out onto a rack, and cool before slicing.

S’mores Brownies

Our home association wine club had a beach themed wine tasting event and I provided the s’mores brownies for 164 guests and staff. With all humility, they were exceptional. I used my basic raspberry chocolate brownie recipe, but with the excellent suggestion by QC, added a layer of crushed graham cracker on the ganache and below the Italian meringue. I also blowtorched the meringue to give it the toasted s’more look.

I received many compliments and several inquiries as to where to buy them. (They cannot.)

Blueberry Crumble Dream Cookies

I had high hopes for this cookies, but there are barely a step above “meh.”

They are basically a chocolate chip cookies substituting blueberries for chocolate chip and really, who would want to do that?

They taste fine and have a good texture. Next time, I am making chocolate chip cookies.

Oh yeah. As long as the oven was going to be on I made a loaf of sandwich bread too. It’s a much tighter crumb than my favorite bread (High Hydration No-knead Honey Bread) but this loaf is great for PB&J sandwiches.

Blueberry Crumble Dream Cookies


Prep Time: 15 minutes | Cooking Time: 15 minutes | Total Time: 30 minutes

INGREDIENTS
• 1 cup unsalted butter, softened
• 1 cup granulated sugar
• 1/2 cup brown sugar
• 2 large eggs
• 1 teaspoon vanilla extract
• 2 1/2 cups all-purpose flour
• 1 teaspoon baking soda
• 1/2 teaspoon salt
• 1 1/2 cups fresh blueberries
• 1/2 cup coarse sugar for sprinkling

METHOD

  1. Preheat oven to 350°F (175°C). Line a baking sheet with parchment paper.
  2. In a large bowl, cream together the butter, granulated sugar, and brown sugar until light and fluffy.
  3. Beat in the eggs one at a time, then stir in the vanilla extract.
  4. In a separate bowl, whisk together the flour, baking soda, and salt.
  5. Gradually add the dry ingredients to the wet ingredients, mixing until just combined.
  6. Gently fold in the blueberries.
  7. Drop rounded tablespoons of dough onto the prepared baking sheet.
  8. Sprinkle each cookie with coarse sugar.
  9. Bake for 12-15 minutes, or until the edges are golden brown.
  10. Allow cookies to cool on the baking sheet for 5 minutes before transferring to a wire rack to cool completely.

Strawberry Mango Margarita Cupcakes

I saw this recipe on Facebook and decided to make it for QC’s Mah Jongg group. I made a number of changes from the published recipe and they are incorporated below.

Next time I’ll punch the flavors up as mango is not a strong flavor and can be overpowered by the strawberry. The tequila didn’t add much either, so maybe a little lime in the cupcake batter would add some punch. (No coconut, so it cannot be “Put the lime in the coconut.”

The were pretty and were well received by the group. I always make a gluten free selection so added some crème patisserie/chocolate ganache topped with chopped pistachio nuts, and had some eclair shells in the freezer that I needed to use up and had the crème patisserie and chocolate ganache anyway and finally, plums from our tree as the season is now over.

Strawberry Mango Margarita Cupcakes

Makes 48 mini-cupcakes

INGREDIENTS :
Cupcakes:
• 3 1/2 cups all-purpose flour
• 1 1/4 cups caster sugar
• 3 tsp baking powder
• 1/2 tsp fine salt
• 1/2 cup unsalted butter, softened
• 2 large eggs
• 1 1/2 cups full cream milk
• 1/2 cup vegetable oil
• 2 tbsp Greek yogurt or sour cream
• 1 tsp vanilla extract
• Pink and red food gel (for strawberry color)
• 2-3 tsp strawberry freeze-dried powder
• Yellow food gel (for mango color)
• 2-3 tsp mango freeze-dried powder
• 8-10 tsp tequila (optional)
Frosting:
• 1 batch American or Swiss Meringue Buttercream
• Food gels: Pink and red for strawberry; yellow for mango
• Flavorings: Strawberry and mango freeze-dried powder
Decorations:
• 1 cup granulated sugar
• 10 limes, cut into 40 wedges
• 10 strawberries, halved

METHOD:

  1. Preheat oven to 275°F (140°C) for fan-forced or 320°F (160°C) for conventional.
  2. Line two mini cupcake tins with liners and spray with bakers spray.
  3. In a large bowl, mix flour, sugar, baking powder, and salt.
  4. Add butter and mix until crumbly.
  5. In another bowl, combine eggs, milk, oil, yogurt, tequila, and vanilla; mix well.
  6. Fold dry ingredients into egg mixture until well combined.
  7. Divide the batter into two portions.
  8. Separately, by hand, mix each freeze-dried powder with 3-4 teaspoons of tequila
  9. Add pink and red food gels and strawberry flavoring to one portion. Mix by hand.
  10. Add yellow food gel and mango flavoring to the other portion. Mix by hand.
  11. Pipe alternating layers of strawberry and mango batter into the liners.
  12. Bake for 10–15 minutes or until a toothpick inserted into the center comes out clean. Cool completely.
  13. Prepare the buttercream frosting, dividing it into two portions.
  14. Add pink and red food gels and strawberry flavoring to one portion.
  15. Add yellow food gel and mango flavoring to the other portion.
  16. Dip the rims of the cooled cupcakes in water, then roll in granulated sugar to mimic a margarita glass.
  17. Pipe frosting in swirls on each cupcake, alternating between strawberry and mango flavors.
  18. Decorate each cupcake with a lime wedge and a strawberry half.

Berry Jam Bars – t.y. KAB

While on our anniversary/baseball stadium journey we stopped by King Arthur Baking in Norwich Vermont. This is my second time at this wonderful store and THIS time, I controlled myself and left after spending less than $100. Whew!

KAB sends me weekly recipes and I received this one while back east. I knew I had blackberries on the vine back home and couldn’t wait to give them a try. The wait was worth it!

KAB calls these “easy” jam bars and they are not incorrect. (Deliberate use of the double negative.)

https://www.kingarthurbaking.com/recipes/berry-easy-jam-bars-recipe

Berry Easy Jam Bars

INGREDIENTS
Dough
• 2 1/4 cups (270g) King Arthur Unbleached All-Purpose Flour
• 1 cup (89g) old-fashioned rolled oats*
• 1/2 cup (106g) light brown sugar, packed
• 1/4 cup (50g) granulated sugar
• 1 1/4 teaspoons baking powder
• heaping 1/2 teaspoon table salt
• 15 tablespoons (212g) unsalted butter, melted
• *Or substitute 1 cup (113g) King Arthur Rolled Oats.

Filling

  1. 1 pound (454g) blueberries, raspberries, and/or blackberries (try 2 cups blueberries, 1/2 cup blackberries, 1/2 cup raspberries)
  2. 1/2 cup (106g) light brown sugar, packed
  3. 3 tablespoons (23g) King Arthur Unbleached All-Purpose Flour
  4. zest and juice from 1 lemon*
  5. 1/2 teaspoon cinnamon
  6. pinch of table salt
    *Aim to use about 2 tablespoons (28g) of fresh juice from the lemon.

Topping

  1. 1 1/2 teaspoons granulated sugar
  2. 1/4 teaspoon cinnamon

METHOD

  1. Preheat the oven to 375°F with a rack in the center. Line an 8″ pan with parchment on all sides, then lightly grease.
  2. In a large bowl, whisk together all of the dough ingredients except the butter. Use your fingers or a spoon to break up any brown sugar lumps. Add the melted butter and stir until fully combined and smooth.
  3. Transfer about 2/3 of the dough (roughly 2 2/3 cups or 485g) to the prepared pan and press into an even layer.
  4. In another large bowl, gently mix together all of the filling ingredients until the berries are evenly coated. Transfer the fruit to the pan and distribute it into an even layer.
  5. Crumble the remaining dough (about 1 1/3 cups or 240g) over the berries; squeeze the dough together to make bigger clumps or tease it apart for finer crumbles. (Even coverage is not important at this step.)
  6. In a small bowl, combine the topping ingredients. Then sprinkle the cinnamon sugar evenly over the top of the bars.
  7. Bake the jam bars for 50 to 55 minutes, covering the pan with foil if the top is browning too quickly, until the berries are bubbling and the topping is baked through.
  8. Let the bars cool completely in the pan (or for at least 1 1/2 hours; if you’re really in a rush, you can stick them briefly in the refrigerator or freezer to expedite the process). As they cool, use a small offset spatula or knife to dislodge any jam from the sides to make removing them from the pan easier.
  9. Remove the bars from the pan using the parchment as a sling, then slice and serve.
  10. Store the sliced jam bars in an airtight container in the refrigerator for up to 4 days. They’re delightful cold.

Perhaps the G.O.A.T.est of all time

Probably not the G.O.A.T,, but a very, very good amuse-bouche. I am harvesting from our plum tree and wanted something beyond plum jam, pie or cake. These goat cheese-honey-basil-stuffed plums really hit the spot as the temperatures climb beyond 100F. Served chilled the are an amazing blend of sweet and mildly bitter.

I pick plums at dawn when the temperatures are still below 80F.

I used about 10 plums for this recipe. (Several were sacrificed learning the best way to pit the plums.) While we were away on our anniversary/baseball stadium tour I asked neighbors and friends to help themselves to the garden and luckily, there are still loads of plums, blackberries and figs remaining.

Goat Cheese and Honey Stuffed Plums

https://www.runningtothekitchen.com/goat-cheese-honey-stuffed-plums/

INGREDIENTS
• 8 regular plums, sliced in half and pits removed
• 4 ounces goat cheese
• 2 teaspoon honey, plus more for garnish
• 6 leaves basil, chopped and divided
• 1 tablespoon pine nuts, toasted

METHOD

  1. Combine goat cheese, 2 teaspoons of honey and 2 leaf of chopped basil in a small bowl and mix together with a spoon.
  2. Spoon cheese mixture into the well of each plum half. I used a melon baller to keep the amount of mixture roughly equal.
  3. Top with toasted pine nuts and remaining basil.
  4. Drizzle more honey on top before serving.

Vacation Baking Test

I didn’t realize there would be a test on this vacation. We started our 50th anniversary/baseball stadium tour last week and are now resting in Vermont for a few days before trekking down to Boston for our 3rd stadium then going to New York City for our 4th.

Being away from baking in my kitchen for a whole week I started to get anxious. On our way to Lake Dunmore I stopped and bought some flour and yeast. Our first day here I made two loaves of bread using a cast iron skillet with a second frypan for a lid to substitute for my Dutch Oven. It worked pretty good, except the bottom of the bread burnt slightly due to the dark cast iron. I adjusted temperature and baking time and each one improved, right up to the 4th loaf when I removed the loaf from the pan and placed it on a cookie sheet for the last 30 minutes of baking time. Perfection!! It took 4 tries, but successfully passed the test.

I used a modified method of version of my high hydration honey no-knead bread.

Memorial Day Bake

Dede’s bakery opened early this morning. QC (Fran) loves the smell of fresh bread when she wakes. It had been a while since I made the hi-hydration honey bread, so… I also made some shortbread cookies which will be part of the decorations for a cake this weekend

I need to flood the cookies to finish them, but I have lots of time. I also need to practices some Italian buttercream as I had major issues the last time I made some.

Both bakes were excellent and a good treat for elevensies.

I Wish I Was in New Orleans (Tom Waits Song)

While still on an early summer berry theme I decided to bake this Gluten Free Berry Chantilly Cake.

The Chantilly cake first came onto the scene in 1829 when it was created by French chefs at Antoine’s Restaurant in New Orleans. Long ago QC and I dined at Antoine’s. While we were waiting in a long line for a table for two the Maître d‘ asked if there were any parties of four as there was a table ready. The couple behind us leaned forward and asked if we wanted to join them, we did, and were shown to the available table. They were a delightful couple and a great time was had by all. 😁

Next time I think I will bake more Chantilly cream. I ended up making this a naked cake because I needed more whipped cream. I might also try an Italian meringue although it might be too sweet.

Berry Chantilly Cake

INGREDIENTS
• 2 ½ c all-purpose flour (or Kim’s for Gluten Free)
• 2 ½ tsp baking powder
•1 tsp salt
• ¾ c unsalted butter, softened
• 1 ⅓ c granulated sugar
• 3 large eggs, room temperature
• 1 tsp vanilla extract
• 1 tsp almond extract
• 1 ½ c whole milk
Chantilly cream and berries
• 3 ½ c heavy cream
• ½ c whipped cream cheese
• ⅓ c powdered sugar
• ¼ tsp cream of tartar

METHOD
Cake

  1. Preheat oven to 350F. Grease and line two 8-inch cake pans with a circle of parchment paper.
  2. In a large bowl, sift together the flour, baking powder, and salt. Set aside.
  3. In another large bowl, use an electric mixer to cream the softened butter and sugar until light and fluffy. Beat, scraping down the sides as necessary, for 3 minutes.
  4. Add the eggs one at a time, mixing well after each addition. Blend in the vanilla and almond extracts.
  5. Add the dry ingredients to the creamed mixture alternately with milk, starting and ending with the flour mixture. Mix until just combined. Do not over-mix to keep the cake light and fluffy.
  6. Divide the batter evenly between the prepared pans. (Batter should weigh ~1800g.) Bake in the preheated oven for 30-35 minutes, or until a toothpick inserted into the center comes out clean or temperature reaches 190⁰F.
  7. Let the cake layers cool before carefully slicing each layer in two, horizontally through the middle. Use a long-serrated knife.

Chantilly cream and berries

  1. Using a stand mixer with balloon whisk or a bowl with electric beaters begin whipping the cream cheese, then add the cream, powdered sugar, and cream of tartar. Whip until the cream holds peaks, but be careful not to over beat the cream.
  2. Place one cake layer, cut side up. Spread about a cup of whipped cream over the surface. Add a layer of berries over the cream. Smaller berries can be left whole, but strawberries should be sliced.
  3. Continue layering 2 more layers in the same manner. Place the final cake layer on top.
  4. Spread more whipped cream on the sides and top of the cake. Decorate with whole berries. Refrigerate the cake for at least 2 hours before serving.

Kim’s Gluten Free Flour

Yield: 700g (5 c)
INGREDIENTS

  • 285g Bob’s Red Mill potato starch
  • 250g superfine white rice flour (DON’T use regular rice flour, ie Bob’s Red Mill)
  • 75g Tapioca flour
  • 75g Whey protein isolate or egg white protein.
  • 15g Xanthan gum

Add ingredients together and mix well.

GF Berry – White Chocolate-Cream Cheese Tart

We are going to a friends birthday luncheon today and QC and I thought a nice summery berry tart would be a nice dessert on a warm sunny day.

There were choices and challenges to this bake. The choice was, should I make a Berry Chantilly Cake or this tart. The tart won, but don’t feel bad, summer is a long time.

The challenge is our refrigerator died yesterday so we spent the afternoon buying and installing and transferring out food to a small refrigerator. While it is a bit inconvenient it’s only for a couple of weeks, and I only have one more required bake. (Note: required.)

I had some left over strawberries so dipped some in chocolate to add around the tart.

INGREDIENTS
Shell
• 100 g cold butter cut into small cubes
• 60 g icing sugar
• 200 g Kim’s Bread flour
• ½ tsp vanilla
• ¼ tsp salt
• 2 eggs – 1 for the dough and the other 1 reserved for an egg wash
Filling:
• 1 (12 ounce) package white chocolate chips, melted and cooled
• ¼ c heavy cream
• 8 ounces cream cheese, softened
Topping:
• 2 c fresh strawberries, sliced
• 1 c fresh blueberries
• 1 c fresh raspberries
Glaze:
• 1 c water
• ½ c white sugar
• 2 Tbl cornstarch
• 2 Tbl corn syrup

METHOD
Shell

  1. Preheat the oven to 300 degrees F (150 degrees C). Grease a 12-inch tart pan.
  2. Pulse flour, sugar and salt a few times to combing
  3. Add cubed butter and pulse until the mixture resembles coarse sand
  4. Add egg and pulse until the dough just comes together but does not clump into a ball.
  5. Chill in fridge for an hour.
  6. Roll dough between sheets of wax paper until ~2 inches wider and longer than the tart pan (It needs to cover the bottom and all sides of the pan,) then refrigerate for 15-30 minutes
  7. Spray tart pan and flip chilled sheet of dough onto the pan and press into all corners. Dock the dough on the bottom of the pan.
  8. Fill with baking beads and bake 15-20 minutes, until the dough is dry and the edges begin to brown.
  9. Take from oven and remove parchment paper.
  10. Egg wash the edges of the tart.
  11. Return to oven and bake crust until lightly browned, 10 to 15 minutes. Let cool completely.
    Filling
  12. Beat melted and cooled white chocolate and heavy cream in a bowl until smooth. Mix in cream cheese until thoroughly combined. Spread over cooled crust. Chill in the refrigerator for 30 minutes.
    Glaze
  13. Combine 1/2 cup water and white sugar in a saucepan and bring to a boil. Mix remaining 1/2 cup water and cornstarch together in a bowl until cornstarch dissolves; add to sugar mixture. Cook and stir until mixture thickens and clears, about 5 minutes. Stir in corn syrup and return to a boil. Remove glaze from heat and let cool for 10 minutes.
    Topping
  14. Arrange strawberries, blueberries, and raspberries over cream cheese layer and brush with glaze. Chill for at least 1 hour; store in refrigerator until ready to serve.

Kim’s Gluten Free Bread Flour Blend
Yield: 700g (5 c)
INGREDIENTS

  • 285g Bob’s Red Mill potato starch
  • 250g superfine white rice flour (DON’T use regular rice flour, ie Bob’s Red Mill)
  • 75g Tapioca flour
  • 75g Whey protein isolate or egg white protein.
  • 15g Xanthan gum
    METHOD
  1. Weigh all ingredients and add to a stand mixer bowl
  2. Mix on low, with bowl covered for 30 seconds