I saw this recipe on FB and was, of course, compelled to make a loaf.
It’s a pretty easy bake and results in a very nice tasting bread with a good whole wheat crumb and texture. Next time will double the amount of maple syrup (costly, but worth it) or add the maple sugar to the top (I didn’t have any.)
Vermont Maple Oatmeal Bread
INGREDIENTS • 1 ¼ cups boiling water • 1 cup rolled oats • ¼ cup (78g) maple syrup or ½ cup maple sugar • 1 tablespoon unsalted butter • 1 ½ teaspoons salt • ½ teaspoon cinnamon • ½ teaspoon maple flavor optional • 2 teaspoons instant yeast • 1 cup whole wheat flour • 2 cups all-purpose flour METHOD
In a large mixing bowl, combine boiling water, oats, maple syrup (or maple sugar), butter, salt, cinnamon, and maple flavor if using. Stir and let cool to lukewarm.
Once cooled, add yeast, whole wheat flour, and all-purpose flour. Stir until a rough dough forms.
Knead the dough until smooth and elastic, about 10 minutes by hand or 7 minutes with a machine.
Transfer to a lightly greased bowl, cover, and let rise for 60 to 90 minutes until puffy and nearly doubled in size.
Gently deflate the dough and shape it into an 8-inch log. Place in a lightly greased 8 ½” x 4 ½” loaf pan.
Cover and let the loaf rise until it crowns about 1 inch over the rim of the pan, about 60 to 90 minutes.
Preheat the oven to 350°F (175°C).
If desired, brush the top with water and sprinkle with maple sugar. Bake for 35 to 40 minutes, tenting with foil after 15 minutes to prevent over-browning. The interior should reach 190°F (88°C).
Remove from the oven, let cool in the pan for 5 minutes, then transfer to a wire rack to cool completely before slicing. NOTES
For a more pronounced maple flavor, increase the maple syrup slightly and reduce the water accordingly.
This bread is excellent toasted with butter or cream cheese. – Store in an airtight container at room temperature for up to three days or freeze for longer storage.
Not often, but on rare occasion I have a baking disaster. Yesterday I wanted blueberry muffins and unfortunately used an old recipe. Apparently, there was a major error in the recipe as after two attempts I binned the results (along with the recipe) and headed to my go-to baker, Sally McKenny. (“Binned” is a term from GBBO where whatever didn’t work is tossed in the trash.)
I wisely turned to Sally’s blueberry muffin recipe and they were overwhelmingly endorsed by the QC Cadre. (For any who do not know, the QC Cadre is composed of a number of my neighbors who volunteered to sample and review my bakes.)
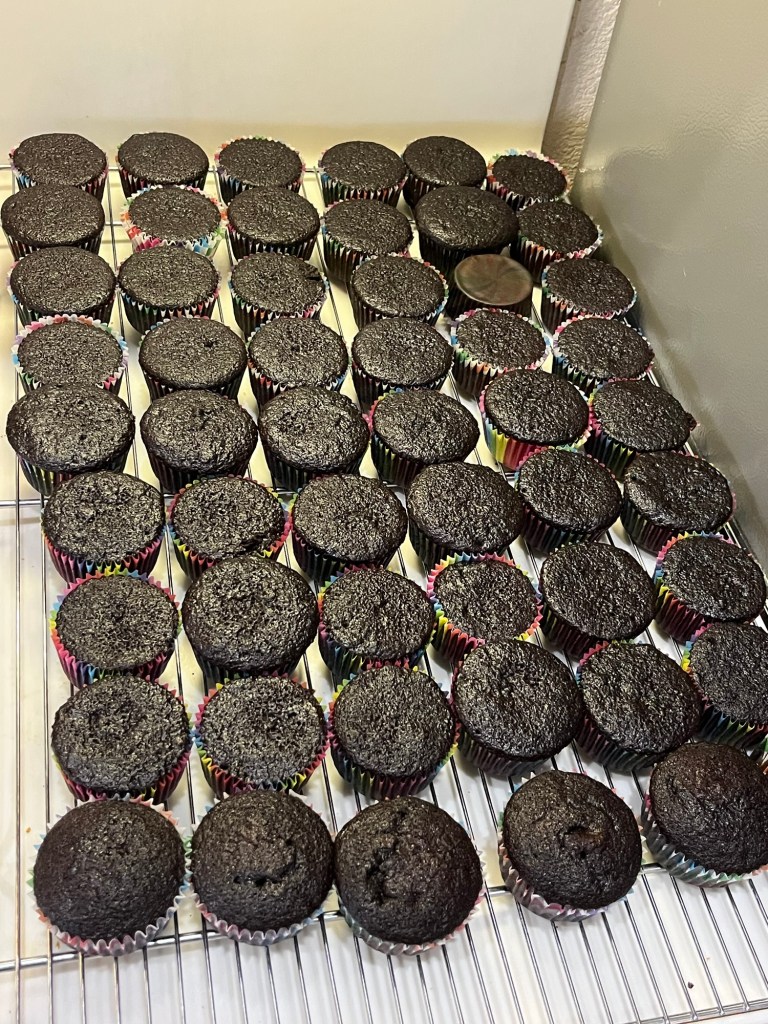
Today is the 80th birthday of one of our good friends, and golf buddy. She asked me to make cupcakes for the 15 guests coming to her bowling/birthday party. I decided to make cupcakes using my Extreme Chocolate Cake recipe with Italian Meringue frosting, because that combination is my fav. I did ask her what her favorite color is, and pink was among her answer, so I made a bi-color frosting.
My notes in my recipe said the recipe would make 36 cupcakes, but of the 3 different sizes of cakes in the recipe, it didn’t say which one made the 36. I decided to go with the medium size cake (10” round.) Well long story shorter, that made 54 cupcakes. I have since modified the recipe.
The cupcakes are soft and delicious and the meringue isn’t too sweet and pairs nicely.
I really think every pastry baker needs to know how to make puff pastry. The easiest version is rough puff, which I made a couple of days ago. It is as easy, delicious, flakey and buttery as the Daring Gourmet claims ( find her recipe here: daringgourmet.com).
I had some issues turning and rolling to develop a smooth pastry, but after 8 turns it looked pretty good. Kept in the fridge for a couple of days and rolled out to about 1/8th inch thick this morning it looked great. I cut 3” circles, filled them with a cream cheese, sugar, white chocolate chip mixture and topped with a small raspberry. The edges were egg washed, folded and crimped with a fork before coating the top with more egg wash and sparkling sugar.
Actually, I both over-filled and under-sealed them so they are a mess. (See step #5 regarding my disregard of my own advice.) That in no way affects their taste. Using a 4” cutter might help. As advertised the puff pastry was excellent, the filling (my recipe) was likewise excellent, but then, the combination of chocolate and raspberries is hard to beat.
Ignore the artisan bread in the background. I had to heat up the oven anyway so why not?
Berry Hand Pie
INGREDIENTS • 1 egg • 1 tablespoon water • 2 tablespoons all-purpose flour • 1 sheet puff pastry, thawed but cool. • 2 ounces cream cheese, softened • 1 tablespoons granulated sugar or decorating sugar • ¼ cup white chocolate chips • 3 ounces berries • 2 tablespoons coarse white sugar or decorating sugar METHOD
Heat the oven to 400°F. Beat the egg and water in a small bowl with a fork.
Stir the cream cheese and granulated sugar in a medium bowl until the mixture is smooth. Stir in the white chocolate chips.
Cut large berries in half.
Sprinkle the flour on the work surface. Unfold the pastry sheet on the work surface. Roll the pastry sheet into a ~12-inch square. Using a round cutter, cut into as many 3 -inch circles as you can. (Try a 4” cutter and settle for fewer, better looking pastries.)
Brush the edges of the pastry circles with the egg mixture. Place about ½ tablespoon cream cheese mixture in the center of each. (Don’t overfill.) Top each with about one small or two halves of a large berry. Fold the circles in half, pinching the edges together. Crimp both edges with a fork. If you don’t seal them adequately or have to much filling it will leak out of the sides of the finished pastry.
Brush the pastries with the egg mixture and sprinkle with the coarse sugar. Using a sharp knife cut small slits in the tops of the filled pastries. Place the pastries onto a silicone or parchment paper lined baking sheet.
Bake for 20 minutes or until the pastries are golden brown. Remove the pastries from the baking sheets and let cool on wire racks for 10 minutes.
Often I bake for an event or occasion. Sometimes I see a recipe online and want to duplicate it. Sometimes I like to immerse myself in a bake to occupy my mind so I don’t think about anything else. Today was one of those days.
This recipe, upside down key lime pie, is from Sally of Sallys Baking Addiction.. It is delicious and my opinion is shared by the QC Cadre (i.e. neighbors.)
The graham cracker crumble is the perfect crunch for the pie filling just as the sweet meringue balances the tartness off the key lime.
I am sorry, but I cannot write my normal, snarky, quirky pander today. Perhaps I will return to it one day, but not today.
I wasn’t going to mention the artisan bread (as seen in the background) I made this morning, but I added a twist to the recipe. I use the Tangzong technique fairly often, but hadn’t used it on artisan bread. The standard method yields a bread that is 9.5 out of 10, so what is the point?
Tangzong pre-gelatinizes the starch in the flour, allowing it to absorb twice as much water than with cool water. Since there’s less free (unabsorbed) water in the dough, it’s less sticky and easier to knead plus it stays fresh longer, not that that is an issue here, over the past 2 weeks I made the artisan loaf every 2 or 3 days. For variety I did occasionally change from boule to batard.
I also made Scottish Oatcakes this morning. I read an article about them, which is all it ever takes for me. The bake resulted in 16 crisp “biscuits” (as cookies are called in the UK.) They be a nice change from all the cookies (but don’t worry, plenty of cookies coming up. I am doing another fund raiser in March and need to practice, practice, practice.)
Artisan Bread with Tangzong
INGREDIENTS
450g (3 ¾ c) bread flour divided (For Italian Bread use AP flour))
2 ¼ teaspoons instant yeast
10g (1 ¾ tsp) kosher salt
360g (1 ½ c) warm water between 120°F and 130°F (360 grams)
METHOD
In a large mixing bowl, whisk flour, yeast, and salt to combine. Measure water into a small bowl
Tangzong: Transfer 3 tablespoons of the measured flour and ½ cup of the measured milk or water into a saucepan and set over medium-high heat.
Cook the mixture, whisking constantly until it thickens into a thick slurry (~1 minute.)
Transfer the cooked mixture to a bowl until cool to lukewarm, then add remaining flour, milk (or water), and other dough ingredients combine with a dutch dough which until the mixture is very sticky, and no lumps of flour remain.
Cover and place in a proofing oven until doubled in size, about 1 to 1 ½ hours.
Preheat the oven to 450°F. Place a large dutch oven with a lid in the oven for at least 30 minutes.
Using lightly floured hands, reach down one side of the dough to the bottom of the bowl, pull up, and stretch the edge of the dough over the center toward the opposite side. Turn the bowl 90 degrees and repeat the folding and turning, working in a circle around the dough until the dough starts to hold its shape, about 8 to 10 rotations. Pinch any seams together at the center of the dough ball.
Turn out the dough onto a lightly floured surface, placing it seam side down. Shape into a boule or batard, depending on the intended use. Transfer the dough onto parchment paper lined banneton and sprinkle with flour. Loosely cover with plastic wrap or a tea towel for 10 minutes while the oven heats to 450°F. Place a large dutch oven with a lid in the oven while it preheats.
Using a sharp knife or bread lame, cut a slit about ¼-inch deep across the top of the dough. Very carefully place the dough with the parchment paper directly into the preheated Dutch oven. Cover with the lid.
Bake for 20 minutes. Remove the lid and bake until deeply golden brown and the internal temperature is about 195°F (~15 to 17 minutes more.) Carefully remove the bread from the Dutch oven using the parchment paper to help, and place on a wire rack to cool for at least 20 minutes before slicing
Tangzong
Tangzong pre-gelatinizes the starch in the flour, allowing it to absorb twice as much water than with cool water. Since there’s less free (unabsorbed) water in the dough, it’s less sticky and easier to knead
METHOD
Measure out the total amount of flour and milk specified in the recipe.
Transfer 3 tablespoons of the measured flour and ½ cup of the measured milk or water into a saucepan and set over medium-high heat.
Cook the mixture, whisking constantly until it thickens into a thick slurry (~1 minute.)
Transfer the cooked mixture to a bowl until cool to lukewarm, then add remaining flour, milk (or water), and other dough ingredients and proceed with the original recipe method.
Scottish Oatcakes
INGREDIENTS • 226g quick-cooking oats (2 ½ c) • 1 tsp kosher salt • ¼ tsp baking soda • 66g (6 Tbl) melted clarified butter • ¾ c hot water, around 200ºF (93ºC)
METHOD
In a medium bowl, stir oats, salt, and baking soda to combine. Add melted clarified butter or ghee to oat mixture and, using a flexible spatula, toss to evenly coat oats with fat. Add hot water and stir until mixture begins to thicken, 30 – 60 seconds. Let sit until oat mixture has hydrated and is slightly sticky, about 5 minutes.
Using a flexible spatula, scrape oat mixture onto a 18×13” piece of parchment. Top with another 18×13” piece of parchment so oat mixture is sandwiched between and, using a rolling pin, roll oat mixture to ¼ “thick. Grab both ends of the parchment, set onto a 18×13” rimmed baking sheet, and freeze until mixture is firm but pliable, about 30 minutes. Line two 18×13” rimmed baking sheet with parchment; set aside.
While the mixture is chilling adjust oven racks to second-from-top and second-from bottom positions and preheat to 350ºF (175ºC). 350ºF or 325ºF convection
Set a clean piece of parchment on your kitchen counter. Remove oatcake mixture from freezer. Peel off top layer of parchment, then invert oatcake mixture onto prepared sheet of parchment. Using a 3-inch round cookie cutter, cut out 16 oatcakes. (Scraps can be rerolled, frozen, and punched out into additional oatcakes.) Transfer oatcakes to prepared baking sheets, spacing them about 1 inch apart, and bake until crispy and lightly browned, 30 to 35 minutes. Remove from oven and let cool completely before serving or storing.
In a small saucepan, melt butter over medium-high heat.
Continue to cook over medium-high heat; an even layer of white milk proteins will float to the surface.
Bring to a boil; the milk proteins will become foamy.
Lower heat to medium and continue to gently boil; the milk proteins will break apart.
As butter gently boils, milk proteins will eventually sink to the bottom of the pot, and the boiling will begin to calm and then cease. Adjust heat as needed to continue boiling off water without scorching milk solids.
Once boiling has stopped, pour butter through a cheesecloth-lined strainer or through a coffee filter into a heatproof container to remove browned milk solids.
Let cool, then transfer to a sealed container and refrigerate until ready to use. Clarified butter should keep at least 6 months in the refrigerator.
On Wednesday this week I spent the morning replenishing our artisan bread supply and making some nibbling cookies. This bread may be the best I make, and QC said the pistachio/cranberry shortbread cookies may be the best of anything I bake.
To mix things up a little this time I shaped the bread as a boule while the previous bread was a batard. The shortbread cookies were the same as the past bake.
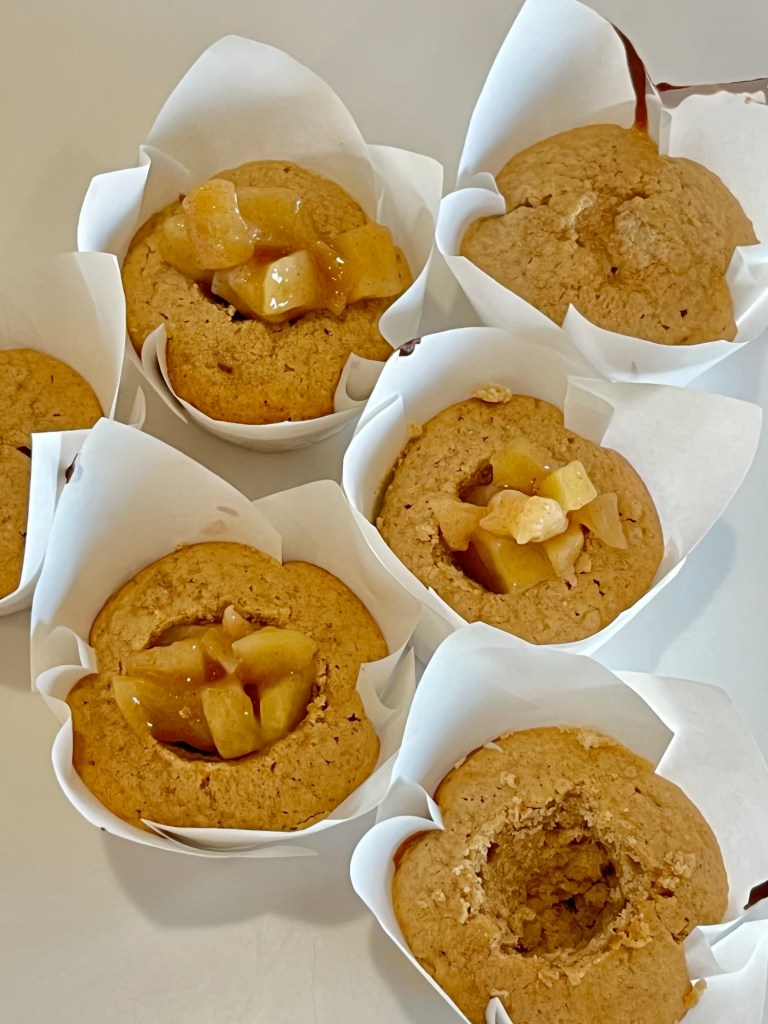
First of all, thank you to all my friends and family for your suggestions on what substrate to use as a carrier for the maple cream-cheese buttercream I could not resist. (There is a nerdish play on words in that sentence. In semiconductor fabrication, a resist is a thin layer used to transfer a circuit pattern to the semiconductor substrate which it is deposited upon. Sorry. Plus that explanation ends with a preposition, which is acceptable in modern English although it still annoys me.)
Most of the QC Cadre cast their votes within minutes of delivery of their sample and universally they loved them, (I did too!)
I hollowed out a cone from the center of each cupcake so I could fit extra apple pie filling. I piped the buttercream frosting to cover any exposed cupcake and all the filling. I then sprinkled a little allspice to add some color and counter the sweetness of the maple syrup.
Apple Pie Cupcakes with Maple Cream-cheese Buttercream
INGREDIENTS For the Apple Pie Filling • 2 apples (prefer granny smith), peeled, cored, and chopped • 3 Tbsp granulated sugar • 2 Tbsp water, divided • 1 Tbsp unsalted butter • ½ tsp ground cinnamon • ½ Tbsp cornstarch For the Cupcakes – makes twelve 78g cupcakes • 1 ⅔ cups (220g) cake flour • ½ c (124g) granulated sugar • ½ c (127g) light brown sugar • 1 ½ tsp baking powder • ½ tsp kosher salt • 1 ½ tsp ground cinnamon • ½ tsp ground allspice • ¼ tsp ground nutmeg • ½ c (1 stick) unsalted butter, melted • 2 large eggs at room temperature • 1 tsp pure vanilla extract • ½ c (114g) whole milk at room temperature • ½ c (112g) sour cream at room temperature For the Buttercream • 250 g (2 ¼ c) butter unsalted • 62 g (½ c) cream cheese • 198 g (7oz) sweetened condensed milk • 107 g (5 ½ Tbl) pure maple syrup
METHOD For the Apple Pie Filling
Melt butter in a saucepan over medium heat. Stir in apples, sugar, 1 Tbsp water, and cinnamon.
Cover and cook, stirring occasionally, for 4 to 6 minutes or until very slightly softened.
In a small dish combine cornstarch and 1 Tbsp water. Add the mixture to the pan while stirring and continue to cook over medium heat until apples are tender, and mixture has thickened.
Remove from heat, pour into an airtight container, and chill in the refrigerator at least 1 hour before adding to cupcakes. For the Cupcakes
Preheat the oven to 350°F. Line a muffin tin with cupcake liners.
Mix together cake flour, sugars, baking powder, salt, cinnamon, allspice, and nutmeg in the bowl of a stand mixer fitted with the paddle attachment.
Beat in butter, whisking until combined. Add eggs, one at a time, beating well after each addition. Beat in vanilla.
Beat in the milk and sour cream, mixing just until the batter is smooth. Scrape down the sides of the bowl and mix for 10 seconds more on medium speed. Divide the batter among muffin cups, filling each 2/3-full (you should get 14 to 15 cupcakes out of this batter).
Bake 15 to 18 minutes or until a toothpick inserted into the center of a cupcake comes out clean.
Cool cupcakes in pans 10 minutes before moving to a cooling rack. For the Cream Cheese Buttercream
Start with the butter in a mixing bowl. It should be soft enough to mix but still cool to the touch.
Using a hand or stand mixer, beat the butter for 2-3 minutes until it becomes light and fluffy.
Add the cream cheese to the bowl and continue mixing for another minute until it’s thoroughly combined with the butter.
Add the chilled sweetened condensed milk and mixing for about a minute, ensuring it blends smoothly into the mixture.
Should the mixture start to curdle, simply keep mixing. It will eventually blend into a smooth texture.
Finally, pour in the maple syrup and mix for one more minute to fully incorporate.
Store the buttercream in the refrigerator for up to one week or in the freezer for up to two months. When ready to use, allow it to reach room temperature and mix well to regain smoothness. Assembly
Cool cupcakes completely before filling with apple pie filling, then frosting with maple cream-cheese buttercream frosting. Dust with nutmeg or cinnamon or …
INGREDIENTS Scone • 3 ½ c AP flour, plus extra for dusting • 2 ½ Tbl baking powder • 1 tsp salt • 1 cup heavy cream • 1 cup lemonade • zest of 1 lemon Chantilly Cream • 1 c cold or whipping cream • ½ c powdered sugar • 1 tsp vanilla bean paste • (Option #1 for stabilized chantilly cream – 1/3 cup mascarpone, fridge cold (40%+fat) • (Option #2 for stabilized chantilly cream – 1 Tbl per cup of cream) Raspberry Jam • Equal weights raspberries and sugar • Juice and zest of 1 lemon (2 Tbl)
METHOD Chantilly Cream
At medium high beat the cream, icing sugar, vanilla (plus mascarpone if making stabilized cream). Move the beater around the bowl until the required stiffness is achieved.
Stiffness options – Beat for around 1 ½ minutes if you want soft peaks (kind of dollops) or 2 minutes for stiff peaks (for piping).
Set aside in a piping bag Raspberry Jam
Mix berries, lemon and sugar in a suitable sized pan and heat on medium-low until berries start to release their juice.
Strain the mixture to remove the seeds, return to heat.
Heat to 220°F
Set aside to cool. (Better to make the day prior to using) Scones
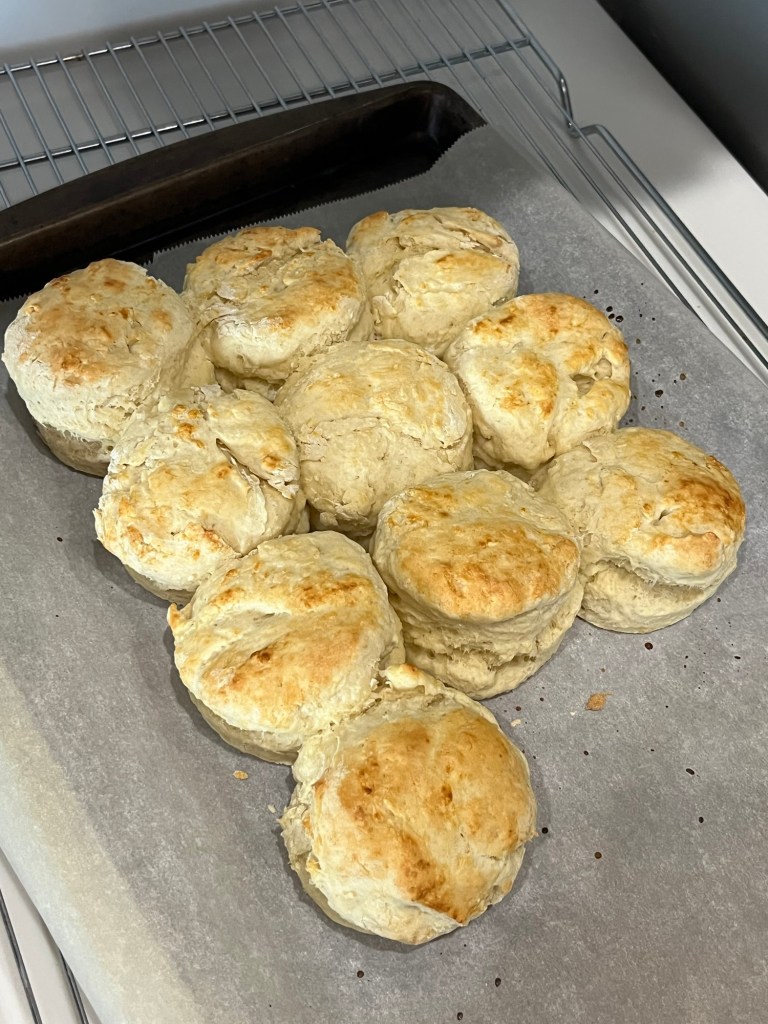
Preheat oven to 390°F. Line tray with baking/parchment paper.
Combine the flour, cream and lemonade in a bowl and mix until flour is mostly combined. Do not over mix, it will make the scones dense! The dough should be soft and sticky.
Turn out onto a floured surface and knead gently just 3 – 5 times to bring dough together, then gently pat into a disc shape 1″ thick.
Use a 2.5″ round cutter to cut rounds – press straight up and down (don’t twist), flour cutter in between.
Use a knife or spatula lift (avoid touching sides) and place on tray, slightly touching each other (they help each other rise).
Brush the tops lightly with milk.
Bake for 15 minutes until golden on top. Place on rack to cool. Place tea towel over them to stop the tops from getting crusty.
Serve with copious amounts of Chantilly cream and jam
Notes
Lemonade – Any brand lemonade works fine, or even 7Up. Just needs to be lemony, fizzy and sweet!
“Thickened cream” is a term typically used in Australia and New Zealand that generally refers to a cream that is simply thicker than regular milk or light cream, but not whipped, often used in sauces or as a pouring cream, while “whipped cream” is when the cream has been beaten to incorporate air bubbles, resulting in a light and fluffy texture; essentially, thickened cream is just a thicker liquid cream, not aerated like whipped cream.
Storage – keeps for 3 days in an airtight container but needs to be reheated to serve. Also freezes well, for up to 3 months.
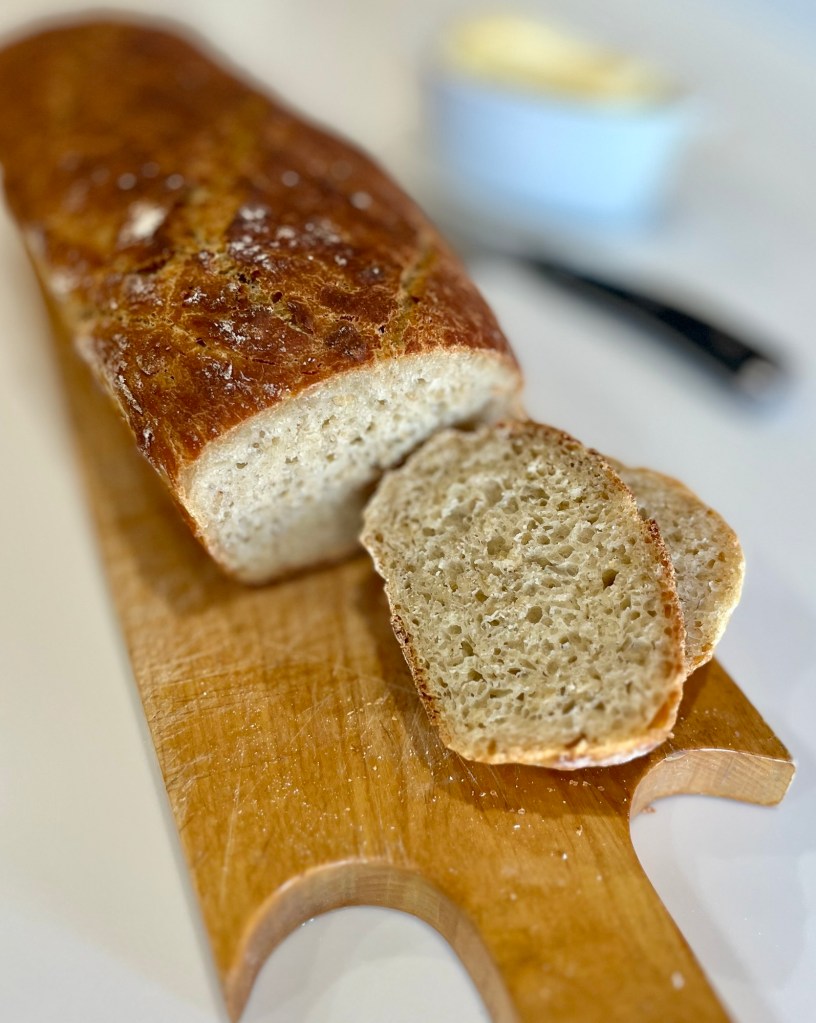
Well, Sally did it again. I subscribe to the sallysbakingaddiction.com mailing list. Along with its featured content it contains links to other enticing bakes and I found one yesterday. First of all “no-knead” always catches my attention. It requires much less hands on action. “Oat” is a second tick in the box as I bought oats at Costco a couple of weeks ago and have lots and lots and lots to use. And finally, “honey” is my go-to sweetener. Plus, the smallest amount Costco sells is three jars!
This is a 92% hydration bread (360g water::390g flour) so do not expect it to behave like the way a 65% hydration bread will. The dough is so soft the lame (or knife) tears it, rather than cuts. You cannot tension the surface as you can with lower hydration bread, but I found freezing it for 30 minutes before baking then slashing helped.
All that being said, this is a delicious honey oat bread. (I am eating a QC test slice right now.) The hint-o-cinnamon sets it off perfectly. (To confirm the evaluation, I had to have a second slice.)
INGREDIENTS • 390g (3 c) bread flour • 85g (1 c) old-fashioned whole oats • 1½ tsp Platinum Yeast from Red Star or any instant or active dry yeast • 1½ tsp salt • ½ tsp ground cinnamon • 360g (1 ½ c water, close to room temperature at about 70°F (21°C) • 128g (6 Tbl) honey • 25g (30ml or 2 Tbl) vegetable oil (or other neutral tasting oil)
METHOD
The evening before baking: In a large ungreased bowl, whisk 3 cups (390g) bread flour, the oats, yeast, salt, and cinnamon together. Set aside. In a medium bowl or large liquid measuring cup, whisk the water, honey, and oil together. Pour water mixture into flour mixture and gently stir together with a dutch dough whisk, silicone spatula or wooden spoon to combine. Dough will be heavy and very wet/sticky. Do not overwork dough.
1st rise: Cover the dough tightly with plastic wrap or aluminum foil and set on the counter at room temperature for 12-18 hours. (See note if you need to extend this time.) You want it to almost double in size during this time.
Gently shape: Turn the dough out onto a lightly floured work surface and, using lightly floured hands, shape into a ball as best you can. Transfer dough to a large piece of parchment paper. Lift the parchment paper and dough up and place it all into a banneton (oval or round depending on the shape of your dutch oven.) Using a very sharp knife or bread lame, gently score an X into the top. Cover dough lightly with plastic wrap and leave alone for 30 minutes. (The dough is very slack, typical of a 90+% hydration bread. To firm the surface of the dough I put it, still in the banneton, into the freezer for 30 minutes, then slashed it.
Bake: Heat the oven, with dutch oven and lid inside, to 425°F (218°C) for 30 minutes. After 30 minutes place the dough inside the dutch oven by lifting it up with the parchment paper and sticking it all–the parchment paper included–inside the pot.
Cover with the lid. Bake for 30 minutes with the lid on. Carefully remove the lid and continue baking for 10-12 more minutes or until the bread is golden brown. The bread is done when an instant read thermometer reads the center of the loaf as 195°F (90°C).
Remove dutch oven from the oven, carefully remove the bread, and allow to cool on the counter for 30 minutes before breaking/slicing/serving.
Cover leftover bread and store at room temperature for up to 3 days or in the refrigerator for up to 10 days.
NOTES
Make Ahead Instructions: This recipe is wonderful for making ahead because the 1st rise time (step 2) is so long. If needed, you can extend the 1st rise time by letting the dough rest in the refrigerator instead of at room temperature for up to 18 hours. Then, after refrigerating, let the dough sit at room temperature to warm and rise, about 4-6 hours. You want it to mostly double in size during this time. Do not extend these times further because the dough may begin to deflate.
Freezing Instructions: Prepare recipe through step 4 and feel free to use a disposable loaf pan since it will be going into the freezer. Cover loaf tightly and freeze for up to 3 months. On the day you serve it, let the loaf thaw and rise for about 5 hours at room temperature. Bake as directed. You can also freeze the baked bread loaf. Allow the bread to cool completely and then freeze for up to 3 months. Thaw in the refrigerator or at room temperature and reheat if/as desired.
If You Want to Top with Oats or Cinnamon-Sugar: If you want to top the dough with oats prior to baking, carefully brush the dough after the 2nd rise (step 5) with 1 egg white beaten with 1 Tbsp water, and then sprinkle 2 Tbsp of oats on top. (The oats do not stick without the egg white and the bread will no longer be egg-free by doing this.) You can skip the egg white/oats and sprinkle cinnamon-sugar on top instead. Combine 1 Tablespoon granulated sugar and 1/8 teaspoon cinnamon. Sprinkle on top of the loaf right before baking.