Easy Homemade Bread

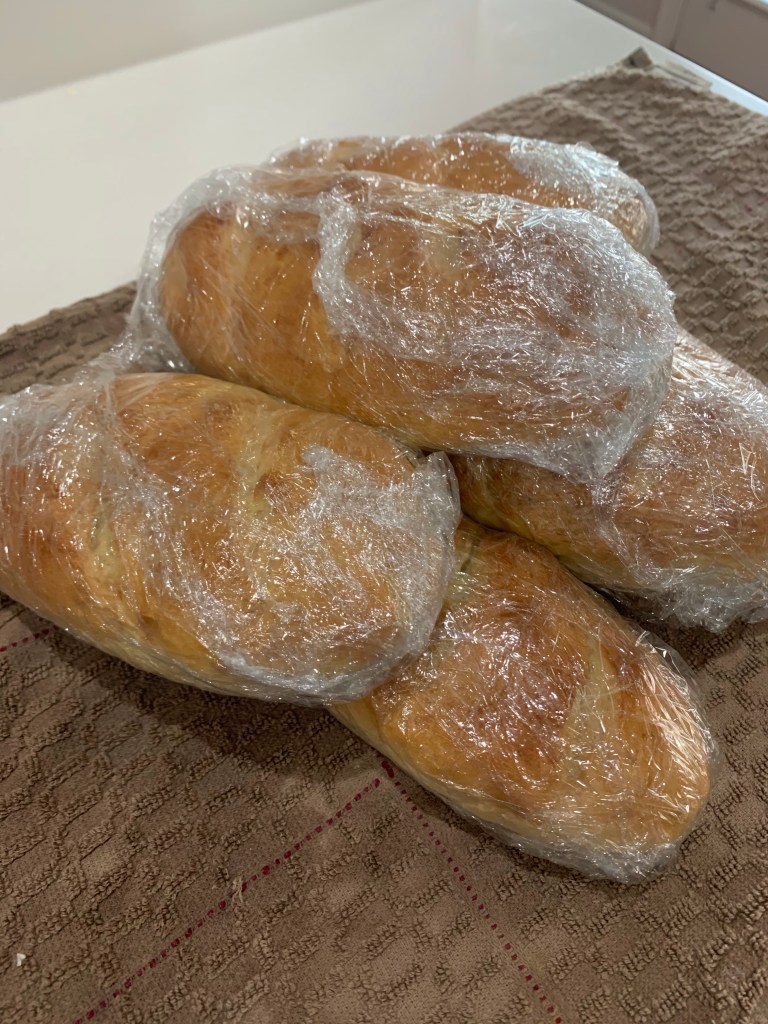
Most basic bread is easy to make. There are a few that require extra steps, rises, shaping, etc. but basic bread is… well… basic. Mix, rise, shape, rise, bake.

I made a few changes to the recipe published by Cookist. Some of them were just language or style differences but a couple were more involved. I use instant yeast so I provided the conversion factor from cake to instant. I knead in a stand mixer so referenced it. I added how long to knead and to tension the loaf before the final rise. I added more description on how to shape the loaf.

Easy Homemade Bread

https://video.cookist.com/video/an/Xp6ftuSwTmRucpzW

INGREDIENTS
• 2 cups water
• 1 tsp sugar
• 8g ( 2 ½ tsp) instant yeast
• 5 cups AP flour
• 1 tsp salt
• 2 tbsp oil

METHOD

  1. Pour water into a stand mixer bowl, add sugar and yeast. Mix.
  2. Add flour and salt. Mix. Let rise for 15 minutes.
  3. Add sunflower (or other) oil and knead about 8 minutes.
  4. Let rise covered until doubled.
  5. Divide the dough into two parts.
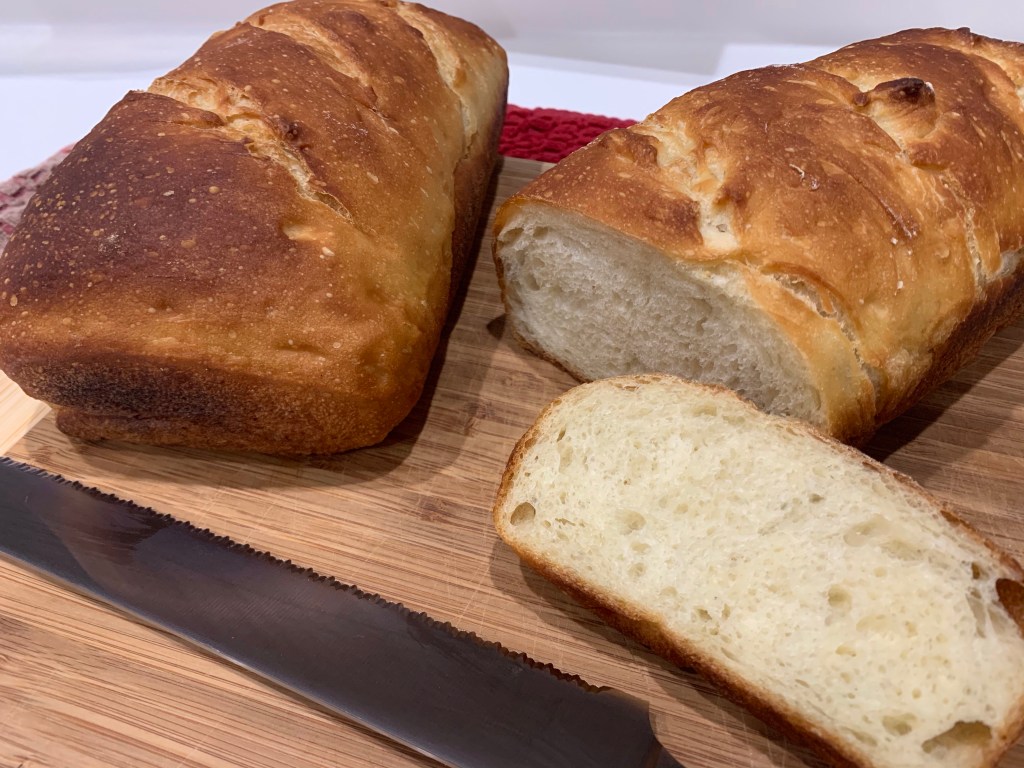
  6. Form a boule from each part, the press out into an oval, roll into a batard
  7. Tension the battery by rolling on a clean surface, cupping your fingers around the bread and rolling the batard back and forth not allowing it to lengthen.
  8. Place on a baking sheet. Let rise until doubled.
  9. On each bread make an incision, paint with milk. Place a cup of hot water on a baking sheet. Cookist’s video showed slashing the bread by cutting in small short strokes rather than one long cut. It worked really well. I will have to try on other bakes.
  10. Bake for 40 minutes at 180 °C / 350 °F until internal temperature reaches 195-200°F.

Like Molasses in October

Whole Wheat / Molasses Seeded Bread

I receive King Arthur Baking Company’s magazine and always peruse the products and recipes. This month there was a beautiful picture of their Molasses Multi-Seed Bread and decided to give it a try.

I discovered two things. More seeds are better and try different time/temperature combinations. I made it as directed and the final loaf was overdone, although the internal temp was just 195°F. Next time I will either drop the temp a little, maybe to 350°F or 325°F. I will also tent it with foil earlier. This time, my first attempt, I tented it for the final 10 minutes, but it was too late.

I may also need to buy a tea loaf pan. The standard 4” x 9” was really to small for the bread to be shaped correctly. The 12” x 4” tea loaf, as specified by KAB would be better. Maybe… let it rise (second rise) on a French bread pan. I may try that before investing in a tea loaf pan that I would use infrequently.

Molasses Multi Seed Bread

INGREDIENTS
• 3/4 cup (170g) warm milk, 105° to 110°F
• 1/2 cup (113g) warm water, 105° to 110°F
• 2 tablespoons (28g) butter, melted and slightly cooled
• 1 cup (113g) King Arthur White Whole Wheat Flour
• 2 1/2 cups (300g) King Arthur Unbleached Bread Flour
• 1/8 teaspoon ascorbic acid, optional
• 2 teaspoons instant yeast or active dry yeast
• 1 1/2 teaspoons salt
• 1/4 cup (85g) molasses
• 3/4 cup (129g) Artisan Bread Topping, divided

METHOD

  1. To make the dough: In the bowl of your stand mixer, combine all the ingredients except the bread topping. Mix and knead with a dough hook for about 8 minutes until a smooth, slightly sticky dough forms, adding a tablespoon of flour if needed. With a minute or so left, knead in 1/4 cup of the topping.
  2. Place the dough in a lightly greased bowl, cover, and let it rise until puffy, 1 to 1 1/2 hours.
  3. To shape the bread: Deflate the dough and divide it in half; roll each half into a 12” rope. Roll one of the ropes in the remaining topping. Be sure the rope is VERY well covered with seeds. When it rises the seeds will separate.
  4. Pinch the ends of the ropes together and twist one over the other, pinching them together at the opposite end.
  5. Transfer the dough to a lightly greased tea loaf pan or similar long loaf pan (12″ x 4″). Cover and let rise until the bread domes 1” above the edge of the pan, about 1 hour. Toward the end of the rising time, preheat your oven to 375°F.
  6. Uncover the loaf and egg wash the un-seeded rope.
  7. Bake for 32 to 36 minutes, or until a digital thermometer inserted into the center registers 190°F. The bread was too dark with this time/temp setting. (Drop temp to 350°F and tent the bread with foil after 20 min or so, before it turns dark.)
  8. Remove the bread from the oven and place the pan on a rack for 5 minutes. Tilt the bread out of the pan and return it to the rack to finish cooling completely.
  9. Store bread, well wrapped, at room temperature for several days; freeze for longer storage.

A Day In the Life – Act II

This morning’s Pain Au Chocolat required a couple of hours in the fridge before baking. We needed another batch of hoagie, or sub or grinder rolls after finishing what we had with steak sandwiches last night, and I had time. I also had time for another loaf of honey white bread. Busy morning!!

These are outstanding rolls and I am lucky to have stumbled across the recipe a month or so ago. I wrapped them for freezing before taking a picture so decided to photograph them as wrapped for the freezer. I double wrap them, then give them a couple of hours to thaw before using. After a month, or more, in the freezer, after thawing, they are as fresh as just baked.

Hoagie Rolls

INGREDIENTS
• 448-512g (3½ – 4) c. bread flour
• 308-355 g (1¼ cups plus 2 Tbl – 1½ c.) warm water (110-115F
degrees)
• 2 Tbl sugar
• 2¼ tsp instant yeast
• 1 tsp kosher salt
• 4 Tbl cold butter, cubed
METHOD

  1. Using a stand mixer fitted with the dough hook, mix 2 cups of flour, water, sugar, and instant yeast on low for 4 minutes.
  2. Add the salt and 1 cup at a time of the remaining flour and mix for 5-6 minutes until the dough is slack. (Slack dough is fluid but not liquid. Poured onto a board it could not be shaped. It would flow and not hold a shape.)
  3. At this point, your mixer should be at medium speed. If your dough, after 5-6 minutes is not slack add in a bit more water (2-4 Tbl). The additional water will fully depend on how humidyour room is.
  4. Add the butter 1 Tbl at a time and mix until almost fully blended before adding the next Tbl. In total, mix for 1-3 minutes or until the dough comes back together. Remove from bowl and transfer to a greased, covered bowl until doubled in size. ~1 hour.
  5. Punch the dough down and place on a very lightly floured board. Divide into 4-8 pieces and shape. I would advise using as little flour as possible when shaping these. The more flour you add, the tougher the hoagies will be. (Hoagie rolls: 125 g, Hamburger rolls: 75g)
  6. When you divide the dough, with your fingers, gently pat into a 4:3 rectangle where the dough is about 1/4″ thick.
  7. Envelope fold the short end of the rectangle towards the center and press gently to seal.
  8. Rotate the dough 180 degrees and repeat the above folding using your hand to seal the dough.
  9. The dough should be shaped like a log/snake. Gently cup your hand over the center of the dough and, without applying pressure/pressing down, gently roll the dough back and forth to reinforce the seal and roll it out into a log.
  10. Carefully pull the ends of the log outwards to stretch out dough (just an inch or so – again dependent on how long you want your rolls).
  11. To help round out the ends, cup each hand at the end of the roll and move them in opposite directions with a back and forth motion to roll the ends and then tuck underneath the roll.
  12. Transfer to a parchment lined tray and cover with lightly sprayed plastic wrap. Allow to rise again until almost doubled. ~30-45 minutes. Do NOT overproof them otherwise they will fall flat.
  13. Preheat oven to 375 F. If you want to slash your bread, using a lame, make your slashes. If desired, brush with coating of choice and bake for 16-23 minutes or until golden brown. To ensure doneness, test the internal bread temp. It should be at 200F.

Berry, Berry, Berry Good Scones

Half of our Q.C. department requested we make some scones. Having never tried our hand at them we finally made some this morning. I found a recipe and modified it to suit my needs. They will become a regular treat here!

These are 3 berry drop scones. They are 3 berry ‘cause I forgot I was making raspberry/blueberry scones and added blackberries. Once I realized what I did I added a half cup of blueberries.

Once mixed, large tablespoon portions are “dropped” onto a parchment covered baking sheet. I ended up baking them for the full 19 minutes at 400F. It was just about right. I forgot to sprinkle some coarse or turbinado sugar, but they didn’t really need it.

Raspberry/Blueberry Drop Scones

Ingredients
• 2 1/2 cups all purpose flour
• 1 tablespoon baking powder
• 3/4 teaspoon kosher salt
• 1/3 cup sugar
• Zest of 1 small lemon (or half a large lemon)
• 1/2 cup unsalted butter, chilled and cut into cubes
• 3/4 cup fresh blueberries
• 3/4 cup fresh raspberries
• 1 cup heavy cream
• Coarse or turbinado sugar for topping

Directions

  1. Preheat oven to 400. Line a baking sheet with parchment paper.
  2. In the bowl of a food processor, add the flour, baking powder, salt, sugar and lemon zest. Pulse a few times to incorporate.
  3. Add the cubed butter and pulse to incorporate. The mixture should resemble very coarse sand.
  4. Empty the flour mixture into a mixing bowl. Add the cream and stir until just barely incorporated.
  5. Gently fold in the berries. It’s fine if the raspberries break up a little – it adds a nice pink stain to the dough. The dough should just be moist, not wet, but also not crumbly or powdery looking. If it looks too dry, add a tablespoon of cold water.
  6. Spoon the dough into 12 equally-sized pieces on the parchment-lined baking sheet. Sprinkle some coarse or turbinado sugar over the top, if desired.
  7. Bake for 16-19 minutes, rotating the pan halfway through. The scones should be lightly golden and cooked through.
  8. Cool in the pan for 5-10 minutes then carefully remove to a cooling rack.

And Now for Something Slightly Different

We nearly ran out of bread today, can you believe it? I thought it might be fun to make a minor change in my technique, and I mean minor. Instead of using a Dutch oven for the 75% Hydration Honey Bread, I decided to make two small loaves and bake them in a steam oven.

It worked fine. The bread is an acceptable size for sandwiches or toast. The crust isn’t quite as firm, but again, acceptable. The texture of the bread was spot on. Overall, I am pleased with the results of the experiment.

(The recipe below uses a Dutch Oven)

Honey No Knead 75 Percent Hydration Bread

Advanced No-Knead Bread

INGREDIENTS
• 600 g all-purpose flour (about 4 cups using ‘scoop and sweep’ method)
• 450 g water (2 cups, room temperature)
• 21 g honey (1 Tbsp)
• 14 g kosher salt (1 level Tbsp)
• 3 g SAF Gold instant yeast (1 tsp)

METHOD

  1. Add the water and honey to a large bowl and mix until the honey is dissolved.
  2. Add the rest of the ingredients and mix by hand, until a sticky homogeneous mass is formed. Cover the bowl with a plastic wrap and let rest for 1 hour.
  3. After one hour, perform stretch and folds every 30 minutes over the next 1½ hours. Let the dough continue its fermentation for additional 1½ hours or until it doubles in size.
  4. Shape the dough in a ball and transfer to a proofing basket dusted with a 50/50 mix of all-purpose and rice flour, seam side up.
  5. Cover with a piece of paper towel (this will prevent sticking of the dough to the plastic wrap), then with a plastic wrap. Let proof for about 60 minutes or until the dough passes the finger test. (Poked with a finger the indentation will spring back very slowly.) The dough will increase in size about one a half times or so.
  6. Place a baking stone and a steam pan in the oven. Place the Dutch Oven into the oven and preheat to(450) 500oF. An hour of preheating is recommended.
  7. Turn the bread over on a piece of parchment paper. Score on top and lower the dough into the preheated Dutch Oven. Be careful opening the oven, it will be full of hot steam. Spray the walls of the oven with a bit of water (gentle mist) to re-create some of the lost steam and close the door.
  8. Immediately drop the temperature to (400) 450oF and bake for 25 minutes.
  9. Remove the water pan from the oven, turn the bread 180 degrees and leave the door cracked open. You can use a wooden spoon for that. Bake for another 25 minutes.
  10. When the baking is done, remove the bread from the oven and place on a cooling rack. Cool for 1 hour at room temperature before slicing.

Fresh Bagels – ET? Anyone?

Recently, I mentioned I still had the alkali bath to boil, brown and make a nice skin on the pretzels and with minor changes would work for bagels as well. So…. today we have bagels.

I used the Chef Steps recipe I posted here some time ago. I also posted the recipe below.

Chefsteps Bagels

I made four ET bagels for me and six plain bagels for Fran (and me). Notice how I cleverly worked the ET title into the text of the post?

Bagels from ChefSteps
INGREDIENTS
• 350 g Water, plus more for boiling
• 650 g Bread flour, divided
• 3 g Active dry yeast
• 25 g Sugar, granulated, optional
• 25 g Diastatic malt powder
• 10 g Salt
• Nonstick spray, as needed
• 25 g Molasses
• 10 g Baked baking soda
OPTIONAL
• 10 g Black sesame seed
• 10 g Dried onion flakes
• 10 g Salt, Maldon flake
• 7 g Poppy seed
• 5 g Sesame seed
• 5 g Dried garlic flakes

METHOD

  1. In a stand mixer bowl, combine 350 g room temperature water, 250 g of the flour, and the active dry yeast. Cover the bowl with plastic wrap or a damp cloth and let the mixture proof at room temperature until it doubles in size and makes frothy bubbles that collapse when you tap the bowl on the countertop. This takes about two to three hours. (Look for a foam that resembles the one on a root beer float. If you don’t see this yet, just give the yeast a bit more time to work its magic.)
  2. In a bowl, combine the remaining 400 g of bread flour with 25 g sugar, 25 g diastatic malt powder, and 10 g salt.
  3. Reattach the bowl containing the sponge (from Step 1) to the stand mixer and fasten on the dough hook. Set the mixer to low. Gradually spoon in the dry ingredients and let the dough mix until it becomes stretchy and smooth and pulls away from the sides of the bowl, about 15 to 20 minutes. (This will be rough work for your stand mixer.)
  4. Cover the bowl with a damp cloth and let the dough cool in the fridge for 20 minutes.
  5. Working quickly to keep the dough cool, divide it into 130 g portions and set them on a parchment paper lined pan. Keep the entire sheet covered with plastic wrap as you work, tucking each new portion underneath the plastic wrap to keep any crust from forming.
  6. First, form a dome. Make a circle with one hand, place a piece of portioned dough halfway inside it, and use one finger of your other hand to turn the dough while gradually pushing it through the circle tightening the dough as you work around the outside. You want to end up with a nice, taut dome.
  7. Next, turn that dome into a ball. Hold the dome with the concave underside facing up. Pinch the dough closed across the “bowl,” then roll the seam on the work surface until smooth. When you finish each piece, return it to its spot under the plastic wrap on the sheet pan.
  8. Cool the dough balls in the refrigerator for 20 minutes.
  9. Working with one ball at a time, use two fingers to pinch a hole through the center of the dough, turning it while you work. Once you break through the dough, turn it on its side (like a spinning wheel). Stick both of your index fingers through the hole from opposite directions, and spin them around each other, slowly stretching out the hole until you can fit three fingers through it. Return the shaped dough to its covered spot on the tray. (You might need a second tray.)
  10. Allow to proof at room temperature until a dough ring floats when set in a bowl of water. This will take about 20–40 minutes. (If the test ring sinks, proof a bit longer.)
  11. Make sure the tray(s) are wrapped tightly with plastic wrap, and let them cool in the refrigerator overnight to allow flavors to develop.
  12. In a large pot over high heat, bring 5 L water, 25 g molasses, and 10 g baking soda to a boil.
  13. Preheat the oven to 425 °F / 218 °C (Use convection if available)
  14. Working in batches, drop the bagels into the water and boil for 60 seconds, then flip them with a spider strainer or fork and boil for another 60 seconds. Transfer them, smooth sides up, to a wire rack on a half-sheet pan.
  15. (TRY AN EGG WASH ON SOME OF THE PLAIN BAGELS)
  16. If you’re adding the seasoning mix—or your own choice of toppings—now’s the time to sprinkle it over the tops of the bagels.
  17. Transfer the bagels to a parchment paper–lined half-sheet pan and move it to the center rack of the preheated oven.
  18. Bake for seven minutes, spin the tray around to ensure even cooking, and continue baking until bagels have a nice, brown color—about seven more minutes.

Babka “Yada, yada, yada”

I am not sure there is much better than a fresh, warm, chocolate babka. For anyone who is unfamiliar with this bread/pastry/cake I strongly suggest you don’t wait but either make or buy a loaf. Warning, this recipe could ruin you for store bought.

I was going to take a few pictures to illustrate how to make and shape a babka, but the woman who posted this recipe did a great job of it. https://prettysimplesweet.com/shaping-babka. Copy and paste this link into your browser for details.

Chocolate Babka

https://prettysimplesweet.com/chocolate-babka/

INGREDIENTS
For the dough:
• 3¾ cups (530 g) all-purpose flour , plus extra for dusting
• ½ cup (100 g) granulated sugar
• 1 tablespoon (10g) instant yeast
• 3 large eggs
• ½ cup (120 ml) water
• ¾ teaspoon fine sea salt
• ⅔ cup (150 g) unsalted butter , at room temperature, cut into small cubes
• Neutral oil (sunflower, canola) for dressing
For the chocolate filling:
• ½ cup (50 g) powdered sugar
• ⅓ cup (30 g) unsweetened cocoa powder
• 130 g dark chocolate , melted*
• ½ cup (120 g) unsalted butter , melted
• ⅔ cup (120 g) chocolate chips or chunks OR 1 cup (100g/3.5oz) pecans, coarsely chopped (optional)
For the sugar syrup:
• ½ cup (120ml) water
• ½ cup (100g) granulated sugar

METHOD
Making the dough:

  1. Place flour, sugar, and yeast in a standing mixer fitted with the dough hook and mix on low speed until combined. Add eggs and water, and mix on medium speed until dough comes together, 2-3 minutes. Add salt, then butter, adding a few cubes at a time, mixing until incorporated. Continue mixing for about 10 minutes on medium speed, until dough is completely smooth, elastic, shiny, and pulls away from the sides of the bowl. During mixing, you will need to scrape down the sides of the bowl.
  2. Place dough in a large bowl brushed with oil, cover with plastic wrap, and leave in the fridge for at least half a day or overnight.
  3. Grease two loaf pans (9×4 inch) with oil and line the bottom of each pan with parchment paper. Divide dough in half and keep one half covered in the fridge.
    Making the filling:
  4. Whisk together powdered sugar, cocoa powder, chocolate, and butter until you have a spreadable paste.
  5. Roll out dough on a lightly floured surface and shape into a rectangle measuring 15×11 inches. Position dough so that a long side is closest to you. Using an offset spatula, spread half of the chocolate mixture over the rectangle, leaving a ¾ inch border all around. Sprinkle half of the pecans or chocolate chips on top of the chocolate.
    Shaping the dough:
  6. Use both hands to roll up the rectangle like a roulade, starting from the long side closest to you and ending at the other long end. Press to seal the dampened end onto the roulade, then use both hands to even out the roll into a perfect thick cigar. Rest the cigar on its seam.
  7. Trim about ¾ inch off both ends of the roulade with a serrated knife. Then use the knife to gently cut the roll in half lengthwise, starting at the top and finishing at the seam, essentially dividing the log into two long even halves, with the layers of dough and filling visible along the length of both halves. With the cut sides facing up, gently press together one end of each half, then lift the right half over the left half. Repeat this process, but this time lifting the left half over the right, to create a simple two-pronged plait. Gently squeeze together the other ends so that you are left with the two halves, intertwined, showing the filling on top. Carefully lift the cake into a loaf pan. Don’t worry if there are gaps in the pan since the cake will rise and will eventually look fine, even if you feel like it’s messy at this point. Cover the pan loosely with plastic wrap or a wet tea towel and leave to rise in a warm place for 1 to 1½ hours. Repeat to make the second cake.
  8. Preheat oven to 375°F/190°C, making sure to allow plenty of time for it to heat fully before the cakes have finished rising. Remove plastic wrap or tea towels, place cakes on middle rack of oven, and bake for about 25-30 minutes, until a skewer inserted into the center comes out clean with no dough attached.
  9. While the cakes are in the oven, make the syrup. In a small saucepan over medium heat, bring water and sugar to a boil. As soon as the sugar dissolves, remove from heat and set aside to cool. As soon as the cakes come out of the oven, brush the syrup over them. Use all of the syrup, even if it looks a lot. Let cakes cool until they are warm, then remove from pans and let cool completely before serving. Serve warm or at room temperature.
  10. Babka will stay fresh for 24 hours in an airtight container at room temperature. Don’t place in the fridge.
  11. Babka freezes well for up to 2 months. To thaw, leave on counter or overnight in the fridge.

Recipe Notes

  • To melt butter and chocolate, place them in a heat-proof bowl, and heat in the microwave in 20 second-intervals, stirring in between each interval, until melted and smooth (or alternatively, set it over a saucepan of simmering water, stirring occasionally).

Holy Jalapeños Batman!

I saw a recipe on Tasty.com for a Dutch Oven Jalapeño Cheese Bread and thought—that’s different and I wanted to try different. You see, I like things that change. I don’t like things that are always the same. Just ask the QA Department. She’ll tell you the truth.

I made the bread diligently following the recipe. No changes. I used the stretch and fold method rather than kneading. This method is good for any high hydration bread. This particular techniques uses a silicone spoon to stretch the dough then fold it over. With other stretch and fold techniques the dough it placed on a lightly floured surface and either a bench scraper or your wet hands stretch, then fold.

Once the dough has risen the second time use the bench stretch and fold technique to form, more or less, a ball. The following video is the first time I have tried recording any bread making technique.

Dutch-Oven Jalapeño Cheddar Bread

https://tasty.co/recipe/dutch-oven-jalapeno-cheddar-bread

INGREDIENTS
• 3 ½ cups bread flour, plus more for dusting
• 2 ½ cups shredded sharp cheddar cheese, divided
• 2 (70g) jalapeños, seeded and coarsely chopped
• 1 jalapeño, sliced into rings, divided
• 1 tablespoon kosher salt
• 2 cups warm water
• 2 ¼ teaspoons instant yeast
• 1 tablespoon olive oil

METHOD

  1. In a large bowl, combine the bread flour, 2 cups (200 g) of cheddar cheese, the chopped jalapeños, and salt. Stir well.
  2. In a separate large bowl, combine the warm water and yeast. Pour the flour mixture on top of the water and use a silicone spatula to stir until the dough comes together.
  3. With the spatula, fold the dough around the edges of the bowl toward the center, rotating the bowl each time and folding a total of 8 times. Cover with a kitchen towel and let rest in a warm place for 60 minutes, or until almost doubled in size.
  4. Using the spatula, fold the dough toward the center again 8 more times. Cover with the towel and let rest for 30 minutes.
  5. Add the Dutch oven and lid to the oven, and preheat to 450˚F (230˚C) for 30 minutes.
  6. Lightly flour a clean work surface and your hands. Carefully peel the dough out of the bowl and onto the floured surface. Flip over and carefully brush away excess flour. Fold the edges of the dough towards the center 8 times, then flip over the dough and transfer to a piece of parchment paper.
  7. Brush the top of the dough with the olive oil, so the cheese will stick. Sprinkle the remaining ½ cup (50 g) of cheese on top. Use a sharp knife to score the bread with an “X”, which will allow steam to escape. Arrange the jalapeño rings on top of the cheese.
  8. Carefully remove the Dutch oven from the oven and use the parchment to lift the bread into the pot. Cover with the lid and bake for 30 minutes, then remove the lid and bake for 20 more minutes, until the bread is golden brown.
  9. Carefully slide the bread out of the pot and onto a wire rack. Remove the parchment paper and let the bread cool for at least 1 hour before slicing.
  10. Slice the bread and serve as desired.

Yes, We Had Some Bananas

What do you do with over ripe bananas? Make banana bread, of course. I found a new recipe online and decided to give it a go. As the author said, “With a very few variations, the recipe I give below is universal to almost every church or community cookbook written in the last 50 years.” I believe her.

I thoroughly mashed the bananas to not leave any chunks but did cream the softened butter and sugar together first to give a more cake-like crumb.

The result was excellent. Better than other recipes? Probably not, but as easy as others so what the hey?

Banana Bread

https://www.thekitchn.com/how-to-make-banana-bread-the-simplest-easiest-recipe-139900

INGREDIENTS

• 8 tablespoons (1 stick) unsalted butter
• 1 cup granulated sugar
• 2 large eggs
• 1/4 cup milk
• 1 teaspoon vanilla extract
• 3 medium bananas, very ripe
• 2 cups all-purpose flour
• 1 teaspoon baking soda
• 1/4 teaspoon salt

METHOD

  1. Arrange a rack in the bottom third of the oven and heat to 350°F. Line an 8×5-inch loaf pan with parchment paper, letting the excess hang over the long sides to form a sling. Spray the inside with cooking spray.
  2. Soften the butter and cream it with the sugar in a stand mixer.
  3. Crack the eggs into the bowl. Whisk until completely combined and the mixture is smooth.
  4. Whisk the milk and vanilla into the batter.
  5. Peel the bananas and add them to the bowl. Using the end of the whisk or a dinner fork, mash them into the batter. Leave the bananas as chunky or as smooth as you prefer. If you prefer an entirely smooth banana bread, mash the bananas separately until no more lumps remain, and then whisk them into the batter.
  6. Measure the flour, baking soda, and salt into the bowl. Switch to using a spatula and gently stir until the ingredients are just barely combined and no more dry flour is visible.
  7. Pour the batter into the prepared loaf pan, using the spatula to scrape all the batter from the bowl. Smooth the top of the batter.
  8. Bake until the top of the cake is caramelized dark brown with some yellow interior peeking through and a toothpick or cake tester inserted into the middle comes out clean, 50 to 65 minutes. Baking time will vary slightly depending on the moisture and sugar content of your bananas — start checking around 50 minutes and then every 5 minutes after.
  9. Set the loaf, still in the pan, on a wire cooling rack. Let it cool for 10 minutes — this helps the loaf solidify and makes it easier to remove from the pan.
  10. Grasping the parchment paper sling, lift the loaf out of the pan and place on the cooling rack. Cool for another 10 minutes before slicing.

RECIPE NOTES

  1. Banana muffins: To make muffins, line a muffin tin with paper liners and fill each cup to roughly 3/4 full, and check for doneness after 20 minutes. Makes 8 to 10 muffins.
  2. Storage: Wrap leftovers tightly in plastic wrap and store at room temperature for several days, or wrap the bread in plastic wrap and then aluminum foil and freeze for up to 3 months.