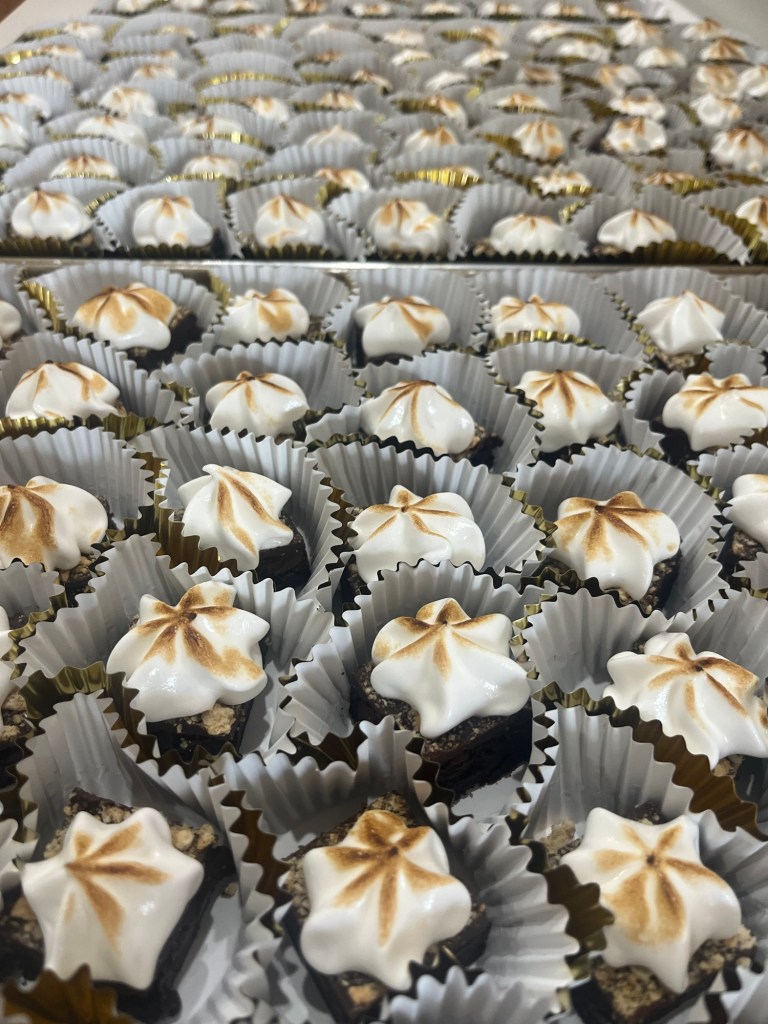
Our home association wine club had a beach themed wine tasting event and I provided the s’mores brownies for 164 guests and staff. With all humility, they were exceptional. I used my basic raspberry chocolate brownie recipe, but with the excellent suggestion by QC, added a layer of crushed graham cracker on the ganache and below the Italian meringue. I also blowtorched the meringue to give it the toasted s’more look.
Cutting the brownies with a pizza cutterActually 175 individual browniesS’mores raspberry brownies
I received many compliments and several inquiries as to where to buy them. (They cannot.)
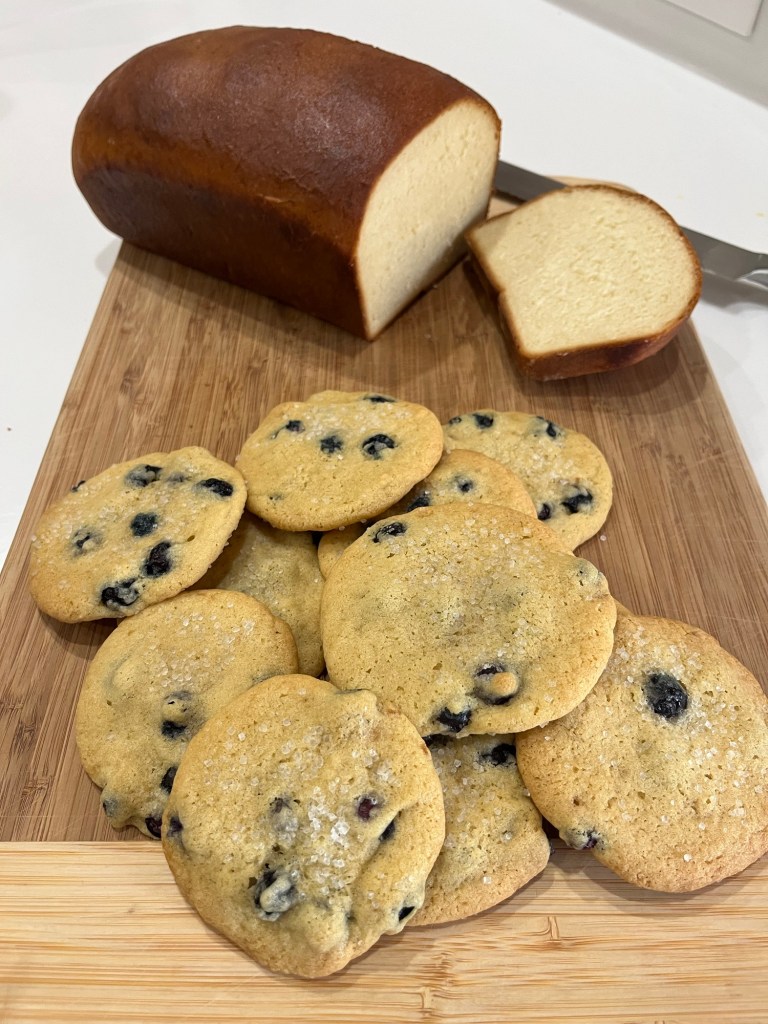
I had high hopes for this cookies, but there are barely a step above “meh.”
They are basically a chocolate chip cookies substituting blueberries for chocolate chip and really, who would want to do that?
They taste fine and have a good texture. Next time, I am making chocolate chip cookies.
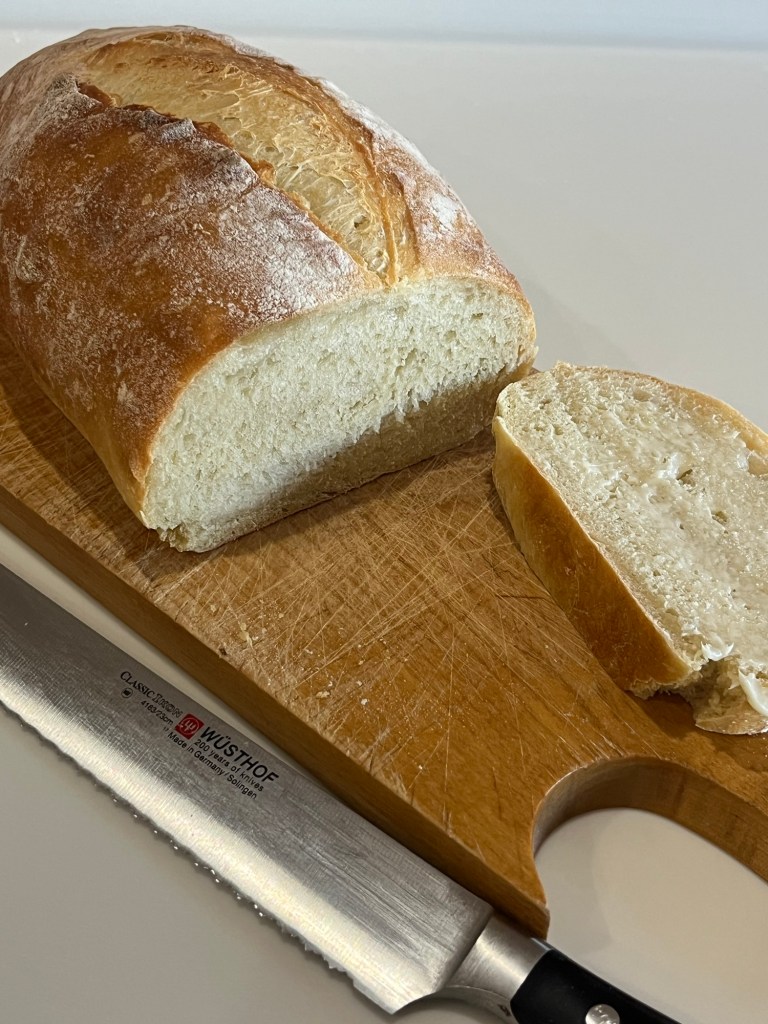
Oh yeah. As long as the oven was going to be on I made a loaf of sandwich bread too. It’s a much tighter crumb than my favorite bread (High Hydration No-knead Honey Bread) but this loaf is great for PB&J sandwiches.
While on our anniversary/baseball stadium journey we stopped by King Arthur Baking in Norwich Vermont. This is my second time at this wonderful store and THIS time, I controlled myself and left after spending less than $100. Whew!
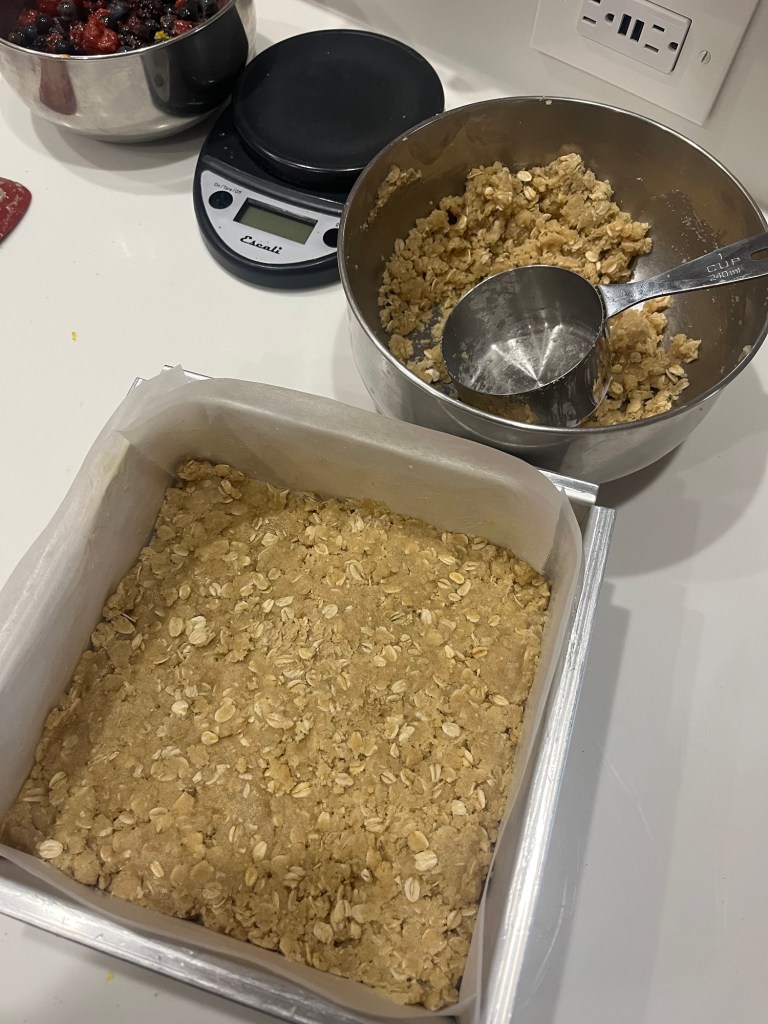
KAB sends me weekly recipes and I received this one while back east. I knew I had blackberries on the vine back home and couldn’t wait to give them a try. The wait was worth it!
Dough and filling ingredientsCrust pressed into baking panBerry mixture added to pan.
KAB calls these “easy” jam bars and they are not incorrect. (Deliberate use of the double negative.)
INGREDIENTS Dough • 2 1/4 cups (270g) King Arthur Unbleached All-Purpose Flour • 1 cup (89g) old-fashioned rolled oats* • 1/2 cup (106g) light brown sugar, packed • 1/4 cup (50g) granulated sugar • 1 1/4 teaspoons baking powder • heaping 1/2 teaspoon table salt • 15 tablespoons (212g) unsalted butter, melted • *Or substitute 1 cup (113g) King Arthur Rolled Oats.
Filling
1 pound (454g) blueberries, raspberries, and/or blackberries (try 2 cups blueberries, 1/2 cup blackberries, 1/2 cup raspberries)
1/2 cup (106g) light brown sugar, packed
3 tablespoons (23g) King Arthur Unbleached All-Purpose Flour
zest and juice from 1 lemon*
1/2 teaspoon cinnamon
pinch of table salt *Aim to use about 2 tablespoons (28g) of fresh juice from the lemon.
Topping
1 1/2 teaspoons granulated sugar
1/4 teaspoon cinnamon
METHOD
Preheat the oven to 375°F with a rack in the center. Line an 8″ pan with parchment on all sides, then lightly grease.
In a large bowl, whisk together all of the dough ingredients except the butter. Use your fingers or a spoon to break up any brown sugar lumps. Add the melted butter and stir until fully combined and smooth.
Transfer about 2/3 of the dough (roughly 2 2/3 cups or 485g) to the prepared pan and press into an even layer.
In another large bowl, gently mix together all of the filling ingredients until the berries are evenly coated. Transfer the fruit to the pan and distribute it into an even layer.
Crumble the remaining dough (about 1 1/3 cups or 240g) over the berries; squeeze the dough together to make bigger clumps or tease it apart for finer crumbles. (Even coverage is not important at this step.)
In a small bowl, combine the topping ingredients. Then sprinkle the cinnamon sugar evenly over the top of the bars.
Bake the jam bars for 50 to 55 minutes, covering the pan with foil if the top is browning too quickly, until the berries are bubbling and the topping is baked through.
Let the bars cool completely in the pan (or for at least 1 1/2 hours; if you’re really in a rush, you can stick them briefly in the refrigerator or freezer to expedite the process). As they cool, use a small offset spatula or knife to dislodge any jam from the sides to make removing them from the pan easier.
Remove the bars from the pan using the parchment as a sling, then slice and serve.
Store the sliced jam bars in an airtight container in the refrigerator for up to 4 days. They’re delightful cold.
Dede’s bakery opened early this morning. QC (Fran) loves the smell of fresh bread when she wakes. It had been a while since I made the hi-hydration honey bread, so… I also made some shortbread cookies which will be part of the decorations for a cake this weekend
I need to flood the cookies to finish them, but I have lots of time. I also need to practices some Italian buttercream as I had major issues the last time I made some.
I made two loaves in a steam oven without a Dutch ovenThese are traditional shortbread cookies w/o chocolate.
Both bakes were excellent and a good treat for elevensies.
Facebook is marvelous for keeping in touch with friends and family. With my browsing history it also displays some marvelous bakes. I
Facebook is incredibly bad at providing accurate, truthful news. Lucky, for me, the years I declined to read any of that, and when given the option selected “Show Less” of those posts. Hence, overall, my Facebook experience is marvelous.
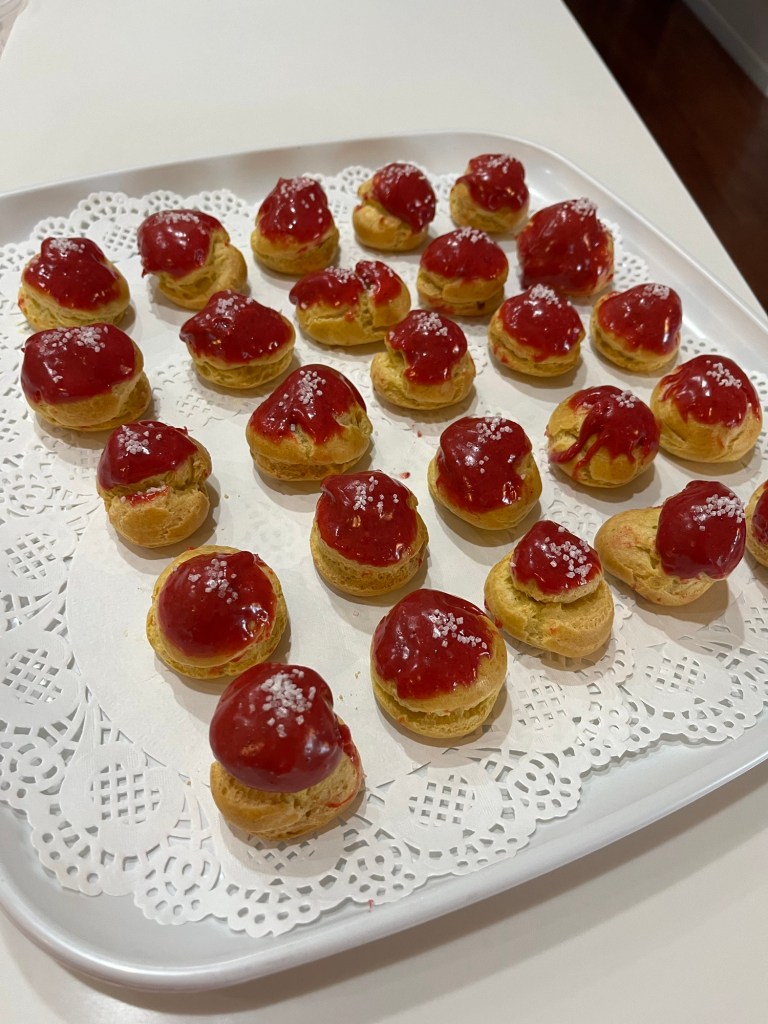
Hallongrottor, Swedish for “raspberry cave,”came to me on Facebook yesterday. Basically, it is a shortbread cookie with fresh raspberry jam baked in a well lined the center. What’s not to love? In America they are called “thumbprint cookies.” My name for them is “delicious.”
Hallongrottor Recipe
INGREDIENTS • 9 Tbl butter, softened • ⅓ c sugar • ¼ tsp salt • 1 tsp vanilla paste • 1 c flour • 3 Tbl potato starch • ½ tsp baking powder • ¼ – ½ c raspberry jam • Powdered sugar for garnish.
METHOD
With a rubber spatula, mix the butter and sugar in a mixing bowl until combined. Mix in the salt and vanilla paste. In a smaller bowl, whisk the flour, potato starch, and baking powder together. Add the flour mixture into the butter mixture and gently combine them until you have a soft dough.
Line a 12-cup cupcake tin with seven paper liners. Using a spoon or ice cream disher, divide the batter among seven cups. Only fill the cups about three-quarters full.
Using the handle of a wooden spoon or a wine cork, press a deep divot into each cookie. Fill the caves with raspberry jam. Pop the hallongrottor into the fridge for about 10 minutes while you preheat the oven to 350°F.
Bake for 15-20 minutes or until just a hint of color appears on the edges. Cool the hallongrottor completely on a wire cooling rack. Dust the tops with powdered sugar before serving.
For some unknown reason, or a moment of weakness, QC and I volunteered to help our community’s wine club with their July wine tasting event. Even worse, I offered to make brownies to pair with the dessert wine for each of the 168 attendees.
For practice (I always practice) I made an 11”x15” pan of brownies and cut them into one inch squares. (Do the math.)
To make them s’moresy I piped some Italian meringue on top, browned some with a blowtorch and topped some with a raspberry. The raspberry isn’t very s’moresy, but I like raspberries.
CHOCOLATE AND RASPBERRY BROWNIE BARS
INGREDIENTS
BROWNIES • 4 large eggs • 1 ¼ cups dark cocoa • 1 teaspoon salt • 1 teaspoon baking powder • 2 teaspoons vanilla extract • 2 ¼ cups sugar 1 cup • 1 cup unsalted butter, melted • 1 ½ cups All-Purpose Flour • 1 cup chocolate chips • 1 cup Raspberry Jammy Bits • 3 Tbl seedless raspberry jam • 1 tablespoon water ½ Tbl water CHOCOLATE GANACHE GLAZE • ½ cup heavy cream • ½tablespoons light corn syrup (20g) • 1 1/3 cups (200 g)) semisweet or bittersweet chocolate, chopped • ½ tablespoon vanilla extract
METHOD
Preheat the oven to 350°F. Lightly grease a 11″ x 15″ pan. To make very even bars, line the pan with aluminum foil before baking, leaving foil sticking up above the edges of the pan.
Crack the eggs into a bowl, and beat them with the cocoa, salt, baking powder, and vanilla until smooth.
Add the sugar and melted butter, stirring until smooth.
Add the flour, chips, and Jammy Bits, again stirring well. The batter will be very thick.
Spoon the batter into the prepared pan and smooth.
Bake the brownies for about 30 minutes, until a cake tester inserted into the center comes out clean (205 degrees,) or with just a few moist crumbs clinging to it. The brownies should feel set on the edges, and the center should look moist, but not uncooked. Do not over bake! Remove them from the oven.
Heat the seedless raspberry jam with the water and stir until smooth. (I use 2 tsp of apply jelly, mixed with 1 tsp water and heated to melt the jelly.) Brush over the warm brownies. Set aside to cool for an hour or longer before topping with the ganache.
To make the ganache, heat the cream and corn syrup until they begin to steam. Pour over the chopped chocolate in a bowl. Let sit for 5 minutes, add any flavorings, and whisk until smooth. Let cool for 15 minutes or so.
Pour ganache over the brownies while it’s still warm but has begun to thicken — reheat if it thickens too much as you work. Allow several hours for the ganache to set up fully. You may refrigerate the brownies to hasten the setting of the ganache.
Remove the brownies from the pan using the aluminum foil sling. Heat a knife in hot water, wipe dry and use to cut the brownies. Repeat with each cut.
Just before serving, garnish brownies with fresh raspberries and confectioners’ sugar, if desired.
ITALIAN MERINGUE
INGREDIENTS • 3 egg whites room temperature • 2/3 cup caster sugar • 1/4 cup water • 1/4 teaspoon cream of tartar
METHOD
Wipe down all tools with white vinegar.
Place sugar and water mixture over medium heat for 5 minutes. Do not stir it at all during this time. The mixture will look cloudy.
Gently stir the mixture for 1 minute. There should be little to no granules of sugar left at this point.
Once the mixture begins to bubble from the bottom, 3 to 5 minutes, place the digital thermometer in the pot and increase to medium-high heat. Do not stir it at all after this.
In the bowl of an electric mixer, whip the eggs whites on low speed until foamy. Add the cream of tartar, increase the speed to medium, and beat until soft peaks form.
Allow the sugar mixture to come to a boil and watch carefully. Once it reaches 230 °F turn stand mixer on highest speed to whip egg whites to peaks.
Once the sugar syrup reaches 240 °F, remove from heat and remove the probe. This takes about 4- 6 minutes. Allow the boiling to come to a slow bubble before moving on.
Slowly pour sugar syrup (steady stream) into whisked egg whites. Avoid the whisk attachment or it will fling your mixture all over the bowl.
Allow mixture to whisk for another 3-5 minutes until the mixer bowl is cool/room temperature to the touch..
Storing and Make Ahead Information:
Italian Meringue can be made ahead of time and stored in a piping bag or covered bowl, in the refrigerator covered for up to five days or at room temperature covered for up to three days.
I saw these somewhere and had to make them. Good tart and tasty after golf bake. Maybe use a graham cracker base next time.
Salted Margarita Bars
INGREDIENTS CRUST • ½ cup/113 grams unsalted butter (1 stick), melted, plus more for greasing the pan • About 40 saltine crackers (from one 4-ounce/113-gram sleeve) • 1 tablespoon granulated sugar • 1 teaspoon kosher salt FILLING • 2 teaspoons lime zest plus ½ cup juice (from about 4 limes) • ¼ cup tequila (preferably blanco) • 2 tablespoons orange liqueur, such as Grand Marnier • Pinch of kosher salt • 5 large egg yolks • 1 (14-ounce) can sweetened condensed milk • Flaky salt, for finishing
METHOD
Heat the oven to 350 degrees. Lightly grease a 9-inch square baking pan with butter. Line the buttered pan with parchment, leaving an overhang on two sides to help pull the bars out of the pan.
CRUST: In a food processor, pulse the saltines until ground like coarse sand. It’s OK if there are a few larger pieces. Add the melted butter, sugar and salt, and pulse a few more times until all the crumbs are evenly saturated. Pour the mixture into the lined pan, press into an even layer and freeze for about 15 minutes.
After the crust has chilled, bake it until fragrant and golden brown, about 15 to 18 minutes.
FILLING: As the crust is chilling, in a liquid measuring cup or small bowl, combine the lime zest, lime juice, tequila, orange liqueur and salt.
In a medium bowl whisk together the yolks and sweetened condensed milk. Add the tequila-lime mixture to the yolk mixture, whisk to combine, then pour into the prepared crust. (It’s OK if the crust is not yet completely cool.) You may be tempted to prepare the curd earlier, but don’t do so more than 10 minutes before baking, as the lime juice will start to thicken it, which could affect the bake.
Bake 15 to 17 minutes until the curd is set around the edges and slightly jiggly in the center.
Transfer to a rack to cool slightly, then freeze for at least 2 hours.
After freezing, remove the bars from the pan using the parchment paper overhang and transfer to a cutting board. Sprinkle with flaky salt, cut into 16 bars and serve right away. Store leftovers in the freezer. Cheers!
I am always pleased when asked to prepare some items for a party, large or small. Tonight is our annual temple baseball themed gala with an expected attendance of 100 people. I started this tradition in 2018, but missed a couple of years due to Covid etc.
Tonight Dede’ Bakery and Confectionary is serving chocolate/raspberry baseball field brownies, gluten free raspberry mousse tarts with baseball decorated cookies and key lime profiteroles with no baseball association whatsoever. (I just like them.)
GLUTEN FREE TARTS INGREDIENTS • 100 g cold butter cut into small cubes • 60 g icing sugar • 200 g Kim’s Bread flour blend • ½ tsp vanilla • ¼ tsp salt • 2 eggs – 1 for the dough and the other 1 reserved for an egg wash
METHOD
Mix dry Ingredients.
Lightly beat egg then add the melted butter.
Add wet to dry ingredients. Form into a dough ball.
Wrap the dough ball in plastic and refrigerate for 30 minutes.
Roll to a 1/8” thick sheet between two pieces of parchment paper or plastic.
Cut rounds of the dough about an inch larger than the tart pans
Gently press the dough circles into the tart pans pressing into any flutes
Patch any breaks with extra dough
Dock the bottom of the crust. Wrap and keep in freezer at least 30 minutes.
Pre-bake the tart crust 8 to 10 minutes in preheated oven at 350 deg.
Depending on recipe, you may want to protect the crust of the tart with foil
Cool to room temperature
Fill with raspberry mousse.
Top with a raspberry and white sugar cookies with red baseball seams.
Combine raspberries and 2 Tbl confectioners’ sugar in a small bowl and add to a food processor and pulse until berries are reduced
Sieve the mixture allowing enough time for most of the raspberry juice to drip into a bowl, (enough to make 200ml (2/3 c) puree)
Add 1 Tbl vanilla pudding, softened cream cheese and 1/4 cup sweetener, raspberry powder and ouzo and beat until well combined (3-4 minutes on high.) Mix in red food coloring in 2 or 3 aliquots until desired color is attained.
In a large bowl, whip the heavy cream, vanilla pudding mix and confectioners sugar.
Add red food coloring (in several small amounts until desired color is attained) and whip to firm peaks.
Fold the raspberry mixture into the whipped cream until combined. Divide the mousse among 6 dessert cups, cover, or fill a piping bag and chill until set, about 1 hour.
KIM’S GLUTEN FREE BREAD FLOUR BLEND Yield: 700g (5 c) INGREDIENTS • 285g Bob’s Red Mill potato starch • 250g superfine white rice flour (DON’T use regular rice flour, ie Bob’s Red Mill) • 75g Tapioca flour • 75g Whey protein isolate or egg white protein. • 15g Xanthan gum METHOD
Weigh all ingredients and add to a stand mixer bowl
Mix on low, with bowl covered for 30 seconds
CHOCOLATE AND RASPBERRY BROWNIE BARS I made a 1 ½ recipe and used an 11×15 pan.
INGREDIENTS Brownies • 4 large eggs • 1 ¼ c dark cocoa • 1 tsp salt • 1 tsp baking powder • 2 tsp vanilla extract • 2 ¼ c sugar • 1 c unsalted butter, melted • 1 ½ c All-Purpose Flour • 1 c chocolate chips • 1 c Raspberry Jammy Bits • 3 Tbl seedless raspberry jam • 1 Tbl water Chocolate Ganache Glaze • 1 Tbl cup heavy cream • 1 Tbl light corn syrup (20g) • 2 ⅔ c (400g) semisweet or bittersweet chocolate, chopped • 1 Tbl vanilla extract
METHOD
Preheat the oven to 350°F. Lightly grease a 9″ x 13″ pan. To make very even bars, line the pan with aluminum foil before baking, leaving foil sticking up above the edges of the pan.
Crack the 4 eggs into a bowl, and beat them with the cocoa, salt, baking powder, and vanilla until smooth.
Add the sugar and melted butter, stirring until smooth.
Add the flour, chips, and Jammy Bits, again stirring well. The batter will be very thick.
Spoon the batter into the prepared pan and smooth.
Bake the brownies for about 30 minutes, until a cake tester inserted into the center comes out clean (205 degrees,) or with just a few moist crumbs clinging to it. The brownies should feel set on the edges, and the center should look moist, but not uncooked. Do not over bake! Remove them from the oven.
Heat the seedless raspberry jam with the water and stir until smooth. (I use 2 tsp of apple jelly, mixed with 1 tsp water and heated to melt the jelly.) Brush over the warm brownies. Set aside to cool for an hour or longer before topping with the ganache.
To make the ganache, heat the cream and corn syrup until they begin to steam. Pour over the chopped chocolate in a bowl. Let sit for 5 minutes, add any flavorings, and whisk until smooth. Let cool for 15 minutes or so.
Pour ganache over the brownies while it’s still warm but has begun to thicken — reheat if it thickens too much as you work. Allow several hours for the ganache to set up fully. You may refrigerate the brownies to hasten the setting of the ganache.
Remove the brownies from the pan using the aluminum foil sling. Heat a knife in hot water, wipe dry and use to cut the brownies. Repeat with each cut.
KEY LIME PROFITEROLES INGREDIENTS Whipped Cream Key Lime Curd: • ½ c white sugar • 2 Tbl cornstarch • ¼ tsp kosher salt • 1 large egg, plus 2 large egg yolks • 2 tsp lime zest • ⅔ c key lime juice • ⅔ c sweetened condensed milk • 2 Tbl butter • ¾ c heavy whipping
Choux Pastry: • ½ c (65 grams) AP flour • ½ tsp granulated white sugar • ¼ tsp salt • 4 tbsp (55 grams) unsalted butter, cut into pieces • ½ c (120 ml) water • 2 large eggs, lightly beaten White Chocolate Raspberry Ganache • 150 g confectioner’s sugar • 50 g heavy cream • 1 Tbl freeze-dried raspberry powder • Red food coloring • Coarse decorating sugar
METHOD
Preheat oven to 400° F (200° C) and place rack in center of oven.
In a bowl whisk the flour with the sugar and salt.
Place the butter and water in a saucepan over medium high heat and bring to a boil.
Remove from heat and, with a wooden spoon, add the flour mixture, all at once, and stir until combined. It will look like mashed potatoes. Return saucepan to the heat and stir constantly until the dough comes away from the sides of the pan and forms a thick smooth ball (about 1-2 minutes). The dough will film the bottom and sides of the saucepan and make cleaning a pain.
Transfer the dough to an electric mixer and beat on low speed to release the steam from the dough (about 1 minute).
Once the dough is lukewarm start adding the lightly beaten eggs (dough will separate and then come together) and continue to mix until you have a smooth thick paste (dough will fall from a spoon in a thick ribbon).
Place the dough in a pastry bag fitted with a large plain tip and pipe oblongs of dough (about 3/4 inch (2 cm) wide) onto the parchment lined baking sheet. (When piping hold the bag at a 45-degree angle.) If desired, with a pastry brush, gently brush the tops of the dough with the lightly beaten egg.
Bake for 15 minutes and then reduce the oven temperature to 350o F (180o C).
Remove from oven, pierce an end of each éclair with a small skewer to release the interior steam.
Continue to bake for a further 25 minutes or until the shells are a nice amber color and when split, are almost dry inside. Remove from oven and place on a wire rack to cool.
Warm white chocolate to soften (30 seconds in a 1000W microwave)
Heat whipping cream to steam, but not boil and pour over the softened white chocolate
Let sit 3-4 minutes then add freeze dried raspberry, red food coloring and beat with a spoon until the mixture is smooth
After filling the profiteroles with the key lime curd dip the top into the warm ganache and sprinkle with decoration sugar. ROYAL ICING Makes ~3 cups of royal icing, (¼ recipe decorated 48 1” diameter cookies) INGREDIENTS • 4 cups (480g) confectioners’ sugar, sifted • 3 Tablespoons meringue powder (not plain egg white powder) • 9–10 Tablespoons room temperature water METHOD
Sift confectioners’ sugar and meringue powder, into a large bowl and add 9 Tablespoons of water. Add half the water after sifting 2 cups of sugar. Add the remaining water or more, checking flow consistency of the icing is what you want for piping etc.
Using a hand mixer or a stand mixer fitted with a whisk attachment, beat icing ingredients together on high speed for 1.5 – 2 minutes.
When lifting the whisk up off the icing, the icing should drizzle down and smooth out within 5-10 seconds. If it’s too thick, beat in more water 1 Tablespoon at a time. I usually need 10 Tablespoons but on particularly dry days, I use up to 12-14 Tablespoons. Keep in mind that the longer you beat the royal icing, the thicker it becomes. If your royal icing is too thin, just keep beating it to introduce more air OR you can add more confectioners’ sugar.
When applied to cookies or confections in a thin layer, icing completely dries in about 2 hours at room temperature. If icing consistency is too thin and runny, it will take longer to dry. If the icing is applied very thick on cookies, it will also take longer to dry. If you’re layering royal icing onto cookies for specific designs and need it to set quickly, place cookies in the refrigerator to help speed it up.
We are going to a gala at our temple next month and our administrator asked if I would make some desserts for the baseball themed event. At this point my providing pastries and other baked goods is more or less a tradition.
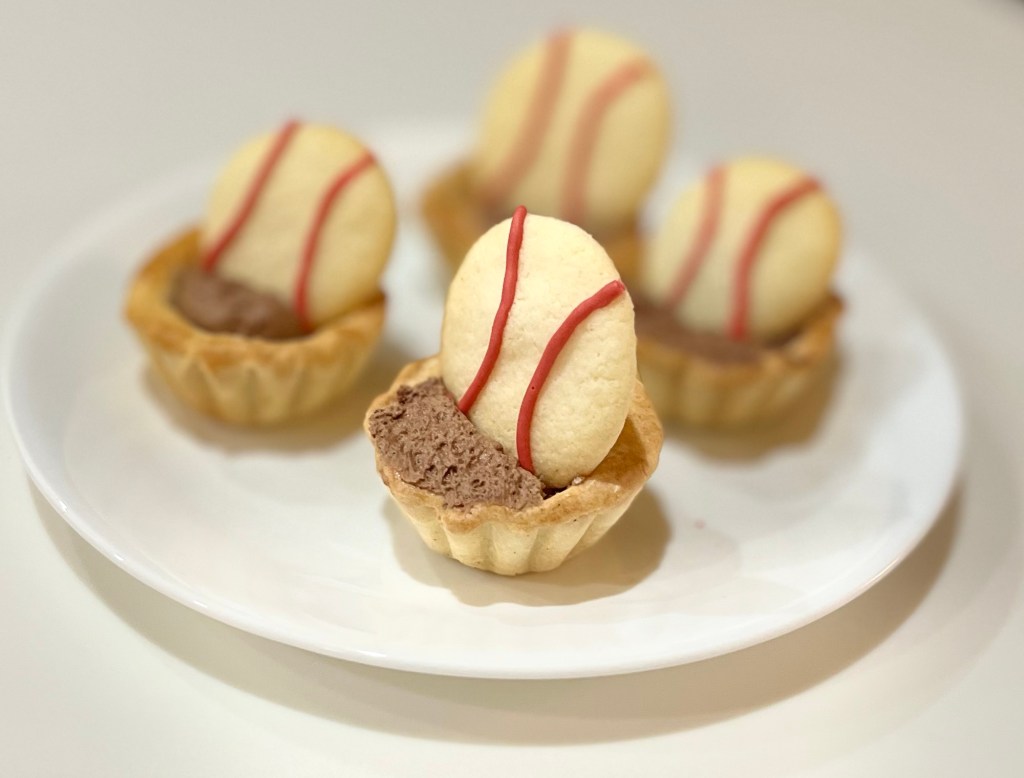
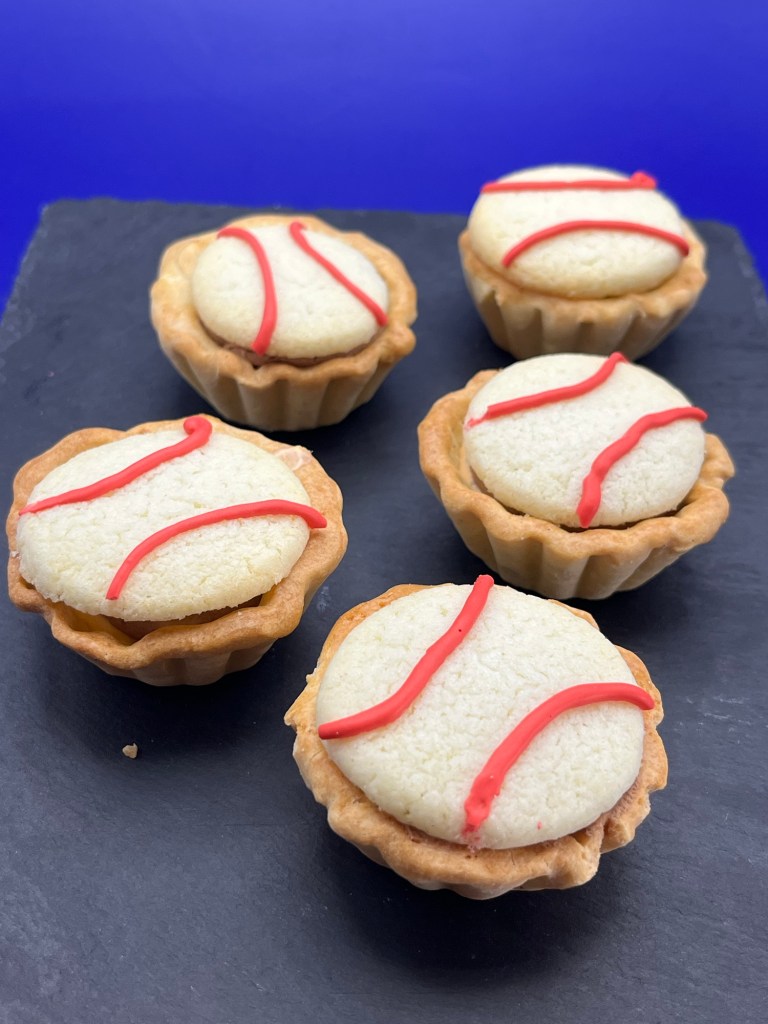
These tartlets are the first of three types of pastries I am making. In deference to a gluten intolerant friend these tartlets are gluten free, but you could not tell from the taste and texture. They are wonderful. (No brag, just fact, for anyone old enough to remember that TV line.)
For gluten free pastries I mix a specialty flour from an online baker named Kim. (Search Kim’s Artisan Bread Flour for more info.) It is an exceptional gluten free flour.
New design after QC’s brilliant suggestion!
A couple of weeks ago my uphill neighbors gave me a bag of oranges and I have been concocting ways of processing and returning them. These tartlets have a layer of fresh orange mousse, covered with a layer of dark chocolate mousse. The entire tartlet is topped with a gluten free sugar cookie striped with royal icing to give the impression of a baseball. Whew!
(If I tell you the cookie topping is supposed to be a baseball would that help?)
Key Lime Tartlets Using Kim’s Bread Flour
INGREDIENTS • 100 g cold butter cut into small cubes • 60 g icing sugar • 200 g Kim’s Bread flour • ½ tsp vanilla • ¼ tsp salt • 2 eggs – 1 for the dough and the other 1 reserved for an egg wash
METHOD
Mix butter with sugar until well incorporated 3-5 min
Add salt then vanilla.
Add egg and mix 3-5 min
Stir in flour. Mix by hand until incorporated and forms a thick smooth(ish) sticky dough
Cover with plastic and refrigerate for 30 min.
Butter or lightly spray tartlet pans or use non-stick pans.
Roll dough between parchment paper to about ⅛” thick
Refrigerate rolled dough still between parchment paper until firm: 20 – 30 minutes
Remove from fridge and while still firm, cut dough to rounds about 1” larger diameter than the mold. Cut all the rounds at once while still firm. If necessary, return to the fridge to firm up. Again, if necessary, use an offset spatula to remove the circles from the parchment paper. Keep the spatula clean.
Lay tart dough circles over molds. This allows the dough to thaw slightly, then gently press into the molds and fill all crevices.
Pre-heat oven to 350 degrees
Return to fridge for 15 – 20 min to firm up the shell
Prick holes in bottom of formed dough
Place a mini cupcake paper in each tart and fill with with pastry weights (or beans)
Paint edges of the tartlet with an egg-white wash. (Whisk one egg white with 1 Tbl water)
Bake in preheated oven 350 deg F (175 C) for 8 min until edges are dry
Remove pastry weights and bake an additional 4-6 minutes to dry the bottoms. Bake until the edges begin to turn light brown and the bottom is nearly dry. (I find it easier to dump the weights into a bowl then remove the cupcake papers.)
Immediately remove from pans and cool on a wire rack
Dark Chocolate Mousse
INGREDIENTS • ½ c chopped chocolate (72 percent) • 1 c heavy cream • 4 large egg yolks • ⅓ c sugar • Whipped cream, for serving • Chocolate shavings, for garnish
METHOD
Melt the chocolate in a bowl over a water bath, making sure the water is not boiling. Set aside.
In a separate bowl, whip the heavy cream to soft peaks.
Place the egg yolks in a small bowl and set over the same water bath to slightly heat while beating them with a whisk.
Add the sugar to the yolks and then transfer the mixture to a stand mixer set up with the whisk attachment. Beat until the sugar is completely dissolved and the yolks double in size, about 5 minutes.
Carefully fold the chocolate into the yolks.
Lastly, fold in the whipped cream.
Store the mousse in an unopened piping bag until ready to fill the tartlets.
When ready to assemble the tartlets pipe about ¼” of chocolate mousse on top of the orange mousse. Store in a refrigerator to keep cold.
Orange Mousse
INGREDIENTS • ½ c orange juice • ¼ c plus 1 tablespoons sugar • 1/8 tsp salt • 2 egg yolks • 2 tbl unsalted butter, at room temperature • ¼ tsp orange zest (from ¼ orange) • ½ c heavy cream • ¼ tsp vanilla extract • Orange gel food coloring (optional)
METHOD
In a small saucepan set over medium heat, bring the orange juice to a boil and cook until reduced by half, about 4 minutes.
Meanwhile in a small bowl, whisk together 1/4 cup of the sugar, the salt and yolks until smooth. Whisking constantly, add half of the reduced orange juice to the yolk mixture to temper.
When it is all incorporated, return the tempered yolk mixture to the pan. Cook over low heat, stirring constantly with a rubber spatula to prevent the eggs from scrambling, until thick enough to coat the back of a spoon, about 7 minutes.
Strain the mixture into a clean bowl and whisk in the butter, 1 tablespoon at a time, and the zest. Place a piece of plastic wrap directly on the surface of the mixture and refrigerate until chilled through, at least 5 hours.
Pour the heavy cream into a medium bowl and add the vanilla and the remaining tablespoon sugar. Using an electric mixer, beat the cream on medium speed just until stiff peaks form, 2 to 3 minutes, being careful avoid over-beating.
Using a rubber spatula, gently fold half of the whipped cream into the chilled orange mixture. Pour that mixture into the remaining whipped cream and continue to fold until completely incorporated.
Transfer the mixture to an unopened piping bag, close the end and refrigerate until ready to use.
When ready to assemble the tartlets pipe about ¼” of orange mousse into the bottom of refrigerated tartlet shells. Store in a refrigerator to keep cold.
Kim’s Gluten Free Bread Flour Blend
Yield: 700g (5 c) INGREDIENTS
285g Bob’s Red Mill potato starch
250g superfine white rice flour (DON’T use regular rice flour, ie Bob’s Red Mill)
75g Tapioca flour
75g Whey protein isolate or egg white protein.
15g Xanthan gum
METHOD
Mix all ingredients, place in an air tight container and shake well to mix everything together.
I saw an article rating (in the author’s opinion) the best chocolate chip cookie recipes and this was #1. It’s actually a toffee/chocolate chip cookie, but with the seriously heavy density of chocolate I felt it really deserved to be in this category.
These cookies require significantly more work and time than a “standard” cookie, but if you are looking for something outside the norm give these a try.
I followed the directions on the first browned butter try. After they went up in a cloud of not very pleasant burnt sugar, I “binned” them. (Binned is a GBBO term.) In the second attempt, I lowered the heat from medium high to low. I realize these terms are relative and individual results may vary.
The resultant cookies were about 3” diameter and a good thickness. The texture was excellent and the predominant flavor was chocolate with overtones of brown sugar and toffee. Were they the “best ever”? I guess I will have to keep trying.
Below is the modified recipe.
Browned Butter Toffee Chocolate Chip Cookies
INGREDIENTS • 2 sticks (227 g) unsalted butter • ½ (100 g) cup granulated sugar • 1 cup (200 g) lightly packed dark brown sugar • 1 ½ cups (190 g) all-purpose flour • 1 cup (127 g) bread flour • 1 tsp baking soda • 1 tsp fine sea salt • 1 tsp instant espresso powder, optional • ½ tsp baking powder • 2 large eggs plus 1 egg yolk, at room temperature • 2 tsp vanilla • 10 ounces (283 grams) semisweet chocolate, chopped • 1 cup toffee bits, homemade or Heath • Flaky sea salt, for finishing
METHOD
In a medium stainless pan set over low heat, melt the butter. Swirling the pan occasionally, it should become foamy as the water boils off. Once the mixture quiets, stir until the butter develops a nutty aroma and brown bits start to form at the bottom. When the bits turn amber, immediately remove from heat and pour into the bowl of a stand mixer or it will burn. Be sure to include the brown bits at the bottom of the pan.
Add the granulated sugar and brown sugar to the hot butter, stirring to combine. Set aside to cool to room temperature.
In a medium bowl, combine the flours, baking soda, salt, espresso powder, and baking powder.
Whisk in the eggs, yolk, and vanilla into the cooled butter mixture until combined. Gradually stir in the flour mixture with a rubber spatula. Stir in the chocolate chunks and toffee bits. Wrap dough in plastic wrap and refrigerate for at least 24 hours but no more than 72 hours.
Let dough sit at room temperature just until it is soft enough to scoop, about 1 hour. (In my kitchen the block of dough was still too hard to scoop so I used a knife to cut the dough into 50g portions, rolled them into balls with my hands and placed on a parchment lined baking sheet.)
Preheat the oven to 350ºF. Line baking sheets with parchment paper.
At this point, you can portion the dough, place it on a baking sheet, and freeze just until solid. Remove frozen balls of dough to an airtight container and store for up to 6 weeks.
Bake for 10 – 12 minutes, or until golden brown. Remove from oven and sprinkle flaky sea salt on top of the cookies, if desired. Let cookies cool for 2 minutes before removing to wire racks to cool completely.
Store in an airtight container at room temperature for up to 3 days.
Homemade Toffee Bits
INGREDIENTS • 1 stick (113 grams) unsalted American butter • 1 cup (200 grams) light brown sugar • 1 teaspoon fine salt
METHOD
Line a small rimmed baking sheet with parchment paper or a silicone baking mat.
In a heavy-bottomed small saucepan, melt the butter over medium heat. Add the sugar and salt and whisk vigorously for one minute until combined. Cook, stirring constantly, until the mixture looks like melted peanut butter and a candy thermometer reaches 295 to 305°F, about 10 minutes.
If the mixture separates at all, remove from heat and whisk vigorously until recombined. Return to heat and continue cooking.
Immediately and carefully pour the hot toffee onto the prepared baking pan, allowing it to spread into an even layer. Let cool and harden for about 20 minutes.
Place the sheet of toffee on a cutting board or in a zip top bag. Use a mallet, rolling pin, or heavy object to crack it into small pieces. You can also cut into bits with a sharp serrated knife. Store in an airtight container for up to 1 week.