This is the second Gathering of the immediate neighbors, plus a few others who comprise the QC Cadre. The Quality Control Cadre taste and review my bakes on a regular basis. This Gathering was offered both savory and sweet selections.
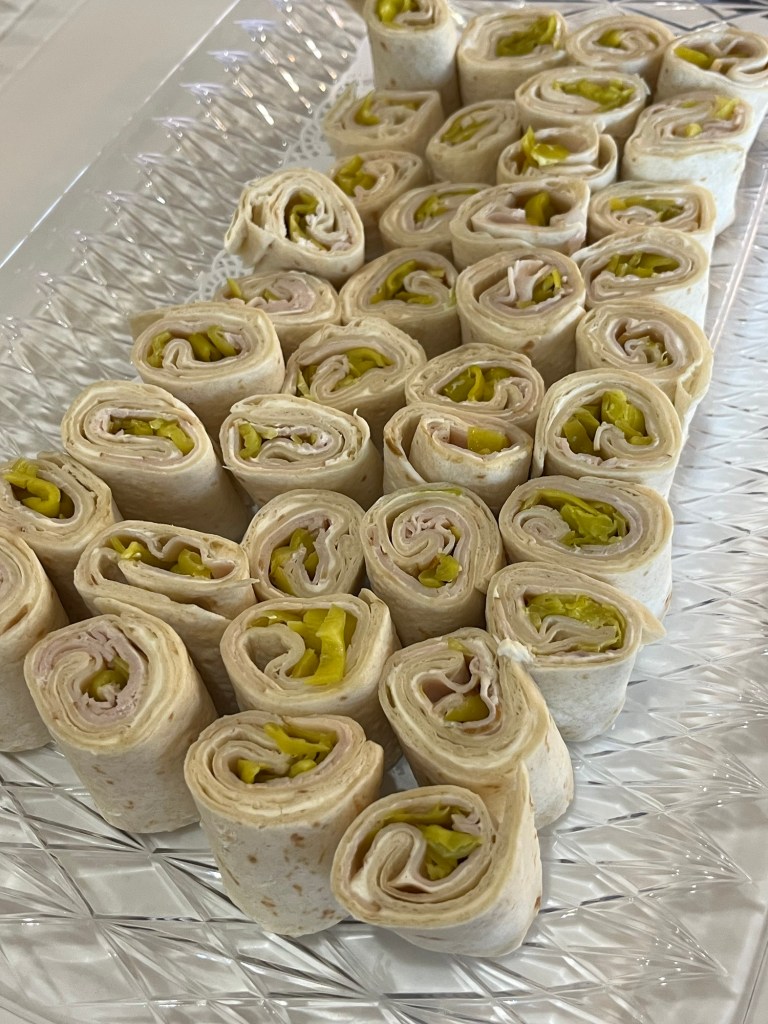
Pain de CristalPain de Cristal with oil and vinegar Turkey Peperocini wrapsBruschettaCaprese BitesOrange Flavored Shortbread Cookies with Chocolate and Crushed MacadamiasMini Key Lime PiesLots of Drinks with Ilayne’s Punch as the StarDecimated Offerings
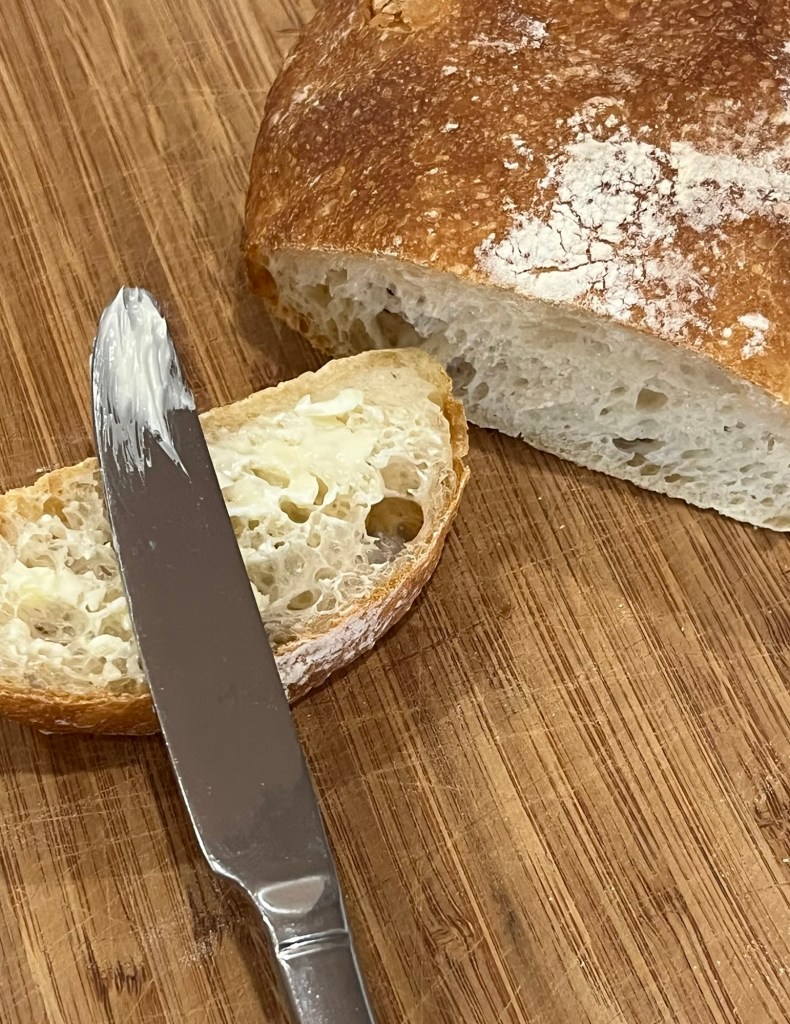
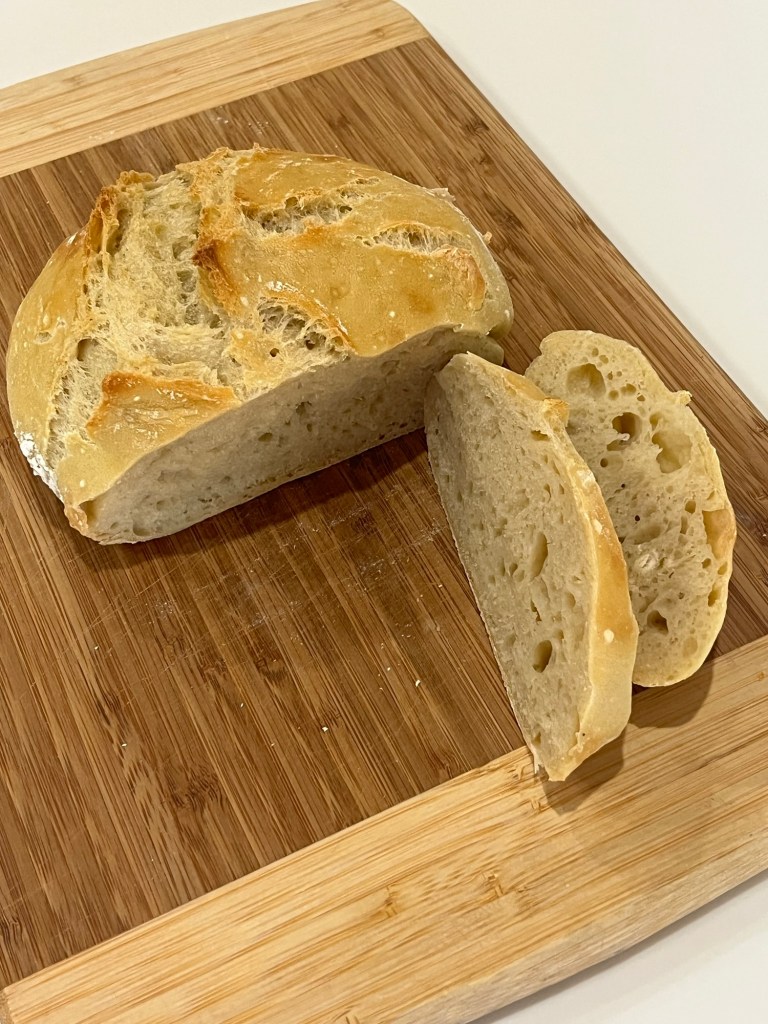
Thanks to my semester of college German (barely passed) and Google Translate, I knew this would be a crusty bread. I saw this recipe and method in YouTube and decided to give it a try. It’s not terribly different from other breads I make, but did you and overnight room temperature proof (12-18 hours) to develop flavor and structure.
This morning it was evident the dough over proofed during the night. I could see on the bowl how high the dough rose on the glass and was down ~20% this morning. I shaped it and let it sit for 30 minutes as the oven pre-heated, hoping it would recover.
I baked it as directed and it did exhibit some oven spring and resulted in a nice, small flavorful loaf, but was wet, dense, and disappointing. Some possible remedies would be to use much less yeast (1/2 – 1/4 teaspoon,) or refrigerate the proofing overnight. Either should retard the proof and make the 12 hours not over proof the dough.
I have another recipe that the author claimed she learned from an Italian restaurant bake and will give that one a try next week. I have other fish to fry… or rather bakes to bake before then.
INGREDIENTS • 390 g (3 c) AP flour • 5 g (1½ tsp) active dry yeast • 360 g (1½ c) warm water • 6 g (1 tsp) salt • extra flour for dusting
METHOD
Mix the first four ingredients together in a large bowl with a Danish whisk. The dough will be sticky and look a mess!
Cover bowl tightly with plastic wrap and rest it on the counter (at room temperature) for at least 12 hours and up to 18 hours. The dough will rise and the top will be bubbly and sticky.
Cut a piece of parchment paper to fit inside of Dutch oven. Place paper on counter and sprinkle lightly with flour.
Lightly sprinkle flour on counter. Gently put the dough on it. Sprinkle a bit of flour on top pat into a rough rectangle and fold the dough over on itself twice, shaping it into an elongated ball.
Gently place onto parchment paper. Cover with a large bowl that doesn’t touch the dough.
Preheat the oven to 450°F (230°C) and put your Dutch oven into the oven to heat for about 30 minutes.
Slash the top of the dough with a sharp knife or lame blade.
Remove preheated Dutch oven and, using oven mitts, gently lift parchment paper with dough into it and cover with lid. Return to oven.
Bake at 450°F for 30 minutes. Remove lid and continue baking for another 15 minutes or until bread is golden brown.
Remove to a cooling rack and let cool for about 1 hour before slicing.
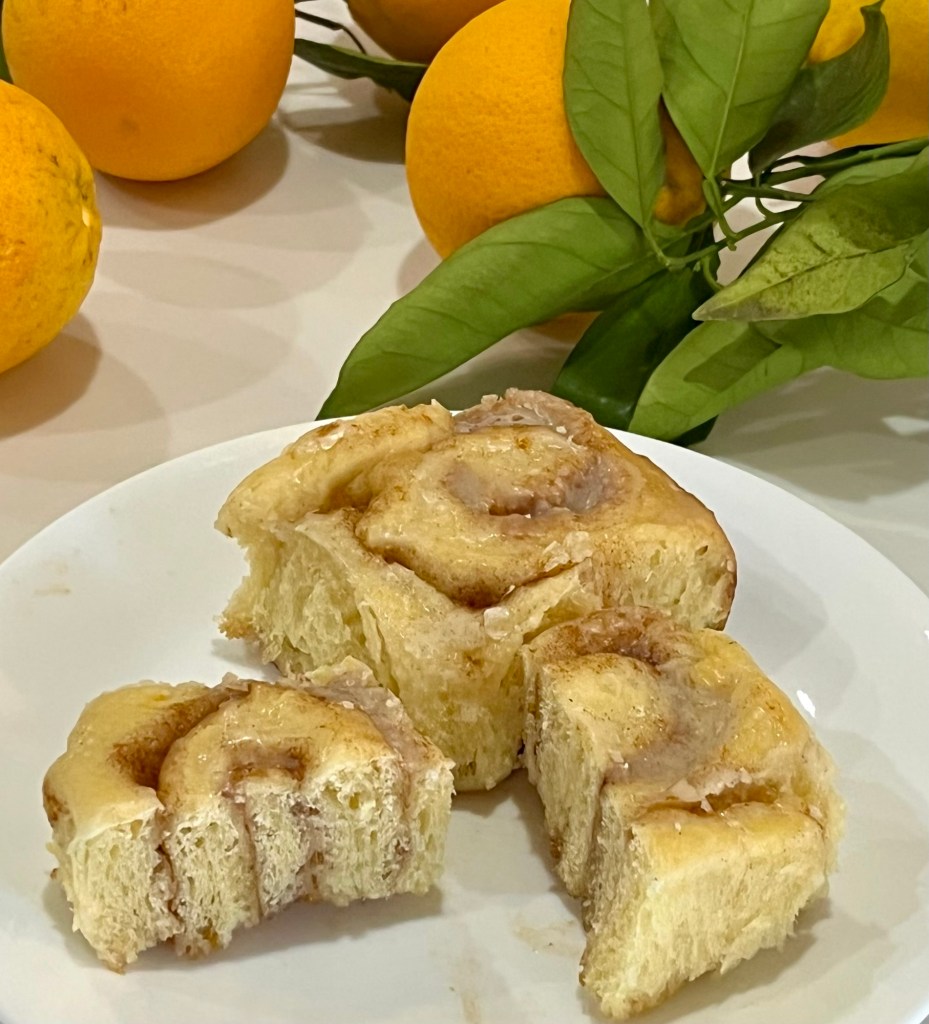
This month’s challenge was to make a Cinnamon Swirl Cheesecake or alternatively an Orange Sweet Roll (which was my entry choice.) While cheesecake is fine, no one bakes one better than my son Dan who makes two for every New Years.
My only comment on Sally’s method is I think chilling the rolled dough for an hour before slicing would make the cutting easier and would not deform the shape.
The taste and texture were outstanding (a word I use too frequently, but is typically appropriate.)
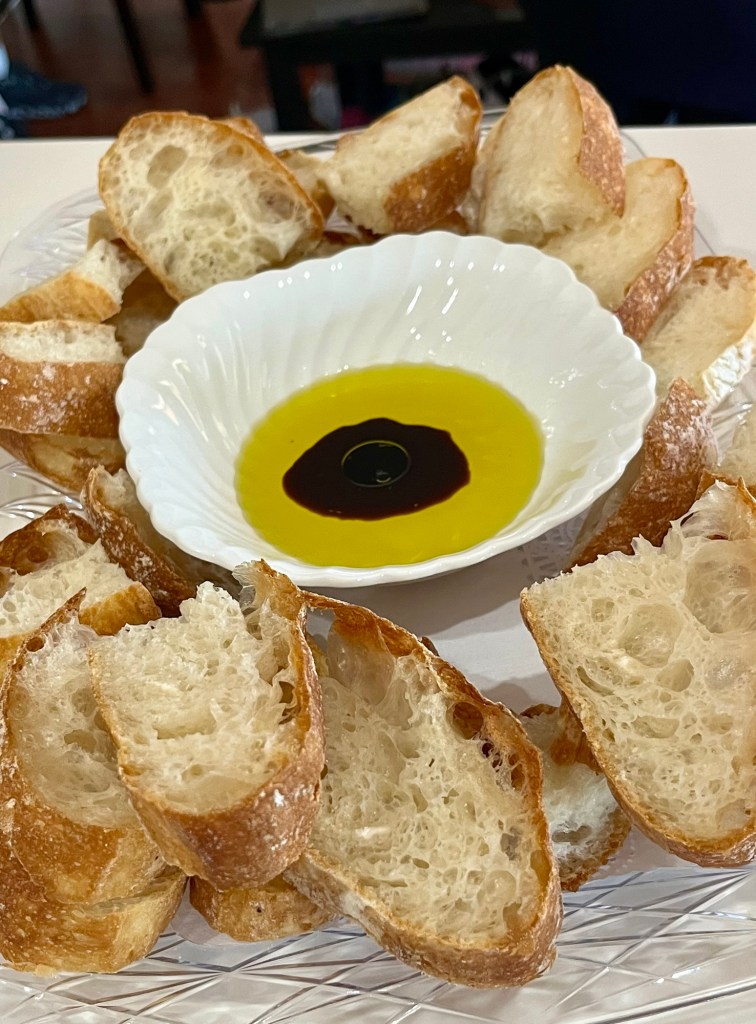
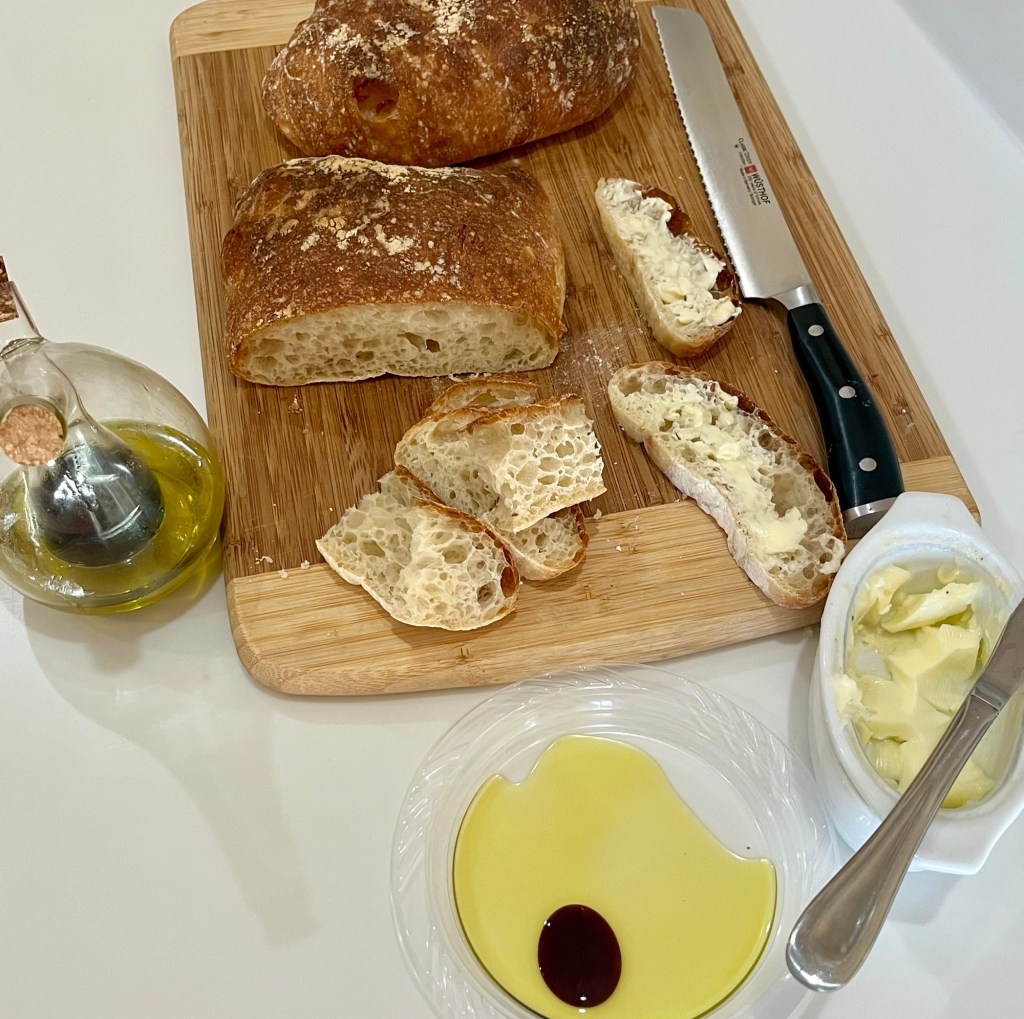
Without doubt my favorite bread, but it is a pain to make (heh, heh.) This bread takes about 7 hours, start to finish, with hands on about every 20 minutes for the first 5 hours, but it’s so worth every minute.
Pain de Cristal is “Glass Bread” developed in the Catalan region of Spain. It has a crispy thin crust that fractures like glass. The interior has large air pockets and an amazingly light, soft, chewy crumb, perfect to dipping in oil and vinegar. This is another addition to our QC Cadre Gathering, and may be my best bake of this bread ever!
It’s a 100% hydration bread, meaning equal parts water and flour. Initially, it looks like pancake batter, but after a few folds and coils begins to exhibit some structure. It is alway fragile so a tender touch is required to may this tender bread.
Pre-bake with large bubblesPost-bakedFinal, with oil and vinegar or butter.
Pain de Cristal
INGREDIENTS • 500g water (80 F in warm weather, 100F if cold) • 500g Bread Flour • 3 g (1 tsp) instant yeast • 10g salt • 15g olive oil (for the casserole pan)
METHOD This is KAB’s method
To make the dough: Weigh your flour.
In a medium bowl, mix the water, flour, yeast, and salt until thoroughly combined and homogenous. Note: The dough starts off very slack and wet and resembles pancake batter. It will transform itself through time and folds.
Oil a two-quart rectangular baking dish, or casserole pan, (10” x 7”) with the olive oil. The sides should be greater than 1.5” high.
Pour the dough into the pan. Check the dough’s temperature by inserting a digital thermometer into the center. If it’s less than 72°F, move the pan to a warmer spot, e.g., your oven with the light turned on. The dough MUST ferment at a constant 72-78 F.
Cover the pan and allow the dough to rest for 20 minutes. (Elapsed time: 30 minutes)
Start with a bowl fold: Use your wet hands to grab a section of dough from one side, lift it up, then press it down into the middle. Repeat 8 to 12 times going around the periphery of the baking dish 2 or 3 times.
Cover the dish and allow the dough to rest for 20 minutes. (Elapsed time: 70 minutes)
Next do a coil fold: With wet hands, reach under the dough and stretch the middle upward until the dough releases from the dish. Roll it forward off your hands, allowing it to fold over (or “coil”) on itself. Rotate the dish 90 degrees (a quarter turn) and repeat. Continue performing this folding action until the dough will stretch and elongate easily, usually four to five times initially.
Cover the pan and allow the dough to rest for 20 minutes. (Elapsed time: 90 minutes)
Repeat the coil fold: Note: Do coil folds three more times, covering each time, to build strength and developing the dough. (60 more minutes.) (Elapsed time: 150 minutes)
At this point, the dough should be easier to handle and feel tighter. Repeat the coil fold using only two or three folds this time. Cover the bowl and allow the dough to rest for 20 minutes. (Elapsed time: 170 minutes)
Repeat the coil fold one last time, (5th coil fold) using only one or two folds if the dough is relatively strong and large bubbles should have formed. Transfer the dough to a larger, oil coated dish, cover the dish and allow the dough to rest for about 80 minutes. It should about triple in size. (After this rest 4 hours 10 minutes should have elapsed.)
Divide the dough: Coat the top of the dough with flour. Use a bowl scraper to gently release the dough from the sides of the pan.
As gently as possible, turn the dough out onto a heavily floured surface, keeping the rectangle or square shape – be careful not to deflate the delicate dough. Sprinkle a generous amount of flour on top of the dough, leaving no exposed sticky spots. a. For four small loaves: Working as gently as possible, use a bench knife or other sharp knife to divide it into four pieces. Gently place two pieces on a piece of parchment, leaving space between them. b. For two long loaves: lay two pieces of parchment paper, overlapping 2”. Carefully divide the dough in half lengthwise. Using a bench knife carefully slide some flour under each loaf and shape into regular rectangles. As gently as possible slide the loaves onto separate pieces of parchment paper. (Elapsed time: 5 hours) c. Allow the loaves to rest at room temperature for 1 hour, uncovered until large bubbles appear on the sides and surface. While the loaves are resting, preheat the oven to 475°F with a baking stone on a lower rack. The loaves are ready for the oven when there are a few large bubbles on the surface of each loaf, and they feel light and airy. (Elapsed time: 6 hours)
To bake the bread: Carefully slide the two loaves (still resting on the parchment) into the oven onto the preheated stone or steel. If space is tight and the full sheet of parchment won’t fit on the stone or steel, cut the parchment between the two loaves and arrange them as best you can. Allow the other two loaves to continue to rest. a. Bake the loaves for 15 minutes, then transfer them, from the stone or steel, directly onto a rack in the upper third of the oven for an additional 13 to 15 minutes. Moving them allows the baking stone or steel to become hot again in preparation for the next two loaves. After a total of 30 minutes of baking, remove the loaves from the oven and allow them to cool on a rack. (Elapsed time: 6 ½ hours)
Repeat the process with the two remaining loaves or loaf. Cool the bread fully before slicing.
Storage information: Wrap the bread loosely and store it at room temperature for up to several days; freeze for longer storage.
It’s nearly time for another QC Cadre gathering. We welcomed new neighbors last month and will introduce them to the Cadre in a couple of weeks. The menu is under development and practice bakes are underway.
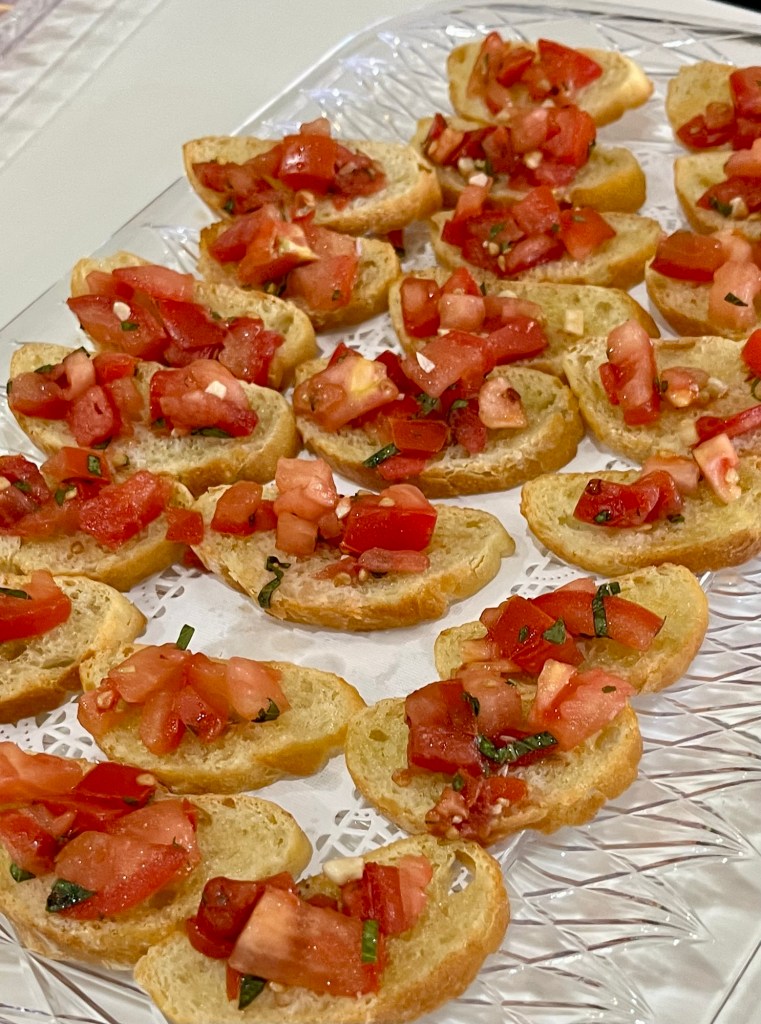
Yesterday I made baguettes in anticipation of today’s bruschetta. I made baguettes several times in the past, but none recently. (They came out great this time too.)
This morning I made the marinated tomato topping (along with an artisan bread for sandwiches etc.) It was delicious. Next time I will chop the browned garlic. I changed the recipe to reflect this alteration.
Classic Bruschetta
INGREDIENTS FOR THE TOMATOES • 2 Tbl extra-virgin olive oil • 1 clove garlic, thinly sliced • 2 large tomatoes, diced • 1/8 c. (2 Tbl) thinly sliced basil • 1 Tbl balsamic vinegar • ½ tsp kosher salt • Pinch of crushed red pepper flakes
FOR THE BREAD • ½ large baguette, sliced ¼” thick on the bias • Extra-virgin olive oil, for brushing • 1 clove garlic, halved
METHOD
Preheat oven to 400°.
In a medium skillet over medium-low heat, heat oil. Add garlic and cook until lightly golden, 2 to 4 minutes, then remove from heat and let cool, then chopped.
In a large bowl, toss together tomatoes, basil, vinegar, salt, and red pepper flakes. Add garlic and oil and toss to combine. Let marinate for 30 minutes.
Meanwhile, toast bread: Brush bread on both sides lightly with oil and place on large baking sheet. Toast bread until golden, 10 to 15 minutes, turning halfway through. Let bread cool for 5 minutes, then rub tops of bread with halved garlic cloves.
Spoon tomatoes on top of bread just before serving.
Daniels recipe: fresh basil and tomatoes, olive oil, salt, good quality balsamic, toasted baguette with olive oil, topped with fresh Parmesan
QC and I rarely have desserts out, but last week it was included in our meal, so what’s a person to do? We had “pizookies” at BJ’s and I instantly thought: “You know, this could be even better if….”
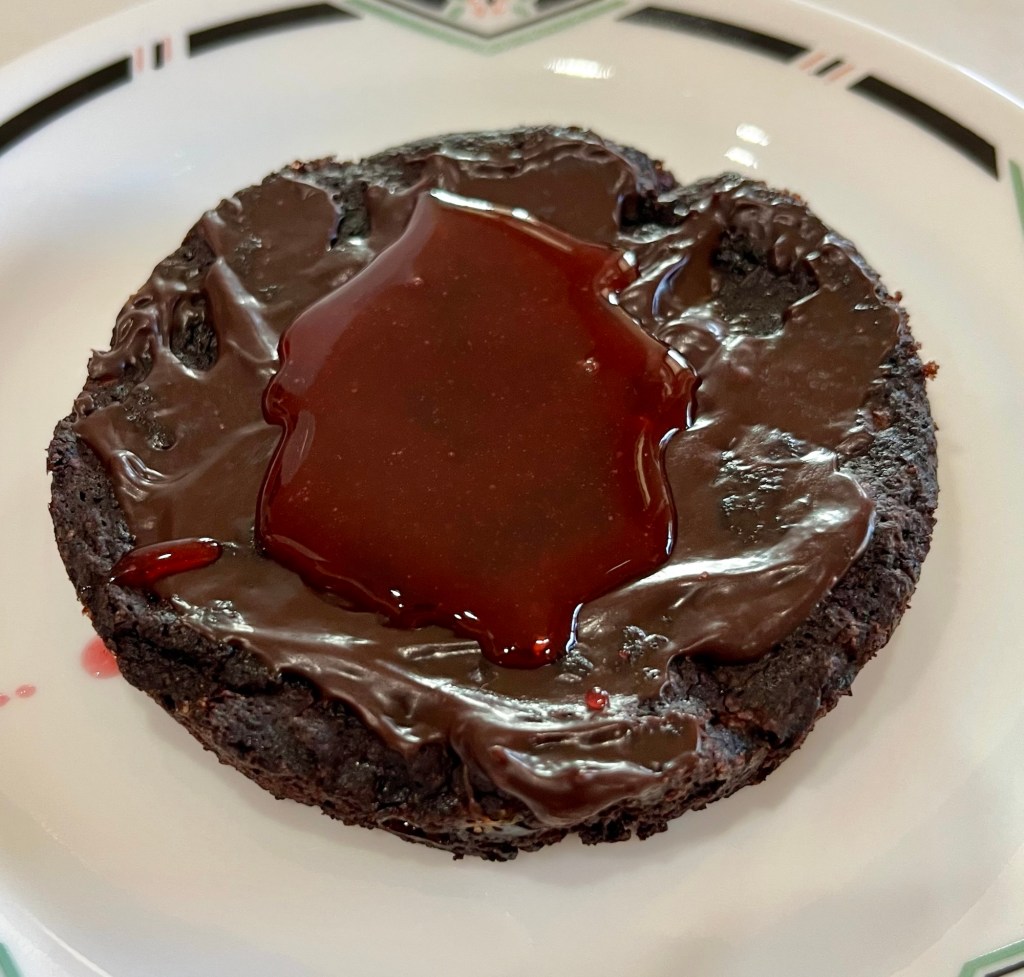
I made my chocolate and raspberry brownie tart free standing, not in a tin. I also add raspberry Jammie bits to the batter, raspberry coulis and whole raspberries because, as you might guess, I like raspberries.
The amount of raspberry stood up to the otherwise overwhelming dominant chocolate. I also made the hot fudge, caramel sauce and coulis.
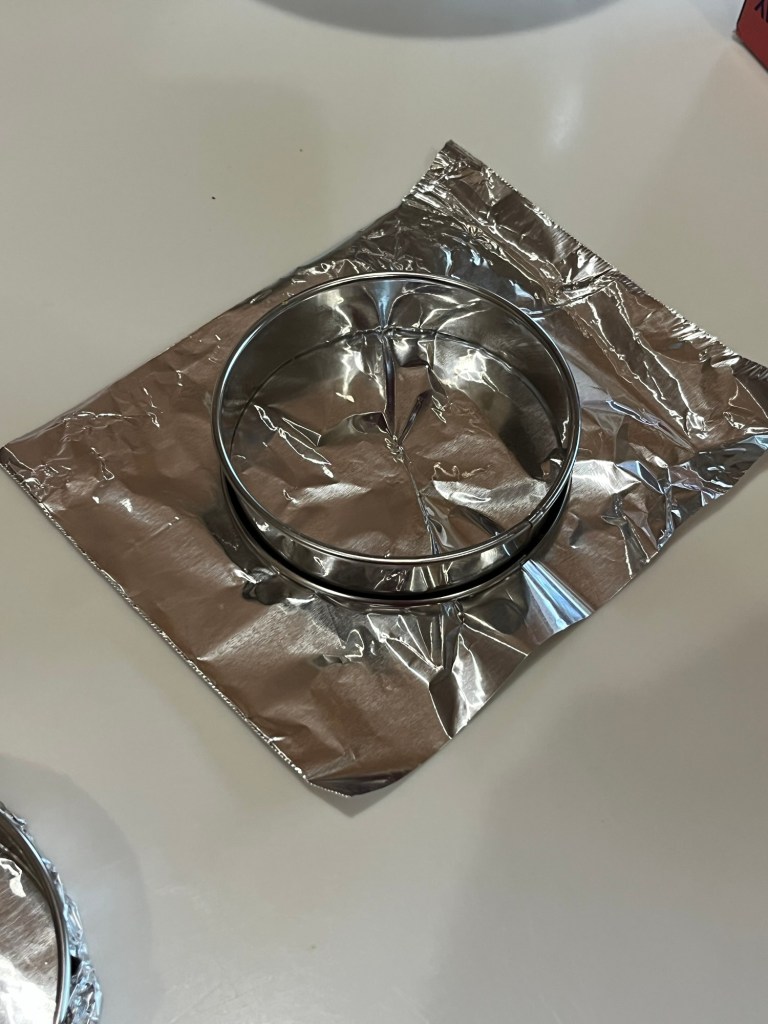
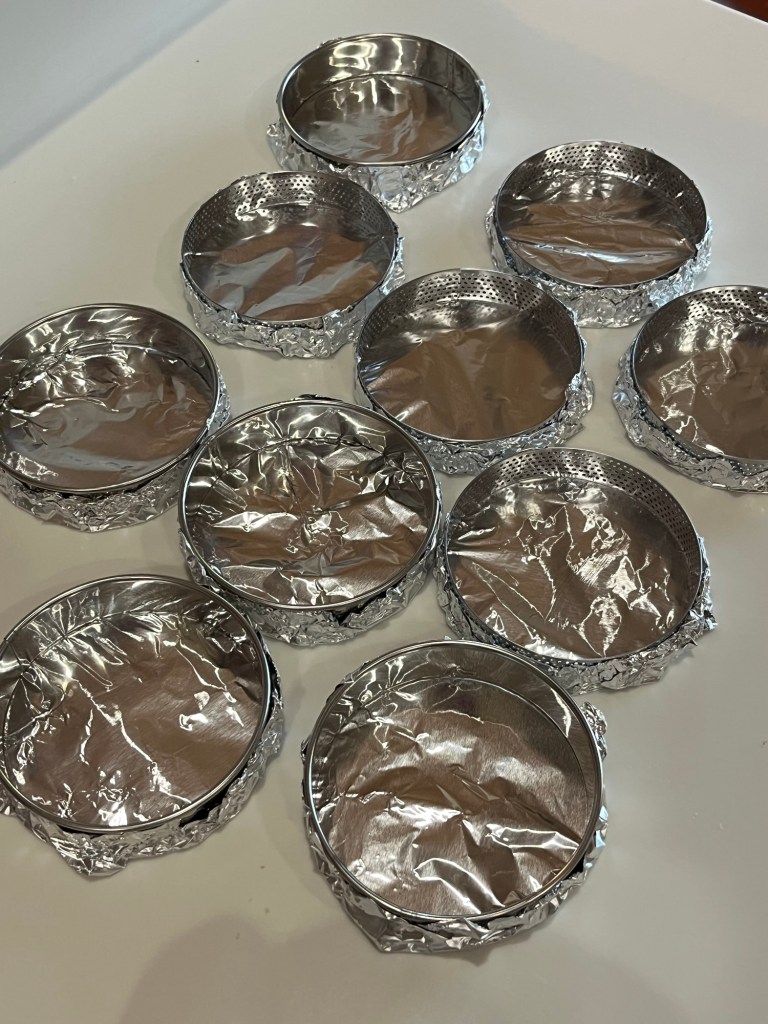
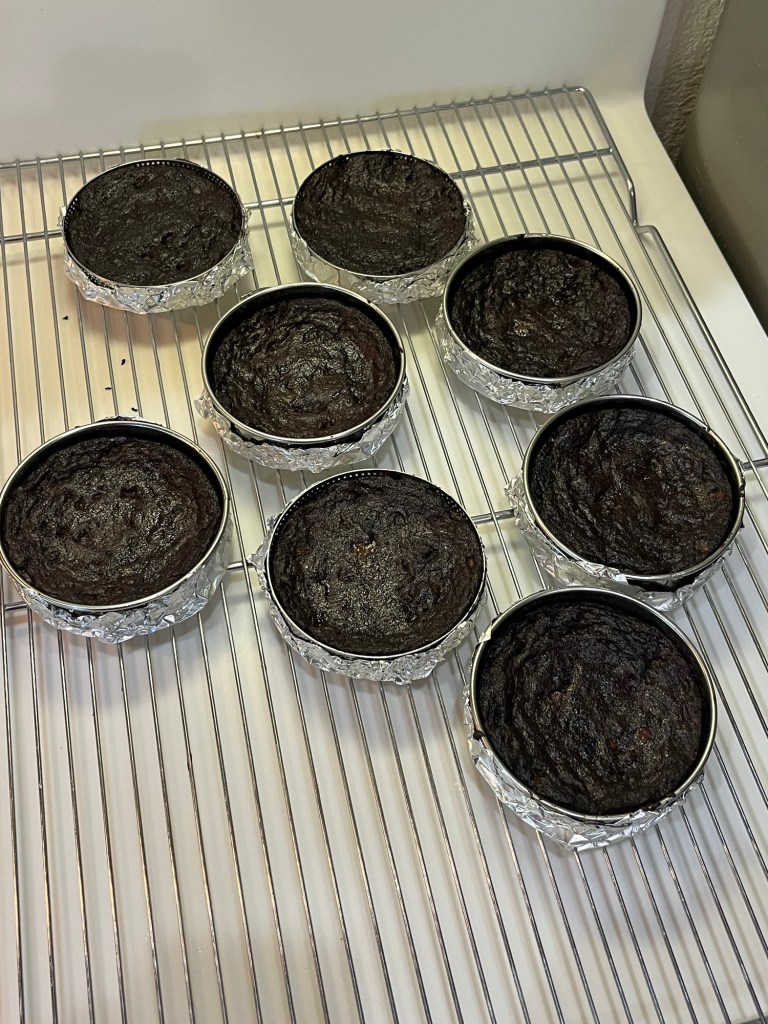
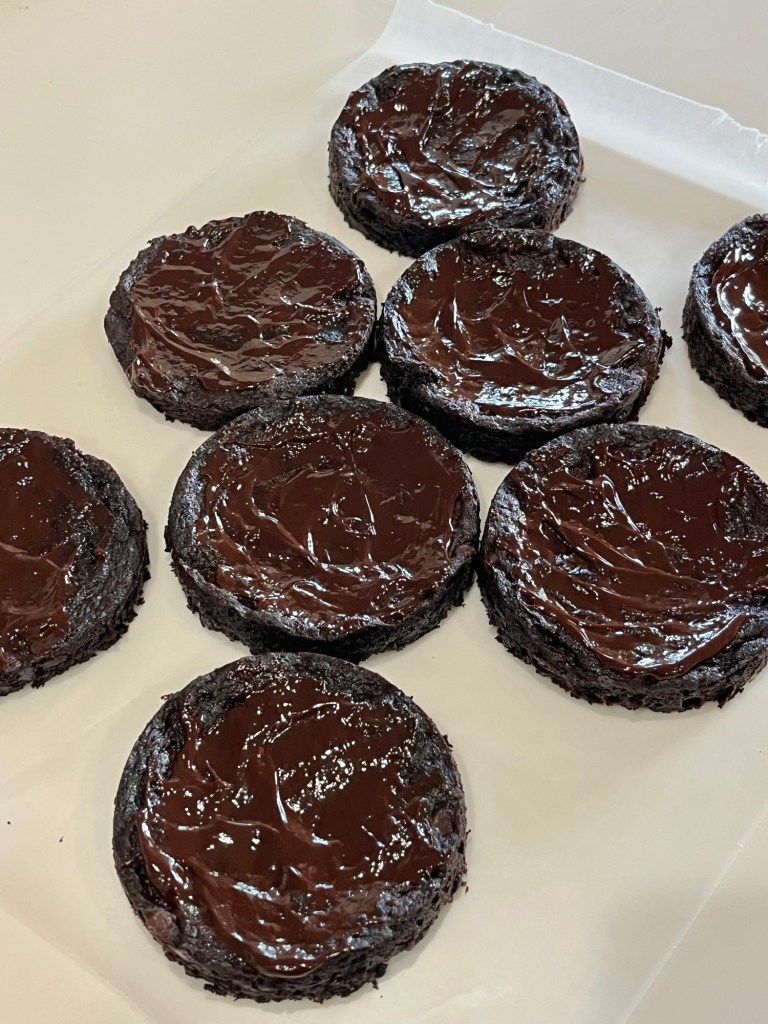
Tart Ring and FoilFoil Wrapped RingBaked Brownie BaseGanache Covered BrownieRaspberry Coulis on Ganache Coated BrownieChocolate and Raspberry Brownie Tart with Raspberry Coulis, Hot Fudge and Caramel Sauce Drizzles.
Chocolate And Raspberry Brownie Tart
INGREDIENTS BROWNIES • 2 large eggs • ½ cup + 2 Tbl dark cocoa • ½ tsp salt • ½ tsp baking powder • 1 tsp vanilla extract • 1 cup + 2 Tbl sugar • ½ cup unsalted butter, melted • ½ cup + 2 Tbl AP flour • ½ cup chocolate chips • ½ cup jammy bits • 1 ½ Tbl honey or seedless raspberry jam • ½ Tbl water CHOCOLATE GANACHE GLAZE • ½ cup heavy cream • 20 g (½ Tbl) light corn syrup • 200 g (1⅓ c) semisweet or bittersweet chocolate, chopped • ½ tablespoon vanilla extract
METHOD
Preheat the oven to 350°F. Lightly grease eight 4” tart rings and cover the bottom and outside with aluminum foil. (Spray the sides of the tart ring and foil on the bottom cooking spray.)
Crack the 2 eggs into a bowl, and beat them with the cocoa, salt, baking powder, and vanilla until smooth.
Add the sugar and melted butter, stirring until smooth.
Add the flour, chips, and Jammy Bits, again stirring well. The batter will be very thick.
Spoon 90 g of batter to half fill each tart ring and smooth with a small offset spatula
Bake the brownies for 12-16 minutes, checking the temperature after 8 minutes. The brownies are done when a cake tester inserted into the center comes out clean (200 degrees,) or with just a few moist crumbs clinging to it. The brownies should feel set on the edges, and the center should look moist, but not uncooked. Do not over bake! Remove them from the oven.
Heat the honey or seedless raspberry jam with 1 Tbl of water and stir until smooth. Brush over the warm brownies. Set aside to cool for an hour or longer before topping with the ganache.
Loosen the brownies from the rings by running a knife around the brownie. Carefully peel the aluminum foil from the brownie and release the brownie from the ring.
To make the ganache, heat the cream and corn syrup until they begin to steam (60 sec in 1000W microwave.) Pour over the chopped chocolate in a bowl. Let sit for 5 minutes, add any flavorings, and whisk until smooth. Let cool for 15 minutes or so.
Spread ganache over the brownies while it’s still warm but has begun to thicken — reheat if it thickens too much as you work. Allow several hours for the ganache to set up fully. You may refrigerate the brownies to hasten the setting of the ganache.
Spread a tablespoon of raspberry sauce on the ganache, top with a scoop of ice cream and drizzle sauce(s) of your choice, i.e. hot fudge, raspberry, caramel or marshmallow. Garnish with fresh raspberries.
Hot Fudge
INGREDIENTS
⅔ c heavy cream
144 g (½ c) light corn syrup
70 g (⅓ c) light brown sugar – not packed
¼ c unsweetened natural cocoa powder
¼ tsp salt
170 g dark or bittersweet chocolate, finely chopped
2 Tbl unsalted butter
2 tsp vanilla extract METHOD
Bring cream, corn syrup, brown sugar, cocoa powder, optional salt, and half the chopped chocolate to a boil in a 1½-quart heavy saucepan over moderate heat, stirring, until chocolate is melted. Reduce heat and cook at a low boil for 5 minutes, stirring frequently.
Turn off the heat and add butter, vanilla, remaining chocolate, and stir until smooth.
Cool slightly before serving.
Cooled sauce can be stored in a jar with a lid or in airtight container in the refrigerator for many weeks. Reheat sauce before using by placing the desired portion in a microwave-safe bowl and heating for about 10 to 15 seconds, or reheat on the stovetop
Caramel Sauce INGREDIENTS • 112 g (½ c) RT butter • 106 g (½ c) light brown sugar • dash salt • 144g (½ c) light corn syrup • 7 oz (½ can) sweetened condensed milk • 1 tsp vanilla METHOD
Melt the butter in 1½ quart or larger saucepan.
Add the brown sugar and salt and combine. Stir in the corn syrup, mix well.
Gradually add the sweetened condensed milk, stirring constantly. It can take 10-15 minutes to add the milk. Go very slowly!
Cook and stir over medium heat to 220°F for sauce viscosity.
Remove from heat, stir in vanilla.
Store in sealable container when cool
Seedless Raspberry Coulis
INGREDIENTS • 480 g fresh washed and dried raspberries • 200 g (1 c) caster sugar • 60 g (1/4 c) cold water • 2 Tbl lemon juice
METHOD
Add all ingredients to a 1 ½ quart saucepan
Cook while stirring and mashing over medium heat until it thickens (~220 F)
Strain the coulis through a fine mesh sieve.
Pour into an airtight container and cool before sealing
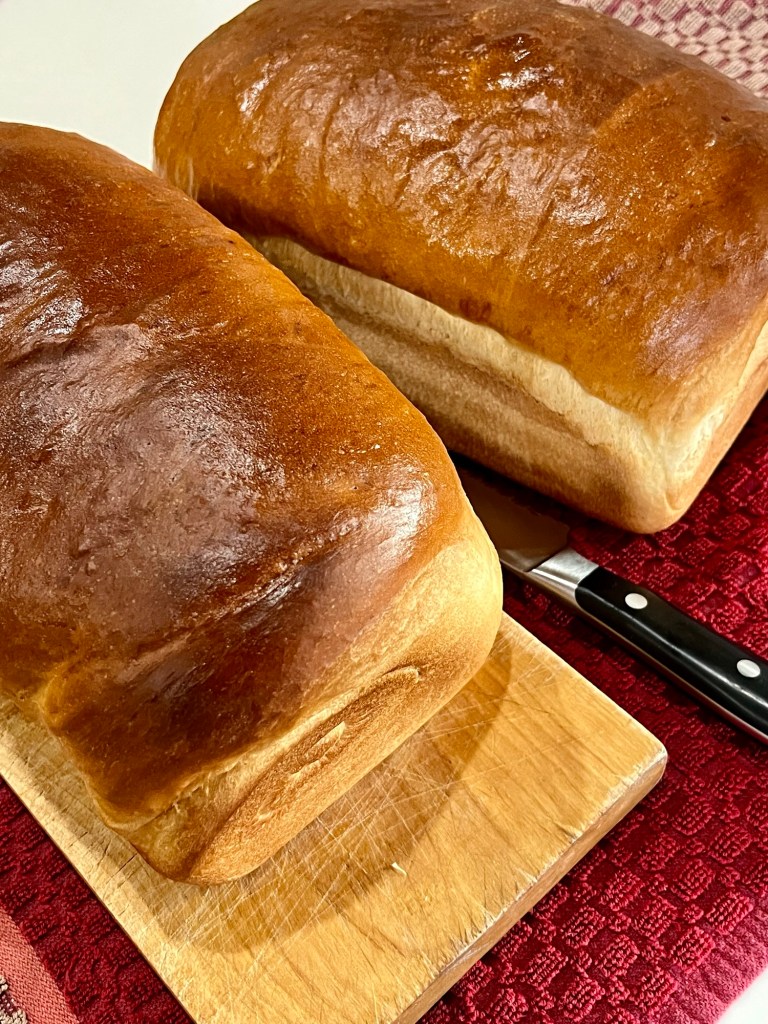
It’s been a while since I made any basic, traditional sandwich bread, but that ended this afternoon.
At 3:30 we decided to have BLT’s for dinner, except we didn’t have any bread. In her infinite wisdom QC said, “It’s only 3:30. Can’t you make bread before dinner?” Usually I start baking around 6am, but in a crisis I can be flexible.
We bought some “B” at the market this noon, and had one “T” left over from our favorite roast beef wraps. (Flour tortillas, mayo, lettuce, tomato, roast beef and in QC’s case, cheese and in mine pickled jalapeños.) My garden lettuce is starting to bolt and grew very tall over the last week, so it needs to be eaten right away, hence the “L” in our sandwich. (I gave “stalks” of lettuce to the QC Cadre.) The head lettuce has another week or two.
I used to make this bread as my standard, until I found the artisan breads that have nicer crust and crumb.
Bread – White Gold Medal Recipe
INGREDIENTS 2 Loaves Bread flour • 6 to 7 cups Sugar • 3 Tbl Salt • 1 Tbl Shortening • 2 Tbl Yeast • 4 ½ Tsp Warm water • 2 ¼ cups (120° to 130°F)
METHOD
In large bowl, stir ½ of the flour, the sugar, salt, shortening and yeast until well mixed. Add warm water. Beat with electric mixer on low speed 1 minute, scraping bowl frequently. Beat on medium speed 1 minute, scraping bowl frequently. Stir in enough remaining flour, 1 cup at a time, to make dough easy to handle.
Place dough on lightly floured surface. Knead about 10 minutes or until dough is smooth and springy. Grease large bowl with shortening. Place dough in bowl, turning dough to grease all sides. Cover bowl loosely with plastic wrap and let rise in warm place 30 to 40 minutes or until dough has doubled in size. Dough is ready if indentation remains when touched.
Grease bottoms and sides of 8×4-inch or 9×5-inch loaf pans with shortening or spray with cooking spray.
Gently push fist into dough to deflate. Divide dough in half. Flatten each half with hands or rolling pin into 18×9-inch rectangle on lightly floured surface.
Roll dough up tightly, beginning at 9-inch side. Press with thumbs to seal after each turn. Pinch edge of dough into roll to seal. Pinch each end of roll to seal. Fold ends under loaf.
Place seam side down in pan. Brush loaves lightly with butter. Cover loosely with plastic wrap and let rise in warm place 20 to 30 minutes or until dough has doubled in size.
Move oven rack to low position so that tops of pans will be in center of oven. Heat oven to 425°F.
Bake 20 to 30 minutes or until loaves are deep golden brown and sound hollow when tapped and internal temperature is 195 deg. (Tent the bread with aluminum foil if the brown too soon.) Remove from pans to wire rack. Brush loaves with butter; cool.
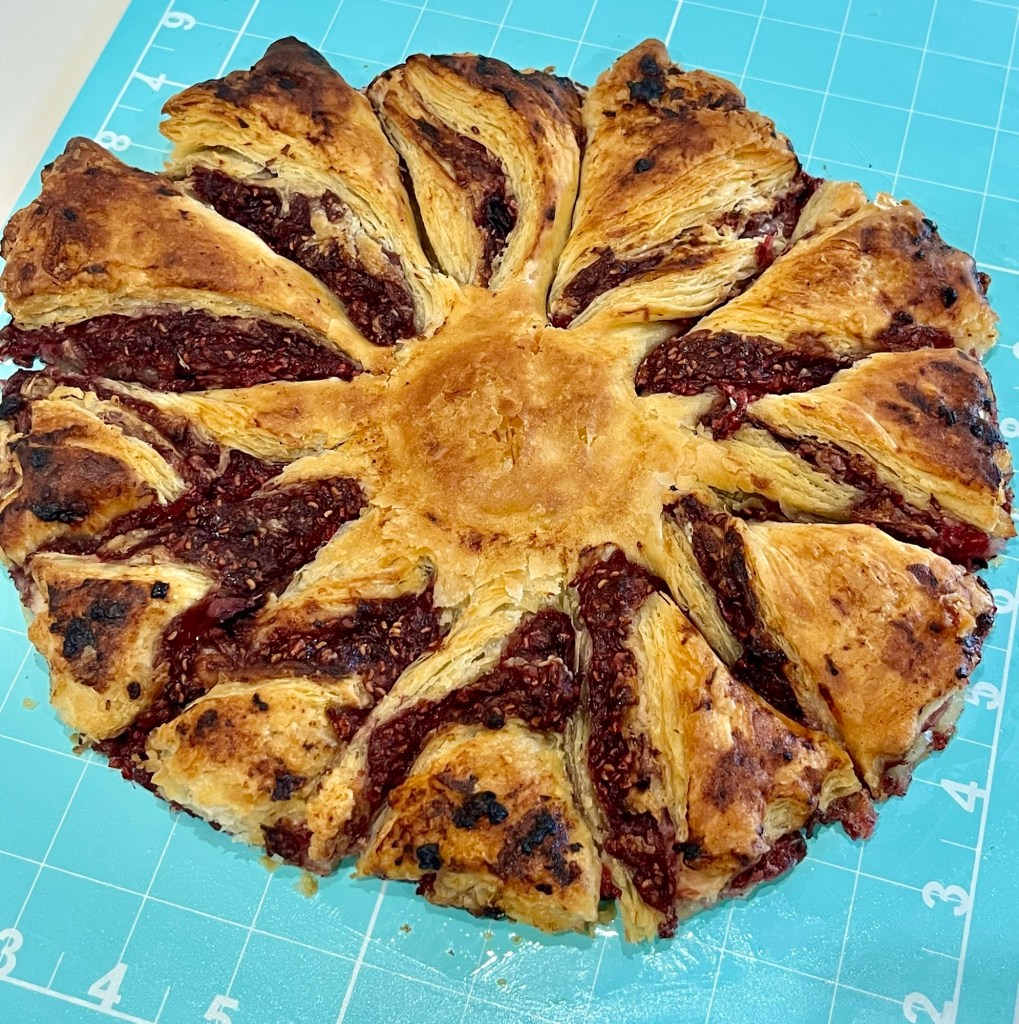
Here’s another nice looking dessert. It had the advantage of using puff pastry and I wanted another excuse to make more Sally’s puff pastry. My first attempt went well so I tried it again. (It went well also.)
The dessert also uses berries, and if you know me, that is a deal maker!
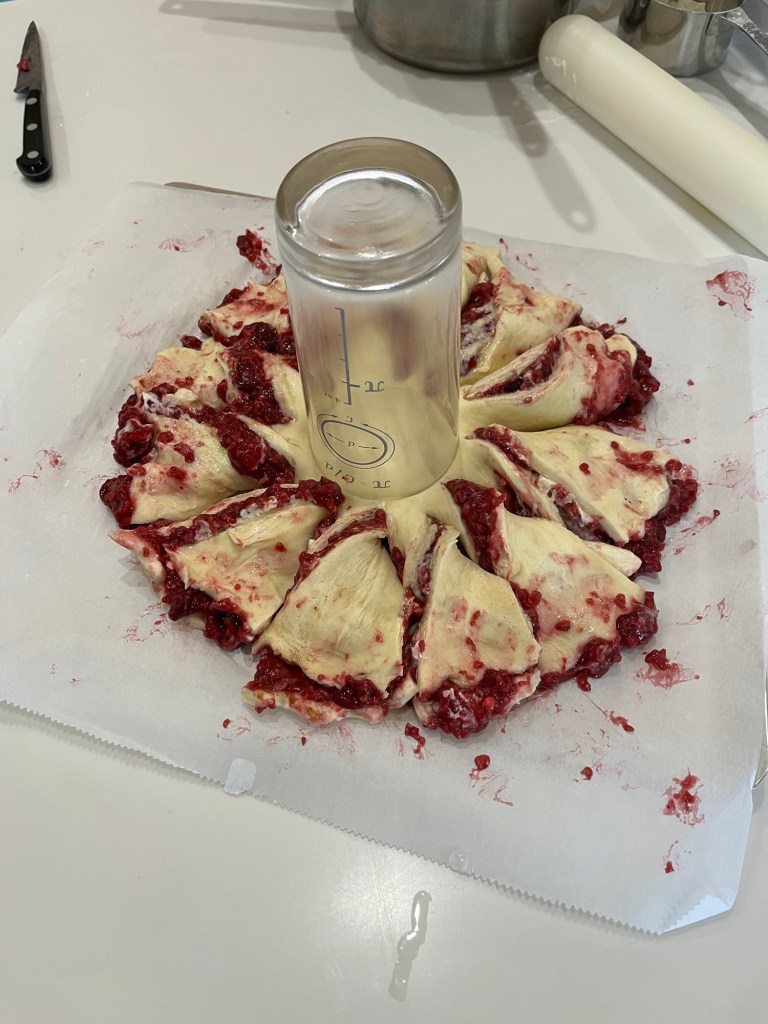
The published recipe used too much jam filling for me. It made the pastry too wet which resulted in a messy final product. I cut the berry jam contents in half for future bakes, as noted below.
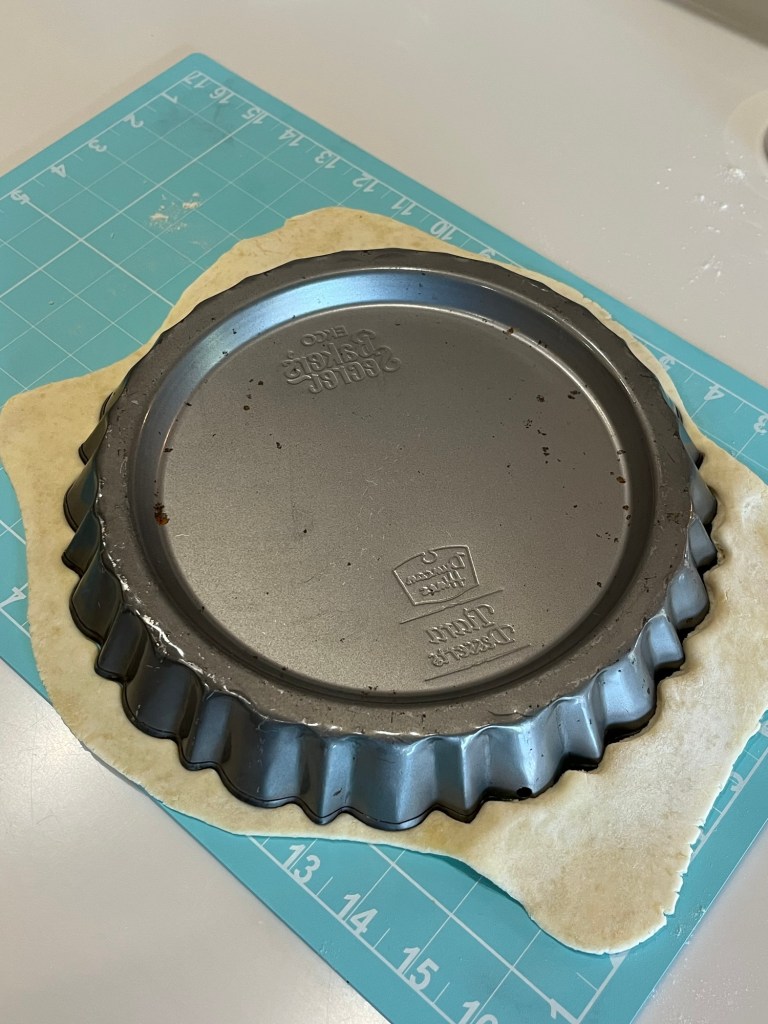
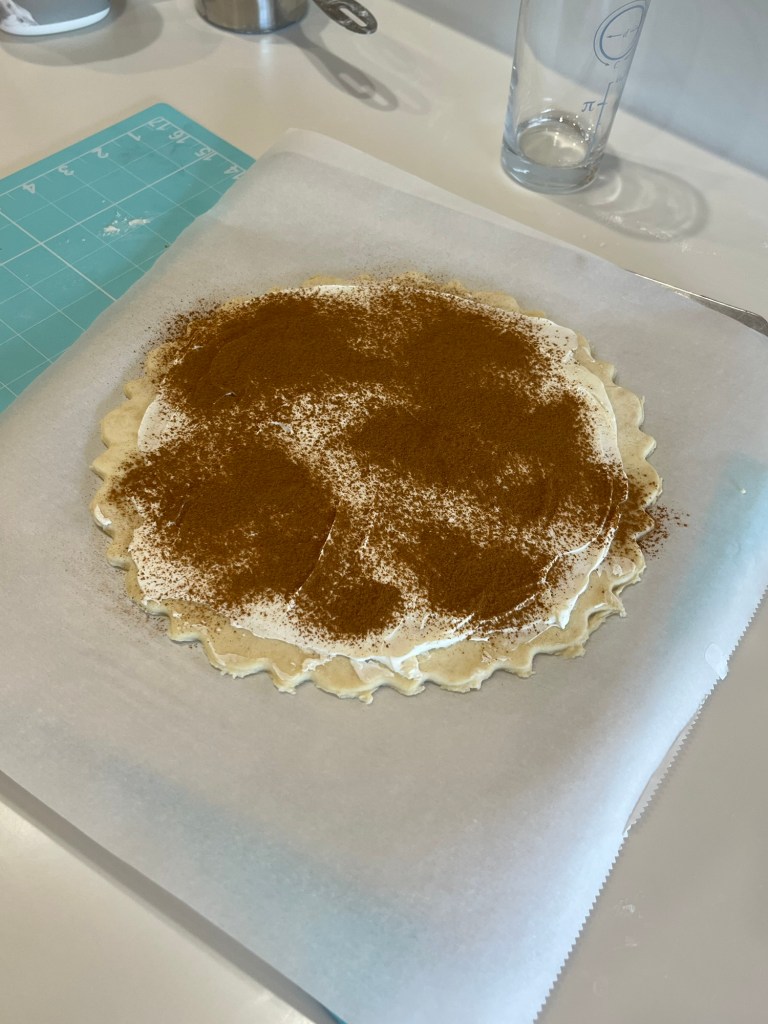
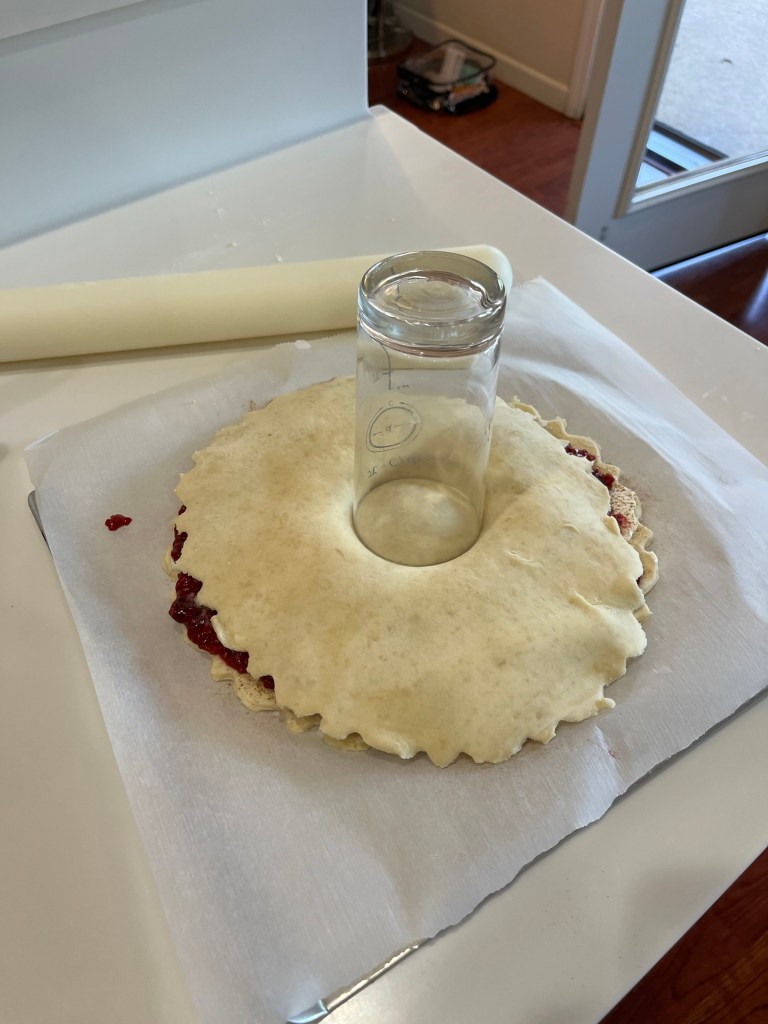
Wet mixture prior to first chillingFirst roll after first chillingFirst fold after first chillingAfter 6 “roll and folds” the pastry was smooth and elasticUsing tart pan to cut 2 “circles” of pastryCoat one circle with cream cheeseCoat the cream cheese with cinnamon Cutting pastry into 12 sections, protecting the centerAfter filling and cutting, twist each section. (This is where it got messy.)Baked Puff Pastry Berry Dessert
As I said, the final product was messy but Sally’s puff pastry is perfect. (Find her recipe in the link above.) It is light, flaky and as GBBO demands, has excellent layers.
Puff Pastry Berry Dessert
INGREDIENTS • 800 g puff pastry ( two 400 g sheets = 2 of Sally’s recipes) • 100 g spreadable cheese cream • 3 g cinnamon • 200 g berries • 50 g water • 25 g honey • 20 g cornstarch • 20 g melted butter Note: The quantities of berry jam were halved from the published recipe
METHOD
Cut 2 circles from the puff pastry as big as possible
Spread cream cheese over the entire area of one piece of pastry
Sprinkle with cinnamon
Add berries to 100g of water and boil for 20 minutes
Add honey and corn starch mix well
Preheat oven to 425⁰F
Cover the dough with jam then add the second layer of puff pastry
Place an inverted glass at the center of the tart and cut radially into 12 strips
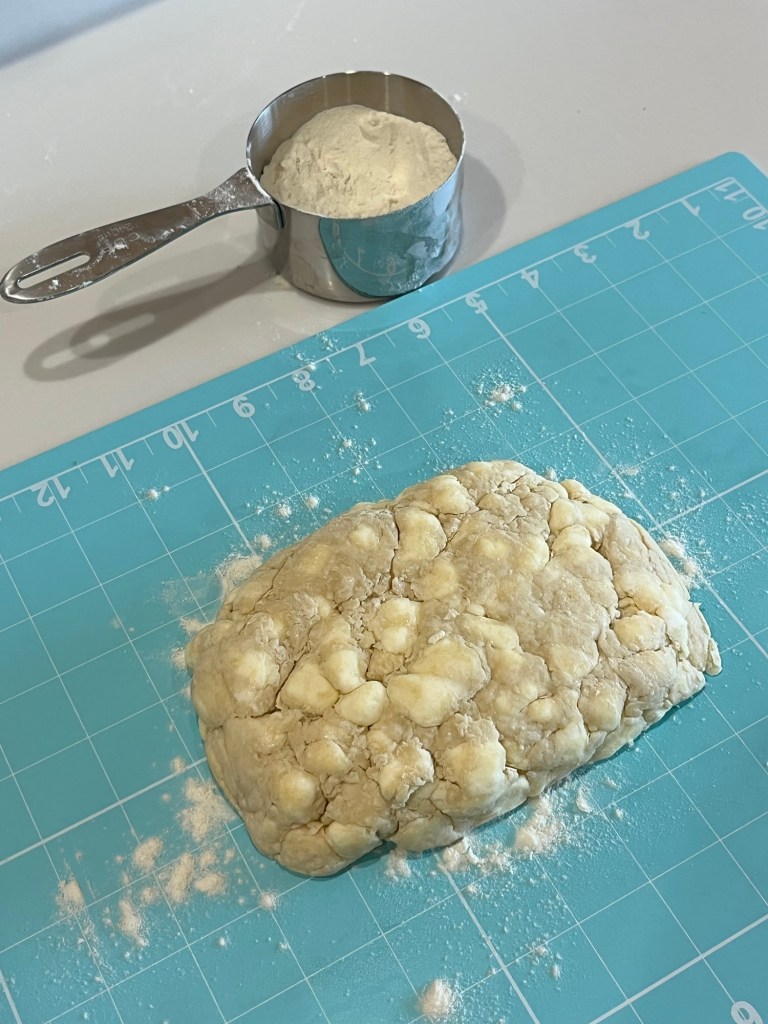
If you know, or follow me, you know I am always looking for new recipes, even if I already use a great one. Case in point is the No-Knead Artisan Bread I found a PreppyKitchen.com. It’s wonderful bread with a nice crunchy crust and soft, chewy interior and excellent flavor. Plus it is easy to make, uses few dishes and only takes a couple of hours. However, I do often find alternate recipes and occasionally give one a try. Hence, today’s experiment.
I found a recipe called “Homemade 25 Minute Bread” and made a loaf exactly following the instructions (even though I knew they were wrong.) At this point I am an experienced bread baker and am comfortable with my abilities to distinguish what will work and what will not, but you never know. I bake to learn.
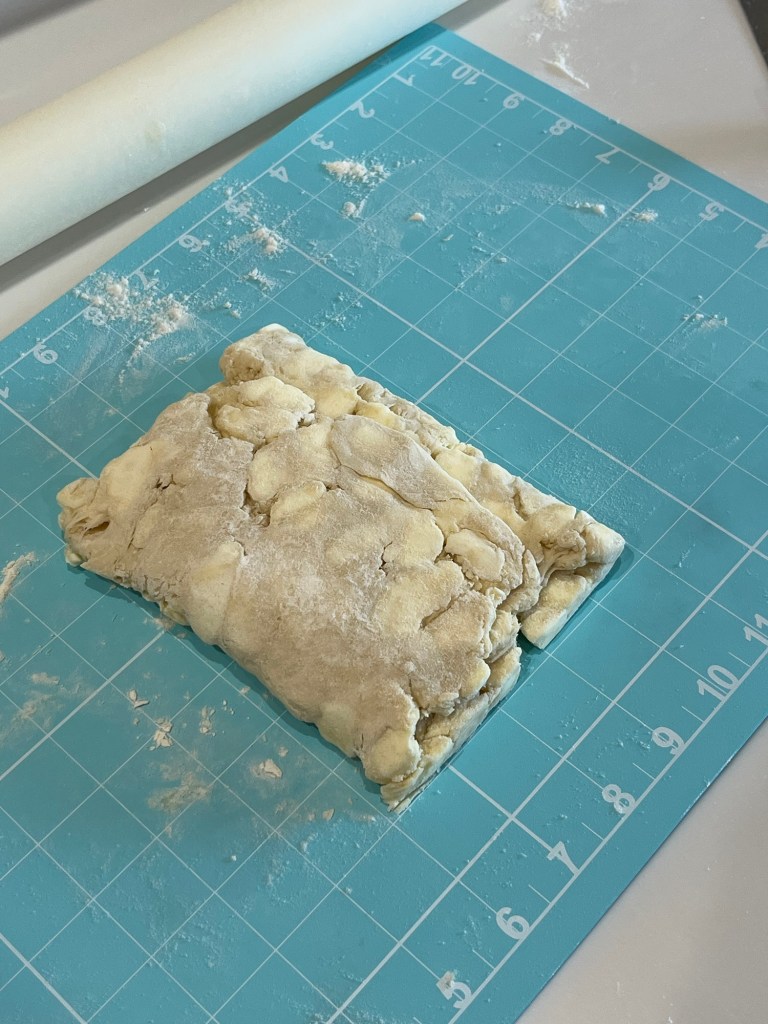
I modified the published recipe, and for expediency used a stand mixer rather than kneading by hand. I enjoy hand kneading, (when I have the time,) but I was making 2 sequential loaves this morning, before I made a batch of rough puff pastry, and watched the RBC Heritage Golf Championship.
The basic difference in the two breads involves handling the dough. The original specified a 5 minute hand knead until the dough was “smooth and elastic.” I increased the kneading time to 8 minutes so it would just about pass the windowpane test. It also only had a 10 minutes “rise” rather than a full “normal” proof, which was 45 minutes at ~90°F. It also did not suggest a lame or sharp knife slash. This gives the dough someplace to expand rather than burst through the sides of the loaf during baking.
The published recipe resulted in a very dense, not very pleasant loaf. ( I see French toast in my future.) The altered recipe was much lighter. While the crumb was very similar it was light and soft with a good crust. The final result is, back to PreppyKitchen!
I renamed the recipe “Homemade 45-Minute Bread – Dede’s Version. It’s slightly more accurate. (The time does not include proofing time.)
Original on the right, “improved” on the leftOriginal with torn sized on the front left, “improved” without tears on the back right.
In a stand mixer bowl, combine the flour (less 4 Tbl) , sugar, salt, and instant yeast. Whisk well.
Add the warm water and olive oil to the dry ingredients. Stir with a dough hook until a dough forms.
Knead the dough for about 10 minutes until smooth and elastic. The dough is very sticky. Add the reserved flour one tablespoon at a time until the sides of he bowl begin to clean.
Shape the dough into a ball and place it in a lightly greased bowl. Cover with a clean towel and let it rise for 45 minutes. The dough weighs ~684g at this point
Preheat your oven to 425°F.
After the dough has rested, punch it down and shape it into a loaf or divide it into smaller rolls.
Place the shaped dough onto a baking sheet lined with parchment paper.
Slash with a lame or knife
Bake for 15-20 minutes or until the internal temperature is ~195⁰F and bread is golden brown and sounds hollow when tapped on the bottom.
Allow to cool slightly before slicing and serving.
Somewhere I came across Pastéis de Natas, so I researched online for a suitable recipe. I had 6 left-over egg yolks and an extra sheet of puff pastry. Doing the maths I calculated if I used two more sheets of puff pastry and made 18 tarts I should about run out of left overs.
Well, I was once semester short of graduating with a math minor, but somehow I ended up with two small bowls of custard. This isn’t a problem as it is smooth and delicious. (I have some raspberries that need to be used soon so a nice raspberry coulis could be used here.)
Pastéis de Nata
INGREDIENTS
• 296 g (1⅓ c) granulated sugar • 115 g (½ c) water • ½ tsp cinnamon • 225 g (1 c) whole milk • ½ cup (115ml) double cream • 5 large egg yolks • 1 large egg • 1 tablespoon vanilla extract • 28 g (¼ c) cornstarch/cornflour • 1 pack frozen puff pastry
METHOD
Preheat oven to 500°F. Making the Custard:
In a small pan, add the sugar, water, and cinnamon stick. Bring to a simmer and allow to simmer for 3 minutes. Turn off the heat and set it aside to infuse.
In a separate saucepan, combine milk and cream and place over medium heat. Allow the mixture to come to a simmer, then remove from the heat and set aside to cool down.
To a large bowl, add the egg yolks, whole egg, vanilla extract, and cornflour. Whisk until fully combined and no lumps remain.
Temper the egg mixture by slowly pouring the hot milk to it briskly whisking as you go.
Return this egg mixture to the saucepan and place over low-medium heat. Whisk continually until mixture thickens, around 3-4 minutes. Remove from the heat.
Whisk in the cooled cinnamon sugar syrup. Set the custard aside. Assembling the Tarts:
Lightly flour a work surface and cut puff pastry into roughly 14 equal rounds using a 3 ½ inch cookie cutter.
To a lightly greased muffin tin, push each piece of puff pastry down and up into the sides of the muffin holes until evenly distributed.
Pour custard into each muffin tin so each one is three-quarters full. Bake for roughly 15 minutes or until golden brown on top.
Serve warm as is or with a dollop of cream on top, or dusted with confectioners sugar.