
I decided to make a new dessert for Passover this year. Of course, leavening agents, such as flour, yeast etc are prohibited from Passover foods, so the chocolate/orange tart I was considering was out… or was it?
My research into Passover prohibitions and tarts logically led me to a discussion of the difference between tarts and prostitutes. Using the Wiki dictionary (the source of all truths) I find the word prostitute, as a verb, is to use one’s talents in return for money, or fame, or perhaps a few nights lodging, whereas a tart, as a noun, is a small open pie, or piece of pastry. Dictionaries are like statistics: what do you want them to say?
This research actually stemmed from looking at the story of Solomon deciding which woman was the real mother by offering to split the child with his sword and giving half to each woman. The women were actually prostitutes, but their profession was either superfluous to the story, and Solomon’s decision, or not, depending on the interpretation. And, of course, as usual in midrash, there are many more opinions than “opinioners.”
I find it interesting that a judge can rule on a case 3000 years ago by purely considering the facts of the case and not the legal standing of the two women. Some say wisdom began flowing from his mouth when he threatened to cut the child in half. Today so many people with questionable legal standing are unable to appeal to the legal establishment for fear of reprisal due not to the injury they may have sustained but rather for the superfluous state of their resident status. And therefore, so often judgement is rendered without any wisdom present.
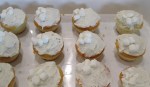
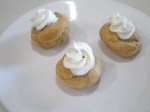
Anyway, I decided an almond flour tart shell with chocolate mousse and orange zest swirl is appropriate and fitting for our Passover this year. I made a shell to be confident it would have the taste and texture required, and it did. It doesn’t roll our like a standard AP flour
dough, but can be formed into the tart shell by hand and pastry weights should keep the shape well enough to form the final tart. Because there is less binding agent in almond flour, I doubled the amount of egg. I will probably increase the almond flour content by 25-50% to make the dough easier to handle and hopefully a little more pastry-like. The chocolate and orange ingredients are allowed anyway, substituting almond flour for AP flour where appropriate.
Please pass over me when the gefilte fish is served!
INGREDIENTS
For the Tart Shell
- 100 g cold butter cut into small cubes
- 200 g almond flour (I may increase this by 50g, not sure yet)
- 60 g icing sugar
- ½ tsp vanilla
- ¼ tsp salt
- 2 eggs (100g)
For the Chocolate Filling
- 75g butter
- 115g dark chocolate (no more than 60% cocoa solids), finely chopped
- 115g caster sugar
- 55g almond flour
- 4 medium eggs
For the Orange Filling
- 25g butter
- 50g white chocolate
- 1 orange, finely grated zest only
- 35g caster sugar
- 25g almond flour
- 2 medium egg yolks
METHOD
Tart Shell
- Mix butter with sugar (I break up the chunks of butter by rubbing them into the sugar with my hands)
- Add salt then vanilla
- Add egg and mix well
- Stir in flour. Mix by hand until incorporated. I did this in 3 parts mixing well between each.
- Cover with plastic and refrigerate for 30 min until it firms up a bit.
- Butter (spray) tartlet pan
- Coat hands with flour and press the sticky dough into tart mold
- Prick holes in bottom and sides of formed dough
- Add pastry weights to the pan
- Bake in preheated oven 350o F (175o C) for 17 – 20 min
- Remove pastry weights with 5 min left in the bake
- Remove pastry shells from pans and let cool on wire rack
Chocolate Filling
- Melt the butter and chocolate in a heatproof bowl set over a pan of gently simmering water until melted and smooth.
- Remove from the heat and stir in the sugar and flour.
- Beat in the eggs, one at a time, and leave to stand.
Orange Filling
- Melt the butter and white chocolate in a heatproof bowl set over a pan of gently simmering water until melted and smooth.
- Remove from the heat and stir in the orange zest, sugar and flour.
- Beat in the egg yolks, one at a time and pour the mixture into a bowl.
Assemble and Bake the Tart
- Place the tart shell on a baking tray.
- Pour the chocolate mixture into the shell.
- Drizzle or pipe the orange filling over the chocolate filling to create a swirl effect.
- Draw a tooth stick through the filling to create a marbled effect.
- Bake for 10-12 minutes, or until just set around the edges, but still slightly wobbly in the centre.
- Remove from the oven and allow to cool slightly, until warm but not piping hot, then serve. It is actually very good cold also.
 be a good combination. The slight snap of this buttery cookie and the sweet/tartness of the fig pureé should pair well.


 99.9% pure Tori. I added another filling to Tori’s fig and caramel apple, when Fran found a cannoli-chocolate chip filling. Talk about a cultural melting pot!
 conveniently planted near our fence such that some of it’s fruit hung over my side, helped me decide to try this new pastry. I hadn’t made a sweet tart where the filling, not just the pastry crust, was baked. This tart had a clean, fresh, sweet taste and excellent texture.


 separate and then come together) and continue to mix until you have a smooth thick paste (dough will fall from a spoon in a thick ribbon).
 desired, with a pastry brush, gently brush the tops of the dough with the lightly beaten egg.
 interior steam.


 these with two different fillings,
  A canelé is a small French


