What The Fig!!

Well, it finally happened. The figs in our backyard tree are ripe and ready for harvest. To date, we have harvested about 55 pounds (about 25 Kilos) of figs. Let me be clear. That is the first harvest. We probably have 2 or 3 more to go.  Prolific tree, I just wish the apricot and plum trees would take a lesson. I made several pints of fig preserve and several fig newton filling (alone with some homemade fig newtons), fig and brie tarts and froze a few pounds for future consideration.

Picking the figs proved somewhat challenging. It turns out many people are allergic to the sap and/or leaves of the fig tree. As luck would have it, all of us were, some more than others. Soap (Dawn dishwashing detergent) and water and time worked well to remove the itch and rash. It was gone the next day. Next time, long sleeves and gloves.

After the figs were washed, dried and sorted the best were sliced (about ½” thick) and frozen. Some were laid out on parchment lined baking sheets and put in the freezer. Others were sliced and put into zip lock bags and a simple syrup with Fruit Fresh added were frozen. We shall see which method we like better.

Picking Figs

Picking 2

Picking

Frances and I picked the first half of the harvest. Daniel, The Young and Tall, joined us after his work the next day to  help with the high fruit. Rosie, the Supervisor as ever vigilant.Supervisor


Washing, Sorting and Processing

The fruit was washed, dried (wet fruit spoils faster) and spread as a single layer on paper towels in the refrigerator for processing the next day (after rash). Note to self: Use gloves on day two also.

The cut figs were boiled to 220oF and either mashed with a potato masher (Frances’ method) or food processed with a couple quick pulses (my method) and canned. I added a couple more pulses for the newton filling, which seemed about right in the final product.

Here are a couple of tips about making the fig newtons. The recipe makes just the right amount of cookie batter vs. filling, try it. After cutting the rolled dough to an 8”x14” sheet, roll it as rectangular and with as straight edges as possible. It will make the cookies look better.  Also, before trying to fold the dough over and pinching shut cut the sheet in half, or ever thirds, crosswise. This makes the soft dough easier to fold smoothly. More also, be bold when folding. Like flipping eggs in a frying pan. Just go for it. If you don’t fold far enough for the un-filled edges to meet, it’s a bear to try to stretch the top layer to meet the bottom to seal.

For the tartlets, be sure to use enough Brie (or other cheese) to fill half the shell. Too little and the cheese does not add enough flavor. You can always add a piece of cheese to the top to compensate. I also sprinkled the tartlets with a little flaked sea salt to offset the fig sweetness.

Homemade Fig Newtons – HGTV

INGREDIENTS

  • 1 pint fresh or preserved figs or 12 ounces dried figs
  • 1 1/2 cups flour
  • 1/4 teaspoon baking powder
  • 1/4 teaspoon salt
  • 1 stick butter
  • 1/3 cup sugar
  • 1 egg
  • 1 teaspoon vanilla extract
  • 2 tablespoons orange juice

If you are using:

  • Fresh figs: Remove stems and boil figs with a cinnamon stick and 2 cups of sugar in 1 cup of water for 45 minutes. Drain and cool.
  • Dried figs: In a bowl, pour boiling water over figs (stems removed) and let rest 10 minutes. Drain all but 2 tablespoons water and stir in 2 tablespoons corn syrup + ¼ teaspoon cinnamon.
  • Preserved figs: Drain syrup.

METHOD

  1. Puree figs in food processor until a thick paste forms (if too thick or thin to spread evenly, add a little water or flour until spreadable consistency is reached).
  2. Combine flour, baking powder and salt together and set aside.
  3. Cream butter and sugar in a mixing bowl.
  4. Add egg and vanilla, mix until smooth
  5. Add orange juice and combined dry ingredients to bowl and mix until dough forms.
  6. Optional: for dough into a flat thick disk and chill to set butter and make it easier to roll and fold.
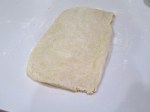
  7. Roll dough out on a floured surface into a 8”x14” rectangle about ¼” thick.
  8. Cut rectangle in half lengthwise.
  9. Spread fig paste onto half of each rectangle, lengthwise.
  10. Cut the rectangle in half crosswise, or even thirds to facilitate folding.
  11. Fold dough in half lengthwise to cover fig paste and pinch edges to seal.
  12. Slide each newton log onto a parchment lined baking sheet.
  13. Bake 25 minutes at 350 degrees until crust begins to brown.
  14. Slice into cookie-sized segments and cool. Slice while warm to reducing flaking.

More Hookers! NYT Fake News! Sad!

A couple of weeks ago, while reading the NYT online I saw this recipe for a Chocolate/Salted Caramel tart. I thought, how could you go wrong with this combination? I mean, salted caramel, chocolate and hookers (tarts), plus wanting to support the poor failing NYT! I planned on making this the first weekend my crack QC/Taster panel was back home. Tada!!

nyt-revenue-report.jpg

Unsurprisingly, the recipe posted in the successful, reliable and accurate NYT made anBroken Baked Tart Shell excellent tart. I made two error with this pastry. First I removed it from the tart pan too soon. The shell was still very fragile and I put a thumb through the side.

Repaired Filled Tart Close Up


I used a little foil to dam the flow of caramel and chocolate, plus I tipped it away from the breach so there is a thinner layer on that side of the tart. SAD!


I also poured the chocolate ganache when it was a little too thick. That may have helped plug the leak in the damn dam, but did not have the nice smooth, shiny top I was looking for. Finished Tart I also added some white chocolate ganache in a spiral and cut it through with a clean knife to make the star like pattern.


Hover your mouse over these three pictures to see the caption.

Anyway, here is the recipe. I followed it pretty closely and really wouldn’t change anything, except adding the white chocolate starburst. Oh, I did use sour cream instead of creme fraiche. Any notes are in red below.

INGREDIENTS

  • FOR THE CHOCOLATE DOUGH:
    • ½ cup (1 stick) salted butter, at room temperature
    • ½ cup plus 1 tablespoon confectioners’ sugar
    • ¼ cup unsweetened cocoa
    • 1 large egg yolk
    • ¾ teaspoon vanilla extract
    • 1 ¼ cups all-purpose flour
    • Optional: water, a tablespoon at a time until the dough is pliable.
  • FOR THE CARAMEL FILLING:
    • 2 cups sugar
    • ½ cup water
    • ¼ cup corn syrup
    • ½ cup (1 stick) unsalted butter
    • ½ cup heavy cream
    • 2 tablespoons creme fraiche or sour cream
    • Pinch of salt
  • FOR THE CHOCOLATE GLAZE:
    • 3 ½ ounces extra-bittersweet chocolate (70 to 85%), chopped
    • ½ cup heavy cream
    • Sea salt

PREPARATION

  1. Prepare chocolate dough: In bowl of an electric mixer, combine the butter, confectioners’ sugar and cocoa. Beat until smooth. Add egg yolk and vanilla, and beat until blended.
  2. Sift flour into dough mixture. Beat on low speed until combined. (Note: next time I will add a little water here to make the dough a little more pliable. I will also rest in in the fridge for 20-30 minutes.) Press the dough into the bottom and up the sides of a 10-inch tart pan. (You can use a 9-inch pan, but the crust will be thicker and the caramel may take longer to set in step 4.)
  3. Preheat oven to 350 degrees. Line tart with foil, and fill with dried beans, rice or pie weights. Bake for 15 minutes. Remove foil and weights, and bake until pastry is dry and set, another 10 to 15 minutes. Transfer to a wire rack to cool. The shell is fragile. Be sure to wait until it is cool before handling.
  4. Prepare caramel filling: In a large saucepan, bring sugar, water and corn syrup to a boil. Stir or swirl the pan occasionally, until mixture is a medium amber color, about 12 minutes. Remove from the heat. Caramel will continue to cook and darken off of the heat. Carefully but quickly whisk in the butter, cream, creme fraiche and salt until smooth (mixture will bubble up). Pour hot caramel into tart, and allow to cool and set, at least 1 hour.
  5. Prepare chocolate glaze: Place chocolate in a bowl. In a small saucepan, bring cream to a boil. Pour hot cream over chocolate and whisk until chocolate has melted and mixture is smooth. Pour glaze over tart, tilting tart for even coverage. (At this point, I piped a spiral of white chocolate ganache on the tart and used a butter knife to cut through the ganache to make the starburst design.) Refrigerate until tart is set, at least one hour, then sprinkle with a few granules of sea salt. Keep refrigerated until serving.

Clouseau, Clafoutis Hasenfeffer Incorporated

Honey Whole Wheat Clafoutis With Raspberries

One of my favorite bits from the old Peter Sellers Inspector Clouseau Pink Panther movies (imagine Clouseau’s fake French accent)

Clouseau: Does your dog bite?
Hotel Clerk: Non.
Clouseau: [bowing down to pet the dog] Nice doggie.
[Dog barks and bites Clouseau in the hand]
Clouseau: I thought you said your dog did not bite!
Hotel Clerk: That eez not my dog.

I saw this recipe online and followed it back to the source (Ellie Krieger, Special to The Washington Post) and as I had a pint of raspberries left over in the fridge I thought this would make a good, perhaps even, elegant breakfast, rather than a dessert.  Actually, clafoutis [klah-foo-TEE] is a basic pancake which is baked rather than cooked on a griddle, but it sure sounds fancy.

The recipe calls for pastry flour (low gluten) to make a more tender, “pancake” type structure. Not having any whole wheat pastry flour, I substituted regular whole wheat flour and added a little cornstarch. I didn’t have a lemon so substituted ½ teaspoon of key lime juice for a little tartness. I made a half recipe, used a 6” pie plate and topped it with some fresh Vermont maple syrup, cutting the ingredients below in half. Perhaps next time I would add a little baking powder to help the rise some.


Using low-fat milk, whole wheat flour and honey rather than sugar increases the healthfulness of this recipe. I did dust the oiled pie plate with a little caster sugar. In hindsight, I probably wouldn’t do that again. It didn’t add anything to the clafoutis.

INGREDIENTS

  • 2 large eggs, beaten
  • 1/2 cup low-fat (1 percent) milk
  • 1/4 cup honey
  • 2 tablespoons unsalted butter, melted and cooled
  • 1 1/2 teaspoons finely grated lemon zest (from 1 lemon)
  • 1/8 teaspoon salt
  • 1/2 cup whole-wheat pastry flour
  • 9 ounces (2 cups) fresh raspberries
  • 1 tablespoon confectioners’ sugar, for serving

METHOD

  1. Preheat the oven to 325 degrees. Grease a 9-inch pie plate or ceramic dish with cooking oil spray.
  2. Whisk together the eggs, milk, honey, butter, lemon zest and salt in a mixing bowl until well incorporated, then gradually whisk in the flour, to form a smooth batter.
  3. Pour into the pie plate, then add the raspberries; top sides down will help them to stay upright as you work. Bake (middle rack) for 40 to 50 minutes, until the clafoutis is golden brown and center is set.
  4. Dust the top with confectioners’ sugar and serve right away.

San Juan Hill Pastry Hand Pies   

Making puff pastry at home is a tedious process requiring several hours to incorporate the butter into the flour. For years I have relied on the kindness of Trader Joe’s and Pillsbury as my source of puff pastry. Both are delicious and easy to use. TJ’s has less rise and is good for a variety of pastries while Pill’s has skyscraper (get it?, “high rise?”) puff. This spring I found out that TJ’s puff pastry is seasonal. Who knew? Also, trying to insert a very little humor and perhaps some click bait with “San Juan Hill” – Teddy Roosevelt and the “Rough” Riders? Oh well, maybe not.

Anyway, I decided it was time to try, at least rough puff pastry. I tried two different recipes, one from King Arthur Flour and the other from Gordon Ramsey via BBC. The primary difference between the two is KAF adds sour cream while Gordon uses cool water as the liquid and KAF adds some baking powder to assist the rise.

To create the characteristic layers in the puff pastry it needs to be book folded and rolled. Both recipes called for repeating this twice, but many of the comments said to repeat up to four times, which I will do next time. The final pastry was very good, but lacked the layers and puff of either TJ’s or Pill’s.

I have trouble making the pastry and remembering to take photos as the work progresses. What I need is a camera that will take pics every 15 seconds, the just use the appropriate ones. I missed the filling of the pies. I used a heaping teaspoon for the blueberry mix and made a few using 3 fresh raspberries. Another suggestion: cut the tops of the pies about and inch bigger than the bottoms. Once the dough tries to stretch over the filled bottom the edges do not line up. I used about 2.5″ for the bottom and 3:5 inches for the tops. Also, round hand pies are much better looking but wastes a lot of dough. Square pies are rather plain, but more efficient.  What I need are two hexagonal cookie cutters, one 2.5″ and the other 3.5″. Then I could have the “roundish” look but a closest pack design, minimizing waste.

Gordon’s pastry was a bit easier to work with than KAF’s. The original recipe called for too much water which made a very, very wet dough. Luckily, I started with about 50 ml (one third of what the recipe said you may need and half of what it said to add initially.) They both tasted excellent and the texture was good, not great, but that may improve with additional rolling, folding and chilling. Once I made Gordon’s pastry I used the bottom of KAF’s to fill and finish the hand pies.

Rough Puff Pastry – Gordon Ramsey

INGREDIENTS

  • 250g strong plain flour
  • 1 tsp fine sea salt
  • 250g butter, at room temperature, but not soft
  • about 150ml cold water

METHOD

  1. Sift the flour and salt into a large bowl. Roughly break the butter in small chunks, add them to the bowl and rub them in loosely. You need to see bits of butter.
  2. Make a well in the bowl and pour in about one-third of the cold water, mixing until you have a firm rough dough adding extra water if needed. Wrap dough with cling film and leave to rest for 20 mins in the fridge.
  3. Turn out onto a lightly floured board, knead gently and form into a smooth rectangle. Roll the dough in one direction only, until 3 times the width, about 20 x 50cm (~ 8”x20”). Keep edges straight and even. Don’t overwork the butter streaks; you should have a marbled effect.
  4. Fold the top third down to the center, then the bottom third up and over that. Give the dough a quarter turn (to the left or right) and roll out again to three times the length. Fold as before, cover with cling film and chill for at least 20 mins before rolling to use.

Blueberry Hand Pies with Rough Puff Pastry – KAF

INGREDIENTS

Pastry

  • 2 cups King Arthur Unbleached All-Purpose Flour
  • ¾ teaspoon salt
  • ½ teaspoon baking powder
  • 1 cup (16 tablespoons) cold unsalted butter
  • ½ cup cold sour cream

Filling

  • 2 cups blueberries, fresh or frozen
  • 2 tablespoons cornstarch
  • ⅓ cup sugar
  • ⅛ teaspoon salt (a large pinch)
  • 1 tablespoon lemon juice
  • *For frozen berries, use 2½ tablespoons cornstarch.

Topping

  • 1 large egg, beaten
  • 2 tablespoons white sparkling sugar, for garnish

METHOD

  1. To make the pastry: Whisk together the flour, salt, and baking powder. Add the butter, working it in to make a coarse/crumbly mixture. Leave most of the butter in large, pea-sized pieces.
  2. Add the sour cream, and stir until the mixture starts to come together in chunks. Turn it out onto a floured work surface, and bring it together with a few quick kneads.
  3. Pat the dough into a rough log, and roll it into an 8″ x 10″ rectangle. Dust both sides of the dough with flour, and starting with a shorter end, fold it in three like a business letter.
  4. Flip the dough over, give it a 90° turn on your work surface, and roll it again into an 8″ x 10″ rectangle. Fold it in three again.
  5. Wrap the dough, and chill for at least 30 minutes before using.
  6. To make the filling: If you’re using fresh berries, rinse and drain well. Place fresh or frozen berries in a saucepan. Whisk the cornstarch with the sugar, and pour over the berries. Add the salt and lemon juice, stirring to combine.
  7. Place the saucepan on a burner set to medium-high heat and cook, stirring, until the small amount of liquid in the bottom of the pan comes to a simmer. Reduce the heat to medium and continue to cook, stirring frequently, until the mixture starts to thicken, about 5 minutes. Transfer the cooked berries to a bowl and let cool to room temperature. It’s fine to make the filling ahead of time, and refrigerate until you’re ready to use it.
  8. Preheat the oven to 425°F; place a rack on the middle shelf. Line a baking sheet with parchment paper.
  9. To assemble the pies: Roll the dough into a 14″ x 14″ square. With a straight edge and pastry wheel, or a 3½” square cutter, cut out sixteen 3½” squares.
  10. Divide the filling among eight of the squares, using about a heaping tablespoon for each; a slightly heaped tablespoon cookie scoop works well here. Brush some of the beaten egg along the edges of each filled square.
  11. Use a knife to cut a vent into each of the remaining eight squares; or use a decorative cutter of your choice.
  12. Top each filled square with a vented square, and press along the edges with the tines of a fork to seal.
  13. Brush the top of each pie with the remaining beaten egg, and sprinkle with sparkling sugar. Transfer the pies to the prepared baking sheet. Note: If at any time during this process the pies become sticky and hard to work with, simply refrigerate them for about 20 minutes, until firm.
  14. Bake the pies for 18 to 20 minutes, until they’re a light golden brown. Remove them from the oven, and let cool for 20 minutes before serving.
  15. Store pies, lightly wrapped, at room temperature for a couple of days; freeze for longer storage.

Have a Very Independent Day

Happy Independence Day family and friends! Have a wonderful day, full of independence, liberty, personal freedom, free speech and remember our government is OUR government, NOT our elected representative’s government.

For Daniel and Frances’ 4th of July BBQ yesterday I made a U.S. flag tart with crème patisserie filling, raspberry and meringue stripes and blueberry and meringue stars. I also made red, white and blue macarons.  The only new recipe I incorporated into these two desserts (the other recipes can be found elsewhere in this blog) was the Italian meringue used to fill the macarons and make the stars for the flag.  I wish I had kept the 4 star, 3 star, 4 star pattern, but miscounted in the middle of piping. Yeah, I miscounted on the way to 4. Oh well, next time.


As you probably know, there are 3 common methods of making meringue. French meringue is the most common which is made by whisking sugar into beaten egg whites. While the easiest to make, it is the least stable meringue and is perfect for filling or toppings, or folded into batters for sponges, jocondes etc. Italian meringue is made by beating egg whites to stiff peaks then drizzling a simple sugar, heated to 2400 F, into the whipped egg whites. This is the most stable meringue and is great for frosting cakes, top filling pies and mousse. Swiss meringue is made by gently beating egg whites and sugar in a bain marie until the sugar is completely dissolved and the mixture reaches 1300 F. The mixture is then removed from the heat and whisked at high speed to create volume, then lower speed to cool the meringue and is very stiff. Swiss meringue is often used as a base for buttercream frosting.

ITALIAN MERINGUE

Makes about 360 ml (or 1½ cups), Author: The Tough Cookie

INGREDIENTS

  • 150g (or ¾ cup) granulated sugar
  • 60ml (or ¼ cup) water
  • 60g (or ¼ cup) egg whites (about 2 large egg whites)

METHOD

  1. In a medium-sized saucepan, combine the sugar and water. Heat over low heat, stirring until the sugar has dissolved. Once the sugar has dissolved, turn the heat to medium-high and allow the syrup to come to a boil.
  2. In the meantime, add the egg whites to a medium-sized, heatproof bowl and mix (with a mixer fitted with the whisk attachment) until foamy and the whites are almost able to hold soft peaks.
  3. Once the syrup is boiling, clip on a candy (or sugar) thermometer.
  4. Cook until the syrup reaches 240°F, then take the pan off the heat and slowly drizzle the hot syrup into the bowl with the foamy egg whites, mixing continuously to prevent the eggs from scrambling. Don’t pour the syrup onto the whisk, or the syrup may splatter against the sides of the bowl (or into your face!). Instead, aim for a spot close to the whisk.
  5. Once all the syrup has been added, keep mixing until the bottom of the bowl feels cool to the touch and the meringue has cooled down to body temperature.
  6. Use immediately or keep in the fridge (covered) until ready to use. It’s a very stable meringue, so it won’t start weeping, leaking or collapsing.

NOTES

Italian meringue can be made two days in advance and stored in the fridge until needed (covered with plastic wrap).


Mah Jong Snacks Anyone?

Last week Fran’s mah jongg group met at our house. While they tend not to each very much before, during or after their games, but I was asked to make something for this week. I had not made pan au chocolat in quite a while and had just seen this recipe for Oreo macarons online. There were very few of anything left.


Macarons and Pain Au Chocolat


Pain au Chocolate

INGREDIENTS

  • Puff pastry
  • Chocolate
  • Confectioner’s sugar

METHOD

  1. Roll out puff pastry
  2. Dust with confectioner’s sugar
  3. Cut into 2” wide
  4. Lay chocolate at one end, roll one time, press down gently and roll again, press gently again
  5. Add second row of chocolate and roll one last time, press gently
  6. Chill overnight
  7. Brush with egg wash
  8. Bake 360 deg 20-25 min on parchment lined baking sheet

Oreo Macarons

INGREDIENTS

  • 3 eggs whites, room temperature
  • ¼ cup sugar
  • 1¼ cups powdered sugar
  • ¾ cup superfine almond flour
  • 2 tablespoons dark cocoa powder
  • ½ teaspoons black food coloring
  • 2 cups of powdered sugar
  • 1 cup of softened butter
  • 1 teaspoons of vanilla
  • 2 tablespoons of milk
  • ½ cup cookies and cream filling
    • 8 oz. cream cheese, at room temperature (takes about 2 hours to reach room temp)
    • 4 oz. salted butter, at room temperature (1 stick)
    • 1 teaspoon vanilla
    • 2 cups powdered sugar

METHOD

  1. Preheat oven to 285ºF/140ºC.
  2. In a medium bowl, beat the egg whites until frothy.
  3. Keep beating and slowly add sugar until stiff peaks form.
  4. Sift powdered sugar, cookie crumbs, almond flour, and cocoa powder over the egg whites.
  5. Fold the dry mixture into the egg whites completely, but make sure to not overmix or the macarons will not rise.
  6. Once the batter reaches a lava-like consistency, add the food coloring. Mix until just combined, without over mixing.
  7. Place the mixture into a piping bag or zip-top bag. Cut of the tip to pipe.
  8. Pipe 1½-inch dollops onto a baking sheet lined with parchment paper. Tip: take a little batter to “glue” down the edges of the parchment paper so it stays put.
  9. Let the cookies rest at room temperature for 30 minutes to an hour, until they are no longer wet to the touch and a skin forms on top.
  10. While resting, make the filling
    1. Cream together the cream cheese, butter, and vanilla until smooth.
    2. Mix in the powdered sugar until smooth.
  11. When the cookies are dry to the touch, bake for 15-18 minutes until they have risen.
  12. Let rest for 10 minutes before filling. To fill, pipe about about a tablespoon of the buttercream onto one macaron and place another on top.
  13. Macarons are best kept refrigerated until serving.

Tilt-a-whirl Down on the South Beach Drag

The other day, Fran watched Biscuit Week on the GBBO (I had fallen asleep on the couch) and decided Mary Berry’s Viennese Whirls might be a good next bake for me;  I made them this morning and will take them to Daniel and France’s house to day for our day-after Father’s Day dinner.

Baked Whirls

These resemble shortbread cookies/biscuits with raspberry jam and buttercream filling. The cookie should be firm enough to handle, but soft enough to melt in your mouth with each bite. The trick is to adjust the viscosity of the dough to allow it to be piped into 2″ diameter circles using a star tip. To accentuate the whirl shape and  texture, chill the piped biscuits in the refrigerator for 15 minutes before baking. (I didn’t do this and they lost some height and swirl detail.)


I was also making some raspberry jam, so I just sieved some to use for the cookies. I also added some meringue powder to help the buttercream harden a little to make the filling a little firmer without having to keep them refrigerated.


Completed Whirls

INGREDIENTS

For the jam

  • 200g (7oz) raspberries
  • 250g (9oz) jam sugar

For the biscuits

  • 250g (9oz) very soft unsalted butter
  • 50g (1¾oz) icing sugar
  • 225g (8oz) plain flour
  • 25g (1oz) cornstarch

For the filling

  • 100g (3½oz) unsalted butter, softened
  • 200g (7oz) icing sugar, plus extra for dusting
  • ½ tsp vanilla extract
  • 1 Tbl Meringue Powder

METHOD

For the jam,

  1. Put the washed raspberries in a small, deep-sided saucepan and crush them using a potato masher. Add the sugar and bring to boil over a low heat. When the sugar is melted, increase the heat and boil further for 4 minutes. Remove from the heat and carefully pour into a shallow container (pass it through a sieve if you’d rather not have seeds in your jam). Leave to cool and set.

For the biscuits,

  1. Preheat the oven to 375F. Line 3 baking sheets with non-stick baking parchment. Using a 2″ round cutter as a guide, draw circles on each sheet of paper, spaced well apart. Turn the paper over so the pencil marks are underneath.
  2. Measure the butter and icing sugar into a bowl and beat until pale and fluffy. Sift in the flour and cornstarch and beat well, until thoroughly mixed. Spoon the mixture into a piping bag fitted with a medium star nozzle. Pipe 24 swirled rounds (not rosettes), inside the circles on the baking sheets.
  3. Bake in the center of the oven for 13—15 minutes, until a pale golden-brown. Cool on the baking sheets for 5 minutes then carefully transfer to a wire rack to cool completely and harden.

For the filling,

  1. measure the butter into a bowl and sift the icing sugar on top.
  2. Add the vanilla extract and beat with a wooden spoon or an electric whisk until very light and smooth.
  3. Spoon into a piping bag fitted with a large star nozzle.

Spoon a little jam onto the flat side of 12 of the biscuits and place jam-side up on a cooling rack. Pipe the buttercream over the jam and sandwich with the remaining biscuits. Dust with icing sugar to finish.

Tips/Techniques

For this recipe you will need a piping bag, a medium star nozzle, a large star nozzle, 3 baking sheets. If your kitchen is warm and you have time you could try placing the whirls in the fridge for 15 minutes before baking. This will help them hold their shape while cooking.

Delightful Day of Rest

Last night Fran and I co-hosted the Oneg Shabbat at our local temple. For those who are unfamiliar with an Oneg, it is a celebration of the beginning of Shabbat (#4 of the Ten Commandments) and is usually accompanied with food and socializing after Friday evening services.  Each family of the temple is urged to host or co-host one Oneg a year. We co-hosted with our friends Ellen and Mark, and in absentia, Annalee and Jerry.Eclairs and Dipped Strawberries

I offered to make pastries (surprise, surprise) and settled on eclairs and Kouign-Amanns (QUEEN-ah-mahns.) We called on Wednesday to check on the expected attendance (which is always a crap shoot which is perhaps the wrong metaphor.) It was a teen appreciation Shabbat. We also added some fruit bowls and a vegetable tray for the health-conscious Californians. Since I needed a chocolate glaze for the eclairs and I Kouing Amannfigured it would be easy enough to use that as a base to dip a few strawberries. Those plus a few blackberries would add some color and be a good garnish for the patters. Ellen and Mark added some cookies, ruggala and chocolate chip Mandelbrot (like a biscotti) and some cheese and crackers for Annalee and Jerry and another woman donated a large plate of chocolate chip cookies.

Well, the long and short of it is, we ended up with about one large platter for every two people in attendance.  Mark estimated there were about 40 people present. I was pleased there were no eclairs left to bring home, and the Kouign-Amanns would likewise have disappeared had I not snuck some out for Frances. We will bring them to her tomorrow when we go to the Founder’s Day Party to celebrate the opening of the newest Coconut’s Fish Cafe, 20010 Stevens Creek Blvd., Cupertino, CA.

For some unknown reason the veggie platter was left all but untouched. (We left it for the Torah study group that meets Saturday mornings.)

Tart vs. Prostitute

I decided to make a new dessert for Passover this year. Of course, leavening agents, such as flour, yeast etc are prohibited from Passover foods, so the chocolate/orange tart I was considering was out… or was it?

My research into Passover prohibitions and tarts logically led me to a discussion of the difference between tarts and prostitutes. Using the Wiki dictionary (the source of all truths) I find the word prostitute, as a verb, is to use one’s talents in return for money, or fame, or perhaps a few nights lodging, whereas a tart, as a noun, is a small open pie, or piece of pastry. Dictionaries are like statistics: what do you want them to say?

This research actually stemmed from looking at the story of Solomon deciding which woman was the real mother by offering to split the child with his sword and giving half to each woman. The women were actually prostitutes, but their profession was either superfluous to the story, and Solomon’s decision, or not, depending on the interpretation. And, of course, as usual in midrash, there are many more opinions than “opinioners.”

I find it interesting that a judge can rule on a case 3000 years ago by purely considering the facts of the case and not the legal standing of the two women. Some say wisdom began flowing from his mouth when he threatened to cut the child in half. Today so many people with questionable legal standing are unable to appeal to the legal establishment for fear of reprisal due not to the injury they may have sustained but rather for the superfluous state of their resident status. And therefore, so often judgement is rendered without any wisdom present.Almond Flour Tart Shell

Anyway, I decided an almond flour tart shell with chocolate mousse and orange zest swirl is appropriate and fitting for our Passover this year. I made a shell to be confident it would have the taste and texture required, and it did. It doesn’t roll our like a standard AP flour
dough, but can be formed into the tart shell by hand and pastry weights should keep the shape well enough to form the final tart. Because there is less binding agent in almond flour, I doubled the amount of egg.  I will probably increase the almond flour content by 25-50% to make the dough easier to handle and hopefully a little more pastry-like. The chocolate and orange ingredients are allowed anyway, substituting almond flour for AP flour where appropriate.

Please pass over me when the gefilte fish is served!

INGREDIENTS

For the Tart Shell

  • 100 g cold butter cut into small cubes
  • 200 g almond flour (I may increase this by 50g, not sure yet)
  • 60 g icing sugar
  • ½ tsp vanilla
  • ¼ tsp salt
  • 2 eggs (100g)

For the Chocolate Filling

  • 75g butter
  • 115g dark chocolate (no more than 60% cocoa solids), finely chopped
  • 115g caster sugar
  • 55g almond flour
  • 4 medium eggs

For the Orange Filling

  • 25g butter
  • 50g white chocolate
  • 1 orange, finely grated zest only
  • 35g caster sugar
  • 25g almond flour
  • 2 medium egg yolks

METHOD

Tart Shell

  1. Mix butter with sugar (I break up the chunks of butter by rubbing them into the sugar with my hands)
  2. Add salt then vanilla
  3. Add egg and mix well
  4. Stir in flour. Mix by hand until incorporated. I did this in 3 parts mixing well between each.
  5. Cover with plastic and refrigerate for 30 min until it firms up a bit.
  6. Butter (spray) tartlet pan
  7. Coat hands with flour and press the sticky dough into tart mold
  8. Prick holes in bottom and sides of formed dough
  9. Add pastry weights to the pan
  10. Bake in preheated oven 350o F (175o C) for 17 – 20 min
    1. Remove pastry weights with 5 min left in the bake
    2. Remove pastry shells from pans and let cool on wire rack

Chocolate Filling

  1. Melt the butter and chocolate in a heatproof bowl set over a pan of gently simmering water until melted and smooth.
  2. Remove from the heat and stir in the sugar and flour.
  3. Beat in the eggs, one at a time, and leave to stand.

Orange Filling

  1. Melt the butter and white chocolate in a heatproof bowl set over a pan of gently simmering water until melted and smooth.
  2. Remove from the heat and stir in the orange zest, sugar and flour.
  3. Beat in the egg yolks, one at a time and pour the mixture into a bowl.

Assemble and Bake the Tart

  1. Place the tart shell on a baking tray.
  2. Pour the chocolate mixture into the shell.
  3. Drizzle or pipe the orange filling over the chocolate filling to create a swirl effect.
  4. Draw a tooth stick through the filling to create a marbled effect.
  5. Bake for 10-12 minutes, or until just set around the edges, but still slightly wobbly in the centre.
  6. Remove from the oven and allow to cool slightly, until warm but not piping hot, then serve. It is actually very good cold also.

WTF! (What The Fig!)

For Purim this year I made and donated 4 dozen hamantaschen to our California temple for their bake sale. I really, Really, REALLY liked the fig variety and knew there must be another place to use that fig purée.  I was considering homemade Fig Newtons®, but those cookies are available in those so-convenient two serving packages I thought, why try to copy perfection? I mean, artists copy Renoirs to hone their artistic skills, but only as an exercise… for practice… right? How could I chance trying to improve my baking skills and thereby perhaps plagiarize perfection?

I thought a fig-filled/short-bread cookie might Fig Shortbread Cookie 3be a good combination. The slight snap of this buttery cookie and the sweet/tartness of the fig pureé should pair well.  

I was right, but the first batch had a minor problem.  I tried to roll the shortbread dough thinner than usual for cookies, but it still ended up too thick. I rolled them directly on the parchment paper covered cookie sheet thinking they would be too fragile to move after cutting. I chickened out and still left them about 2x too thick, much like leaving your birdie putt short. (NEVER leave your birdie putt short!) By making the cookie thick, the buttery flavor of the cookie overpowered the fig flavor, so I added additional fig filling for each cookie. (What a shame.) When biting the cookie, the filling squeezes out the sides of the cookie and has to be licked off. (What a shame.)

Shortbread Cookie

INGREDIENTS

  • 1 cup butter or margarine, softened
  • ¾ cup powdered sugar
  • 1 teaspoon vanilla
  • 2 ½ cups Gold Medal™ all-purpose flour

METHOD

  1. Heat oven to 350°F. In large bowl, beat butter, powdered sugar and vanilla with spoon. Stir in flour. (If dough is crumbly, mix in 1 to 2 tablespoons butter or margarine, softened.)
  2. Roll dough ¼” (or less if you can) thick on a parchment paper lined cookie sheet. Cut into small shapes and remove the excess, combine and roll out again, and again.
  3. Bake 10 to 16 minutes (depending on thickness of the cookie) or until set and bottoms are light golden brown. Immediately remove from cookie sheet to wire rack. Cool completely, about 30 minutes. I like to slide the parchment paper off the cookie sheet with all the cookies still attached, let cool until cookies release from the paper and leave on the wire rack until cool.

Fig Filling

INGREDIENTS

  • 1 ½ scant cups chopped, stemmed, dried black figs (about 9 ounces)
  • 3/4 cup (177 ml) pomegranate juice
  • ⅓ cup (66 grams) sugar
  • Finely grated zest of 1 orange
  • 1 star anise, or ¼ tsp crushed fennel seeds
  • 1 cup water

METHOD

  1. In a saucepan, combine the figs, juice, sugar, zest, star anise (or fennel), and 1 cup of water and bring to a boil.
  2. Simmer over low heat until the figs are softened and the liquid is syrupy and is reduced to about ½ cup.
  3. Let the figs cool in their syrup, then puree in a food processor until smooth. [If you dislike the taste of star anise, you should remove it before pureeing, but if you do, leave it in.