Like Molasses in October

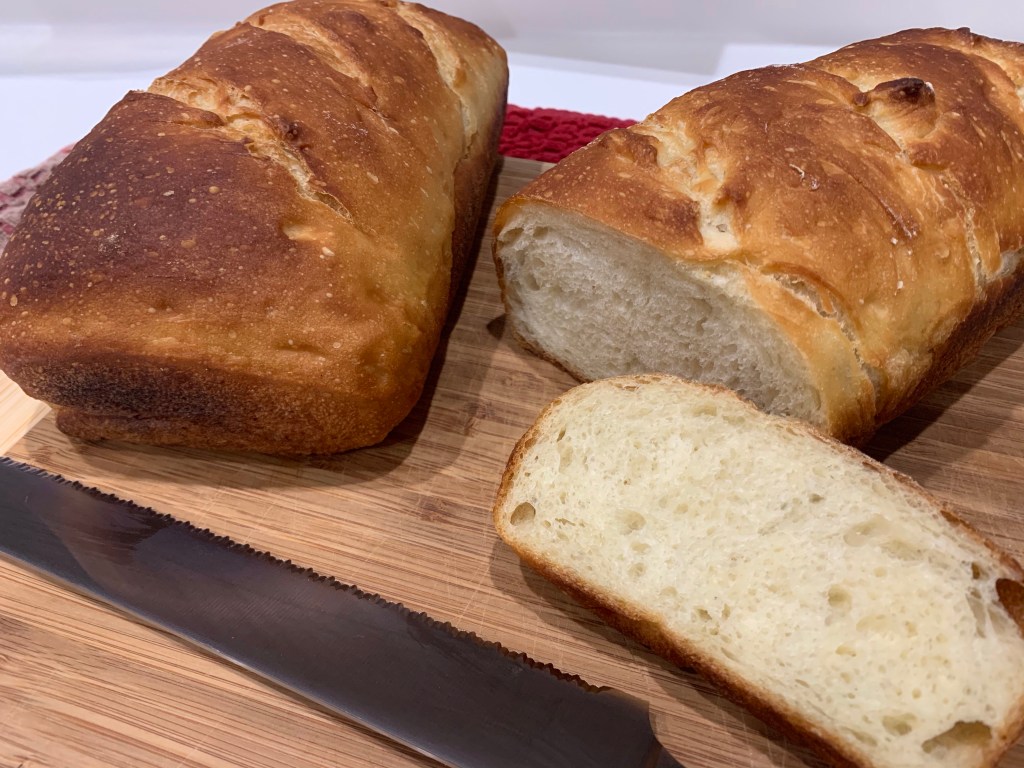
Whole Wheat / Molasses Seeded Bread

I receive King Arthur Baking Company’s magazine and always peruse the products and recipes. This month there was a beautiful picture of their Molasses Multi-Seed Bread and decided to give it a try.

I discovered two things. More seeds are better and try different time/temperature combinations. I made it as directed and the final loaf was overdone, although the internal temp was just 195°F. Next time I will either drop the temp a little, maybe to 350°F or 325°F. I will also tent it with foil earlier. This time, my first attempt, I tented it for the final 10 minutes, but it was too late.

I may also need to buy a tea loaf pan. The standard 4” x 9” was really to small for the bread to be shaped correctly. The 12” x 4” tea loaf, as specified by KAB would be better. Maybe… let it rise (second rise) on a French bread pan. I may try that before investing in a tea loaf pan that I would use infrequently.

Molasses Multi Seed Bread

INGREDIENTS
• 3/4 cup (170g) warm milk, 105° to 110°F
• 1/2 cup (113g) warm water, 105° to 110°F
• 2 tablespoons (28g) butter, melted and slightly cooled
• 1 cup (113g) King Arthur White Whole Wheat Flour
• 2 1/2 cups (300g) King Arthur Unbleached Bread Flour
• 1/8 teaspoon ascorbic acid, optional
• 2 teaspoons instant yeast or active dry yeast
• 1 1/2 teaspoons salt
• 1/4 cup (85g) molasses
• 3/4 cup (129g) Artisan Bread Topping, divided

METHOD

  1. To make the dough: In the bowl of your stand mixer, combine all the ingredients except the bread topping. Mix and knead with a dough hook for about 8 minutes until a smooth, slightly sticky dough forms, adding a tablespoon of flour if needed. With a minute or so left, knead in 1/4 cup of the topping.
  2. Place the dough in a lightly greased bowl, cover, and let it rise until puffy, 1 to 1 1/2 hours.
  3. To shape the bread: Deflate the dough and divide it in half; roll each half into a 12” rope. Roll one of the ropes in the remaining topping. Be sure the rope is VERY well covered with seeds. When it rises the seeds will separate.
  4. Pinch the ends of the ropes together and twist one over the other, pinching them together at the opposite end.
  5. Transfer the dough to a lightly greased tea loaf pan or similar long loaf pan (12″ x 4″). Cover and let rise until the bread domes 1” above the edge of the pan, about 1 hour. Toward the end of the rising time, preheat your oven to 375°F.
  6. Uncover the loaf and egg wash the un-seeded rope.
  7. Bake for 32 to 36 minutes, or until a digital thermometer inserted into the center registers 190°F. The bread was too dark with this time/temp setting. (Drop temp to 350°F and tent the bread with foil after 20 min or so, before it turns dark.)
  8. Remove the bread from the oven and place the pan on a rack for 5 minutes. Tilt the bread out of the pan and return it to the rack to finish cooling completely.
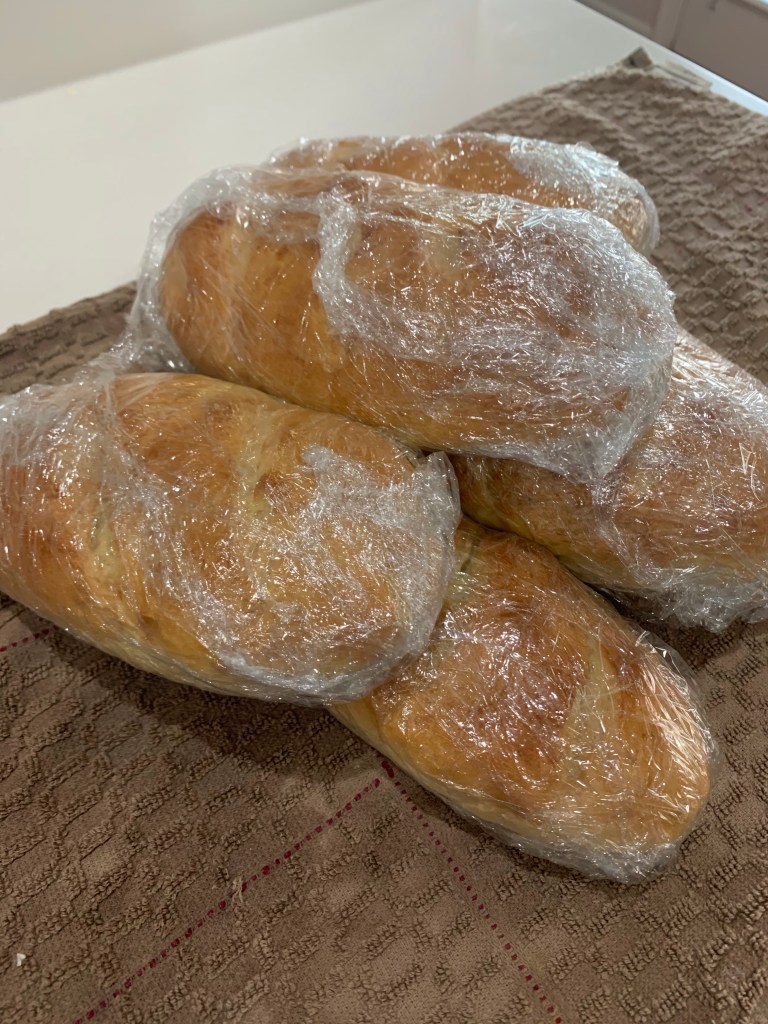
  9. Store bread, well wrapped, at room temperature for several days; freeze for longer storage.

A Day In the Life – Act II

This morning’s Pain Au Chocolat required a couple of hours in the fridge before baking. We needed another batch of hoagie, or sub or grinder rolls after finishing what we had with steak sandwiches last night, and I had time. I also had time for another loaf of honey white bread. Busy morning!!

These are outstanding rolls and I am lucky to have stumbled across the recipe a month or so ago. I wrapped them for freezing before taking a picture so decided to photograph them as wrapped for the freezer. I double wrap them, then give them a couple of hours to thaw before using. After a month, or more, in the freezer, after thawing, they are as fresh as just baked.

Hoagie Rolls

INGREDIENTS
• 448-512g (3½ – 4) c. bread flour
• 308-355 g (1¼ cups plus 2 Tbl – 1½ c.) warm water (110-115F
degrees)
• 2 Tbl sugar
• 2¼ tsp instant yeast
• 1 tsp kosher salt
• 4 Tbl cold butter, cubed
METHOD

  1. Using a stand mixer fitted with the dough hook, mix 2 cups of flour, water, sugar, and instant yeast on low for 4 minutes.
  2. Add the salt and 1 cup at a time of the remaining flour and mix for 5-6 minutes until the dough is slack. (Slack dough is fluid but not liquid. Poured onto a board it could not be shaped. It would flow and not hold a shape.)
  3. At this point, your mixer should be at medium speed. If your dough, after 5-6 minutes is not slack add in a bit more water (2-4 Tbl). The additional water will fully depend on how humidyour room is.
  4. Add the butter 1 Tbl at a time and mix until almost fully blended before adding the next Tbl. In total, mix for 1-3 minutes or until the dough comes back together. Remove from bowl and transfer to a greased, covered bowl until doubled in size. ~1 hour.
  5. Punch the dough down and place on a very lightly floured board. Divide into 4-8 pieces and shape. I would advise using as little flour as possible when shaping these. The more flour you add, the tougher the hoagies will be. (Hoagie rolls: 125 g, Hamburger rolls: 75g)
  6. When you divide the dough, with your fingers, gently pat into a 4:3 rectangle where the dough is about 1/4″ thick.
  7. Envelope fold the short end of the rectangle towards the center and press gently to seal.
  8. Rotate the dough 180 degrees and repeat the above folding using your hand to seal the dough.
  9. The dough should be shaped like a log/snake. Gently cup your hand over the center of the dough and, without applying pressure/pressing down, gently roll the dough back and forth to reinforce the seal and roll it out into a log.
  10. Carefully pull the ends of the log outwards to stretch out dough (just an inch or so – again dependent on how long you want your rolls).
  11. To help round out the ends, cup each hand at the end of the roll and move them in opposite directions with a back and forth motion to roll the ends and then tuck underneath the roll.
  12. Transfer to a parchment lined tray and cover with lightly sprayed plastic wrap. Allow to rise again until almost doubled. ~30-45 minutes. Do NOT overproof them otherwise they will fall flat.
  13. Preheat oven to 375 F. If you want to slash your bread, using a lame, make your slashes. If desired, brush with coating of choice and bake for 16-23 minutes or until golden brown. To ensure doneness, test the internal bread temp. It should be at 200F.

A Day In The Life – Act I

So, I started the morning with Pain Au Chocolat, (making, not eating.) I have some opened chocolate I need to use before I open the new bag. To me, baking is a hobby so I like to make everything I can from scratch. I don’t use mixes or other short cuts…. except for puff pastry. In the past I made puff pastry a few times and must admit that what I make is not nearly as good as what is available in the super market.

I buy two brands of puff pastry. Trader Joe sells a box with two 10”x10” sheets. TJ’s is good when you don’t want a huge puff when baked. If you knock it before baking it will puff less than 100%, which is what I used for todays pastry. Pepperidge Farms puff pastry also comes in two sheets per box, but each sheet is conveniently individually wrapped. This pastry puffs 200% if baked without knocking, a little less if you do. Pepperidge Farms is available year round, while TJ’s is only available from roughly Thanksgiving to New Year’s. Buy a few boxes and put them in the bottom of your freezer. I do.

Using Trader Joe’s puff pastry makes Pain Au Chocolat a snap. There is the added benefit it is also delicious.

Pain au Chocolate


INGREDIENTS
Puff pastry (Trader Joe’s)
Chocolate ( I used Guittard’s 63%)
Confectioner’s sugar

METHOD

  1. Roll out puff pastry
  2. Dust with confectioner’s sugar
  3. Cut into 2” wide (Trader Joe’s Puff Pastry – cut 5 long strips, then cut each in half)
  4. Lay chocolate at one end, roll one time, press down gently and roll again, press gently again
  5. Add second row of chocolate and roll one last time, press gently
  6. Chill overnight or at least 2 hours.
  7. Brush with egg wash
  8. Bake 360 deg 20-25 min on parchment lined baking sheet

Chocolat de Couverture Noir

On a visit to a Restaurant Depot my Q.C. Department convinced me to buy 11 lbs of bulk Chocolat de Couverture Noir. (64% is dark chocolate is not very bitter. I use 73% for dark bitter chocolate.) My question is… what should I make with it?

I am thinking Pain au Chocolat, chocolate croissants, chocolate chip cookies and/or brownies. Note the fluidity on the package. This chocolate is suitable for coating caramel, creams, berries and other confections.

Last year I made an over the top chocolate/orange tart. My neighbor’s orange tree has a abundance of oranges too high up for her to harvest. Hmmm……

Maybe something I made before: Eclairs? Chocolate Babka? Soufflés? Chocolate pudding? (Try the easy home made chocolate pudding recipe.) Chocolate chip scones? Lava Cake? Chocolate Fudge? Oh yes, chocolate fudge!!! (Maybe chocolate/peanut butter fudge, the QC department doesn’t like Chocolate/peanut butter fudge.)

Andy other suggestions?????

Berry, Berry, Berry Good Scones

Half of our Q.C. department requested we make some scones. Having never tried our hand at them we finally made some this morning. I found a recipe and modified it to suit my needs. They will become a regular treat here!

These are 3 berry drop scones. They are 3 berry ‘cause I forgot I was making raspberry/blueberry scones and added blackberries. Once I realized what I did I added a half cup of blueberries.

Once mixed, large tablespoon portions are “dropped” onto a parchment covered baking sheet. I ended up baking them for the full 19 minutes at 400F. It was just about right. I forgot to sprinkle some coarse or turbinado sugar, but they didn’t really need it.

Raspberry/Blueberry Drop Scones

Ingredients
• 2 1/2 cups all purpose flour
• 1 tablespoon baking powder
• 3/4 teaspoon kosher salt
• 1/3 cup sugar
• Zest of 1 small lemon (or half a large lemon)
• 1/2 cup unsalted butter, chilled and cut into cubes
• 3/4 cup fresh blueberries
• 3/4 cup fresh raspberries
• 1 cup heavy cream
• Coarse or turbinado sugar for topping

Directions

  1. Preheat oven to 400. Line a baking sheet with parchment paper.
  2. In the bowl of a food processor, add the flour, baking powder, salt, sugar and lemon zest. Pulse a few times to incorporate.
  3. Add the cubed butter and pulse to incorporate. The mixture should resemble very coarse sand.
  4. Empty the flour mixture into a mixing bowl. Add the cream and stir until just barely incorporated.
  5. Gently fold in the berries. It’s fine if the raspberries break up a little – it adds a nice pink stain to the dough. The dough should just be moist, not wet, but also not crumbly or powdery looking. If it looks too dry, add a tablespoon of cold water.
  6. Spoon the dough into 12 equally-sized pieces on the parchment-lined baking sheet. Sprinkle some coarse or turbinado sugar over the top, if desired.
  7. Bake for 16-19 minutes, rotating the pan halfway through. The scones should be lightly golden and cooked through.
  8. Cool in the pan for 5-10 minutes then carefully remove to a cooling rack.

Homemade Hot Fudge

10 – 20 – 30 Minute Homemade Hot Fudge: 36 years ago tonight Fran embarked on a hiatus from chocolate consumption. You see, our son Daniel would be born the next morning and as Fran was going to nurse, she had to abstain. It was certainly worth it, especially as I had no such restrictions.

To commemorate Dan’s birth I made what was amusingly referred to as 10 Minute Hot Fudge. I suppose it would be an accurate title if you started the timer after you measured and chopped all ingredients before you started the clock, but I didn’t. 30 minutes later our celebration began. It was well worth the wait. It is exceptional hot fudge.

The hot fudge is not to sweet and has a great consistency. Well worth the effort!

10- 20- 30- Minute Homemade Hot Fudge


INGREDIENTS
• 2/3 cup heavy cream (I used half-and-half)
• ½ cup light corn syrup
• 1/3 cup light brown sugar – not packed
• ¼ cup unsweetened natural cocoa powder (I used natural, Dutch-process may be used; if your cocoa is particularly lumpy, sift it)
• ¼ teaspoon salt, optional and to taste
• 6 ounces dark or bittersweet chocolate, finely chopped (I used 3 ounces 63% Guittard and 3 ounces 70% Scharffen Berger chocolate.)
• 2 tablespoons unsalted butter
• 2 teaspoons vanilla extract

INSTRUCTIONS

  1. Bring cream, corn syrup, brown sugar, cocoa powder, optional salt, and half the chopped chocolate to a boil in a 1 to 1 1/2-quart heavy saucepan over moderate heat, stirring, until chocolate is melted. Reduce heat and cook at a low boil for 5 minutes, stirring frequently.
  2. Turn off the heat and add butter, vanilla, remaining chocolate, and stir until smooth. Cool slightly before serving.
    Cooled sauce can be stored in a jar with a lid or in airtight container in the refrigerator for many weeks. Reheat sauce before using by placing the desired portion in a microwave-safe bowl and heating for about 10 to 15 seconds, or reheat on the stovetop.

And Now for Something Slightly Different

We nearly ran out of bread today, can you believe it? I thought it might be fun to make a minor change in my technique, and I mean minor. Instead of using a Dutch oven for the 75% Hydration Honey Bread, I decided to make two small loaves and bake them in a steam oven.

It worked fine. The bread is an acceptable size for sandwiches or toast. The crust isn’t quite as firm, but again, acceptable. The texture of the bread was spot on. Overall, I am pleased with the results of the experiment.

(The recipe below uses a Dutch Oven)

Honey No Knead 75 Percent Hydration Bread

Advanced No-Knead Bread

INGREDIENTS
• 600 g all-purpose flour (about 4 cups using ‘scoop and sweep’ method)
• 450 g water (2 cups, room temperature)
• 21 g honey (1 Tbsp)
• 14 g kosher salt (1 level Tbsp)
• 3 g SAF Gold instant yeast (1 tsp)

METHOD

  1. Add the water and honey to a large bowl and mix until the honey is dissolved.
  2. Add the rest of the ingredients and mix by hand, until a sticky homogeneous mass is formed. Cover the bowl with a plastic wrap and let rest for 1 hour.
  3. After one hour, perform stretch and folds every 30 minutes over the next 1½ hours. Let the dough continue its fermentation for additional 1½ hours or until it doubles in size.
  4. Shape the dough in a ball and transfer to a proofing basket dusted with a 50/50 mix of all-purpose and rice flour, seam side up.
  5. Cover with a piece of paper towel (this will prevent sticking of the dough to the plastic wrap), then with a plastic wrap. Let proof for about 60 minutes or until the dough passes the finger test. (Poked with a finger the indentation will spring back very slowly.) The dough will increase in size about one a half times or so.
  6. Place a baking stone and a steam pan in the oven. Place the Dutch Oven into the oven and preheat to(450) 500oF. An hour of preheating is recommended.
  7. Turn the bread over on a piece of parchment paper. Score on top and lower the dough into the preheated Dutch Oven. Be careful opening the oven, it will be full of hot steam. Spray the walls of the oven with a bit of water (gentle mist) to re-create some of the lost steam and close the door.
  8. Immediately drop the temperature to (400) 450oF and bake for 25 minutes.
  9. Remove the water pan from the oven, turn the bread 180 degrees and leave the door cracked open. You can use a wooden spoon for that. Bake for another 25 minutes.
  10. When the baking is done, remove the bread from the oven and place on a cooling rack. Cool for 1 hour at room temperature before slicing.

I care. You Care. Eclairs!

It’s Wednesday and I don’t (usually) play golf on Wednesday. What will I do to occupy my time? What will I do? Well, I froze some choux pastry a couple of months ago, just to have some for an emergency. Choux freezes well but should be used within a few months. Plus I had some leftover chocolate glaze. All I needed was some creme patisserie (which I made before dawn today,) and I could have some eclairs! (I also made a loaf of bread later in the morning.) A very full day!!

Recipe and technique are here: https://abatteredoldsuitcase.com/2016/12/19/a-b-c-d-eclairs/

Fresh Bagels – ET? Anyone?

Recently, I mentioned I still had the alkali bath to boil, brown and make a nice skin on the pretzels and with minor changes would work for bagels as well. So…. today we have bagels.

I used the Chef Steps recipe I posted here some time ago. I also posted the recipe below.

Chefsteps Bagels

I made four ET bagels for me and six plain bagels for Fran (and me). Notice how I cleverly worked the ET title into the text of the post?

Bagels from ChefSteps
INGREDIENTS
• 350 g Water, plus more for boiling
• 650 g Bread flour, divided
• 3 g Active dry yeast
• 25 g Sugar, granulated, optional
• 25 g Diastatic malt powder
• 10 g Salt
• Nonstick spray, as needed
• 25 g Molasses
• 10 g Baked baking soda
OPTIONAL
• 10 g Black sesame seed
• 10 g Dried onion flakes
• 10 g Salt, Maldon flake
• 7 g Poppy seed
• 5 g Sesame seed
• 5 g Dried garlic flakes

METHOD

  1. In a stand mixer bowl, combine 350 g room temperature water, 250 g of the flour, and the active dry yeast. Cover the bowl with plastic wrap or a damp cloth and let the mixture proof at room temperature until it doubles in size and makes frothy bubbles that collapse when you tap the bowl on the countertop. This takes about two to three hours. (Look for a foam that resembles the one on a root beer float. If you don’t see this yet, just give the yeast a bit more time to work its magic.)
  2. In a bowl, combine the remaining 400 g of bread flour with 25 g sugar, 25 g diastatic malt powder, and 10 g salt.
  3. Reattach the bowl containing the sponge (from Step 1) to the stand mixer and fasten on the dough hook. Set the mixer to low. Gradually spoon in the dry ingredients and let the dough mix until it becomes stretchy and smooth and pulls away from the sides of the bowl, about 15 to 20 minutes. (This will be rough work for your stand mixer.)
  4. Cover the bowl with a damp cloth and let the dough cool in the fridge for 20 minutes.
  5. Working quickly to keep the dough cool, divide it into 130 g portions and set them on a parchment paper lined pan. Keep the entire sheet covered with plastic wrap as you work, tucking each new portion underneath the plastic wrap to keep any crust from forming.
  6. First, form a dome. Make a circle with one hand, place a piece of portioned dough halfway inside it, and use one finger of your other hand to turn the dough while gradually pushing it through the circle tightening the dough as you work around the outside. You want to end up with a nice, taut dome.
  7. Next, turn that dome into a ball. Hold the dome with the concave underside facing up. Pinch the dough closed across the “bowl,” then roll the seam on the work surface until smooth. When you finish each piece, return it to its spot under the plastic wrap on the sheet pan.
  8. Cool the dough balls in the refrigerator for 20 minutes.
  9. Working with one ball at a time, use two fingers to pinch a hole through the center of the dough, turning it while you work. Once you break through the dough, turn it on its side (like a spinning wheel). Stick both of your index fingers through the hole from opposite directions, and spin them around each other, slowly stretching out the hole until you can fit three fingers through it. Return the shaped dough to its covered spot on the tray. (You might need a second tray.)
  10. Allow to proof at room temperature until a dough ring floats when set in a bowl of water. This will take about 20–40 minutes. (If the test ring sinks, proof a bit longer.)
  11. Make sure the tray(s) are wrapped tightly with plastic wrap, and let them cool in the refrigerator overnight to allow flavors to develop.
  12. In a large pot over high heat, bring 5 L water, 25 g molasses, and 10 g baking soda to a boil.
  13. Preheat the oven to 425 °F / 218 °C (Use convection if available)
  14. Working in batches, drop the bagels into the water and boil for 60 seconds, then flip them with a spider strainer or fork and boil for another 60 seconds. Transfer them, smooth sides up, to a wire rack on a half-sheet pan.
  15. (TRY AN EGG WASH ON SOME OF THE PLAIN BAGELS)
  16. If you’re adding the seasoning mix—or your own choice of toppings—now’s the time to sprinkle it over the tops of the bagels.
  17. Transfer the bagels to a parchment paper–lined half-sheet pan and move it to the center rack of the preheated oven.
  18. Bake for seven minutes, spin the tray around to ensure even cooking, and continue baking until bagels have a nice, brown color—about seven more minutes.

One of My Favorite Tools

I don’t know how I got by without one of these dough whisks. For everyone who does a significant amount of making dough for bread, pretzels, bagels, donuts etc, this is a must have took. It makes the initial mixing, prior to kneading or stretch and pull so much faster and easier. Do yourself a favor and buy one.