Dave Oney was born mid last century in Middlebury, Vermont. He received his BS in Chemistry and worked as a polymer chemist in Massachusetts and New Jersey. He became a microscopist (someone who studies little bitty things using a microscope) and photomicrographer (someone who photographs little bitty things) before settling into a 35-year career in technical sales of scientific imaging equipment (the science of digitally recording itty bitty things, sending the image to a computer for analysis.) He designed and created a number of products contributing to this field. He is (was) proficient in several computer languages and is currently working on mastering English.
After making a few more paradigm shift career changes Dave and his wife, Fran, retired and moved closer to their children and granddaughters and now live in the foothills of the Sierra Nevadas.
This noon we are co-hosting a soup and bread lunch for a group of friends. I decided to make some of my favorite breads to share. They are all documented in this blog, so I am not including any recipes here.
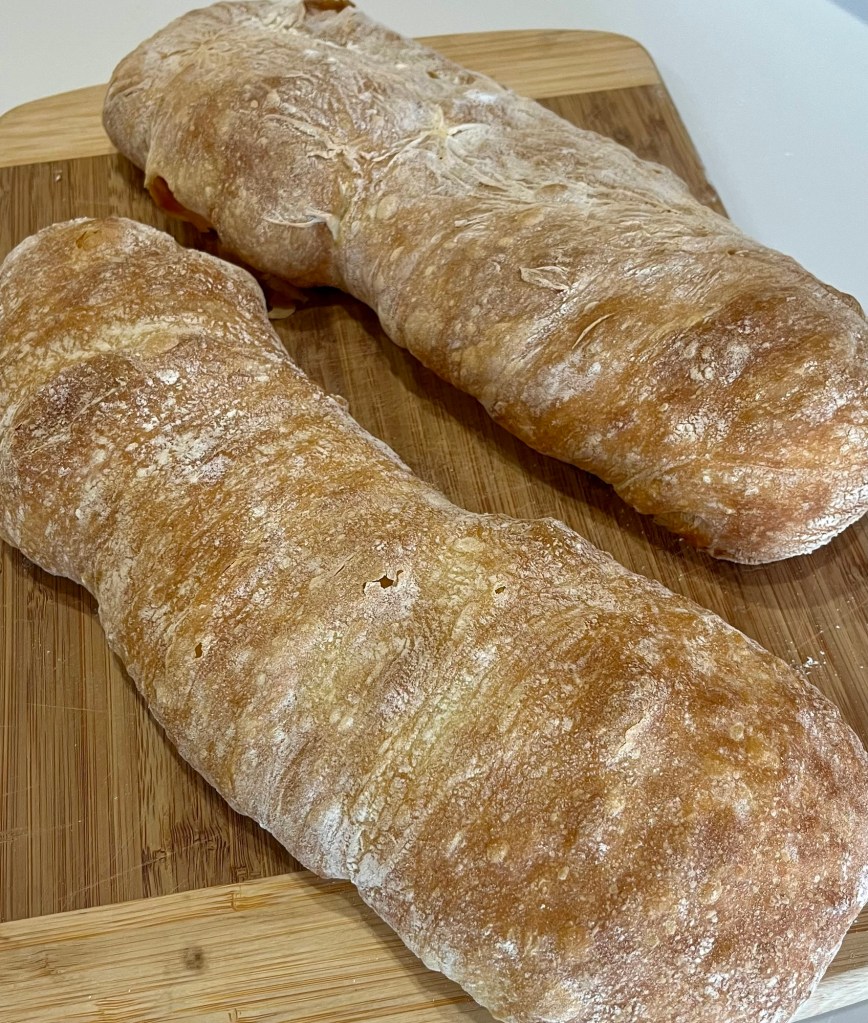
Pan de Cristal, or ice bread, is one of my favorites. It’s an open structure and crisp crust bread, and so good.
Artisan bread rolls are easy to make and are always delicious. I simply formed my normal artisan bread into small rolls and baked for a shorter time.
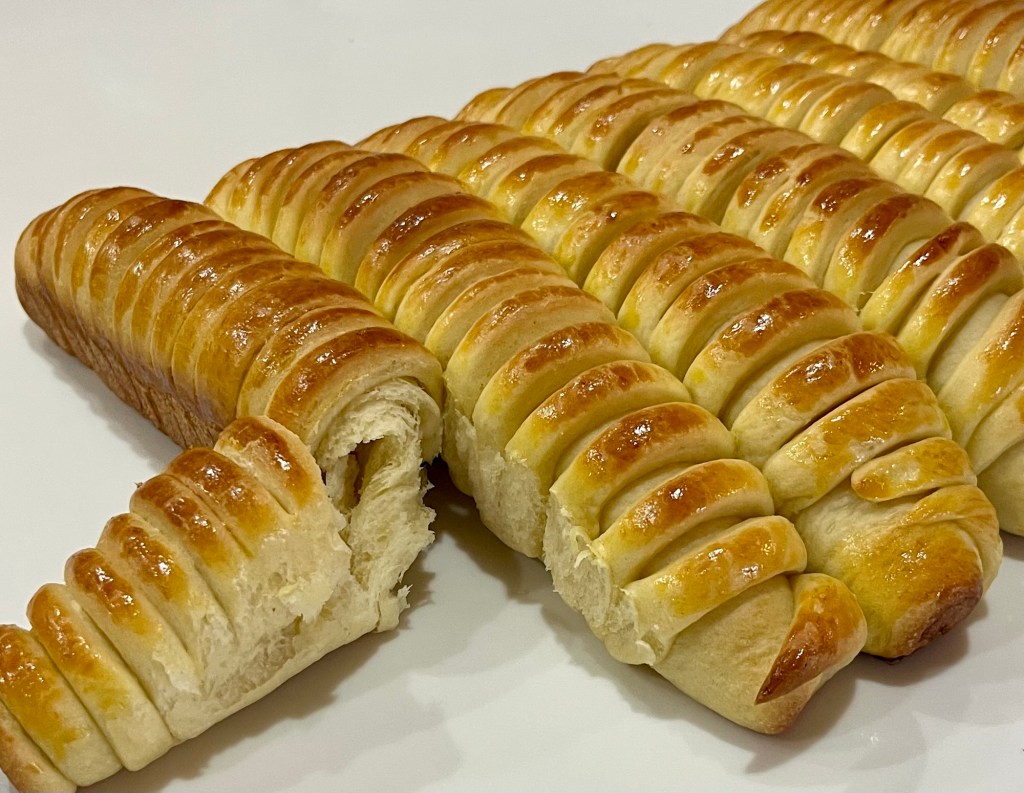
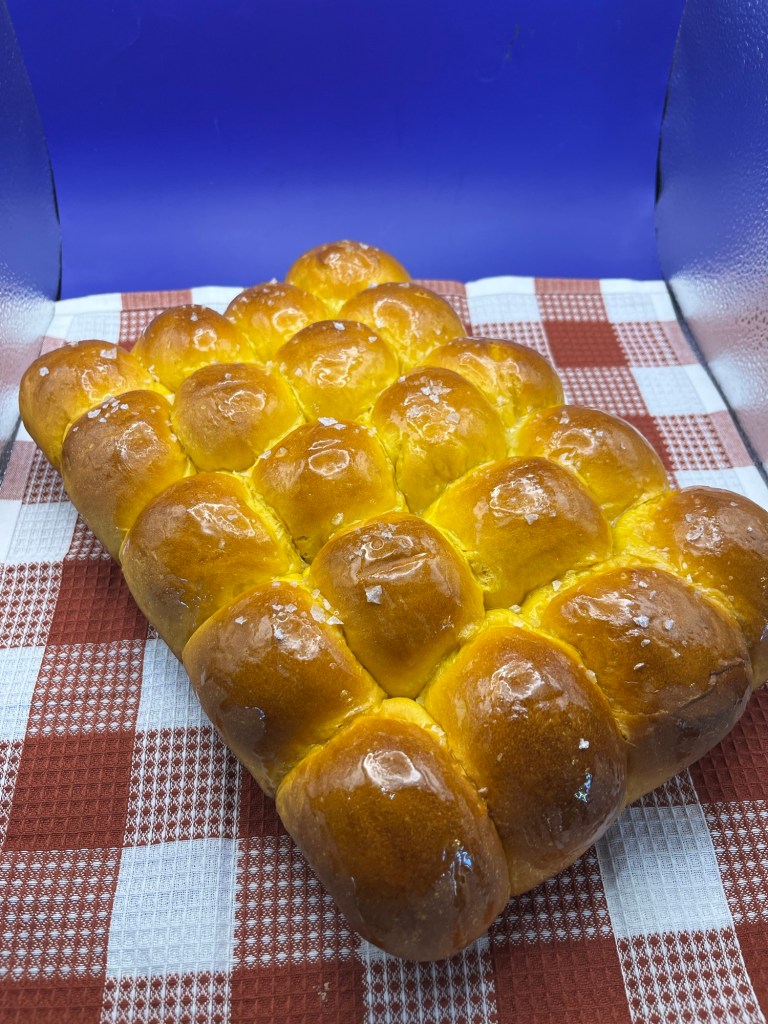
I saw a picture of Angel Hair Bread and of course, searched for a recipe. The one I found included a number of flaws, which I fixed, except one. The recipe didn’t call for any salt, and while I thought that was odd, I decided to give the bread a bake anyways. Note to self: If you think it is wrong, fix it.
The author also neglected to add the baking powder although it was listed in the ingredients, (I added it with the first portion of flour.) They also didn’t specify a pan size, but I calculated a 9 x 12” would work, also, I added oiling or spraying the pan, Parchment paper would have helped also, next time.
They also didn’t bother to give approximate times for resting, proving or baking. I watched, timed and noted everything.
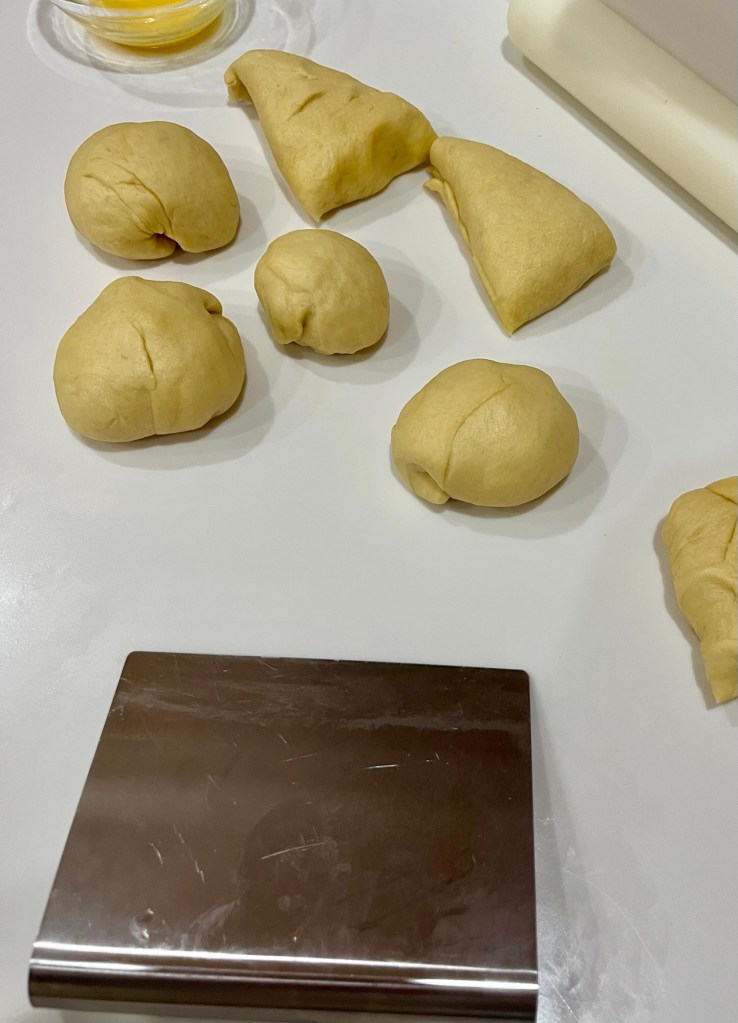
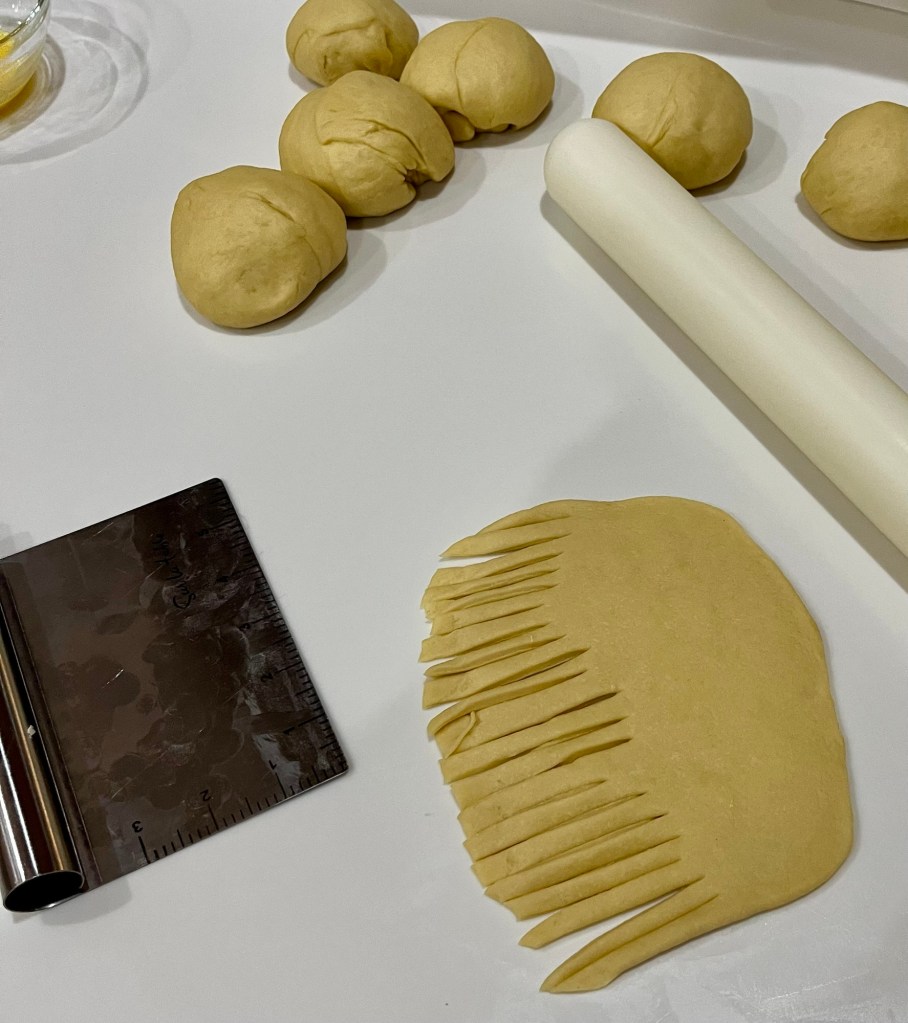
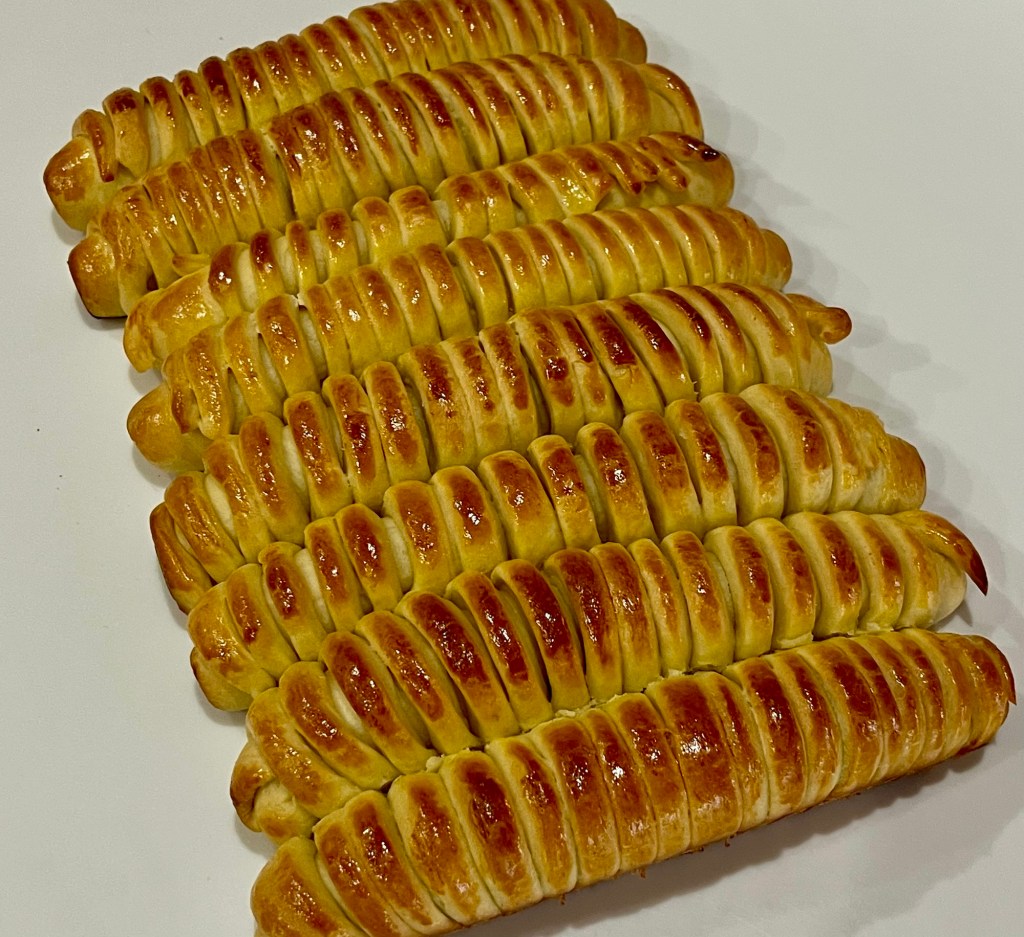
Divided into 8 segmentsRolled to ~6×8” and slicedPlaced in oiled pan and egg yolk washedFinished loafFinished loaf showing crumb
The flavor is good, (although salt would have made it very good), and the crumb is excellent.
Angel Hair Bread
INGREDIENTS • 1 ¼ c warm milk • 2 eggs (1 for egg wash) • 3 Tbl sugar • 1/3 c oil • 10 g yeast • 10 g salt • 10 g baking powder • 700 g AP flour
METHOD
Add warm milk, 1 egg, sugar, oil, salt, and yeast and mix well.
Add 100 g of wheat flour and baking powder in 2-3 portions mixing well after each addition.
Let rest 10 – 30 minutes until mixture is a little firm and full of bubbles
Add the remaining flour and mix well
Dump onto the table and knead it until it becomes smooth, ~8 minutes
Let it rest 45 – 60 minutes (until doubled in size.)
De-gas the dough then knead again
Roll into a circle and divide into 8 pieces.
Form into balls, then roll out to ~6” x 8” ovals
Pinch one long edge of oval to stick to work surface. I stretched the stuck edge to form a rectangle, then cut slits ~ ½” into the thin edge and roll up so that the fingers are exposed.
Lay into an oiled or sprayed 9”x12” baking pan
Leave to rest 10-30 minutes, preheat oven while resting.
Wash with the egg yolk mixed with a Tbl water.
Bake at 350⁰F for 20-30 minutes, until golden brown.
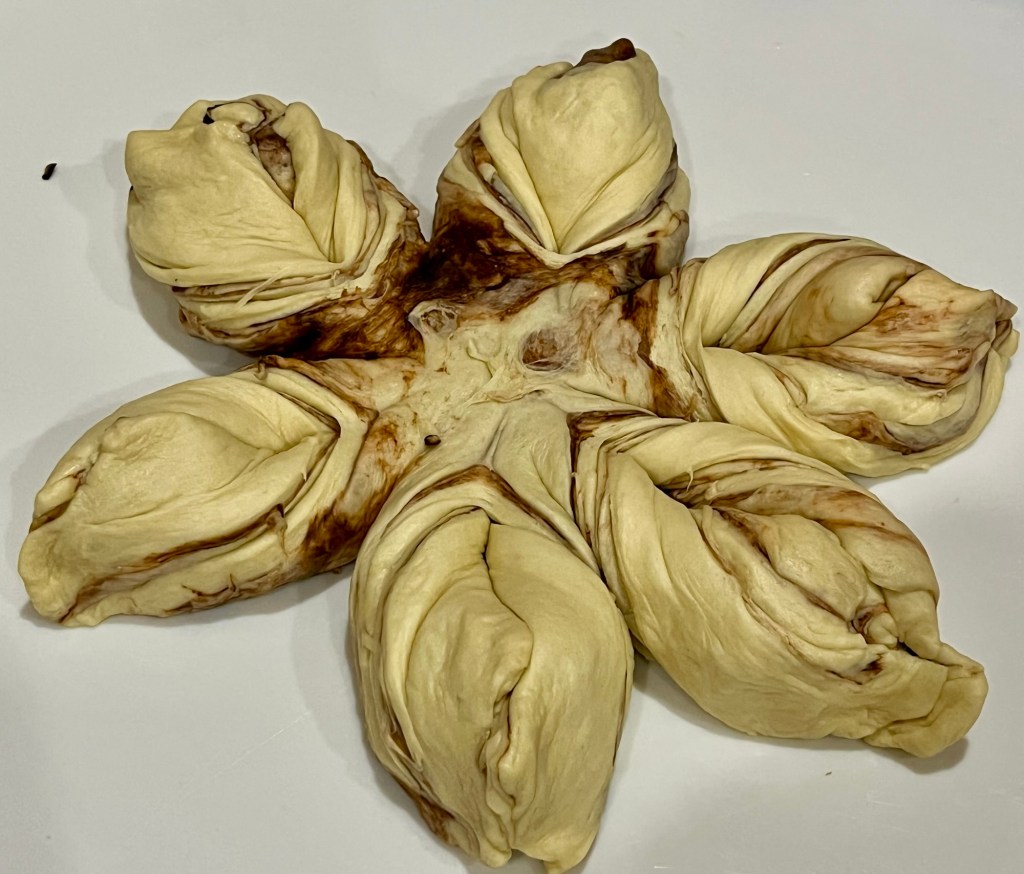
I made this trial loaf for a luncheon I am co-hosting next week. I made this type of bread before but my co-host is making soups and I wanted a bread that wouldn’t fight with the flavors of the soups. Rather than use cinnamon or chocolate to make the color, I used some gel food coloring.
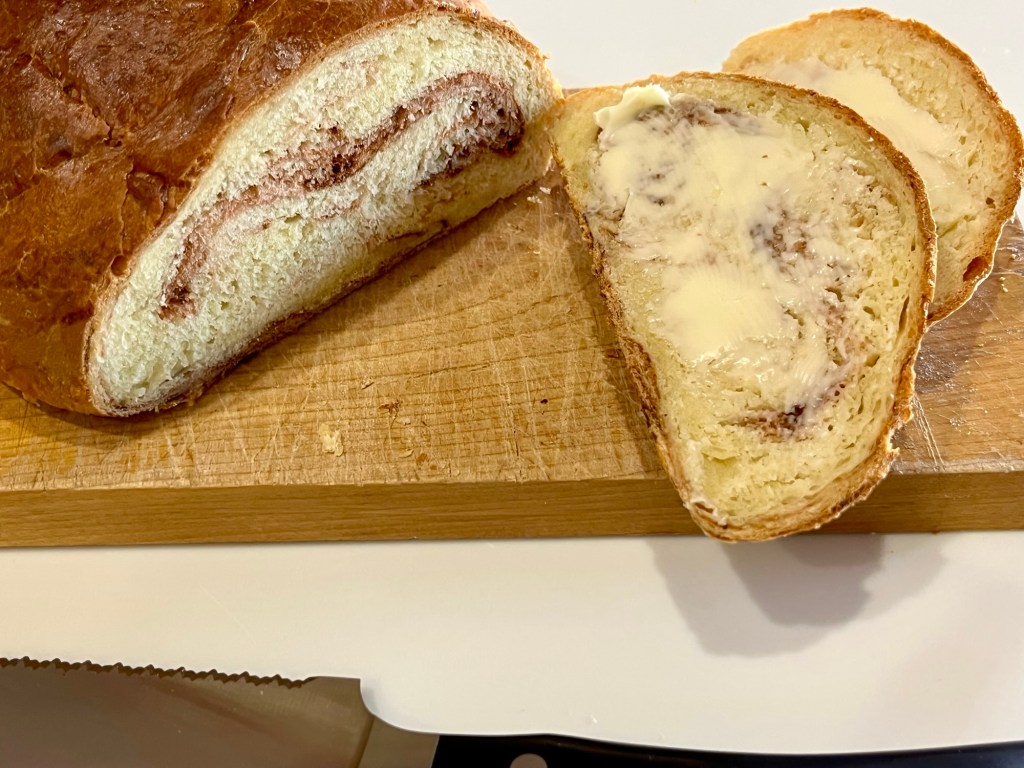
I used my dinner roll recipe as the soft texture would pair well with the various soups. The resultant bread is soft, tender and if you closed your eyes and thought “dinner rolls” that is what you would think you are eating.
Pre-baked star breadScraps as a bouleFinished star breadFinished “Scrap Boule”Inside of “Scrap Boulevard”
Bi-Color Pull Apart Rolls
INGREDIENTS • 488g (2 cups) warm milk • 2 Tbl instant dry yeast • 50g white granulated sugar • 2 tsp salt • 6 Tbl salted butter softened • 2 large eggs • 750-850g all-purpose flour • 1 egg and 1 Tbl water
METHOD
In a stand mixer bowl, combine and mix all ingredients except the flour.
Add in 5 ½ cups of flour. Using a dough hook, turn the mixer on and increase speed slowly to keep the flour from flying all over. Slowly add the remaining flour until the dough pulls away from the sides of the bowl. (I watch the bottom of the bowl and add flour until the dough just comes clean from the bottom.) Once the dough clears, knead for 8 minutes. The dough mixture should be sticky and soft.
Transfer the dough to a lightly greased bowl. Cover and let rise 35-45 minutes (until doubled) in a proofing drawer,
Punch down the dough and form into 2 balls. (I like to weigh the dough and divide the total weight by 2 to make equal sized balls. My dough weighed 1630 g therefore, each ball should be ~815g.)
Add 2-3 drops of brown gel food coloring to one ball and knead until well mixed. (Wear gloves)
Divide each ball into two smaller balls, each ~400g and form each into a rough circle ~6” diameter, then roll out into circles ~10”
Stack the circles interleaving the light and dark colored ones.
Center a 10” cake pan and trim the circles with a pizza cutter to an even circle.
Set a 3” bowl in the center of the stack of circles and press down making an impression
Use a pizza cutter to cut the dough from the perimeter to the outside of the 3” circle into 12 equal portions
Twist adjacent portions away from each other and pinch the ends into a point.
Combine the scraps and roll into an oval, fold and form into a boule.
Cover and let rise 20-30 min. Re-pinch the ends as you stretch them out, then tuck the thin ends under the bread.
Whisk the egg and water and use to egg wash the breads
Preheat oven to 375⁰F. Bake for 20 to 30 minutes, until lightly browned. (Tent the bread with foil after 15 -18 minutes to prevent over browning.) Internal temperature should be ~190⁰ F
Best when served warm. To cool, let rest in the pan for 15 minutes then transfer to a wire rack. Once cooled completely, store in a plastic bag.
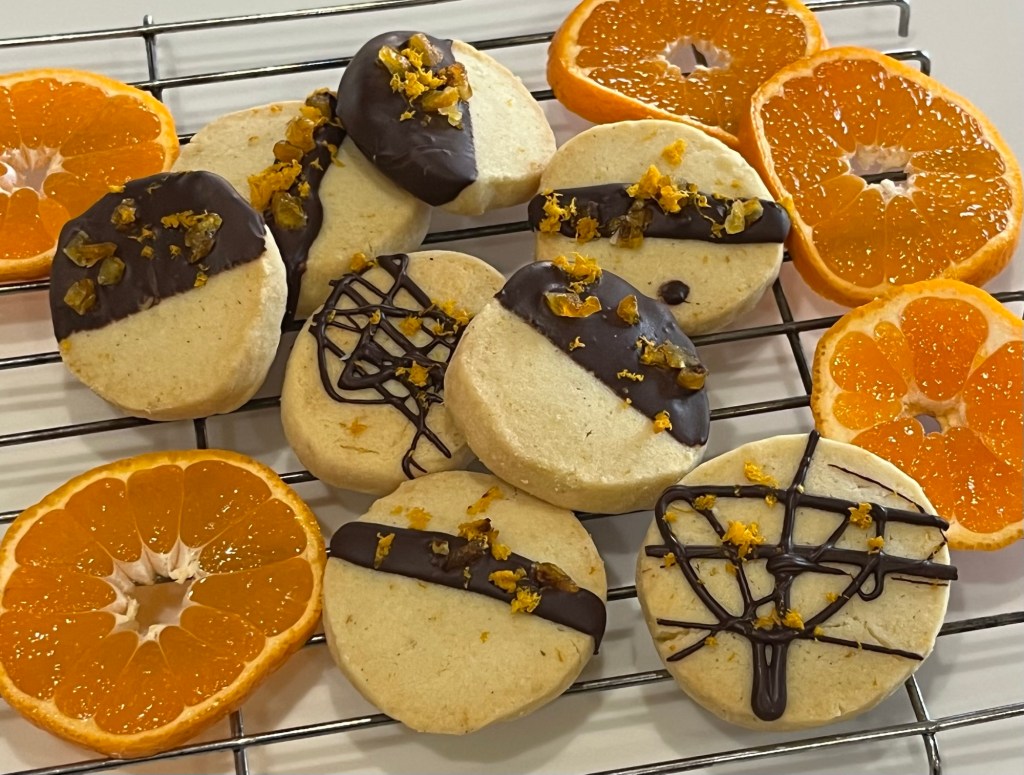
Our neighbor, and QC Cadre member, gave us mandarin oranges off her tree, so once again I “processed” and returned to her in a different form. I thought the chocolate dipped orange shortbread cookies were really good, until I sampled the cranberry pistachio shortbread cookies.
Both are easy to make and take little hands-on time, and both are well worth the effort.
Pistachio and CranberryChocolate and Orange
Chocolate Dipped Orange Shortbread Cookies
INGREDIENTS • 1 c unsalted butter, softened • ½ c powdered sugar • 2 tsp orange zest (from 1 orange) • 1 tsp vanilla extract • 2 c all-purpose flour • ¼ teaspoon salt • ½ c dark or semi-sweet chocolate, melted • finely chopped candy orange or zest for garnish
METHOD
In a large mixing bowl, cream the softened butter and powdered sugar until light and fluffy.
Mix in the orange zest and vanilla extract until evenly combined.
In a separate bowl, whisk together the flour and salt. Gradually add this to the wet ingredients, mixing until the dough just comes together.
Roll the dough into a log about 2 inches in diameter, wrap it tightly in plastic wrap, and refrigerate for at least 1 hour or until firm.
Preheat your oven to 350°F (175°C) and line a baking sheet with parchment paper.
Slice the chilled dough into 1/4-inch-thick rounds and place them on the prepared baking sheet, about 1 inch apart.
Bake for 15-20 minutes, checking often after 12, until the edges are lightly golden. Allow the cookies to cool completely on a wire rack.
Once cooled, dip half of each cookie into the melted chocolate and place them on parchment paper to set. Sprinkle with finely chopped candied orange or additional orange zest if desired.
Let the chocolate set fully before serving or storing in an airtight container.
Cranberry Pistachio Shortbread Cookies Recipe
INGREDIENTS • 1 cup (2 sticks) unsalted butter, softened • 3/4 cup powdered sugar • 1 tsp vanilla extract • 2 cups all-purpose flour • 1/2 tsp salt • 1/2 cup dried cranberries, chopped • 1/2 cup shelled pistachios, chopped
METHOD
In a large bowl, beat the softened butter and powdered sugar until light and fluffy, about 2-3 minutes. Add the vanilla extract and mix until combined.
Add the Flour and Salt:
Gradually add the flour and salt to the butter mixture, mixing until just combined.
Fold in the Cranberries and Pistachios:
Gently fold in the chopped dried cranberries and pistachios until evenly distributed throughout the dough.
Divide the dough in half and shape each portion into a log about 2 inches in diameter. Wrap each log tightly in plastic wrap and refrigerate for at least 1 hour, or until firm.
Preheat the oven to 350°F (175°C). Line a baking sheet with parchment paper. Remove the dough logs from the refrigerator and slice them into 1/4-inch-thick rounds.
Place the cookies on the prepared baking sheet, about 1 inch apart. Bake for 15-20 minutes, checking often after 12, until the edges are lightly golden.
Let the cookies cool on the baking sheet for a few minutes, then transfer them to a wire rack to cool completely.
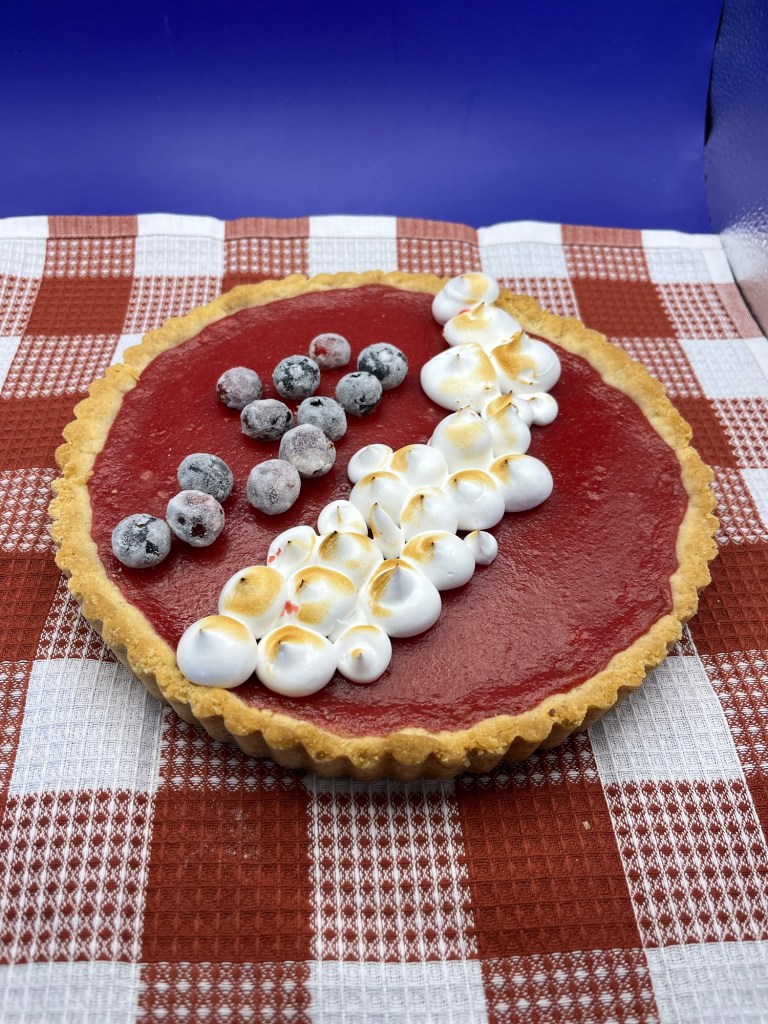
By special invitation is my almond-crust-cranberry-curd tart.
Today is Thanksgiving in the USA . Thanksgiving is a national holiday celebrating the harvest and other blessings of the past year. It is believed to be modeled on a 1621 harvest feast shared by the English colonists (Pilgrims) of Plymouth and the Wampanoag people.
For my whole life Thanksgiving centered around family and friends, old and new, sharing both a meal and each other. As a child Thanksgiving was held at our house and all our aunts, uncles and cousins would come for a huge mid-day meal. We had to finish early as our uncles had to go back to the farm to milk the cows. I had a lot of aunts and uncles and LOTS of cousins. Mostly I remember the pies, so many pies.
Since moving to California our son and daughter in law have hosted Thanksgiving and this year was no exception. There were over 20 people and enough food for 50.
I made an apple pie, an almond-crust-cranberry-curd tart (see below) and sweet potato dinner rolls. There were also two pumpkin pies and very little left when we were done.
Cranberry Curd Tart Almond Crust
INGREDIENTS For the crust • 99g (½ c) granulated sugar • 113g (8 Tbl) unsalted butter, softened • ¼ tsp table salt • 1 tsp King Arthur Pure Vanilla Extract • ½ tsp almond extract • 180g (1½ c) King Arthur Unbleached All-Purpose Flour • 72g (¾ c) almond flour or finely ground sliced or slivered almonds
For the cranberry curd • 12 ounces cranberries (fresh or frozen) • juice of one orange (~ ¼ c) • 250g (1 ¼ c) sugar • 2 whole eggs • 2 egg yolks • 113g (½ c, 1 stick) unsalted butter • 1 teaspoon vanilla extract • 1 tablespoon orange liqueur, such as TripleSec or Grand Marnier (optional)
For the Italian meringue • 2 egg whites • 1/8 teaspoon cream of tartar • 1/2 cup sugar • 1/4 cup water
METHOD Crust
Mix butter with sugar then add salt then vanilla.
Add egg and mix until incorporated. Stir in flour. Mix by hand like you are kneading bread until incorporated
Cover with plastic and refrigerate for 30 min
Pre-heat oven to 350⁰F
Butter tartl pans, or use non-stick pans
Dock (prick holes in) bottom and sides of formed dough then refrigerate for 20 minutes
Line tart pan with crumpled then smoothed parchment paper and fill with pastry weights.
Paint edges of the tartlet with the egg wash.
Bake in preheated oven 350⁰ F (175⁰ C) for 15 min. Remove pastry weights 5 minutes before the end of the bake.
Immediately remove from pans and cool on a wire rack
Cranberry Curd
Heat the cranberries and orange juice in a medium saucepan over medium-high heat until the cranberries split. Mix with an immersion blender then strain through a food mill or fine mesh sieve and discard the skins.
Return the strained cranberry mixture to the saucepan and add the sugar, eggs, egg yolks, butter, vanilla, and orange liqueur (if using) to the pan and give everything a good stir. Heat gently over medium-low heat, stirring constantly, until the mixture thickens and registers 170°F on an instant read thermometer (this usually takes about 8-9 minutes). Immediately strain (again) through a fine mesh sieve into a large measuring bowl and then pour into the prepared crust. (The curd can be stored in an airtight container in the fridge for up to a week. You may need to bake it a few more minutes for the tart to set when baking from chilled)
Bake (still at 350°F) until the curd is set (it should jiggle but not slosh), about 10 minutes. (Curd was jiggly after 20 more minutes baking.)
Let cool at room temperature for about 1 hour, then transfer to the refrigerator to chill. You can serve this chilled or at room temperature.
Italian meringue
Add egg whites and cream of tartar to the bowl of a stand mixer fitted with a whisk attachment. Heat sugar and water in a small saucepan over medium high heat.
When the sugar mixture registers about 220°F turn on the mixer and begin beating the egg whites on medium speed.
When the sugar mixture registers 240°F remove from heat and carefully pour into the mixer over the egg whites. Increase the mixer speed to high and beat until the egg whites form stiff peaks.
Transfer to a piping bag (or zip top bag) and pipe onto cooled tart as desired. If you want, torch the meringue with a kitchen torch. (But since it is cooked, this is totally optional).
As long as the oven was on and I had time to wait for doughs to chill etc, I also made a loaf of artisan bread.
When I cannot golf, I bake. On one hand, that is a good thing. My skills and knowledge are growing. On another hand the QC Cadre isn’t tired of my supplying them with baked goods. On someone else’s hand my muscles for playing golf are atrophying.
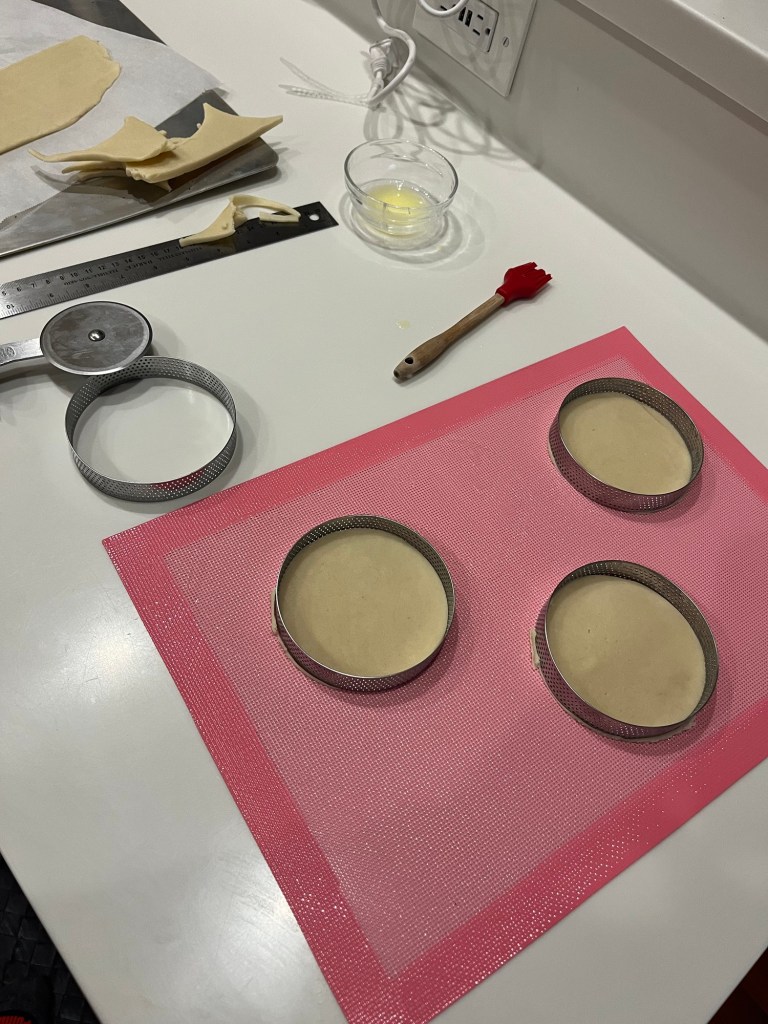
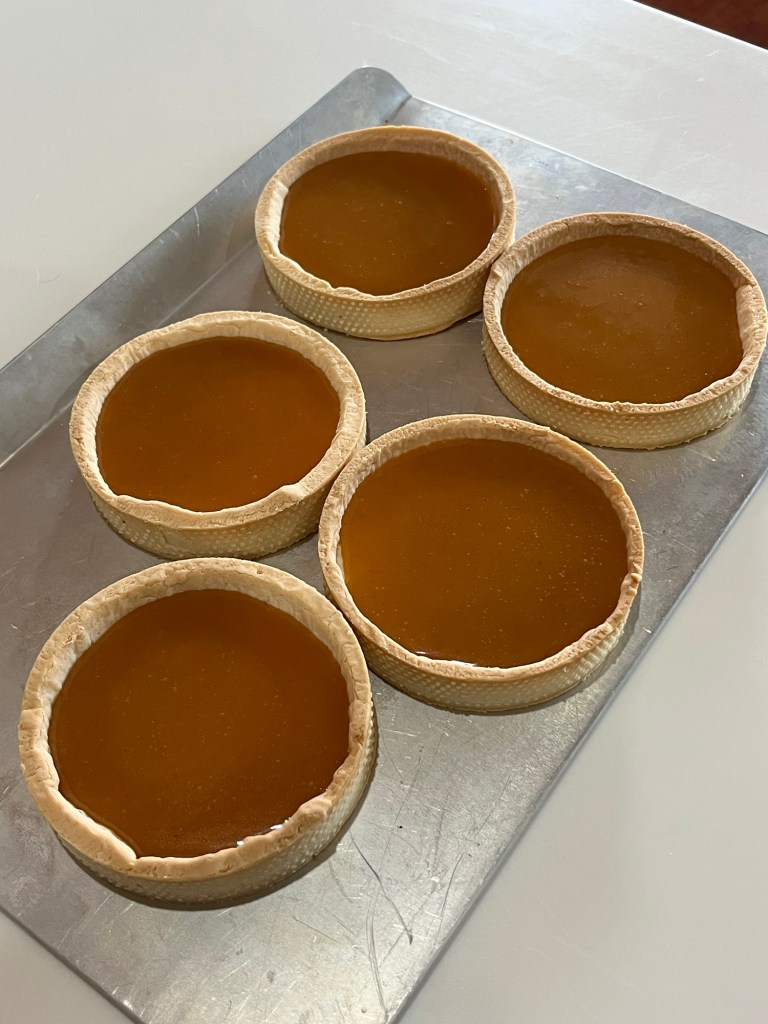
I recently received a set of perforated tart rings and a perforated silicon mat to bake the rings on. They all worked perfectly. Once baked, the tarts almost fell out of the rings.
QC asked for a chocolate covered caramel tart for her birthday. We spent her birthday day at the grands school talent show, then at a car dealership, during a severe rainstorm, and finally out with the family to a pizza birthday dinner. There was no time to fill the tarts, so I did them this morning.
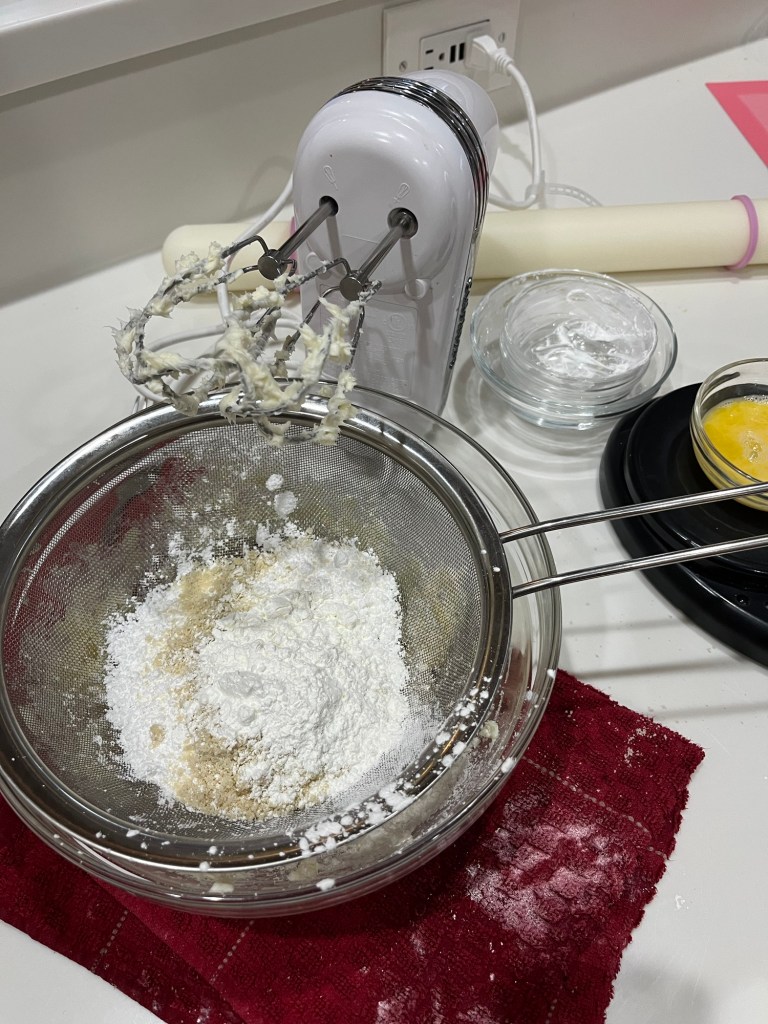
Ingredients measured and weighedDry ingredients siftedTart disk bottoms cut and placed in ringsCaramel filled baked rings filledChocolate glazed tarts with edible gold foil garnish
CHOCOLATE CARAMEL TART
INGREDIENTS Crust • Unsalted Butter (room temp) 100g • Salt a pinch • Powdered Sugar 72g • Almond Powder 20g • Corn Starch 30g • Eggs (room temp)36g • Cake Flour 170g Caramel • 2 cups (424 g) granulated sugar • ½ cup water • ¼ cup corn syrup • ½ cup (113 g) salted butter, cut into 4-5 pieces • ½ cup heavy cream • 1 teaspoon vanilla extract Glaze • 2 Tbl water • 60g sugar • 46g corn syrup (60ml) • 52g condensed Milk (40ml) • ¼ tsp agar agar • 60g dark chocolate
METHOD
Beat the room temp. butter lightly (add in salt).
Sift in powdered sugar, almond powder and corn starch. Beat lightly. Add the room temp. eggs gradually and mix. Finally, add in the cake flour and mix well.
Using a bench knife, “fraiser” the dough by repeated smearing portions of it on the table.
Roll it out to 2mm/3mm thickness between parchment papers. (2mm thickness for 6~8cm diameter, 3mm thickness for 14~18cm thickness.
Rest in the fridge for 1~2hrs
For perforated tart ring:
Cut it out into strips/discs. Disks equal to tart ring diameter, strips ~ ¾” wide and 2” longer than tart ring circumference, ~14.5” for a 4” tart ring. (4” x π + 2”)
Coat the inside of the ring with butter. Position tart ring over a disk and place on a perforated mat.
If the strips are too stiff to bend, warm slightly with your hands. Line the side of the tart ring with the disk. Glue any seams by warming with your finger.
Trim top of strip with a knife
Refrigerate for 20 minutes.
Bake 3mm thick crust at 340⁰F for 15mins. (320⁰F for 2mm)
If you are to bake the tart crust again after adding the almond cream, then bake 2-3mins less. (~12-13mins.)
For regular tart pan:
Cut it out into one big disc ~2” larger than tart pan
Line the tart pan.
Prick the bottom.
Place a sheet of parchment paper and then pie weights.
Bake 3mm crust at 340⁰F for 10mins, take the pie weights out, then bake for another 5 mins. (320⁰F for 2mm)
If you want to apply egg wash the recipe is as follows: 10g Heavy Cream, 40g Egg yolk. Mix them well and strain it before use. Once the tart shell has cooled down completely, then brush them evenly and bake for ~10-12mins at 160℃.
For the caramel:
In a heavy bottomed saucepan (important so that the heat conducts evenly!), combine the sugar, water and corn syrup (try not to splash the mixture up on the sides of the pan). Bring the mixture to a simmer over medium heat. Cook for 10-12 minutes, until the mixture is a medium-dark amber color, tilting the pan just slightly every couple of minutes to swirl the mixture.
Immediately remove the pan from the heat and carefully add the butter, cream and vanilla. The hot mixture will bubble vigorously. Stir to combine (don’t go too crazy scraping down the sides of the pan).
Pour the caramel over the baked crust. Refrigerate until the caramel is set and no longer warm, 1-2 hours (make sure you set the tart on a really flat surface in the fridge or else it will set up tilted or uneven).
For the glaze:
Heat water, sugar, agar, corn syrup to boil to 220⁰F
Add condensed milk and dark chocolate and blend with an immersion blender.
Leave it overnight and use it the next day.
Heat in the microwave to make it pourable
Divide evenly among the tarts, rolling around to smooth out and cover each tart
Sorry to be redundant, but I made PreppyKitchen’s amazing pie crust again. I filled the crust with some apple pie filling that I made a couple of weeks ago.
I did make PreppyKitchen’s pie crust last week and while delicious, it was tough. Hence, another try. I think I over worked the dough the last time as today the recipe resulted in a marvelous flaky, tender, delicious crust. I am now confident to bring an apple pie for Thanksgiving dinner.
Here are some of the comments from my QC Cadre:
Crust is excellent , very buttery !! Best crust we ever had !! Apple filling is to die for , perfect amount of cinnamon , apples —just right Thank you
Well, I don’t know anything about pie crust and I’m not sure what you’re looking for, but all I can say is to me that pie crust was just about perfect. The whole apple pie just delicious.
Absolute perfection! It was the perfect flakiness 😊
Some of the best pie crust I have ever tasted. Very flaky and light. Excellent 👍❤️🥧
There are volumes documenting all that I don’t know, and a postcard describing what I do know. I discover, or am taught, new ideas daily.
Here are two things I didn’t know, but probably everyone else did.
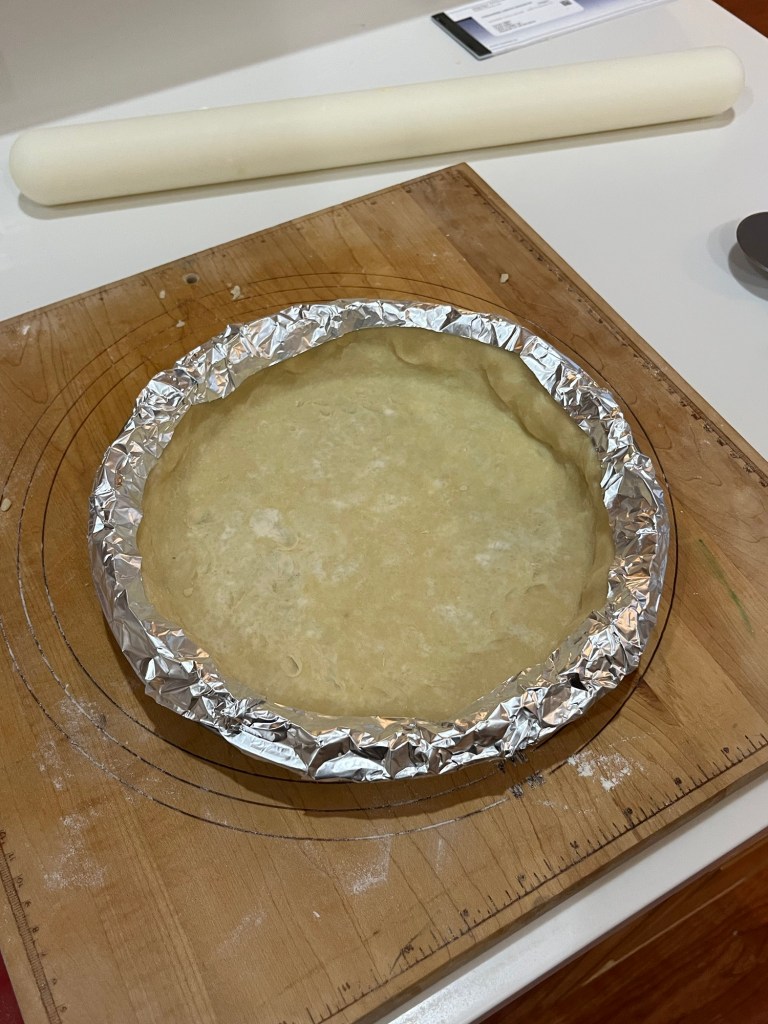
A pie shield that doesn’t fall off during baking
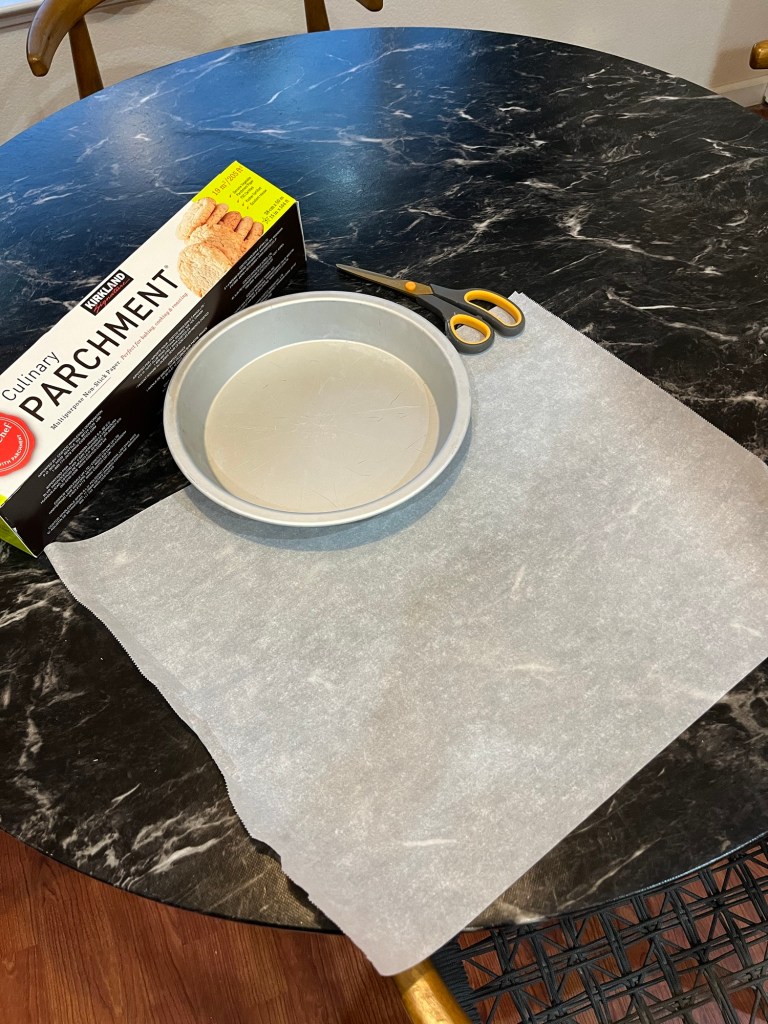
A parchment paper liner for par baking that fits the pastry
Pie Shield to Protect the Edges of the Pie
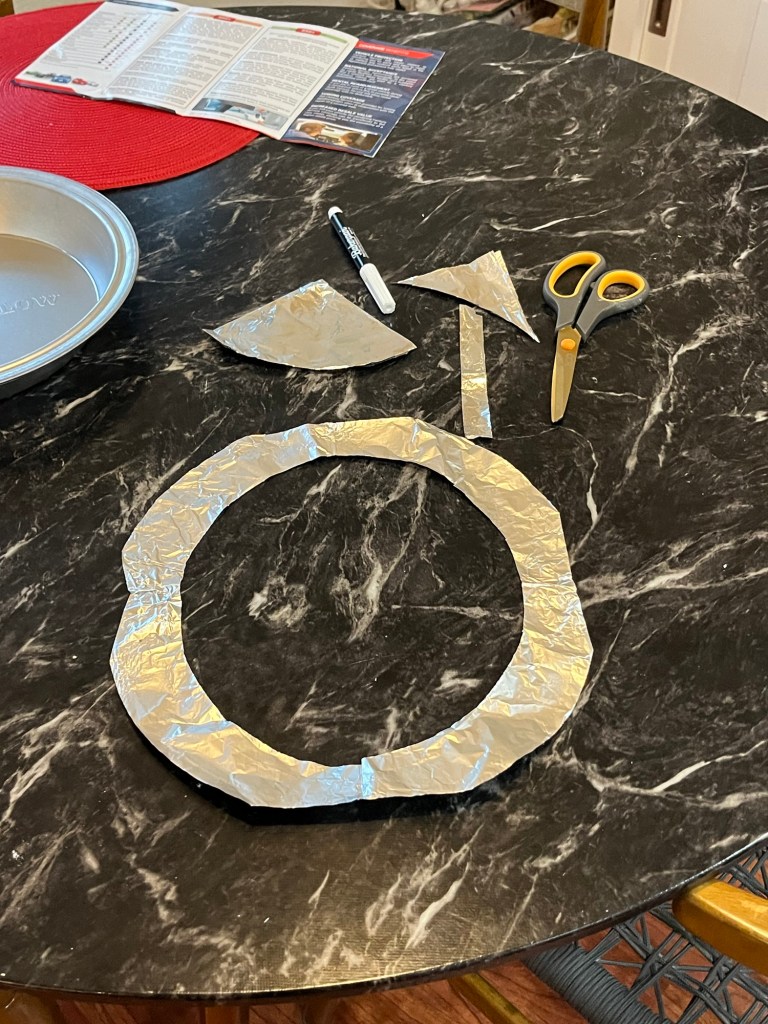
I reviewed all the pie shields on Amazon and reviews of all of them complained about them falling off. This one creates a shield from a single sheet of aluminum foil that does not come off while baking.
Trace a circle ~1”larger than your pie plate (Use a skewer or chop stick)Trace a smaller concentric circle ~1” smaller than your pie plateFold the square in half, then in half againCut out the circlesEnd up with a ring ~2 inches wide.Wrap the foil around the edge of the crust
Contour forming parchment paper liner
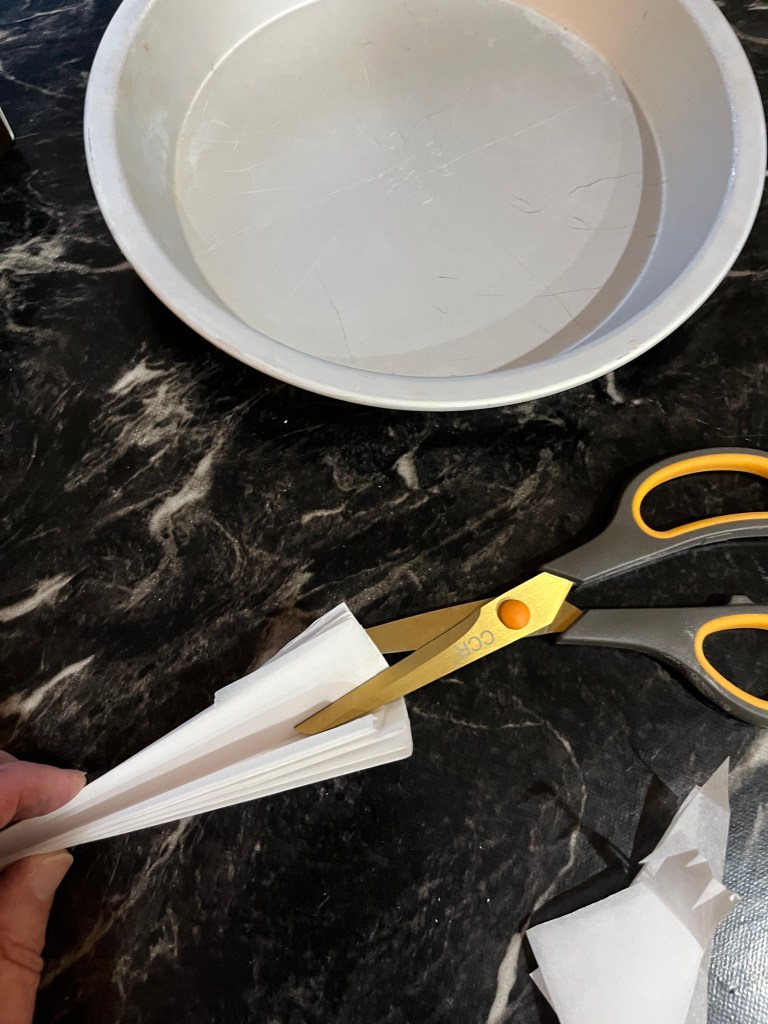
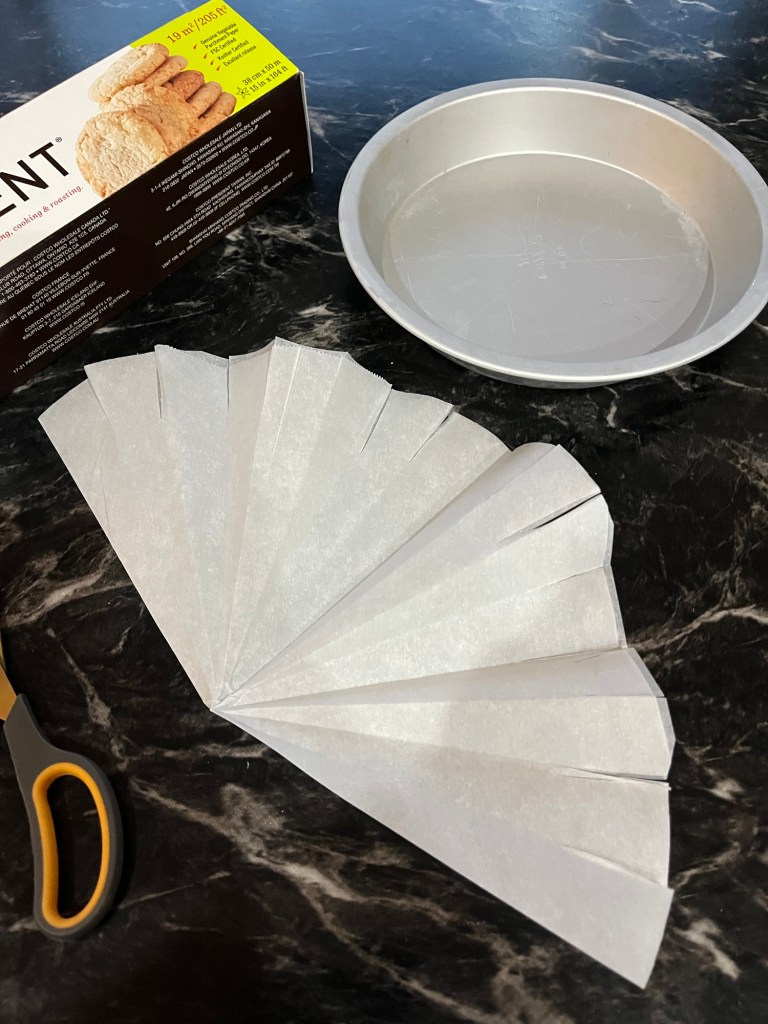
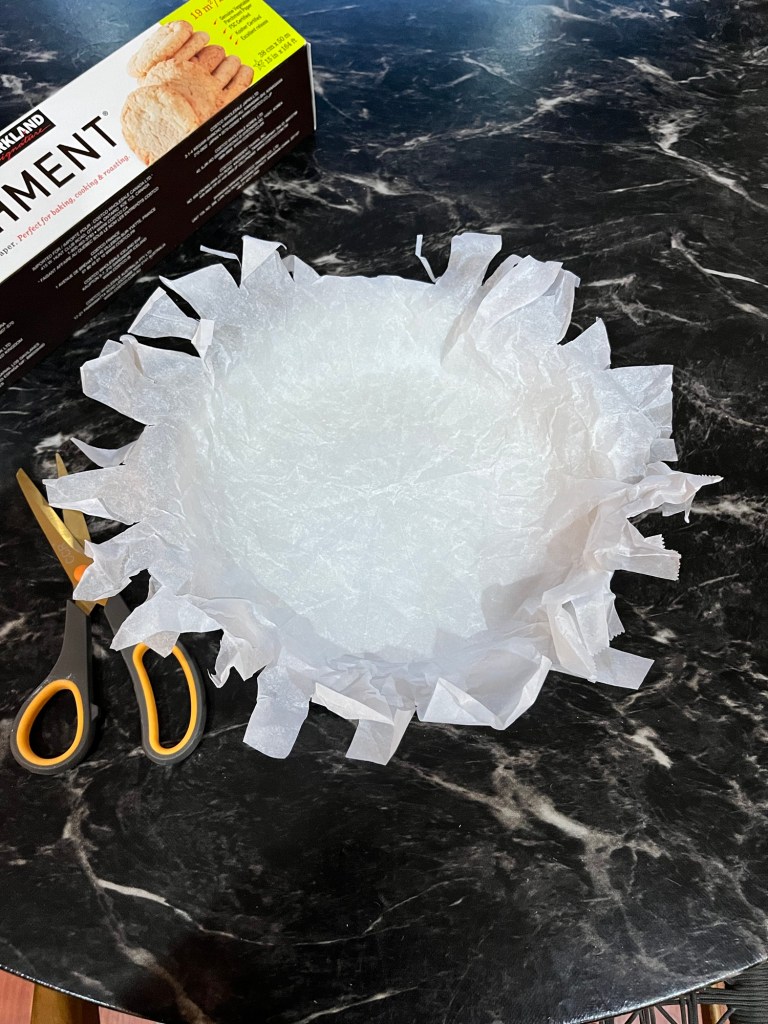
Ever try to fit a piece of parchment paper to a pastry shell without deforming the pastry? The simple solution is to crumple the parchment paper then smooth out (at least two times.) For smaller pastries cut slits into the edges of the paper to allow it to fit into the smaller shells.
Parchment paper, curling up on the edgesCut into a square then folded in half, diagonally.Fold in half again, Fold as many times as you can. Trim to ~2” longer than the radius of the pan.Cut the folds on the endUnfold and lengthen any cuts as requiredCrumple and smooth, crumple and smooth againFit to the pie plateAdd pie weights.
Fold the parchment paper diagonally in half. Place a finger in the middle of the long side of the triangle and fold across your finger. Keep your finger in the same place and fold diagonally again. Fold one short side down the the long side and repeat. Cut the large end to make a triangle ~2 inches longer than the radius of your pie plate.
A day off from golf usually means a day on in Dede’s bakery.
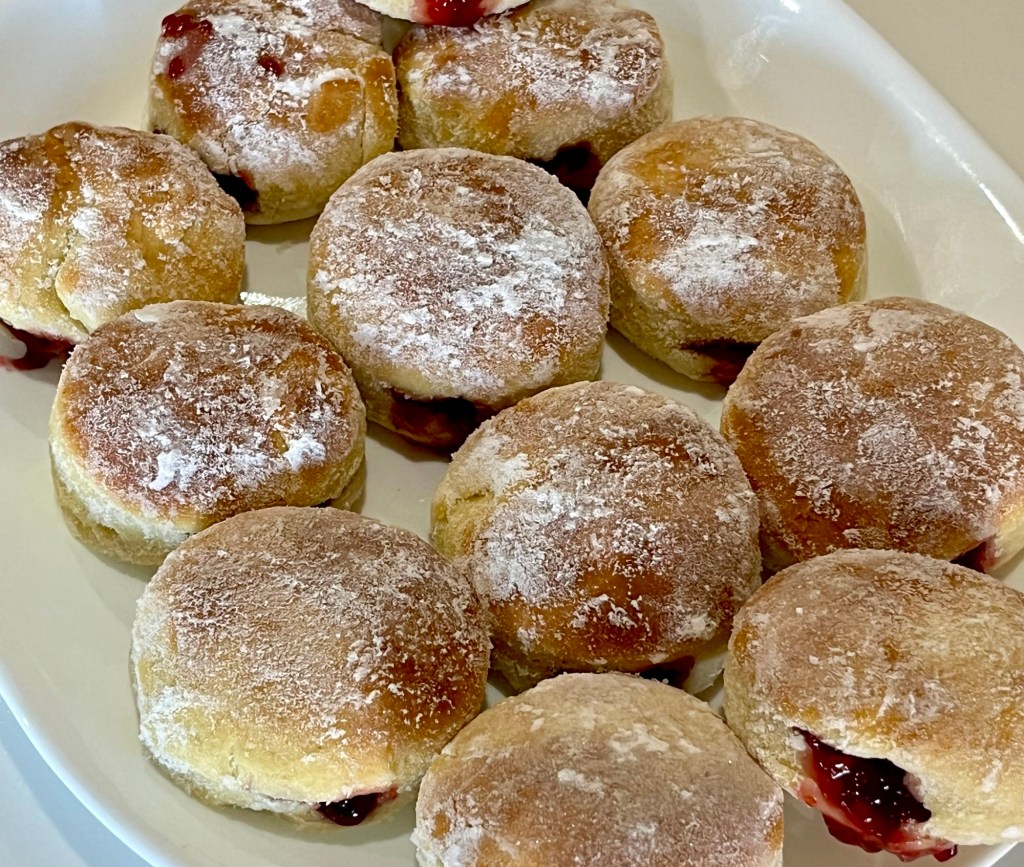
I found this recipe from Natashas Kitchen on YouTube. Considering they are not fried (a good thing) they are light, airy and delicious. (An even better thing.) I did cheat and bought some seedless raspberry jam to fill the donuts rather than making my own. (Raspberries are very expensive this time of year.)
I followed the method as written below but was slightly disappointed with re-rolling the scraps to make the additional 4 donuts. The dough didn’t come together all that well. Any suggestions would be appreciated.
Baked Jelly Donut Holes
INGREDIENTS • 2 ½ cups all-purpose flour, divided, plus more for dusting • ¼ cup granulated sugar • ¼ tsp salt • 2 ¼ tsp instant yeast, quick acting, (1 packet = 7 grams) • ⅔ cup warm milk, 110˚F – microwave 35 sec. • 4 Tbsp unsalted butter, melted, divided 3::1 • 2 egg yolks • ½ tsp vanilla extract • ⅓ cup jelly or jam, (no large fruit pieces) • ⅓ cup granulated sugar to roll donuts
METHOD
In a large mixing bowl, whisk together 1 cup flour, ¼ cup sugar, 2 ¼ tsp instant yeast and ¼ tsp salt.
Add warm milk, 3 Tbsp melted butter, 2 egg yolks and ½ tsp vanilla extract, and whisk vigorously to combine well.
Cover with plastic wrap and rest at room temperature 10 minutes, until some bubbles form on the surface.
Add remaining 1 ½ cups flour, adding just enough until dough holds together and no longer sticks to the sides of the bowl (Add the last 2 Tbsp of flour only if needed) and knead in the bowl 5 minutes. If dough is really sticking to your hands, dust lightly with flour then continue kneading with clean dry hands. Cover the bowl with plastic wrap and let rise in a 100˚F oven for 45 min or at room temperature for 1 ½ hours, or until doubled in size.
Line a baking sheet with parchment paper.
Turn dough out onto a floured surface and roll the dough out to just under ½” thick. Cut circles using a 2 ½ inch round cookie cutter. Re-roll scraps if needed to make 12 donuts total. Place donuts on prepared baking sheet, cover with a tea towel and let rise in a 100˚F oven for 20 min or at room temperature 45 min, or until puffed.
While the donuts are rising, preheat oven to 375˚F with rack in the center of the oven.
Bake uncovered in the center of a preheated oven at 375˚F for 10-12 minutes or until lightly golden on top.
Right out of the oven, brush each hot bun, one at a time, all over with remaining 1 Tbsp melted butter and roll in a bowl of granulated sugar to coat all over.
After all the donuts are sugar coated, cut a deep slit in the side of each donut and pipe jam with a pastry bag into each one.
One of my neighbors gave me some of their mandarin oranges and to thank them I “processed” the fruit and re-gifted it to them. I love the orange/chocolate tarts I made a few times, but have yet to perfect them. I changed the recipe and method this time, remembering Einstein’s quote: (reported and most likely never said,) “The definition of insanity is doing the same thing over and over again and expecting different results“
I used a recipe and method (by Philippine pastry chef, Hanbit Cho. My first attempt used standard tart rings resulted in useable but not “excellent” tart shells. The edges are ragged and some of them broke.
(I ordered and received some perforated tart rings and am waiting for the accompanying perforated baking mat to arrive, then will try again. If at first…)
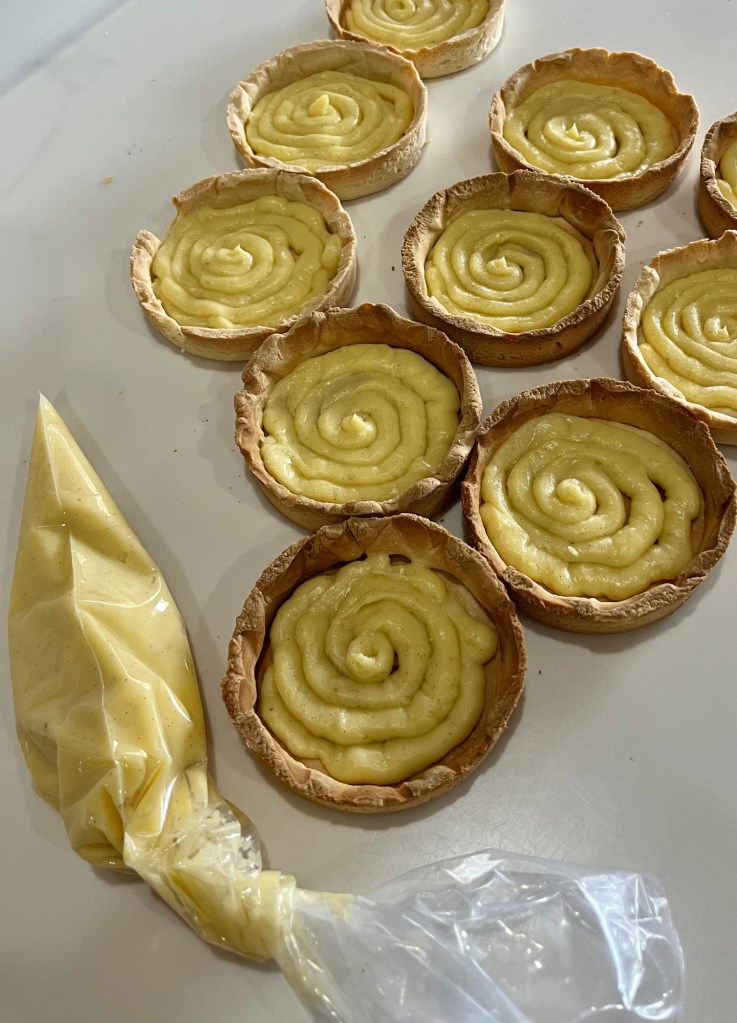
I also changed my previous recipe to use creme patisserie and chocolate ganache which don’t require baking. I used my standard creampat recipe (ala Martha Stewart) and a chocolate ganache and orange glaze from Preppy Kitchen.
Baked Tart ShellsCandied Orange SlicesCreamPat Filled ShellsChocolate Ganache with Orange Creme spiralFinished TartsFinished Tart
Chocolate Orange Tart with Crème Patisserie – REVISED
Yield: Five 4” tarts. INGREDIENTS Tart Shell • 100g unsalted room temperature butter • Salt a pinch • 72g powdered sugar • 20g almond flour • 30g corn starch • 36g (~1) room temperature egg • 170g cake flour Chocolate Ganache • ½ cup heavy cream (120ml) • 180g (1 c) semi-sweet chocolate chopped Orange Glaze • 1 cup powdered sugar • 3 Tbl orange juice • 1 tsp orange zest Crème Patisserie • 1¾ cups 2% milk + ¼ cup heavy cream • 80g (~4) egg yolks • ½ cup sugar • ¼ c corn starch • Pinch salt • 2 Tbl butter • 1 tsp vanilla ½ tsp vanilla
METHOD Tart Shell
Beat the butter lightly (add in salt).
Sift in powdered sugar, almond flour and corn starch. Beat lightly.
Add the eggs gradually and mix.
Finally, add in the cake flour and mix well.
Roll it out to 2mm/3mm thickness between parchment papers. (2mm thickness for 3-4” diameter, 3mm thickness for 7-9” diameter.
Rest in the fridge for 1~2hrs.
For regular tart pan: Cut chilled dough into disc ~2” larger diameter than tart ring
For perforated tart ring: Cut discs the size of the tart ring
For regular tart pan: Butter inside of ring and gently fit the dough inside the ring, leaving enough to line the edges. Be gentle to not tear the dough. Prick the bottom. Place a sheet of parchment paper on the dough and and fill with pie weights.
For perforated tart ring: Butter inside of ring and set over one of the cut-to-size discs. Cut strips of dough 1” wide and cut ~15” long. Line the ring with the long strips cementing and connections by warming gently with a finger. Place it on a perforated mat.
For either type of tart ring chill the formed rings in the fridge for an hour before baking, then put them directly in the pre-heated oven.
For regular tart pan: Bake at 350F for 10mins, take the pie weights out, then bake for another 5 mins. (325Ffor 2mm thick)
For perforated tart ring: Bake at 350 F for 15mins. (325 Ffor 2mm thick)
Chocolate Ganache
Heat the cream in a small saucepan over medium heat until very steamy and just about to boil. (You can also heat it in the microwave for 1 to 2 minutes until very hot but not boiling.)
Meanwhile, place the chocolate in a large measuring cup.
Pour the hot cream over the chocolate and set aside for 5 minutes, allowing the chocolate to melt from the heat of the cream.
Stir the chocolate and cream together until fully combined, smooth, and glossy. If there are a few pieces of chocolate left unmelted, you can microwave the ganache at 50% power for about 10 seconds and mix again.
Orange Glaze
Place confectioners’ sugar into a bowl. Add 2 tablespoon orange juice and 1 teaspoon orange zest.
Whisk or beat until smooth, adding more juice as necessary. Reserve remaining zest and juice for another use. The glaze should be pipeable but should not flow from the piping tip. Crème Patisserie
Whisk eggs and milk together and add to all other ingredients (except vanilla) to a medium saucepan. Bring to boil whisking constantly. Cook until thickened (it will look lumpy, its ok)
Sieve lumpy mixture into a bowl and add vanilla, mix thoroughly
When incorporated, cover with plastic directly on the crème patisserie and cool about an hour. (Alternatively, slide the piping tip you would use to fill the pâte à choux into the piping bag but don’t cut off the tip. Spoon the hot batter directly into the piping bag with sealed end. When the crème patisserie is cool, cut the tip off, force the bag around the piping tip and squeeze the crème pat to fill the end )
ASSEMBLY
Pipe a ¼” layer of crème patisserie layer into each tart shell and smooth while the crème patisserie is still warm. Let set before proceeding.
Pipe a ¼” layer of warm chocolate ganache on the crème patisserie layer
Pipe a spiral ⅛” wide circles of orange cream and feather the orange cream with a toothpick
Chill to set
Candied Orange Slices
Add the sugar and water to a 12-inch skillet or a large saucepan and set it over medium-high heat. Bring the water to a boil, stirring from time to time. As the water heats, the sugar will melt into the water. It’s important that the sugar be completely melted before adding the orange slices.
After boiling the water, reduce the heat to medium and add the orange slices. Don’t overcrowd the pan; the orange slices should fit in the pan with little overlap.
Let the orange slices cook at a gentle simmer for about ~60 minutes, until the white part of the peel (the pith) is nearly translucent. Use tongs to turn them over in the syrup every now and then.
Use tongs to remove the slices from the sugar syrup, laying them out in one layer on a wire rack.
Spread the slices on a parchment paper lined baking pan and bake for 1-2 hours at 170F
When “dry” they will be tacky but also feel set – kind of like gummy candy. Coat with caster sugar if desired.