Savory Gougeres

As mentioned elsewhere Frances and Daniel prefer savory to bleu-cheese-gougers_0007sweet. Not that they don’t like sweet but somehow they escaped our kitchens of sweets iniquity to be more sensible and healthier eaters than their parents. Not that we don’t like savory, but c’mon, we are talking sweets here.

bleu-cheese-gougers_0008


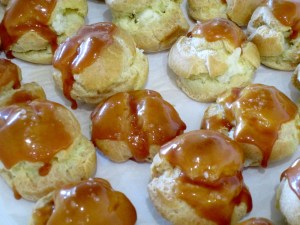
Anyway, they are not fans of goat or brie cheeses (I am) but do like bleu cheese, so I decided to make some bleu cheese filled gougeres with a caramel glaze topped with a little sea salt. This combination of flavors balanced very nicely.


INGREDIENTS

  • FOR THE GOUGERES
    • 1 cup water
    • 1 stick unsalted butter, cut into small pieces
    • 1 teaspoon sugar
    • Table salt
    • 1¼ cups all-purpose flour
    • 4 large eggs, plus 1 large egg white if needed
    • Vegetable oil cooking spray
    • Coarse salt, for sprinkling
  • FOR THE BLUE CHEESE FILLING (MAKES ABOUT 1 CUP)
    • 140g crumbled blue cheese
    • 283g mascarpone cheese
    • 2 tablespoons heavy cream
    • Freshly ground pepper
  • FOR THE CARAMEL
    • 1 cup sugar
    • 1½ cup water

DIRECTIONS

  1. Make the gougeres: See and follow recipe for pate a choux
  2. Make the blue cheese filling:
    1. Beat blue cheese and mascarpone in the clean bowl of a mixer on medium-low speed until well combined.
    2. Reduce speed to low, and beat in heavy cream and 1/2 teaspoon pepper.
  3. Transfer filling to a pastry bag fitted with a plain 1/8-inch round tip. Insert tip into bottom of each gougere, and fill.
  4. Make the caramel:
    1. Prepare an ice-water bath. Bring sugar and water to a boil in a small saucepan, swirling pan and brushing down sides with a wet pastry brush to prevent sugar crystal from forming.
    2. Cook, without stirring, until caramel turns dark amber, about 10 minutes.
    3. Remove from heat, and set saucepan in ice-water bath to stop sugar from cooking.
    4. Immediately dip the top of each gougere into caramel, and sprinkle with a pinch of coarse salt. (If the caramel hardens as you work, reheat over very low heat until it loosens.)

a, b, c, d… eCLAIRS!

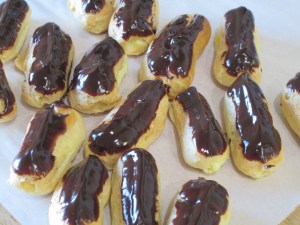
Yesterday morning I made a couple of dozen savory gougères to take to Daniel and Frances as part of a family brunch. The pate à choux came out so beautiful and is so easy to make I thought, perhaps taking some sweet pastries would be a good idea also. While Frances and Daniel like savory, Kathy, Fran and I really do like sweet. Oh yeah, I also made some Christmas and Chanukah cookies on Friday and might as well bring those along too. There were too many for just Fran and me. Well, not too many but…eclair_0002

All the “how to” instruction videos and tutorials stress that you should make all the eclairs uniform size by drawing a template on the backside of some parchment paper. I say, who cares? It’s not like these are for sale, they are for personal consumption and if the eclairs are 2, 2½ or 3″ long, well, I really don’t care.

eclair_0001


Anyway, I made about 4 dozen of these little bits ‘o heaven and took over half to the brunch, heh, heh, heh.

The pate à choux (or just choux) uses one saucepan and the stand mixer, the crème pâtissèrie (creme pat) uses the same saucepan, a sieve and a bowl, and the ganache the same saucepan and a low sided bowl for dunking the filled eclairs in the chocolate. Easy! The most time consuming part of making eclairs is the drying of the choux after the initial bake. I use this time to prepare the creme pat and ganache and to clean up from making the choux.

Ingredients

  • Choux Pastry:
    • ½ c (65 grams) AP flour
    • ½ tsp granulated white sugar
    • ¼ tsp salt
    • 4 tbsp (55 grams) unsalted butter, cut into pieces
    • ½ c (120 ml) water
    • 2 large eggs, lightly beaten
  • Glaze: (optional)
    • 1 large egg, lightly beaten
  • Pastry Cream:
    • ½ c sugar
    • ¼ c corn starch
    • Pinch salt
    • 2 c whole milk
    • 4 egg yolks
    • 2 Tbl butter
  • Chocolate Glaze:
    • 2 ounces (55 grams) semisweet
    • chocolate, finely chopped
    • ¼ c (60 ml) heavy “whipping” cream (cream with 35% butterfat content)
    • ¼ tsp pure vanilla extract
    • ½ tbsp light corn syrup (or golden syrup or glucose)

Method

  1. Choux Pastry:
    1. Preheat oven to 400o F (200o C) and place rack in center of oven.
    2. In a bowl whisk the flour with the sugar and salt.
    3. Place the butter and water in a saucepan over medium high heat and bring to a boil.
    4. Remove from heat and, with a wooden spoon, add the flour mixture, all at once, and stir until combined. It will look like mashed potatoes. Return saucepan to the heat and stir constantly until the dough comes away from the sides of the pan and forms a thick smooth ball (about 1-2 minutes). The dough will film the bottom and sides of the saucepan and make cleaning a pain.
    5. Transfer the dough to an electric mixer and beat on low speed to release the steam from the dough (about 1 minute).
    6. Once the dough is lukewarm start adding the lightly beaten eggs (dough will separate and then come together) and continue to mix until you have a smooth thick paste (dough will fall from a spoon in a thick ribbon).
    7. Place the dough in a pastry bag fitted with a large plain tip and pipe oblongs of dough (about 3/4 inch (2 cm) wide) onto the parchment lined baking sheet. (When piping hold the bag at a 45-degree angle.) If desired, with a pastry brush, gently brush the tops of the dough with the lightly beaten egg.
    8. Bake for 15 minutes and then reduce the oven temperature to 350o F (180o C).
    9. Remove from oven, pierce an end of each éclair with a small skewer to release the interior steam.
    10. Continue to bake for a further 25 minutes or until the shells are a nice amber color and when split, are almost dry inside. Remove from oven and place on a wire rack to cool.
  2. Pastry Cream:
    1. Whisk eggs and milk together and add to all other ingredients (except vanilla) to a medium saucepan.
    2. Bring to boil whisking constantly
    3. Cook until thickened (it will look lumpy, its ok)
    4. Sieve lumpy mixture into a bowl and add 1 tsp vanilla, mix thoroughly
    5. When incorporated, cover with plastic directly on the cream and cool.
  3. Chocolate Glaze:
    1. Place the chocolate in a heatproof bowl.
    2. Heat the cream just until boiling and immediately pour it over the chocolate.
    3. Gently stir until the chocolate has melted.
    4. Stir in the vanilla extract and corn syrup, mixing to ensure incorporation.
  4. To complete:
    1. Fill a piping bag equipped with a filling tip (such as Wilton 230). Inject crème pat into the hole you made to allow the steam to escape. When you feel the side of the éclair begin to bulge, the éclair is full.
    2. Dip the top of each éclair into the warm, thin ganache and set on a piece of waxed or parchment paper to dry. (I use the parchment paper previously used to line the baking sheet.)

Brioche

While visiting Neil and Maureen in Seattle last weekend Maureen had a brioche roll at breakfast. On the spot, I knew I had to add this to my recipe catalog.

For those of you who are unfamiliar with brioche, it is a pastry of

brioche-1

Five 1/6ths Dough and Three 1/48ths

French origin that is like a highly-enriched bread whose high egg and butter content give it a rich and tender crumb, light and slightly puffy. It has a dark, golden, and flaky crust, accentuated by an egg/cream wash applied after proofing. Let me tell you, this bread is a
lot of work. Unless you like melt in your mouth, buttery, delicious bread I would urge to run, not walk away.

As usual, I adapted a number of online recipes to make this one.

brioche-2

Finished, Cooling Brioche

INGREDIENTS

Dough Starter (Sponge):

  • 29½ g room temperature water
  • 12½ g sugar:
  • 1 teaspoon Dry Yeast
  • 71 g unbleached all-purpose flour
  • 1 large egg

Flour mixture:

  • 156 g unbleached all-purpose flour
  • 25 g sugar
  • 16 g dry yeast
  • 3 g salt
  • 2 large eggs
  • 113 g very soft unsalted butter

Egg Glaze (if making a large loaf, glaze is optional)

  • 1 large egg yolk
  • cream or milk: 1 teaspoon

PREPARATION

  1. One day or up to 2 days ahead, make the dough. In the mixer bowl, place the water, sugar, instant yeast, flour, and egg. Whisk by hand until very smooth, to incorporate air, about 3 minutes. The sponge will be the consistency of a very thick batter.  Scrape down the sides of the bowl and set it aside, covered with plastic wrap.
  2. Combine the ingredients for the flour mixture and add to the sponge. In a small bowl, whisk the flour with the sugar and yeast. Then whisk in the salt (this keeps the yeast from coming in contact with the salt, which would kill it). Sprinkle this mixture on top of the sponge. Cover it tightly with plastic wrap and let it stand for 1½ to 2 hours at room temperature.
  3. Mix the dough. Add the 2 cold eggs and mix with the dough hook on low (#2 KitchenAid ) for about 1 minute or until the flour is moistened. Raise the speed to medium (#4 KitchenAid) and beat for 2 minutes.
    1. Scrape the sides of the bowl with an oiled spatula and continue beating for about 5 minutes longer or until the dough is smooth and shiny but very soft and sticky. It will mass around the dough hook but not pull away from the bowl completely.
    2. Add the butter by the tablespoon, waiting until each addition is almost completely absorbed before adding the next tablespoon, beating until all the butter is incorporated. The dough will be very soft and elastic and will stick to your fingers, but don’t add more flour at this point; it will firm considerably after chilling.
  4. Let the dough rise. Using an oiled spatula or dough scraper, scrape the dough into a 2-quart dough rising container or bowl, greased lightly with cooking spray or oil. Lightly spray or oil the top of the dough and cover the container with a lid or plastic wrap. The dough will rise a lot, be sure your container is at least 3x as big as the original unrisen dough. Allow the dough to rise until doubled, 1 1/2 to 2 hours.
  5. Chill the dough. Refrigerate the dough for 1 hour to firm it; this will prevent the butter from separating.
    1. Gently deflate the dough by stirring it with a rubber scraper or spatula, and return it to the refrigerator for another hour so that it will be less sticky and easier to handle.
  6. Deflate the dough and allow it to rest, chilled. Turn the dough out onto a well-floured surface and roll it into a rectangle, flouring the surface and dough as needed to keep it from sticking. The exact size of the rectangle is not important. (Mine was about 6″ x 12″.) Give the dough a business letter turn, brushing off any excess flour, and again press down or roll it out into a rectangle. Rotate it 90 degrees and give it a second business letter turn and round the corners. Dust it lightly on all sides with flour. Wrap it loosely but securely in plastic wrap and then place it in a large zip-seal bag. Refrigerate for at least 6 hours or up to 2 days to allow the dough to ripen (develop flavor) and firm.
  7. Shape the dough and let it rise. Remove the dough from the refrigerator and gently press it down to deflate it. Cut the dough into 16 pieces (roughly 60g each). Without a scale, the easiest way to divide the dough evenly is to lightly flour your hands and press it into a long brick. Cut it in half, then in half, then in half, then in half until there are 16 pieces.
    1. Cut each of the 16 pieces into thirds or about 20g each and tuck three of the little pieces into a greased cupcake pan. (Next time I would make each of the smallest pieces about 10-15 g and make more, smaller brioche.)
    2. Cover the pan loosely with oiled plastic wrap and let rise (ideally at 75° to 80°F, I used my proofing oven) until the edges of the dough reach the tops of the molds, about 1 hour.
  8. Preheat the oven. Preheat the oven to 425°F 1 hour before baking. Have an oven shelf at the lower level and place a baking stone or baking sheet on it before preheating.
  9. Glaze and bake the brioche. Lightly beat together the egg yolk and cream for the glaze. Brush the top of the brioche with the egg glaze, being careful not to drip any on the side of the pans, or it will impede rising. Allow it to dry for 5 minutes and then brush a second time with the glaze.
    1. Set the cupcake pan on a baking sheet  Bake for 10 to 15 minutes, or until an instant-read thermometer inserted into the center will read about 190°F.
  10. Cool the brioche. Remove the brioche from the oven and pan onto a wire rack. Turn top side up and allow them to cool until barely warm.
  11. Note: The small brioche can be reheated in a 350°F oven for 5 minutes.

It’s Kim’s Birthday! It’s Joe’s Birthday!

Invited to the family birthday celebration of the dynamic duo of daughter Kim and father Joe (parental, not priestley type father), I asked if I could bring a couple of varieties of pastries I was working on that day. I was making some tartlets in recognition of the Mandarin Orange Festival recently held in this area. I also wanted to make ganache/caramel/sea-salt tartlets. Also, having just binge watched several seasons of The Great British Bake Off with Fran I was compelled to try my hand at a roulade. I told Kim I would bring those that were successful. Disasters never leave home.

I have a nice, easy recipe for tartlet shells and used it to make a dozen, six small 2½”  and six img_0003larger 3″ diameter, wanting more surface areaimg_0001 for the orange slices. Because the oranges are very sweet and the creme de Patisserie is likewise sweet, I wanted to add something to balance. I added the zest of three small mandarin oranges to the creme pat to add just a little bitter to the mix. (Hindsight – use 3 slices,  not 5. Even small slices were too big/many.)

Sadly, the ganache did not set (too much hot cream initially, and not enough time to img_0005correct it before the party.) Happily, I had some extra creme pat so I could substitute some img_0006blackberry tarts for the ganache/caramel/sea-salt ones originally planned. (Remember, disasters stay home.)

Back to the GBBO binge.  A roulade is a rolled sponge cake filled with something. Think Swiss Roll but without the chocolate and yodelling. I filled mine with cream cheese frosting, a blackberry reduction and fresh blackberries, hence extra blackberries for tartlets above.

I made a genoise sponge, taking a bit of a risk having never attempted one. A genoise is a sponge cake that is leavened naturally with eggs using the foaming method which is the gentle warming of the eggs with sugar and beating them until they are foamy and thick. After baking and while still warm the sponge is dusted with confectioners sugar, rolled up in parchment paper and left to cool. While waiting for it to cool, I made the berry reduction and cream cheese frosting. The reduction is simply mixing equal weights berry and sugar and cook over medium heat until boiling for a few minutes, until it starts to thicken. The cream cheese recipe, while equally simple is below. Once the two spreads are ready, carefully unroll the now cooled sponge, coat with both layers, lay a dozen or so fresh berries on the fillings and re-roll, this time without the parchment paper.  Refrigerate until the filling is set, dust the top with more confectioners sugar, trim the edges to a clean line and serve.

Note: I am slowly converting recipes to weight and want to be consistent with units but am too damned lazy to convert existing recipes until I need to.

Tartlet Shell
Ingredients

  • 50 g cold butter cut into small cubes
  • 100 g all-purpose flour
  • 30 g icing
  • ¼ tsp vanilla
  • ⅛ tsp salt
  • 1 egg – ½ for the dough and the other ½ reserved for an egg wash

Method


  1. Mix butter with sugar
  2. Add salt then vanilla
  3. Add egg
  4. Stir in flour. Mix by hand until incorporated
  5. Cover with plastic and refrigerate for 30 min

Then:

  1. Butter tartlet pans, or use non-stick pans
  2. Roll dough to about ⅛” thick
  3. Lay over tart mold and press into all crevices
  4. Roll top to cut off excess
  5. Prick holes in bottom and sides of formed dough
  6. Fill tarts with pastry weights (I put beans in a cupcake paper and remove 5 minutes before the end of the bake.)
  7. Paint edges of the tartlet with the egg wash.
  8. Bake in preheated oven 350 deg F (175 C) for 15 min
  9. Immediately remove from pans and cool on a wire rack

Creme Patisserie (Creme Pat to us philistines)
Ingredients

  • ½ cup sugar
  • ¼ cup corn starch
  • Pinch salt
  • 2 cups whole milk
  • 4 egg yolks

Method

  1. Whisk eggs and milk
  2. Add 2 Tbl butter
  3. Bring to boil whisking constantly
  4. Cook until thickened (it will look lumpy, its ok)
  5. Sieve into a bowl
  6. Add and stir 1 tsp vanilla
  7. Cover with plastic directly touching the cream
  8. Refrigerate

Cream Cheese Filling
Ingredients

  • 1/4 cup butter, softened
  • 4 oz cream cheese
  • 2 cups confectioner sugar
  • 1 tsp vanilla extract

Method

  1. Add all the ingredients to a bowl and beat it with the whisk attachment to make as light, airy and spreadable as possible.
  2. Easy, huh?

Genoise Sponge
Ingredients

  • 3 large eggs
  • 3 large egg yolks
  • Pinch of salt
  • ¾ cup sugar
  • ½ cup cake flour (spoon flour into dry-measure cup and level off)
  • ¼ cup cornstarch

Method

Set a rack in the middle level of the oven and preheat to 350 degrees. Butter a jelly roll pan, line it with parchment paper, and butter that too.

  1. Half-fill a medium saucepan with water and bring it to a boil over high heat. Lower the heat so the water is simmering.
  2. Whisk the eggs, yolks, salt, and sugar together in the bowl of a heavy-duty mixer. Place over the pan of simmering water and whisk gently until the mixture is just lukewarm, about 100 degrees (test with your finger or play with your infrared thermometer, which is what I do). Attach the bowl to the mixer and, with the whisk attachment, whip on medium-high speed until the egg mixture is cooled (touch the outside of the bowl to tell) and tripled in volume. The egg foam will be thick and will form a slowly dissolving ribbon falling back onto the bowl of whipped eggs when the whisk is lifted.
  3. While the eggs are whipping, stir together the flour and cornstarch.
  4. Sift one-third of the flour mixture over the beaten eggs. Use a rubber spatula to fold in the flour mixture, making sure to scrape all the way to the bottom of the bowl on every pass through the batter to prevent the flour mixture from accumulating there and making lumps. Repeat with another third of the flour mixture and finally with the remainder. There is a balance between incorporating all the flour mixture and deflating the egg mixture. Be thorough but careful.
  5. Scrape the batter into the prepared pan and smooth the top.
  6. Bake the gênoise for about 25 minutes, or until well risen, deep gold, and firm to the touch. Do not over bake it.  Also, do not over fill the pan. Very thick genoise is more difficult to roll.
  7. Immediately use a small pairing knife to loosen the cake from the sides of the pan. Invert the cake onto a rack, then reinvert onto another rack and let the cake cool right side up on the paper. Remove the paper when the cake is cool.

Storage:

Wrap in plastic wrap and refrigerate for several days, or double wrap and freeze for up to a month

 

Gougere

Gougeres are baked savory choux cheese pastries. The cheese is typically Gruyere and, as this was my first attempt at this pastry, I wanted to follow the recipe exactly. (I actually found them a little bland and will use a sharp cheddar next time.) I added a little flavor to them by piping some whipped cream inside, which, while bastardizing the savory gougere, did increase the flavor.

img_0013The recipe I used did not include the step to dry the choux after the bake. Typically, after the first bake at 425 F, each piece of pastry is punctured and returned to the over forimg_0009 another 30 min at 375 F. This lets the steam out of the inside of the pastry and gives them that little crispness usually found it cream puffs or eclairs.

Ingredients

  • 1 cup water
  • 1 pinch kosher salt
  • ½ cup unsalted butter, cut up
  • 1 cup flour
  • 4 eggs, lightly beaten
  • 1 cup cheese, Gruyere or sharp cheddar

Method

  1. Boil: Heat water, salt and butter to a boil
  2. Mix: Dump in flour, all at once. Stir with a wooden spoon to a big soft lump that looks something like mashed potatoes. Stir another minute to cook the flour.
  3. Beat: Scrape dough into the bowl of a stand mixer fitted with the paddle attachment. Beat on medium, slowly pouring in eggs. Sprinkle in ¾ cup cheese. Dough will look like vanilla pudding.
  4. Shape: Scrape dough into a piping bag fitted with a plain ½ inch tip. Pip about 48 1-inch diameter mounds onto parchment lined baking sheets. Sprinkle remaining cheese on the top of the little lumps
  5. Bake: Slide pans into a 400o oven, bake until gougeres are golden and puffed, about 20 minutes. Pull one out, break open and check. Inside should be steamy and creamy but not wet. If need be, bake another minute.
    1. NOTE: My correction would be to puncture each pastry and place back in the oven at reduced heat. The initial oven temperature should be 425 F then turned down to 375 F as soon as you put the pastries in.
    2. They are done when they are golden brown and sound hollow when tapped with a fingernail.
    3. Puncture each pastry (I use a wooden chop stick) followed by another few min at 300 F. Break one open and check that the inside is dry.
    4. Transfer to a wire rack to cool.
  6. Serve: Delightful plain, or use a paring knife to slip the bottom and stuff with any savory morsel – even a pistachio, chunk of brie or whip of salami.

Keith’s Brownies

If you are looking for an outstandingimg_0003 brownie try those Chef Keith makes at Cooks & The Cork in Coral Springs. For the nearly 10 years that we have known him, and eaten his food, his brownies have been Fran’s favorites while mine were a distant second. Having been taken into his confidence (and now living in img_0001California and sworn to secrecy) here is my attempt at his recipe Keith recently shared with me.
Not overly sweet, but decadently moist and chocolatey.

Cheddar Cheese Crackers

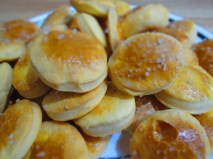
I wanted a snack to go with football and a beer or two this past weekend and remembered this recipe in Paul Hollywood’s bread cookbook. I based my recipe on his for poppy or caraway seed or Gruyere cheese crackers but mine just uses cheddar cheese.

A couple of caveats I learned the hard way:img_0009

  • Rolling the dough out thinner makes more, crispier crackers. They will puff up, especially if thick. Next time I will use the spacer rubber bands on my rolling pin to be sure they are thin and uniform.
  • Make sure they are img_0004cooked through. They need to be a good golden brown. Leave them in a few extra minutes and test a thick one when you think they are done. They should be well cooked all the way through or they won’t have a good cracker snap (they will still taste great though.)


Ingredients

  • 325 g white bread flour
  • 8 g salt
  • 110 g softened butter
  • 45 g water
  • 2 eggs
  • 120 g sharp cheddar cheese

Method

  1. Put the flour, salt, butter, water and 1 beaten egg into a bowl and mix for 5 min. (Stand mixer level 2)
  2. Add the shredded cheddar cheese and mix until well incorporated.
  3. Wrap dough in plastic wrap and chill for 1-2 hrs.
  4. Preheat an oven to 400o fan and line a large baking sheet with parchment paper.
  5. Roll out dough on a lightly floured counter to about 1/8″ (no more) and cut. I used a 2″ round cutter. Place on the lined cookie sheet, brush with the second egg (beaten.) Dust with Kosher or Sea Salt and bake for 15 – 20 min.
  6. Transfer to a wire rack to cool.

Serve warm or cold.
Makes 30-40 crackers.


mmmm… Do’h-nuts – D’oh!

I saw this recipe on Chefsteps even before I subscribed to them and instantly knew it was mine.  I made the recipe as published and they turned out fantastic. Apparently, I missed the part of the directions that said it would make 20 donuts and 20 donut holes, or didn’t fully realize exactly how many 20 actually is.  Let’s see, two of us live her, that would be 10 donuts and 10 donut holes each, mmmm… do’h-nuts! That is enough to keep our stomachs upset and blood sugar soaring for several days. I could give some away (I did) and still be sick for 2 or 3 days. I think next time I will make a half a recipe and still give half away.


As Chefsteps says, this are not the un-bodied Krispy Kreme donut, these are more a brioche like texture with a little chewy give. Outstanding!

Click the link above for the recipe and instructions.

Kouign-Amann (QUEEN-ah-mahn)

Thank you! thank you! thank you to Chefsteps.com for posting the recipie for these amazing pastries. I made 3 varieties for breakfast this morning. They are small so I had one of each. Hey! There is such a thing as quality control you know!kouignamann-1

Anyway, as I said,  I made three varieties, one was the traditional sweet/savory and slightly salty, the second had a semi-sweet chocolate filling and the last was sweeter and less salty with a blackberry inside. What differentiates this pastry from the hand pies I made the other day is the crust finish. After buttering the cupcake pan, coat it with a heavy dusting of sugar/salt (just sugar for the berry version).  This caramelizes the the crust that adds to the crunch, but with sweetness.

kouignamann-3I used Trader Joe’s puff pastry dough for this recipe. Also, Chefsteps.com recommends a 60g piece of dough per pastry. I found 30g was fine. I used one sheet of puff pastry (about 12″x12″), coated with sugar and cut in half. One side was sprayed with a little water to help them adhere to each other. The two pieces were then stacked, coated with more sugar and rolled gently. Cut the stacked sheet (6″x12″) into 3″ squares. Place a berry, a bit of chocolate or nothing in the center, fold as described in Chefsteps and place into the cupcake pan. Dust with a little more sugar/salt mixture or just sugar. Bake at 375 fan for 20 min which was just about right for me. Be sure to dump them onto a cooling rack as the caramelized crust will stick to the cupcake pan. I had a couple of berries fall out. (I just pushed them back into the pastry.)

Good luck and enjoy! Sorry, brb, just one more…Delicious!

Berry Hand Pie

hand-pieA good hand pie is one of my favorite treats. They are quick, easy to make and versatile. I prefer berry hand pies, but you can also make savory, meat, veggie, almost any kind you can imagine. Most of all they are delicious and if you make them small enough, you don’t have to share.

In 2025 I started making my own rough puff pastry using Sally’s recipe. It’s easy to make and way better than any commercial brand.

Ingredients

  • 1 egg
  • 1 tablespoon water
  • 2 tablespoons all-purpose flour
  • 1 sheet puff pastry, thawed but cool.
  • 4 ounces cream cheese, softened
  • 2 tablespoons granulated sugar or decorating sugar
  • ½ cup white chocolate chips
  • 6 ounces berries (and berry but I prefer raspberry and bluegerre
  • 3 tablespoons coarse white sugar or decorating sugar

Directions

  1. Heat the oven to 400°F.  Beat the egg and water in a small bowl with a fork.
  2. Stir the cream cheese and granulated sugar in a medium bowl until the mixture is smooth.  Stir in the white chocolate chips.
  3. Cut large berries in half.
  4. Sprinkle the flour on the work surface.  Unfold the pastry sheet on the work surface.  Roll the pastry sheet into a 12-inch square. Using a round cutter, cut into 24 (2½ -inch) circles.
  5. Brush the edges of 12 pastry circles with the egg mixture.  Place about ½ tablespoon cream cheese mixture in the center of each.  Top each with about one small or two halves of a large berry.  Place the remaining pastry circles over the filling.  Press the edges firmly to seal.  Crimp the edges with a fork. If you don’t seal them adequately the filling will leak out of the sides of the finished pastry.
  6. Brush the pastries with the egg mixture and sprinkle with the coarse sugar.  Using a sharp knife cut small slits in the tops of the filled pastries.  Place the pastries onto a silicone or parchment paper lined baking sheet.
  7. Bake for 20 minutes or until the pastries are golden brown.  Remove the pastries from the baking sheets and let cool on wire racks for 10 minutes.
  8. Eat. They are small. Eat again.