Kouign-Amann (QUEEN-ah-mahn)

Thank you! thank you! thank you to Chefsteps.com for posting the recipie for these amazing pastries. I made 3 varieties for breakfast this morning. They are small so I had one of each. Hey! There is such a thing as quality control you know!kouignamann-1

Anyway, as I said,  I made three varieties, one was the traditional sweet/savory and slightly salty, the second had a semi-sweet chocolate filling and the last was sweeter and less salty with a blackberry inside. What differentiates this pastry from the hand pies I made the other day is the crust finish. After buttering the cupcake pan, coat it with a heavy dusting of sugar/salt (just sugar for the berry version).  This caramelizes the the crust that adds to the crunch, but with sweetness.

kouignamann-3I used Trader Joe’s puff pastry dough for this recipe. Also, Chefsteps.com recommends a 60g piece of dough per pastry. I found 30g was fine. I used one sheet of puff pastry (about 12″x12″), coated with sugar and cut in half. One side was sprayed with a little water to help them adhere to each other. The two pieces were then stacked, coated with more sugar and rolled gently. Cut the stacked sheet (6″x12″) into 3″ squares. Place a berry, a bit of chocolate or nothing in the center, fold as described in Chefsteps and place into the cupcake pan. Dust with a little more sugar/salt mixture or just sugar. Bake at 375 fan for 20 min which was just about right for me. Be sure to dump them onto a cooling rack as the caramelized crust will stick to the cupcake pan. I had a couple of berries fall out. (I just pushed them back into the pastry.)

Good luck and enjoy! Sorry, brb, just one more…Delicious!

Berry Hand Pie

hand-pieA good hand pie is one of my favorite treats. They are quick, easy to make and versatile. I prefer berry hand pies, but you can also make savory, meat, veggie, almost any kind you can imagine. Most of all they are delicious and if you make them small enough, you don’t have to share.

In 2025 I started making my own rough puff pastry using Sally’s recipe. It’s easy to make and way better than any commercial brand.

Ingredients

  • 1 egg
  • 1 tablespoon water
  • 2 tablespoons all-purpose flour
  • 1 sheet puff pastry, thawed but cool.
  • 4 ounces cream cheese, softened
  • 2 tablespoons granulated sugar or decorating sugar
  • ½ cup white chocolate chips
  • 6 ounces berries (and berry but I prefer raspberry and bluegerre
  • 3 tablespoons coarse white sugar or decorating sugar

Directions

  1. Heat the oven to 400°F.  Beat the egg and water in a small bowl with a fork.
  2. Stir the cream cheese and granulated sugar in a medium bowl until the mixture is smooth.  Stir in the white chocolate chips.
  3. Cut large berries in half.
  4. Sprinkle the flour on the work surface.  Unfold the pastry sheet on the work surface.  Roll the pastry sheet into a 12-inch square. Using a round cutter, cut into 24 (2½ -inch) circles.
  5. Brush the edges of 12 pastry circles with the egg mixture.  Place about ½ tablespoon cream cheese mixture in the center of each.  Top each with about one small or two halves of a large berry.  Place the remaining pastry circles over the filling.  Press the edges firmly to seal.  Crimp the edges with a fork. If you don’t seal them adequately the filling will leak out of the sides of the finished pastry.
  6. Brush the pastries with the egg mixture and sprinkle with the coarse sugar.  Using a sharp knife cut small slits in the tops of the filled pastries.  Place the pastries onto a silicone or parchment paper lined baking sheet.
  7. Bake for 20 minutes or until the pastries are golden brown.  Remove the pastries from the baking sheets and let cool on wire racks for 10 minutes.
  8. Eat. They are small. Eat again.

Ivory and Ebony

black-and-white-cookies-1 black-and-white-cookies-finalI love black and white cookies and I wish I could make them, oh wait, I did make them. I like to eat the white side first and save the chocolate side for dessert dessert.

They are pretty easy to make and very easy to eat (see procedure above.) I substituted keylime juice for lemon, as that is all I had on hand. I might also try confectioners sugar rather than caster’s sugar. The white was a bit grainy. Also, I read somewhere to use milk rather than water for the frosting. They white frosting was slightly translucent and milk should make it opaque.

Ingredients

  • ⅓ cup unsalted softened butter
  • ½ cup white sugar
  • 1 egg
  • 1 teaspoon lemon juice
  • 1¼ cups all-purpose flour
  • 1½ teaspoons baking soda
  • ½ teaspoon salt
  • ⅓ cup well shaken buttermilk
  • ½ teaspoon vanilla extract
  • 1½ cups bakers or casting or confectioners sugar
  • ⅓ cup boiling water, or maybe very hot milk
  • 1 teaspoon light corn syrup (Note: 1 teaspoon corn syrup weighs 20 grams. I find it easier to weigh viscous liquids then pour and measure.)
  • ¼ cup dark cocoa powder

Directions

  1. Preheat oven to 350 degrees F (176 degrees C). Draw 2” diameter circles about 3” apart on parchment paper and place drawn side down on a baking sheet.
  2. In a medium bowl, cream together butter and sugar until smooth. Beat in the egg then stir in lemon juice. Combine the buttermilk and vanilla. Combine all-purpose flour, baking powder, and salt; gradually add to the blended mixture alternating with the milk/vanilla solution stirring well after each addition. Start and end with the dry ingredients.
  3. Pipe 2” diameter disks of the dough on prepared baking sheets.
  4. Bake until edges begin to brown, about 20 to 30 minutes. Cool completely on a wire rack.
  5. Boil a cup or so of water in a small sauce pan. Place casting sugar in small, heat-safe mixing bowl. Gradually stir corn syrup and in enough boiling water to the sugar to make a thick, spreadable mixture. Err on the side of caution because a too-thin frosting is hard to undo. Leave remaining boiling water on the stove.
  6. With a small angled spatula, coat half the cookie with the white frosting. Try to divide the middle of the cookie with a straight line. Set the half-frosted cookie on a wire rack placed over waxed paper to catch any dripped frosting.
  7. Put the bowl over a small pan containing barely boiling water (double boiler style.) Stir in the chocolate. Warm mixture, stirring frequently, until the chocolate melts. Remove from heat. (Return to heat if frosting thickens too much to spread.)
  8. While preparing the chocolate frosting the white frosted cookies should cooled and set enough to allow you to pick them up without the white frosting running. Coat the other half of the cookie with chocolate and set back on the wire rack.

Best Sandwich Since Sliced Bread

Yesterday we bought some sliced turkey for a nice sandwich today. This morning I realized I didn’t really want turkey on white, so as there was some whole wheat flour left over I decided to make a loaf of bread before we went to vote at 9am. Paul Hollywood’s simple recipe uses only one bowl (the stand mixer bowl) and it extremely easy.
whole-wheat-breadfile-nov-08-12-45-25-pm
As I started to build the sandwich Fran asked for sliced tomato on it too. It was then I realized I also had some romaine lettuce ready to be harvested from out winter garden, so I went out and selected some from several of the plants. Ultimately, we ended up home made bread, home grown lettuce and store bought tomatoes and turkey. Not bad for Election Day 2016.


Ingredients

  • 2/3 cup white bread flour
  • scant 2 1/2 cups whole wheat flour
  • 1 1/2 teaspoons sale
  • 1 oz yeast
  • 1/2 stick butter, softened
  • 1 1/2 cups water

Directions

  1. Mix flours, salt, yeast and butter in the stand mixer bowl
  2. Slowly add the water, mixing on slow with the dough hook
  3. Once the ingredients are mixed knead with the dough hook for about 7 minutes
  4. If after 7 min the dough is still sticky add more flour, a tablespoon at a time, until it is smooth and no longer sticky.
  5. Cover the bowl with plastic wrap and a tea towel and put in a warn, draft free place, like the microwave. It was a little cool this morning so I heated a mug of water to boiling and left it in, with the microwave off, for the one hour rest.
  6. As we were making sandwiches I form the dough into a loaf shape instead of the typical round loaf that Paul prefers.
  7. Preheat the over to 450 F, line a baking sheet with parchment paper.
  8. Cut a slash down the middle of the loaf and dust the top with flour.
  9. Bake 30-45 min until brown and sounds hollow when tapped on the bottom
  10. Transfer to a wire rack to cool.

Soft, Chewy Pretzels

After about 4 months I may finally be getting the hang of retirement. The winter veggie garden is in and growing, little todo projects are either underway or completed. I drew the plans for a new display shelf and front entry way table, I just need to pick up the wood to start construction.  I am now pretty familiar with our new kitchen so am comfortable baking a few things, both tried and true and new and exciting.

Early this morning I made the cheesy soda bread which turned out very well. I was invited to watch the 49ers play tomorrow at a neighbors and wanted to bring something along for a nosh that will go well with a nice stout. Let me be clear, the 49ers are not playing at my neighbors, I am going to my neighbors to watch the 49ers on TV. Oh yeah, I almost forgot, there is a batch of London Porter fermenting nicely too. After lunch I decided to do a practice  batch of pretzels. You may know I do practice everythings if what I bake is to be made public. I actually made 4 cakes for Grace’s baptism cake. Anyway,  I saw a YouTube video on how to make pretzels (not to different from bagels) plus I have two other recipes so decided to merge the three and see what happens.

The following directions are adapted from a recipe by Diane Kometa and some techniques from Emma Christensen of the Kitchn.

Ingredients:

  • 1 cup water
  • ½ cup regular milk (not fat-free milk)
  • 4 ½ tsp. white sugar – regular table sugar
  • 1 ½ tsp. salt
  • 1 package active dry yeast – ¼ ounce or 2 ¼ teaspoons
  • 5 ½ cups flour – poured & leveled – not scooped flour!
  • 3 ½ Tbs. unsalted butter, melted – cooled slightly
  • Vegetable oil
  • 8 cups water
  • 1 Tbs. light malt powder
  • 4 Tbs. baked baking soda
  • 1 large egg yolk
  • 1 Tbs. water
  • Kosher salt

Directions:

  1. Heat the water in the microwave for 20-30 sec to achieve a temperature of about 120-130 deg then combine with the cold milk in a large measuring cup for a resulting solution temperature of 110 to 115 degrees F. Add the sugar and salt to the warmed water and milk and stir to combine. Sprinkle in the yeast and mix with a fork. Allow the mixture to sit for about 5 minutes or until it becomes foamy.
  2. Pour the foamy mixture into the bowl of a stand mixer fitted with a dough hook and add the melted, cooled, unsalted butter and flour. (I add the flour a cup at a time to be sure it mixes well.) Mix on low speed for until combined and no dry flour remains in the bowl. Scrape the bowl as needed. Continue to mix for about another 7 minutes or until the dough pulls away from the sides of the bowl and is smooth. Scrape the dough from the hook if it comes up to far. Note: The dough may begin to pull away from the bowl after only 2 minutes, but may look a bit pulled or shaggy and still be sticky. It is not done kneading until it is smooth to the touch and no longer sticky.
  3. Remove the dough from the bowl and form into a ball. Wipe out the bowl, if necessary and grease it with 1-2 tablespoons of oil. Place the dough ball back into the bowl and turn over a couple of times to coat thoroughly with the oil. Cover the bowl with a dish towel or plastic wrap and place in a warm area , free from drafts or cool air (a microwave, turned off is a good location), for about 1 hour, until the dough has risen and doubled in size.
  4. When the dough is ready, preheat the oven to 450 degrees F and position the oven rack in the upper third of the oven. Line a large (15″ x 20″) baking sheet with parchment paper and spray with Bakers Joy. Set aside. Note: You may need 2 baking sheets to avoid crowding the pretzels. If only one small, puny sheet is available, make one batch of pretzels and keep the remaining dough covered, so it does not become dry. Between batches, allow the baking sheet to cool, before filling with remaining pretzels.
  5. In a large, wide pot (6-8 quarts) add 8 cups of water, baked baking soda and malt powder. Stir to combine and bring to a full boil. Place a plate lined with paper towels nearby, as well as the kitchen spider or slotted spoon.
  6. In the meantime, dampen a kitchen towel with water and set aside. Lightly grease a clean work surface with some vegetable oil (spraying with Bakers Joy worked well too). Remove the dough from the bowl, place it on the work surface and divide into 8 equal pieces. Cover the pieces that you’re not rolling with plastic wrap or a damp kitchen towel, so they don’t become dry. Using the palms of your hands, roll each piece of dough to a 24-30 inch long rope and then shape into a “U”. Grab the ends of the rope and cross them over each other once or twice and then bring the ends down to the bottom of the ‘U” and press them down to seal, forming the shape of a pretzel. Place the pretzels onto the greased parchment-lined baking sheet and cover with a damp kitchen towel to prevent the dough from drying out, while you continue to roll the remaining dough. You can also cut some of them into 1 ½” logs to make nuggets
  7. In a small bowl, whisk together the egg yolk with 1 tablespoon of water (egg wash). Set aside.
  8. One at a time, lower each pretzel into the boiling water mixture for about 30 seconds. I push them down underwater a few times to assure the top is treated as well. The pretzels will puff up while boiling. Using a kitchen spider or slotted spoon, carefully remove the pretzel from the water, blot slightly on paper towels and then place back onto the parchment lined greased or sprayed baking sheet a few inches apart.
  9. Using a pastry brush, brush the top and sides of each pretzel with the egg wash and then sprinkle with coarse salt.

Place the pretzel filled baking sheet on the upper oven rack and bake for about 7 minutes. Open the oven and quickly rotate the baking sheet so that the pretzels that were facing the front are now facing the rear of the oven. It may seem like a pain, but it’s quick and easy and will ensure even baking. Continue to bake for another 7 minutes or until pretzels are dark golden brown. Remove sheet from oven and place pretzels on a wire rack to cool slightly before serving. Outrageously good if served warm. Mildly spectacular if served later.

Cheesy Soda Bread

Fran and I watch a lot (meaning every episode) of The Great British Bake Off on BBC. I made a few recipes from the show, and learned many more tips and techniques, especially from the master class episodes.

This morning I made Paul Hollywood’s Wholemeal (whole wheat in the USA) Soda Bread, but with cheddar cheese. It only takes 15 minutes to make the dough and 45 min to bake. Don’t be afraid to bake the full 40 minutes. I found less leaves the center a little underbaked. Like Paul, I mixed everything with my right hand thereby requiring only one bowl to clean. I kept my left hand clean to measure and move stuff as needed.

The end result was a crunchy crusted, chewy, cheesy moist bread.  (How is that for alliteration Mr. Buley?)

Ingredients

Chefsteps Bagels

An obscure passage in Genesis states “And God said: let there be bagels, and there were. And it was good.” I found and joined the website Chefsteps.com this weekend. One of their detailed recipes describes how to make homemade bagels. Go to their website and search for bagels for the procedure. While making bagels at home is a relatively long process much of it is waiting for the dough to rise, or cool or knead in the mixer. I estimate it required 1-2 hours of actual man (person) time to make them. It required about 20 total hours with all the resting, rising and cooling, most of it being overnight.

I had to make one substitution and one modification to the published recipe. I did not have malt syrup to add to the boiling water. Instead I used molasses. I could have used honey, but the comments said this produces more of a “Montreal” bagel. The molasses was spot on. Also, to increase the pH of the water I used baked baking soda.  Baking baking soda (I could have worded this differently, but this was more fun to write) drives out water and carbon dioxide, reducing the positive charge, thereby making the baking soda more alkali and more similar to lye. This enhances the maillard reaction which provides the crunchy, slightly blistered brown bagel surface.


Grace’s Baptism Cake

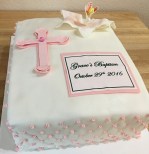
Saturday October 28, 2016 was our granddaughter Grace’s baptism. completed-cakeAround 60 family members and friends attended at a Catholic church in Roseville for a short but meaningful service, then gathered at Frances and Daniel’s for brunch. I was asked to provide a cake for 60 people. (This may be the largest cake I have made.) The specific request was for a layer cake with chocolate mousse filling and a quilted finish.

For 60 servings the cake needed to be about 4″ high and 11″ x 15″. Knowing I would lose a little from the edges to square the sides I assumed there would be at least a few sheetcakepeople who do not eat cake (friends of Marie Antionette, no doubt) and I could get away with this size. Therefore I needed two sheet cakes. (Note: about 10 slices were left at the end of the event.)
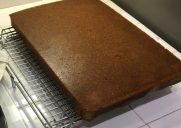
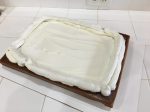
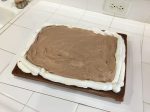
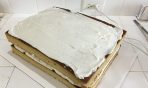
To have a decent thickness of mousse separatinbuttercream-dam-4g the cake layers I built a dam of crusting buttercream around the edges of the top crumb coated cake. Crusting buttercream has a little more body and will keep the mousse in place. Add a tablespoon of meringue powder to the confectioners sugar to make regular buttercream into crusting buttercream. After the second sheet cake is cool, add the buttercream-dam-2mousse to the damned 🙂 bottom cake. Top with the second layer, crumb coat the entire cake and refrigerate. stacked-layersA cold cake is easier to trim to make nice square edges and setting the mousse will retard the effects the moisture will have on the fondant coating.
I used an electric knife to trim the edges of the cake prior to covering with fondant. After trimming crumb coat the nice, straight smooth edges of the cake. stacked-and-cut-layers
I rolled out a 17″ x 22″ piece of fondant to have enough to cover the cake. Once it was covered and smoothed, 45 degree crisscrossed lines were embossed into the sides of the cake. Then it was dusted with pearl luster to add a little sparkle to the fondant and little pink rosettes were piped into each intersection of the quilt pattern.

Egraces-cake-quiltingarlier in the week I made the pink orchid, cross and text backing from gumpaste.graces-orchid I purchased the text from a company that makes sugar images and pasted it onto the backing gumpaste.
YELLOW SHEET CAKE – SERVES 60

INGREDIENTS:

  • 4 1/2 cups (570g) all-purpose flour
  • 2 teaspoon baking soda
  • 1 teaspoon salt
  • 2 cup (460g) unsalted butter, softened
  • 3 3/4 cups (700g) granulated sugar
  • 4 large eggs, at room temperature
  • 4 teaspoons pure vanilla extract
  • 1 cup (240g) sour cream, at room temperature
  • 2 cup (480ml) whole milk, at room temperature

DIRECTIONS:

  1. Preheat oven to 350°F (177°C). Generously grease and lightly flour a 12×17 inch half sheet/jelly roll pan. The pan should be at least 2″ deep. Set aside.
  2. Whisk the flour, baking soda, and salt together in a large bowl. Set aside. Using a handheld or stand mixer fitted with a paddle attachment, beat the butter on high speed until smooth and creamy – about 1 minute. Add the sugar and beat on high speed for 3 full minutes until creamed together. The mixture should be a light yellow color. Scrape down the sides and up the bottom of the bowl with a rubber spatula as needed. On medium-high speed, add 1 egg at a time, beating well after each addition until both are mixed in. On high speed, beat in the vanilla extract and sour cream. Scrape down the sides and up the bottom of the bowl with a rubber spatula as needed.
  3. With the mixer running on low speed, add the dry ingredients to the wet ingredients alternating with the milk. Start and end with the dry ingredients. Mix each addition just until incorporated. Do not overmix this batter. The batter will be smooth, velvety, and slightly thick.
  4. Spread the cake batter into the prepared pan. Smooth it out into a thin, even layer. Bake for 20-22 minutes (less for a half recipe or 35-40 minutes for a double. Actual times depend on pan used, less time for shallow pan, more for deeper, or until the top is lightly browned and a toothpick inserted in the center comes out clean. Make sure you rotate the cake pan once or twice during bake time if your oven has hot spots. Remove from the oven and allow the cake to cool in the pan placed on a wire rack. As the cake is cooling, make the frosting.
  5. Make ahead tip: Cake can be made 1 -2 days in advance, covered tightly at room temperature.

BUTTERCREAM FROSTING – I made several batches of this frosting

INGREDIENTS

  • 4 cups of powdered sugar (or 1 box)
  • 1 Cup (2 sticks) of softened butter
  • 2-3 teaspoons of vanilla
  • 1-2 tablespoons of milk
  • Violet food coloring

INSTRUCTIONS

  1. Add powdered sugar to mixing bowl.
  2. Add softened sticks of butter
  3. Add vanilla. If you want white buttercream use clear imitation vanilla.
  4. Add 1 tbsp of milk.
  5. Beat on low until powdered sugar is incorporated. Then move mixer up to medium-high speed. Scrape sides and bottom of bowl often. When completely mixed the frosting may appear dry.
  6. Add more milk, a little bit at a time until frosting is the proper consistency.
  7. Again, for white frosting now add a little violet food coloring. I use the end of a toothpick and add just a little at a time. Mix thoroughly.

CHOCOLATE MOUSSE

INGREDIENTS

  • 4 egg yolks
  • ¼ cup sugar
  • 1 cup whipping (heavy) cream
  • 1 package (6 ounces) semisweet chocolate chips
  • 1 ½ cups whipping (heavy) cream

DIRECTIONS

  1. Beat egg yolks in small bowl with electric mixer on high speed about 3 minutes or until thick and lemon colored, then gradually beat in sugar.
  2. Heat 1 cup whipping cream in 2-quart saucepan over medium heat until hot. Temper the eggs by gradually (i.e. slowly, a little at a time) stirring (rapidly) at least half of the hot whipping cream into egg yolk mixture; stir back into hot cream in saucepan. Cook over low heat about 5 minutes, stirring constantly, until mixture thickens (do not boil). Stir in chocolate chips until melted. Cover and refrigerate about 2 hours, stirring occasionally, just until chilled.
  3. Beat 1 ½ cups whipping cream in chilled medium bowl with electric mixer on high speed until stiff. By hand fold chocolate mixture into whipped cream to not collapse the whipped cream. Pipe or spoon mixture into serving bowls. Immediately refrigerate any remaining dessert after serving.


Small Batch Berry Jam

Confession here: I like seeds in my berry jam. I don’t know why, either some trauma forced on me by my older brother, or perhaps faded memories of my mother making jams or even some totally unrelated reason. The point is my berry jam must have seeds. Do you have any idea how difficult it is to find blackberry jam with seeds? Raspberry? No Blackberry Jamproblem, but find a jar of blackberry without that insidious word “seedless” on the label? Good luck. Either you spend an inordinate amount of time searching your supermarket, or go to a farm or specialty market and shell out twice the cash. I look for BOGO’s on berries. It’s like getting jam free, almost.
Or….
Google (the worlds 42) “small batch jam” and find 461,000 results in 0.44 seconds.
I read a lot of them and boiled it down (bad pun) to this:

  • Measure equal weights (not volumes) washed berries and granulated sugar. Obviously for sweeter jam add more sugar, tarter, less. Duh.
  • Mash berries in a saucepan, heat then add sugar in small aliquots. Use a large enough saucepan or you will end up washing two of them. Been there, done that, no t-shirt.
  • Cook at a moderate boil until the temperature reaches 220 deg. and it begins to thicken. Cook less for thinner (think dessert topping) or more for thicker.
  • Skim the light colored foam off the top as it boils.
  • While it is cooking put a canning jar (about a pint size for a pint of berries, go figure) filled to about an inch from of the top with water into the microwave and cook until boiling vigorously.
  • Pour the boiling water out into a small bowl containing your canning lid and funnel.
  • Wait a minute. You aren’t really sterilizing because you will just keep this in the fridge for quick use.
  • Pour the still very hot jam into the jar using the funnel, put on the lids, screw on the top and you are done, except for the clean up. One pan, one spoon and a funnel.
  • Total time, less than 30 min.

Pate a Choux #1

Rising from the depths of a cold caught in Seattle a week ago, I decided to try my luck at baking pate a choux, the basis for pastries such as creme puffs or eclairs. I found several recipes and decided on one from The Kitchn (thekitchn.com). I made small profiteroles with pastry cream (recipe also from The Kitchn) instead of ice cream. My execution of this recipe produced a nice flaky, although not fully risen pastries which were easily filled with pastry cream and dipped in a hardening ganache. The mini eclairs I piped on the same sheet did not rise at all and were discarded.First Pate a Choux 2

I tried a second recipe which used one baking temperature for baking, finishing and drying. These did not rise nearly as well as The Kitchn recipe.

While the shape was less than ideal, the flavor was excellent. Trying again next weekend. The shape as to be the result of having too much or too little water in the batter prior to baking. The water turns to steam which “inflates” the dough.